Vidly_MVCProject
1.0.0
이것은 학습 목적으로 .NET Framework 4.8로 개발 된 MVC 앱입니다.
행동 결과
| 유형 | 도우미 방법 |
|---|---|
| ViewResult | 보다() |
| partialviewresult | partialview () |
| ContentResult | 콘텐츠() |
| 리디렉션 | 리디렉션 () |
| 리디렉션 렉터 로우터 | 리디렉터링 () |
| JSONRESULT | JSON () |
| fileresult | 파일() |
| httpnotfoundresult | httpnotfound () |
| emptyresult | - |
몇 가지 예
 public ActionResult Test ( )
	{
		return View ( data ) ;
		return Content ( "Hello World!" ) ;
		return HttpNotFound ( ) ;
		return new EmptyResult ( ) ;
		return RedirectToAction ( "Index" , "Home" , new { page = "1" , sortBy = "name" } ) ;
} 컨벤션 기반 라우팅 : Routeconfig.cs
 routes . MapRoute (
  		 "MoviesByReleaseDate" , //name of route
  		"movies/released/{year}/{month}" , //route url
  		new { controller = "Movies" , action = "ByReleaseDate" } , //default corresponding controller and actions
  		new { year = @"2020|2021" , month = @"d{2}" } ) ; //constraints for parameters
속성 라우팅 : lourteconfig.cs에서 routes.MapMvcAttributeRoutes(); 컨트롤러를 사용하기 전에 속성 [Route("url template")] . 또한 Min, Max, Minlength, Maxlength, Int, Float, Guid와 같은 제약 조건을 사용할 수 있습니다.
 [ Route ( "movies/released/{year:regex( \ d{4}:range(1800,2021))}/{month:regex( \ d{2}:range(1,12))}" ) ]
public ActionResult ByReleaseDate ( int year , int month )
  {
  	return Content ( year + "/" + month ) ;
} public ActionResult Test ( )
{
var movie = new Movie ( ) { Name = "Shrek!" } ;
ViewData [ "Movie" ] = movie ;
ViewBag . Movie = movie ;
return View ( movie ) ;
} < h2 > @Model.Name </ h2 > <!-- preffered way -->
< h2 > @( ((Movie) ViewData["Movie"]).Name) </ h2 > <!-- ugly way / dont use -->
< h2 > @ViewBag.Movie.Name </ h2 > <!-- casted at runtime / not safe --> public class RandomMovieViewModel
{
public Movie Movie { get ; set ; }
public List < Customer > Customers { get ; set ; }
} public class MoviesController : Controller
{
// GET: Movies
public ActionResult Random ( )
{
//adding data
var movie = new Movie ( ) { Name = "Shrek!" } ;
var customers = new List < Customer >
{
new Customer { Name = "cust1" } ,
new Customer { Name = "cust2" }
} ;
//filing viewmodel with data
var viewModel = new RandomMovieViewModel ( )
{
Movie = movie ,
Customers = customers
} ;
return View ( viewModel ) ;
}@ *
this is a razor comment
* @
@ {
//multiple lines
//when razor sees html prints it and when razor sees csharp interprets it
}
@ {
var className = Model . Customers . Count > 0 ? "popular" : null ;
}
< h2 class = "@className" > @Model . Movie . Name < / h2 > < ! -- preferred way -- >
@if ( Model . Customers . Count == 0 )
{
< p > No one has rented this movie before . < / p >
}
< ul >
@foreach ( var customer in Model . Customers )
{
< li > @customer . Name < / li >
}
< / ul > 보기에서보기에서보기에서보기 및 부분보기를 선택하십시오. 다른보기 @Html.Partial("_PartialView", Model.Data)
엔티티 프레임 워크 : 컨텍스트 파일을 사용하여 관계형 데이터베이스의 데이터를 객체에 맵핑하는 ORM.
LINQ : SQL 쿼리와 같은 메소드.
워크 플로 : 데이터베이스 먼저, 코드 먼저.
DB FIRST : DASTION DATABASE 테이블 디자인 먼저, 나중에 EF가 테이블에 따라 도메인 클래스를 생성하도록합니다.
코드 먼저 : 도메인 클래스를 먼저 만들고 나중에 EF가 데이터베이스 테이블을 생성하도록합니다.
컨텍스트에서 DBSET에서 테이블 이름 : 패키지 관리자 콘솔의 DBCONTEXT 클래스 PM > enable-migrations , PM> add-migration migrationName , PM> update-database
파종 DB : MIGRATIOS UP () 메소드에 SQL 명령을 넣습니다.
컨트롤러에서
private Context _context ;
public CustomersController ( )
{
_context = new Context ( ) ;
}
//...
public ActionResult Index ( )
{
var customers = _context . Customers . ToList ( ) ;
return View ( customers ) ;
}
//...
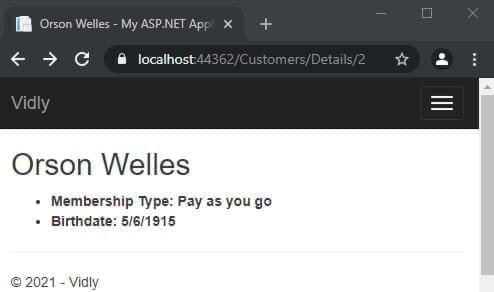
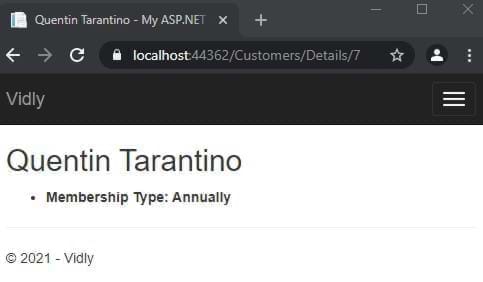
public ActionResult Details ( int id )
{
var customer = _context . Customers . Single ( c => c . Id == id ) ;
return View ( customer ) ;
} 로드 관계형 외국 표 : _context.Customer.Include(c=>c.MembershipType).ToList();
보기 :
 @using ( Html . BeginForm ( actionName : "Create" , controllerName : "Customers" ) )
{
	< div class = "form-group" >
		@Html . LabelFor ( m => m . Name )
		@Html . TextBoxFor ( m => m . Name , new { @class = "form-control" } )
	< / div >
} 데이터 주석이있는 모델에서 :
 [ Display ( Name = "Date of Birth" ) ]
public DateTime ? Birthdate { get ; set ; }
또는 <label for="Birthdate">Date of Birth</label> 있는 것입니다
ViewModel 만들기 :
 public class NewCustomerViewModel
{
	public IEnumerable < MembershipType > MembershipTypes { get ; set ; }
	public Customer Customer { get ; set ; }
}
컨트롤러에서 :
 var membershipTypes = _context . MembershipTypes . ToList ( ) ;

var viewModel = new NewCustomerViewModel ( )
{
	MembershipTypes = membershipTypes
} ;
보기 :
 < div class =" form-group " >
	@Html.LabelFor(m = > m.Customer.MembershipTypeId)
	@Html.DropDownListFor(m = > m.Customer.MembershipTypeId, new SelectList(Model.MembershipTypes,"Id","Name"),"Select Membership Type", new { @class = "form-control" })
</ div > 컨트롤러에서 :
 [ HttpPost ]
public ActionResult Create ( Customer customer )
{
	//...
	return View ( ) ;
}
조치 이름과 컨트롤러 이름을 확인하십시오.
 ( Html . BeginForm ( actionName : "Create" , controllerName : "Customers" ) )
//... [ HttpPost ]
public ActionResult Create ( Customer customer )
{
_context . Customers . Add ( customer ) ;
_context . SaveChanges ( ) ;
return RedirectToAction ( "Index" , "Customers" ) ;
} 컨트롤러의 ID에서 해당 항목으로 데이터를 채우십시오.
	 public ActionResult Edit ( int id )
	{
		var customer = _context . Customers . SingleOrDefault ( c => c . Id == id ) ;

		if ( customer == null )
			return HttpNotFound ( ) ;

		var viewModel = new CustomerFormViewModel ( )
		{
			Customer = customer ,
			MembershipTypes = _context . MembershipTypes . ToList ( )
		} ;
		return View ( "CustomerForm" , viewModel ) ;
	}
} 존재하지 않으면 추가, 업데이트가 있으면 업데이트하십시오. 컨트롤러 맵에서 속성
 public ActionResult Save ( Customer customer )
{
	if ( customer . Id == 0 )
		_context . Customers . Add ( customer ) ;
	else
	{
		var customerInDb = _context . Customers . Single ( c => c . Id == customer . Id ) ;


		customerInDb . Name = customer . Name ;
		customerInDb . Birthdate = customer . Birthdate ;
		customerInDb . MembershipTypeId = customer . MembershipTypeId ;
		customerInDb . IsSubscribedToNewsletter = customer . IsSubscribedToNewsletter ;
	}

	_context . SaveChanges ( ) ;

	return RedirectToAction ( "Index" , "Customers" ) ;
}
숨겨진 것으로보기에 종속 ID 필드를 추가하십시오.
@Html.HiddenFor(m= > m.Customer.Id)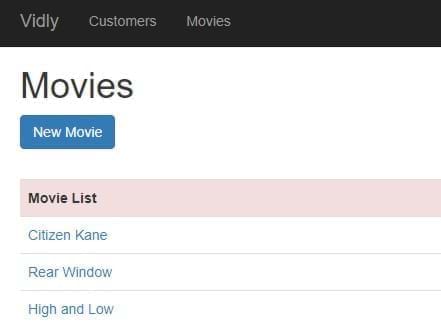
1 단계 : Model, Step2에 주석을 추가 : 컨트롤러에서 유효성 검사 제어를 추가하십시오. 사용자 데이터와 함께 유효한 반환 양식이 아닌 경우
 if ( ! ModelState . IsValid )
{
    var viewModel = new CustomerFormViewModel
    {
    Customer = customer ,
    MembershipTypes = _context . MembershipTypes . ToList ( )
    } ;
    return View ( "CustomerForm" , viewModel ) ;
}
3 단계 :보기에 유효성 검사 메시지를 추가하십시오.
@Html.ValidationMessageFor(m= > m.Customer.Name)스타일링 유효성 검사 오류이 클래스에 액세스하고 양식을 작성합니다.
. field-validation-error {
    color : red;
}
. input-validation-error {
    border : 2 px red;
}
모델에서 유효성 검사 메시지를 우선적 인 데이터 주석에 추가합니다.
 [ Required ( ErrorMessage = "Please enter customer's name." ) ]
 [ StringLength ( 255 ) ]

public string Name { get ; set ; } 1 단계 : ValidationAttribute를 상속하는 클래스를 만듭니다 (system.componentModel.DataAnnotations 사용)
 public class Min18YearsIfAMember : ValidationAttribute
   {
       protected override ValidationResult IsValid ( object value , ValidationContext validationContext )
       {
           var customer = ( Customer ) validationContext . ObjectInstance ;

           if ( customer . MembershipTypeId == 0 || customer . MembershipTypeId == 1 )
           {
               return ValidationResult . Success ;
           }
           if ( customer . Birthdate == null )
           {
               return new ValidationResult ( "Birthdate is required." ) ;
           }

           var age = DateTime . Today . Year - customer . Birthdate . Value . Year ;

           return ( age >= 18 )
               ? ValidationResult . Success
               : new ValidationResult ( "Customer should be at least 18 years old to go on a membership." )
       }
   }
2 단계 : 모델에 데이터 주석을 추가하십시오
 [ Display ( Name = "Membership Type" ) ]
[ Min18YearsIfAMember ]
public byte MembershipTypeId { get ; set ; }
3 단계 :보기에 메시지를 추가하십시오
@Html.ValidationMessageFor(m= > m.Customer.MembershipTypeId)@Html.ValidationSummary(true, "Please fix the following errors.")ExcludeProperTyerRors : True HISS 개별 오류 목록 메시지 : 사용자에게 표시된 메시지 (양식화 될 수 있음)
이것을보기에 양식에 추가하십시오
 @section scripts {
    @Scripts . Render ( "~/bundles/jqueryval" )
} 보기 에서이 HTML 도우미를 사용하십시오.
@Html . AntiForgeryToken ( )컨트롤러 동작 에서이 데이터 주석을 추가하십시오.
컨트롤러에서 Web API를 만듭니다. 그리고 이것을 Global.asax.js에 추가하십시오.
GlobalConfiguration . Configure ( WebApiConfig . Register ) ;컨트롤러에서 컨텍스트 초기화 :
 private Context _context ;

  public CustomersController ( )
  {
      _context = new Context ( ) ;
  }
get/post/put 메소드 생성 : 모두 : 모두 :
 //GET /api/customers
[ HttpGet ]
public IEnumerable < Customer > GetCustomers ( )
{
    return _context . Customers . ToList ( ) ;
}
하나 얻기 :
 //GET /api/customers/1
[ HttpGet ]
public Customer GetCustomer ( int id )
{
    var customer = _context . Customers . SingleOrDefault ( c => c . Id == id ) ;

    if ( customer == null )
        throw new HttpResponseException ( HttpStatusCode . NotFound ) ;

    return customer ;
}
만들다:
 //POST /api/customers
[ HttpPost ]
public Customer CreateCustomer ( Customer customer )
{
    if ( ! ModelState . IsValid )
        throw new HttpResponseException ( HttpStatusCode . BadRequest ) ;

    _context . Customers . Add ( customer ) ;
    _context . SaveChanges ( ) ;

    return customer ;
}
업데이트:
 //PUT /api/customers/1
        [ HttpPut ]
        public void UpdateCustomer ( int id , Customer customer )
        {
            if ( ! ModelState . IsValid )
                throw new HttpResponseException ( HttpStatusCode . BadRequest ) ;

            var customerInDb = _context . Customers . SingleOrDefault ( c => c . Id == id ) ;

            if ( customerInDb == null )
                throw new HttpResponseException ( HttpStatusCode . NotFound ) ;

            customerInDb . Name = customer . Name ;
            customerInDb . Birthdate = customer . Birthdate ;
            customerInDb . IsSubscribedToNewsletter = customer . IsSubscribedToNewsletter ;
            customerInDb . MembershipTypeId = customer . MembershipTypeId ;

            _context . SaveChanges ( ) ;
        }
삭제:
 //DELETE /api/customers/1
[ HttpDelete ]
public void DeleteCustomer ( int id )
{
    var customerInDb = _context . Customers . SingleOrDefault ( c => c . Id == id ) ;

    if ( customerInDb == null )
        throw new 	HttpResponseException ( HttpStatusCode . NotFound ) ;

    _context . Customers . Remove ( customerInDb ) ;
    _context . SaveChanges ( ) ;
}
우체부와 테스트
도메인 객체 변경하거나 표시하고 싶지 않은 데이터를 제거합니다. 우리의 필요를 위해 형성되었습니다. DTOS 폴더에 저장하십시오
app_start에서 mappingprofile.cs를 작성하십시오.
 public class MappingProfile : Profile
{
    public MappingProfile ( )
    {
        Mapper . CreateMap < Customer , CustomerDto > ( ) ;
        Mapper . CreateMap < CustomerDto , Customer > ( ) ;
    }
}
Global.asax.cs에 Mapper를 추가하십시오
 protected void Application_Start ( )
{
    Mapper . Initialize ( c => c . AddProfile < MappingProfile > ( ) ) ;
    //..
}
컨트롤러 작업 업데이트 :
 //GET /api/customers
[ HttpGet ]
public IEnumerable < CustomerDto > GetCustomers ( )
{
    return _context . Customers . ToList ( ) . Select ( Mapper . Map < Customer , CustomerDto > ) ;
}
//GET /api/customers/1
[ HttpGet ]
public CustomerDto GetCustomer ( int id )
{
var customer = _context . Customers . SingleOrDefault ( c => c . Id == id ) ;
if ( customer == null )
throw new HttpResponseException ( HttpStatusCode . NotFound ) ;
return Mapper . Map < Customer , CustomerDto > ( customer ) ;
} //POST /api/customers
[ HttpPost ]
public CustomerDto CreateCustomer ( CustomerDto customerDto )
{
if ( ! ModelState . IsValid )
throw new HttpResponseException ( HttpStatusCode . BadRequest ) ;
var customer = Mapper . Map < CustomerDto , Customer > ( customerDto ) ;
_context . Customers . Add ( customer ) ;
_context . SaveChanges ( ) ;
customerDto . Id = customer . Id ;
return customerDto ;
} //PUT /api/customers/1
[ HttpPut ]
public void UpdateCustomer ( int id , CustomerDto customerDto )
{
if ( ! ModelState . IsValid )
throw new HttpResponseException ( HttpStatusCode . BadRequest ) ;
var customerInDb = _context . Customers . SingleOrDefault ( c => c . Id == id ) ;
if ( customerInDb == null )
throw new HttpResponseException ( HttpStatusCode . NotFound ) ;
Mapper . Map ( customerDto , customerInDb ) ;
_context . SaveChanges ( ) ;
} APP_START에서 webapiconfig.cs add in Register
 var settings = config . Formatters . JsonFormatter . SerializerSettings ;
         settings . ContractResolver = new CamelCasePropertyNamesContractResolver ( ) ;
settings . Formatting = Formatting . Indented ; 우리의 행동에 대한 HTTP 결과를 올바르게하십시오.
 //GET /api/customers/1
[ HttpGet ]
public IHttpActionResult GetCustomer ( int id )
{
    var customer = _context . Customers . SingleOrDefault ( c => c . Id == id ) ;

    if ( customer == null )
        return NotFound ( ) ;

    return Ok ( Mapper . Map < Customer , CustomerDto > ( customer ) ) ;
}
//POST /api/customers
[ HttpPost ]
public IHttpActionResult CreateCustomer ( CustomerDto customerDto )
{
if ( ! ModelState . IsValid )
return BadRequest ( ) ;
var customer = Mapper . Map < CustomerDto , Customer > ( customerDto ) ;
_context . Customers . Add ( customer ) ;
_context . SaveChanges ( ) ;
customerDto . Id = customer . Id ;
return Created ( new Uri ( Request . RequestUri + "/" + customer . Id ) , customerDto ) ;
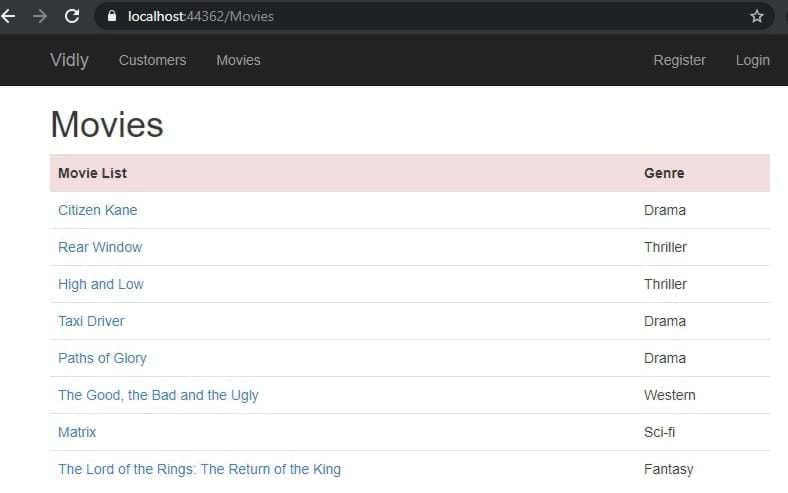
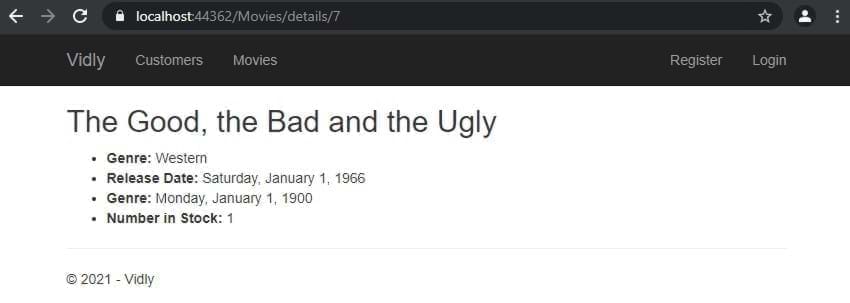
} 우체부 : get : https : // localhost : 44362/api/movies 200 Ok
[
    {
        "id" : 1 ,
        "name" : " Citizen Kane " ,
        "genreId" : 3 ,
        "dateAdded" : " 1900-01-01T00:00:00 " ,
        "releaseDate" : " 1941-01-01T00:00:00 " ,
        "numberInStock" : 4
    },
    {
        "id" : 3 ,
        "name" : " Rear Window " ,
        "genreId" : 10 ,
        "dateAdded" : " 1900-01-01T00:00:00 " ,
        "releaseDate" : " 1954-01-01T00:00:00 " ,
        "numberInStock" : 3
    },
//.......
]
get : https : // localhost : 44362/api/movies/7 200 OK
{
    "id" : 7 ,
    "name" : " The Good, the Bad and the Ugly " ,
    "genreId" : 6 ,
    "dateAdded" : " 1900-01-01T00:00:00 " ,
    "releaseDate" : " 1966-01-01T00:00:00 " ,
    "numberInStock" : 1
}
게시물 : https : // localhost : 44362/api/movies 201 만들기
{
  "name" : " Life Is Beautiful " ,
  "genreId" : 3 ,
  "dateAdded" : " 1900-01-01T00:00:00 " ,
  "releaseDate" : " 1997-01-01T00:00:00 " ,
  "numberInStock" : 1
}
put : https : // localhost : 44362/api/movies/11 204 내용 없음
{
  "name" : " Life Is Beautiful " ,
  "genreId" : 3 ,
  "dateAdded" : " 1900-01-01T00:00:00 " ,
  "releaseDate" : " 1997-01-01T00:00:00 " ,
  "numberInStock" : 5
}
삭제 : https : // localhost : 44362/api/movies/12 204 콘텐츠 없음
볼 때 클래스, 데이터 및 ID를 항목에 추가합니다. 그리고 끝 스크립트에서 :
 < table id =" customers " < ---
       class =" table table-borderless " >
           < tr class =" danger " >
               < th > Customers </ th >
....
....
< td >
    < button data-customer-id =" @item.Id " < ---
            class =" btn-link js-delete " < ---
            >
        Delete
    </ button >
</ td >
.....
@section scripts{
    < script >
        $ ( document ) . ready ( function ( ) {
            $ ( "#customers .js-delete" ) . on ( "click" , function ( ) {
                var button = $ ( this ) ;
                if ( confirm ( "sure to delete?" ) ) {
                    $ . ajax ( {
                        url : "/api/customers/" + button . attr ( "data-customer-id" ) ,
                        method : "DELETE" ,
                        success : function ( ) {
                            alert ( "success" ) ;
                            button . parents ( "tr" ) . remove ( ) ;
                        }
                    } ) ;
                }
            } ) ;
        } ) ;
    </ script >
} bundleconfig.cs를 추가하십시오 :
 bundles . Add ( new ScriptBundle ( "~/bundles/bootstrap" ) . Include (
          "~/Scripts/bootstrap.js" ,
          "~/Scripts/bootbox.js" , //<--- here
          "~/Scripts/respond.js"
          ) ) ;
보기에서 구현 :
@section scripts{
< script >
    $ ( document ) . ready ( function ( ) {
        $ ( "#customers .js-delete" ) . on ( "click" , function ( ) {
            var button = $ ( this ) ;
            bootbox . confirm ( "sure to delete?" , function ( result ) {
                if ( result ) {
                    $ . ajax ( {
                        url : "/api/customers/" + button . attr ( "data-customer-id" ) ,
                        method : "DELETE" ,
                        success : function ( ) {
                            alert ( "success" ) ;
                            button . parents ( "tr" ) . remove ( ) ;
                        }
                    } ) ;
                }
            } ) ;
        } ) ;
    } ) ;
</ script >
} 번들에 추가 : (그리고 우리는 _layout.cshtml-> @Scripts.Render("~/bundles/lib") )에서 타사 번들을 lib.
         bundles . Add ( new ScriptBundle ( "~/bundles/lib" ) . Include (
                        "~/Scripts/jquery-{version}.js" ,
                        "~/Scripts/bootstrap.js" ,
                        "~/Scripts/bootbox.js" ,
                        "~/Scripts/respond.js" ,
                        "~/Scripts/DataTables/jquery.dataTables.js" , //<--
                        "~/Scripts/DataTables/dataTables.bootstrap.js" //<--
                        ) ) ;
bundles . Add ( new StyleBundle ( "~/Content/css" ) . Include (
"~/Content/bootstrap.css" ,
"~/content/datatables/css/dataTables.bootstrap.css" , //<-- style
"~/Content/site.css" ) ) ;보기에는 테이블이 ID와 Thead, tbody 태그가 있어야합니다. 마지막으로 문서가 준비된 경우 스크립트 섹션에서 :
 $ ( document ) . ready ( function ( ) {
            $ ( "#customers" ) . DataTable ( ) ;
    //...
} jQuery 데이터 가능한 호출 :
 $ ( document ) . ready ( function ( ) {
        $ ( "#customers" ) . DataTable ( {
            ajax : {
                url : "/api/customers" ,
                dataSrc : ""
            } ,
            columns : [
                {
                    data : "name" ,
                    render : function ( data , type , customer ) {
                        return "<a href='/customers/edit/'" + customer . id + "'>" + customer . name ;
                    }
                } ,
                {
                    data : "membershipType.name"
                } ,
                {
                    data : "id" ,
                    render : function ( data ) {
                        return "<button class='btn-link js-delete' data-customer-id=" + data + ">Delete</button>" ;
                    }
                }
            ]
} ) ; 1 단계 : DTO 작성, 2 단계 : DTO 추가 부모 DTO에 DTO 추가 단계 3. 맵핑 프로파일 4 단계 : 컨트롤러에 추가 (._AppDBContext.Customers.Include (C => C.Membershiptype) .TOLIST () ..) 단계 5 : 뷰에 추가하십시오.
 {
    data : "membershipType.name"
} , 변수에 테이블을 할당하고 제거 메소드에서 사용하십시오.
    < script >
        $ ( document ) . ready ( function ( ) {
            var table //<--
            = $ ( "#customers" ) . DataTable ( {
                ajax : {
                    url : "/api/customers" ,
                    dataSrc : ""
                } ,
                columns : [
                    {
                        data : "name" ,
                        render : function ( data , type , customer ) {
                            return "<a href='/customers/edit/'" + customer . id + "'>" + customer . name ;
                        }
                    } ,
                    {
                        data : "membershipType.name"
                    } ,
                    {
                        data : "id" ,
                        render : function ( data ) {
                            return "<button class='btn-link js-delete' data-customer-id=" + data + ">Delete</button>" ;
                        }
                    }
                ]
            } ) ;


            $ ( "#customers" ) . on ( "click" , ".js-delete" , function ( ) {
                var button = $ ( this ) ;
                bootbox . confirm ( "Are you sure you want to delete this customer?" , function ( result ) {
                    if ( result ) {
                        $ . ajax ( {
                            url : "/api/customers/" + button . attr ( "data-customer-id" ) ,
                            method : "DELETE" ,
                            success : function ( ) {
                                ///<--- here
                                table . row ( button . parents ( "tr" ) )
                                    . remove ( ) . draw ( ) ;
                            }
                        } ) ;
                    }
                } ) ;
            } ) ;
        } ) ;
</ script > 
모든 논리는 내장되어 있습니다 (파일 및 세부 사항은 커밋 참조)
컨트롤러 동작 또는 컨트롤러 상단에 [Authorize] 속성을 추가하여 모든 작업을 제한합니다.
FilterConfig.cs :
filters . Add ( new AuthorizeAttribute ( ) ) ;이는 무단 사용자를위한 모든 컨트롤러를 비활성화하지만 컨트롤러 또는 조치에 액세스 할 수 있도록 [허용]을 추가 할 수 있습니다.
데이터베이스 시드 : 다른 작업 시나리오에서 프로젝트의 일관성을 유지하려면 마이그레이션에 추가
손님 및 공인 사용자를위한 별도의 조회수를 만듭니다
컨트롤러에서 :
 public ViewResult Index ( int ? pageIndex , string sortBy )
 {
     if ( User . IsInRole ( RoleName . CanManageMovies ) )
         return View ( "List" ) ;
     return View ( "ReadOnlyList" ) ;
}
다른 작업 액세스 [Authorize(Roles = RoleName.CanManageMovies)] 비활성화하려면이 속성을 추가합니다.
Rolename.cs 역할을 유지하기위한 모델을 만듭니다.
public const string CanManageMovies = "CanManageMovies" ; 사용자에게 사용자 정의 필드를 추가하려면 : 애플리케이션 사용자 클래스와보기의 뷰 모델에 소품을 추가하십시오. 또한 작업 할당 섹션을 등록하기 위해 새 소품을 추가하십시오
속성에서 SSL을 활성화하고 필터를 추가하십시오
filters . Add ( new RequireHttpsAttribute ( ) ) ;Facebook, Google에서 Appid 및 AppSecret을 얻으십시오 ... startup.auth.cs에 삽입하십시오.
 app . UseFacebookAuthentication (
   appId : "id" ,
   appSecret : "secret" ) ;
외부 로그인 양식 및 뷰 모델에 사용자 정의 소품을 추가하십시오. 외부 로그인 컨트롤러에서 초기화하십시오
nuget에서 glimpse.mvc5 및 glimpse.ef6에서 /glimse.axd로 이동하여 활성화
캐싱 비활성화 : [OutputCache(Duration = 0, VaryByParam = "*", NoStore = true)]
캐싱 활성화 :
[OutputCache(Duration=50,Location=OutputCacheLocation.Server,VaryByParam="genre")]
컨트롤러 동작
 if ( MemoryCache . Default [ "Genres" ] == null )
        {
            MemoryCache . Default [ "Genres" ] = _appDbContext . Genres . ToList ( ) ;
        }

var genres = MemoryCache . Default [ "Genres" ] as IEnumerable < Genre > ; system.web의 web.config에서
우리는 앱에 임대 기능을 추가 할 것입니다. DTO : NewrentalDTO :
 public class NewRentalDto
{
    public int CustomerId { get ; set ; }
    public List < int > MovieIds { get ; set ; }
}
모델 생성 : 임대, 컨텍스트에 추가하고 마이그레이션을 실행하십시오.
 public class Rental
{
    public int Id { get ; set ; }
    [ Required ]
    public Customer Customer { get ; set ; }
    [ Required ]
    public Movie Movie { get ; set ; }
    public DateTime DateRented { get ; set ; }
    public DateTime ? DateReturned { get ; set ; }
}
커밋에 대한 자세한 내용. (자가 완성을 위해 사용 된 Typeahead, Bloodhound)
마우스 오른쪽 버튼을 클릭하고 게시하십시오
PM> update-database -script -SourceMigration:SeedUsers
MIG를 마지막으로 대상으로합니다. 지금 DB의 SQL 쿼리가 있습니다
web.config <appSettings key="value"></appSettings> 또는 다른 구성 파일을 외부 생성 <appSettings configSource="AppSettings.config"></appSettings> 코드에서 사용합니다 : ConfigurationManager.AppSettings["Key"] 참고 : AppSettings는 항상 스트링을 반환합니다. 필요에 맞게 수동으로 변환해야합니다
web.config에서 <system.web> 에 추가하십시오
<customErrors mode="On"></customErrors>
ON : 모든 곳에서 원격으로 활성화 : LocalHost에서 비활성화하십시오
views> shared error.cshtml에서 사용자 정의하십시오
web.config에서 <system.web> >> <customErrors> 에 추가하십시오
  < system .web>
    < customErrors mode = " On " >
      < error statusCode = " 404 " redirect = " ~/404.html " />
    </ customErrors >
      <!-- ..... -->
</ system .web> n web.config add <system.webServer> 에 추가하십시오
    < httpErrors errorMode = " Custom " >
      < remove statusCode = " 404 " />
      < error statusCode = " 404 " path = " 404.html " responseMode = " File " />
    </ httpErrors >
사용자 정의 : 모든 곳에서 세부 사항을 활성화하십시오 : LocalHost에서 비활성화하십시오
누그 트> 엘마
예외 로거. /ELMAH.AXD 에 의한 액세스
기본적으로 메모리에 로그를 저장하지만 작은 구성으로 모든 종류의 데이터베이스에 대한 예외를 가질 수 있습니다.
원격으로 액세스하려면 이것을 Elmah에 추가하십시오
      < authorization >
        < allow roles = " admin,user2,user3,... " />
        < deny users = " * " />
      </ authorization >
감사해요!!!


