tinybuild
1.0.0

npm i -g tinybuild 또는 npm i tinybuild .
자신의 워크 플로 자동화에 관심이 있으시면 기여하십시오. 현재 우리는 우리 자신의 개발을 기반으로 편집하고 중단하고 수정하므로 소스 컨트롤이 전혀 없지만 가능한 한 다재다능하게 만들기 위해 최선을 다합니다.
 |  |  |  |  |
이것은 항상 원하는 번들 및 개발 서버 콤보입니다. 작별 인사 난해한 지침, 작별 인사는 다루기 쉬운 종속성 및 작별 시간이 컴파일러 실행을 쳐다보고 낭비됩니다! 웹 팩, 소포 및 vite로 이동하면 도시에 새로운 게임이 있습니다.
전제 조건 : 최신 nodejs lts
npm i -g tinybuild
tinybuild
응용 프로그램이나 라이브러리를 개발할 준비가되었습니다!
tinybuild.config.js 및 package.json을 필요에 맞게 수정하십시오. build:true 또는 set server:false 구성에서 개발 서버를 비활성화합니다.
TinyBuild는 또한 NODE.JS를 통해 사용자 정의 스크립트에서 npx tinybuild 또는 Packager 스크립트를 실행하는 로컬 의존성으로 작동합니다. 자세한 내용은 문서를 참조하고 소스 코드를 확인하십시오.
Bundler 및 Server 사전 설정에는 전체 CLI, 구성 파일 또는 Esbuild 및 Server 사용자 정의 용 기능 (스크립트 내) 래퍼가 포함되며 단일 구성 (예 : 브라우저, ESM, Node)에서 여러 배포판을 작성합니다. 번들 및 복잡한 라이브러리 및 복잡한 라이브러리 및 서비스를 제공하여 핫 재 장전 테스트 환경을 통해 밀리 초의 복잡한 라이브러리 및 프로그램을 제공하며 생산으로 쉽게 확장 할 수 있습니다.
package.json이있는 프로젝트 폴더에서 (예 : npm init 처음 실행 한 후),
so와 같은 tinybuild.config.js 파일을 만듭니다 (복사/붙여 넣기 또는 TinyBuild는 단순히 실행하여 하나를 생성 할 수 있습니다) :
 //import {defaultBundler, defaultServer, packager} from 'tinybuild'

const config = {
    //build:true, //enable this to skip serve step (same as cli)
    //serve:true //or enable this to skip build step (same as cli)
    bundler : { //esbuild settings, set false to skip build step or add bundle:true to config object to only bundle (alt methods)
        entryPoints : [ //entry point file(s). These can include .js, .mjs, .ts, .jsx, .tsx, or other javascript files. Make sure your entry point is a ts file if you want to generate types
        "index.js"
        ] ,
        outfile : "dist/index" , //exit point file, will append .js as well as indicators like .esm.js, .node.js for other build flags
        //outdir:'dist'               //exit point folder, define for multiple entryPoints
        bundleBrowser : true , //create plain js build? Can include globals and init scripts
        bundleESM : false , //create esm module js files // { platform:'node' } //etc you can also supply an object here to add more specific esbuild settings
        bundleTypes : false , //create .d.ts files, //you need a .tsconfig for this to work, tinybuild will create one for you when you set this true, however, and has typescript support built in
        bundleNode : false , //create node platform plain js build, specify platform:'node' to do the rest of the files
        bundleHTML : false , //wrap the first entry point file as a plain js script in a boilerplate html file, frontend scripts can be run standalone like a .exe! Server serves this as start page if set to true.
        //bundleIIFE:false,   //create an iife build, this is compiled temporarily to create the types files and only saved with bundleIIFE:true
        //bundleCommonJS:false, //cjs format outputted as .cjs
        minify : true ,
        sourcemap : false ,
        //plugins:[] //custom esbuild plugins? e.g. esbuild-sass-plugin for scss support
        //includeDefaultPlugins:true //true by default, includes the presets for the streaming imports, worker bundling, and auto npm install
        //blobWorkers:true, //package workers as blobs or files? blobs are faster but inflate the main package size
        //workerBundler:{minifyWhitespace:true} //bundler settings specific to the worker. e.g. apply platform:'node' when bundling node workers, default is minifyWhitespace:true as full minifying may cause unforeseen errors
        //globalThis:null //'mymodule'
        //globals:{'index.js':['Graph']}
        //init:{'index.js':function(bundle) { console.log('prepackaged bundle script!', bundle); }.toString(); }
        //  outputs:{ //overwrites main config settings for specific use cases
        //     node:{ //e.g. for bundleNode
        //     // external:[] //externals for node environment builds
        //     },
        //     //commonjs:{} //bundleCommonJS
        //     //browser:{}
        //     //esm:{}
        //     iife:{
        //     // external:[] //we only use the iife for types so it doesn't really matter if it bundles node, just note otherwise if you need iife for some obscure reason
        //     }
        // },
        //refer to esbuild docs for more settings
     } ,
    server : {  //node server settings, set false to skip server step or add serve:true to config object to only serve (alt methods)
        debug : false ,
        protocol : "http" ,  //'http' or 'https'. HTTPS required for Nodejs <---> Python sockets. If using http, set production to False in python/server.py as well
        host : "localhost" , //'localhost' or '127.0.0.1' etc.
        port : 8080 , //e.g. port 80, 443, 8000
        //redirect: 'http://localhost:8082' //instead of serving the default content, redirect ot another url
        //headers: { 'Content-Security-Policy': '*'  }, //global header overrides
        startpage : 'index.html' ,  //default home page/app entry point
        /*
        routes:{ //set additional page routes (for sites instead of single page applications)
            '/page2': 'mypage.html',
            '/custom':{ //e.g. custom page template
                headers: { 'Content-Security-Policy': '*' }, //page specific headers
                template:'<html><head></head><body><div>Hello World!</div></body></html>'
                //path: 'mypage.html' //or a file path (e.g. plus specific headers)
            },
            '/redirect':{ //e.g. custom redirect
                redirect:'https://google.com'
            },
            '/other':(request,response) => {}, //custom request/response handling
            '/': 'index.html', //alt start page declaration
            '/404':'packager/node_server/other/404.html', //e.g. custom error page
        },
        */
        socket_protocol : "ws" , //frontend socket protocol, wss for served, ws for localhost
        hotreload : 5000 ,  //hotreload websocket server port
        //reloadscripts: false, //hot swap scripts, can break things if script handles initializations, otherwise css, link, srcs all hot swap without page reloading fairly intelligently
        //delay: 50, //millisecond delay on the watch command for hot reloading
        //pwa: "service-worker.js",  //pwa mode? Injects service worker webpage code to live site, will create a service worker and webmanifest for you if not existent
        //watch: ['../'], //watch additional directories other than the current working directory
        //python: false,//7000,  //quart server port (configured via the python server script file still)
        //python_node:7001, //websocket relay port (relays messages to client from nodejs that were sent to it by python)
        errpage : 'node_modules/tinybuild/tinybuild/node_server/other/404.html' , //default error page, etc.
        certpath : 'node_modules/tinybuild/tinybuild/node_server/ssl/cert.pem' , //if using https, this is required. See cert.pfx.md for instructions
        keypath : 'node_modules/tinybuild/tinybuild/node_server/ssl/key.pem' //if using https, this is required. See cert.pfx.md for instructions
    } ,
    // electron:true //desktop apps as a full chromium bundle, not small and needs some customization for things like bluetooth menus. Better for full featured applications. Can trigger backend runtimes on local machines.
    /*mobile:{ //this will copy the dist and index.html to capacitor builds that can create small interoperable javascript webview + native functionality (e.g. bluetooth) mobile apps (~2Mb at minimum).
        //android:'open', //'open'//true //Requires Android Studio, it will be launched
        //ios:false //'open'//true //Requires XCode
    }, */
    //tauri:true, //alternative tauri build options for very minimal native engine desktop apps that generally lack the latest web APIs. Good for simple apps, you can bundle it with backend runtimes on local machines.
    /*
    assets:[ //for the mobile/desktop bundlers to copy into their respective folders
        './assets',
        './favicon.ico'
    ]
    */
}

export default config ;
그런 다음 tinybuild 실행하여 패커에 제공하여 프로젝트를 구축하고 실행하십시오. 예를 들어 다른 진입 지점 및 사용 사례에 대해 귀하의 요구에 맞게 사용자 정의하십시오. JSX 및 TSX를 포함하여 TypeScript가 자동으로 인식됩니다. CSS는 스크립트에서 어딘가에서 가져 오면 자동으로 컴파일됩니다. 자세한 내용은 예를 참조하십시오.
TinyBuild 로컬 ( npm install 대 npm install -g )을 사용하려면 TinyBuild 라이브러리에서 packager(config) 가져 와서 실행하고 스크립트 파일로 실행해야합니다.
프로젝트 디렉토리의 루트에서 tinybuild.js를 만듭니다
 import { packager } from 'tinybuild'
import config from './tinybuild.config.js'

packager ( config ) ;
그런 다음 해당 프로젝트 디렉토리에서 콘솔에서 node tinybuild.js 실행합니다.
예를 들어 tinybuild build 또는 tinybuild serve .
tinybuild help 목록 허용 된 인수, 새로운 리포지토리에서 생성 된 보일러 플레이트를 참조하십시오. tinybuild 명령은 편집 된 tinybuild.config.js 또는 tinybuild.js (라이브러리 포함 및 초기화 후 Bundler 및/또는 서버 자체를 포함하여 포장기를 실행하는) 구성 파일을 실행하여 package.json 을 사용하여 더 많은 로컬 명령을 참조하십시오.
글로벌 명령 :
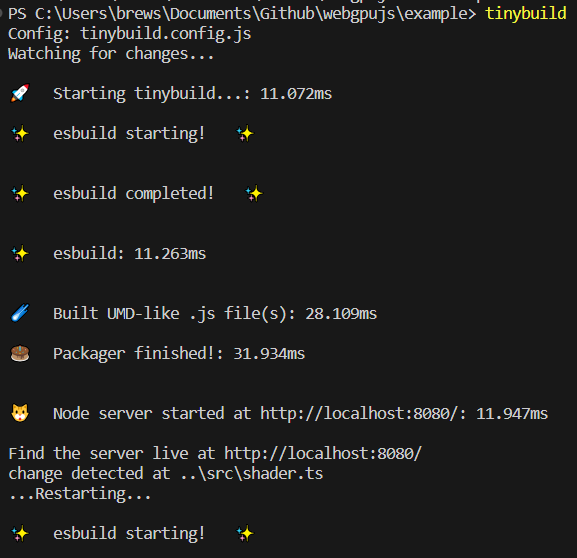
tinybuild 보일러 플레이트를 실행합니다. TinyBuild Bundler + 서버 설정은 현재 작업 디렉토리에서 실행됩니다. 누락 된 index.js, package.json (자동 npm/yarn 설치 포함) 및 tinyBuild.js를 생성하고 핫 재 장전을 위해 작업 디렉토리 (minus node_modules)의 시계 폴더와 함께 제공됩니다.로컬 사령부 :
node path/to/tinybuild.js 현재 작업 디렉토리를 참조 하여이 Packager Config를 실행합니다.start - 현재 작업 디렉토리에서 node tinybuild.js 와 동등한 것을 실행합니다.build / bundle - esbuild bundler를 실행하고, jsonified 객체를 통해 config={"bundler":{}} 로 구성을 지정할 수 있습니다.serve -Node Development Server를 실행하고 Jsonified Object 및 Object를 통해 config={"server":{}} 로 구성을 지정할 수 있습니다.mode=python 별도의 포트 (기본적으로 7000)에서 Dist를 제공하는 Python뿐만 아니라 Python을 실행합니다.mode=dev (BoilerPlate에 tinybuild 입력하는 경우 기본적으로 사용)path=custom.js 사용자 정의 동등한 TinyBuild.js Entry 파일을 대상으로 (패커 또는 Bundler/Server를 실행하려면) ST`- 서버의 호스트 이름, LocalHost는 기본적으로 로컬 호스트entryPoints=index.js 스크립트의 진입 점을 설정하면 jsonified 문자열 배열 일 수도 있습니다.outfile=dist/index 출력 디렉토리 및 파일 이름을 설정합니다 (확장 이름 제외)outdir=dist 여러 진입 지점을 사용할 때 Outdir를 사용합니다.bundleBrowser=true 기본적으로 브라우저 친화적 인 평범한 .js 번들을 생성합니다.bundleESM=false 기본적으로 False, ESM 모듈 번들을 생성하면 .esm.js로 식별됩니다.bundleTypes=false -yed .d.ts 파일, 기본적으로 거짓, 입력 점은 TypeScript 파일에 따라 요구 사항이 있지만 그렇지 않으면 Repo의 JS 파일에 대한 유형을 생성하려고 시도합니다. 파일은 사용 된 Dist Folder에서 Repo처럼 구성됩니다.bundleNode=false 노드 종속성을 포함하도록 별도의 번들 세트를 만듭니다. .node.js로 식별됩니다bundleHTML=true 브라우저 번들을 빠른 테스트로 감싸고 실행하는 HTML 보일러 플레이트를 번들로 묶습니다. true 인 경우 Packager 명령 이이 파일을 시작 페이지로 설정하면 index.html이 있습니다. 예를 들어 index.build.html을 찾으십시오.external=['node-fetch'] -repo의 외부 마크, 노드 페치는 많은 작업에 사용되므로 기본적으로 기본적으로 사용되므로 노드 번들에는 자체 제외가 있습니다 (readme의 esbuild 옵션 참조).platform=browser -비 노드 번들은 기본적으로 브라우저를 기본적으로 사용하고 노드로 설정하여 모든 번들이 노드 플랫폼을 대상으로합니다. 외부는 적절하게 설정해야합니다.globalThis=myCustomBundle BundleBrowser 설정의 진입 지점에서 내보내기를 글로벌 변수로 액세스 할 수 있습니다. 기본적으로 설정되지 않습니다.globals={[entryPoint]:['myFunction']} - 번들에서 내보내는 추가 함수, 클래스, 변수 등을 지정할 수 있습니다.host=localhost 기본적으로 서버의 호스트 이름을 설정합니다. 서빙 할 때 서버 URL 또는 IP 주소로 설정할 수 있습니다. 일반적으로 서빙 할 때 포트 80을 사용하십시오.port=8080 서버의 포트, 기본적으로 8080protocol=http -http 또는 https? HTTPS를 실행하려면 SSL Cert 및 키가 필요합니다python=7000 노드 서버가 기본적으로 7000을 킬 신호를 보낼 수 있도록 Python Server 용 포트. Python 서버를 동시에 실행하거나 mode=python 사용하십시오hotreload=5000 노드 서버 용 핫 릴로드 포트, 기본적으로 5000watch=../../path/to/other/src 또는 watch=['path/to/src1','src2','.xml'] - 추가 폴더와 확장을 시청하십시오extensions=xml,3ds 또는 extensions=['xml','3ds'] 변경 사항을 시청합니다ignore=../../path/to/other/src,path2/src2 또는 ignore=['path/to/src1','../path2/src2'] - 파일과 폴더를 무시하십시오startpage=index.html 홈에 대한 항목 HTML 페이지 '/'페이지, index.html 기본적으로certpath=tinybuild/node_server/ssl/cert.pem https 용 Cert 파일keypath=tinybuild/node_server/ssl/key.pem https의 키 파일pwa=tinybuild/pwa/workbox-config.js Workbox-Cli를 사용하여 PWA에 대한 서비스 작업자 구성 (package.json을 통해 별도로 설치), 서버는 메인 폴더에 manifest.json을 설치하지 않으면 HTTPS가 필요합니다.config="{"server":{},"bundler":{}}" - Packager의 jsonified config 객체를 전달합니다. 문서의 Bundler 및 서버 설정을 참조하십시오.init 폴더를 필요한 파일로 새로운 TinyBuild 저장소로 초기화하면 아래 명령을 사용하여 소스를 포함시킬 수 있습니다.core=true 적절한 package.json으로 새 저장소에 TinyBuild 소스를 포함시킵니다.entry=index.js 작성하려는 항목 파일의 이름, index.js로 기본값script=console.log("Hello%20World!") -Jsonified and uri-Encoded (공백 등) JavaScript String을 기본값으로 전달하십시오.electron - 보일러 플레이트로 전자 앱을 시작하여 Dist 및 Spewified 자산을 복사하십시오. 전자 문서를 참조하십시오mobile={android:'open',ios:false} - 커패시터를 사용하여 번들 모바일 앱을 만들거나 'Open'을 사용하여 Android Studio 또는 Xcode를 실행하거나 종속성을 설치했다고 가정하여 CLI를 사용하도록 설정하십시오. 커패시터 문서를 참조하십시오.tauri Tauri를 통한 대체 최소 데스크톱 런타임. Tauri Docs를 참조하십시오.assets=['./assets','favicon.ico'] - 기본 분포에 복사 할 추가 자산을 지정이러한 유형의 애플리케이션 작업 방법에 대한 자세한 내용은 각 하위 폴더의 ReadMe.md 파일을 참조하십시오.
Mac에 TinyBuild를 설치하고 작동하지 않는 경우이 stackoverflow 게시물을 기반으로 터미널에서 다음 명령을 실행해보십시오.
 brew install dos2unix
sudo dos2unix node_modules/tinybuild/tinybuild/bin/global.js
Windows는 또한 글로벌 패키지 권한에 오류를 던질 수 있습니다. Google에 오류를 복사하고 찾은 명령 줄 솔루션을 사용하면 이동하는 것이 좋습니다.
문제 또는 Joshua Brewster와의 직접적인 접촉을 통해 자유롭게 변경하거나 변경하고 버그를보고하십시오. 전체 개발 시스템은 모듈 식이며 여러 단순화 된 개발 도구 위에 간단한 자동화입니다. 우리는 이것을 일상 개발 워크 플로우에서 사용하므로 전투 테스트를 거치지 만 작은 샘플 크기로 사용합니다.


