react native spokestack tray
Release 0.9.1
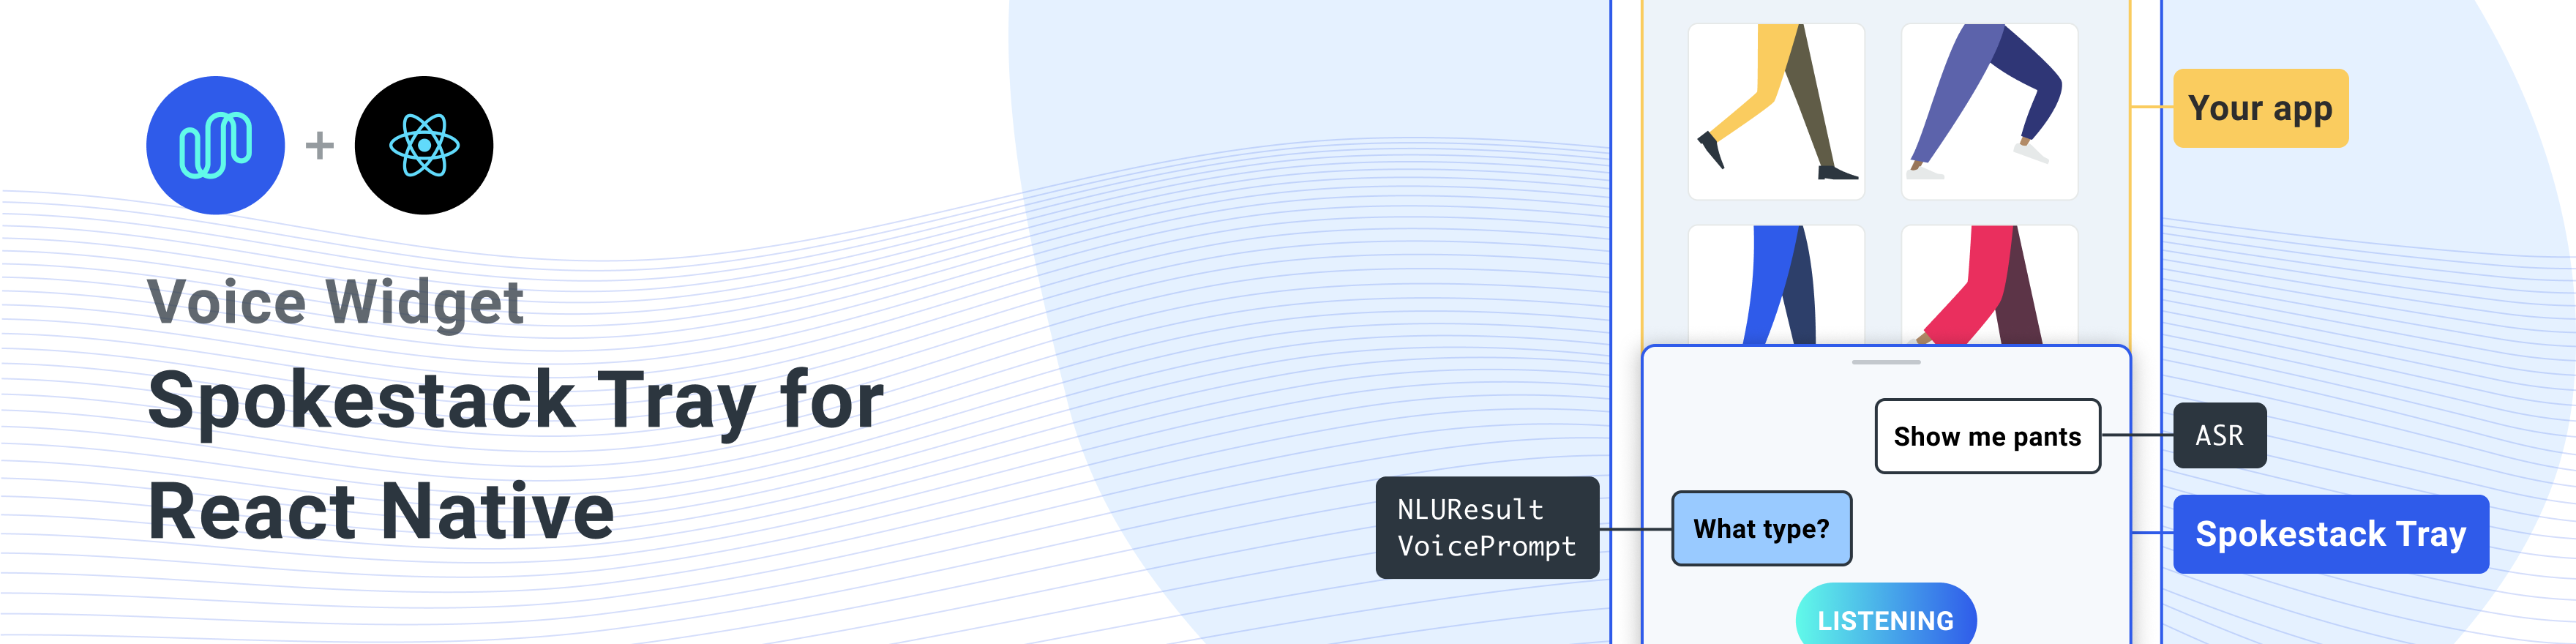
用於將Spokestack添加到任何React Native應用程序中的React Native組件。
與同行依賴關係安裝此庫
一個單線安裝所有依賴項
npm install react-native-spokestack-tray react-native-spokestack @react-native-community/async-storage react-native-video react-native-haptic-feedback react-native-linear-gradient react-native-permissions$ npm install react-native-spokestack-tray react-native-spokestack
# Used for storing a simple boolean to turn on/off sound
$ npm install @react-native-community/async-storage
# Used to play TTS audio prompts.
# Despite its name, we think this is one of the best
# plugins (if not the best) for playing audio.
# In iOS, Audio and Video are intertwined anyway.
$ npm install react-native-video
# Used to show an animating gradient when Spokestack listens
$ npm install react-native-linear-gradient
# Used to check microphone and speech recognition permissions
$ npm install react-native-permissions
# Used to generate a haptic whenever Spokestack listens.
# This can be turned off, but the dependency is still needed.
$ npm install react-native-haptic-feedback然後按照每個平台的說明將React-Native-Spokestack鏈接到您的項目:
React-Native-Spokestack使用僅在iOS 13+中可用的相對較新的API。確保將部署目標設置為iOS 13。
首先,打開XCode並轉到項目 - >信息以將iOS部署目標設置為13.0或更高。
另外,將部署設置為目標 - >一般 - >部署信息下的13.0。
當引入Flipper進行反應本地時,設置了一些庫搜索路徑以供Swift。 React Native Project中的默認搜索路徑存在很長的問題,因為Swift 5.0添加了搜索路徑,該搜索路徑阻止了僅在Swift 5.2或更高版本中使用API的任何其他React本機庫。 spokestack-ios,反應本地spokestack的依賴性使用這些API和Xcode將無法構建。
幸運的是,修復程序非常簡單。轉到您的目標 - >構建設置並蒐索“庫搜索路徑”。
從列表中刪除""$(TOOLCHAIN_DIR)/usr/lib/swift-5.0/$(PLATFORM_NAME)"" 。
在運行pod install之前,請確保進行以下編輯。
platform :ios , '13.0'我們還需要使用use_frameworks!在我們的podfile中,以支持用迅速編寫的依賴項。
 target 'SpokestackExample' do
  use_frameworks!
  #...
暫時, use_frameworks!不與Flipper一起使用,因此我們還需要禁用Flipper。卸下豆莢纖維中的任何與腳鉗相關的線條。在React Native 0.63.2中,它們看起來像這樣:
  # X Remove or comment out these lines X
  # use_flipper!
  # post_install do |installer|
  #   flipper_post_install(installer)
  # end
# XX 我們使用React-native-permissions檢查並請求麥克風許可(iOS和Android)以及語音識別許可(僅IOS)。該庫將每個權限分為自己的POD,以避免使用不使用的代碼將您的應用程序充氣。將以下豆莢添加到您的豆莢中:
 target 'SpokestackTrayExample' do
  # ...
  permissions_path = '../node_modules/react-native-permissions/ios'
  pod 'Permission-Microphone' , :path => " #{ permissions_path } /Microphone.podspec"
  pod 'Permission-SpeechRecognition' , :path => " #{ permissions_path } /SpeechRecognition.podspec"
React Native 0.64.0使用use_frameworks!在他們的豆莢裡。
有關此錯誤的更多信息,請參見Facebook/React-Native#31149。
要解決此問題,請將以下內容添加到您的podfile:
 # Moves 'Generate Specs' build_phase to be first for FBReactNativeSpec
post_install do | installer |
  installer . pods_project . targets . each do | target |
    if ( target . name &. eql? ( 'FBReactNativeSpec' ) )
      target . build_phases . each do | build_phase |
        if ( build_phase . respond_to? ( :name ) && build_phase . name . eql? ( '[CP-User] Generate Specs' ) )
          target . build_phases . move ( build_phase , 0 )
        end
      end
    end
  end
end 刪除您現有的podfile.lock和pods文件夾,以確保沒有衝突,然後安裝吊艙:
$ npx pod-install將以下內容添加到您的info.plist中以啟用權限。在XCode中,還要確保將iOS部署目標設置為13.0或更高。
< key >NSMicrophoneUsageDescription</ key >
< string >This app uses the microphone to hear voice commands</ string >
< key >NSSpeechRecognitionUsageDescription</ key >
< string >This app uses speech recognition to process voice commands</ string >弗里普(Flipper)致力於修復其pod for use_frameworks! ,我們必須禁用腳鉗。我們已經從上面的豆莢中刪除了腳依依賴,但是在appdelegate.m中仍然有一些代碼導入flipper。有兩種解決此問題的方法。
-DFB_SONARKIT_ENABLED=1 。在我們的示例應用程序中,我們完成了選項1,並保留在Flipper代碼中,以便將來使其在將來工作,並且可以添加回去。
# import < AVFoundation/AVFoundation.h > 設置AudioSession類別。有幾種可行的配置。
以下是適合大多數用例的建議:
- ( BOOL )application:(UIApplication *)application didFinishLaunchingWithOptions:( NSDictionary *)launchOptions
{
  AVAudioSession *session = [AVAudioSession sharedInstance ];
  [session setCategory: AVAudioSessionCategoryPlayAndRecord
     mode: AVAudioSessionModeDefault
  options: AVAudioSessionCategoryOptionDefaultToSpeaker | AVAudioSessionCategoryOptionAllowAirPlay | AVAudioSessionCategoryOptionAllowBluetoothA2DP | AVAudioSessionCategoryOptionAllowBluetooth
    error: nil ];
  [session setActive: YES error: nil ];

// ... 該示例使用使用系統提供的ASRS( AndroidSpeechRecognizer和AppleSpeechRecognizer )。但是,100%的設備無法使用AndroidSpeechRecognizer 。如果您的應用程序支持沒有內置語音識別的設備,請使用配置文件道具將配置profile設置為Spokestack配置文件,以使用profile ASR。
有關更多信息,請參見我們的ASR文檔。
 // ...
  ext {
    // Minimum SDK is 21
    minSdkVersion = 21
// ...
  dependencies {
    // Minimium gradle is 3.0.1+
    // The latest React Native already has this
classpath( " com.android.tools.build:gradle:3.5.3 " )將必要的權限添加到您的AndroidManifest.xml 。第一個權限通常已經存在。使用麥克風需要第二個。
    <!-- For TTS -->
    < uses-permission android : name = " android.permission.INTERNET " />
    <!-- For wakeword and ASR -->
    < uses-permission android : name = " android.permission.RECORD_AUDIO " />
    <!-- For ensuring no downloads happen over cellular, unless forced -->
< uses-permission android : name = " android.permission.ACCESS_NETWORK_STATE " /> import SpokestackTray , { listen } from 'react-native-spokestack-tray'
// ...
export default function ConversationHandler ( { navigation } ) {
return (
< SpokestackTray
clientId = { process . env . SPOKESTACK_CLIENT_ID }
clientSecret = { process . env . SPOKESTACK_CLIENT_SECRET }
handleIntent = { ( intent , slots , utterance ) => {
switch ( intent ) {
// These cases would be for all
// the possible intents defined in your NLU.
case 'request.select' :
// As an example, search with some service
// with the given value from the NLU
const recipe = SearchService . find ( slots . recipe ?. value )
// An example of navigating to some scene to show
// data, a recipe in our example.
navigation . navigate ( 'Recipe' , { recipe } )
return {
node : 'info.recipe' ,
prompt : 'We found your recipe!'
}
default :
return {
node : 'welcome' ,
prompt : 'Let us help you find a recipe.'
}
}
} }
// The NLU models are downloaded and then cached
// when the app is first installed.
// See https://spokestack.io/docs/concepts/nlu
// for more info on NLU.
nlu = { {
nlu : 'https://somecdn/nlu.tflite' ,
vocab : 'https://somecdn/vocab.txt' ,
metadata : 'https://somecdn/metadata.json'
} }
/>
)
} 要在您的應用中將模型文件包括在本地(而不是從CDN下載),您還需要添加必要的擴展名,以便Babel可以包含這些文件。為此,請編輯您的metro.config.js 。
 const defaults = require ( 'metro-config/src/defaults/defaults' )

module . exports = {
  resolver : {
    // json is already in the list
    assetExts : defaults . assetExts . concat ( [ 'tflite' , 'txt' , 'sjson' ] )
  }
}
然後使用源對象包括模型文件:
 < SpokestackTray
  clientId = { process . env . SPOKESTACK_CLIENT_ID }
  clientSecret = { process . env . SPOKESTACK_CLIENT_SECRET }
  handleIntent = { handleIntent }
  wakeword = { {
    filter : require ( './filter.tflite' ) ,
    detect : require ( './detect.tflite' ) ,
    encode : require ( './encode.tflite' )
  } }
  nlu = { {
    model : require ( './nlu.tflite' ) ,
    vocab : require ( './vocab.txt' ) ,
    // Be sure not to use "json" here.
    // We use a different extension (.sjson) so that the file is not
    // immediately parsed as json and instead
    // passes a require source object to Spokestack.
    // The special extension is only necessary for local files.
    metadata : require ( './metadata.sjson' )
  } }
/>這不是必需的。將遠程URL傳遞到相同的配置選項,並且首次調用initialize時將下載和緩存文件。
請參閱了解如何為存儲庫和開發工作流程貢獻的貢獻指南。
<SpokestackTray />組件道具• Optional按鈕: number (默認值: 60 )
麥克風按鈕的寬度(和高度)
src/spokestacktray.tsx:132
•客戶端: string
您的Spokestack代幣在您的Spokestack帳戶中生成的,網址為https://spokestack.io/account。免費創建一個帳戶,然後生成一個令牌。這是來自“ ID”字段。
src/spokestacktray.tsx:74
•客戶端: string
您的Spokestack代幣在您的Spokestack帳戶中生成的,網址為https://spokestack.io/account。免費創建一個帳戶,然後生成一個令牌。這是來自“秘密”領域。
src/spokestacktray.tsx:81
• Optional封閉式: number (默認值: 0 )
講話後要等待要關閉托盤多長時間(MS)
src/spokestacktray.tsx:134
• Optional調試: boolean
顯示來自React-Native Spokestack的調試消息
src/spokestacktray.tsx:136
• Optional持續時間: number (默認值: 500 )
托盤動畫的持續時間(MS)
src/spokestacktray.tsx:138
• Optional寬鬆: EasingFunction (默認值:寬鬆。
托盤動畫的寬鬆功能
src/spokestacktray.tsx:140
• Optional出口: string []
此數組中的所有節點都應結束對話並關閉托盤
src/spokestacktray.tsx:150
• Optional fontfamily : string
用於“聽力...”,“加載...”和聊天氣泡文本的字體。
src/spokestacktray.tsx:155
• Optional梯度顏色: string [](默認值: [“#61fae9”,“#2f5bea”] )
當收聽時顯示的線性梯度的顏色可能是任何數量的顏色(推薦:2-3)
src/spokestacktray.tsx:160
• Optional問候: boolean (默認: false )
托盤打開時,是否要通過歡迎消息向用戶打招呼。注意: handleIntent必須響應“問候”意圖。
src/spokestacktray.tsx:166
• Optional觸覺: boolean (默認: true )
將其設置為錯誤,以禁用每當托盤開始聆聽時會播放的觸覺。
src/spokestacktray.tsx:171
• Optional關鍵字: KeywordConfig
關鍵字識別的配置
過濾器,檢測,編碼和元數據字段接受2種值類型。
require或import的源對象(例如model: require('./nlu.tflite') )請參閱https://www.spokestack.io/docs/concepts/keywords,以了解有關關鍵字識別的更多信息。
example
 // ...
keyword = { {
  detect : 'https://s.spokestack.io/u/UbMeX/detect.tflite' ,
  encode : 'https://s.spokestack.io/u/UbMeX/encode.tflite' ,
  filter : 'https://s.spokestack.io/u/UbMeX/filter.tflite' ,
  metadata : 'https://s.spokestack.io/u/UbMeX/metadata.json'
} }
您還可以提前下載模型,並將其從本地文件中包括在內。注意:這需要更改您的Metro.config.js。有關更多信息,請參閱readme.md中的“在應用程序捆綁包中包含模型文件”。
 // ...
keyword = { {
  detect : require ( './detect.tflite' ) ,
  encode : require ( './encode.tflite' ) ,
  filter : require ( './filter.tflite' ) ,
  // IMPORTANT: a special extension is used for local metadata JSON files (`.sjson`) when using `require` or `import`
  // so the file is not parsed when included but instead imported as a source object. This makes it so the
  // file is read and parsed by the underlying native libraries instead.
  metadata : require ( './metadata.sjson' )
} }
關鍵字配置還接受一個類字段,用於未指定元數據時。
 // ...
keyword = { {
  detect : require ( './detect.tflite' ) ,
  encode : require ( './encode.tflite' ) ,
  filter : require ( './filter.tflite' ) ,
  classes : [ 'one' , 'two' , 'three]
} } src/spokestacktray.tsx:221
• Optional minheight : number (默認值: 170 )
托盤的最小高度
src/spokestacktray.tsx:223
• nlu : NLUConfig
Nlu Tensorflow Lite模型(.tflite),JSON元數據和NLU詞彙(.txt)
所有3個字段都接受2種值類型。
require或import的源對象(例如model: require('./nlu.tflite') )請參閱https://spokestack.io/docs/concepts/nlu了解有關NLU的更多信息。
 // ...
nlu = { {
  model : 'https://somecdn.com/nlu.tflite' ,
  vocab : 'https://somecdn.com/vocab.txt' ,
  metadata : 'https://somecdn.com/metadata.json'
} }
您也可以傳遞本地文件。注意:這需要更改您的Metro.config.js。有關更多信息,請參閱readme.md中的“在應用程序捆綁包中包含模型文件”。
 // ...
nlu = { {
  model : require ( './nlu.tflite' ) ,
  vocab : require ( './vocab.txt' ) ,
  // IMPORTANT: a special extension is used for local metadata JSON files (`.sjson`) when using `require` or `import`
  // so the file is not parsed when included but instead imported as a source object. This makes it so the
  // file is read and parsed by the underlying native libraries instead.
  metadata : require ( './metadata.sjson' )
} } src/spokestacktray.tsx:130
• Optional方向: "left" | "right" (默認: “左” )
托盤按鈕可以定向在屏幕的兩側
src/spokestacktray.tsx:235
• Optional主彩色: string (默認值: “#2F5BEA” )
該顏色用於主題托盤,並用於麥克風按鈕和語音氣泡中。
src/spokestacktray.tsx:240
• Optional配置文件: PipelineProfile
Spokestack配置配置文件傳遞給React-Native-Spokestack。這些可從版本4.0.0始於React-Native-Spokestack獲得。
如果指定了Wakeword配置文件,則默認為TFLITE_WAKEWORD_NATIVE_ASR 。否則,默認值為PTT_NATIVE_ASR 。
 import SpokestackTray from 'react-native-spokestack-tray'
import { PipelineProfile } from 'react-native-spokestack'

// ...
< SpokestackTray
 profile = { PipelineProfile . TFLITE_WAKEWORD_SPOKESTACK_ASR }
// ... src/spokestacktray.tsx:261
• Optional刷新模型: boolean
在設備(強制覆蓋)上,很少使用此此功能來刷新喚醒字,關鍵字和NLU模型。 <SpokestackTray refreshModels={process.env.NODE_ENV !== 'production'} ... />
src/spokestacktray.tsx:268
• Optional Saygreeting : boolean (默認: true )
是說問候還是只顯示帶有問候消息的聊天泡沫,即使聲音正在打開。
src/spokestacktray.tsx:274
• Optional soundoffimage : ReactNode (默認值: <<image source = {soundoffimage} style = {{width:30,高度:30}} />) )
通過傳遞React圖像組件來替換映像的聲音圖像
src/spokestacktray.tsx:278
• Optional soundonimage : ReactNode (默認值: <<image source = {soundonimage} style = {{width:30,高度:30}} />) )
通過傳遞反應圖像組件來替換圖像上的聲音
src/spokestacktray.tsx:276
• Optional SpokestackConfig : Partial SpokestackConfig
將選項直接傳遞到spokestack.initialize()函數,來自React-Native-Spokestack。有關可用選項,請參見https://github.com/spokestack/reaeact-native-spokestack。
src/spokestacktray.tsx:285
• Optional startheight : number (默認值: 220 )
托盤的起始高度
src/spokestacktray.tsx:287
•可選樣式: false | RegisteredStyle ViewStyle | Value | AnimatedInterpolation | WithAnimatedObject ViewStyle | WithAnimatedArray < false | ViewStyle | RegisteredStyle ViewStyle | RecursiveArray < false | ViewStyle | RegisteredStyle < ViewStyle >> | Optional ( false | ViewStyle | RegisteredStyle ViewStyle )[]>
此樣式道具傳遞給托盤的容器
src/spokestacktray.tsx:289
• Optional ttsformat : TTSFormat (默認: ttsformat.text )
文本傳遞給Spokestack.Synthesize的格式
src/spokestacktray.tsx:291
• Optional語音: string (默認: “演示 - 男性” )
Spokestack TTS中聲音的鑰匙,傳遞給Spokestack.Synthesize。僅當您使用Spokestack Maker帳戶創建自定義語音時,才能更改。請參閱https://spokestack.io/pricing#maker。如果未指定,則使用Spokestack的免費“演示”語音。
src/spokestacktray.tsx:298
• Optional喚醒詞: WakewordConfig
NLU Tensorflow Lite模型(.tflite)用於wawdword。
所有3個字段都接受2種值類型。
require或import的源對象(例如model: require('./nlu.tflite') )請參閱https://spokestack.io/docs/concepts/wakeword-models以了解有關Wakeword的更多信息
Spokestack提供示例WAVEWORD模型文件(“ Spokestack”):
 // ...
wakeword = { {
  detect : 'https://s.spokestack.io/u/hgmYb/detect.tflite' ,
  encode : 'https://s.spokestack.io/u/hgmYb/encode.tflite' ,
  filter : 'https://s.spokestack.io/u/hgmYb/filter.tflite'
} }
您還可以提前下載這些模型,並將其包括在本地文件中。注意:這需要更改您的Metro.config.js。有關更多信息,請參閱readme.md中的“在應用程序捆綁包中包含模型文件”。
 // ...
wakeword = { {
  detect : require ( './detect.tflite' ) ,
  encode : require ( './encode.tflite' ) ,
  filter : require ( './filter.tflite' )
} } src/spokestacktray.tsx:332
▸ Optional Editranscript ( transcript ): string
在分類前和顯示用戶響應氣泡之前編輯成績單。
| 姓名 | 類型 |
|---|---|
transcript | string |
string
src/spokestacktray.tsx:145
▸handleintent ( intent , slots? , utterance? ): [IntentResult](#IntentResult)
此功能從NLU中呈現出意圖,並返回具有唯一對話節點名稱(您定義的)的對象,並通過TTS處理並說話提示。
注意:如果聲音關閉,則提示僅在聊天氣泡中顯示。
| 姓名 | 類型 |
|---|---|
intent | string |
slots? | SpokestackNLUSlots |
utterance? | string |
[IntentResult](#IntentResult)
src/spokestacktray.tsx:91
▸ Optional Onclose (): void
每當托盤關閉時打電話
void
src/spokestacktray.tsx:227
▸ Optional OnError ( e ): void
每當spokestack出現錯誤時都打電話
| 姓名 | 類型 |
|---|---|
e | SpokestackErrorEvent |
void
src/spokestacktray.tsx:229
▸ Optional onopen (): void
每當托盤打開時打電話
void
src/spokestacktray.tsx:231
• Optional數據: any
您可能想添加的任何其他數據
src/spokestacktray.tsx:64
• Optional nointerrupt : boolean
設置為true以在提示播放期間停止喚醒識別器。
src/spokestacktray.tsx:62
•節點: string
用戶定義的鍵指示用戶在對話中的何處,如果Spokestack在說明提示後不應再次聆聽,則將其包含在exitNodes Prop中。
src/spokestacktray.tsx:55
•提示: string
除非托盤處於靜音模式,否則將處理到語音中
src/spokestacktray.tsx:57
<SpokestackTray />組件方法這些方法可從spokestacktray組件獲得。使用React Ref訪問這些方法。
 const spokestackTray = useRef ( null )

  // ...
  < SpokestackTray ref = { spokestackTray }

// ...
spokestackTray . current . say ( 'Here is something for Spokestack to say' )注意:在大多數情況下,您應該調用listen而不是open 。
▸open (): void
打開托盤,問候(如果適用),然後聽
void
src/spokestacktray.tsx:743
▸關閉(): void
關閉托盤,停止聆聽並重新啟動喚醒字
void
src/spokestacktray.tsx:754
▸說( input ): Promise void
將輸入傳遞到spokestack.synthesize(),播放音頻,並增加了語音泡沫。
| 姓名 | 類型 |
|---|---|
input | string |
Promise void
src/spokestacktray.tsx:766
▸addBubble ( bubble ): void
將氣泡(系統或用戶)添加到聊天接口
| 姓名 | 類型 |
|---|---|
bubble | Bubble |
void
src/spokestacktray.tsx:799
• Isleft : boolean
SRC/組件/Secembubbles.tsx:9
•文字: string
src/components/segingBubbles.tsx:8
▸togglesilent (): Promise boolean
切換靜音模式
Promise boolean
src/spokestacktray.tsx:816
▸ISLENT (): boolean
返回托盤是否處於靜音模式
boolean
src/spokestacktray.tsx:828
這些功能可作為來自React-Native-Spokestack-tray的出口
▸lining (): Promise void
告訴Spokestack語音管道開始聆聽。還請求在必要時授予聆聽的權限。如果尚未啟動,它將嘗試在激活之前開始管道。如果該應用在後台,此功能將無能為力。
 import { listen } from 'react-native-spokestack-tray'
try {
  await listen()
} catch (error) {
  console.error(error)
}
Promise void
src/spokestack.ts:21
▸停止列表(): Promise void
Promise void
src/spokestack.ts:30
Const Islisting (): Promise boolean
返回Spokestack是否當前正在聽
console . log ( `isListening: ${ await isListening ( ) } ` ) Promise boolean
src/index.ts:19
Const isInitialized (): Promise boolean
返回Spokestack是否已初始化
console . log ( `isInitialized: ${ await isInitialized ( ) } ` ) Promise boolean
src/index.ts:27
Const isstarted (): Promise boolean
返回語音管道是否已經開始
console . log ( `isStarted: ${ await isStarted ( ) } ` ) Promise boolean
src/index.ts:35
Const addEventListEner ( eventType , listener , context? ): EmitterSubscription
綁定到本機庫發出的任何事件中,事件是:“識別”,“ partial_recognize”,“ error”,“激活”,“停用”和“超時”。有關事件的描述,請參見readme.md的底部。
 useEffect ( ( ) => {
  const listener = addEventListener ( 'recognize' , onRecognize )
  // Unsubscribe by calling remove when components are unmounted
  return ( ) => {
    listener . remove ( )
  }
} , [ ] ) | 姓名 | 類型 |
|---|---|
eventType | string |
listener | ( event : any )=> void |
context? | Object |
EmitterSubscription
src/index.ts:51
Const removeeventListener ( eventType , listener ): void
刪除活動聽眾
removeEventListener ( 'recognize' , onRecognize ) | 姓名 | 類型 |
|---|---|
eventType | string |
listener | (... args : any [])= any |
void
src/index.ts:59
Const removeAlllisteners (): void
刪除任何現有的聽眾
 componentWillUnmount ( ) {
  removeAllListeners ( )
} void
src/index.ts:69
使用addEventListener() , removeEventListener()和removeAllListeners()添加和刪除事件處理程序。 iOS和Android都可以使用所有事件。
| 姓名 | 數據 | 描述 |
|---|---|---|
| 認出 | { transcript: string } | 每當能夠成功完成語音識別時,就被解僱。 |
| partial_recognize | { transcript: string } | 每當筆錄在語音識別過程中變化時被解僱。 |
| 開始 | null | 當語音管道開始時被解僱(開始聆聽WakeWord或啟動VAD)。 |
| 停止 | null | 當語音管道停止時被解僱。 |
| 啟用設定 | null | 當語音管道通過VAD,WakeWord或調用.activate()激活時,被解僱。 |
| 停用 | null | 當語音管道停用時被解僱。 |
| 玩 | { playing: boolean } | 當TTS播放啟動和停止時被解僱。請參閱speak()函數。 |
| 暫停 | null | 由於缺乏識別,當主動管道時間熄滅時被解僱。 |
| 痕跡 | { message: string } | 發射跟踪消息。冗長由traceLevel選項確定。 |
| 錯誤 | { error: string } | 當Spokestack發生錯誤時被解僱。 |
當觸發錯誤事件時,任何現有承諾將被拒絕。
Spokestack使用這些實用程序功能來檢查iOS和Android和iOS的語音識別許可的麥克風許可。
▸checkspeech (): Promise boolean
此功能可用於檢查用戶是否授予了語音的必要權限。在iOS上,這同時包括麥克風和語音再報表。在Android上,僅需要麥克風。
 import { checkSpeech } from 'react-native-spokestack-tray'

// ...

const hasPermission = await checkSpeech ( ) Promise boolean
src/utils/permissions.ts:78
▸requestSpeech (): Promise boolean
此功能可用於實際請求語音的必要權限。在iOS上,這同時包括麥克風和語音再報表。在Android上,僅需要麥克風。
注意:如果用戶過去在iOS上降低,則必須將用戶發送到設置。
 import { requestSpeech } from 'react-native-spokestack-tray'

// ...

const hasPermission = await requestSpeech ( ) Promise boolean
src/utils/permissions.ts:106
麻省理工學院


