react native spokestack tray
Release 0.9.1
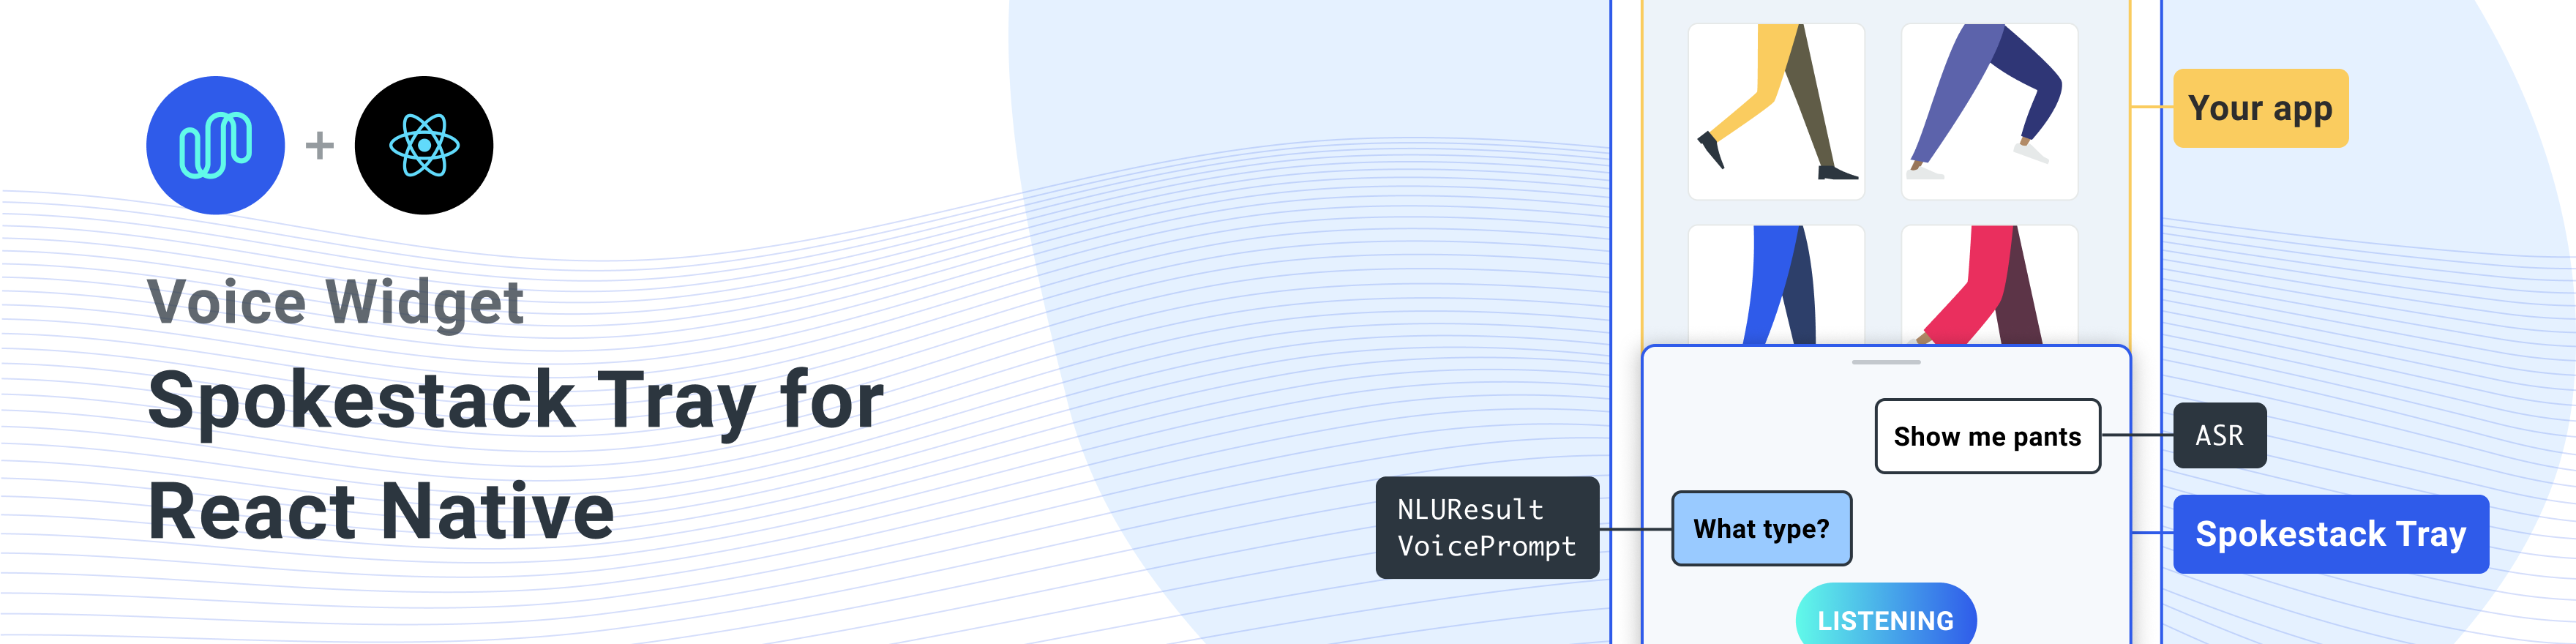
REACT 기본 앱에 스포크 스택을 추가하기위한 원시 구성 요소.
피어 종속성 으로이 라이브러리를 설치하십시오
모든 종속성을 설치하는 1 라이너
npm install react-native-spokestack-tray react-native-spokestack @react-native-community/async-storage react-native-video react-native-haptic-feedback react-native-linear-gradient react-native-permissions$ npm install react-native-spokestack-tray react-native-spokestack
# Used for storing a simple boolean to turn on/off sound
$ npm install @react-native-community/async-storage
# Used to play TTS audio prompts.
# Despite its name, we think this is one of the best
# plugins (if not the best) for playing audio.
# In iOS, Audio and Video are intertwined anyway.
$ npm install react-native-video
# Used to show an animating gradient when Spokestack listens
$ npm install react-native-linear-gradient
# Used to check microphone and speech recognition permissions
$ npm install react-native-permissions
# Used to generate a haptic whenever Spokestack listens.
# This can be turned off, but the dependency is still needed.
$ npm install react-native-haptic-feedback그런 다음 각 플랫폼에 대한 지침을 따르십시오.
React-Native-Spokestack은 iOS 13+에서만 사용할 수있는 비교적 새로운 API를 사용합니다. 배포 대상을 iOS 13으로 설정하십시오.
먼저 Xcode를 열고 프로젝트 -> 정보로 이동하여 iOS 배포 대상을 13.0 이상으로 설정하십시오.
또한 대상 -> 일반 -> 배포 정보에 따라 배포를 13.0으로 설정하십시오.
Flipper가 React Native를 위해 도입되었을 때 일부 라이브러리 검색 경로는 Swift로 설정되었습니다. React Native Projects의 기본 검색 경로에는 오랜 문제가있었습니다. SWIFT 5.0의 검색 경로가 추가 되었기 때문에 다른 React 기본 라이브러리가 SWIFT 5.2 이상으로 만 사용할 수있는 API를 사용하지 못하게되었습니다. Real-Native-Spokestack의 종속성 인 Spokestack-IOS는 이러한 API를 사용하며 Xcode는 빌드되지 않습니다.
다행히이 수정은 상당히 간단합니다. 목표 -> 설정 구축 및 "라이브러리 검색 경로"를 검색하십시오.
목록에서 ""$(TOOLCHAIN_DIR)/usr/lib/swift-5.0/$(PLATFORM_NAME)"" 제거하십시오.
pod install 실행하기 전에 다음 편집을하십시오.
platform :ios , '13.0' 또한 use_frameworks! Swift로 작성된 종속성을 지원하기 위해 Podfile에서.
 target 'SpokestackExample' do
  use_frameworks!
  #...
당분간 use_frameworks! 플리퍼와 함께 작동하지 않으므로 플리퍼도 비활성화해야합니다. 포드 파일에서 플리퍼 관련 라인을 제거하십시오. React Native 0.63.2에서는 다음과 같습니다.
  # X Remove or comment out these lines X
  # use_flipper!
  # post_install do |installer|
  #   flipper_post_install(installer)
  # end
# XX 당사는 RECT-NATIVE PERMISSIONS를 사용하여 마이크 권한 (iOS 및 Android) 및 음성 인식 권한 (iOS 만 해당)을 확인하고 요청합니다. 이 라이브러리는 사용하지 않는 코드로 앱을 팽창하지 않도록 각 권한을 자체 포드로 분리합니다. Podfile에 다음 포드를 추가하십시오.
 target 'SpokestackTrayExample' do
  # ...
  permissions_path = '../node_modules/react-native-permissions/ios'
  pod 'Permission-Microphone' , :path => " #{ permissions_path } /Microphone.podspec"
  pod 'Permission-SpeechRecognition' , :path => " #{ permissions_path } /SpeechRecognition.podspec"
React Native 0.64.0은 use_frameworks! 그들의 podfiles에서.
이 버그에 대한 자세한 내용은 Facebook/React-Native#31149를 참조하십시오.
이 문제를 해결하려면 Podfile에 다음을 추가하십시오.
 # Moves 'Generate Specs' build_phase to be first for FBReactNativeSpec
post_install do | installer |
  installer . pods_project . targets . each do | target |
    if ( target . name &. eql? ( 'FBReactNativeSpec' ) )
      target . build_phases . each do | build_phase |
        if ( build_phase . respond_to? ( :name ) && build_phase . name . eql? ( '[CP-User] Generate Specs' ) )
          target . build_phases . move ( build_phase , 0 )
        end
      end
    end
  end
end 충돌이 없도록 기존의 podfile.lock 및 pods 폴더를 제거한 다음 포드를 설치하십시오.
$ npx pod-install다음을 info.plist에 추가하여 권한을 활성화하십시오. Xcode에서 iOS 배포 대상이 13.0 이상으로 설정되어 있는지 확인하십시오.
< key >NSMicrophoneUsageDescription</ key >
< string >This app uses the microphone to hear voice commands</ string >
< key >NSSpeechRecognitionUsageDescription</ key >
< string >This app uses speech recognition to process voice commands</ string > Flipper는 use_frameworks! , 우리는 플리퍼를 비활성화해야합니다. 우리는 이미 위의 포드에서 플리퍼 종속성을 제거했지만 Flipper를 가져 오는 AppDelegate.m에는 코드가 남아 있습니다. 이것을 고치는 두 가지 방법이 있습니다.
-DFB_SONARKIT_ENABLED=1 제거하십시오.이 예제 앱에서는 옵션 1을 수행하고 향후 작동 할 경우 플리퍼 코드를 남겨두고 다시 추가 할 수 있습니다.
# import < AVFoundation/AVFoundation.h > 오디오 세션 카테고리를 설정하십시오. 작동하는 몇 가지 구성이 있습니다.
다음은 대부분의 사용 사례에 맞는 제안입니다.
- ( BOOL )application:(UIApplication *)application didFinishLaunchingWithOptions:( NSDictionary *)launchOptions
{
  AVAudioSession *session = [AVAudioSession sharedInstance ];
  [session setCategory: AVAudioSessionCategoryPlayAndRecord
     mode: AVAudioSessionModeDefault
  options: AVAudioSessionCategoryOptionDefaultToSpeaker | AVAudioSessionCategoryOptionAllowAirPlay | AVAudioSessionCategoryOptionAllowBluetoothA2DP | AVAudioSessionCategoryOptionAllowBluetooth
    error: nil ];
  [session setActive: YES error: nil ];

// ... 이 예제 사용은 시스템 제공 ASR ( AndroidSpeechRecognizer 및 AppleSpeechRecognizer )을 사용합니다. 그러나 AndroidSpeechRecognizer 장치의 100%에서 사용할 수 없습니다. 앱이 스피치 인식이 내장되지 않은 장치를 지원하는 경우 profile 사용하여 스포크 profile 프로필로 프로파일을 설정하여 Spokestack ASR을 사용하십시오.
자세한 내용은 ASR 문서를 참조하십시오.
 // ...
  ext {
    // Minimum SDK is 21
    minSdkVersion = 21
// ...
  dependencies {
    // Minimium gradle is 3.0.1+
    // The latest React Native already has this
    classpath( " com.android.tools.build:gradle:3.5.3 " )
AndroidManifest.xml 에 필요한 권한을 추가하십시오. 첫 번째 허가는 종종 이미 있습니다. 두 번째는 마이크를 사용하는 데 필요합니다.
    <!-- For TTS -->
    < uses-permission android : name = " android.permission.INTERNET " />
    <!-- For wakeword and ASR -->
    < uses-permission android : name = " android.permission.RECORD_AUDIO " />
    <!-- For ensuring no downloads happen over cellular, unless forced -->
< uses-permission android : name = " android.permission.ACCESS_NETWORK_STATE " /> import SpokestackTray , { listen } from 'react-native-spokestack-tray'
// ...
export default function ConversationHandler ( { navigation } ) {
return (
< SpokestackTray
clientId = { process . env . SPOKESTACK_CLIENT_ID }
clientSecret = { process . env . SPOKESTACK_CLIENT_SECRET }
handleIntent = { ( intent , slots , utterance ) => {
switch ( intent ) {
// These cases would be for all
// the possible intents defined in your NLU.
case 'request.select' :
// As an example, search with some service
// with the given value from the NLU
const recipe = SearchService . find ( slots . recipe ?. value )
// An example of navigating to some scene to show
// data, a recipe in our example.
navigation . navigate ( 'Recipe' , { recipe } )
return {
node : 'info.recipe' ,
prompt : 'We found your recipe!'
}
default :
return {
node : 'welcome' ,
prompt : 'Let us help you find a recipe.'
}
}
} }
// The NLU models are downloaded and then cached
// when the app is first installed.
// See https://spokestack.io/docs/concepts/nlu
// for more info on NLU.
nlu = { {
nlu : 'https://somecdn/nlu.tflite' ,
vocab : 'https://somecdn/vocab.txt' ,
metadata : 'https://somecdn/metadata.json'
} }
/>
)
} 앱에 로컬로 모델 파일을 포함하려면 (CDN에서 다운로드하는 대신) 필요한 내선을 추가하여 파일을 Babel에 포함시킬 수 있도록해야합니다. 이렇게하려면 metro.config.js 편집하십시오.
 const defaults = require ( 'metro-config/src/defaults/defaults' )

module . exports = {
  resolver : {
    // json is already in the list
    assetExts : defaults . assetExts . concat ( [ 'tflite' , 'txt' , 'sjson' ] )
  }
}
그런 다음 소스 개체를 사용하여 모델 파일을 포함시킵니다.
 < SpokestackTray
  clientId = { process . env . SPOKESTACK_CLIENT_ID }
  clientSecret = { process . env . SPOKESTACK_CLIENT_SECRET }
  handleIntent = { handleIntent }
  wakeword = { {
    filter : require ( './filter.tflite' ) ,
    detect : require ( './detect.tflite' ) ,
    encode : require ( './encode.tflite' )
  } }
  nlu = { {
    model : require ( './nlu.tflite' ) ,
    vocab : require ( './vocab.txt' ) ,
    // Be sure not to use "json" here.
    // We use a different extension (.sjson) so that the file is not
    // immediately parsed as json and instead
    // passes a require source object to Spokestack.
    // The special extension is only necessary for local files.
    metadata : require ( './metadata.sjson' )
  } }
/>
이것은 필요하지 않습니다. 원격 URL을 동일한 구성 옵션으로 전달하면 처음 호출 initialize 때 파일이 다운로드 및 캐시됩니다.
리포지토리 및 개발 워크 플로에 기여하는 방법을 배우려면 기고 가이드를 참조하십시오.
<SpokestackTray /> 구성 요소 소품 • Optional 버튼 전체 : number (기본값 : 60 )
마이크 버튼의 너비 (및 높이)
src/spokestacktray.tsx : 132
• ClientId : string
Spokestack 계정에서 https://spokestack.io/account에서 생성 된 Spokestack 토큰. 무료로 계정을 만들고 토큰을 생성하십시오. 이것은 "ID"필드에서 나온 것입니다.
src/spokestacktray.tsx : 74
• clientsecret : string
Spokestack 계정에서 https://spokestack.io/account에서 생성 된 Spokestack 토큰. 무료로 계정을 만들고 토큰을 생성하십시오. 이것은 "비밀"필드에서 나온 것입니다.
src/spokestacktray.tsx : 81
• Optional 폐쇄 장치 : number (기본값 : 0 )
말을 한 후 트레이를 닫는 시간 (MS)
src/spokestacktray.tsx : 134
• Optional 디버그 : boolean
React-Native-Spokestack에서 디버그 메시지를 표시하십시오
src/spokestacktray.tsx : 136
• Optional 기간 : number (기본값 : 500 )
트레이 애니메이션의 기간 (MS)
src/spokestacktray.tsx : 138
• Optional 완화 : EasingFunction (기본값 : Easing.Bezier (0.77, 0.41, 0.2, 0.84) )
트레이 애니메이션의 완화 기능
src/spokestacktray.tsx : 140
• Optional exitnodes : string []
이 배열의 모든 노드는 대화를 종료하고 트레이를 닫아야합니다.
src/spokestacktray.tsx : 150
• Optional 글꼴 패밀리 : string
"청취 ...", "로드 ..."및 채팅 버블 텍스트에 사용하는 글꼴.
src/spokestacktray.tsx : 155
• Optional GradientColors : string [] (기본값 : [ "#61fae9", "#2f5bea"] ))
청취시 표시된 선형 그라디언트의 색상은 여러 가지 색상 일 수 있습니다 (권장 : 2-3)
src/spokestacktray.tsx : 160
• Optional 인사 : boolean (기본값 : 거짓 )
트레이가 열릴 때 환영 메시지로 사용자를 맞이할지 여부. 참고 : handleIntent "인사"의도에 응답해야합니다.
src/spokestacktray.tsx : 166
• Optional 선택 : boolean (기본값 : true )
트레이가 들리기 시작할 때마다 재생되는 햅틱을 비활성화하려면 이것을 false로 설정하십시오.
src/spokestacktray.tsx : 171
• Optional 키워드 : KeywordConfig
키워드 인식 구성
필터, 감지, 인코딩 및 메타 데이터 필드는 2 가지 유형의 값을 허용합니다.
require 또는 import 에 의해 검색된 소스 개체 (예 : model: require('./nlu.tflite') )키워드 인식에 대해 자세히 알아 보려면 https://www.spokestack.io/docs/concepts/keywords를 참조하십시오.
example
 // ...
keyword = { {
  detect : 'https://s.spokestack.io/u/UbMeX/detect.tflite' ,
  encode : 'https://s.spokestack.io/u/UbMeX/encode.tflite' ,
  filter : 'https://s.spokestack.io/u/UbMeX/filter.tflite' ,
  metadata : 'https://s.spokestack.io/u/UbMeX/metadata.json'
} }
미리 모델을 다운로드하여 로컬 파일에 포함시킬 수도 있습니다. 참고 : Metro.config.js를 변경해야합니다. 자세한 내용은 readme.md의 "앱 번들에 모델 파일 포함"을 참조하십시오.
 // ...
keyword = { {
  detect : require ( './detect.tflite' ) ,
  encode : require ( './encode.tflite' ) ,
  filter : require ( './filter.tflite' ) ,
  // IMPORTANT: a special extension is used for local metadata JSON files (`.sjson`) when using `require` or `import`
  // so the file is not parsed when included but instead imported as a source object. This makes it so the
  // file is read and parsed by the underlying native libraries instead.
  metadata : require ( './metadata.sjson' )
} }
키워드 구성은 또한 메타 데이터가 지정되지 않은 경우 클래스 필드를 허용합니다.
 // ...
keyword = { {
  detect : require ( './detect.tflite' ) ,
  encode : require ( './encode.tflite' ) ,
  filter : require ( './filter.tflite' ) ,
  classes : [ 'one' , 'two' , 'three]
} } src/spokestacktray.tsx : 221
• Optional MinHeight : number (기본값 : 170 )
트레이의 최소 높이
src/spokestacktray.tsx : 223
• NLU : NLUConfig
NLU Tensorflow Lite 모델 (.tflite), JSON 메타 데이터 및 NLU 어휘 (.txt)
3 개의 필드는 모두 2 가지 유형의 값을 허용합니다.
require 또는 import 에 의해 검색된 소스 개체 (예 : model: require('./nlu.tflite') )NLU에 대해 자세히 알아 보려면 https://spokestack.io/docs/concepts/nlu를 참조하십시오.
 // ...
nlu = { {
  model : 'https://somecdn.com/nlu.tflite' ,
  vocab : 'https://somecdn.com/vocab.txt' ,
  metadata : 'https://somecdn.com/metadata.json'
} }
로컬 파일을 전달할 수도 있습니다. 참고 : Metro.config.js를 변경해야합니다. 자세한 내용은 readme.md의 "앱 번들에 모델 파일 포함"을 참조하십시오.
 // ...
nlu = { {
  model : require ( './nlu.tflite' ) ,
  vocab : require ( './vocab.txt' ) ,
  // IMPORTANT: a special extension is used for local metadata JSON files (`.sjson`) when using `require` or `import`
  // so the file is not parsed when included but instead imported as a source object. This makes it so the
  // file is read and parsed by the underlying native libraries instead.
  metadata : require ( './metadata.sjson' )
} } src/spokestacktray.tsx : 130
• Optional 방향 : "left" | "right" (기본값 : "왼쪽" )
트레이 버튼은 화면 양쪽에 방향을 정할 수 있습니다.
src/spokestacktray.tsx : 235
• Optional 1 차 콜러 : string (기본값 : "#2f5bea" )
이 색상은 트레이를 테마로 사용하는 데 사용되며 마이크 버튼 및 음성 기포에 사용됩니다.
src/spokestacktray.tsx : 240
• Optional 프로필 : PipelineProfile
Spokestack 구성 프로파일은 React-Native-spokestack으로 전달됩니다. 버전 4.0.0에서 시작하여 React-Native-Spokestack에서 구입할 수 있습니다.
WakeWord 구성 파일이 지정되면 기본값은 TFLITE_WAKEWORD_NATIVE_ASR 입니다. 그렇지 않으면 기본값은 PTT_NATIVE_ASR 입니다.
 import SpokestackTray from 'react-native-spokestack-tray'
import { PipelineProfile } from 'react-native-spokestack'

// ...
< SpokestackTray
 profile = { PipelineProfile . TFLITE_WAKEWORD_SPOKESTACK_ASR }
// ... src/spokestacktray.tsx : 261
• Optional 새로 고침 모드 : boolean
드물게 사용하여 장치에서 Wakeword, 키워드 및 NLU 모델을 새로 고치십시오 (강제 덮어 쓰기). <SpokestackTray refreshModels={process.env.NODE_ENV !== 'production'} ... />
src/spokestacktray.tsx : 268
• Optional SayGreeting : boolean (기본값 : true )
인사말을 할 것인지 또는 소리가 켜져 있더라도 인사말 메시지와 함께 채팅 버블 만 표시할지 여부.
src/spokestacktray.tsx : 274
• Optional 사운드 오프 시마 : ReactNode (기본값 : (<image source = {soundoffimage} style = {{width : 30, 높이 : 30} />)) ))
반응 이미지 구성 요소를 전달하여 사운드 오프 이미지 교체
src/spokestacktray.tsx : 278
• Optional 사운드 니지 : ReactNode (기본값 : (<image source = {soundonimage} style = {{width : 30, 높이 : 30} />)) ).
반응 이미지 구성 요소를 전달하여 이미지의 사운드 교체
src/spokestacktray.tsx : 276
• Optional SpokestackConfig : Partial SpokestackConfig
rect-native-spokestack에서 spokestack.initialize () 함수로 직접 옵션을 전달합니다. 사용 가능한 옵션은 https://github.com/spokestack/react-native-spokestack을 참조하십시오.
src/spokestacktray.tsx : 285
• Optional 스타 theight : number (기본값 : 220 )
트레이의 시작 높이
src/spokestacktray.tsx : 287
• Optional 스타일 : false | RegisteredStyle ViewStyle | Value | AnimatedInterpolation | WithAnimatedObject ViewStyle | WithAnimatedArray < false | ViewStyle | RegisteredStyle ViewStyle | RecursiveArray < false | ViewStyle | RegisteredStyle < ViewStyle >> | readonly ( false | ViewStyle | RegisteredStyle ViewStyle ) []>
이 스타일의 소품은 트레이 용기에 전달됩니다
src/spokestacktray.tsx : 289
• Optional ttsformat : TTSFormat (기본값 : ttsformat.text )
텍스트의 형식은 spokestack.synthesize로 전달되었습니다
src/spokestacktray.tsx : 291
• Optional 음성 : string (기본값 : "데모-남성" )
Spokestack TTS에서 음성의 핵심은 Spokestack.synthesize로 전달되었습니다. 스포크 스택 메이커 계정을 사용하여 사용자 정의 음성을 만든 경우에만 변경 될 수 있습니다. https://spokestack.io/pricing#maker를 참조하십시오. 지정되지 않으면 Spokestack의 무료 "데모 남성"음성이 사용됩니다.
src/spokestacktray.tsx : 298
• Optional Wakeword : WakewordConfig
Wakeword의 NLU Tensorflow Lite 모델 (.tflite).
3 개의 필드는 모두 2 가지 유형의 값을 허용합니다.
require 또는 import 에 의해 검색된 소스 개체 (예 : model: require('./nlu.tflite') )Wakeword에 대해 자세히 알아 보려면 https://spokestack.io/docs/concepts/wakeword-models를 참조하십시오
Spokestack은 샘플 웨이크 워드 모델 파일 ( "Spokestack")을 제공합니다.
 // ...
wakeword = { {
  detect : 'https://s.spokestack.io/u/hgmYb/detect.tflite' ,
  encode : 'https://s.spokestack.io/u/hgmYb/encode.tflite' ,
  filter : 'https://s.spokestack.io/u/hgmYb/filter.tflite'
} }
이 모델을 미리 다운로드하여 로컬 파일에 포함시킬 수도 있습니다. 참고 : Metro.config.js를 변경해야합니다. 자세한 내용은 readme.md의 "앱 번들에 모델 파일 포함"을 참조하십시오.
 // ...
wakeword = { {
  detect : require ( './detect.tflite' ) ,
  encode : require ( './encode.tflite' ) ,
  filter : require ( './filter.tflite' )
} } src/spokestacktray.tsx : 332
▸ Optional EditTranscript ( transcript ) : string
분류 전과 사용자 응답 버블이 표시되기 전에 전 사체를 편집하십시오.
| 이름 | 유형 |
|---|---|
transcript | string |
string
src/spokestacktray.tsx : 145
▸ Handleintent ( intent , slots? , utterance? ) : [IntentResult](#IntentResult)
이 함수는 NLU의 의도를 취하고 고유 한 대화 노드 이름 (정의)과 TTS에서 처리 할 프롬프트가있는 객체를 반환합니다.
참고 : 사운드가 꺼진 경우 프롬프트가 채팅 버블에만 표시됩니다.
| 이름 | 유형 |
|---|---|
intent | string |
slots? | SpokestackNLUSlots |
utterance? | string |
[IntentResult](#IntentResult)
src/spokestacktray.tsx : 91
▸ Optional ONCLOSE () : void
트레이가 닫힐 때마다 호출됩니다
void
src/spokestacktray.tsx : 227
OnError ( e ) Optional : void
Spokestack의 오류가있을 때마다 호출됩니다
| 이름 | 유형 |
|---|---|
e | SpokestackErrorEvent |
void
src/spokestacktray.tsx : 229
ONOPEN () : void Optional
트레이가 열릴 때마다 호출됩니다
void
src/spokestacktray.tsx : 231
• Optional 데이터 : any
추가하려는 다른 데이터
src/spokestacktray.tsx : 64
• Optional Nointerrupt : boolean
프롬프트 재생 중에 Wakeword 인식기를 중지하도록 true 로 설정하십시오.
src/spokestacktray.tsx : 62
• 노드 : string
사용자가 대화중인 위치를 나타내는 사용자 정의 키는 프롬프트를 말한 후 Spokestack이 다시 듣지 않아야하는 경우 exitNodes Prop에 이것을 포함합니다.
src/spokestacktray.tsx : 55
• 프롬프트 : string
트레이가 조용한 모드에 있지 않으면 음성으로 처리됩니다.
src/spokestacktray.tsx : 57
<SpokestackTray /> 구성 요소 메소드이 방법은 SPOKESTACKTRAY 구성 요소에서 사용할 수 있습니다. 이러한 방법에 액세스하려면 React Ref를 사용하십시오.
 const spokestackTray = useRef ( null )

  // ...
  < SpokestackTray ref = { spokestackTray }

// ...
spokestackTray . current . say ( 'Here is something for Spokestack to say' )
참고 : 대부분의 경우 open 대신 listen 호출해야합니다.
▸ Open () : void
트레이를 열고 인사하고 (해당되는 경우) 듣습니다
void
src/spokestacktray.tsx : 743
close () : void
트레이를 닫고 듣기를 중지하고 Wakeword를 다시 시작하십시오
void
src/spokestacktray.tsx : 754
say ( input ) : Promise void
입력을 Spokestack.synthesize ()로 전달하고 오디오를 재생하며 음성 버블을 추가합니다.
| 이름 | 유형 |
|---|---|
input | string |
Promise void
src/spokestacktray.tsx : 766
addbubble ( bubble ) : void
채팅 인터페이스에 버블 (시스템 또는 사용자) 추가
| 이름 | 유형 |
|---|---|
bubble | Bubble |
void
src/spokestacktray.tsx : 799
• 섬 : boolean
SRC/구성 요소/SpeechBubbles.tsx : 9
• 텍스트 : string
SRC/구성 요소/SpeechBubbles.tsx : 8
▸ 토글 리 텐트 () : Promise boolean
무음 모드를 전환합니다
Promise < boolean >
src/spokestacktray.tsx : 816
▸ issilent () : boolean
트레이가 조용한 모드인지 여부를 반환합니다
boolean
src/spokestacktray.tsx : 828
이러한 기능은 React-Native-Spokestack-Tray의 수출로 제공됩니다
▸ 듣기 () : Promise void
스포크 스택 스피치 파이프 라인에 청취를 시작하도록 지시합니다. 또한 필요한 경우들을 수있는 권한을 요청합니다. 아직 시작되지 않은 경우 활성화하기 전에 파이프 라인을 시작하려고 시도합니다. 이 기능은 앱이 백그라운드에 있으면 아무것도하지 않습니다.
 import { listen } from 'react-native-spokestack-tray'
try {
  await listen()
} catch (error) {
  console.error(error)
}
Promise void
SRC/SPOKESTACK.TS : 21
stoplistening () : Promise void
Promise void
SRC/SPOKESTACK.TS : 30
Const islistening () : Promise < boolean >
Spokestack이 현재 듣고 있는지 여부를 반환합니다
console . log ( `isListening: ${ await isListening ( ) } ` ) Promise < boolean >
src/index.ts : 19
Const isinitialized () : Promise boolean
스포크 스택이 초기화되었는지 여부를 반환합니다
console . log ( `isInitialized: ${ await isInitialized ( ) } ` ) Promise < boolean >
src/index.ts : 27
Const isstarted () : Promise boolean
음성 파이프 라인이 시작되었는지 여부를 반환합니다
console . log ( `isStarted: ${ await isStarted ( ) } ` ) Promise < boolean >
src/index.ts : 35
Const AddeventListener ( eventType , listener , context? ) : EmitterSubscription
기본 라이브러리가 방출 한 모든 이벤트에 바인딩 이벤트는 "인식", "partial_recognize", "error", "activate", "deactivate"및 "timeout"입니다. 이벤트에 대한 설명은 readme.md의 맨 아래를 참조하십시오.
 useEffect ( ( ) => {
  const listener = addEventListener ( 'recognize' , onRecognize )
  // Unsubscribe by calling remove when components are unmounted
  return ( ) => {
    listener . remove ( )
  }
} , [ ] ) | 이름 | 유형 |
|---|---|
eventType | string |
listener | ( event : any ) => void |
context? | Object |
EmitterSubscription
src/index.ts : 51
Const removeEventListener ( eventType , listener ) : void
이벤트 리스너를 제거하십시오
removeEventListener ( 'recognize' , onRecognize ) | 이름 | 유형 |
|---|---|
eventType | string |
listener | (... args : any []) => any |
void
src/index.ts : 59
Const removealllisteners () : void
기존 청취자를 제거하십시오
 componentWillUnmount ( ) {
  removeAllListeners ( )
} void
src/index.ts : 69
addEventListener() , removeEventListener() 및 removeAllListeners() 사용하여 이벤트 핸들러를 추가하고 제거하십시오. 모든 이벤트는 iOS 및 Android에서 사용할 수 있습니다.
| 이름 | 데이터 | 설명 |
|---|---|---|
| 인정하다 | { transcript: string } | 음성 인식이 성공적으로 완료 될 때마다 발사되었습니다. |
| partial_recognize | { transcript: string } | 음성 인식 중에 성적표가 변경 될 때마다 발사됩니다. |
| 시작 | null | 음성 파이프 라인이 시작될 때 해고되었습니다 (Wakeword를 듣기 시작하거나 VAD가 시작됩니다). |
| 멈추다 | null | 음성 파이프 라인이 멈출 때 발사되었습니다. |
| 활성화 | null | 음성 파이프 라인이 VAD, Wakeword를 통해 또는 .activate() 호출 할 때 활성화 될 때 발사되었습니다. |
| 비활성화 | null | 음성 파이프 라인이 비활성화 될 때 발사되었습니다. |
| 놀다 | { playing: boolean } | TTS 재생이 시작되고 멈출 때 발사되었습니다. speak() 함수를 참조하십시오. |
| 시간 초과 | null | 인식 부족으로 인해 활성 파이프 라인이 시간이 흐르면 발사되었습니다. |
| 추적하다 | { message: string } | 추적 메시지를 위해 해고되었습니다. Verbosity는 traceLevel 옵션에 의해 결정됩니다. |
| 오류 | { error: string } | Spokestack에 오류가 발생하면 해고되었습니다. |
오류 이벤트가 트리거되면 기존 약속이 거부됩니다.
이 유틸리티 기능은 Spokestack에서 iOS 및 Android 및 iOS의 음성 인식 권한을 확인하는 데 사용됩니다.
▸ checkSpeech () : Promise < boolean >
이 기능은 사용자가 음성에 필요한 권한을 부여했는지 확인하는 데 사용될 수 있습니다. iOS에는 여기에는 마이크와 음성 재생이 모두 포함됩니다. 안드로이드에서는 마이크 만 필요합니다.
 import { checkSpeech } from 'react-native-spokestack-tray'

// ...

const hasPermission = await checkSpeech ( ) Promise < boolean >
src/utils/contrions.ts : 78
▸ requestSpeech () : Promise boolean
이 기능은 실제로 음성에 필요한 권한을 요청하는 데 사용될 수 있습니다. iOS에는 여기에는 마이크와 음성 재생이 모두 포함됩니다. 안드로이드에서는 마이크 만 필요합니다.
참고 : iOS에서 과거에 사용자가 거절 한 경우 사용자는 설정으로 전송되어야합니다.
 import { requestSpeech } from 'react-native-spokestack-tray'

// ...

const hasPermission = await requestSpeech ( ) Promise < boolean >
src/utils/contrions.ts : 106
MIT


