ask_chatgpt
0.5.0

AI驱动的助手宝石就在您的栏杆控制台中。
新更新:使用麦克风的语音输入,演示:https://youtu.be/ubr0wnqvkao
一种利用AI的力量使您的开发体验更有效和愉快的宝石。使用此宝石,您可以简化编码过程,轻松地重构并改进代码,甚至可以随时生成测试。 +请参见下面的更多示例。
前往Rails Console并运行:
  gpt . ask ( "how to get max age of user with projects from Ukraine" ) . with_model ( User , Project , Country )
  gpt . ask ( "convert json to xml" )
  gpt . with_code ( "User.get_report" , Project ) . ask "make it better" # with_class alias for with_code
  gpt . with_class ( User ) . ask "make it better"
  gpt . payload ( json ) . ask ( "extract emails from json" )
  gpt . refactor ( "User.get_report" )
  gpt . improve ( "User.get_report" )
  gpt . rspec_test ( User )
  gpt . unit_test ( User )
  gpt . code_review ( User . method ( :get_report ) )
  gpt . find_bug ( 'User#full_name' )
  gpt . explain ( User )
  gpt . improve %Q{
    def full_name
      [first_name, last_name].join
    end
  }
  #
  # --- NEW ---
  #
  gpt . speak # or with alias gpt.s
或使用CLI工具:
 > ask_chatgpt -q " 134*1245 "
166830

> ask_chatgpt base64 this string " hello world "
aGVsbG8gd29ybGQ=

> ask_chatgpt decode base64 this string " aGVsbG8gd29ybGQ= "
hello world
ask_chatgpt -s 1#使用CLI开始语音输入
请参阅下面的一些示例。您还可以在此处使用几行代码创建自己的提示。
您也可以使用CLI工具,如何使用它。
典型的用例如何使用此插件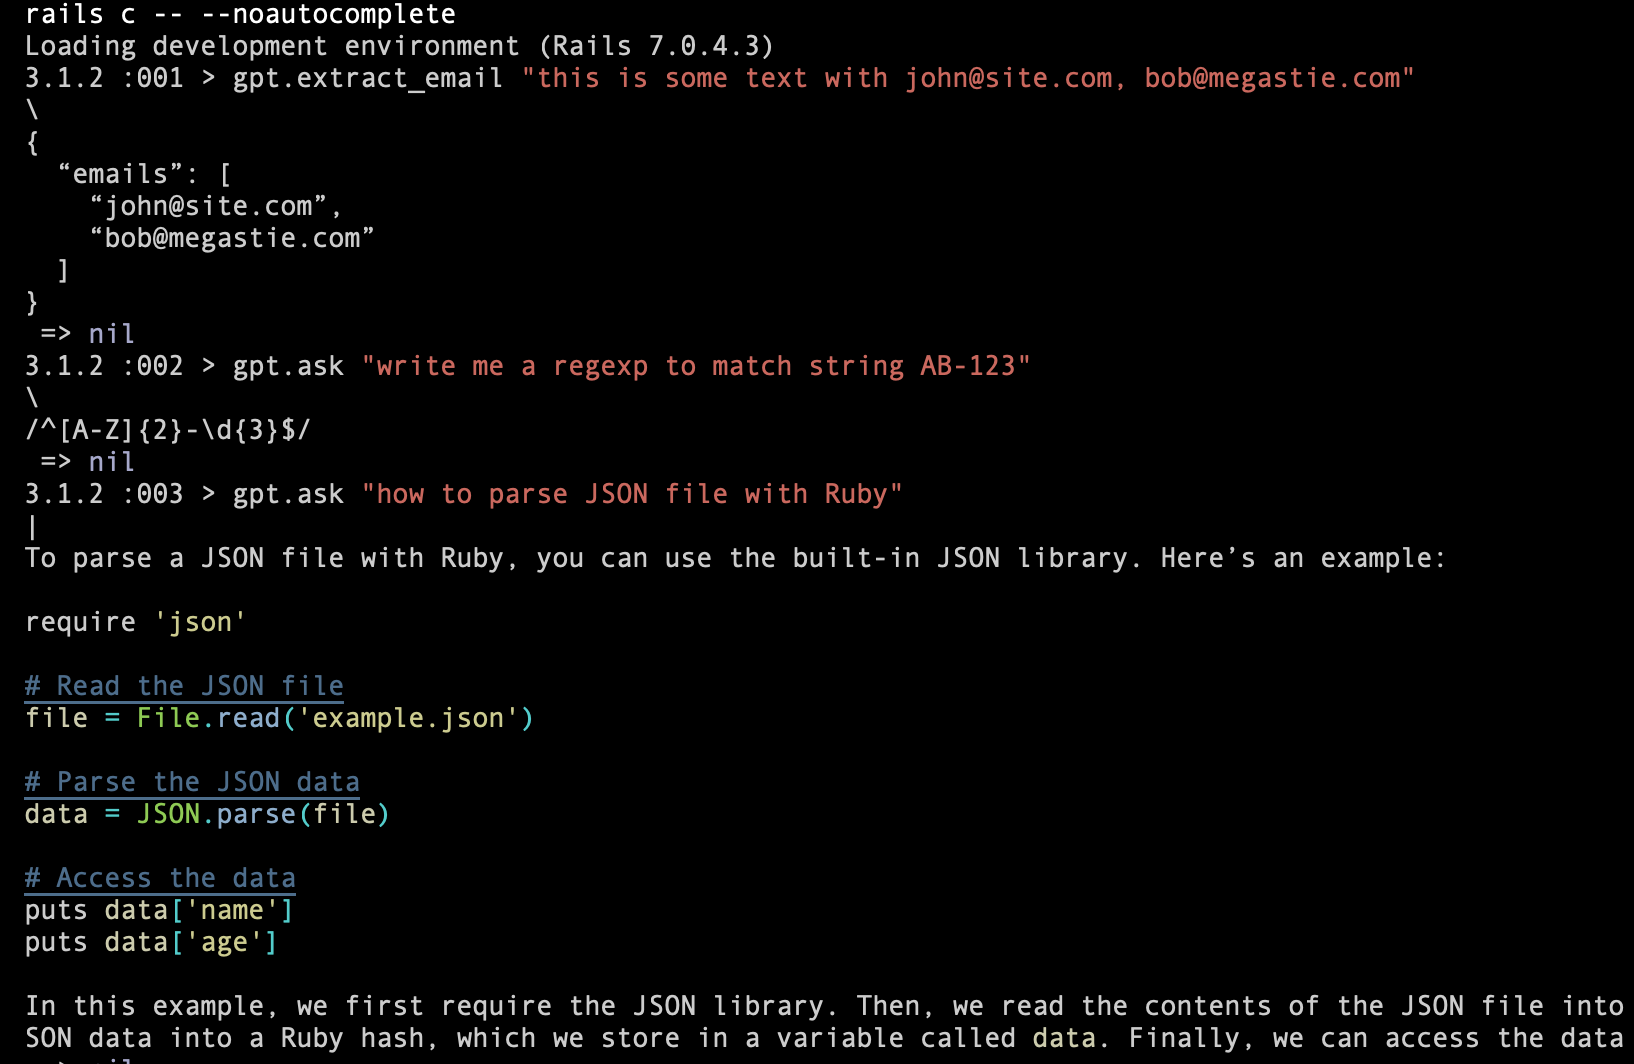
询问代码想法: 
您需要帮助来编写RSPEC测试吗? 
那单位测试呢? 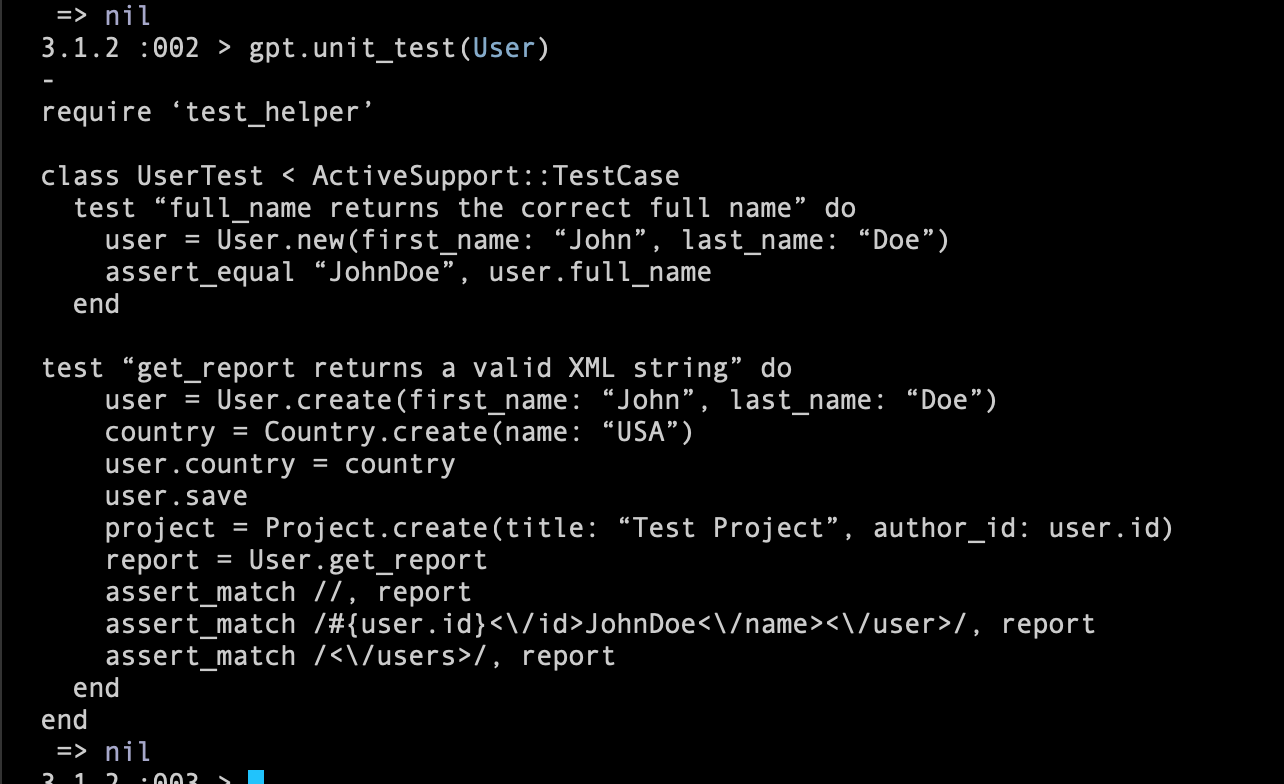
要求ChatGpt改进您的代码: 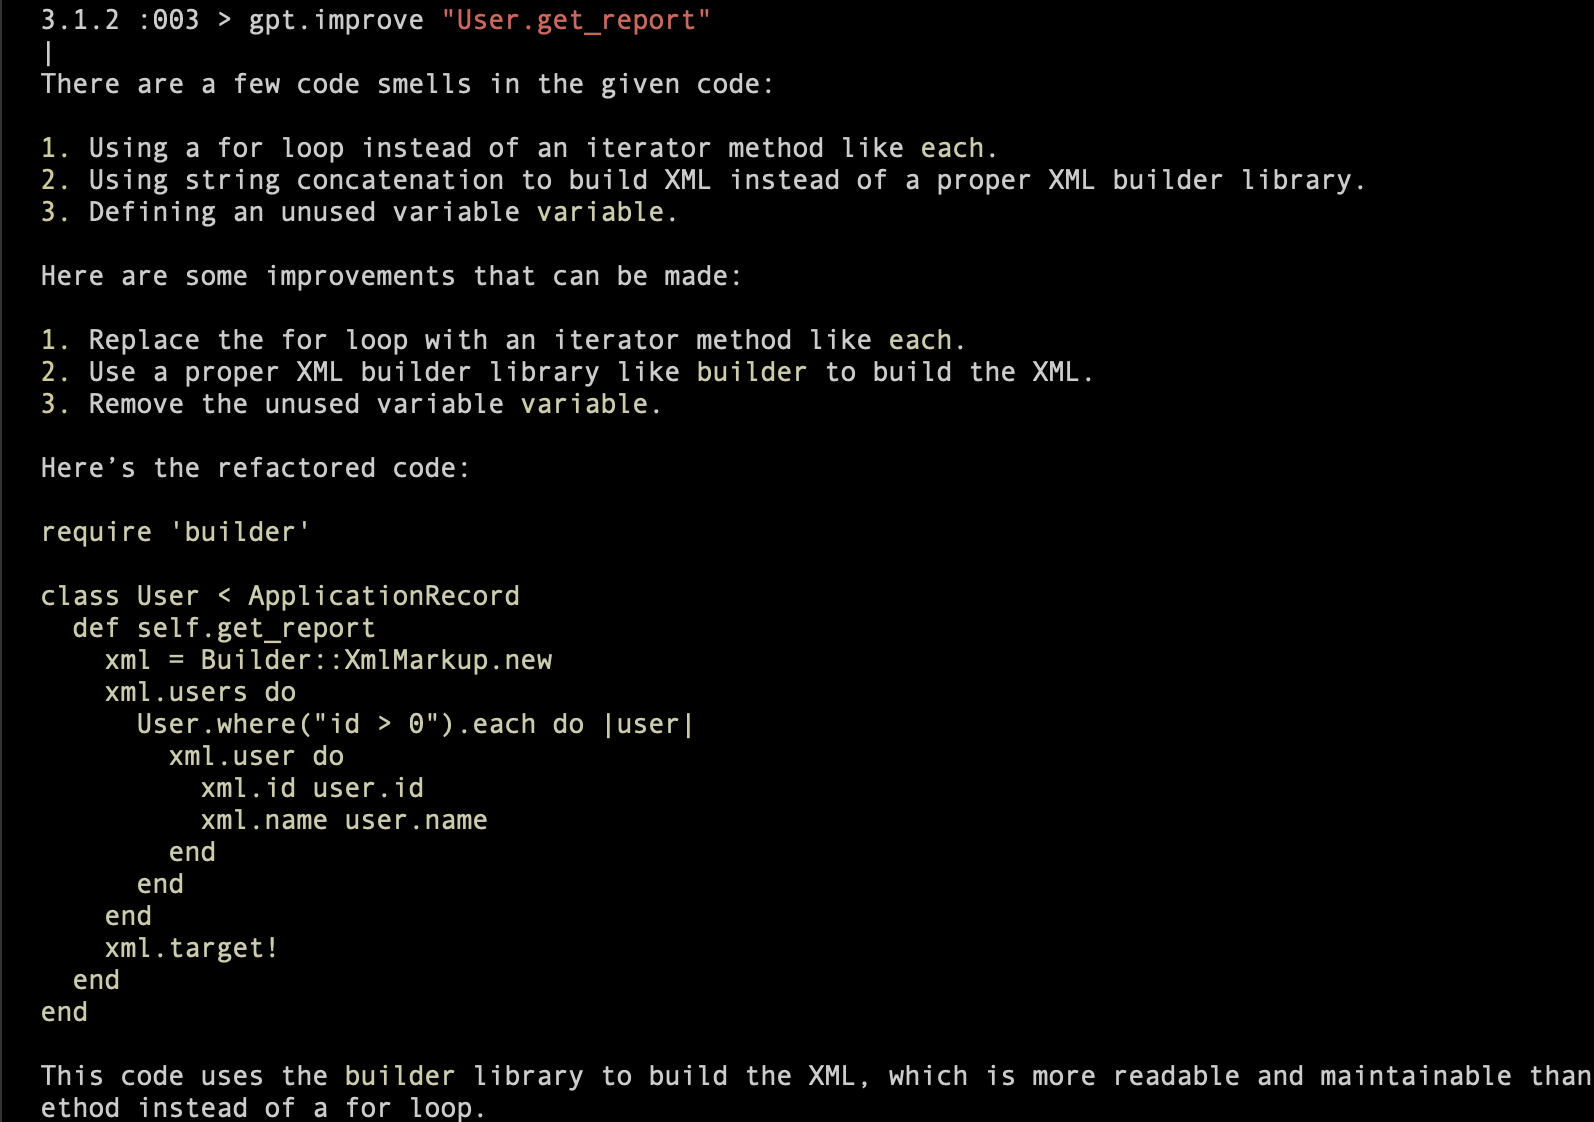
要求chatgpt解析你的json: 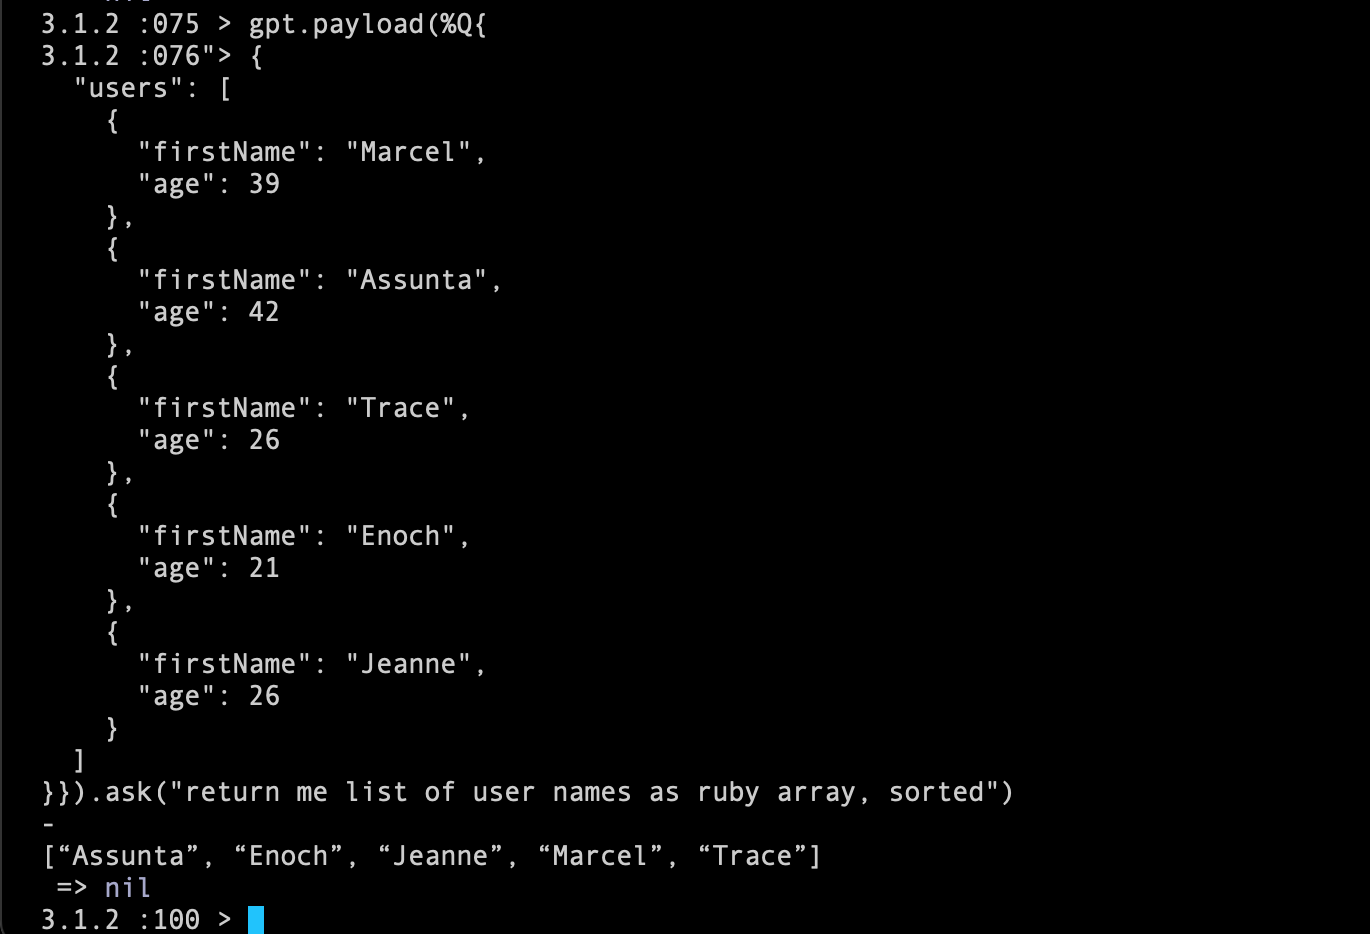
否则可以在base64中编码您的字符串: 
为您的模型创建I18N YAML(自定义提示): 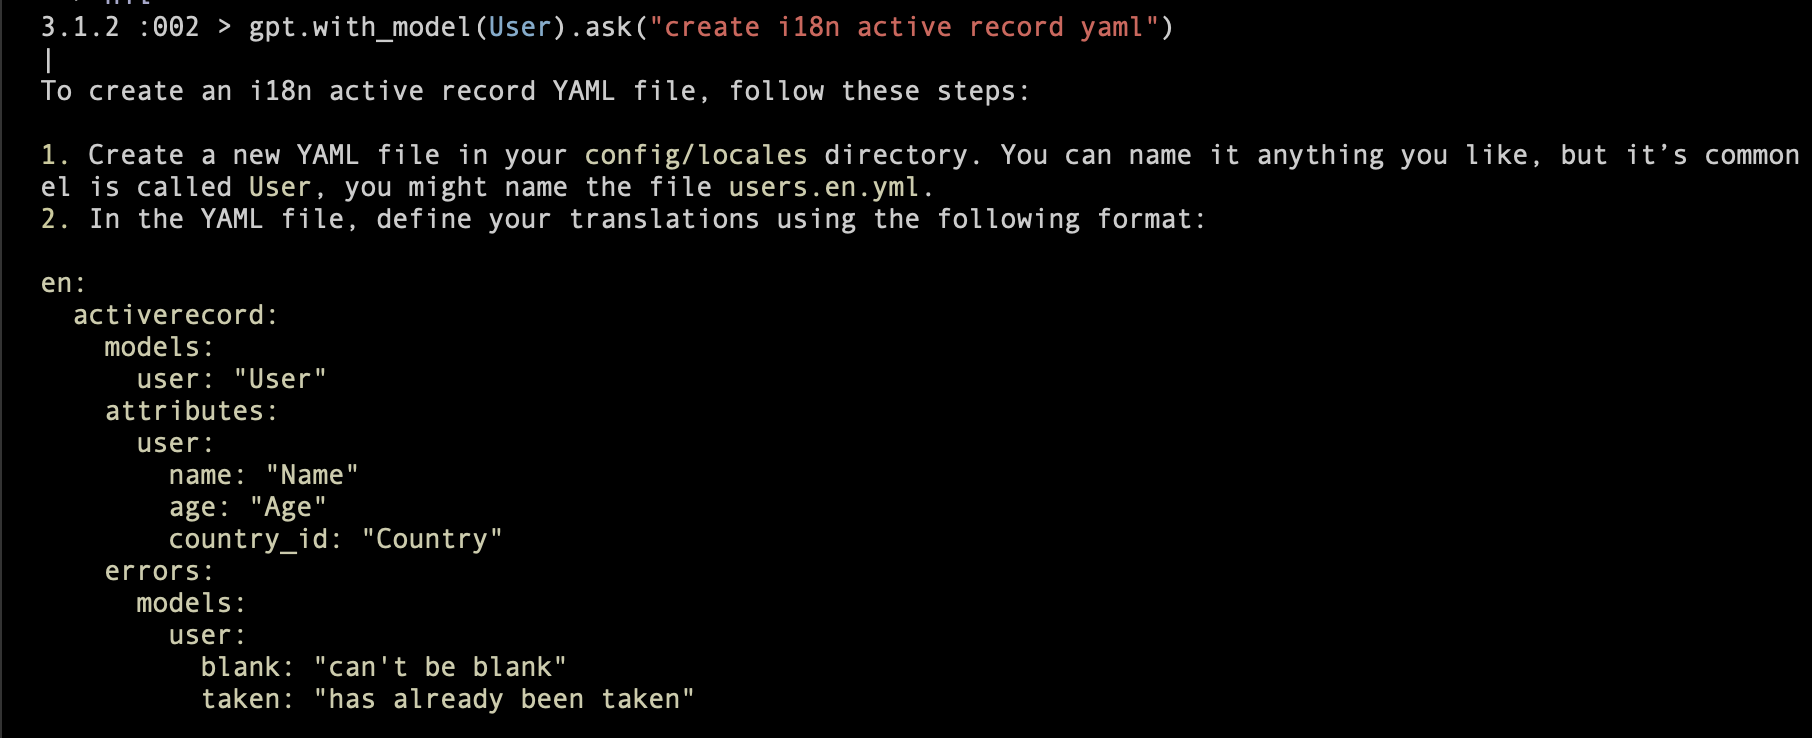
将此行添加到您的应用程序的gemfile:
gem "ask_chatgpt"然后执行:
$ bundle或自行安装:
$ gem install ask_chatgpt运行rails g ask_chatgpt initializer 。
您可以编辑:
  AskChatGPT . setup do | config |
    # config.access_token    = ENV["OPENAI_API_KEY"]

    # async mode will use OpenAI streamming feature and will return results as they come
    # config.mode             = :async # or :sync
    # config.markdown         = true # try to output nicely Markdown response
    # config.debug            = false
    # config.model            = "gpt-3.5-turbo"
    # config.temperature      = 0.1
    # config.max_tokens       = 3000 # or nil by default
    # config.included_prompts = []

    # enable voice input with `gpt.speak` or `gpt.s`. Note, you also need to configure `audio_device_id`
    # config.voice_enabled = true

    # to get audio device ID (index in the input devices)
    # install ffmpeg, and execute from the console
    # `ffmpeg -f avfoundation -list_devices true -i ""`
    # config.audio_device_id = 1

    # after "voice_max_duration" seconds it will send audio to Open AI
    # config.voice_max_duration = 10 # 10 seconds

    # Examples of custom prompts:
    # you can use them `gpt.extract_email("some string")`

    # config.register_prompt :extract_email do |arg|
    #   "Extract email from: #{arg} as JSON"
    # end

    # config.register_prompt :extract_constants do |arg|
    #   "Extract constants from class: #{AskChatGPT::Helpers.extract_source(arg)}"
    # end

    # config.register_prompt :i18n do |code|
    #   "Use I18n in this code:n#{AskChatGPT::Helpers.extract_source(code)}"
    # end
  end
注意:您需要设置API密钥https://platform.openai.com/account/api-keys。您可以将其存储在.env或.bash_profile中。
nano ~/.bash_profile的示例:
export OPENAI_API_KEY=key
但是,请确保不会致力于GitHub。是必须是私人的。
您可以定义自己的提示,并使用.register_prompt使用它们。例如:
  config . register_prompt :extract_email do | arg |
    "Extract email from: #{ arg } as JSON"
end稍后,您可以使用gpt.extract_email("some text with [email protected], [email protected]") 。如果您认为您的自定义提示会很有用 - 为此宝石创建PR。
如果要获得源代码,请使用此助手AskChatGPT::Helpers.extract_source(str) 。
您可以通过:
  AskChatGPT :: Helpers . extract_source ( 'User.some_class_method' )
  AskChatGPT :: Helpers . extract_source ( 'User#instance_method' )
  AskChatGPT :: Helpers . extract_source ( 'User' )
  AskChatGPT :: Helpers . extract_source ( User )
  AskChatGPT :: Helpers . extract_source ( "a = b" )
默认情况下,当您在Rails App中使用默认一个提示时( .included_prompts ),该提示正在发送Ruby/Rails版本,以及数据库适配器的名称。
您可以启用调试模式,以两种方式查看OpenAI的请求/响应:
 AskChatGPT . setup do | config |
  config . debug = false
end

# or

# gpt.on!(:debug)
# gpt.off!(:debug)或直接在控制台gpt.debug! (并完成gpt.debug!(:off) )
演示:https://youtu.be/ubr0wnqvkao
现在,我认为这是一个实验性和有趣的功能。期待看到您的反馈。
使用命令: gpt.speak或gpt.s (别名)。
此命令立即开始录制,它将在voice_max_duration秒后停止,或者按下任何键。
退出记录模式按Q
语音使用ffmpeg工具,因此您需要安装它。这样的一些指令将起作用:https://www.hostinger.com/tutorials/how-to-now-to-install-ffmpeg。
另外,您需要配置audio_device_id 。运行ffmpeg -f avfoundation -list_devices true -i ""
它将为您提供所有设备的列表,例如:
 ffmpeg - f avfoundation -list_devices true -i ""
ffmpeg version 6 . 0 Copyright (c) 2000-2023 the FFmpeg developers
  built with Apple clang version 14 . 0 . 0 (clang -1400 . 0 . 29 . 202 )
  configuration: --prefix=/usr/local/Cellar/ffmpeg/ 6 . 0 --enable-shared --enable-pthreads --enable-version3 --cc=clang --host-cflags= --host-ldflags= --enable-ffplay --enable-gnutls --enable-gpl --enable-libaom --enable-libaribb24 --enable-libbluray --enable-libdav1d --enable-libmp3lame --enable-libopus --enable-librav1e --enable-librist --enable-librubberband --enable-libsnappy --enable-libsrt --enable-libsvtav1 --enable-libtesseract --enable-libtheora --enable-libvidstab --enable-libvmaf --enable-libvorbis --enable-libvpx --enable-libwebp --enable-libx264 --enable-libx265 --enable-libxml2 --enable-libxvid --enable-lzma --enable-libfontconfig --enable-libfreetype --enable-frei0r --enable-libass --enable-libopencore-amrnb --enable-libopencore-amrwb --enable-libopenjpeg --enable-libspeex --enable-libsoxr --enable-libzmq --enable-libzimg --disable-libjack --disable-indev=jack --enable-videotoolbox
  libavutil      58 .  2 . 100 / 58 .  2 . 100
  libavcodec     60 .  3 . 100 / 60 .  3 . 100
  libavformat    60 .  3 . 100 / 60 .  3 . 100
  libavdevice    60 .  1 . 100 / 60 .  1 . 100
  libavfilter     9 .  3 . 100 /  9 .  3 . 100
  libswscale      7 .  1 . 100 /  7 .  1 . 100
  libswresample   4 . 10 . 100 /  4 . 10 . 100
  libpostproc    57 .  1 . 100 / 57 .  1 . 100
[AVFoundation indev @ 0x7f7fd1a04380] AVFoundation video devices:
[AVFoundation indev @ 0x7f7fd1a04380] [ 0 ] FaceTime HD Camera
[AVFoundation indev @ 0x7f7fd1a04380] [ 1 ] USB Camera VID: 1133 PID: 2085
[AVFoundation indev @ 0x7f7fd1a04380] [ 2 ] Capture screen 0
[AVFoundation indev @ 0x7f7fd1a04380] [ 3 ] Capture screen 1
[AVFoundation indev @ 0x7f7fd1a04380] AVFoundation audio devices:
[AVFoundation indev @ 0x7f7fd1a04380] [ 0 ] Microsoft Teams Audio
[AVFoundation indev @ 0x7f7fd1a04380] [ 1 ] Built-in Microphone
[AVFoundation indev @ 0x7f7fd1a04380] [ 2 ] Unknown USB Audio Device
: Input/output error
就我而言,我使用了“ 1”,因为它是Built-in Microphone 。
您可以从CLI中提出问题,甚至可以开始语音输入。
示例1: 
示例2: 
如何使用:
  ask_chatgpt -q "How to parse JSON file in Ruby?"
  ask_chatgpt -t 0.7 -q "How to parse JSON file in Ruby?"
  ask_chatgpt -f app/models/user.rb -q "find a bug in this Rails model"
  ask_chatgpt -f app/models/user.rb -q "create RSpec spec for this model"
  ask_chatgpt -f test/dummy/Gemfile -q "sort Ruby gems alphabetically"
  ask_chatgpt -m 3.5 -q "How to parse JSON file in Ruby?"
  ask_chatgpt -m 4 -q "Why Ruby is the best language?"
例如,您还可以创建一个别名“ A”或“ Q”:
编辑文件: nano ~/.bash_profile
 alias a= ' ask_chatgpt '
alias q= ' ask_chatgpt '现在,您可以使用q "how to unzip file with Ruby"
从控制台控制模式。或者,从初始化器中,使用config.mode = :async (或同步)。
  gpt . async!
gpt . sync! 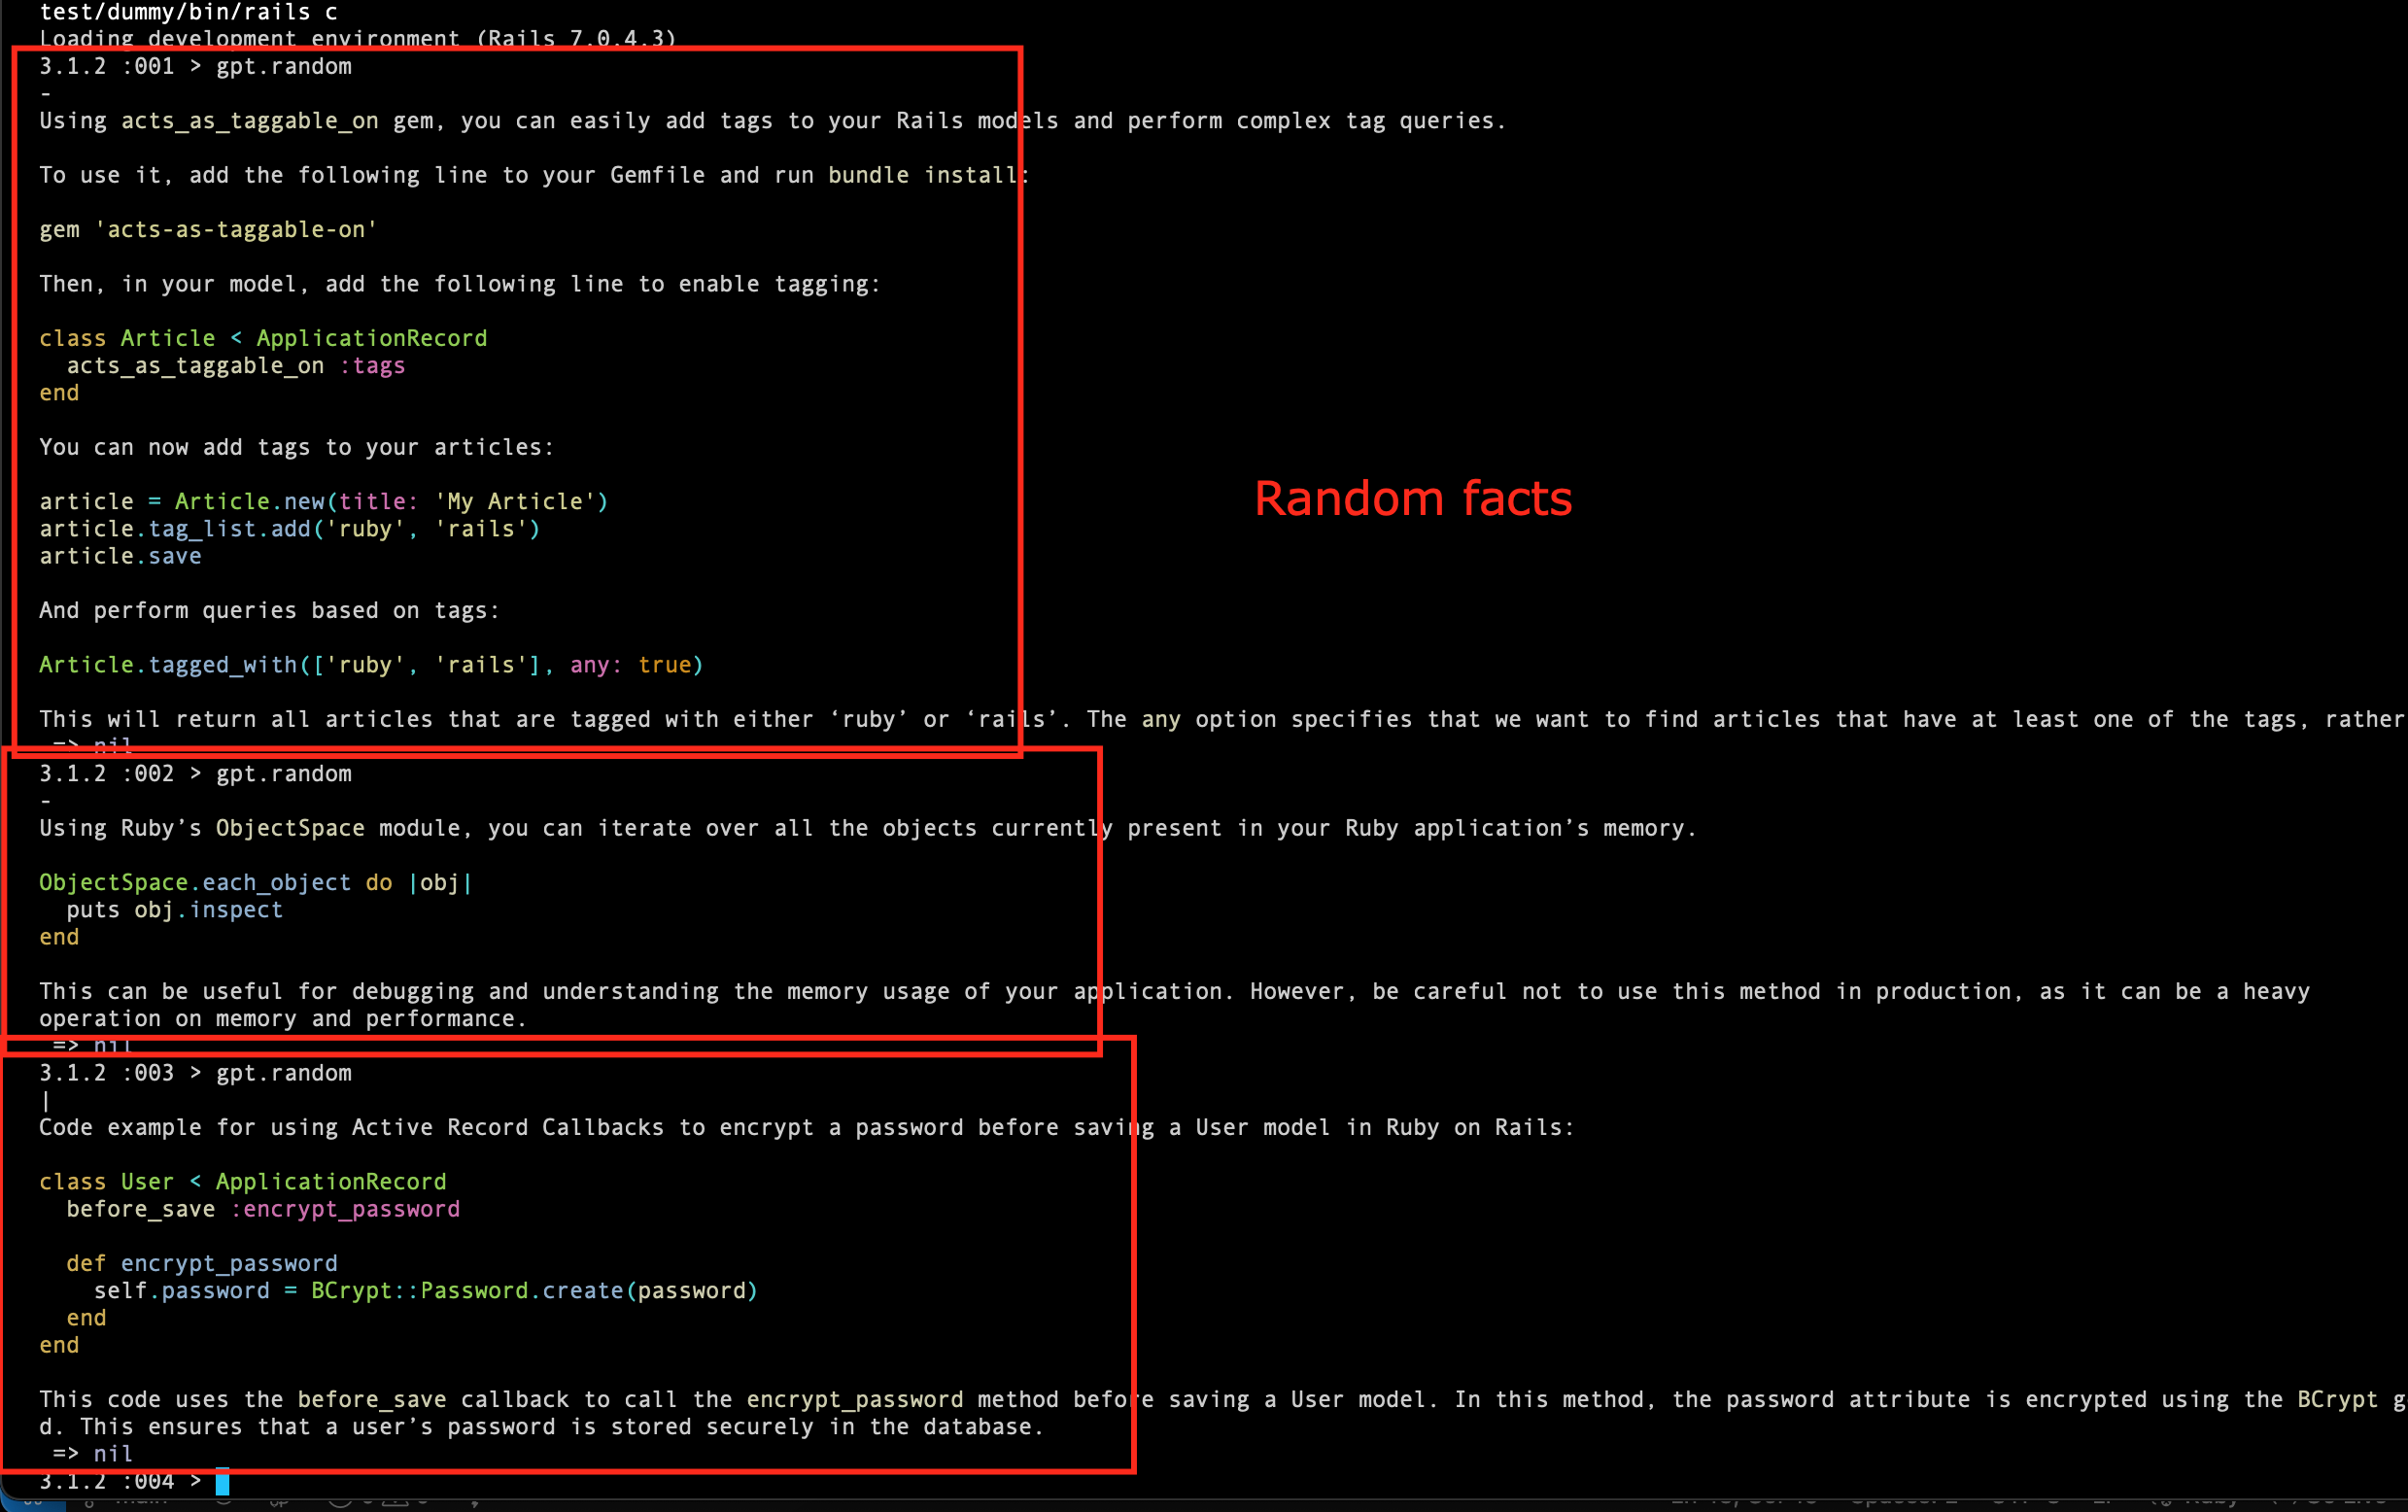
以随机的事实和有用的提示使自己感到惊讶。要使用只需致电gpt.random (或gpt.tip , gpt.random_tip )即可。
默认情况下,它使用Ruby/Rails主题(请参阅RandomTip类)。
但是您也可以使用其他主题,例如:
  gpt . tip
  gpt . tip ( "active record" )
  gpt . tip ( "sidekiq" )
gpt . tip ( "security" ) 尝试将Markdown的响应格式化,然后在控制台中很好地打印出来。
 AskChatGPT . setup do | config |
  config . markdown = true
end

# or

# gpt.on!(:markdown)
# gpt.off!(:markdown) with_controller , with_class ,....with_usagegptgpt.with_payload(json).speak我们欢迎您提出新提示或调整现有提示!
要开始克隆这个仓库。运行捆绑包,然后转到cd test/dummy/ 。启动rails c并测试您的提示。
根据MIT许可证的条款,该宝石可作为开源。


