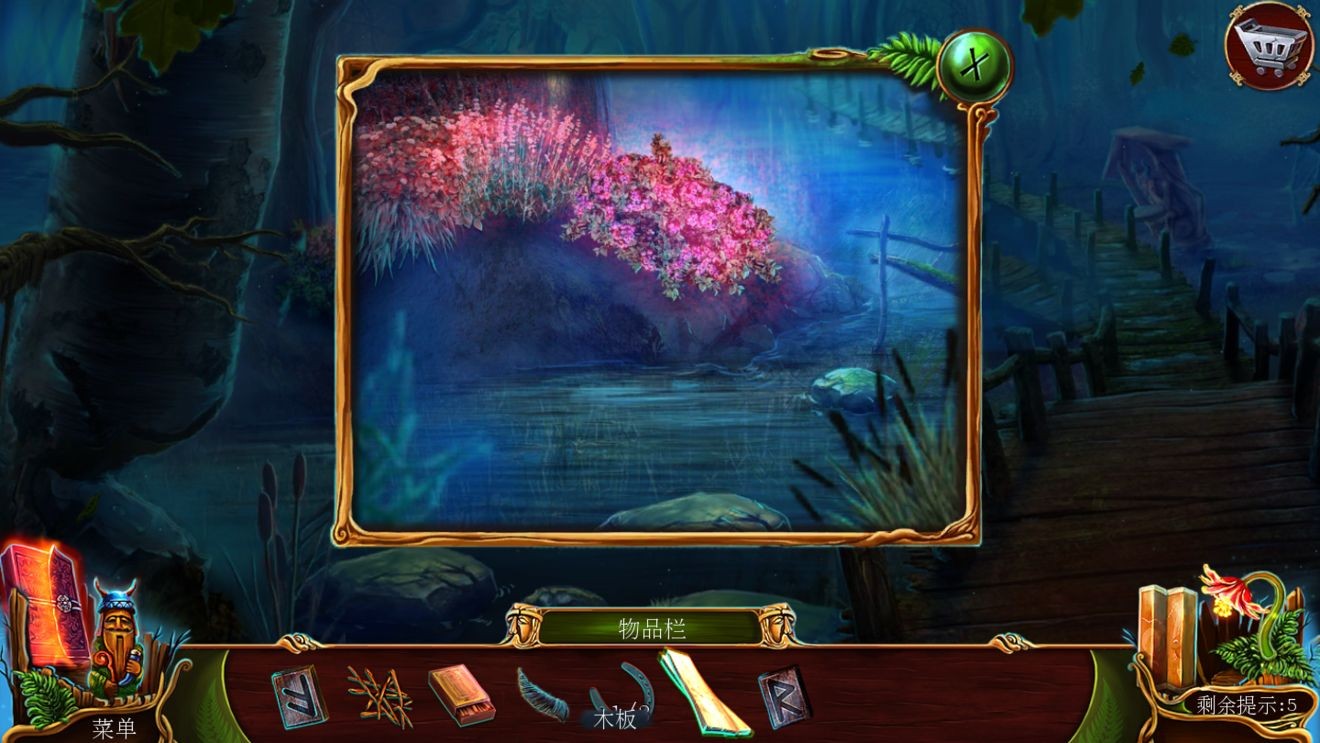
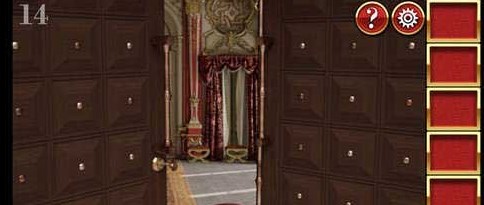
How to clear the Holy Grail of Temple Ruins in Escape Room 16? "Escape Room 16: Temple Ruins" is the 16th part of the escape room series. After escaping from the temple in the previous part, we came to a mysterious palace again in this part. What magical things are left in it? If you don’t know, then follow the editor to learn about the complete chapter clearance strategy of "Escape Room 16 Temple Ruins".

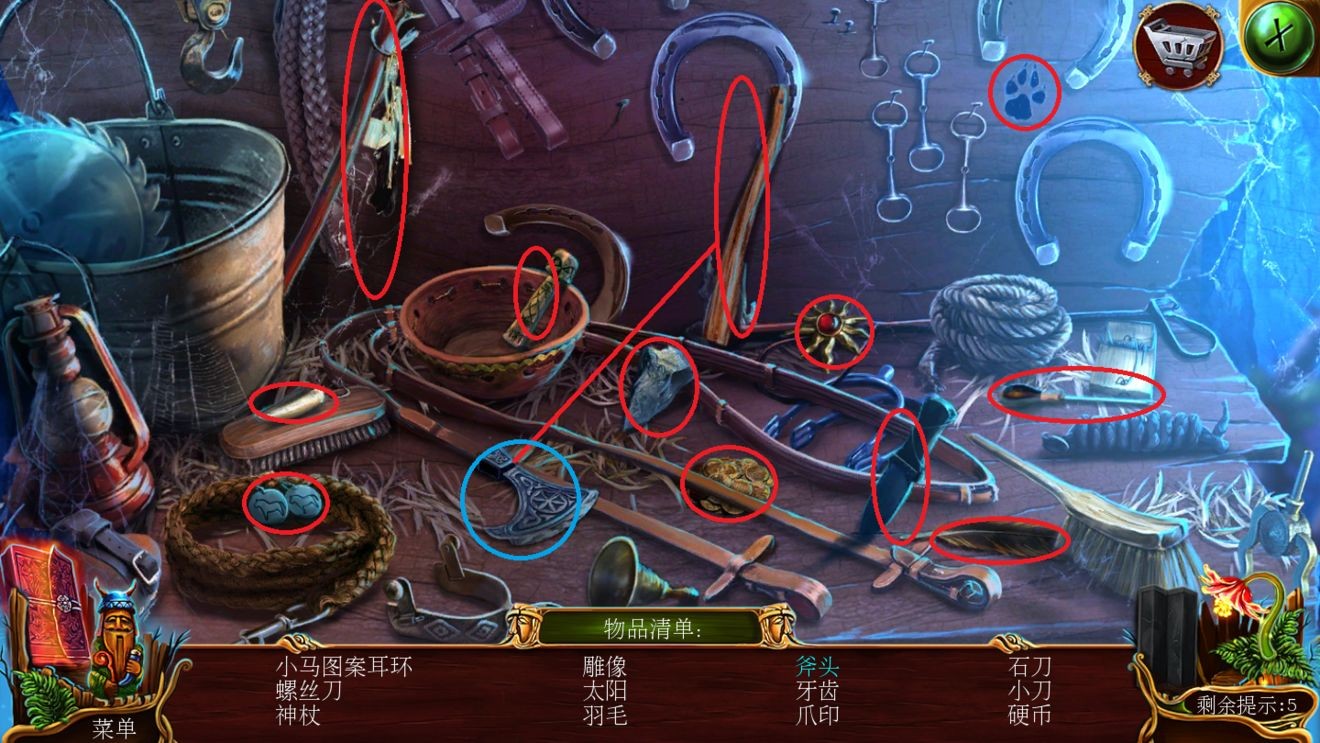
Take the bracelet and nail file from the shoulder bag on the right. The first one also has a tutorial for you to go through quickly.

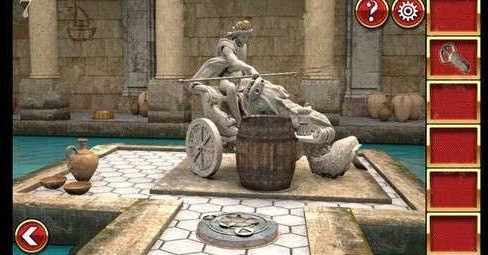
Click on the passenger car and use a nail file to open the panel lock to get the key.

Lift up the clothes on the left side and use the key to unlock, open the box and click to open it, and you will enter the blind object-finding stage.

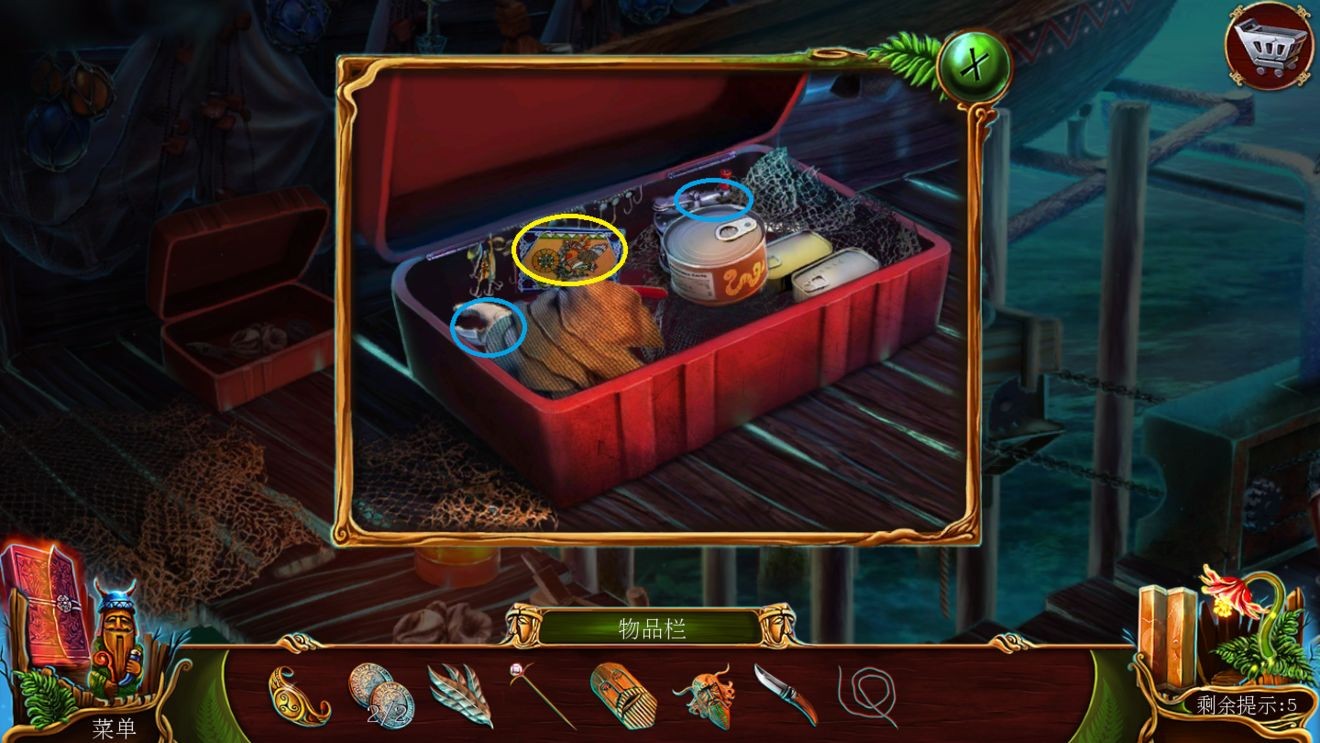
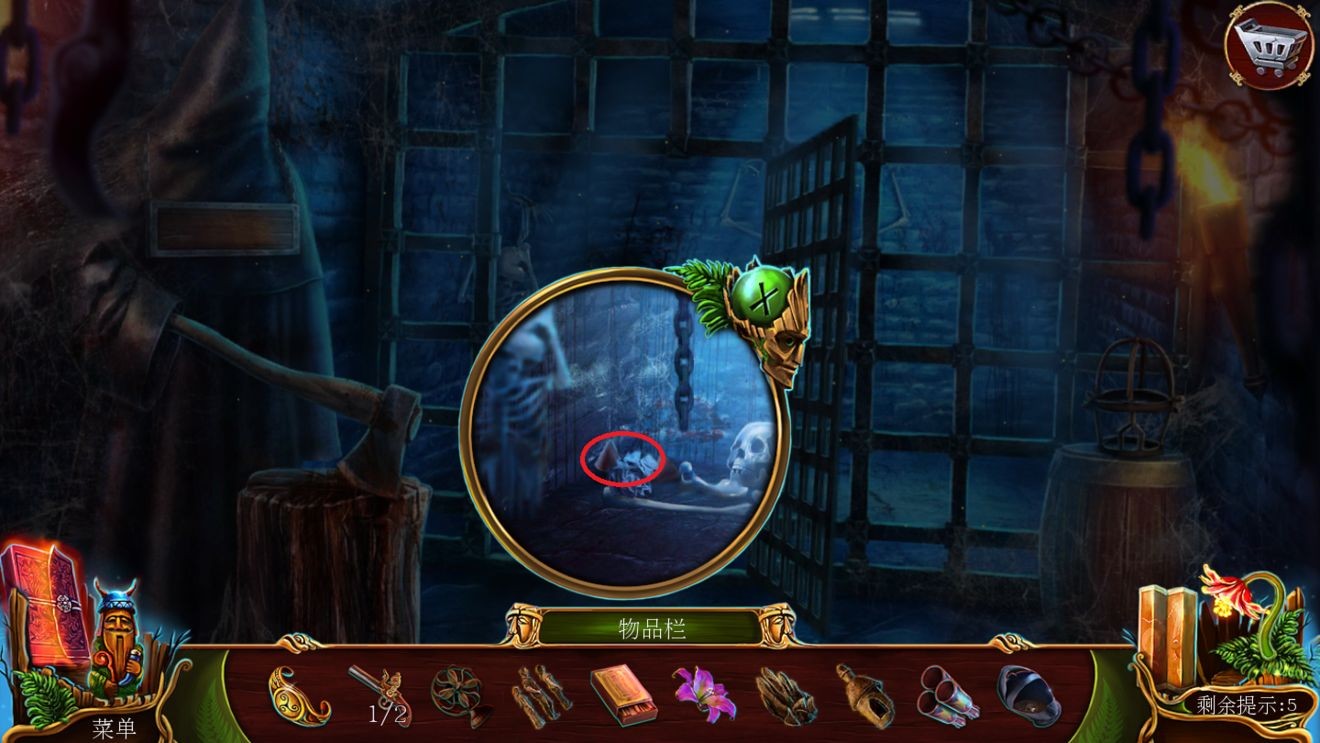
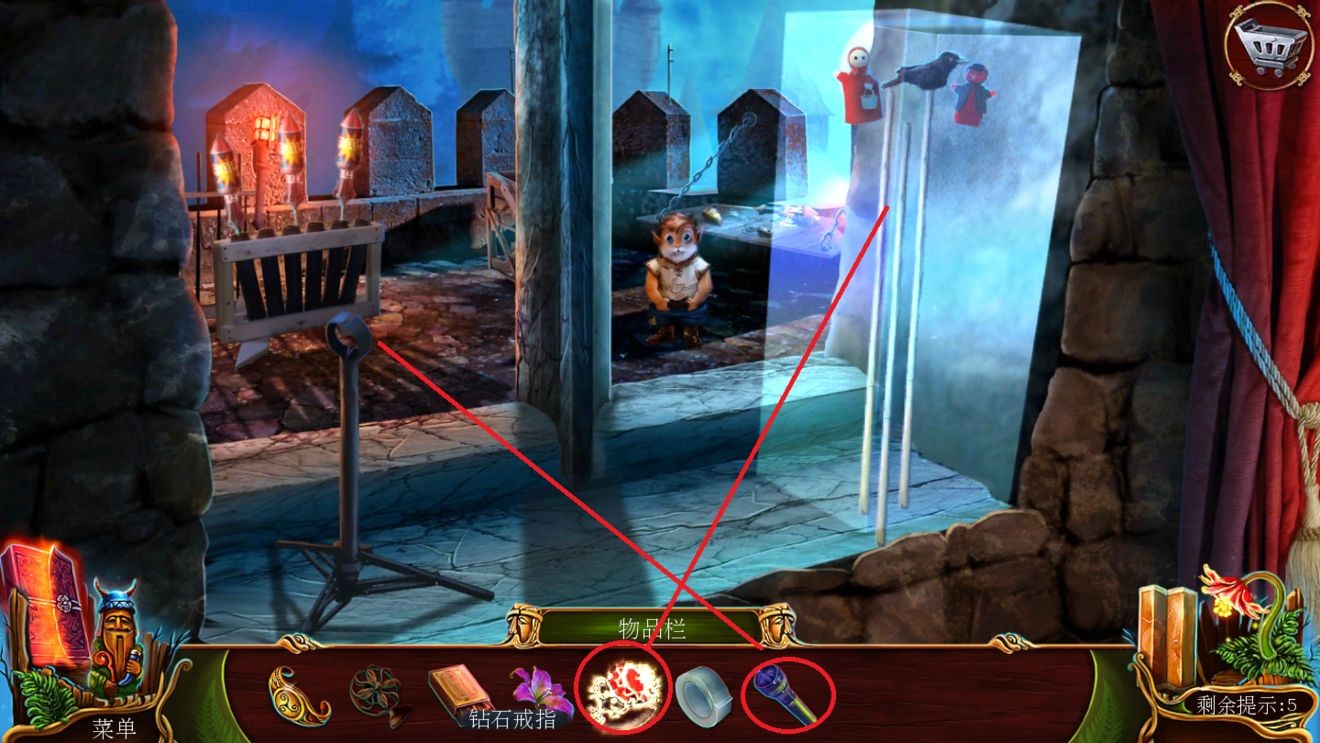
Red indicates objects that can be found directly on the surface, while blue indicates hidden objects. Finally get the pickaxe.

Click on the car's front window and use a pickaxe to smash the glass and escape from the car. Chapter one is over.

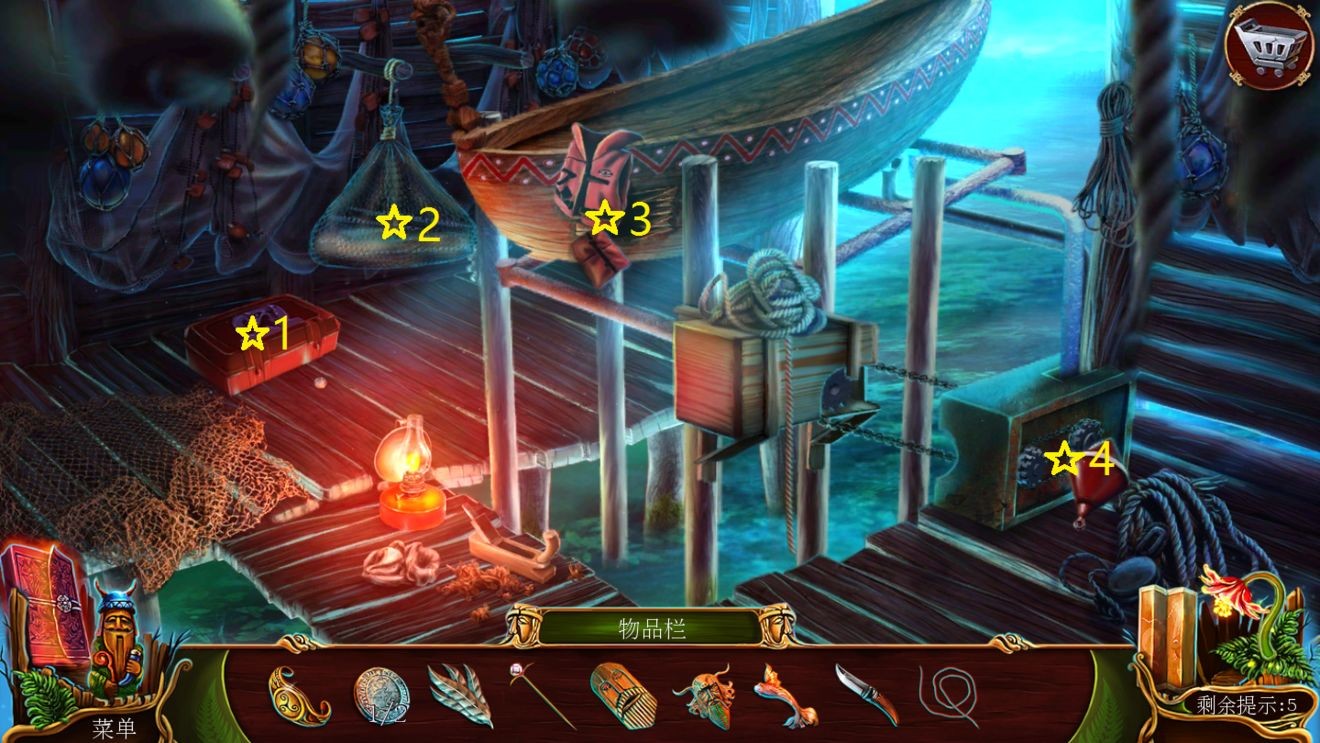
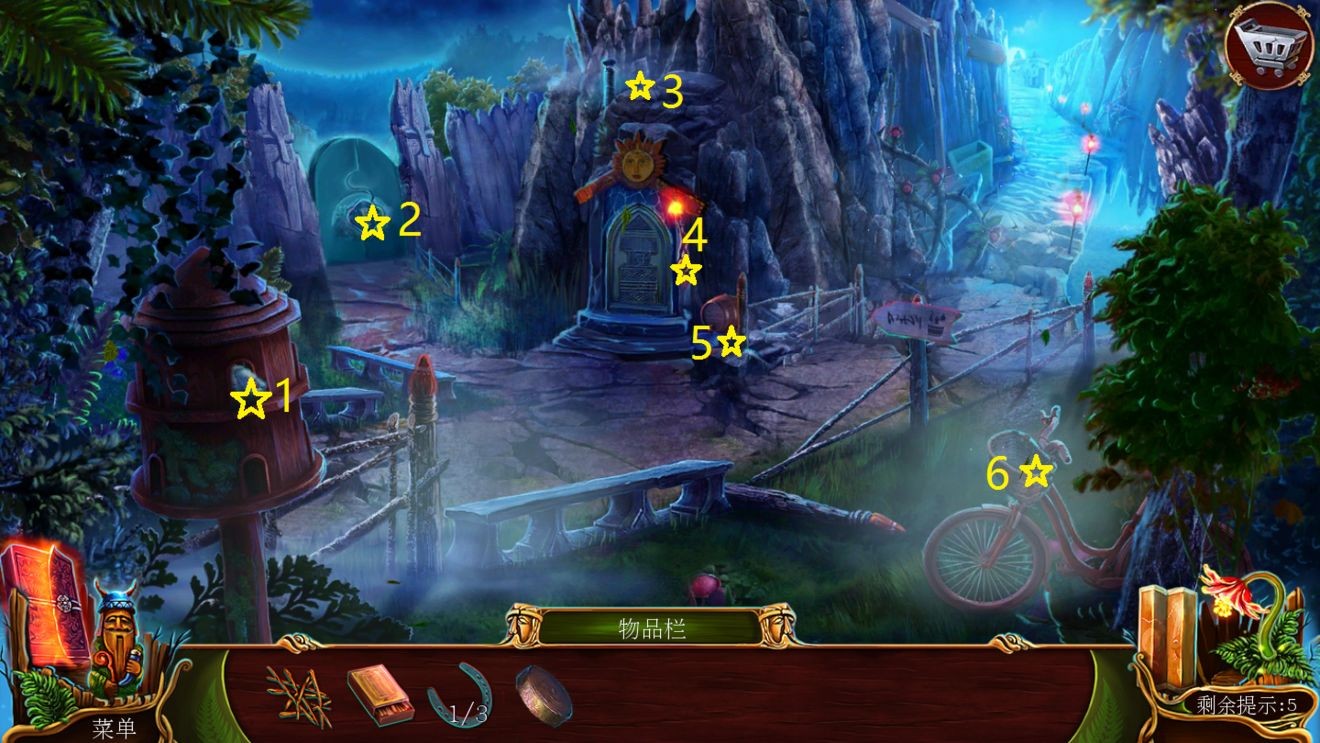
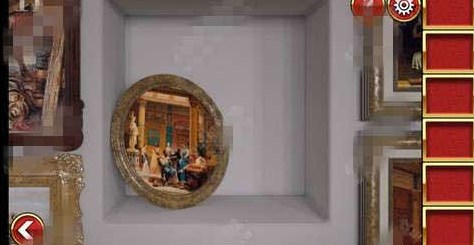
The first Aurora Flower (the yellow circles below are all collected items). Stars indicate areas where objects interact. For convenience, we will say star 1, star 2, and star 3 areas below. When you can't find it, you can refer to these places to see if they have been looted. There are dialogues and posters that are viewable but don’t contribute much to the plot. I won’t talk about them. Just be blind.

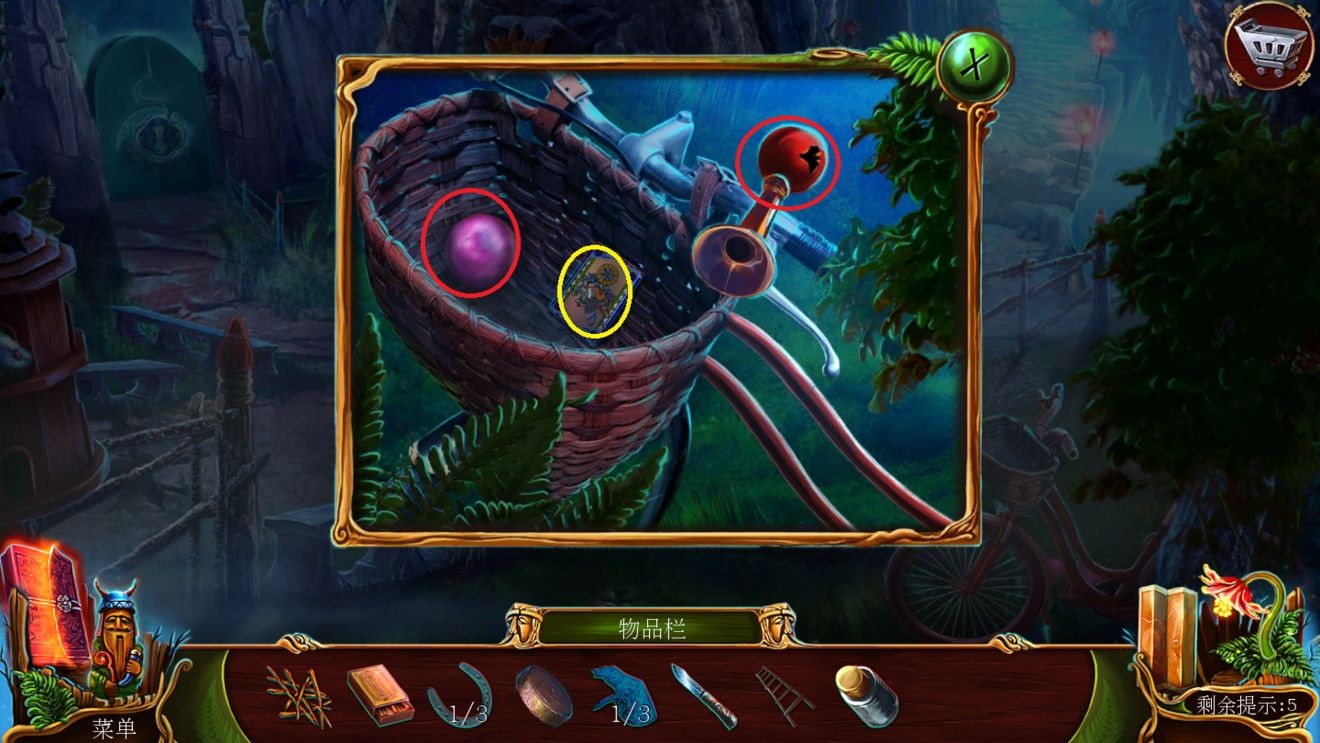
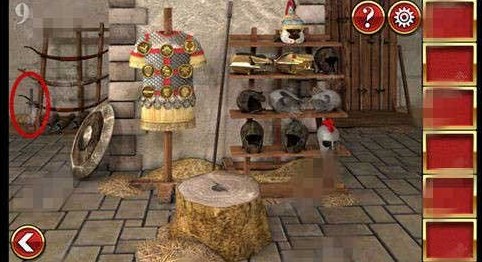
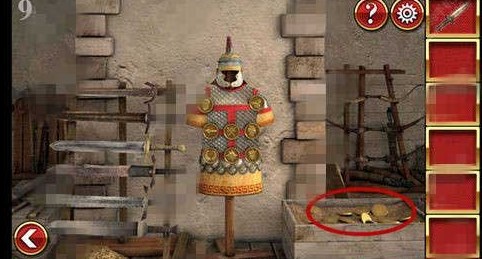
Open the wooden cabinet of Star 2 on your left hand, take out the knife wrapped in the basket on the right side, and collect a flower and a card.

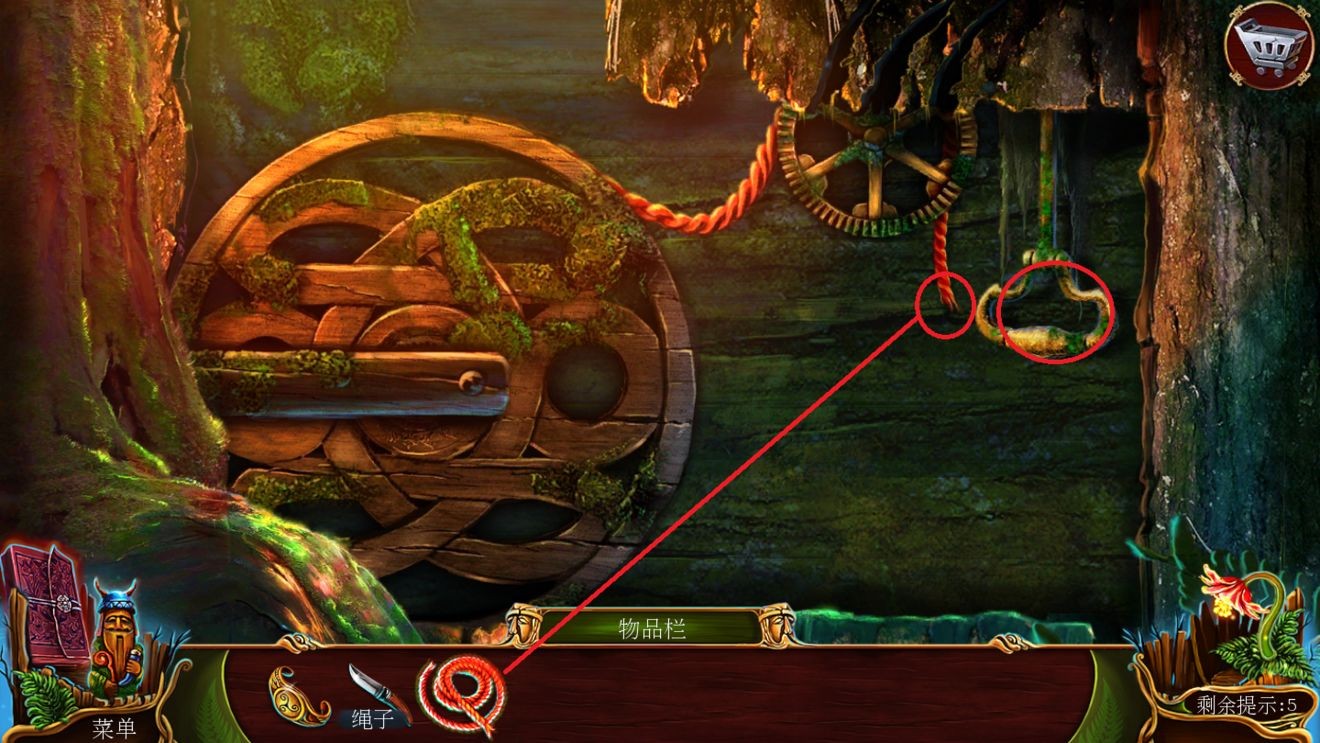
Return to the wooden cabinet at Zuo Zexing 1 in the gate scene and use the knife to cut the red rope to get the rope.

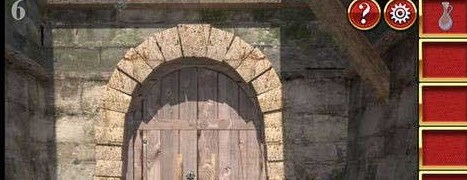
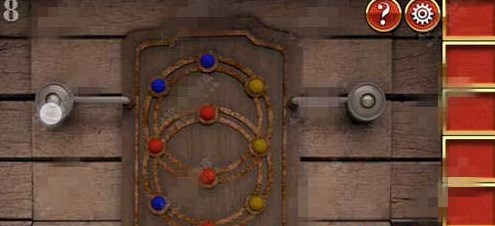
Go back to the gate scene point 3, peel off the wood, renew the life of the rope, and pull off the hook to enter the game.
Pass the game to open the door and enter the next scene (the following bold reminder scene switch).


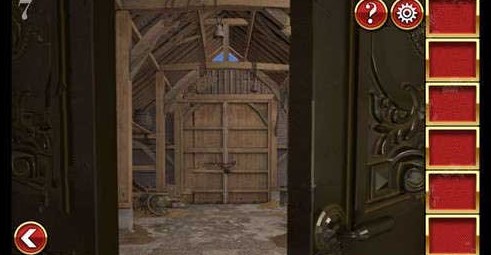
Collect a wave first by putting out the fire (manual funny). Click on star 1 of the house in the distance, open the outer cover on the right, take out the pipe, and collect a flower.

Return to the fire house and connect the water pipe to the fire hydrant on star 1, put out the fire and enter the house.

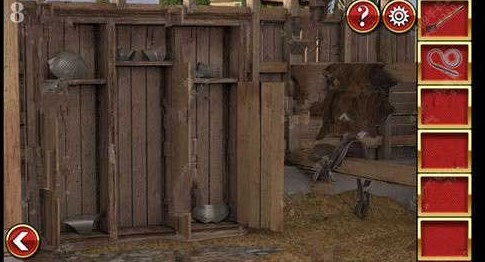
Click on the wooden cabinet star 1 at the back of the house to enter the game, drag the ring on the right into the picture on the left to match the pattern. Then use the bracelet to open the mark.


Talk to the little boy. After clicking on Wooden Cabinet Star 1, you can get the Red Clover and Box Parts. Open the star 2 door curtain and enter the room.


One flower, 3 stars, use the knife to sharpen the pencil to get the sharpened pencil.


Leave the room and return to the previous scene, point star 3, slide the pencil to get the information desk password, the photo part on the left, and a card.

Take two steps back to return to the gate scene. Click on the star 1 wooden cabinet on the right hand and press the password to open the wooden cabinet to find objects (this one is difficult to explain, but you should be able to understand it according to the numbering process, so the game is omitted). Finally get the map coins.


Click on the star 2 wooden cabinet on the right, put in the map coins, and pull the button to get the map and box parts. From then on, the gate scene lived up to its mission and I never had to go home again.

Go forward three steps to the [back room] of Baba's house. Star 2 boxes, open the blanket and put in the 2 box parts to play the game. Obtain the snake emblem and potion.

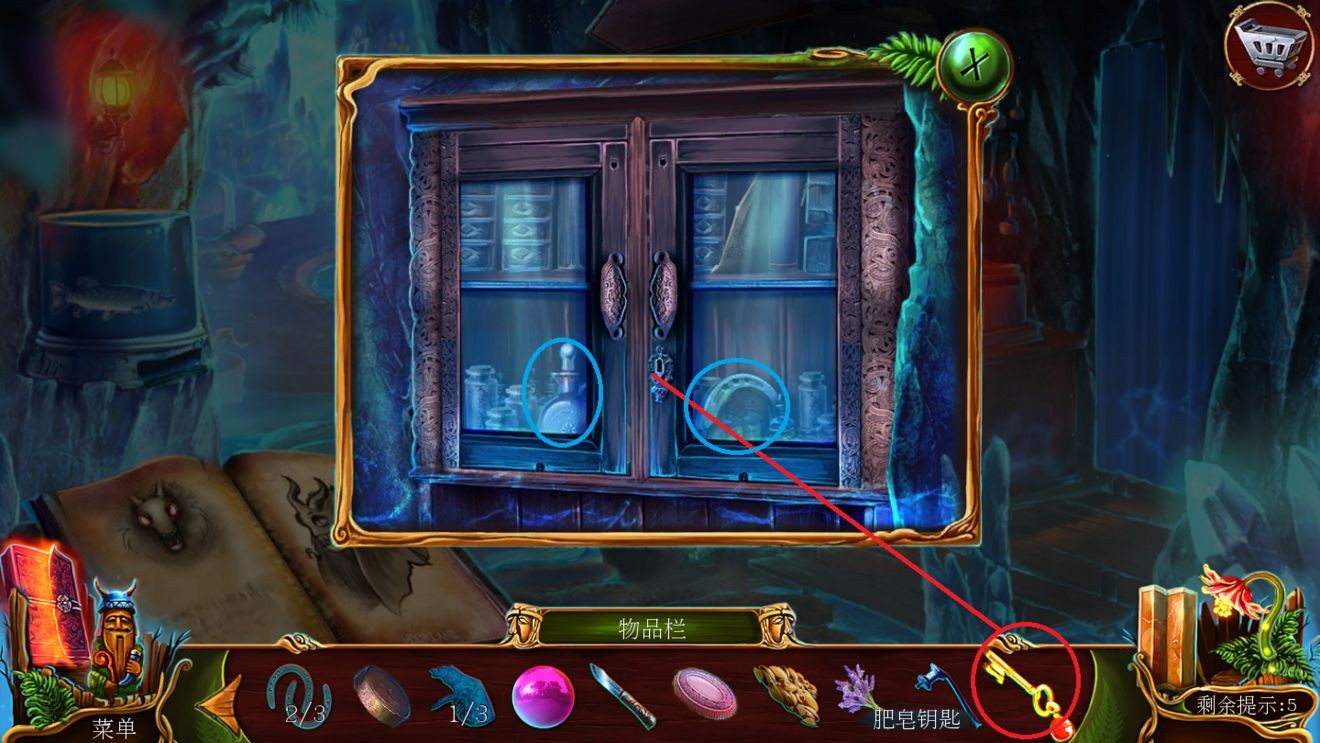
Exit Barba's house and move forward to House Star 1 in the distance. Put the snake emblem in the mailbox on the left to get gauze.

Return to the [back room] of Barba's house. Click on star 1 on the right hand medicine liquid making table, open the secret recipe book and two drawers, and get marigolds and nettles, one card. All ingredients are prepared according to the secret recipe. Get medicated gauze. (Don’t worry about my inventory)


Withdrew from the back room and handed the gauze to the boy. Follow the boy to a distant house. Remove feathers and pins from hat.

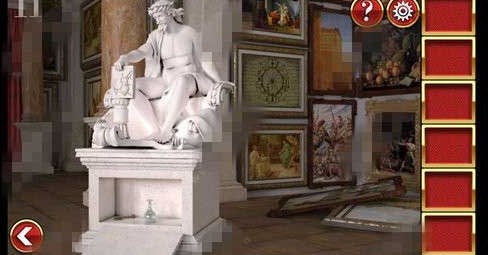
Return to the [back room] of Barba's house. Point three stars in the tree hole, use a needle to remove the basilisk statue, then return to the far house and put the basilisk statue in the door. Pass the game and enter the museum.


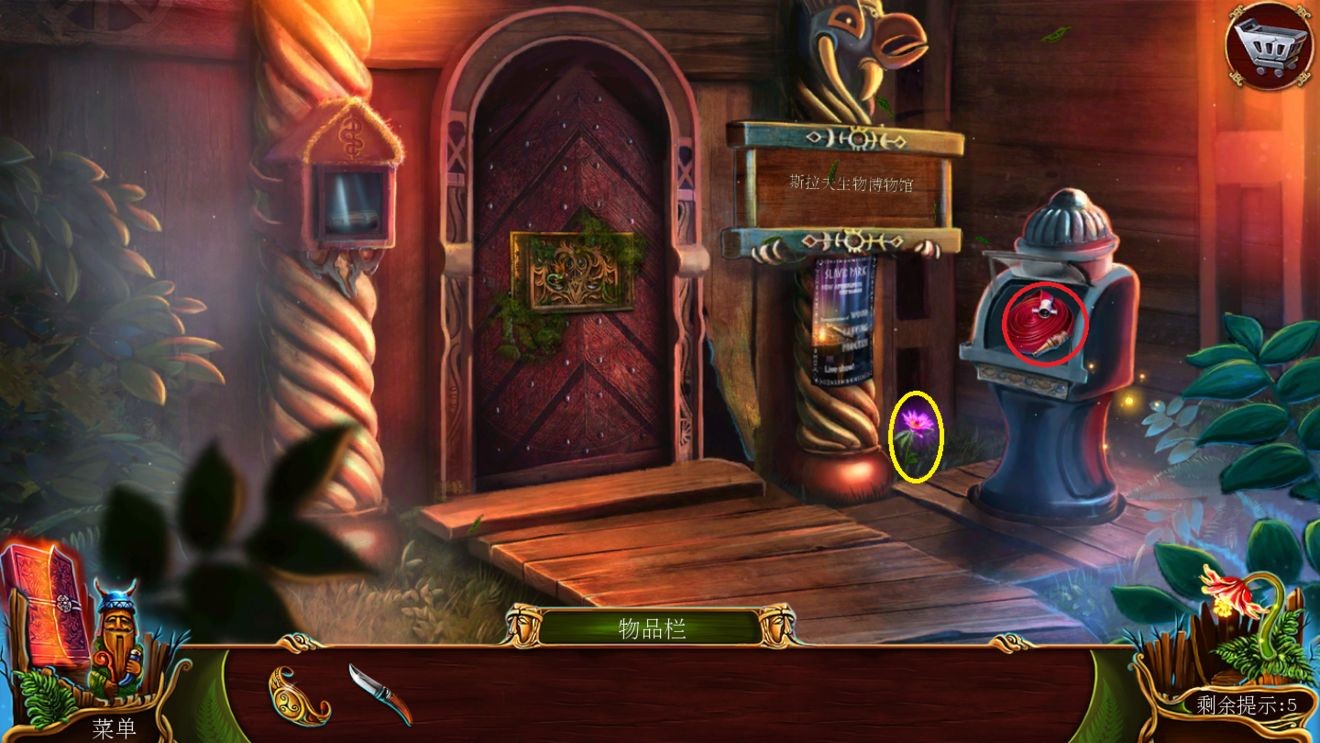
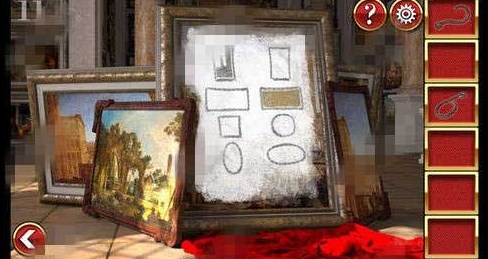
Point star 1, open the glass cabinet to get the photo parts, the old man's portrait, and one card.

Click Star 2 in the museum, put in two picture parts, play the game, and enter the basement.

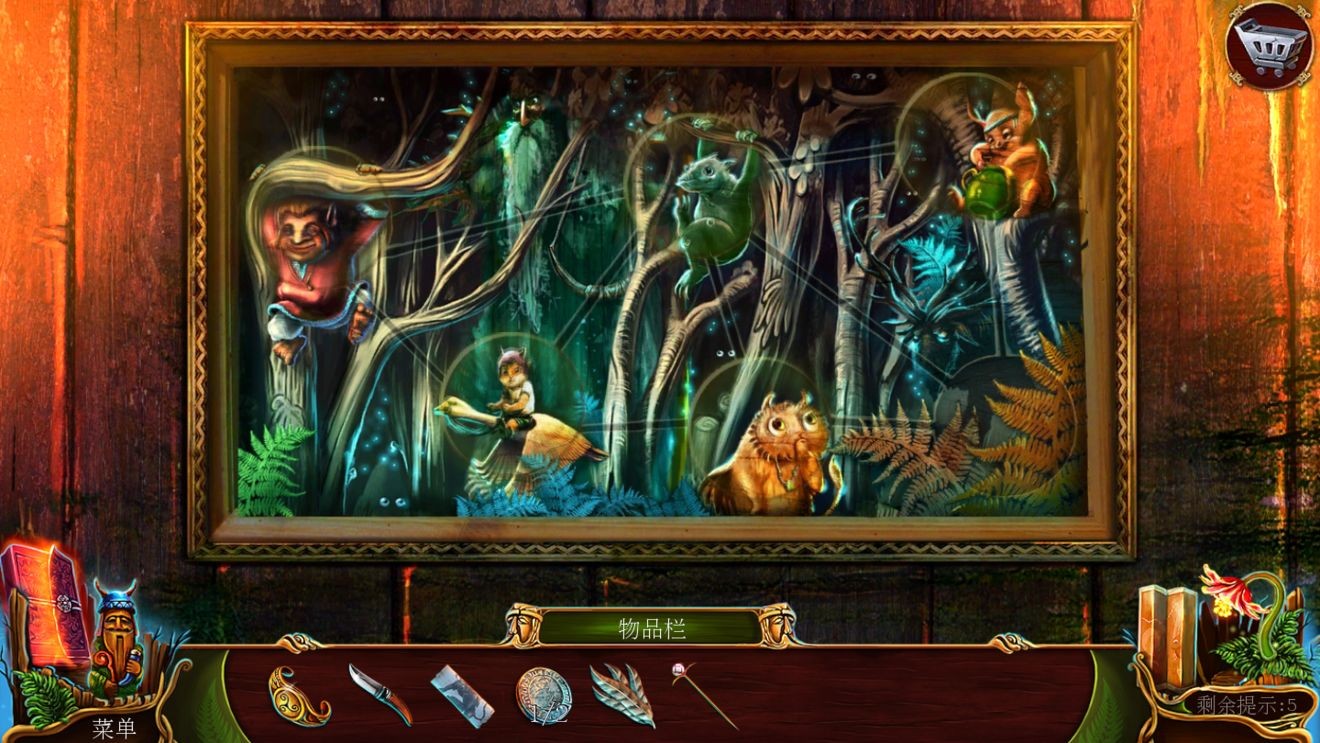
Click the curtain to enter the cutscene to get the gear. There is achievement in speaking to all animals. Peel off the table wood to get the carving, one card.

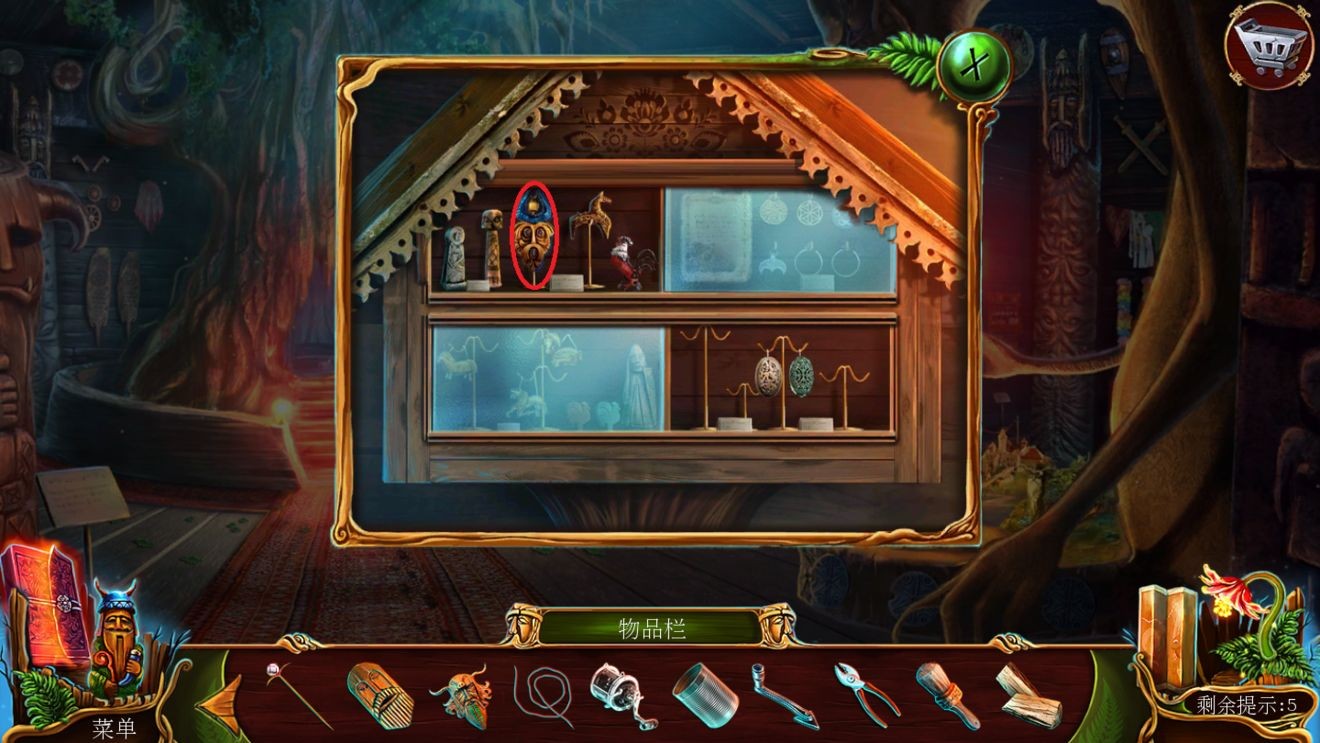
Return the 3 point stars to the museum hall and return each sculpture to its place. Obtain the horn mask and fish charm. Go back to the basement, put the gear to the right of the door, and enter the harbor.
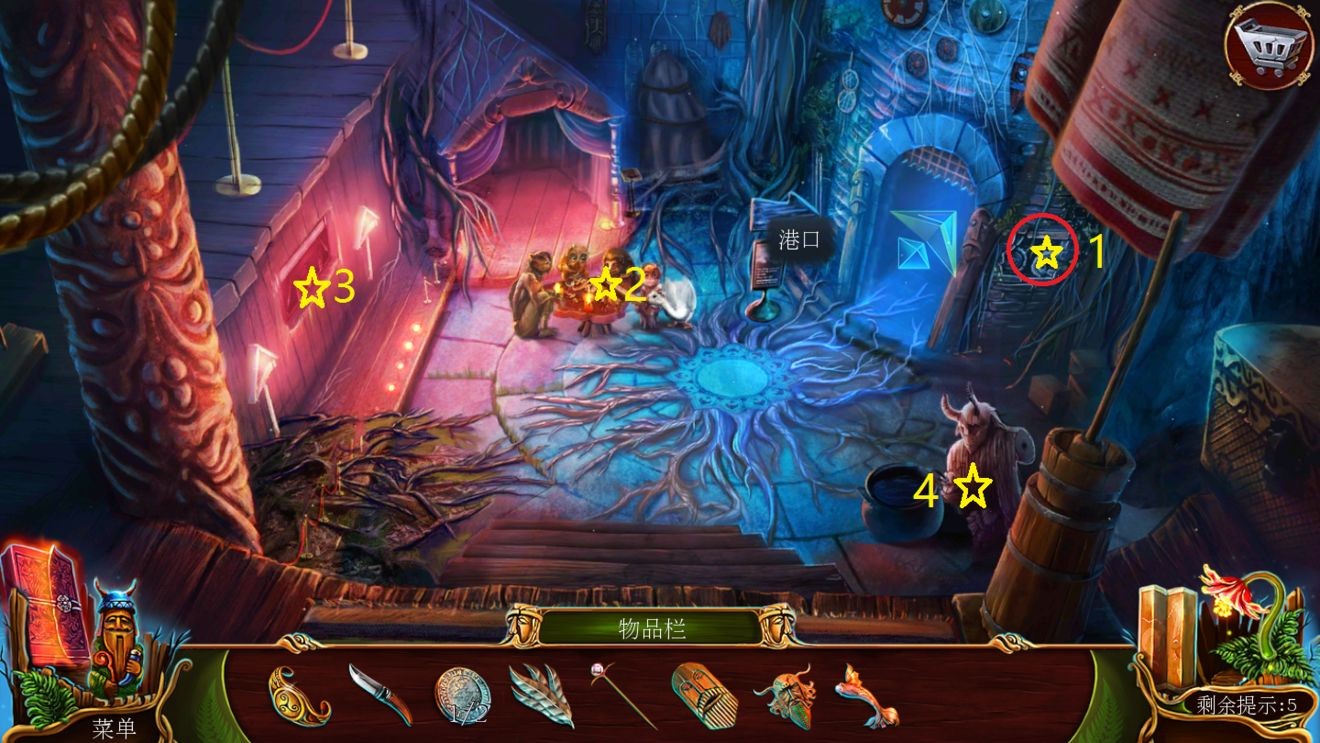
One flower, one card. Point to the balcony of Star 2, remove the potted plant, and get the key and a flower. Use the key to open the door and enter the studio.


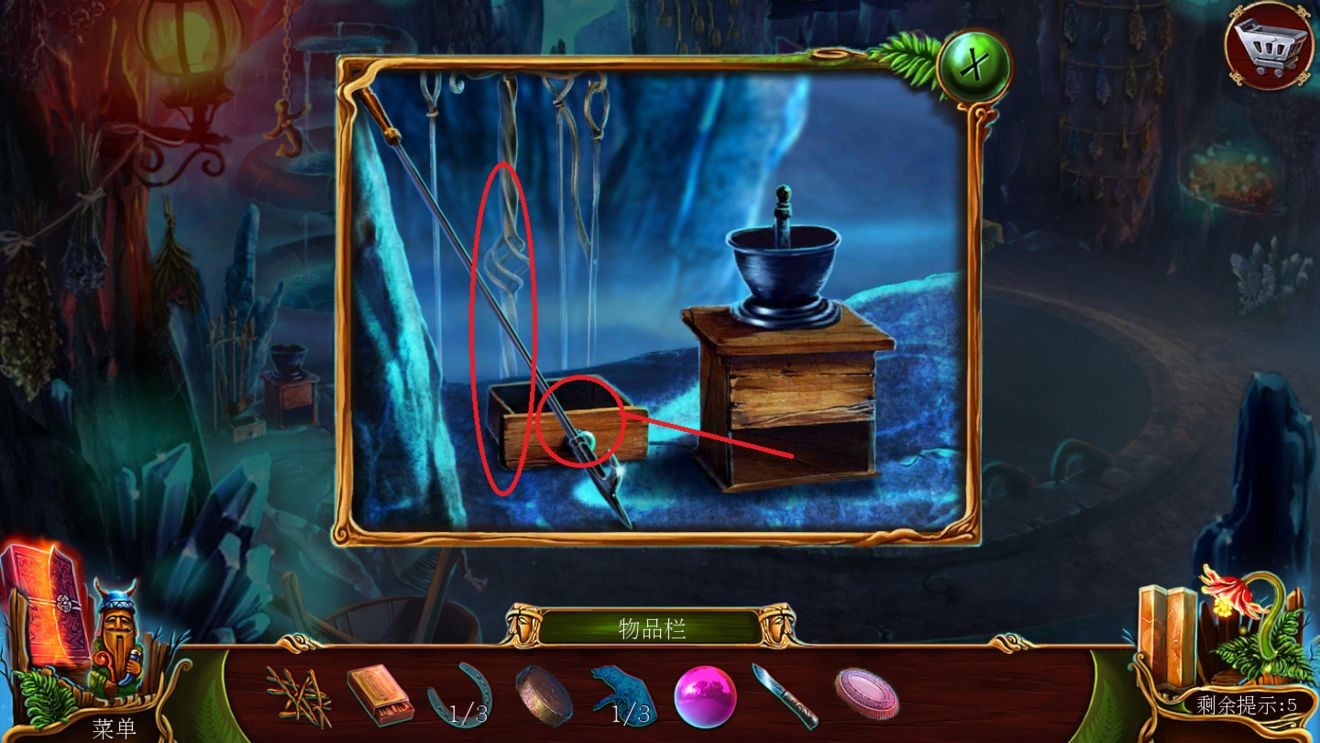
Point 1 star, pick up the coins, put in the fish charm and open the box. Get a reel, pliers, and a card.

Use the knife to pierce the star 2 fishing net to get a wooden board. Go to Star 3, take out the can, put in the wooden board, and enter the puzzle game.

Point 4, take out the safety bolt. Return to the basement, lock the gate gear with the safety bolt, and take out the crankshaft.

Take two steps back to the door of Barba's house. Click on the glass cabinet star 3 on the entrance, pick up the coins, use pliers to twist the wire, and get a brush, rooster currency, and a card.

Insert two coins into the Star 4 totem and hold down the red button to get the split wood. At this point, the scene at the door of Baba's house and inside the house is over, and there is no need to go home again.

Go back to the museum hall, click star 1, put in the rooster currency, and get the weird mask.

Go into the basement. Click star 1 on the left, put in the old man's mask, the horn mask, the weird mask, play the game, open it with the bracelet, and get the wooden arm.

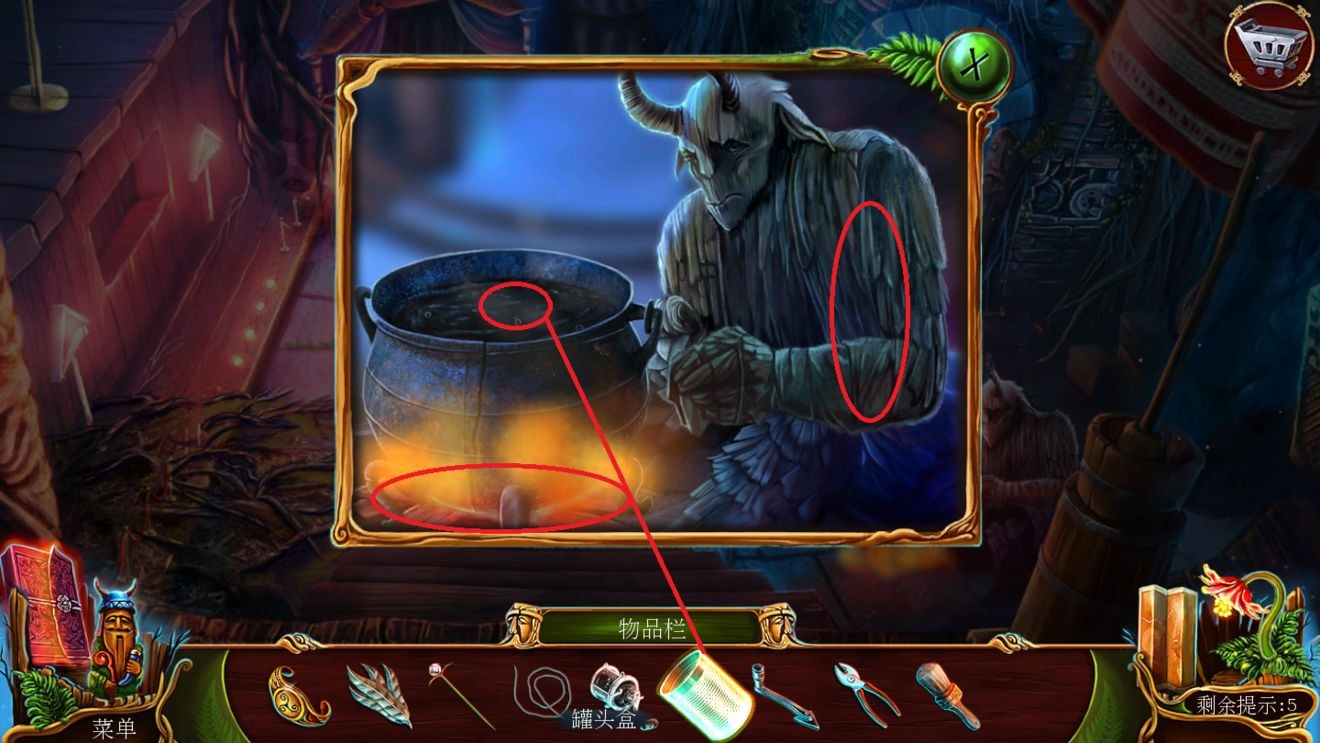
Point 4, put cracked wood in the bottom of the pot, and assemble the wooden arm. Click on the arm to light the fire, put the can into the pot and fill it with the pitch.
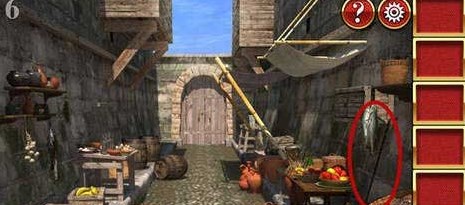
Enter the harbor. Star 1 water monster. After the conversation, use the knife to cut the net and get the pyrotechnic fuse (serious translation error, it should be fishing line!!!). Point to Star 2 on the balcony, put in the fireworks fuse (fishing line), reel, and needle to get the fishing rod.

Return to the Star 1 water monster again and use the fishing rod to pick up the old paddle. Enter the studio.
Dot 3 hulls, add asphalt and brush, rub evenly. Point star 4, put in the gear, and the ship goes to sea.
Return to the basement to start the cutscene and take out the old paddle. Return to the harbor and start the animation to get the repaired paddle.
Select the paddle and click on the boat to follow the wave. Chapter 2 completed.
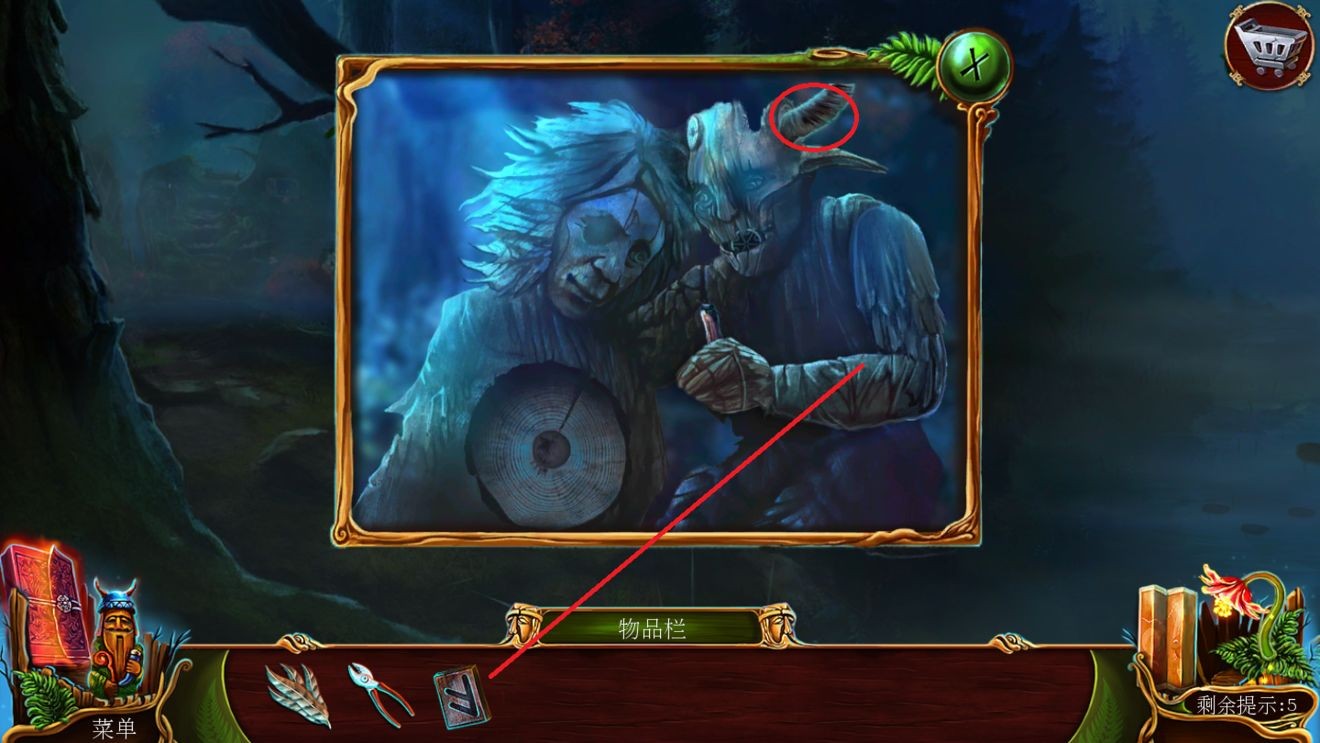
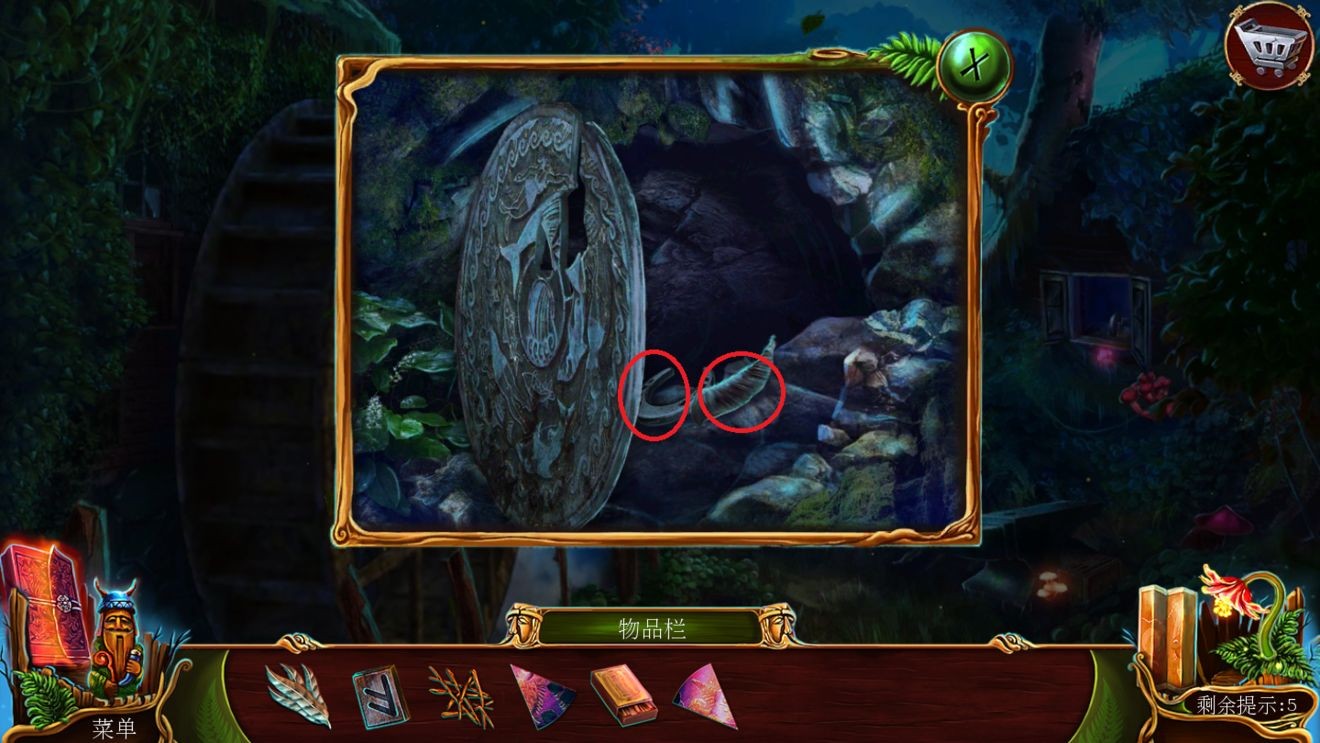
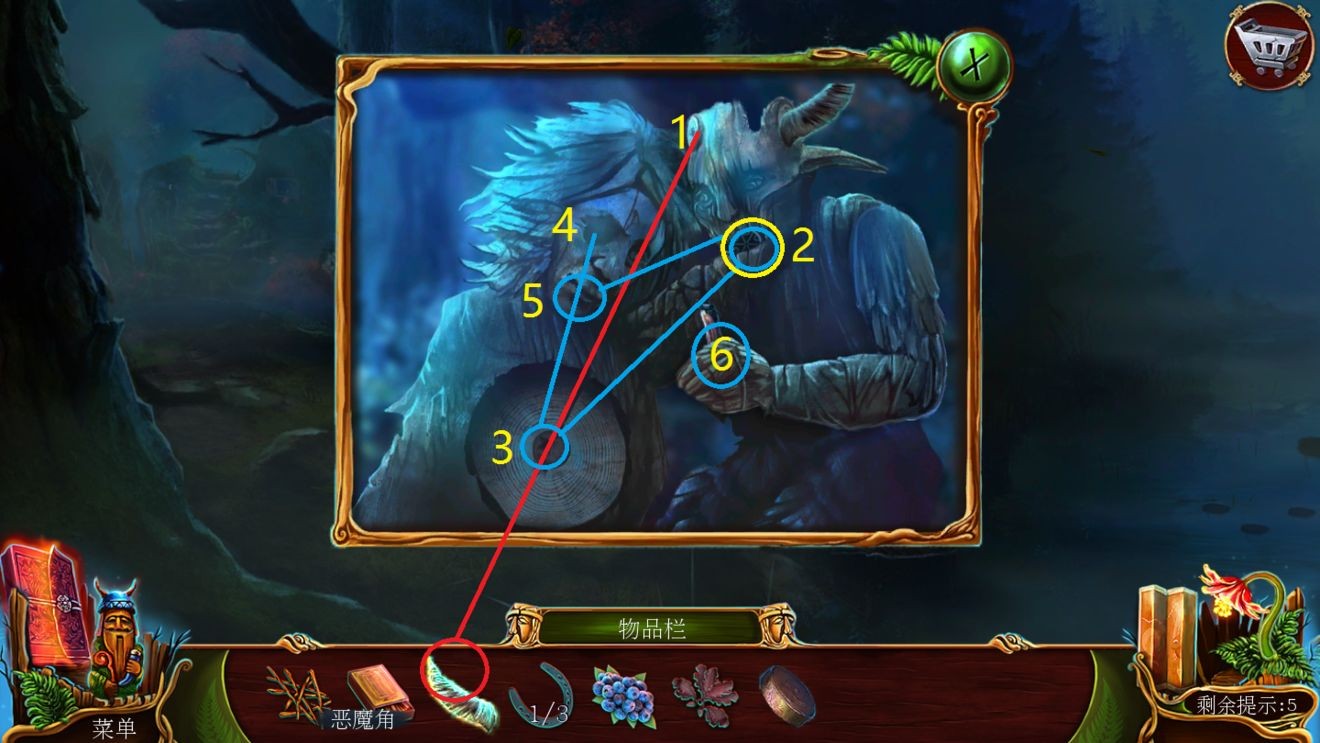
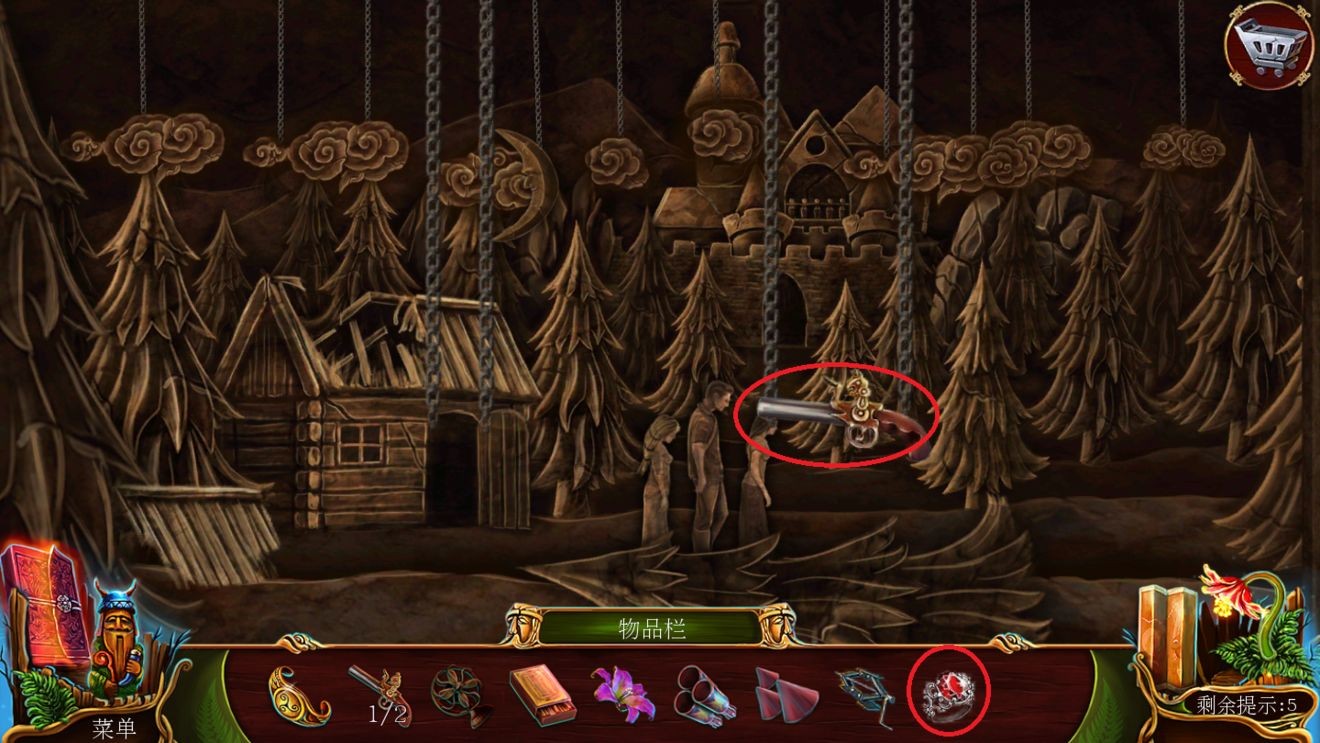
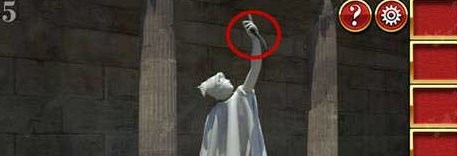
With one flower, click on the water monster to get colorful feathers and pliers. Click on the iron cage to get the devil horn, Ichika. Click on the statue to get the inscription and assemble the devil horns.

Enter the village. Point star 1. Once spent, pick up the whetstone door handle. Point Star 2 balconies, one flower. Pick up the buttons and use pliers to remove the board.


Return to Lakeside. Open the iron cage with the button. Get the ax handle and window components.

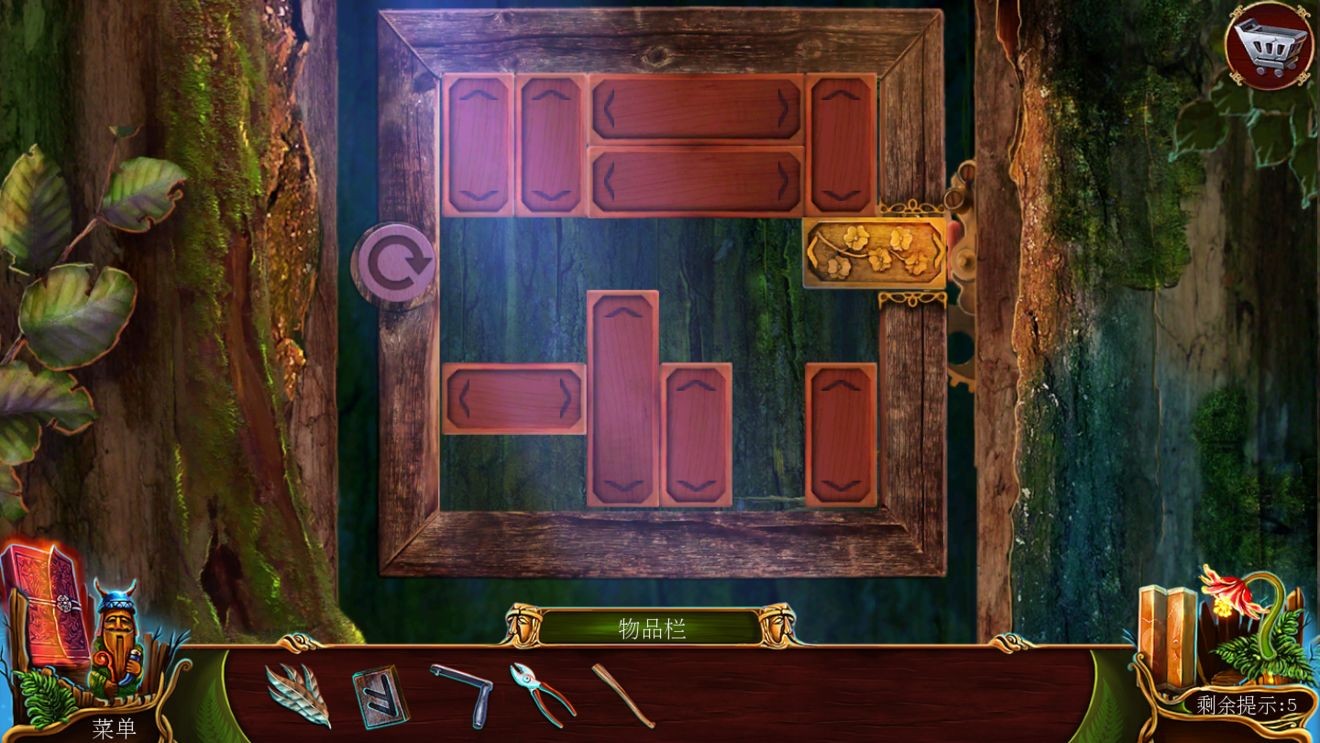
Enter the village. Point Star 2 balcony, put in the window component, and play the Huarong Road game to open the window. Get the gavel.
Enter the swamp. Once spent, click on the wooden pillar and use pliers to remove the steel nail to obtain the steel nail.

Return to the village. Click on star 3, assemble the ax handle, steel nails, and fix them with a mallet to obtain a blunt axe. Click on the star 2 balcony, assemble the whetstone door handle, and use the blunt ax to get the axe.

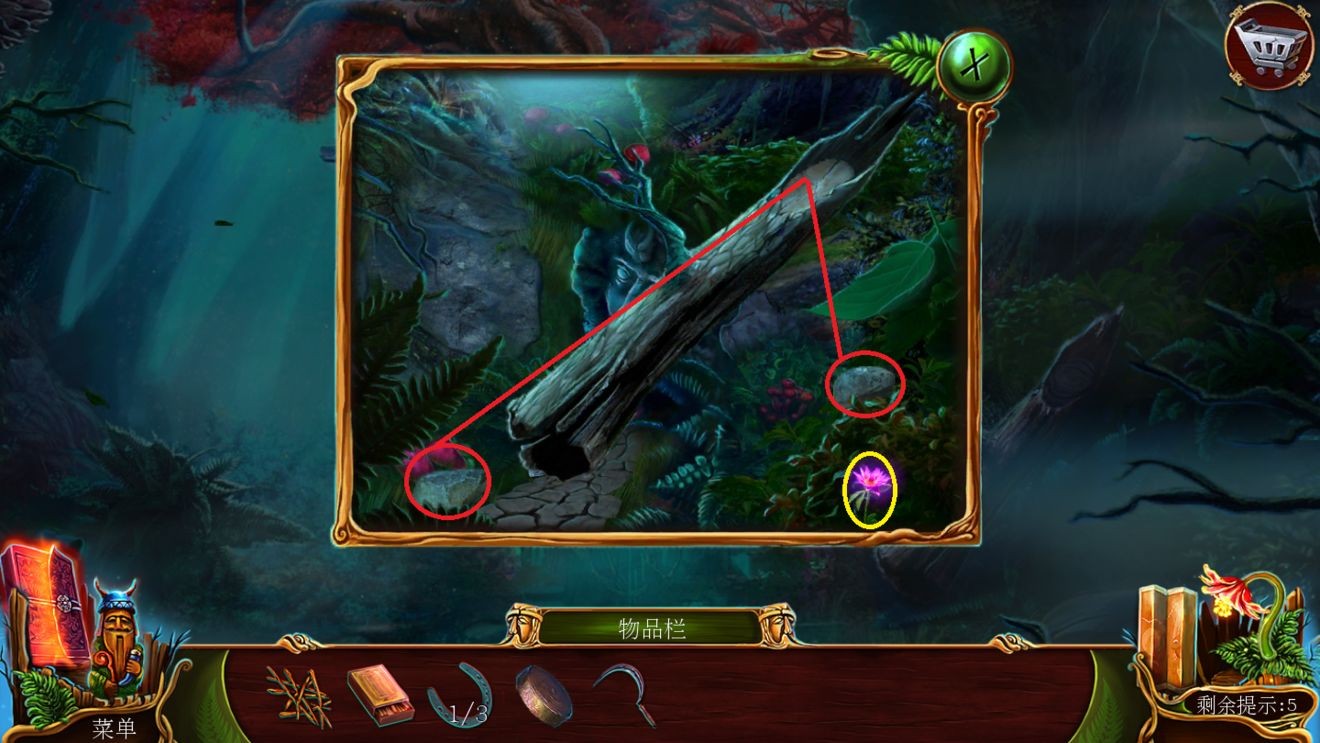
Enter the swamp. Destroy the dam with an axe. Go directly to the outdoor room of Star 2. Go directly into Lacey's room. Go directly to the balcony and click Lacey to start the session. For a flower, light the bottom of the sacred fire to get a dry branch.
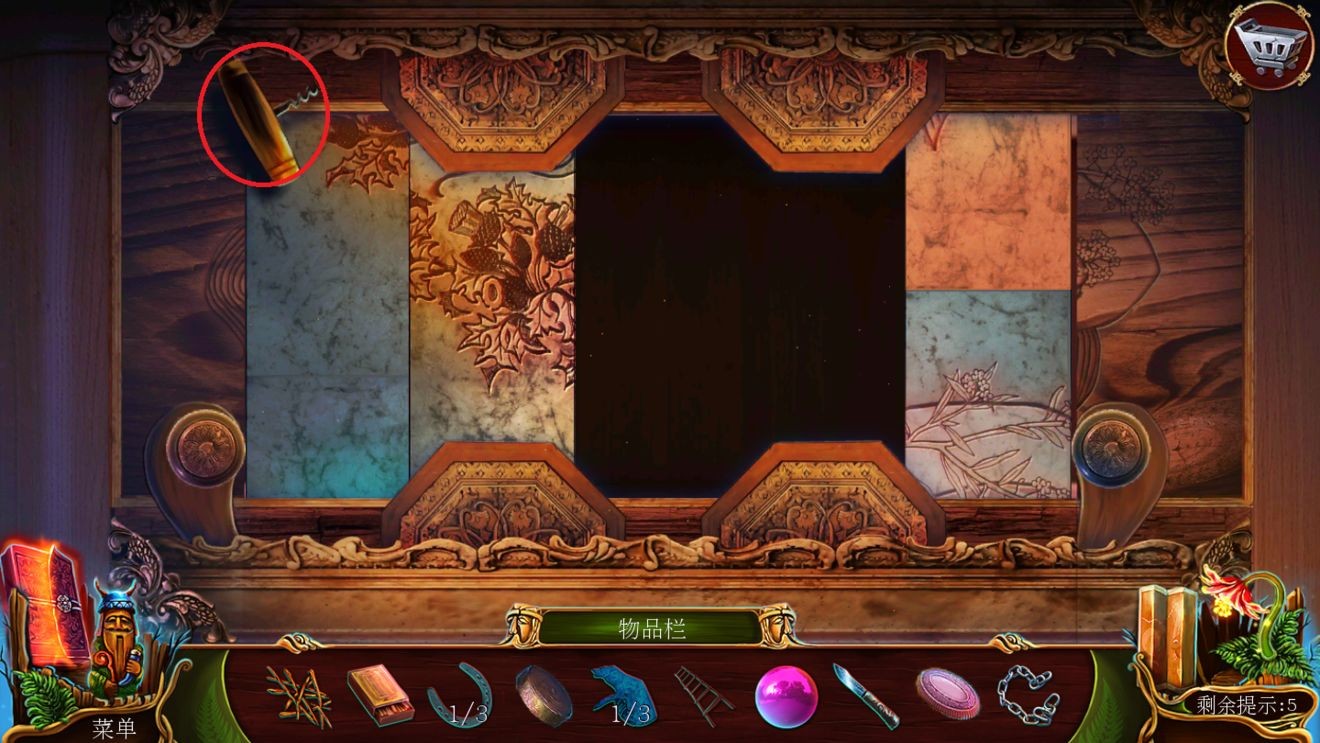
Return to the house. One card, 2 stars, one flower, pick up the closet door handle, and use an ax to break the tree.
Point Star 3 wall cabinets. Ichika, assembled the door handle of the closet, picked up the components of the box, and obtained the parts of the lock after reading the book. Point 2 boxes, assemble the components of the box, and obtain floor tiles and ropes.
Return to the balcony. Click on the bottom of the holy fire, assemble the floor tiles, and get the telescope knob, a card. Click on the telescope, assemble the knob, and play the game to obtain the maze password (not in the inventory).
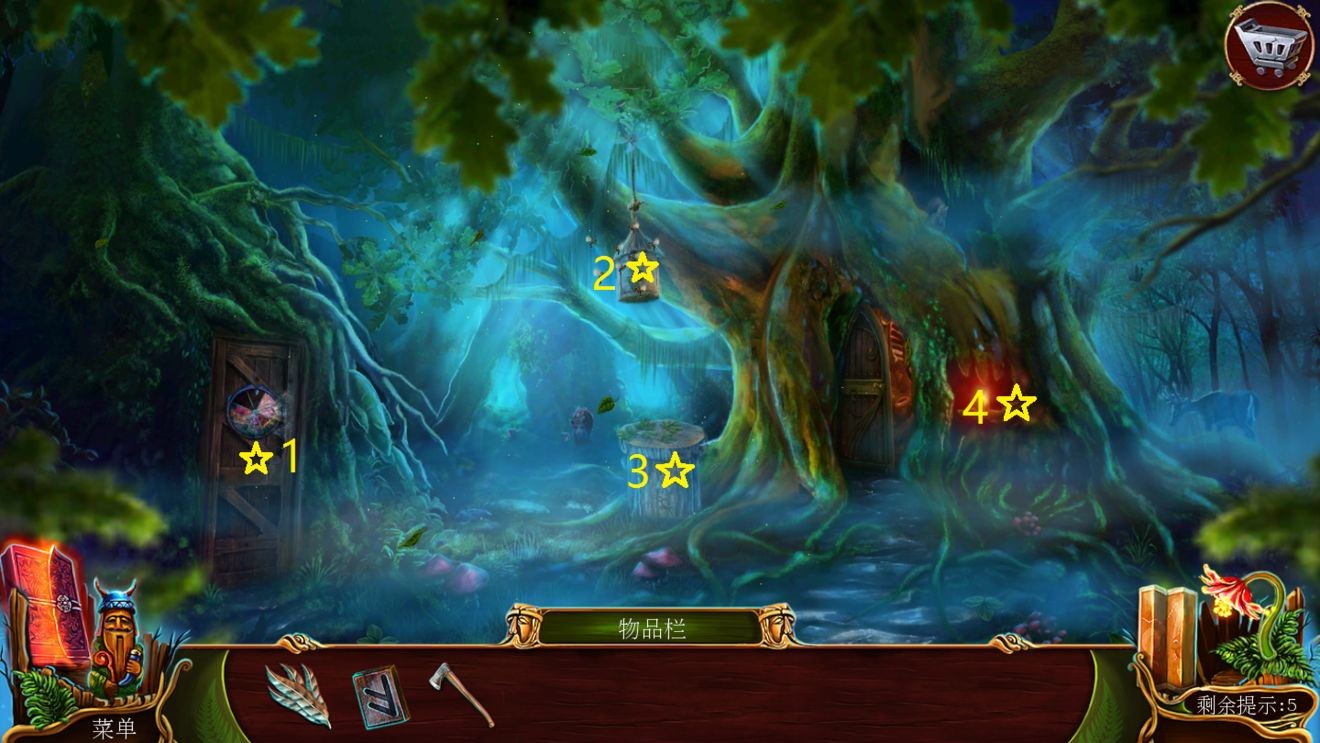
Take two steps back and rush outside. Enter the forest maze, pick up the lock parts, learn that Piggy wants to eat blueberries, and then return outside. Point 3, peel off the leaves in the tree shape, put in the feathers, and get the feather duster.

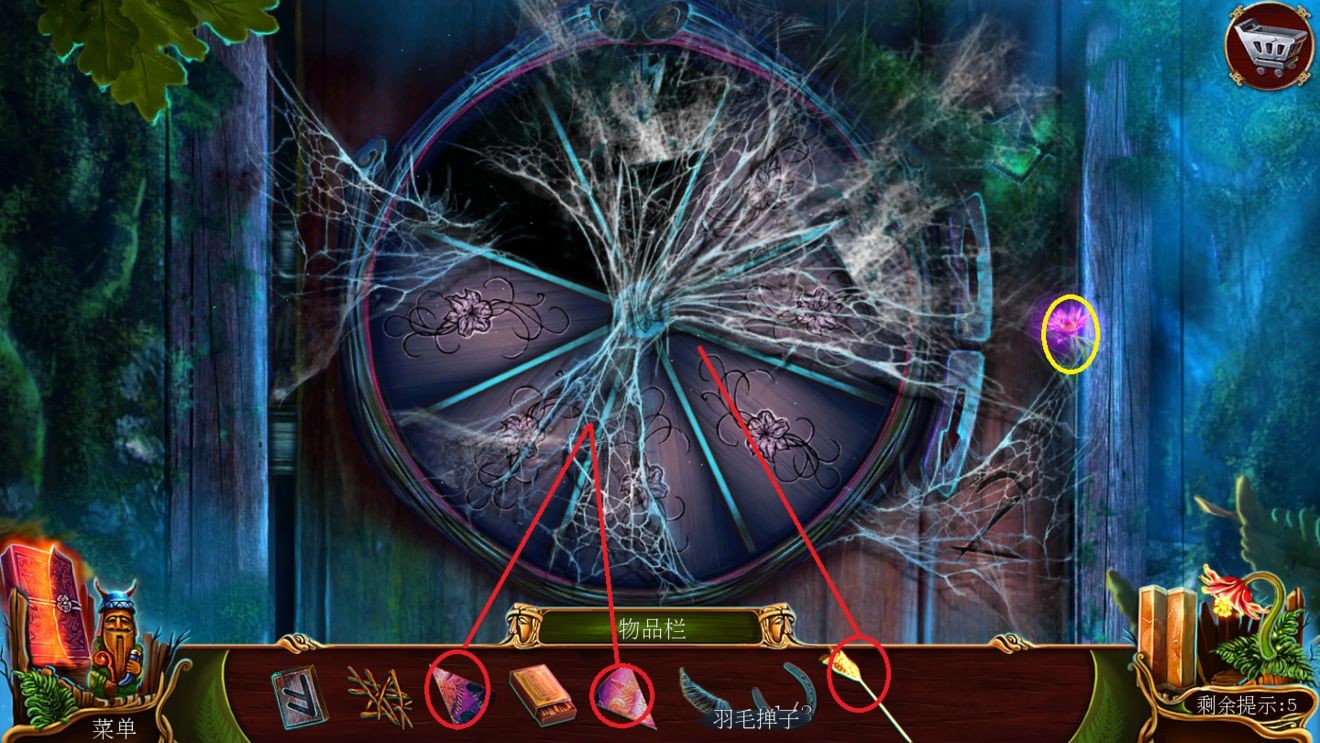
Point 1 star on the wooden door, 1 flower, use a feather duster to clean the cobwebs, put in 2 lock parts, and start the game (you can point them all black and then press 3 wildly). Obtain the plank and inscription.

Return to the swamp. Click on star 1 on land and water, and put in the plank. Click again to enter the Strawberry Quest game and get strawberries. (Pay attention to the game reminder "Strawberries and lavender grow together"). This search is the simplest and can be used to cultivate "Eagle Eye" and "Precise Positioning".

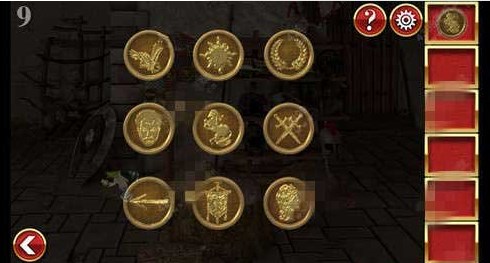
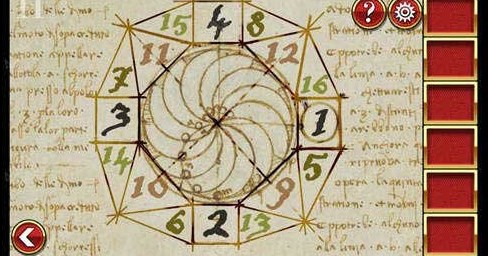
Point Star 4 statues, one flower and one card, put in 2 inscriptions to play the game. The tooth order is 7325, 42816, 836725 respectively. Obtain the Tree Talisman Mechanical Park Disk.

Return to the village. Point star 1 on the stone door, tie the stone door with a rope, and place the other end on the already rotating waterwheel. Open the stone door and get the devil horn and horseshoe items 1.

Back up to the lakeside. Click on the statue, put in the devil's horn, operate the mechanisms in sequence, and get a long handle and one card.
Go forward four steps to [Lacie's Room]. Click on the box and assemble the long handle to get the long knife.

Exit the house and enter the forest maze. Use strawberries to raise wild boars. Erase the green moss to highlight the mark, follow the maze map, and pick up two flowers in the middle.


Follow the riddle and rush to the tree pole. Pick up one flower and one card, put the tree talisman into the wooden door, and play the game (connect both sides first, and the countryside surrounds the city). Go into the trees.


One flower. Click on the tilted tree pole to get a flower. Place the two rocks in this scene on the right end of the tree trunk to connect the stream. Click on the fallen leaves on the right, one card, use the fallen leaves to grab the stream, and get the leaves filled with water.


Click on the tree pole to irrigate it with fallen leaves filled with water to form a ladder. Click on the tree to climb up, untie the vines, and use a long knife to cut off the pine cones to obtain pine cones.
Return outside, return to the house, and enter the balcony. Put the pine cone into the sacred fire to start the plot and get the flame-shaped key. Put the flame-shaped key into the tree stump slot on the right and enter the search object. Get the horn.

Take three steps back to the swamp. Click on star 3 to place the horn. Enter the hut.

Take two steps forward directly into the rock area and then into the surveillance area. Get the shovel.
Return to the rocky area. Pick up the ladder and get a flower. Click on the pile of stones in the middle, pick up the relief, use a shovel to shovel away the stones, and get a knife, one card.
Return to the front of the cabin. Point star 5 wooden basin, pick up the doorbell component. Point 4 doorbells, use a knife to lift the doorbell, put in the doorbell component, press the doorbell, and enter the living room.


Enter the living room, open the anime, and get the soap. I entered the bathroom and found that the vent was damaged. Order a book in the living room, change pages and get restrained, one card.

Exit the hut and put the ladder under the smoke pipe. Go up and connect the lock.

Return to the bathroom. Pull off the vents.
For Star 1, you have to burn the fire stick and return the drawer to its place. Open the Star 3 curtain to enter and get the faucet handle. Point star 4, pick up the rubber gloves, and use the fire stick to pick up the owl fragments. Click star 2 again, pick up the filter, one card, and assemble the faucet handle.


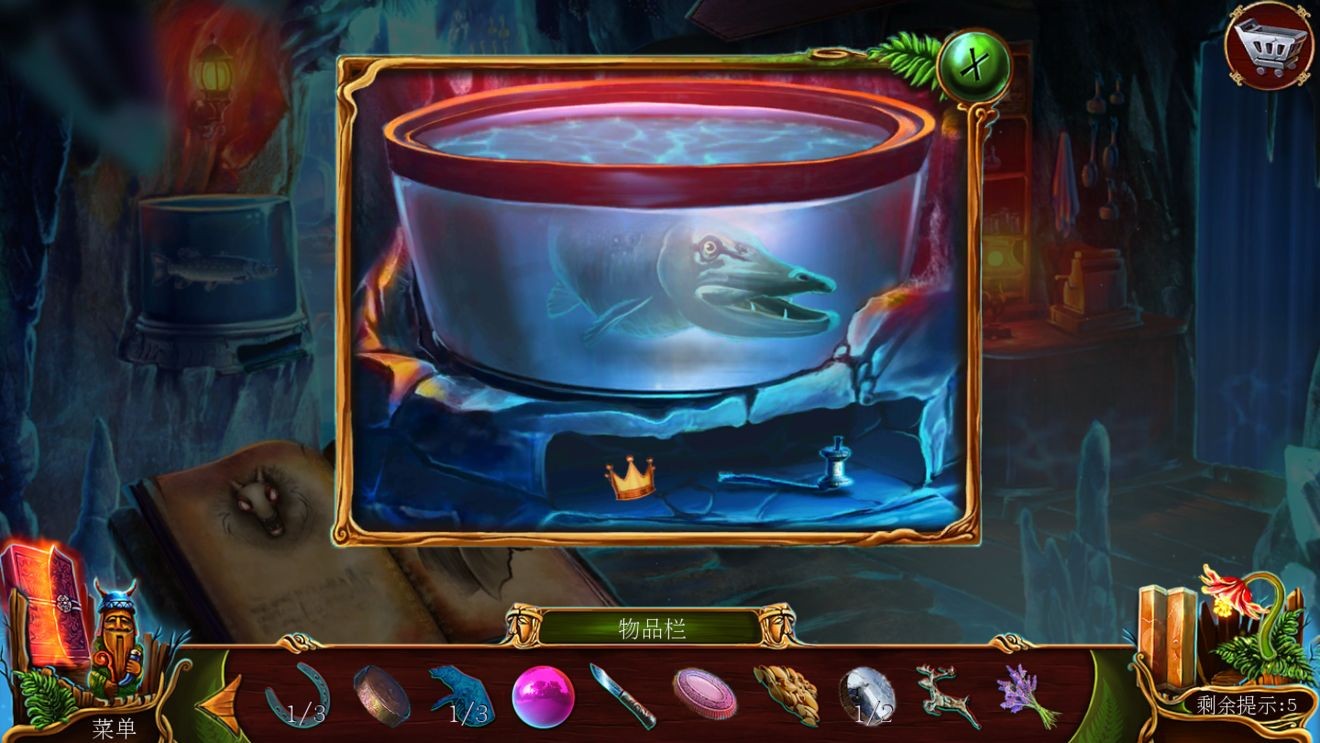
Return to the living room. Point 1 fish tank, use a strainer to fish out the handle of the cash register. Point star 4 to get the bottle opener. Point star 5, assemble the handle of the cash register to get the fish charm, use the bottle opener to open the bottle, and get the nuts. Return to the fish tank and put in the fish talisman to get the crown talisman and the coffee grinder handle.


Leave the room and order a bicycle. Pick up the door parts, use a rubber glove to break the speaker, and get the speaker.
Click on the mailbox on the left. With one flower, use the trumpet to scare away the birds and get the deer.

Return to the swamp. Star 1: Find lavender on land and water (where you find strawberries). Get lavender.

Head outdoors into Lacey's cabin. Click on the closet, put in the crown talisman, and get the owl fragment. Click on the owl painting, put in 2 owl fragments, play the game, and get the bison. The looting of Lacey's house is now complete.
Return to the great outdoors. Point tree stump. Add in deer and bison. Get a card, horseshoe object, click (serious translation error, it is a leader).
Return to the swamp and enter the cabin. Point star 4 wooden basins, put them in and click (take the lead), and get the soap key (translation of "convinced").

Enter the living room. Click on the closet, insert the soap key, and get the shower gel and horseshoe items.
Go back to the [Village], put in three horseshoe objects, and get the bellows, one card.
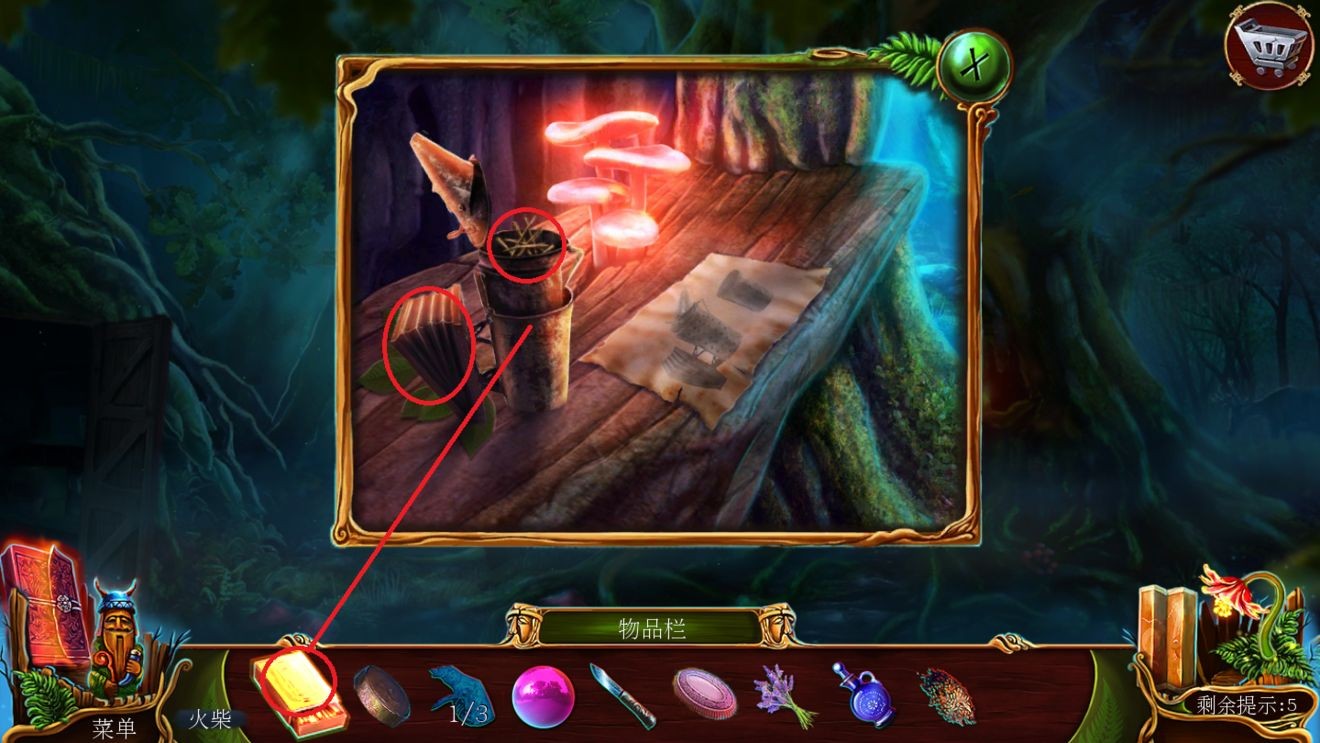
Take two steps forward to the outdoors. Click on balcony star 4, pick up the matches, put them into the bellows according to the drawing, dry the branches, light the matches, and get the smoke blower.
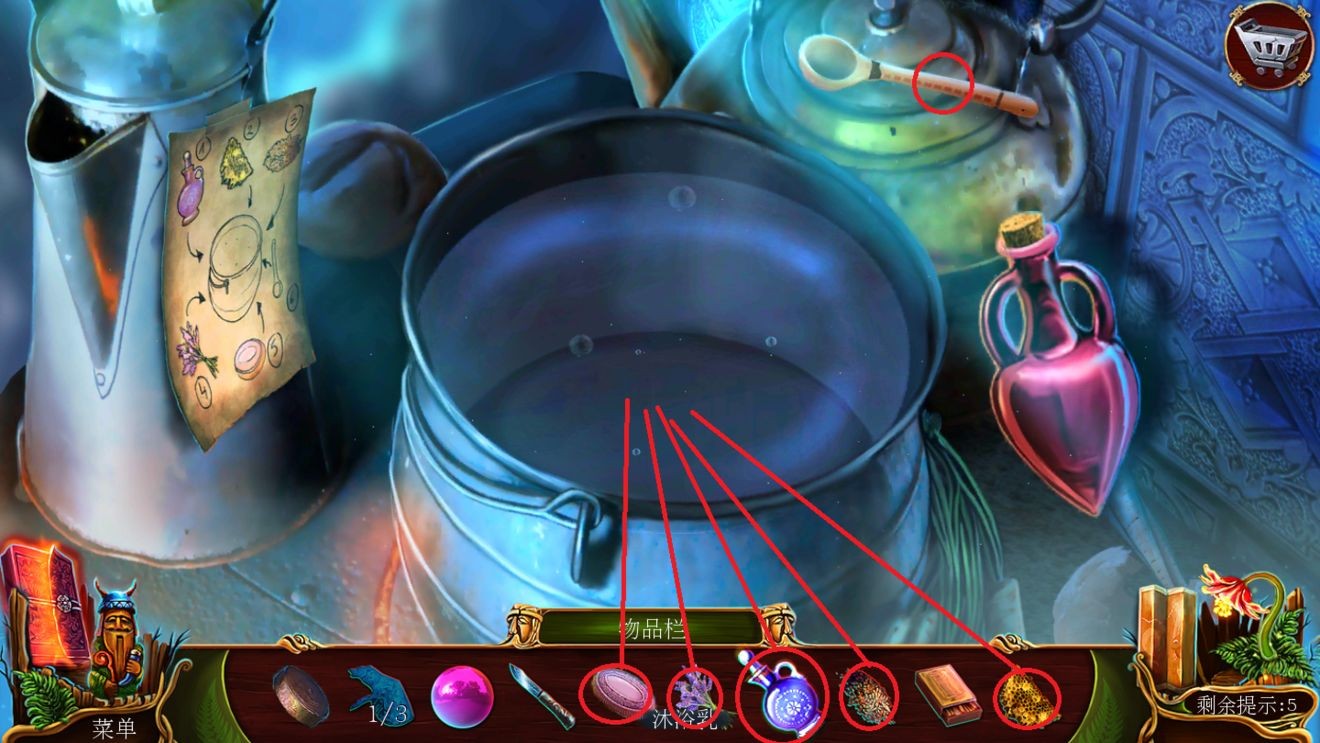
Click on the honeycomb star 2, a flower, use the smoke machine, open it to get honey. The shower materials are full.

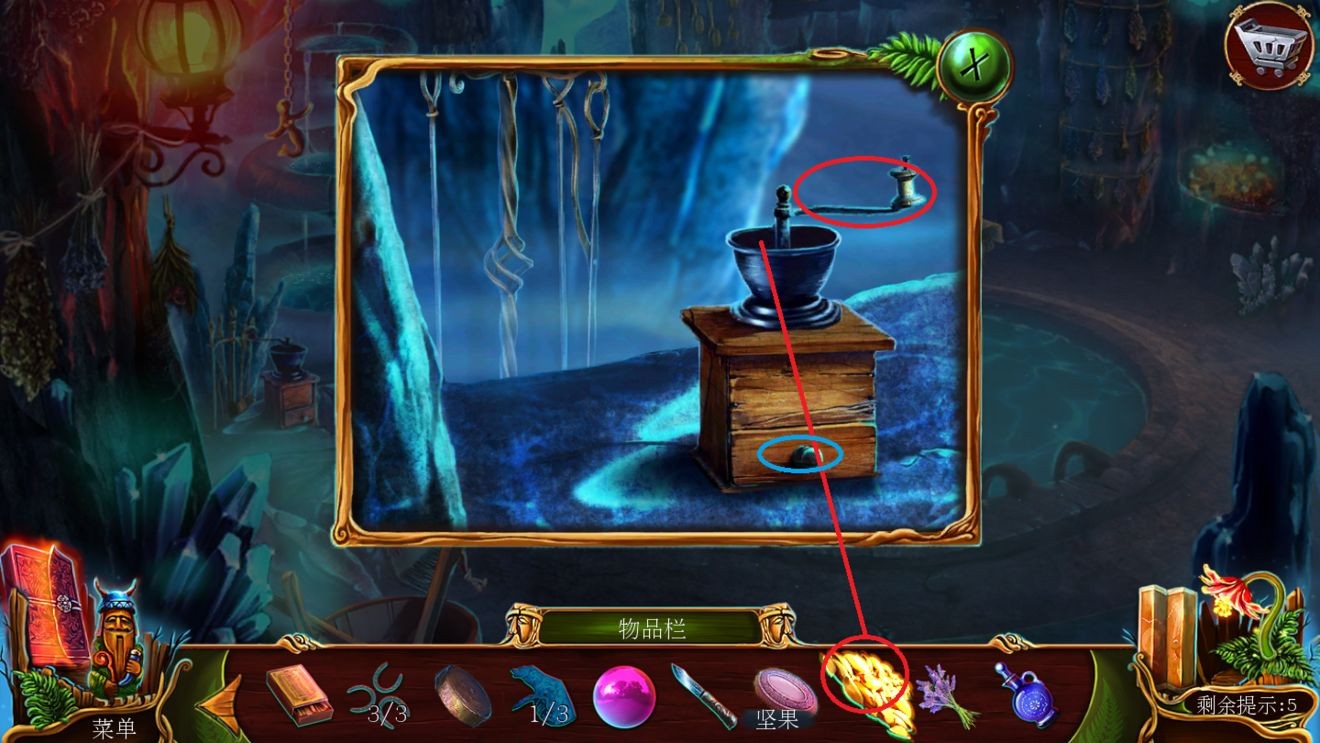
Return to the swamp and enter the hut directly to enter the bathroom. Point 1 grinder, assemble the coffee grinder handle, add nuts, and grind to get ground nuts.
Point 3: Add shower gel, honey, ground nuts, lavender, and soap according to the recipe, and stir with a spoon to start the game. This is really annoying. The red descriptions overlap. Be sure to drag them so that all the information does not overlap. Slow down and it will float back home. Obtain mixed solution.

Pour the mixture into the bathroom to open a conversation and get the stable key. Leave the house and go to the rock area, use the stable key to open the stable and open the hidden object. All this can be found on the surface. Get the mana bridle.


Go to the surveillance area and put the magic bridle on the moth. Click on the human-shaped target, cut the eyes with a knife, and get the shell and wolf talisman. Dianshi table, one flower and one card, pick up the mechanical garden disk.


Take two steps back and enter the cabin living room. Open the star 4 cabinet, put in 2 mechanical disks (it should be a side view), and play the game (in the order of 1-2-3-4-5-1-3 towards the fast side). Get the arrow.

Enter the bathroom. Put star 2 into the shell and get the bow.
Leave the house and go directly to the surveillance area. Put the bow and arrows on the stone table and connect them with the hemp rope in the stone crevice to get the crossbow.
Guard the door. Click on the crossbow to enter the shooting page. There are four sandbags in total. The two sandbags in the middle can only be exposed after shooting the sandbags on both sides. Enter the courtyard. This chapter ends.

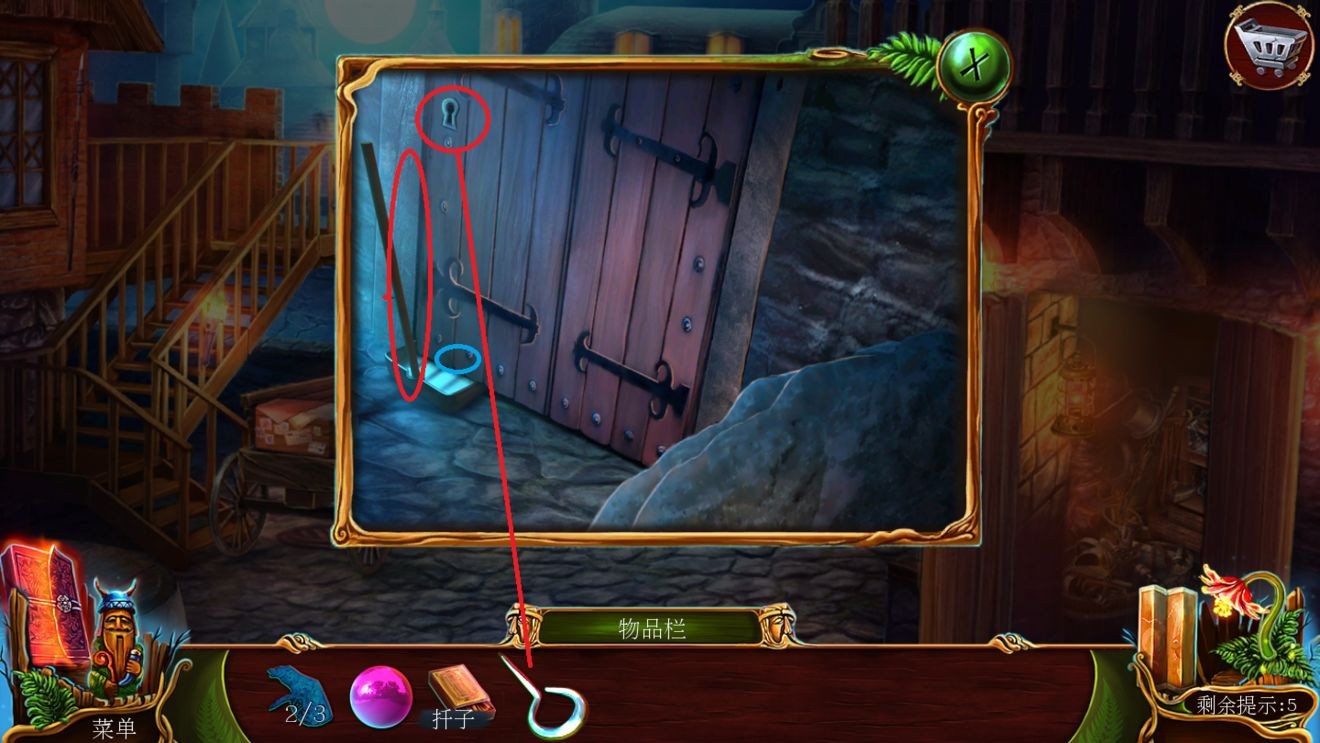
One card in the courtyard. At the gate of Point 5, get the oil lamp. Point star 3 to get a skewer. Point 2 items, one flower, and pick up the hook. Click star 4 to open the wooden door, remove the broken hook on the upper left, place the hook and oil lamp, and enter to find objects. There is a fragment under each object, and you will eventually get a flat shovel after finishing it.


At the gate of Point 5, put the shovel into the bottom of the door, poke the keyhole with a skewer, pull out the shovel and find the door key, and use the key to open the door.
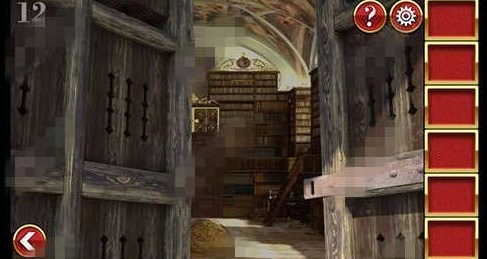
Enter the first floor. There is a card next to the wooden door. Click on the warrior armor and take out the hat. Go into the aisle.

Click on the stained glass on the right, search for objects, and get a rope.

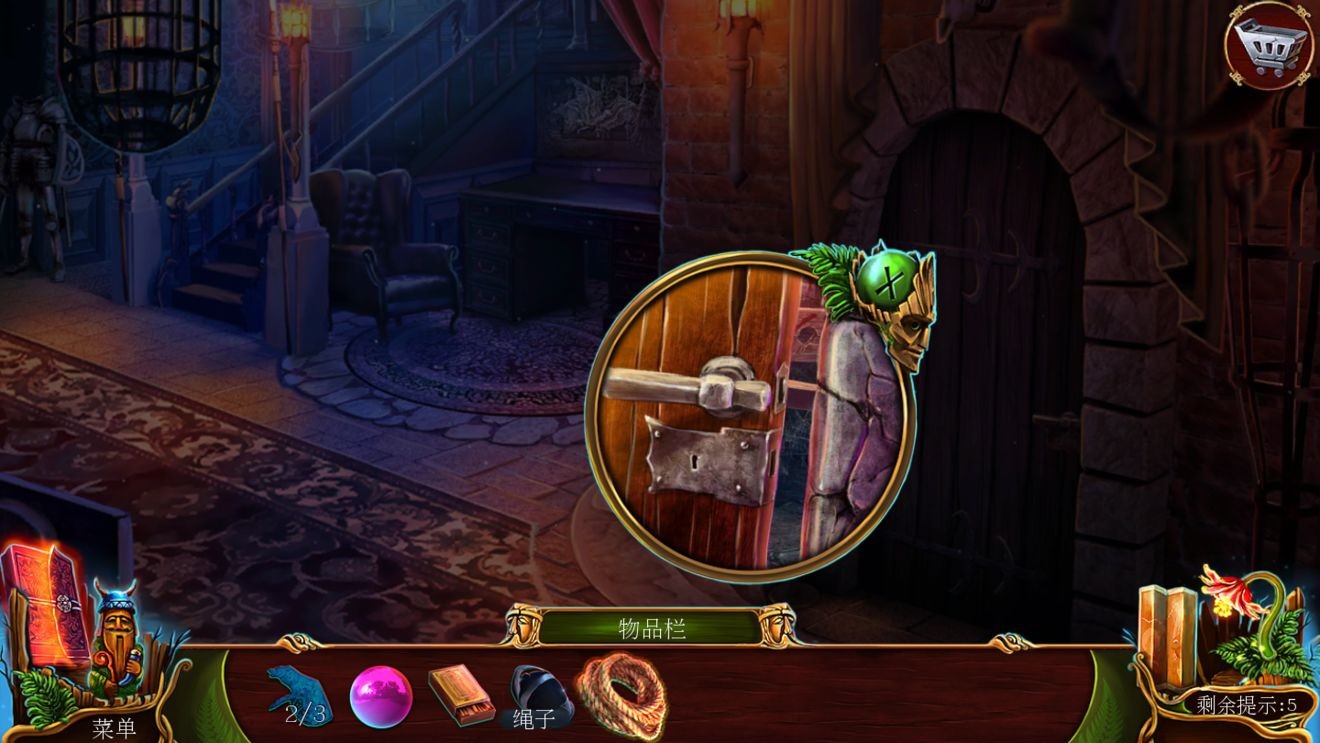
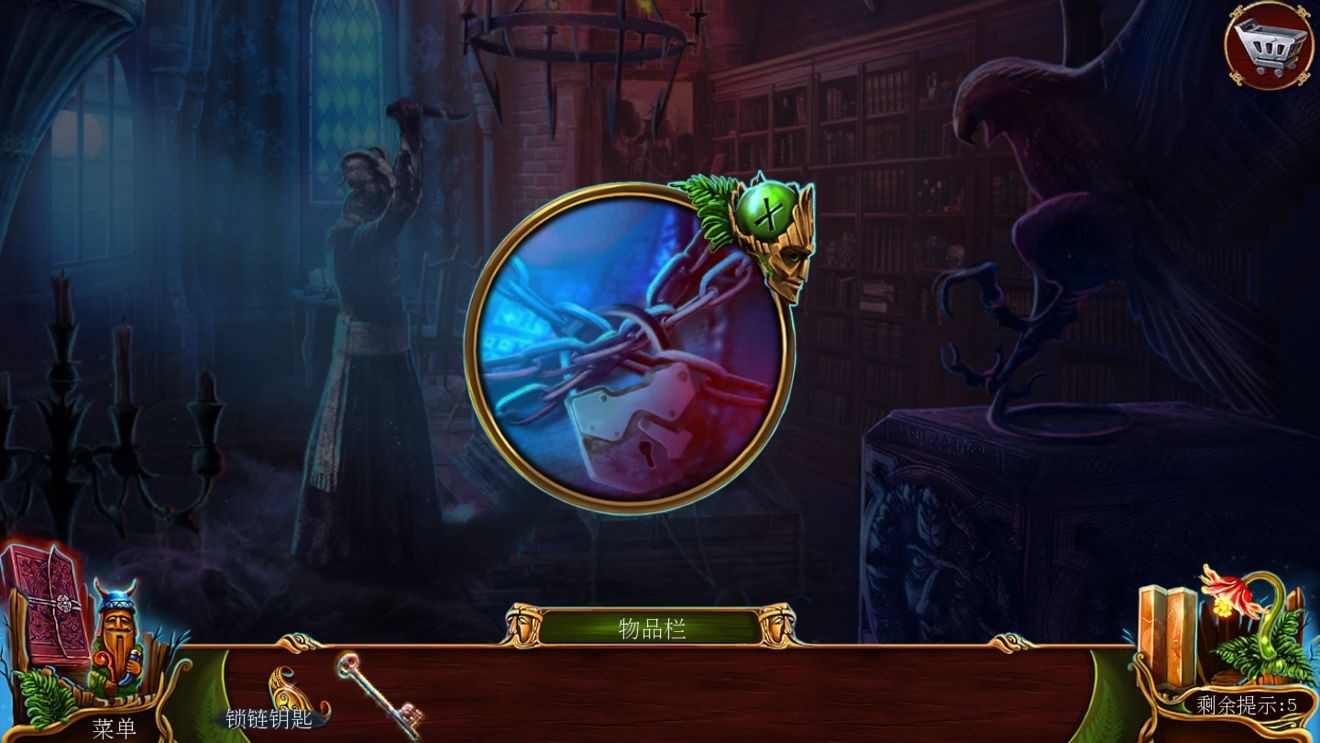
Return to the first floor, click on the prison door, put in the rope, open the crypt door, enter the crypt to trigger the animation.
One card, to jail. One card, talk to grandma, and get the bracelet.


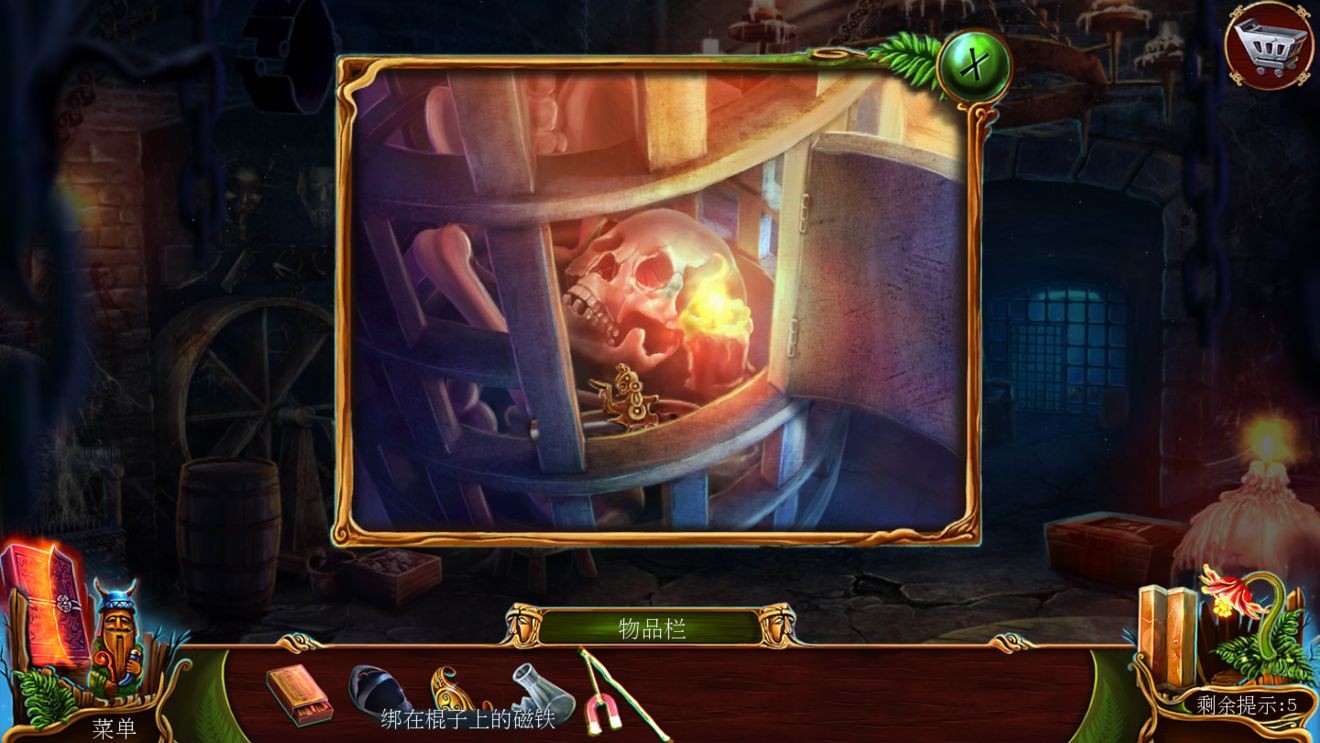
Return to the crypt. Click on the dirt on the left to enter the search object. There is a blue fragment under each object, and you will eventually get the Wolf Talisman.

Return immediately to the previous chapter, The Rocks. Click on the relief on the wall, put in three wolf charms, and complete the puzzle to get the door parts.

Take another step back to the cabin. Put 2 door parts into the stone door on the left to start the game. The rules of this game are very clear. The first must be a pink ball on the left, a green ball on the right, and two blue balls in the middle. Secondly, look at the original layout of the pink ball at the top and the green ball below, so it must be turning in roughly the opposite direction. So first let the two basketballs go out of the separate circles, three times in the left circle and three times in the right circle. At this time, the blue balls are in positions 1 and 2 respectively. After that, you can keep turning in large circles, which should be enough (if I remember correctly).

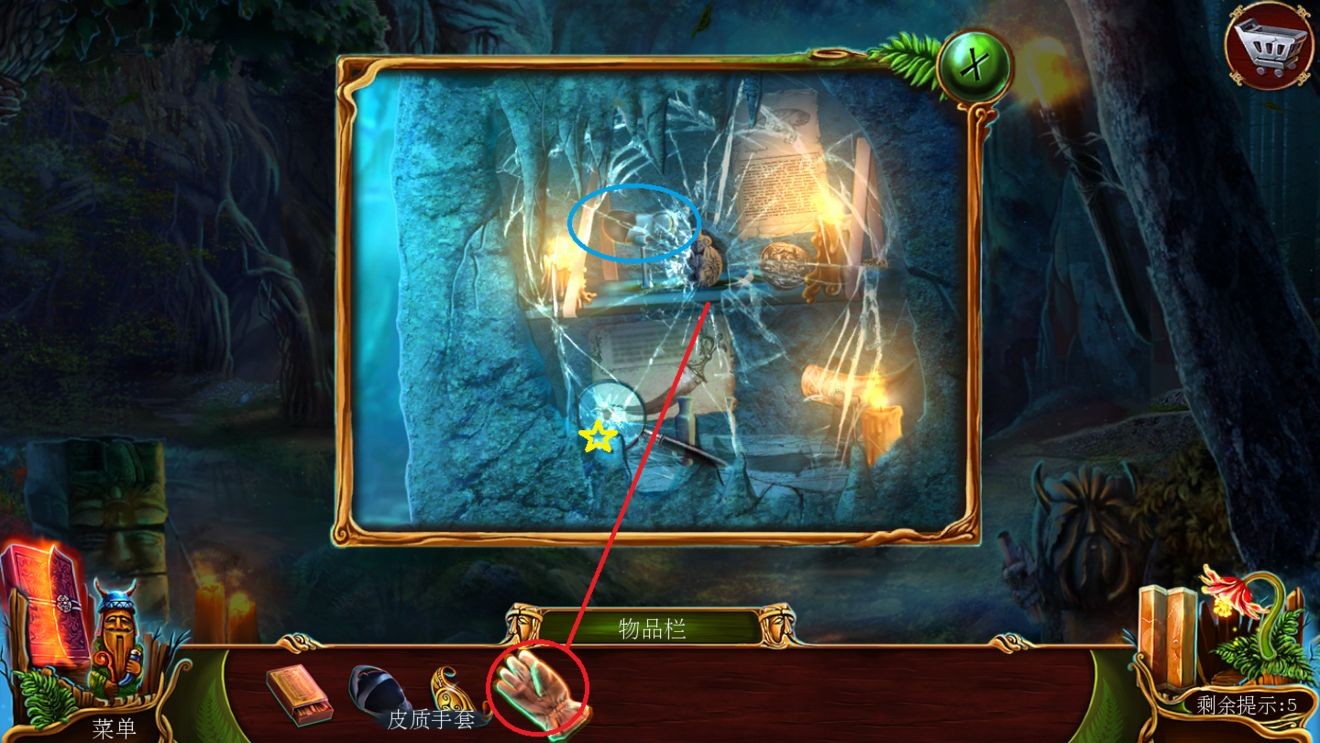
Enter the tomb. Point Star 3 Experiment Table to get the Magic Stone. Point star 5, one flower, pick up the leather gloves. Point 4, use leather gloves to remove the glass slag and pick up your fingers.


Return to Star 5, assemble the fingers, and release the statue's hand to obtain the appearance of the second statue. Point Star 1: For the second statue, pick up the stick tied with a hemp rope, a flower. Turn the statue according to the drawing, open it and get the magic stone, one card.


Point Star 2 statue, put 2 magic stones (the other one is on the side) and enter the game. Use the bracelet to unlock the pattern to trigger the animation to open the fern garden door.


Enter Fern Garden. One flower, one card. Click on the fern flower to trigger the plot, one card. Go back to the left to pick up the rake, click on the grass on the right, use the rake to remove the wheat straw, and click to view the found objects. Obtain the iron saw.


Return to the bathing hut door. Click on the bicycle, use the iron saw to cut off the bicycle pole, and click to pick up the pole.

Enter the tomb. Point Star 5 statue, use the pole to pry up the stone slab to get the lens. Point star 4, put the lens into the magnifying glass, pick it up to get the magnifying glass.


Enter the Fern Garden. Click to look at the fern flower with the magnifying glass to get the secret recipe.

Head to the Rocks. Click on the stable to trigger the hidden object. Get a screwdriver.
Go forward two steps to the courtyard. Click on the cargo cart, use a screwdriver to unscrew the screws, and enter the jigsaw puzzle. Obtained password 481, dropper (obviously a measuring cup).


Take two steps forward to the aisle. Point the stained glass to trigger the hidden object. Get the Pitchfork.

Click on the small cupboard on the right. Put the straw fork in the little devil's hand, open the iron door and get the yellow medicine and the cabinet key.

Click on the box on the left. Open the lower left drawer and pick up the fan, one card. Use the cabinet key to open the drawer on the right to obtain the relief component. Enter the password 481 to open the box. Get the red medicine.

Return to the first floor. Click on the bottom drawer of the dining table and connect the magnet with a stick tied with a hemp rope to get a magnet tied with a hemp rope.

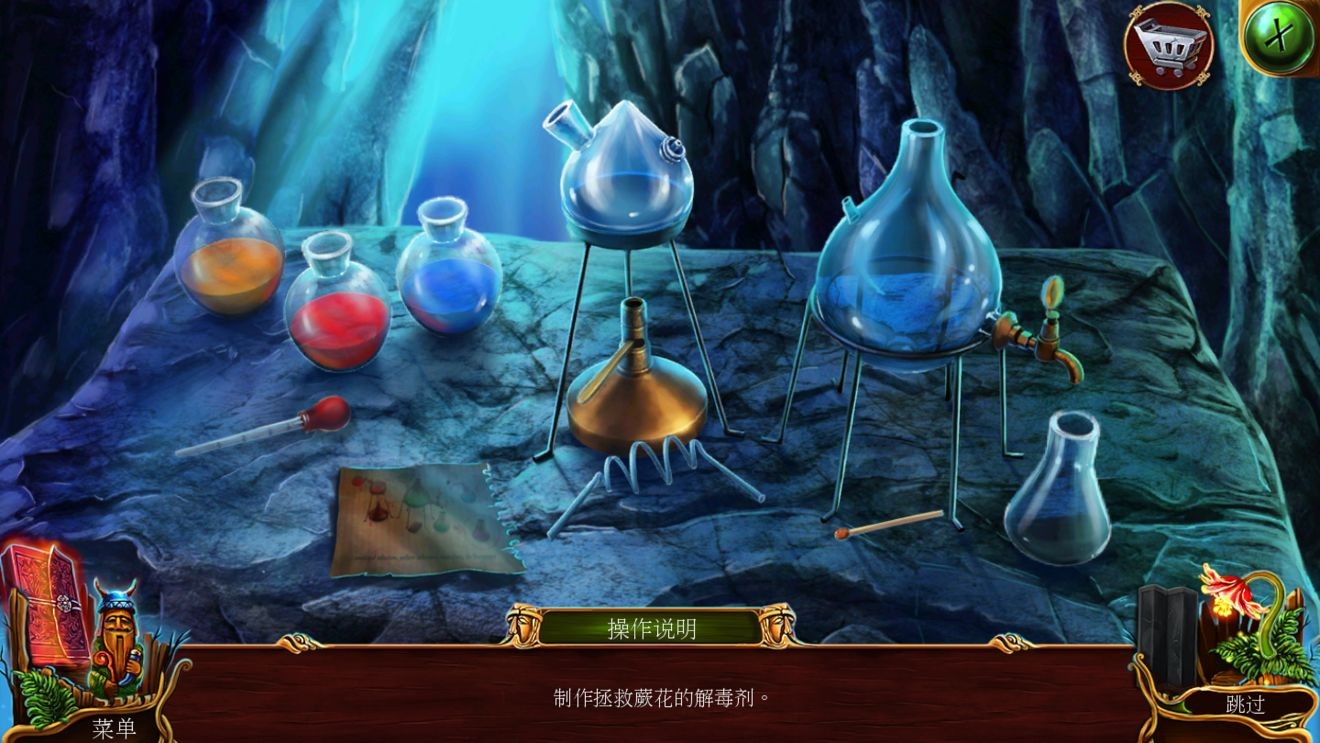
Go back and go straight to the tomb. Put the yellow medicine, red medicine, dropper (measuring cup), and matches into the Dot Star 3 test bench one after another, and follow the secret recipe process to obtain the insecticide.
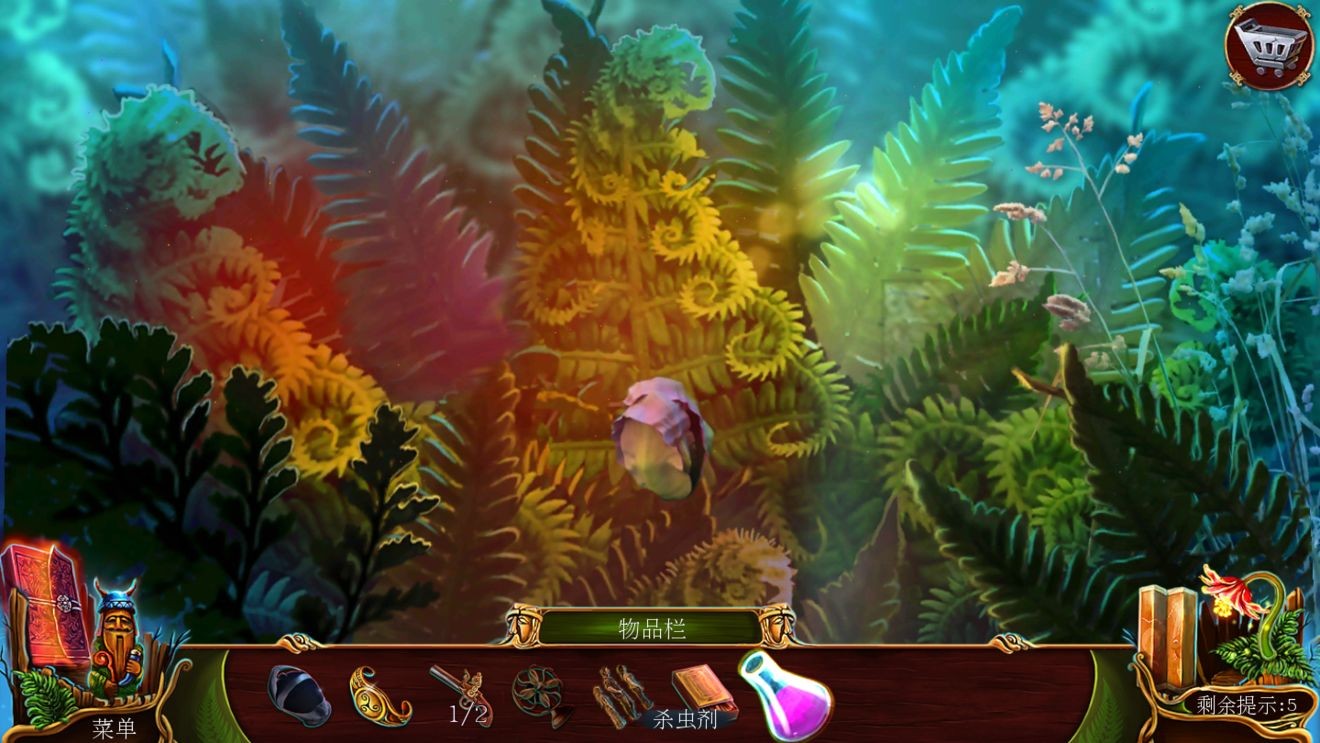
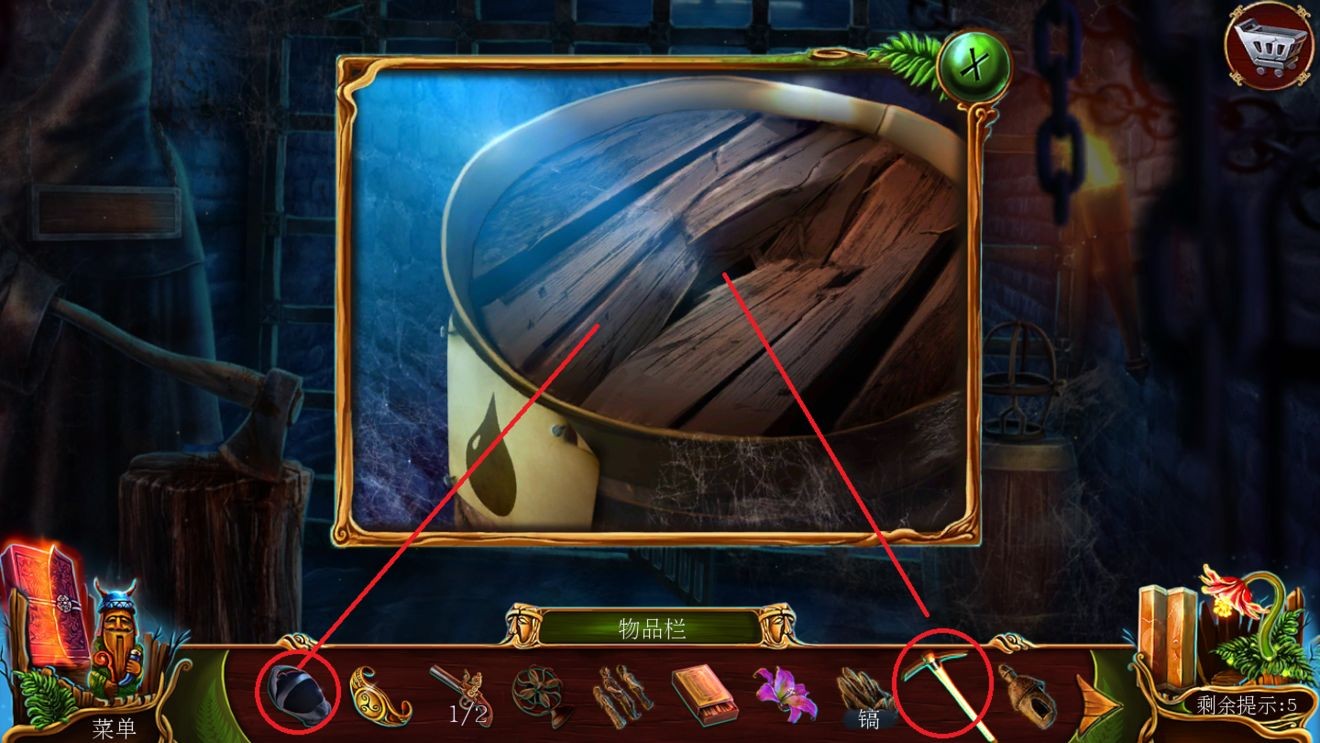
Enter Fern Garden. Click on the fern flower, pour in the pesticide to trigger the animation, and get the fern flower. Click on the grass on the right to trigger the hidden object. Get a pickaxe.

Click on the cliff on the left. Knock it down with a pickaxe and get the relief fragment. The cemetery has fulfilled its mission here.

Direct access to the courtyard. Point star 3 wheels, use pickaxe to obtain relief fragments. Trigger anime.
Enter the first floor to trigger the animation. Take two steps forward to reach the prison. Light the oil barrel, use a pickaxe to smash the lid of the tub, and use the hat to hold the grease to get the oil. Click on the prison to have a conversation, where did grandma go (didn't you see that she was taken away), get comments from grandma, and pick up the fireworks hat.
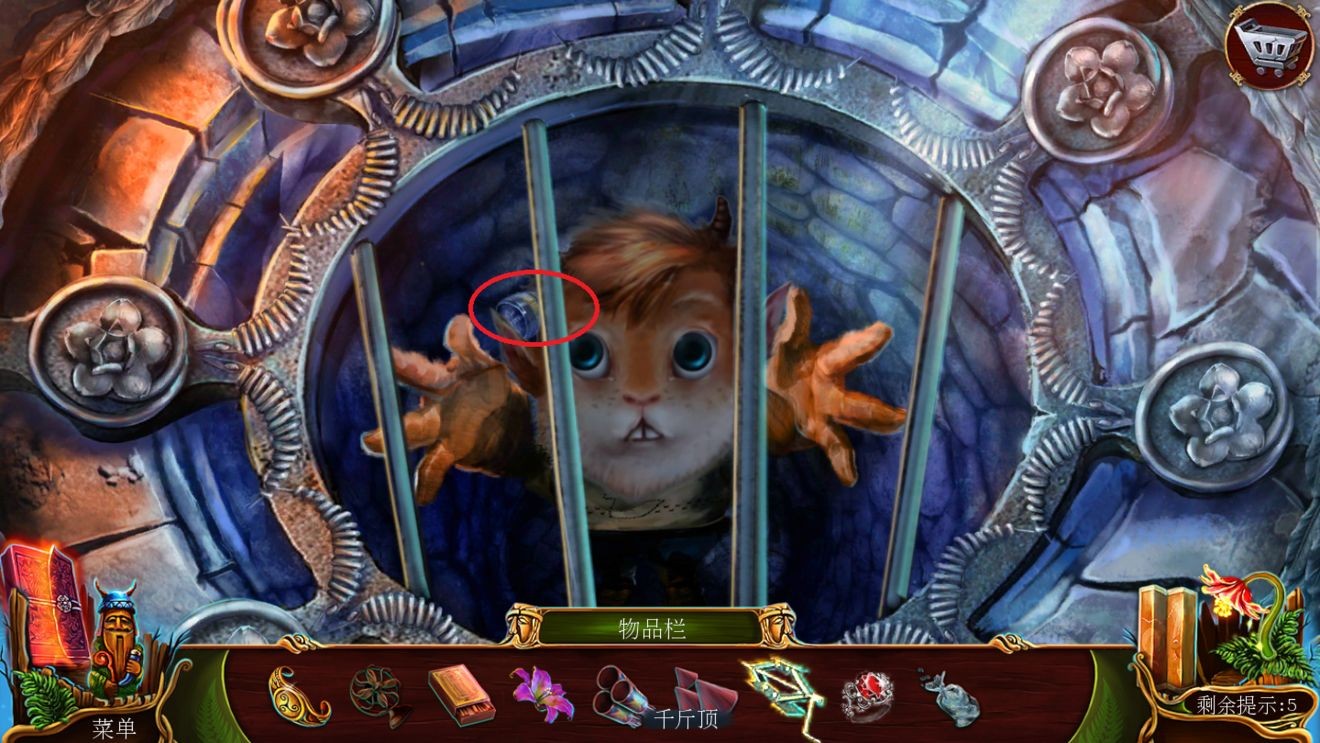
Take a step back to the crypt. Click on the dirty object on the left to trigger the most blind-looking object in the game. Get the jack. Click the iron cage, click it directly without a key, and use the magnet tied to the wooden stick to suck out the pistol button 1.

Exit the prison to the first floor. Click on the warrior armor, add oil, and get relief fragments.

Click on the wood carving mural on the table, put in four relief fragments, and play the game to get pistol button 2 and a diamond ring.
Go back to the crypt, open the box and put in the 2 pistol buttons to get the explosives.

Return to the courtyard. Use the jack to rescue the animal (what's it called) and trigger the animation to get the tape. Take another look into the well to get a flashlight.
Take three steps forward to the aisle to trigger the animation. Clicking on the door also has an animation. Click on the balcony, use the diamond ring to cut the glass, and get the fireworks stick. I put a flashlight on the left shelf and found that it had no power. Click on the cabinet on the right and put in the fan. Tape the wires together and click on the blower to get the fuse.

Go back to the courtyard. Click the stairs on the second floor and go upstairs to the fireworks platform. Pick up the fireworks tube. Click on the experimental table to place the fireworks hat, fireworks tube, fireworks stick, fuse, and explosives, and then assemble them with tape. Get fireworks.

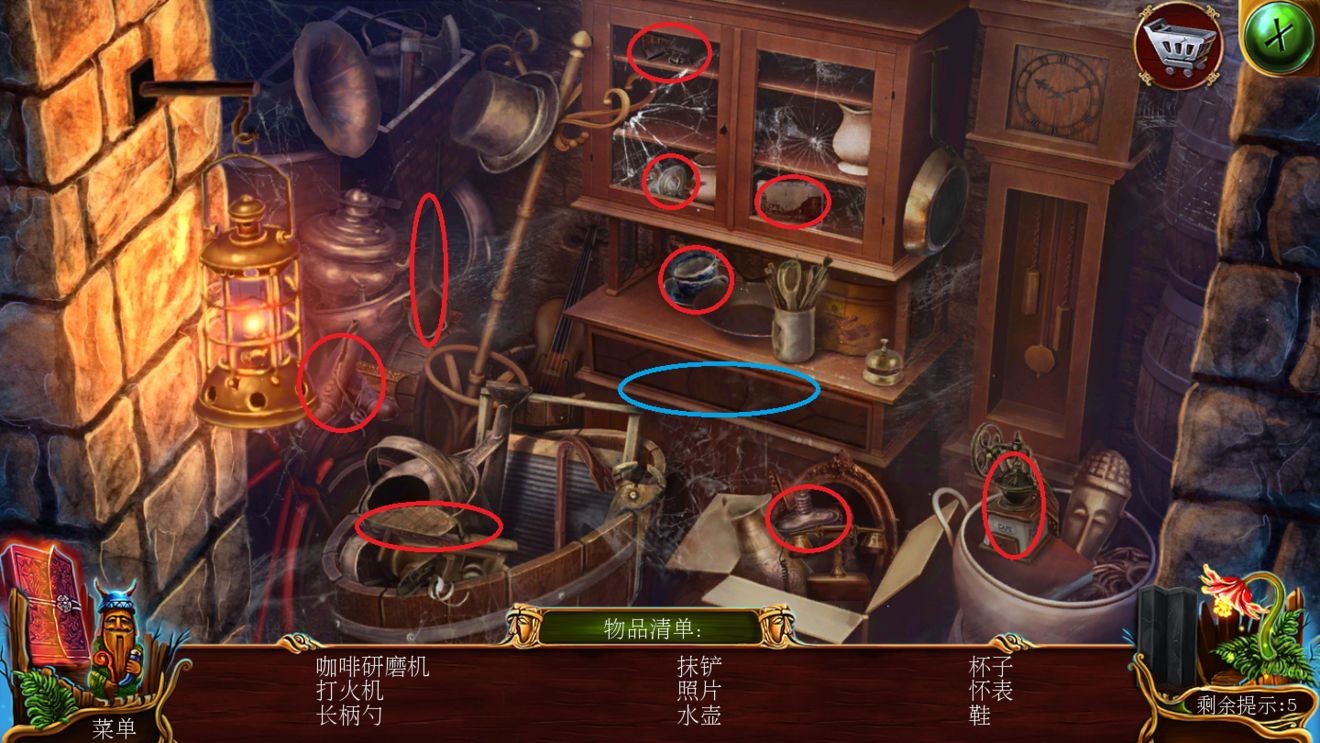
Give the fireworks and matches to the animals and leave for the second floor. The hidden object is triggered in the wooden house on the right side of the courtyard point. There is a fragment under each object, and you will eventually get the battery.

Go straight ahead and pass the balcony. Put the battery into the flashlight to send a signal, triggering the animation and the door opening.

Enter the tower to trigger the animation. Click on the experimental table at the back. One card, put the fern flower into the mortar, mash it with a pestle and pour it into the medicine, triggering the animation Boruta Goes Home.

Click on the petrified Boruta and pick up the chest key. Unlock grandma's shackles.

Spread flowers through the level.

You can rest assured to appreciate and create.

1. First take away the knife in the statue's hand and the wooden basin next to it.
2. There is a rope on the wall on the right side of the scene.
3. Use a knife to cut off the weeds on the ground, and then tie them into a bundle with rope.

4. Use a bucket to scoop out the water in the water tank, and then sweep it clean with grass to expose a few marks.

5. Light up the corresponding marks on the right wall to obtain a fragment.

6. Put the pieces into this tool and start to puzzle. The puzzle is made up of three people, and after finishing the puzzle, you get the key.
7. Use the key to open the door and leave. This level is over.

1. Everyone first goes to the red circle in the picture below to get a bamboo pole.
2. Then go to the location in the picture below. There is a knife head here.

3. It consists of two, hook out the key.

4. Then use the key to open the wooden cabinet on the right and get a glass bottle inside.

5. There is a hammer next to the door.
6. Use a hammer to break open the box on the left side of the street to get a jar of red dye.

7. Pour the fuel into the glass bottle, and then use it to replace the fuel of other colors. Place it according to the colors on the table, open the mechanism, and get a grid.

8. Then there is a wooden box in the red circle in the picture below.

9. Put the remaining pieces in, and first make the four corners as shown in the picture below. The method is to make a prism in the middle. Once done, just click in the middle.

10. Open the box and get a key.

11. Use the key to open the door and leave. This is the basis of this level.

1. We first go to the location in the picture below to get the barrels and parts.

2. Install the part on the rotary switch, put up a small part, and then use a wooden bucket to fill the pool with water.

3. Put the barrel filled with water and a mechanism will appear.
4. Select the area shown in the red circle in the picture below. The principle is that these are all related to the ocean. The reminder is the ship on the wall.

5. Get a hammer.

6. Use a hammer to hit the area shown in the red circle in the picture below.

7. Get another identical part.

8. Click on the area indicated by the arrow.

9. Insert the two parts into this disk to get a key.

10. Use the key to open the door and pass this level.
1. In this level, everyone first goes to the area in the picture below to get a hammer and some nails.

2. There is a horseshoe on the wall. Remember the shape of it and the two marks on the side.

3. Combine the hammer head, nails and horseshoe and put them here, placing them in the direction of the red circle in the previous step.

4. Obtain a horse rope and an iron rake.
5. Use the rope to drive the horse away and the rake to shovel the grass.

6. Discover a reminder and a prop.

7. The small prop is a "P", put it into the box on the left cart, and then click PECTUS.

8. Obtain a prop.

9. There is a device in the area where you got the horseshoe before.

10. Install the props first, click on the right side first, then click on the left side, and keep clicking.
11. Open it and get a key.

12. Use the key to open the door and leave.
1. Get the knife in the corner.
2. Get a gold coin here.
3. A hammer.

4. Use a knife to pluck the gold coins off the wall. This is a clue that there is a number 18 on the wall. Write it down.

5. Put the two gold coins together and hit this place with a hammer.

6. And put the gold coins into the armor that is missing one.

7. This is to see an identical armor on the opposite side. The gold coins on it are arranged in this way (picture below). We put the piece with the gold coins on it into the same order.
8. Get a face mask.

9. When the mask is placed on this giant shield, the vertical sum of both sides must be equal to 18. The left side from top to bottom can be 6, 8, 1, 3, and the right side can be 2, 4, 5, 7.

10. Get the key.

11. Open the door and leave, this is the basis for this level.

1. Let’s first get a mirror at the location in the picture below.

2. A brush that burns the wall.
3. There is a piece of earth-like thing here, which is merged with the mirror and then with the brush.
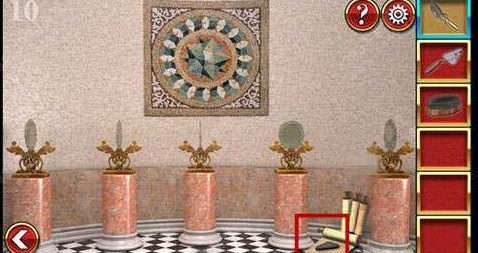
4. Become very clean.

5. Soak it in the bucket again to make it cleaner.

6. Place the mirror on the fourth one from left to right, and then rotate the other mirrors to send five beams of light.
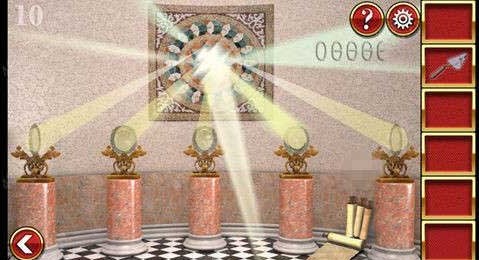
7. When the light hits the middle of the floor, use the shovel to shovel it down to get a statue.

8. Put in the statue, look to the left on the far right, and look to the back on the far left. If you don’t understand the three in the middle, open the mechanism and get the key.

9. Use the key to open the door and close it.

1. Get the ball on the statue first in this level.

2. Take the ball and replace the book at the lion's feet. At this time, there will be a change behind the lion, and a mechanism will appear.

3. Put it in the hand of the statue, open it below, and get a hook and a bottle.
4. There is a rope on the door.
5. Here is a brush.

6. The bottle and the brush are combined, and eight patterns are produced when the painting is brushed.
7. Combine the hook and the rope, open the prologue, and find seven patterns similar to the previous step, so there is one less.

8. Look here, there is a picture.

9. The numbers above mean the numbers you click on.
10. Click on the mechanisms behind the lion in sequence.

11. Get the garden plate.
12. Put it in and place it according to the appearance in the previous painting to get the key.

13. Open the door and leave.

1. First pick up the ax on the ground.

2. Then there is a big stick in the maze.

3. The big stick and the ax head form a complete axe, which can break the iron chain.
4. There is a prosthetic hand next to the small pool on the right side of the gate.
5. Put the iron chain into the pool, and a disk will appear.

6. Place the disk on the mechanism in the pavilion.

7. Refer to the direction indicated in orange at this location.

8. Adjust the orange hand of the corresponding disk to the corresponding direction to get a stone.

9. Attach the fake hand to the female statue on the left, click the hand, and place the chain in the red circle below to generate the second stone.

10. Place two stones under the seahorse statue and click on the seahorse statue.

11. Play a game and want two balls to reach the orange area at the same time.

12. The method is to sink first, then let the ball on the left get stuck in the position shown in the picture below and move up a little, and then let the ball on the right move up. Then the two balls maintain the position shown in the picture below, and they can reach the left at the same time.

13. Get the key.

14. Open the door and leave. This level is over.
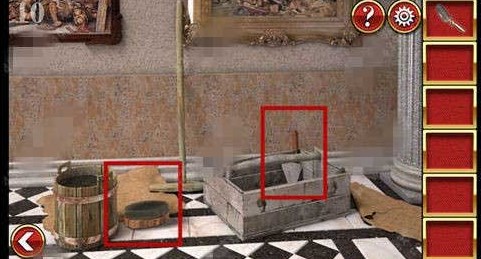
1. Take away the candle from the table.

2. Take away the ladder, order it on the dining table, and take away the steel nails and the like.

3. Click these squares on the left side of the bookcase, take away what you can, and put the ladder up.

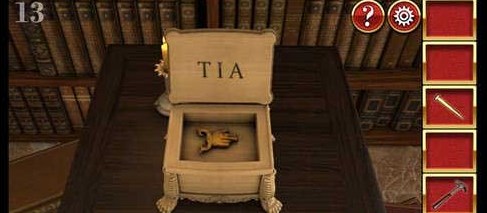
4. Here you need to combine the flint and the candle and put them on. Then click on the data where the pointer belongs, and white circle prompts will be generated continuously. The number will become more and more. Just click once according to the prompts.

5. Get a hand-shaped pointer and a TIA prompt.
6. The pointer is fused with the steel nail and hammer head and placed on this clock.

7. Here we need to move the ruler to get the items on the dial.

8. The minute hand prompt is here.
9. The clock prompt is here, representing 2.
10. Therefore, if the clock is tilted towards 2 and the minute hand points to that mark (between 4 and 5), you can obtain this item.

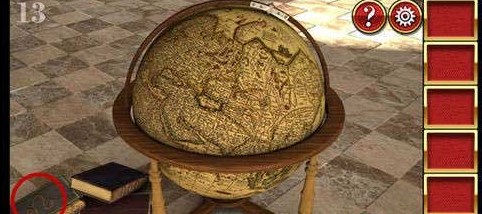
11. Click on the globe, go to the one with an eagle pattern, and then click with a prop.

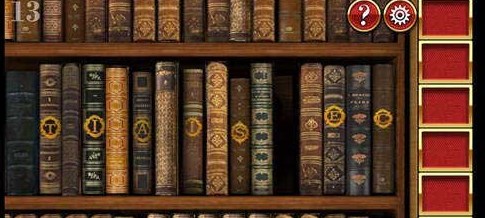
12. Get a book with a prompt of the word SCIEN.

13. Place the book on top, and then adjust the order to SCIENTIA.
14. Get a key.
15. Open the door and leave. This level is over.

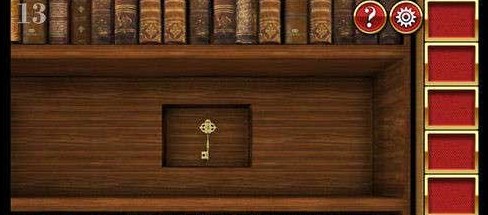
1. Entering level 14 of the game, we first get tomatoes and wooden chopsticks on the dining table.
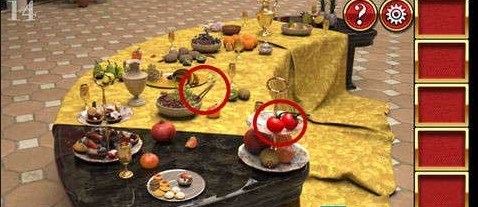
2. There is a fork on the other side.

3. Here is a banana, a prop that I don’t know what it is, and then use chopsticks to pick up the peach.

4. Use that prop to open the box and get a disc.

5. Use a fork to open the wooden cabinet and get a knife and a bowl.

6. Put the disk you obtained before here, and reverse the order of the four number series. The original order is from big to small to small to big. After reversing all the numbers, you will get a bottle of spices.

7. Use a bowl to hold a bowl of soup and place it on the left side.
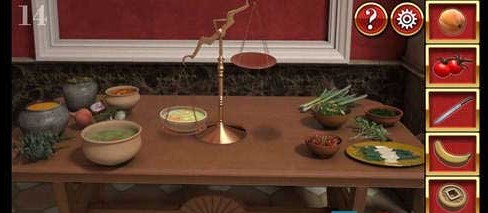
8. Then use a knife to cut the peach, add the remaining other things, and put them on the right side to get a key.
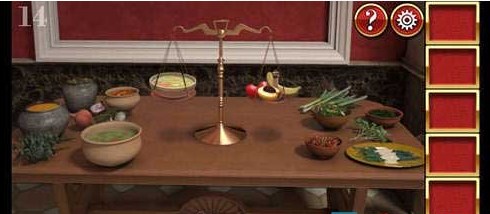
9. Use the key to open the door and this level is completed.
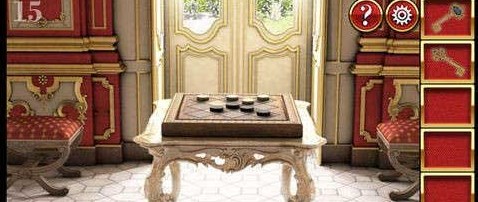
1. First look for a small knife in the area shown below.

2. Then place a square piece in the position shown below.

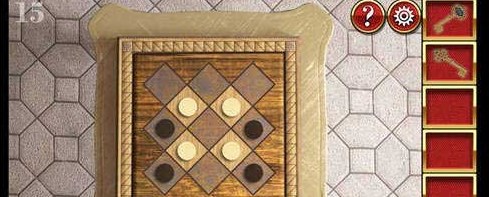
3. Cut open the table and chairs with the knife to get a black chess piece, take away the pillow core, and put the square piece into the gap below.

4. Play a memory game. Only two identical patterns can be saved, otherwise you have to click again. The pattern is as follows.

5. Get a key and a white chess piece.

6. Put the black pieces here.

7. Play a game and swap black and white. The standard is that different colors can jump, but the same color cannot jump. Get the second key when it's over.

8. Put the white chess here.
9. Play the third game. The purpose is to place the white chess piece on the white part. The rules are that the same color can jump one square, and different colors can move one square, as follows. Get the third key at the end.
10. Put the three keys in.

11. The left side is diagonally upward to the right, the right side is diagonally upward to the left, and the middle is flat. Open the box and get the final key.

12. Use the key to open the door and leave. This level is over.
