Eureka
5.5.0

ทำด้วย❤โดย xmartlabs นี่คือการสร้าง XLFORM อีกครั้งใน Swift
简体中文
 |  |  |
|---|
สำหรับข้อมูลเพิ่มเติมดูที่โพสต์บล็อกของเราที่แนะนำ ยูเรก้า
คุณสามารถโคลนและเรียกใช้โครงการตัวอย่างเพื่อดูตัวอย่างของคุณสมบัติส่วนใหญ่ของยูเรก้า
 |  |
|---|
โดยการขยาย FormViewController คุณสามารถเพิ่มส่วนและแถวลงในตัวแปร form
import Eureka
class MyFormViewController : FormViewController {
override func viewDidLoad ( ) {
super . viewDidLoad ( )
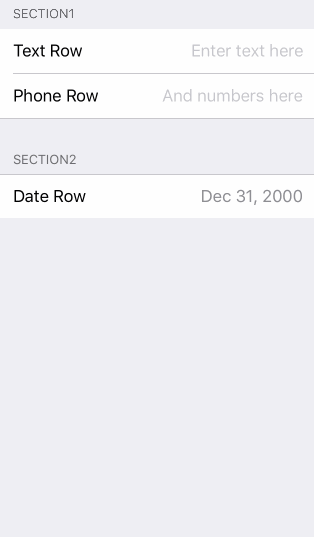
form +++ Section ( " Section1 " )
<<< TextRow ( ) { row in
row . title = " Text Row "
row . placeholder = " Enter text here "
}
<<< PhoneRow ( ) {
$0 . title = " Phone Row "
$0 . placeholder = " And numbers here "
}
+++ Section ( " Section2 " )
<<< DateRow ( ) {
$0 . title = " Date Row "
$0 . value = Date ( timeIntervalSinceReferenceDate : 0 )
}
}
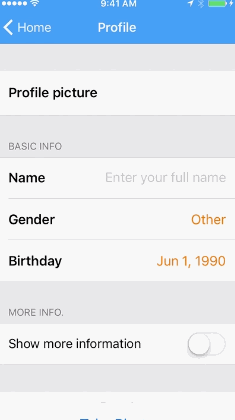
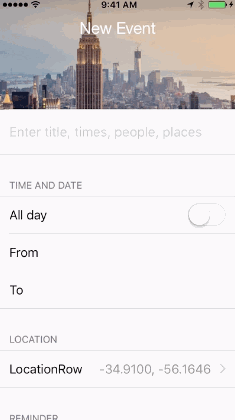
}ในตัวอย่างเราสร้างสองส่วนด้วยแถวมาตรฐานผลลัพธ์คือ:
คุณสามารถสร้างแบบฟอร์มได้โดยเพียงแค่ตั้งค่าคุณสมบัติ form ด้วยตัวเองโดยไม่ต้องขยายจาก FormViewController แต่โดยทั่วไปแล้ววิธีนี้จะสะดวกกว่า
ในการเปลี่ยนพฤติกรรมนี้คุณควรตั้งค่าตัวเลือกการนำทางของคอนโทรลเลอร์ของคุณ FormViewController มีตัวแปร navigationOptions ซึ่งเป็น enum และสามารถมีค่าต่อไปนี้อย่างน้อยหนึ่งค่า:
canBecomeFirstResponder() ค่าเริ่มต้นถูก enabled & skipCanNotBecomeFirstResponderRow
เพื่อเปิดใช้งานการเลื่อนอย่างราบรื่นไปยังแถวนอกหน้าจอให้เปิดใช้งานผ่านคุณสมบัติ animateScroll โดยค่าเริ่มต้น FormViewController จะกระโดดทันทีระหว่างแถวเมื่อผู้ใช้กดปุ่มถัดไปหรือก่อนหน้าใน Accesory การนำทางแป้นพิมพ์รวมถึงเมื่อแถวถัดไปปิดหน้าจอ
ในการตั้งค่าจำนวนช่องว่างระหว่างแป้นพิมพ์และแถวที่ไฮไลต์หลังจากเหตุการณ์การนำทางให้ตั้งค่าคุณสมบัติ rowKeyboardSpacing โดยค่าเริ่มต้นเมื่อแบบฟอร์มเลื่อนไปที่มุมมองนอกจอจะไม่มีช่องว่างอยู่ระหว่างด้านบนของแป้นพิมพ์และด้านล่างของแถว
 class MyFormViewController : FormViewController {

    override func viewDidLoad ( ) {
        super . viewDidLoad ( )
        form = ...

	// Enables the navigation accessory and stops navigation when a disabled row is encountered
	navigationOptions = RowNavigationOptions . Enabled . union ( . StopDisabledRow )
	// Enables smooth scrolling on navigation to off-screen rows
	animateScroll = true
	// Leaves 20pt of space between the keyboard and the highlighted row after scrolling to an off screen row
	rowKeyboardSpacing = 20
    }
}
หากคุณต้องการเปลี่ยนมุมมองอุปกรณ์เสริมการนำทางทั้งหมดคุณจะต้องแทนที่ตัวแปร navigationAccessoryView ในคลาสย่อยของ FormViewController
วัตถุ Row ถือ ค่า ของประเภทเฉพาะ ตัวอย่างเช่น SwitchRow ถือค่า Bool ในขณะที่ TextRow มีค่า String
// Get the value of a single row
let row : TextRow ? = form . rowBy ( tag : " MyRowTag " )
let value = row . value

// Get the value of all rows which have a Tag assigned
// The dictionary contains the 'rowTag':value pairs.
let valuesDictionary = form . values ( )ยูเรก้ามีตัวดำเนินการที่กำหนดเองเพื่อให้การสร้างแบบฟอร์มง่าย:
form +++ Section ( )

// Chain it to add multiple Sections
form +++ Section ( " First Section " ) +++ Section ( " Another Section " )

// Or use it with rows and get a blank section for free
form +++ TextRow ( )
+++ TextRow ( ) // Each row will be on a separate sectionform +++ Section ( )
<<< TextRow ( )
<<< DateRow ( )
// Or implicitly create the Section
form +++ TextRow ( )
<<< DateRow ( ) // Append Sections into a Form
form += [ Section ( " A " ) , Section ( " B " ) , Section ( " C " ) ]
// Append Rows into a Section
section += [ TextRow ( ) , DateRow ( ) ]ยูเรก้ารวมถึงผู้สร้างผลลัพธ์เพื่อสร้างรูปแบบการสร้างได้ง่าย:
// Section + Section
form = ( Section ( " A " ) +++ {
    URLRow ( " UrlRow_f1 " ) { $0 . title = " Url " }
    if something {
        TwitterRow ( " TwitterRow_f2 " ) { $0 . title = " Twitter " }
    } else {
        TwitterRow ( " TwitterRow_f1 " ) { $0 . title = " Twitter " }
    }
    AccountRow ( " AccountRow_f1 " ) { $0 . title = " Account " }
} )

// Form + Section
form +++ {
    if something {
        PhoneRow ( " PhoneRow_f1 " ) { $0 . title = " Phone " }
    } else {
        PhoneRow ( " PhoneRow_f2 " ) { $0 . title = " Phone " }
    }
    PasswordRow ( " PasswordRow_f1 " ) { $0 . title = " Password " }
} @ FormBuilder
var form : Form {
Section ( " Section A " ) { section in
section . tag = " Section_A "
}
if true {
Section ( " Section B " ) { section in
section . tag = " Section_B "
}
}
NameRow ( " NameRow_f1 " ) { $0 . title = " Name " }
}ยูเรก้ารวมถึงการโทรกลับเพื่อเปลี่ยนลักษณะที่ปรากฏและพฤติกรรมของแถว
Row เป็น abstraction Eureka ใช้ซึ่งถือ ค่า และมี Cell มุมมอง Cell จัดการมุมมองและคลาสย่อย UITableViewCell
นี่คือตัวอย่าง:
 let row  = SwitchRow ( " SwitchRow " ) { row in      // initializer
                        row . title = " The title "
                    } . onChange { row in
                        row . title = ( row . value ?? false ) ? " The title expands when on " : " The title "
                        row . updateCell ( )
                    } . cellSetup { cell , row in
                        cell . backgroundColor = . lightGray
                    } . cellUpdate { cell , row in
                        cell . textLabel ? . font = . italicSystemFont ( ofSize : 18.0 )
} 
onchange ()
เรียกว่าเมื่อค่าของแถวเปลี่ยน คุณอาจสนใจปรับพารามิเตอร์บางอย่างที่นี่หรือแม้แต่ทำให้แถวอื่น ๆ ปรากฏหรือหายไป
OncellSelection ()
เรียกว่าทุกครั้งที่ผู้ใช้แตะในแถวและได้รับการเลือก โปรดทราบว่าสิ่งนี้จะได้รับการเรียกว่าเป็นแถวปิดใช้งานดังนั้นคุณควรเริ่มรหัสของคุณภายในการโทรกลับนี้ด้วยบางอย่างเช่น guard !row.isDisabled else { return }
cellsetup ()
เรียกเพียงครั้งเดียวเมื่อเซลล์ถูกกำหนดค่าเป็นครั้งแรก ตั้งค่าการตั้งค่าถาวรที่นี่
CellUpdate ()
เรียกว่าทุกครั้งที่เซลล์ปรากฏบนหน้าจอ คุณสามารถเปลี่ยนรูปลักษณ์ที่นี่โดยใช้ตัวแปรที่อาจไม่ปรากฏบน cellsetup ()
Oncellhighlightchanged ()
เรียกว่าเมื่อใดก็ตามที่เซลล์หรือมุมมองย่อยใด ๆ กลายเป็นหรือลาออกจากการตอบกลับครั้งแรก
Onrowvalidationchanged ()
เรียกว่าเมื่อใดก็ตามที่ข้อผิดพลาดการตรวจสอบความถูกต้องที่เกี่ยวข้องกับการเปลี่ยนแปลงแถว
onexpandinlinerow ()
เรียกก่อนขยายแถวอินไลน์ ใช้กับแถวที่สอดคล้องกับโปรโตคอล InlineRowType
OnCollapseinlinerow ()
เรียกว่าก่อนที่จะยุบแถวอินไลน์ ใช้กับแถวที่สอดคล้องกับโปรโตคอล InlineRowType
onpresent ()
เรียกโดยแถวก่อนที่จะนำเสนอคอนโทรลเลอร์มุมมองอื่น นำไปใช้กับแถวที่สอดคล้องกับ PresenterRowType โปรโตคอล ใช้เพื่อตั้งค่าคอนโทรลเลอร์ที่นำเสนอ
คุณสามารถตั้งค่า String ชื่อหรือ View ที่กำหนดเองเป็นส่วนหัวหรือส่วนท้ายของ Section
 Section ( " Title " )

Section ( header : " Title " , footer : " Footer Title " )

Section ( footer : " Footer Title " ) คุณสามารถใช้มุมมองที่กำหนดเองได้จากไฟล์ .xib :
 Section ( ) { section in
    var header = HeaderFooterView < MyHeaderNibFile > ( . nibFile ( name : " MyHeaderNibFile " , bundle : nil ) )

    // Will be called every time the header appears on screen
    header . onSetupView = { view , _ in
        // Commonly used to setup texts inside the view
        // Don't change the view hierarchy or size here!
    }
    section . header = header
}
หรือ UIView ที่กำหนดเองที่สร้างขึ้นโดยทางโปรแกรม
 Section ( ) { section in
    var header = HeaderFooterView < MyCustomUIView > ( . class )
    header . height = { 100 }
    header . onSetupView = { view , _ in
        view . backgroundColor = . red
    }
    section . header = header
}
หรือเพียงแค่สร้างมุมมองด้วยการโทรกลับ
 Section ( ) { section in
    section . header = {
          var header = HeaderFooterView < UIView > ( . callback ( {
              let view = UIView ( frame : CGRect ( x : 0 , y : 0 , width : 100 , height : 100 ) )
              view . backgroundColor = . red
              return view
          } ) )
          header . height = { 100 }
          return header
        } ( )
}
ในกรณีนี้เราซ่อนและแสดงส่วนทั้งหมด
ในการทำสิ่งนี้ให้สำเร็จในแต่ละแถวมีตัวแปรที่ hidden ของ Condition ประเภทเสริมซึ่งสามารถตั้งค่าได้โดยใช้ฟังก์ชั่นหรือ NSPredicate
ใช้กรณี function ของ Condition :
Condition . function ( [ String ] , ( Form ) - > Bool ) อาร์เรย์ของ String ที่จะผ่านควรมีแท็กของแถวแถวนี้ขึ้นอยู่กับ ทุกครั้งที่ค่าของแถวใด ๆ เปลี่ยนฟังก์ชันจะถูกประเมินใหม่ ฟังก์ชั่นจะใช้ Form และส่งคืน Bool ที่ระบุว่าควรซ่อนแถวหรือไม่ นี่เป็นวิธีที่ทรงพลังที่สุดในการตั้งค่าคุณสมบัติ hidden เนื่องจากไม่มีข้อ จำกัด ที่ชัดเจนของสิ่งที่สามารถทำได้
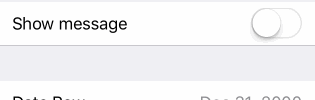
form +++ Section ( )
            <<< SwitchRow ( " switchRowTag " ) {
                $0 . title = " Show message "
            }
            <<< LabelRow ( ) {

                $0 . hidden = Condition . function ( [ " switchRowTag " ] , { form in
                    return ! ( ( form . rowBy ( tag : " switchRowTag " ) as? SwitchRow ) ? . value ?? false )
                } )
                $0 . title = " Switch is on! "
} 
 public enum Condition {
    case function ( [ String ] , ( Form ) -> Bool )
    case predicate ( NSPredicate )
} ตัวแปร hidden สามารถตั้งค่าด้วย NSPredicate ในสตริงเพรดิเคตคุณสามารถอ้างอิงค่าของแถวอื่นโดยแท็กเพื่อตรวจสอบว่าควรซ่อนแถวหรือมองเห็นได้หรือไม่ สิ่งนี้จะใช้ได้เฉพาะในกรณีที่ค่าของแถวที่เพรดิเคตต้องตรวจสอบคือ nsobjects (สตริงและ int จะทำงานได้ตามที่เชื่อมต่อกับคู่ OBJC ของพวกเขา แต่ enums จะไม่ทำงาน) เหตุใดจึงมีประโยชน์ในการใช้งานเพรดิเคตเมื่อมี จำกัด มากขึ้น? พวกเขาสามารถทำได้ง่ายกว่าและอ่านง่ายกว่าฟังก์ชั่น ดูตัวอย่างนี้:
$0 . hidden = Condition . predicate ( NSPredicate ( format : " $switchTag == false " ) ) และเราสามารถเขียนได้สั้นลงเนื่องจาก Condition สอดคล้องกับ ExpressibleByStringLiteral :
$0 . hidden = " $switchTag == false "หมายเหตุ: เราจะแทนที่ค่าของแถวที่มีแท็กคือ 'switchtag' แทน '$ switchtag'
สำหรับทั้งหมดนี้ในการทำงาน แถวที่เกี่ยวข้องทั้งหมดจะต้องมีแท็ก เนื่องจากแท็กจะระบุพวกเขา
นอกจากนี้เรายังสามารถซ่อนแถวด้วยการทำ:
$0 . hidden = true ตาม Condition สอดคล้องกับ ExpressibleByBooleanLiteral
การไม่ตั้งค่าตัวแปร hidden จะทำให้แถวมองเห็นได้เสมอ
หากคุณตั้งค่าเงื่อนไขที่ซ่อนอยู่ (หรือปิดการใช้งาน) ด้วยตนเองหลังจากแสดงแบบฟอร์มคุณอาจต้องโทรหา row.evaluateHidden() เพื่อบังคับให้ยูเรก้าประเมินเงื่อนไขใหม่อีกครั้ง ดูส่วนคำถามที่พบบ่อยนี้สำหรับข้อมูลเพิ่มเติม
สำหรับส่วนนี้ใช้งานได้เหมือนกัน นั่นหมายความว่าเราสามารถตั้งค่าคุณสมบัติ hidden เพื่อแสดง/ซ่อนมันแบบไดนามิก
ในการปิดการใช้งานแถวแต่ละแถวมีตัวแปรปิด disabled ซึ่งเป็นคุณสมบัติประเภท Condition ทางเลือก ตัวแปรนี้ยังใช้งานได้เช่นเดียวกับตัวแปร hidden เพื่อให้ต้องมีแถวที่จะมีแท็ก
โปรดทราบว่าหากคุณต้องการปิดการใช้งานแถวอย่างถาวรคุณสามารถตั้งค่าตัวแปรปิด disabled เป็น true
ในการแสดงรายการตัวเลือก Eureka มีส่วนพิเศษที่เรียกว่า SelectableSection เมื่อสร้างหนึ่งคุณต้องผ่านประเภทของแถวที่จะใช้ในตัวเลือกและ selectionType selectionType เป็น enum ซึ่งสามารถเป็น multipleSelection หรือ singleSelection(enableDeselection: Bool) โดยที่พารามิเตอร์ enableDeselection จะกำหนดว่าจะเลือกแถวที่เลือกไว้หรือไม่
form +++ SelectableSection < ListCheckRow < String > > ( " Where do you live " , selectionType : . singleSelection ( enableDeselection : true ) )

let continents = [ " Africa " , " Antarctica " , " Asia " , " Australia " , " Europe " , " North America " , " South America " ]
for option in continents {
    form . last! <<< ListCheckRow < String > ( option ) { listRow in
        listRow . title = option
        listRow . selectableValue = option
        listRow . value = nil
    }
} ในการสร้างส่วนดังกล่าวคุณต้องสร้างแถวที่สอดคล้องกับโปรโตคอล SelectableRowType
 public protocol SelectableRowType : RowType {
    var selectableValue : Value ? { get set }
}
selectableValue นี้เป็นที่ที่ค่าของแถวจะถูกเก็บไว้อย่างถาวร ตัวแปร value จะถูกใช้เพื่อตรวจสอบว่าแถวถูกเลือกหรือไม่หรือไม่คือ 'selectablevalue' หากเลือกหรือไม่มีเป็นอย่างอื่น ยูเรก้ารวม ListCheckRow ซึ่งใช้ตัวอย่างเช่น ในแถวที่กำหนดเองของโครงการตัวอย่างคุณยังสามารถค้นหา ImageCheckRow
เพื่อให้ได้แถว/s ที่เลือกได้อย่างง่ายดายของ SelectableSection มีสองวิธี: selectedRow() และ selectedRows() ซึ่งสามารถเรียกได้เพื่อรับแถวที่เลือกในกรณีที่เป็นส่วน SingleSelection หรือแถวที่เลือกทั้งหมดหากเป็นส่วน MultipleSelection
นอกจากนี้คุณสามารถตั้งค่ารายการตัวเลือกที่จะจัดกลุ่มตามส่วนโดยใช้คุณสมบัติต่อไปนี้ของ SelectorViewController :
sectionKeyForValue - การปิดที่ควรส่งคืนคีย์สำหรับค่าแถวเฉพาะ คีย์นี้ใช้ในภายหลังเพื่อทำลายตัวเลือกตามส่วน
sectionHeaderTitleForKey - การปิดที่ส่งคืนชื่อส่วนหัวสำหรับส่วนสำหรับคีย์เฉพาะ โดยค่าเริ่มต้นจะส่งคืนคีย์เอง
sectionFooterTitleForKey - การปิดที่ส่งคืนชื่อส่วนท้ายสำหรับส่วนสำหรับคีย์เฉพาะ
ยูเรก้ารองรับหลายค่าสำหรับฟิลด์ที่แน่นอน (เช่นหมายเลขโทรศัพท์ในผู้ติดต่อ) โดยใช้ส่วนที่หลากหลาย ช่วยให้เราสามารถสร้างส่วนที่สามารถแทรกลบได้และสามารถจัดเรียงใหม่ได้อย่างง่ายดาย
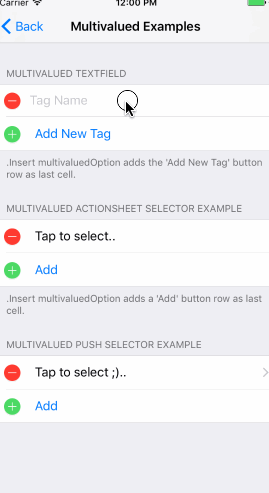
ในการสร้างส่วนที่หลากหลายเราต้องใช้ประเภท MultivaluedSection แทนประเภท Section ปกติ MultivaluedSection ขยาย Section และมีคุณสมบัติเพิ่มเติมบางอย่างเพื่อกำหนดค่าพฤติกรรมส่วนหลายส่วน
มาดำดิ่งลงไปในตัวอย่างรหัส ...
form +++
    MultivaluedSection ( multivaluedOptions : [ . Reorder , . Insert , . Delete ] ,
                       header : " Multivalued TextField " ,
                       footer : " .Insert adds a 'Add Item' (Add New Tag) button row as last cell. " ) {
        $0 . addButtonProvider = { section in
            return ButtonRow ( ) {
                $0 . title = " Add New Tag "
            }
        }
        $0 . multivaluedRowToInsertAt = { index in
            return NameRow ( ) {
                $0 . placeholder = " Tag Name "
            }
        }
        $0 <<< NameRow ( ) {
            $0 . placeholder = " Tag Name "
        }
    }
ตัวอย่างโค้ดก่อนหน้านี้แสดงวิธีการสร้างส่วนที่หลากหลาย ในกรณีนี้เราต้องการแทรกลบและเรียงลำดับแถวใหม่เป็นอาร์กิวเมนต์ multivaluedoptions ระบุ
addButtonProvider ช่วยให้เราสามารถปรับแต่งแถวปุ่มซึ่งแทรกแถวใหม่เมื่อ Tapped และ multivaluedOptions มีค่า .Insert insert
คุณสมบัติการปิด multivaluedRowToInsertAt ถูกเรียกโดยยูเรก้าทุกครั้งที่ต้องใส่แถวใหม่ เพื่อให้แถวเพื่อเพิ่มลงในส่วนที่มีหลายส่วนเราควรตั้งค่าคุณสมบัตินี้ ยูเรก้าผ่านดัชนีเป็นพารามิเตอร์การปิด ขอให้สังเกตว่าเราสามารถส่งคืนแถวใดก็ได้แม้กระทั่งแถวที่กำหนดเองแม้ว่าในกรณีส่วนใหญ่แถวหลายส่วนเป็นประเภทเดียวกัน
ยูเรก้าจะเพิ่มแถวปุ่มโดยอัตโนมัติเมื่อเราสร้างส่วนที่สามารถแทรกได้หลายส่วน เราสามารถปรับแต่งวิธีที่แถวปุ่มนี้มีลักษณะตามที่เราอธิบายไว้ก่อนหน้านี้ คุณสมบัติ showInsertIconInAddButton ระบุว่าปุ่มบวก (รูปแบบแทรก) ควรปรากฏทางด้านซ้ายของปุ่มจริงโดยค่าเริ่มต้น
มีข้อควรพิจารณาบางประการที่เราต้องคำนึงถึงเมื่อสร้างส่วนที่สามารถแทรกได้ แถวใด ๆ ที่เพิ่มเข้ามาในส่วนที่สามารถแทรกได้หลายส่วนควรวางไว้เหนือแถวที่ยูเรก้าจะเพิ่มเข้ามาในแถวใหม่โดยอัตโนมัติ สิ่งนี้สามารถทำได้อย่างง่ายดายโดยการเพิ่มแถวเพิ่มเติมเหล่านี้ไปยังส่วนจากภายในการปิดการเริ่มต้นของส่วน (พารามิเตอร์สุดท้ายของส่วนเริ่มต้น) ดังนั้น Eureka จะเพิ่มปุ่มเพิ่มการแทรกที่ส่วนท้ายของส่วน
โดยค่าเริ่มต้น Eureka จะตั้ง isEditing ของ tableview เป็นจริงเฉพาะในกรณีที่มี multivaluedsection ในรูปแบบ สิ่งนี้จะทำใน viewWillAppear เป็นครั้งแรกที่มีการนำเสนอแบบฟอร์ม
สำหรับข้อมูลเพิ่มเติมเกี่ยวกับวิธีการใช้หลายส่วนโปรดดูที่โครงการตัวอย่างยูเรก้าซึ่งมีตัวอย่างการใช้งานหลายตัวอย่าง
หากคุณต้องการใช้ปุ่มเพิ่มซึ่งไม่ใช่ ButtonRow คุณสามารถใช้ GenericMultivaluedSection<AddButtonType> โดยที่ AddButtonType เป็นประเภทของแถวที่คุณต้องการใช้เป็นปุ่มเพิ่ม สิ่งนี้มีประโยชน์หากคุณต้องการใช้แถวที่กำหนดเองเพื่อเปลี่ยน UI ของปุ่ม
ตัวอย่าง:
 GenericMultivaluedSection < LabelRow > ( multivaluedOptions : [ . Reorder , . Insert , . Delete ] , {
    $0 . addButtonProvider = { section in
        return LabelRow ( ) {
            $0 . title = " A Label row as add button "
        }
    }
    // ...
}ยูเรก้า 2.0.0 แนะนำคุณสมบัติการตรวจสอบความถูกต้องในตัวที่ร้องขอมาก
แถวมีการรวบรวม Rules และการกำหนดค่าเฉพาะที่กำหนดเมื่อควรประเมินกฎการตรวจสอบความถูกต้อง
มีกฎบางอย่างตามค่าเริ่มต้น แต่คุณสามารถสร้างกฎใหม่ได้ด้วยตัวเอง
กฎที่ให้คือ:
มาดูวิธีการตั้งค่ากฎการตรวจสอบความถูกต้อง
 override func viewDidLoad ( ) {
        super . viewDidLoad ( )
        form
          +++ Section ( header : " Required Rule " , footer : " Options: Validates on change " )

            <<< TextRow ( ) {
                $0 . title = " Required Rule "
                $0 . add ( rule : RuleRequired ( ) )

		// This could also have been achieved using a closure that returns nil if valid, or a ValidationError otherwise.
		/*
		let ruleRequiredViaClosure = RuleClosure<String> { rowValue in
		return (rowValue == nil || rowValue!.isEmpty) ? ValidationError(msg: "Field required!") : nil
		}
		$0.add(rule: ruleRequiredViaClosure)
		*/

                $0 . validationOptions = . validatesOnChange
            }
            . cellUpdate { cell , row in
                if !row . isValid {
                    cell . titleLabel ? . textColor = . systemRed
                }
            }

          +++ Section ( header : " Email Rule, Required Rule " , footer : " Options: Validates on change after blurred " )

            <<< TextRow ( ) {
                $0 . title = " Email Rule "
                $0 . add ( rule : RuleRequired ( ) )
                $0 . add ( rule : RuleEmail ( ) )
                $0 . validationOptions = . validatesOnChangeAfterBlurred
            }
            . cellUpdate { cell , row in
                if !row . isValid {
                    cell . titleLabel ? . textColor = . systemRed
                }
            }
อย่างที่คุณเห็นในตัวอย่างโค้ดก่อนหน้านี้เราสามารถตั้งค่ากฎได้มากเท่าที่เราต้องการในแถวโดยเรียกใช้ add(rule:) ฟังก์ชั่น
แถวยังให้ func remove(ruleWithIdentifier identifier: String) เพื่อลบกฎ ในการใช้งานเราต้องกำหนด ID ให้กับกฎหลังจากสร้าง
บางครั้งคอลเลกชันของกฎที่เราต้องการใช้ในแถวก็เหมือนกันกับที่เราต้องการใช้กับแถวอื่น ๆ อีกมากมาย ในกรณีนี้เราสามารถตั้งค่ากฎการตรวจสอบทั้งหมดโดยใช้ RuleSet ซึ่งเป็นชุดของกฎการตรวจสอบความถูกต้อง
 var rules = RuleSet < String > ( )
rules . add ( rule : RuleRequired ( ) )
rules . add ( rule : RuleEmail ( ) )

let row = TextRow ( ) {
            $0 . title = " Email Rule "
            $0 . add ( ruleSet : rules )
            $0 . validationOptions = . validatesOnChangeAfterBlurred
        }
ยูเรก้าช่วยให้เราสามารถระบุได้ว่าควรประเมินกฎการตรวจสอบความถูกต้องเมื่อใด เราสามารถทำได้โดยการตั้งค่าคุณสมบัติของ validationOptions แถวซึ่งสามารถมีค่าต่อไปนี้:
.validatesOnChange - ตรวจสอบเมื่อใดก็ตามที่ค่าแถวเปลี่ยน.validatesOnBlur - (ค่าเริ่มต้น) ตรวจสอบความถูกต้องทันทีหลังจากที่เซลล์ลาออกจากตำแหน่งแรก ไม่สามารถใช้ได้กับทุกแถว.validatesOnChangeAfterBlurred - ตรวจสอบเมื่อใดก็ตามที่ค่าแถวเปลี่ยนหลังจากที่จะลาออกครั้งแรกตอบกลับเป็นครั้งแรก.validatesOnDemand - เราควรตรวจสอบความถูกต้องของแถวหรือแบบฟอร์มด้วยตนเองโดยการเรียกใช้วิธี validate() หากคุณต้องการตรวจสอบความถูกต้องของแบบฟอร์มทั้งหมด (แถวทั้งหมด) คุณสามารถเรียกใช้วิธี validate() ด้วยตนเอง
แต่ละแถวมีคุณสมบัติ validationErrors ที่สามารถใช้ในการดึงข้อผิดพลาดการตรวจสอบทั้งหมด คุณสมบัตินี้เพียงแค่เก็บรายการข้อผิดพลาดการตรวจสอบความถูกต้องของการดำเนินการตรวจสอบแถวล่าสุดซึ่งหมายความว่าไม่ได้ประเมินกฎการตรวจสอบความถูกต้องของแถว
ตามที่คาดไว้กฎจะต้องใช้ประเภทเดียวกันกับวัตถุแถว ระมัดระวังเป็นพิเศษในการตรวจสอบประเภทแถวที่ใช้ คุณอาจเห็นข้อผิดพลาดของคอมไพเลอร์ ("ฉลาก arugment ที่ไม่ถูกต้องในการโทร (มี 'กฎ:' กฎ 'ที่คาดหวัง:')" ซึ่งไม่ได้ชี้ไปที่ปัญหาเมื่อผสมประเภท
โดยการใช้การดำเนินการปัดเราสามารถกำหนด leadingSwipe และ trailingSwipe หลายการกระทำต่อแถว เนื่องจากการกระทำของการปัดขึ้นอยู่กับคุณสมบัติของระบบ iOS leadingSwipe มีอยู่ใน iOS 11.0+ เท่านั้น
มาดูกันว่าจะกำหนดการกระทำของการปัด
 let row = TextRow ( ) {
            let deleteAction = SwipeAction (
                style : . destructive ,
                title : " Delete " ,
                handler : { ( action , row , completionHandler ) in
                    //add your code here.
                    //make sure you call the completionHandler once done.
                    completionHandler ? ( true )
                } )
            deleteAction . image = UIImage ( named : " icon-trash " )

            $0 . trailingSwipe . actions = [ deleteAction ]
            $0 . trailingSwipe . performsFirstActionWithFullSwipe = true

            //please be aware: `leadingSwipe` is only available on iOS 11+ only
            let infoAction = SwipeAction (
                style : . normal ,
                title : " Info " ,
                handler : { ( action , row , completionHandler ) in
                    //add your code here.
                    //make sure you call the completionHandler once done.
                    completionHandler ? ( true )
                } )
            infoAction . actionBackgroundColor = . blue
            infoAction . image = UIImage ( named : " icon-info " )

            $0 . leadingSwipe . actions = [ infoAction ]
            $0 . leadingSwipe . performsFirstActionWithFullSwipe = true
        }
การดำเนินการปัดจำเป็นต้องตั้งค่า tableView.isEditing เป็น false ยูเรก้าจะตั้งค่านี้ให้เป็น true หากมี multivaluedsection ในรูปแบบ (ใน viewWillAppear ) หากคุณมีทั้ง multivaluesections และการปัดการกระทำในรูปแบบเดียวกันกับที่คุณควรตั้งค่า isEditing ตามความต้องการของคุณ
เป็นเรื่องธรรมดามากที่คุณต้องการแถวที่แตกต่างจากที่รวมอยู่ในยูเรก้า หากเป็นกรณีนี้คุณจะต้องสร้างแถวของคุณเอง แต่นี่ไม่ยาก คุณสามารถอ่านบทช่วยสอนนี้เกี่ยวกับวิธีการสร้างแถวที่กำหนดเองเพื่อเริ่มต้น คุณอาจต้องการดูที่ยูเรคาคอมม. ซึ่งรวมถึงแถวพิเศษบางอย่างพร้อมที่จะเพิ่มเข้าไปในยูเรก้า
ในการสร้างแถวที่มีพฤติกรรมและลักษณะที่กำหนดเองคุณอาจต้องการสร้างคลาสย่อยของ Row และ Cell
โปรดจำไว้ว่า Row เป็นสิ่งที่เป็นนามธรรมยูเรก้าใช้ในขณะที่ Cell เป็น UITableViewCell ที่เป็นจริงในการดูแลมุมมอง เมื่อ Row มี Cell ทั้ง Row และ Cell จะต้องถูกกำหนดสำหรับประเภท ค่า เดียวกัน
// Custom Cell with value type: Bool
// The cell is defined using a .xib, so we can set outlets :)
public class CustomCell : Cell < Bool > , CellType {
    @ IBOutlet weak var switchControl : UISwitch !
    @ IBOutlet weak var label : UILabel !

    public override func setup ( ) {
        super . setup ( )
        switchControl . addTarget ( self , action : #selector ( CustomCell . switchValueChanged ) , for : . valueChanged )
    }

    func switchValueChanged ( ) {
        row . value = switchControl . on
        row . updateCell ( ) // Re-draws the cell which calls 'update' bellow
    }

    public override func update ( ) {
        super . update ( )
        backgroundColor = ( row . value ?? false ) ? . white : . black
    }
}

// The custom Row also has the cell: CustomCell and its correspond value
public final class CustomRow : Row < CustomCell > , RowType {
    required public init ( tag : String ? ) {
        super . init ( tag : tag )
        // We set the cellProvider to load the .xib corresponding to our cell
        cellProvider = CellProvider < CustomCell > ( nibName : " CustomCell " )
    }
}
ผลลัพธ์: 
เช่นเดียวกับการเรียก BELLSTEAP และ COLLUPDATE Cell มีวิธีการตั้งค่าและอัปเดตที่คุณสามารถปรับแต่งได้
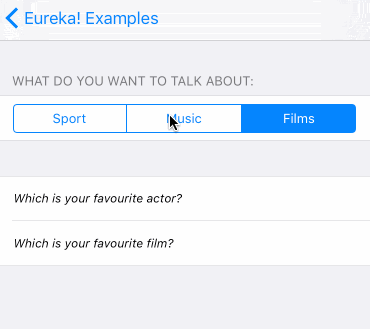
แถวอินไลน์เป็นประเภทเฉพาะของแถวที่แสดงแถวแบบไดนามิกด้านล่างโดยปกติจะมีการเปลี่ยนแปลงแถวอินไลน์ระหว่างโหมดขยายและยุบเมื่อใดก็ตามที่แถวถูกเคาะ
ดังนั้นในการสร้างแถวอินไลน์เราต้องการ 2 แถวแถวที่ "อยู่เสมอ" มองเห็นได้และแถวที่จะขยาย/ล่มสลาย
ข้อกำหนดอีกประการหนึ่งคือประเภทค่าของแถว 2 แถวเหล่านี้จะต้องเหมือนกัน ซึ่งหมายความว่าหากแถวหนึ่งถือค่า String อีกแถวหนึ่งจะต้องมีค่า String ด้วย
เมื่อเรามี 2 แถวเหล่านี้เราควรสร้างประเภทแถวบนให้สอดคล้องกับ InlineRowType โปรโตคอลนี้ต้องการให้คุณกำหนด typealias InlineRow และฟังก์ชัน setupInlineRow ประเภท InlineRow จะเป็นประเภทของแถวที่จะขยาย/ล่มสลาย ทำสิ่งนี้เป็นตัวอย่าง:
 class PickerInlineRow < T > : Row < PickerInlineCell < T > > where T : Equatable {

    public typealias InlineRow = PickerRow < T >
    open var options = [ T ] ( )

    required public init ( tag : String ? ) {
        super . init ( tag : tag )
    }

    public func setupInlineRow ( _ inlineRow : InlineRow ) {
        inlineRow . options = self . options
        inlineRow . displayValueFor = self . displayValueFor
        inlineRow . cell . height = { UITableViewAutomaticDimension }
    }
}
InlineRowType จะเพิ่มวิธีการบางอย่างในแถวอินไลน์ของคุณ:
 func expandInlineRow ( )
func collapseInlineRow ( )
func toggleInlineRow ( )
วิธีการเหล่านี้ควรทำงานได้ดี แต่หากคุณต้องการที่จะแทนที่พวกเขาโปรดทราบว่ามันเป็น toggleInlineRow ที่ต้องเรียก expandInlineRow และ collapseInlineRow
ในที่สุดคุณต้องเรียกใช้ toggleInlineRow() เมื่อเลือกแถวตัวอย่างเช่นการเอาชนะ customDidSelect :
 public override func customDidSelect ( ) {
    super . customDidSelect ( )
    if !isDisabled {
        toggleInlineRow ( )
    }
}หมายเหตุ: แถวผู้นำเสนอคือแถวที่แสดง UIViewController ใหม่
ในการสร้างแถวผู้นำเสนอที่กำหนดเองคุณต้องสร้างคลาสที่สอดคล้องกับโปรโตคอล PresenterRowType ขอแนะนำอย่างยิ่งให้เลือก subclass SelectorRow เนื่องจากสอดคล้องกับโปรโตคอลนั้นและเพิ่มฟังก์ชั่นที่เป็นประโยชน์อื่น ๆ
โปรโตคอล PresentErrowtype ถูกกำหนดดังนี้:
 public protocol PresenterRowType : TypedRowType {

     associatedtype PresentedControllerType : UIViewController , TypedRowControllerType

     /// Defines how the view controller will be presented, pushed, etc.
     var presentationMode : PresentationMode < PresentedControllerType > ? { get set }

     /// Will be called before the presentation occurs.
     var onPresentCallback : ( ( FormViewController , PresentedControllerType ) -> Void ) ? { get set }
}
onpresentCallback จะถูกเรียกเมื่อแถวกำลังจะนำเสนอคอนโทรลเลอร์มุมมองอื่น สิ่งนี้ทำใน SelectorRow ดังนั้นหากคุณไม่ได้คลาสย่อยคุณจะต้องเรียกมันว่าตัวเอง
presentationMode เป็นสิ่งที่กำหนดวิธีการนำเสนอคอนโทรลเลอร์และนำเสนอคอนโทรลเลอร์ใด งานนำเสนอนี้สามารถใช้ตัวระบุ SEGUE, คลาส SEGUE, นำเสนอคอนโทรลเลอร์ที่เป็นโมดูลหรือผลักไปยังคอนโทรลเลอร์มุมมองที่เฉพาะเจาะจง ตัวอย่างเช่น custompushrow สามารถกำหนดเช่นนี้:
มาดูตัวอย่าง ..
/// Generic row type where a user must select a value among several options.
open class SelectorRow < Cell : CellType > : OptionsRow < Cell > , PresenterRowType where Cell : BaseCell {


    /// Defines how the view controller will be presented, pushed, etc.
    open var presentationMode : PresentationMode < SelectorViewController < SelectorRow < Cell > > > ?

    /// Will be called before the presentation occurs.
    open var onPresentCallback : ( ( FormViewController , SelectorViewController < SelectorRow < Cell > > ) -> Void ) ?

    required public init ( tag : String ? ) {
        super . init ( tag : tag )
    }

    /**
     Extends `didSelect` method
     */
    open override func customDidSelect ( ) {
        super . customDidSelect ( )
        guard let presentationMode = presentationMode , !isDisabled else { return }
        if let controller = presentationMode . makeController ( ) {
            controller . row = self
            controller . title = selectorTitle ?? controller . title
            onPresentCallback ? ( cell . formViewController ( ) ! , controller )
            presentationMode . present ( controller , row : self , presentingController : self . cell . formViewController ( ) ! )
        } else {
            presentationMode . present ( nil , row : self , presentingController : self . cell . formViewController ( ) ! )
        }
    }

    /**
     Prepares the pushed row setting its title and completion callback.
     */
    open override func prepare ( for segue : UIStoryboardSegue ) {
        super . prepare ( for : segue )
        guard let rowVC = segue . destination as Any as? SelectorViewController < SelectorRow < Cell > > else { return }
        rowVC . title = selectorTitle ?? rowVC . title
        rowVC . onDismissCallback = presentationMode ? . onDismissCallback ?? rowVC . onDismissCallback
        onPresentCallback ? ( cell . formViewController ( ) ! , rowVC )
        rowVC . row = self
    }
}


// SelectorRow conforms to PresenterRowType
public final class CustomPushRow < T : Equatable > : SelectorRow < PushSelectorCell < T > > , RowType {

    public required init ( tag : String ? ) {
        super . init ( tag : tag )
        presentationMode = . show ( controllerProvider : ControllerProvider . callback {
            return SelectorViewController < T > ( ) { _ in }
            } , onDismiss : { vc in
                _ = vc . navigationController ? . popViewController ( animated : true )
        } )
    }
}บางครั้งเราต้องการเปลี่ยนรูปลักษณ์ UI ของหนึ่งในแถวของเรา แต่ไม่เปลี่ยนประเภทแถวและตรรกะทั้งหมดที่เกี่ยวข้องกับแถวเดียว ขณะนี้มีวิธีหนึ่งในการทำเช่นนี้ หากคุณใช้เซลล์ที่สร้างอินสแตนซ์จากไฟล์ NIB ปัจจุบันไม่มีแถวหลักของยูเรก้าที่ถูกสร้างอินสแตนซ์จากไฟล์ NIB แต่บางแถวที่กำหนดเองในยูเรคาคอมมอนโดยเฉพาะอย่างยิ่ง postaladdressrow ซึ่งถูกย้ายไปที่นั่น
สิ่งที่คุณต้องทำคือ:
cellProvider เพื่อใช้ NIB นี้ คุณควรทำสิ่งนี้ใน Initialiser ไม่ว่าจะเป็นอินสแตนซ์คอนกรีตแต่ละครั้งหรือใช้ defaultRowInitializer ตัวอย่างเช่น: <<< PostalAddressRow ( ) {
$0 . cellProvider = CellProvider < PostalAddressCell > ( nibName : " CustomNib " , bundle : Bundle . main )
}คุณสามารถสร้างแถวใหม่สำหรับสิ่งนี้ ในกรณีนั้นพยายามที่จะสืบทอดจากซูเปอร์คลาสเดียวกันกับแถวที่คุณต้องการเปลี่ยนเพื่อสืบทอดตรรกะของมัน
มีบางสิ่งที่ต้องพิจารณาเมื่อคุณทำเช่นนี้:
Unknown class <YOUR_CLASS_NAME> in Interface Builder file อาจเป็นได้ว่าคุณต้องยกตัวอย่างประเภทใหม่นั้นในรหัสของคุณเพื่อโหลดในรันไทม์ การโทรไป let t = YourClass.self ช่วยในกรณีของฉัน แถวฉลาก | แถวปุ่ม | ตรวจสอบแถว  |
สลับแถว | แถวแถบเลื่อน | แถว Stepper 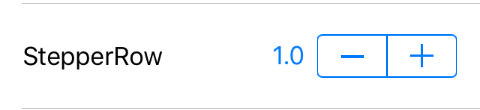 |
แถวข้อความแถว  |
แถวเหล่านี้มีฟิลด์ข้อความทางด้านขวาของเซลล์ ความแตกต่างระหว่างแต่ละอันประกอบด้วยการกำหนดค่าการแก้ไขอัตโนมัติและการกำหนดค่าประเภทแป้นพิมพ์ที่แตกต่างกัน
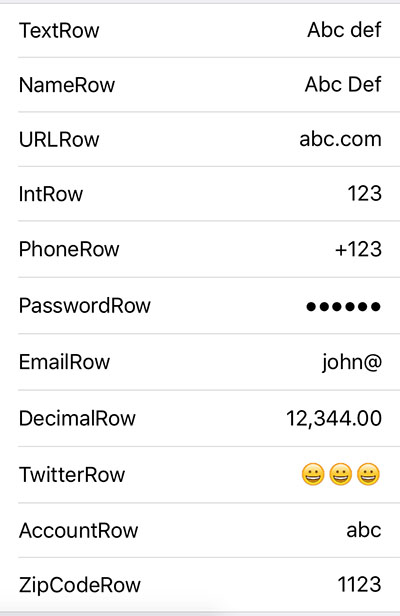 | Textrow สิ่งที่น่าเบื่อหน่าย urlrow อุ้ม เครื่องเสียง รหัสผ่าน emailRow Decimalrow Twitterrow Accountrow zipcoderow |
ชนิดย่อยทั้งหมดของ FieldRow ด้านบนมีคุณสมบัติ formatter ของประเภท NSFormatter ซึ่งสามารถตั้งค่าเพื่อกำหนดว่าควรแสดงค่าของแถวนั้นอย่างไร รูปแบบที่กำหนดเองสำหรับตัวเลขที่มีสองหลักหลังจากเครื่องหมายทศนิยมจะรวมอยู่ในยูเรก้า ( DecimalFormatter ) โครงการตัวอย่างยังมี CurrencyFormatter ซึ่งแสดงตัวเลขเป็นสกุลเงินตามสถานที่ตั้งของผู้ใช้
โดยค่าเริ่มต้นการตั้ง formatter ของแถวจะมีผลต่อวิธีการแสดงค่าเมื่อไม่ได้รับการแก้ไข หากต้องการจัดรูปแบบค่าในขณะที่แถวกำลังได้รับการแก้ไขให้ตั้งค่า useFormatterDuringInput เป็น true เมื่อเริ่มต้นแถว การจัดรูปแบบค่าตามที่กำลังแก้ไขอาจต้องอัปเดตตำแหน่งเคอร์เซอร์และยูเรก้าให้โปรโตคอลต่อไปนี้ที่ฟอร์แมตของคุณควรปฏิบัติตามเพื่อจัดการตำแหน่งเคอร์เซอร์:
 public protocol FormatterProtocol {
    func getNewPosition ( forPosition forPosition : UITextPosition , inTextInput textInput : UITextInput , oldValue : String ? , newValue : String ? ) -> UITextPosition
}
นอกจากนี้ชนิดย่อย FieldRow ยังมีคุณสมบัติ useFormatterOnDidBeginEditing เมื่อใช้ DecimalRow ที่มีรูปแบบที่อนุญาตให้มีค่าทศนิยมและสอดคล้องกับสถานที่ของผู้ใช้ (เช่น DecimalFormatter ) หาก useFormatterDuringInput เป็น false useFormatterOnDidBeginEditing จะต้องตั้งค่าเป็น true เพื่อให้เครื่องหมายทศนิยมในค่าที่ถูกแก้ไข
แถววันที่ถือวันที่และอนุญาตให้เราตั้งค่าค่าใหม่ผ่านการควบคุม UidatePicker โหมดของ uidatepicker และวิธีการแสดงมุมมองตัวเลือกวันที่คือสิ่งที่เปลี่ยนแปลงระหว่างพวกเขา
แถววันที่ 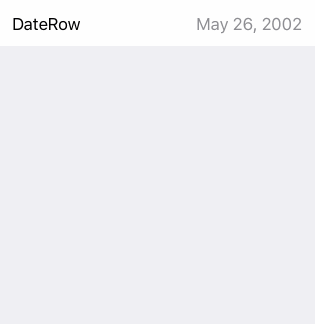 ตัวเลือกที่แสดงในแป้นพิมพ์ | แถววันที่ (อินไลน์) 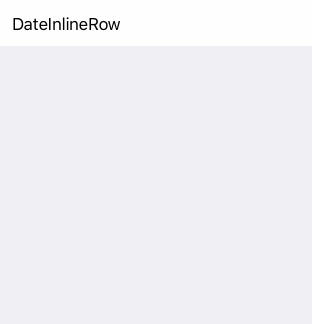 แถวขยาย | แถววันที่ (ตัวเลือก) 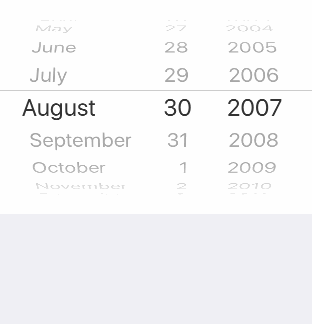 ตัวเลือกสามารถมองเห็นได้เสมอ |
ด้วย 3 รูปแบบ (ปกติ, อินไลน์และตัวเลือก), ยูเรก้ารวมถึง:
นี่คือแถวที่มีรายการตัวเลือกที่เกี่ยวข้องซึ่งผู้ใช้ต้องเลือก
 <<< ActionSheetRow < String > ( ) {
                $0 . title = " ActionSheetRow "
                $0 . selectorTitle = " Pick a number "
                $0 . options = [ " One " , " Two " , " Three " ]
                $0 . value = " Two "    // initially selected
            }
การแจ้งเตือน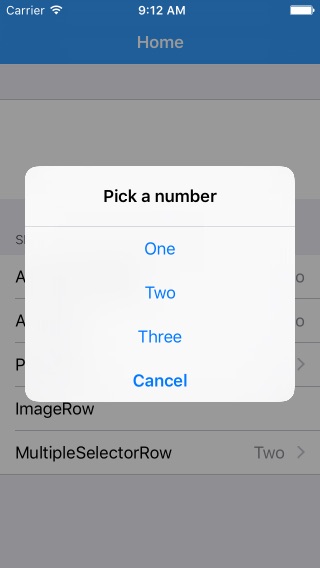 จะแสดงการแจ้งเตือนพร้อมตัวเลือกให้เลือก | แถว ActionSheet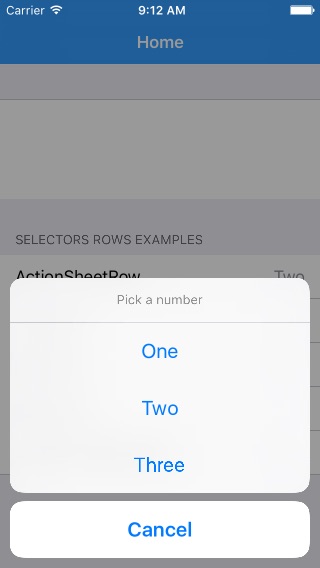 จะแสดงแผ่นแอ็คชั่นพร้อมตัวเลือกให้เลือก | ดันแถว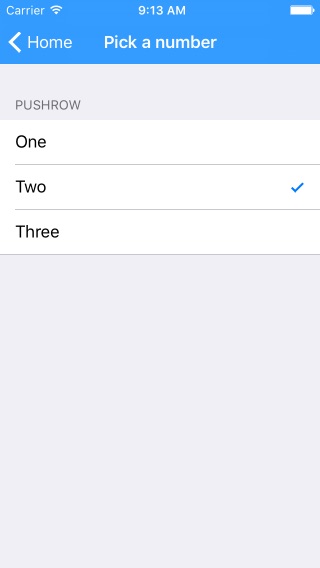 จะผลักดันไปยังคอนโทรลเลอร์ใหม่จากสถานที่เลือกตัวเลือกที่แสดงรายการโดยใช้แถวตรวจสอบ | แถวตัวเลือกหลายแถว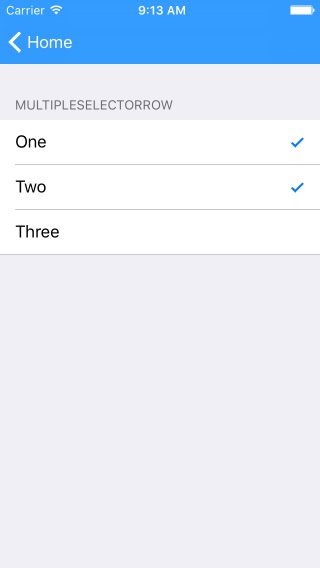 เช่นพุ๊ก แต่อนุญาตให้เลือกหลายตัวเลือก |
แถวแบ่ง | แบ่งแถว (w/title) | แถวตัวเลือก นำเสนอตัวเลือกประเภททั่วไปผ่านมุมมองตัวเลือก (นอกจากนี้ยังมี Row Inline Picker) |
แจ้งให้เราทราบเกี่ยวกับเรื่องนี้เรายินดีที่จะพูดถึงที่นี่ -
Cocoapods เป็นผู้จัดการการพึ่งพาสำหรับโครงการโกโก้
ระบุยูเรก้าลงใน Podfile ของโครงการของคุณ:
 source 'https://github.com/CocoaPods/Specs.git'
platform :ios , '9.0'
use_frameworks!

pod 'Eureka'
จากนั้นเรียกใช้คำสั่งต่อไปนี้:
$ pod installSwift Package Manager เป็นเครื่องมือในการจัดการการกระจายรหัส Swift
หลังจากที่คุณตั้งค่า Package.swift manifest ไฟล์แล้วคุณสามารถเพิ่มยูเรก้าเป็นการพึ่งพาได้โดยเพิ่มลงในค่าการอ้างอิงของ Package.swift ของคุณ
การพึ่งพา: [.package (URL: "https://github.com/xmartlabs/eureka.git" จาก: "5.5.0")]]
คาร์เธจเป็นผู้จัดการการพึ่งพาการกระจายอำนาจที่เรียบง่ายสำหรับโกโก้
ระบุยูเรก้าลงใน Cartfile ของโครงการของคุณ:
github "xmartlabs/Eureka" ~> 5.5
$ git submodule add https://github.com/xmartlabs/Eureka.gitเปิดโฟลเดอร์ Eureka ที่สร้างขึ้นโดยคำสั่ง Git Submodule ก่อนหน้าและลาก eureka.xcodeproj ไปยังโครงการ Navigator ของโครงการ XCode ของแอปพลิเคชันของคุณ
เลือก eeureka.xcodeproj ใน Project Navigator และตรวจสอบการจับคู่เป้าหมายการปรับใช้กับเป้าหมายการปรับใช้แอปพลิเคชันของคุณ
เลือกโครงการของคุณในการนำทาง XCode จากนั้นเลือกเป้าหมายแอปพลิเคชันของคุณจากแถบด้านข้าง ถัดไปเลือกแท็บ "ทั่วไป" และคลิกที่ปุ่ม + ภายใต้ส่วน "Binaries ฝังตัว"
เลือก Eureka.framework แล้วเราก็เสร็จแล้ว!
eureka-forms )ก่อนที่จะมีส่วนร่วมตรวจสอบไฟล์ที่มีส่วนร่วมสำหรับข้อมูลเพิ่มเติม
หากคุณใช้ ยูเรก้า ในแอพของคุณเราชอบที่จะได้ยินเกี่ยวกับเรื่องนี้! วางสายบน Twitter
ทุกแถวมีคุณสมบัติต่อไปนี้:
/// Block variable used to get the String that should be displayed for the value of this row.
public var displayValueFor : ( ( T ? ) -> String ? ) ? = {
    return $0 . map { String ( describing : $0 ) }
}
คุณสามารถตั้ง displayValueFor ตามค่าสตริงที่คุณต้องการแสดง
เราสามารถรับแถวเฉพาะได้โดยเรียกใช้ฟังก์ชั่นใด ๆ ต่อไปนี้ที่เปิดเผยโดยคลาส Form :
 public func rowBy < T : Equatable > ( tag : String ) -> RowOf < T > ?
public func rowBy < Row : RowType > ( tag : String ) -> Row ?
public func rowBy ( tag : String ) -> BaseRow ?
ตัวอย่างเช่น:
 let dateRow : DateRow ? = form . rowBy ( tag : " dateRowTag " )
let labelRow : LabelRow ? = form . rowBy ( tag : " labelRowTag " )

let dateRow2 : Row < DateCell > ? = form . rowBy ( tag : " dateRowTag " )

let labelRow2 : BaseRow ? = form . rowBy ( tag : " labelRowTag " ) let section : Section ? = form . sectionBy ( tag : " sectionTag " ) การเรียกใช้ setValues(values: [String: Any?]) ซึ่งถูกเปิดเผยโดยคลาส Form
ตัวอย่างเช่น:
form . setValues ( [ " IntRowTag " : 8 , " TextRowTag " : " Hello world! " , " PushRowTag " : Company ( name : " Xmartlabs " ) ] ) ที่ "IntRowTag" , "TextRowTag" , "PushRowTag" เป็นแท็กแถว (แต่ละอันระบุแถวที่ไม่ซ้ำกัน) และ 8 "Hello world!" , Company(name:"Xmartlabs") เป็นค่าแถวที่สอดคล้องกันในการกำหนด
ประเภทค่าของแถวจะต้องตรงกับประเภทค่าของค่าพจนานุกรมที่สอดคล้องกันมิฉะนั้นจะไม่มีการกำหนด NIL
หากแบบฟอร์มปรากฏขึ้นแล้วเราต้องโหลดแถวที่มองเห็นได้ใหม่โดยการโหลด Table View tableView.reloadData() หรือเรียกใช้ updateCell() ไปยังแต่ละแถวที่มองเห็นได้
หลังจากตั้งค่าเงื่อนไขเงื่อนไขนี้จะไม่ได้รับการประเมินโดยอัตโนมัติ หากคุณต้องการให้ทำทันทีคุณสามารถโทร .evaluateHidden() หรือ .evaluateDisabled()
ฟังก์ชั่นนี้เรียกว่าเมื่อมีการเพิ่มแถวลงในแบบฟอร์มและเมื่อแถวมันขึ้นอยู่กับการเปลี่ยนแปลง หากเงื่อนไขมีการเปลี่ยนแปลงเมื่อมีการแสดงแถวจะต้องประเมินใหม่ด้วยตนเอง
ดูปัญหานี้
section . header = HeaderFooterView ( title : " Header title ( variable ) " ) // use String interpolation
//or
var header = HeaderFooterView < UIView > ( . class ) // most flexible way to set up a header using any view type
header . height = { 60 }  // height can be calculated
header . onSetupView = { view , section in  // each time the view is about to be displayed onSetupView is invoked.
    view . backgroundColor = . orange
}
section . header = headersection . reload ( ) selectableRowSetup , selectableRowCellUpdate และ selectableRowCellSetup Properties มีให้เพื่อให้สามารถปรับแต่ง SelectorViewController และ MultipleCtorViewCoNtroller เซลล์ที่เลือกได้
 let row = PushRow < Emoji > ( ) {
              $0 . title = " PushRow "
              $0 . options = [ ?? , ? , ?? , ? , ? , ? ]
              $0 . value = ??
              $0 . selectorTitle = " Choose an Emoji! "
          } . onPresent { from , to in
              to . dismissOnSelection = false
              to . dismissOnChange = false
              to . selectableRowSetup = { row in
                  row . cellProvider = CellProvider < ListCheckCell < Emoji > > ( nibName : " EmojiCell " , bundle : Bundle . main )
              }
              to . selectableRowCellUpdate = { cell , row in
                  cell . textLabel ? . text = " Text " + row . selectableValue!  // customization
                  cell . detailTextLabel ? . text = " Detail " +  row . selectableValue!
              }
} ดังที่เราได้กล่าวไปแล้วประเภทของ Form และ Section สอดคล้องกับ MutableCollection และ RangeReplaceableCollection แบบฟอร์มคือชุดของส่วนและส่วนคือชุดของแถว
ส่วนขยายโปรโตคอล RangeReplaceableCollection ให้วิธีการที่มีประโยชน์มากมายในการแก้ไขคอลเลกชัน
 extension RangeReplaceableCollection {
    public mutating func append ( _ newElement : Self . Element )
    public mutating func append < S > ( contentsOf newElements : S ) where S : Sequence , Self . Element == S . Element
    public mutating func insert ( _ newElement : Self . Element , at i : Self . Index )
    public mutating func insert < S > ( contentsOf newElements : S , at i : Self . Index ) where S : Collection , Self . Element == S . Element
    public mutating func remove ( at i : Self . Index ) -> Self . Element
    public mutating func removeSubrange ( _ bounds : Range < Self . Index > )
    public mutating func removeFirst ( _ n : Int )
    public mutating func removeFirst ( ) -> Self . Element
    public mutating func removeAll ( keepingCapacity keepCapacity : Bool )
    public mutating func reserveCapacity ( _ n : Self . IndexDistance )
}
วิธีการเหล่านี้ใช้ภายในเพื่อใช้ตัวดำเนินการที่กำหนดเองตามที่แสดง Bellow:
 public func +++ ( left : Form , right : Section ) -> Form {
    left . append ( right )
    return left
}

public func += < C : Collection > ( inout lhs : Form , rhs : C ) where C . Element == Section {
    lhs . append ( contentsOf : rhs )
}

public func << < ( left : Section , right : BaseRow ) -> Section {
    left . append ( right )
    return left
}

public func += < C : Collection > ( inout lhs : Section , rhs : C ) where C . Element == BaseRow {
    lhs . append ( contentsOf : rhs )
}
คุณสามารถดูได้ว่าผู้ให้บริการที่กำหนดเองมีการใช้งานที่นี่อย่างไร
ขึ้นอยู่กับคุณที่จะตัดสินใจว่าคุณต้องการใช้ผู้ให้บริการที่กำหนดเองยูเรก้าหรือไม่
แบบฟอร์มจะแสดงใน UITableView เสมอ คุณสามารถตั้งค่าคอนโทรลเลอร์มุมมองของคุณในกระดานเรื่องราวและเพิ่ม uitableView ที่คุณต้องการให้เป็นและจากนั้นเชื่อมต่อเต้าเสียบเข้ากับตัวแปร tableView ของ FormViewController สิ่งนี้ช่วยให้คุณสามารถกำหนดเฟรมที่กำหนดเอง (อาจมีข้อ จำกัด ) สำหรับแบบฟอร์มของคุณ
ทั้งหมดนี้สามารถทำได้โดยการเปลี่ยนเฟรมระยะขอบ ฯลฯ ของ tableView ของ FormViewController ของคุณ
ดังนั้นเราสามารถทำให้ยูเรก้าดียิ่งขึ้น! 
สามารถพบได้ในไฟล์ changelog.md


