UnityRuntimeNodeEditor
1.0.0
Unity로 만든 거의 모든 노드 편집기는 Unity 편집기를 사용하여이를 만들고 있습니다.
저의 목표는 Unity UI와 함께 런타임으로 만드는 것이 었습니다.
Unity 버전 2021.3.3f1
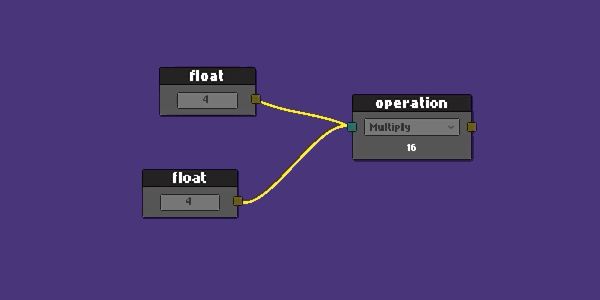
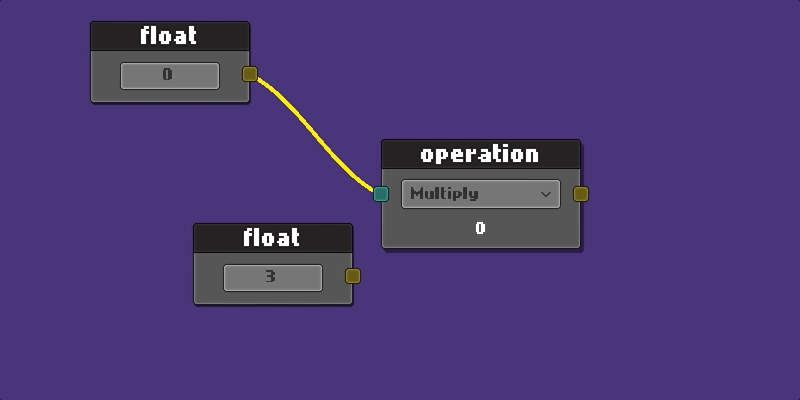
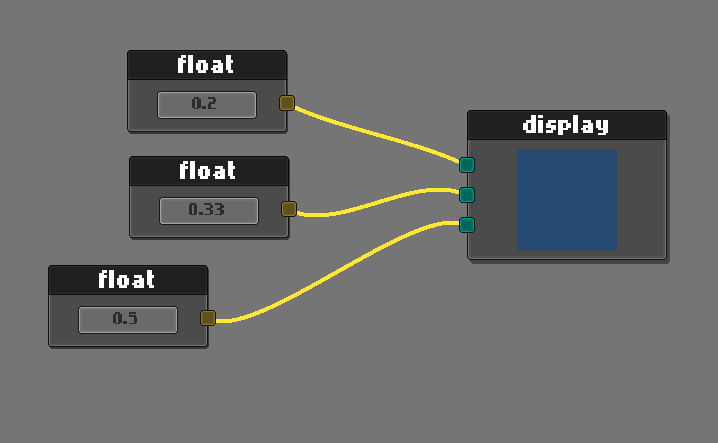
RGB 컬러 디스플레이 예제
NodeEditor 단순히 확장하십시오.
 public class ExampleNodeEditor : NodeEditor
{
    public override void StartEditor ( NodeGraph graph )
    {
        base . StartEditor ( graph ) ;

        //  make your custom initialization here
    }
}
API를 사용하여 그래프를 작성하면 그래프가 홀더 객체로 늘어납니다. (조립식이 포함되지 않음)
 public class ApplicationStartup : MonoBehaviour
{
    public RectTransform        editorHolder ;
    public ExampleNodeEditor    editor ;    //  asigned in unity from hierarchy

    private void Start ( )
    {
        var graph = editor . CreateGraph < NodeGraph > ( editorHolder ) ;
        // var graph = editor.CreateGraph<NodeGraph>(editorHolder, bgColor, connColor);
        editor . StartEditor ( graph ) ;
    }
}
자신의 사용자 정의 그래프와 프리 브를 사용하고 싶을 수도 있습니다.
 public class ApplicationStartup : MonoBehaviour
{
    public RectTransform        editorHolder ;
    public ExampleNodeEditor    editor ;

    private void Start ( )
    {
        editor . StartEditor ( graph ) ;
    }
}
그래프 작업은 이벤트 기반입니다.
예제 폴더에서 완전한 예제를 찾을 수 있습니다. 연습합시다.
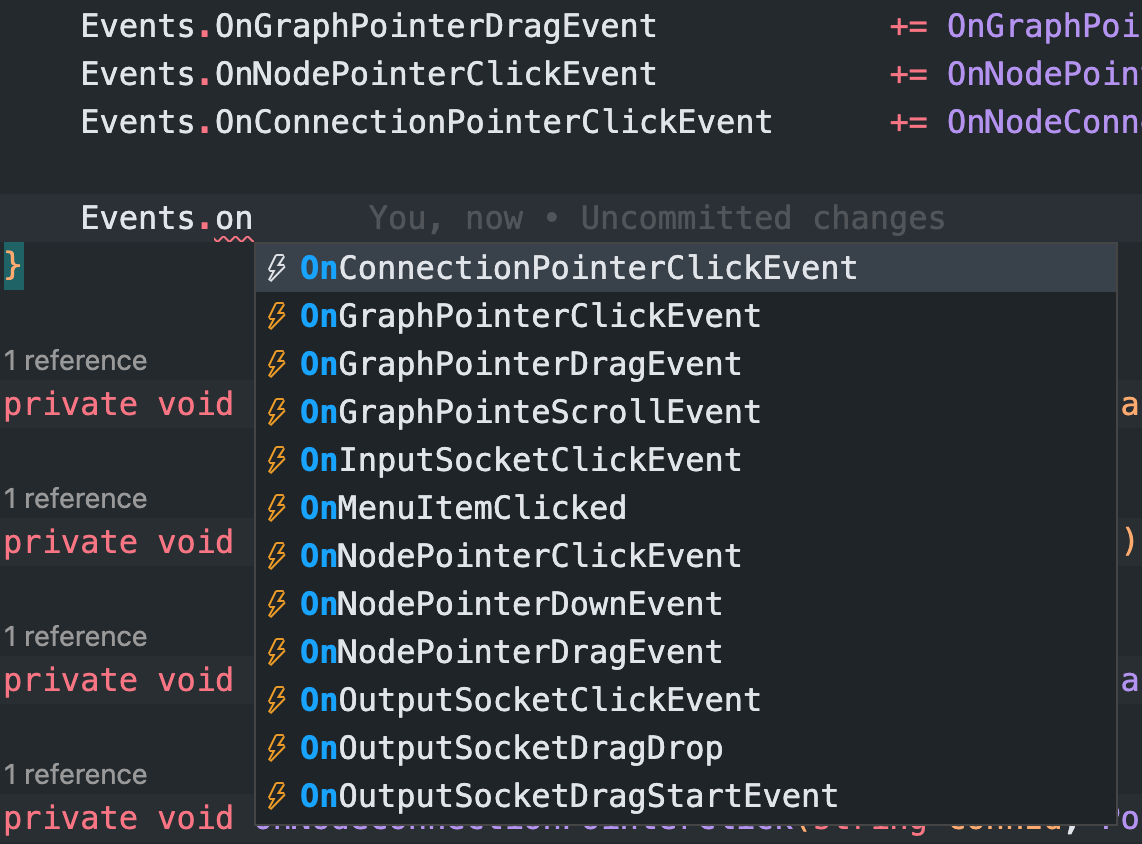
편집자의 이벤트를 듣습니다
 public class ExampleNodeEditor : NodeEditor
{
    private string _savePath ;

    public override void StartEditor ( NodeGraph graph )
    {
        base . StartEditor ( graph ) ;

        _savePath = Application . dataPath + "/Example/Resources/graph.json" ;

        Events . OnGraphPointerClickEvent           += OnGraphPointerClick ;
        Events . OnGraphPointerDragEvent            += OnGraphPointerDrag ;
        Events . OnNodePointerClickEvent            += OnNodePointerClick ;
        Events . OnConnectionPointerClickEvent      += OnNodeConnectionPointerClick ;
    }
} protected override void OnGraphPointerClick ( PointerEventData eventData )
{
switch ( eventData . button )
{
case PointerEventData . InputButton . Right :
{
var ctx = new ContextMenuBuilder ( )
. Add ( "nodes/float" , CreateFloatNode )
. Add ( "nodes/math op" , CreateMatOpNode )
. Add ( "graph/load" , ( ) => LoadGraph ( _savePath ) )
. Add ( "graph/save" , ( ) => SaveGraph ( _savePath ) )
. Build ( ) ;
SetContextMenu ( ctx ) ;
DisplayContextMenu ( ) ;
}
break ;
case PointerEventData . InputButton . Left : CloseContextMenu ( ) ; break ;
}
} protected override void OnNodePointerClick ( Node node , PointerEventData eventData )
{
if ( eventData . button == PointerEventData . InputButton . Right )
{
var ctx = new ContextMenuBuilder ( )
. Add ( "duplicate" , ( ) => DuplicateNode ( node ) )
. Add ( "clear connections" , ( ) => ClearConnections ( node ) )
. Add ( "delete" , ( ) => DeleteNode ( node ) )
. Build ( ) ;
SetContextMenu ( ctx ) ;
DisplayContextMenu ( ) ;
}
} protected override void OnNodeConnectionPointerClick ( string connId , PointerEventData eventData )
{
if ( eventData . button == PointerEventData . InputButton . Right )
{
var ctx = new ContextMenuBuilder ( )
. Add ( "clear connection" , ( ) => DisconnectConnection ( connId ) )
. Build ( ) ;
SetContextMenu ( ctx ) ;
DisplayContextMenu ( ) ;
}
}즉, 새 노드를 만들겠다고합니다.
 public class MyAwesomeNode : Node
{
    public TMP_InputField valueField ;   //  added from editor
    public SocketOutput outputSocket ;   //  added from editor
    public SocketInput inputSocket ;     //  added from editor

    public override void Setup ( )
    {
        Register ( outputSocket ) ;
        Register ( inputSocket ) ;

        SetHeader ( "float" ) ;
    }

    public override void OnSerialize ( Serializer serializer )
    {
        //  save values on graph save
        serializer . Add ( "floatValue" , valueField . text ) ;

        //  it would be good idea to use JsonUtility for complex data
    }

    public override void OnDeserialize ( Serializer serializer )
    {
        //  load values on graph load
        var value = serializer . Get ( "floatValue" ) ;
        valueField . SetTextWithoutNotify ( value ) ;
    }
}
편집기에서 노드를 만들려면 Resources 폴더에서 경로를 전달하십시오.
 //  context item actions
private void CreateMyNode ( )
{
    graph . Create ( "Prefabs/Nodes/MyAwesomeNode" ) ;    //  your prefab path in resources
}
자세한 내용은 ExampleScene 의 전체 전시를 확인하십시오.
이 프로젝트는 적극적으로 개발 중입니다. 제안이나 피드백에 대한 문제를 자유롭게 삭제하십시오.
MIT
저작권 (C) 2022 CEM Ugur Karacam


