qui
v1.4.5

반응 형, 사용자 친화적이며 가벼운 라이브러리를 통해 고객에게 훌륭한 제품을 구축 할 수 있습니다. VUE 2.X 의이 라이브러리
스토리 북 (라이브 데모)
무엇입니까?
아래 몇 가지 예 :


cdn :
 <!-- import CSS -->
< link rel =" stylesheet " href =" https://unpkg.com/@qvant/qui/dist/qui.css " />
<!-- import JavaScript -->
< script src =" https://unpkg.com/@qvant/qui/dist/qui.umd.min.js " > </ script >
NPM | 방사:
npm install @qvant/qui -S
yarn add @qvant/qui
qui를 완전히 가져 오거나 필요한 것을 가져올 수 있습니다. 완전히 가져 오기 시작하겠습니다.
main.js :
 import Vue from 'vue' ;
import Qui from '@qvant/qui' ;
import '@qvant/qui/dist/qui.css' ;

// Setup all components
Vue . use ( Qui ) ;
// that's it! All components will be imported with styles
yourcomponent.vue에서 : (예)
< template >
  < q-input v-model = " value " />
</ template >
< script >
export default {
  data () {
    return {
      value : ' '
    };
  },
  mounted () {
    // the modals have shortcuts in your components:
    this . $notify ({ ... }) // calls QNotification
    this . $message ({ ... }) // calls QMessageBox
    this . $dialog ({ ... }) // calls QDialog
  }
};
</ script >
... 또는 빠른 설정을 구성합니다
main.js :
 import Vue from 'vue' ;
import Qui from '@qvant/qui' ;
import '@qvant/qui/dist/qui.css' ;

Vue . use ( Qui , {
  localization : {
    locale : 'en' , // Russian language by default, you can set `en` for English
    customI18nMessages : {
      // rewrite default texts, see the source: src/qComponents/constants/locales
      en : {
        QDatepicker : {
          placeholder : 'Pick your birthday!'
        }
      }
    } ,
    zIndexCounter : 3000 , // zIndexCounter is being used by some components, (e.g QPopover, QSelect, QDialog ...etc), 2000 by default
    prefix : 'yo' // you can change component's prefix, e.g. must be used <yo-input /> instead of <q-input />
  }
} ) ;
yourcomponent.vue에서 : (예)
< template >
<!-- placeholder is changed on 'Pick your birthday!' -->
< yo-datepicker v-model = " value " type = " date " />
</ template >
< script >
export default {
data () {
return {
value : null
};
}
};
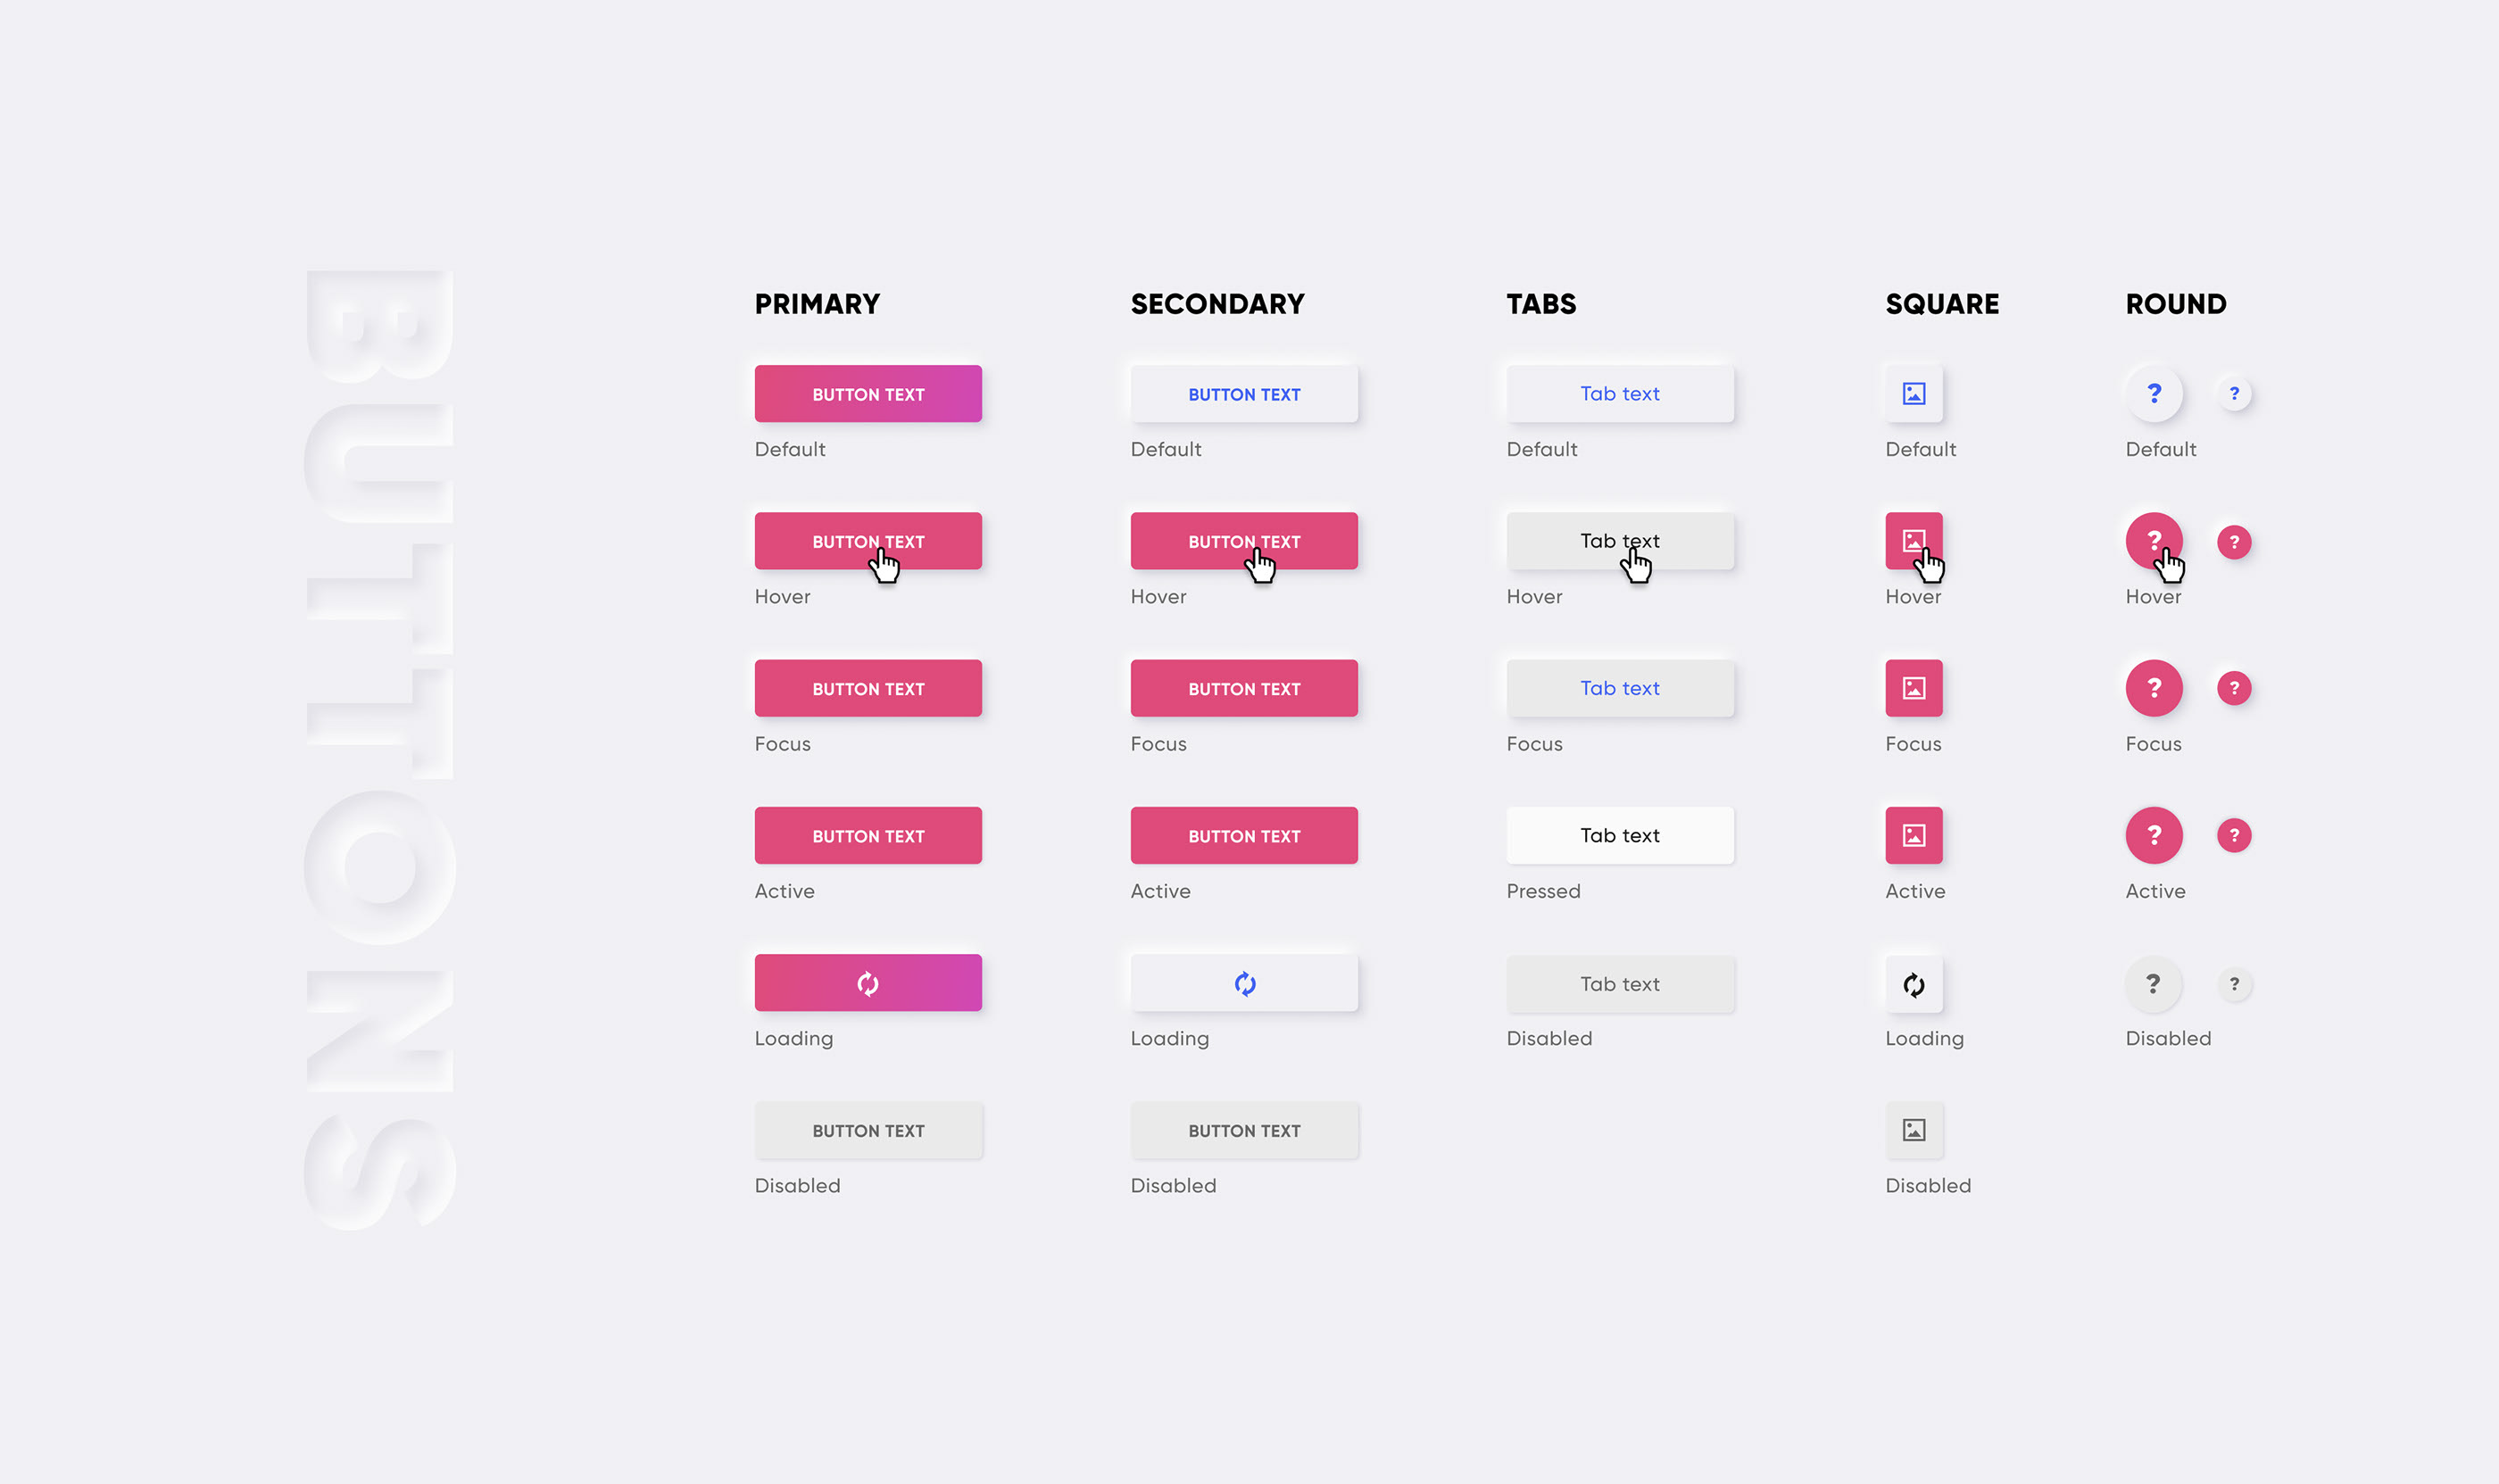
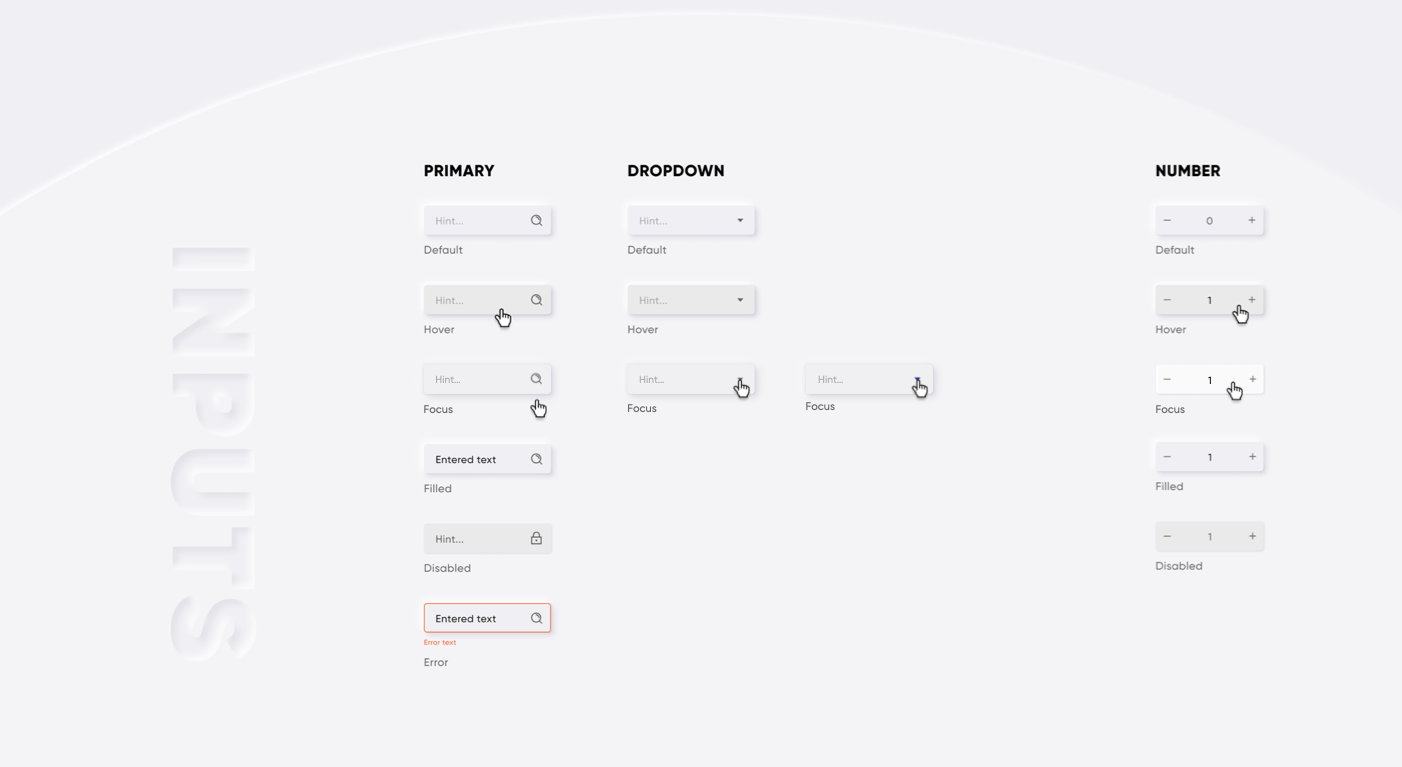
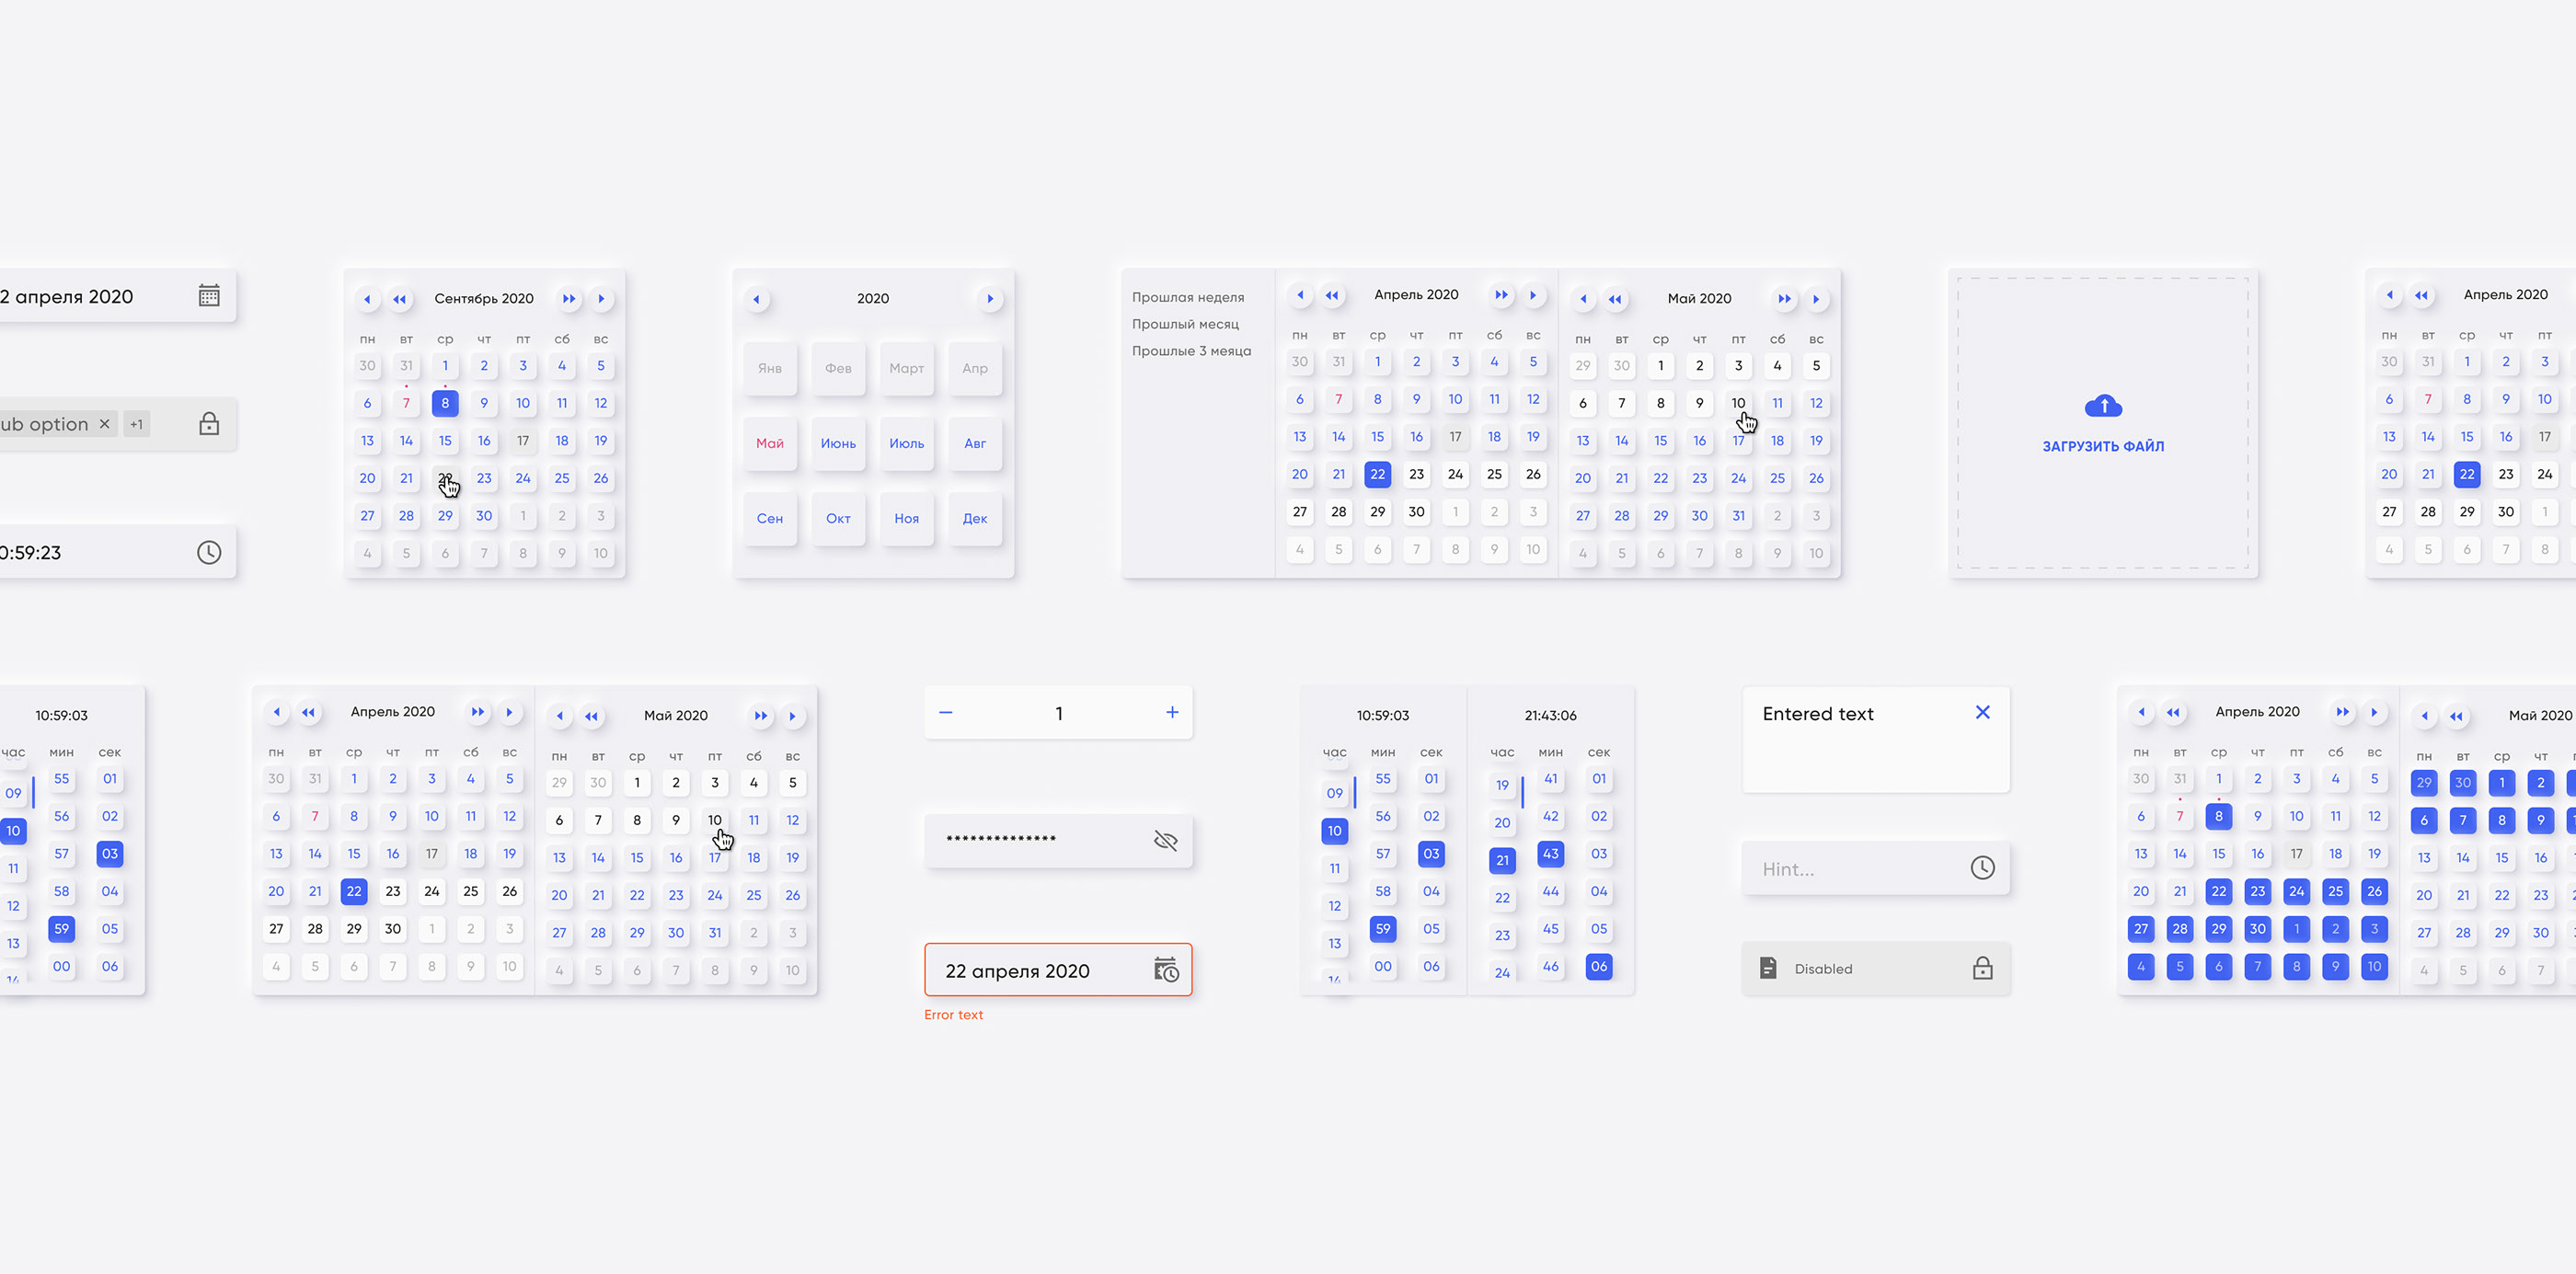
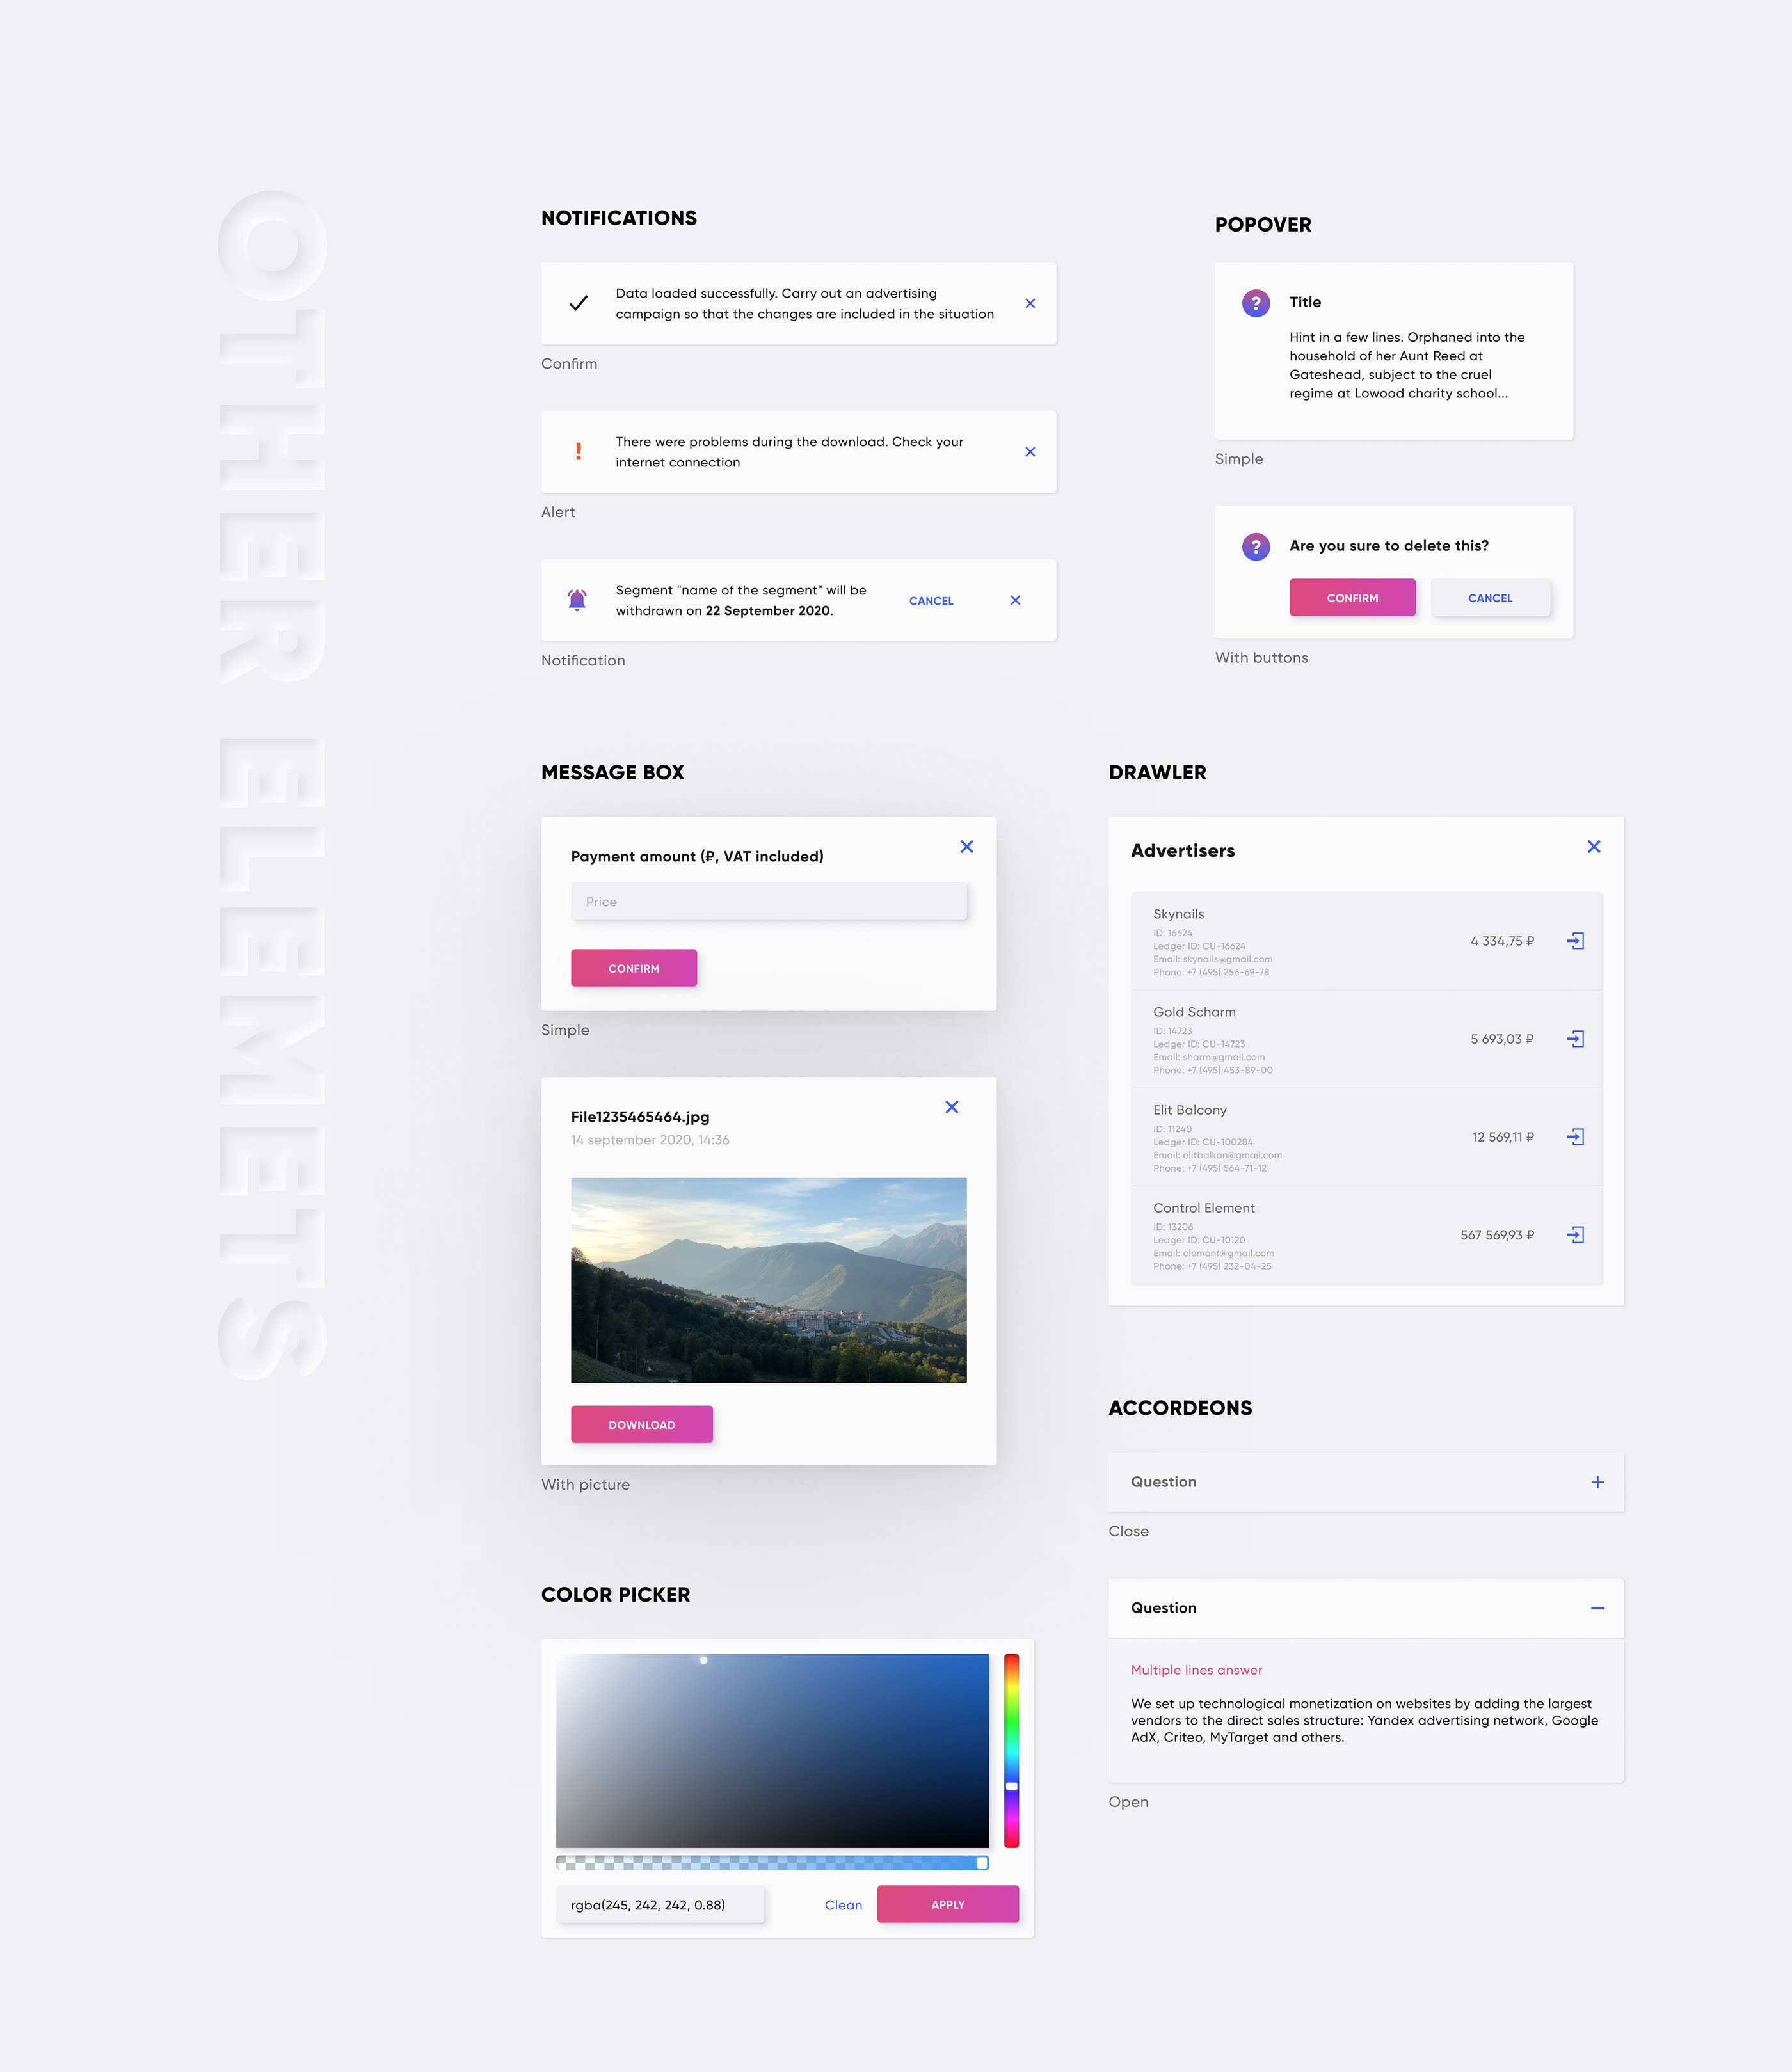
</ script >이제 프로젝트에 vue와 qui를 구현했으며 이제 코드를 작성할 때입니다. 사용 방법을 배우려면 각 구성 요소의 이야기를 참조하십시오.
모듈 Bundler (예 : Webpack)가있는 경우 구성 요소를 별도로 가져 와서 번들 크기에주의를 기울일 수 있습니다.
main.js :
 // import the main plugin from another place (it ensures Qui will be installed without any components, but instance will set required properties and directives)
import Qui from '@qvant/qui/src/onDemand' ;

// import the component you want
import QButton from '@qvant/qui/src/qComponents/QButton' ;
// ...or in async way
Vue . component ( 'q-button' , ( ) =>
  import ( /* webpackChunkName: "qui" */ '@qvant/qui/src/qComponents/QButton' )
) ;

// init
Vue . use ( Qui ) ;
Vue . use ( QButton ) ;
main.scss :
 // need to set the path for files with statics
$--base-path : ' ~@qvant/qui/src ' ;
// set main styles
@import ' ~@qvant/qui/src/main.scss ' ;
// notice that you must use `fonts` and `icons` styles for some of components:
@import ' ~@qvant/qui/src/fonts/index.scss ' ;
@import ' ~@qvant/qui/src/icons/index.scss ' ;
모든 스타일 가져 오기 :
@import ' ~@qvant/qui/src/components.scss ' ;... 또는 별도로 구성 요소 :
 @import ' ~@qvant/qui/src/qComponents/QBreadcrumbs/src/q-breadcrumbs.scss ' ;
@import ' ~@qvant/qui/src/qComponents/QButton/src/q-button.scss ' ;
// ...etc import { QMessageBox , QDialog , QNotification } from '@qvant/qui' ;
// or import separately
import QMessageBox from '@qvant/qui/src/qComponents/QMessageBox' ;
import QDialog from '@qvant/qui/src/qComponents/QDialog' ;
import QNotification from '@qvant/qui/src/qComponents/QNotification' ;
Vue . prototype . $message = QMessageBox ;
Vue . prototype . $dialog = QDialog ;
Vue . prototype . $notify = options =>
QNotification ( {
duration : 3000 , // - ms
... options
} ) ; import VueI18n from 'vue-i18n' ;
import { en , ru } from '@qvant/qui/src/qComponents/constants/locales' ;
Vue . use ( VueI18n ) ;
const messages = {
en : {
message : {
hello : 'hello world'
} ,
... en
} ,
ru : {
message : {
hello : 'привет, мир'
} ,
... ru
}
} ;
const i18n = new VueI18n ( {
locale : 'en' ,
messages
} ) ;
new Vue ( {
i18n
} ) . $mount ( '#your-app' ) ; 현대식 브라우저가 권장됩니다
복제 저장소 및 실행 스토리 북
yarn storybook
npm run storybookMIT


