inspect4py
Inspect4py 0.0.8:
사용자가 소프트웨어 프로젝트 폴더 (예 : 디렉토리 및 하위 디렉토리)를 검사하고 클래스, 메소드 및 매개 변수 문서, 클래스 (및 메소드), 기능 등과 같은 가장 관련성있는 정보를 추출 할 수 있도록 라이브러리.
코드가있는 폴더가 주어지면 inspect4py 다음과 같습니다.
inspect4py Library 기본 유형으로 반환합니다).모든 메타 데이터는 JSON 파일로 추출됩니다.
inspect4py는 현재 Python 3 프로젝트에 대해서만 작동합니다.
inspect4py GraphCodebert : Github & Paper에서 영감을 얻은 각 기능에 대한 캡처 데이터 흐름 그래프의 기능을 추가했습니다. 그림은 다음과 같습니다.
| 소스 코드 | 출력을 나열하십시오 | 네트워크 이미지 |
|---|---|---|
def max (a, b) : | ( 'a', 3, 'comesfrom', [], []))) | 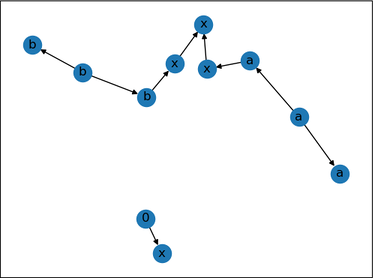 |
inspect4py AST,보다 구체적으로 Python의 AST 모듈을 사용하여 클래스가 모두 ast.ast에서 상속하는 객체 트리 (파일 당)를 생성합니다.
inspect4py 각 입력 파일을 AST 트리로 구문 분석하여 관련 정보를 추출하고 JSON 파일로 저장합니다. 또한 다른 두 라이브러리를 사용하여 각 입력 파일의 제어 흐름을 캡처합니다.
또한 REST, Google 및 NumpyDoc 스타일의 Docstrings를 지원하는 DocString_parser도 사용합니다. 이 라이브러리를 사용하여 수행 된 일부 (기본) 테스트는 여기에서 찾을 수 있습니다.
마지막으로, 우리는 주어진 저장소의 요구 사항을 자동으로 생성하기 위해 Pigar를 재사용합니다. 이것은 선택적 기능입니다. 인수 ( -r )를 활성화하려면 Inspect4py를 실행할 때 표시되어야합니다.
MSR 2022 데모 용지를 인용하십시오 :
 @inproceedings{FilgueiraG22,
  author    = {Rosa Filgueira and
               Daniel Garijo},
  title     = {Inspect4py: {A} Knowledge Extraction Framework for Python Code Repositories},
  booktitle = {{IEEE/ACM} 19th International Conference on Mining Software Repositories,
               {MSR} 2022, Pittsburgh, PA, USA, May 23-24, 2022},
  pages     = {232--236},
  publisher = {{IEEE}},
  year      = {2022},
  url       = {https://dgarijo.com/papers/inspect4py_MSR2022.pdf},
  doi       = {10.1145/3524842.3528497}
}
트리 시터가 설치되어 있는지 확인하고 C 상환자가 필요합니다. 추가 정보 :
pip install tree-sitter
".so"파일이 제대로 작동하지 않으면 다음 커뮤니케이션을 실행하여 OS에 대한 SO 파일을 생성하는 것이 좋습니다.
 git clone https://github.com/tree-sitter/tree-sitter-python

python inspect4py/build.py
GraphViz가 설치되어 있는지 확인하십시오.
sudo apt-get install graphviz
Python 3.7+에서 inspect4py 테스트했습니다. 권장 버전은 Python 3.9입니다 .
우리는 UNIX, MACOS 및 Windows 11 (22621.1265)에서 inspect4py 테스트했습니다.
PYPI에서는 inspect4py 사용할 수 있습니다! 일반 패키지처럼 설치하기 만하면됩니다.
pip install inspect4py
당신은 끝났습니다!
그런 다음 Python-Dev 유틸리티를 업데이트하십시오 : sudo apt-get install python3.X-dev (여기서 X는 Python 버전).
가상 Python3 Enviroment를 준비하고, cd inspect4py 폴더에 넣고 다음과 같이 패키지를 설치하십시오.
 git clone https://github.com/SoftwareUnderstanding/inspect4py
cd inspect4py
pip install -e .
당신은 끝났습니다!
 docstring_parser==0.7
astor
graphviz
click
pigar
setuptools==54.2.0
json2html
configparser
bigcode_astgen
GitPython
tree-sitter
평가를 실행하려면 이전 세트에 pandas 추가하는 것을 잊지 마십시오.
Docker를 설치해야합니다.
다음으로, inspect4py 저장소를 복제하십시오.
git clone https://github.com/SoftwareUnderstanding/inspect4py/
inspect4py 에 대한 docker 이미지를 생성하십시오.
docker build --tag inspect4py:1.0 .
inspect4py 이미지 실행 :
docker run -it --rm inspect4py:1.0 /bin/bash
이제 inspect4py 실행할 수 있습니다.
root@e04792563e6a:/# inspect4py --help
inspect4py 실행 옵션에 대한 자세한 내용은 아래 섹션 (실행)을 참조하십시오.
Docker를 사용하여 inspect4py 실행할 때는 분석 할 대상 저장소의 경로를 제공해야합니다. 다음을 수행 할 수 있습니다.
 docker run -it --rm inspect4py:1.0 /bin/bash
# Docker image starts
root@e04792563e6a:/# git clone https://github.com/repo/id
root@e04792563e6a:/# inspect4py -i id
 docker run -it -v -v $PWD:/out --rm inspect4py:1.0 /bin/bash
# Docker image starts
root@e04792563e6a:/# inspect4py -i /out/path/to/repo
Docker를 사용할 때 다른 유용한 명령 :
 docker cp [OPTIONS] CONTAINER:SRC_PATH DEST_PATH|-
docker image rm -f inspect4py:1.0
이 도구는 파일 또는 주어진 디렉토리의 모든 파일 (및 하위 디렉토리)을 검사하기 위해 실행될 수 있습니다. 예를 들어, 주어진 GitHub 리포지토리의 모든 Python 파일을 검사하는 데 사용될 수 있습니다 (이전에 로컬로 복제 된).
기본적으로 도구는 결과를 OutputDir 디렉토리에 저장하지만 사용자는 -o 또는 --output 플래그를 사용하여 자체 디렉토리 이름을 지정할 수 있습니다.
inspect4py --input_path <FILE.py | DIRECTORY> [--output_dir "OutputDir", --ignore_dir_pattern "__", ignore_file_pattern "__" --requirements --html_output]
명확성을 위해 각 입력 매개 변수를 설명하기 위해 help 명령을 추가했습니다.
 inspect4py --help


Usage: inspect4py [OPTIONS]

Options:
  --version                       Show the version and exit.
  -i, --input_path TEXT           input path of the file or directory to
                                  inspect.  [required]
  -o, --output_dir TEXT           output directory path to store results. If
                                  the directory does not exist, the tool will
                                  create it.
  -ignore_dir, --ignore_dir_pattern TEXT
                                  ignore directories starting with a certain
                                  pattern. This parameter can be provided
                                  multiple times to ignore multiple directory
                                  patterns.
  -ignore_file, --ignore_file_pattern TEXT
                                  ignore files starting with a certain
                                  pattern. This parameter can be provided
                                  multiple times to ignore multiple file
                                  patterns.
  -r, --requirements              find the requirements of the repository.
  -html, --html_output            generates an html file of the DirJson in the
                                  output directory.
  -cl, --call_list                generates the call list in a separate html
                                  file.
  -cf, --control_flow             generates the call graph for each file in a
                                  different directory.
  -dt, --directory_tree           captures the file directory tree from the
                                  root path of the target repository.
  -si, --software_invocation      generates which are the software
                                  invocation commands to run and test the
                                  target repository.
  -ast, -—abstract_syntax_tree    generates abstract syntax tree in json format.
  -sc, --source_code              generates source code of each ast node.
  -ld, --license_detection        detects the license of the target repository.
  -rm, --readme                   extract all readme files in the target repository.
  -md, --metadata                 extract metadata of the target repository using
                                  Github API.
  -df, --data_flow                extract data flow graph for every function, BOOL
  -st, --symbol_table             symbol table file location. STR
  --help                          Show this message and exit.
추가 문서 및 예를 보려면 온라인 문서를 살펴보십시오.
현재 문제를 해결하기위한 기여를 환영합니다. 기여를 추진하려면 풀 요청을 개발 지점 ( dev )으로 밀어 넣으 십시오. 마스터 브랜치에는 최신 릴리스와 관련된 코드 만 있습니다.
로고의 디자이너 인 Laura Camacho에게 감사드립니다.


