dart_native
0.7.11
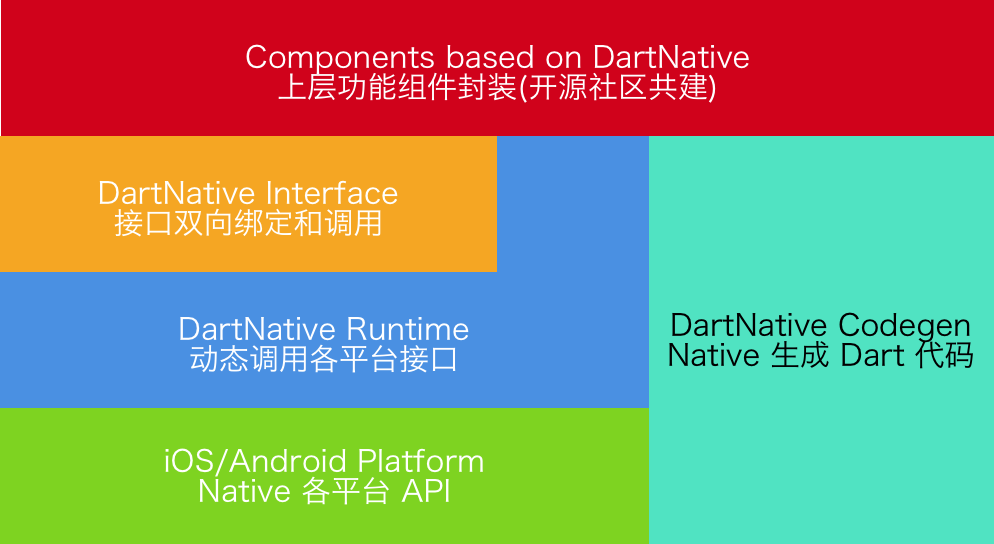
DARTNATIVE는 다트와 네이티브 API 사이를 통신하기위한 다리 역할을합니다.
저 성능 플러터 채널을 더 빠르고 간결한 코드로 대체합니다.
Dartnative는 모든 기본 API를 동적으로 호출합니다. 동기 및 비동기 채널링을 모두 지원합니다.
플러터 채널과 같은 매개 변수 및 반환 값의 직렬화는 더 이상 필요하지 않습니다. Dartnative는 직접 통화 및 자동 객체를 언어 인터페이스 사이에 마샬링합니다.
Dart Finalizer는 Flutter 3 (Dart 2.17) 위에만 지원되지만 Dartnative는 Dart Flutter 2.2.0 (Dart 2.13.0) 이상에서 사용할 수 있습니다.
Dartnative는 자동 유형 변환을 지원하므로 브리징 코드는 플러터 채널보다 짧고 간단합니다.
이 패키지의 디자인과 비전 :
| 신장 된 버전 | 플러터 요구 사항 | Codegen 버전 |
|---|---|---|
| 0.4.x -0.7.x | Flutter 2.2.0 (다트 2.13.0) | 2.X |
| 0.3.x | Flutter 1.20.0 (다트 2.9.1) | 1.2.x |
| 0.2.x | 플러터 1.12.13 (Dart 2.7) | 1.X |
iOS & MacOS 및 Android
dart_native 종속성에 추가하고 dev_dependencies에 build_runner 추가하십시오. 그런 다음 코드를 쓸 수 있습니다. 몇 가지 예는 다음과 같습니다.
다트 코드 :
 final interface = Interface ( "MyFirstInterface" );
// Example for string type.
String helloWorld () {
    return interface . invokeMethodSync ( 'hello' , args : [ 'world' ]);
}
// Example for num type.
Future < int > sum ( int a, int b) {
    return interface . invokeMethod ( 'sum' , args : [a, b]);
}
해당 대상 C 코드 :
 @implementation DNInterfaceDemo

// Register interface name.
InterfaceEntry (MyFirstInterface)

// Register method "hello".
InterfaceMethod(hello, myHello:( NSString *)str) {
    return [ NSString stringWithFormat: @" hello %@ ! " , str];
}

// Register method "sum".
InterfaceMethod (sum, addA:( int32_t )a withB:( int32_t )b) {
    return @(a + b);
}

@end
해당 Java 코드 :
 // load libdart_native.so
DartNativePlugin . loadSo ();

@ InterfaceEntry ( name = "MyFirstInterface" )
public class InterfaceDemo extends DartNativeInterface {

    @ InterfaceMethod ( name = "hello" )
    public String hello ( String str ) {
        return "hello " + str ;
    }

    @ InterfaceMethod ( name = "sum" )
    public int sum ( int a , int b ) {
        return a + b ;
    }
}
참고 : SO 경로가 사용자 정의 인 경우 특정 경로를 통과해야합니다.
DartNativePlugin . loadSoWithCustomPath ( "xxx/libdart_native.so" ); 다트에서 Dartnative를 사용하기 전에 먼저 dartNativeInitCustomSoPath() 호출합니다. 채널에서 경로를 얻을 수 있습니다.
다트 코드 :
 interface . setMethodCallHandler ( 'totalCost' ,
        ( double unitCost, int count, List list) async {
    return { 'totalCost: ${ unitCost * count }' : list};
});
해당 대상 C 코드 :
[ self invokeMethod: @" totalCost "
         arguments: @[@ 0.123456789 , @ 10 , @[ @" testArray " ]]
            result: ^( id _Nullable result, NSError * _Nullable error) {
    NSLog ( @" %@ " , result);
}];
해당 Java 코드 :
 invokeMethod ( "totalCost" , new Object []{ 0.123456789 , 10 , Arrays . asList ( "hello" , "world" )},
             new DartNativeResult () {
                @ Override
                public void onResult ( @ Nullable Object result ) {
                    Map retMap = ( Map ) result ;
                    // do something
                }

                @ Override
                public void error ( @ Nullable String errorMessage ) {
                    // do something
                }
              }
); final foo = Bar (); // A custom instance.
unitTest. addFinalizer (() { // register a finalizer callback.
print ( 'The instance of ' foo ' has been destroyed!' ); // When `foo` is destroyed by GC, this line of code will be executed.
});| 다트 | 대상 c | 스위프트 | 자바 |
|---|---|---|---|
| 널 | 무 | 무 | 널 |
| 부 | 부 | 부 | 부 |
| int | nsinteger | int | int |
| 더블 | 더블 | 더블 | 더블 |
| 끈 | nsstring | 끈 | 끈 |
| 목록 | NSARRAY | 정렬 | 목록, ArrayList |
| 지도 | nsdictionary | 사전 | 지도, 해시 맵 |
| 세트 | NSSET | 세트 | 설정, 해시 세트 |
| 기능 | 차단하다 | 폐쇄 | 약속하다 |
| 바늘 | 무효의 * | 비 미감실 | - |
| 네이티브 비트 | nsdata | 데이터 | DirectByTebuffer |
| aviretobject | nsobject | nsobject | 물체 |
1 단계 : dart_native 종속성에 추가하고 dev_dependencies에 build_runner 하십시오.
2 단계 : @dartnative/codegen으로 다트 래퍼 코드를 생성하거나 다트 코드를 수동으로 작성하십시오.
3 단계 : 다음 단계 (3.1-3.3)와 함께 dart_native_gen을 사용하여 자동 유형 변환 코드를 생성합니다.
3.1 다트 래퍼 클래스에 @native 에 주석을 달다.
 @native
class RuntimeSon extends RuntimeStub {
  RuntimeSon ([ Class isa]) : super ( Class ( 'RuntimeSon' ));
  RuntimeSon . fromPointer ( Pointer < Void > ptr) : super . fromPointer (ptr);
}
3.2 @nativeRoot 와 함께 자신의 항목 (예 : main() )에 주석을달라고하십시오.
 @nativeRoot
void main () {
  runApp ( App ());
}
3.3 실행
flutter packages pub run build_runner build --delete-conflicting-outputs 소스 디렉토리에 파일을 생성합니다.
참고 : 먼저 clean 실행하는 것이 좋습니다.
flutter packages pub run build_runner clean 4 단계 : <generated-name>.dn.dart 에서 자율적 인 함수를 호출하십시오. 함수 이름은 pubspec.yaml name 으로 결정됩니다.
 @nativeRoot
void main () {
  // Function name is generated by name in pubspec.yaml.
  runDartNativeExample ();
  runApp ( App ());
}
5 단계 : 그러면 코드를 작성할 수 있습니다. 몇 가지 예는 다음과 같습니다.
5.1 iOS :
다트 코드 (생성) :
 // new Objective-C object.
RuntimeStub stub = RuntimeStub ();

// Dart function will be converted to Objective-C block.
stub. fooBlock (( NSObject a) {
    print ( 'hello block! ${ a . toString ()}' );
    return 101 ;
});

// support built-in structs.
CGRect rect = stub. fooCGRect ( CGRect ( 4 , 3 , 2 , 1 ));
print (rect);
해당 대상 C 코드 :
 typedef int (^BarBlock)( NSObject *a);

@interface RuntimeStub

- ( CGRect ) fooCGRect : ( CGRect ) rect ;
- ( void ) fooBlock : (BarBlock) block ;

@end
더 많은 iOS 예제 : ios_unit_test.dart를 참조하십시오
5.2 안드로이드 :
다트 코드 (생성) :
 // new Java object.
RuntimeStub stub = RuntimeStub ();

// get java list.
List list = stub. getList ([ 1 , 2 , 3 , 4 ]);

// support interface.
stub. setDelegateListener ( DelegateStub ());
해당 Java 코드 :
 public class RuntimeStub {

    public List < Integer > getList ( List < Integer > list ) {
        List < Integer > returnList = new ArrayList <>();
        returnList . add ( 1 );
        returnList . add ( 2 );
        return returnList ;
    }

    public void setDelegateListener ( SampleDelegate delegate ) {
        delegate . callbackInt ( 1 );
    }
}
더 많은 안드로이드 예제 참조 : android_unit_test.dart
참고 : macOS에서 dart_native를 사용하는 경우 use_frameworks! 당신의 podfile에서.
Q : MacOS 아카이브에서 기호 (dlsym (rtld_default, initdartapidl) : 기호)를 조회하지 못했습니다.
A : 하나의 해결책을 선택하십시오.
use_frameworks! Podfile에서.Dartnative는 BSD 3-Clause 라이센스에 따라 제공됩니다. 자세한 내용은 라이센스 파일을 참조하십시오.


