WisBlock API V2
AT command parsing and default fPort changes
 |  |  |  |  |
|---|
低消費電力をターゲットにしたこのRakwireless WisblockコアモジュールのこのArduinoライブラリは、コマンド機能ですべてのLora P2P、Lorawan、BLEを処理します。アプリケーションに集中し、残りをAPIに任せることができます。 SX126X-Arduino Lorawan Libraryの仲間として作られています
setup()またはloop()関数がないため、Arduinoアプリケーションについて再考する必要があります。代わりに、すべてがイベント駆動型です。 MCUは、行動を起こす必要があるまで眠っています。これは、USBポートまたはアプリケーションイベントで受け取ったATコマンドであるロラワンイベント、例えばセンサーからの割り込みなどです。
このアプローチにより、低電力使用量向けに設計されたアプリケーションを簡単に作成できます。睡眠中、Wisblock Base + Wisblock Core Rak4631は40UAのみを消費します。
さらに、APIは、ソースコードにハードコードする必要なく、Lora P2P / Lorawan設定をセットアップする2つのオプションを提供します。
ライブラリのV2は、コマンド形式を変更し、コマンドでRUI3と互換性があるように変更しました。違いについては、RUI3のコマンドマニュアルを確認してください。
V2リリースはRakwireless Wisblock Rak4631コアモジュールのみをサポートします
RAK11310とRAK1200のサポートが将来追加される可能性があります
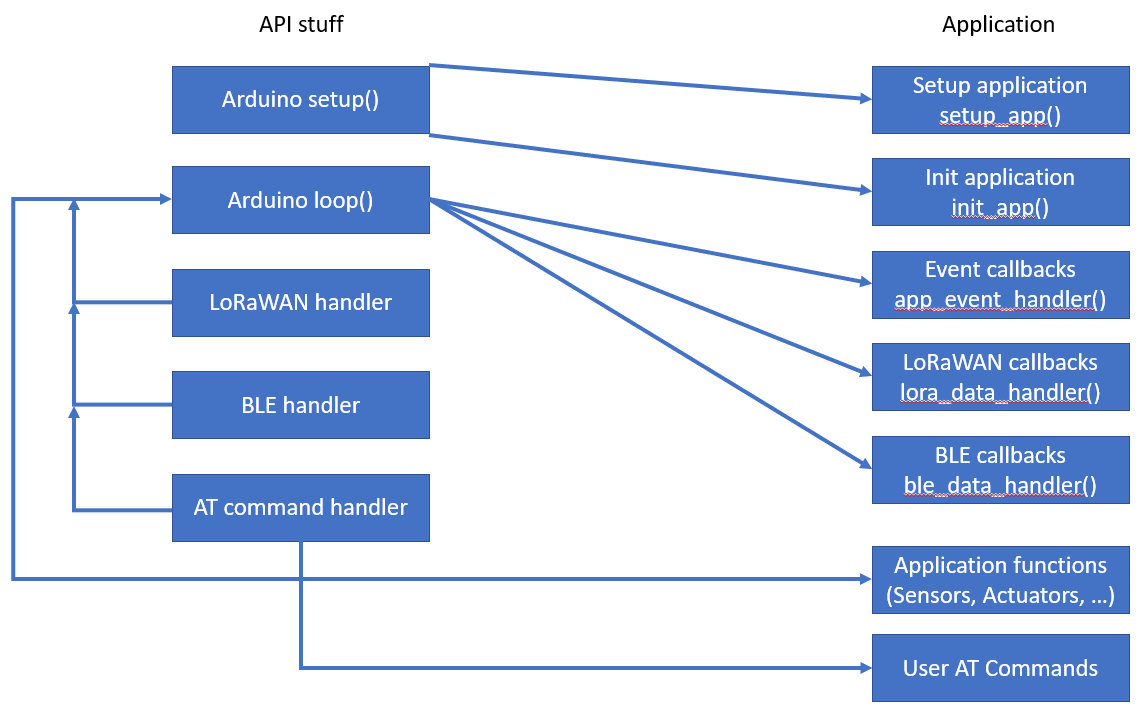
APIは、 setup() 、 loop() 、lorawanの初期化、ロラワンイベントの取り扱い、BLE初期化、bleイベントのハンドリングATコマンドインターフェイスからすべてを処理しています。
述べる!
ユーザーアプリケーションには、functions setup()とloop()を持っていてはなりません。
ユーザーアプリケーションには2つの初期化関数があり、1つはsetup()の先頭に呼び出され、もう1つは最後にあります。他の関数はloop()から呼び出されるイベントコールバックです。カスタムイベント(センサーからの割り込みなど)も定義することができます。
センサーの読み取り、アクチュエータコントロール、またはその他のアプリケーションタスクはapp_event_handler()で処理されます。 app_event_handler()は頻繁に呼ばれますが、通話間の時間はアプリケーションによって定義されます。さらに、 app_event_handler()はカスタムイベントで呼び出されます。
ble_data_handler()はloop()からBLEイベント(現在のBLE UART RXイベント)で呼び出されます。 BLE UARTを介してカスタム通信を実装するために使用できます。
述べる!
この関数はRAK11310では必要ありません!
lora_data_handler()は、異なるlorawanイベントで呼び出されます
グラフTD
a [boot]  - > |起動| B(セットアップ)
    b-> | 1 | D(setup_app)
        D-> B(セットアップ)
    b-> | 2 | e [ロラとブルを初期化]
        E-> B(セットアップ)
    b-> | 3 | g(init_app)
        g-> k(セットアップが終了)
    k-> |ループを開始| I(ループ)
        Q [ロライベント]  - > |ウェイクアップ| j
        o [センサーイベント]  - > |ウェイクアップ| JP [BLEイベント]  - > |ウェイクアップ| jr [at Command]  - > |ウェイクアップ| JT [タイマー]  - > |ウェイクアップ| ji-> j(眠っている)
        k-> |スタートタイマー| t
        j-> l(app_event_handler)
        j-> m(lora_data_handler)
        j-> n(ble_data_handler)
        j-> s(コマンドハンドラー)
        l-> u(センサーを読む)
        M-> V(参加、TXおよびRXイベント)
        n  - > w(コマンドでbleを処理)
        s-> aa(コマンドのユーザー)
        u-> l
        v-> m
        w-> n
        aa-> s
        L-> j
        m-> j
        n  - > j
        s-> j
すべてのコマンドは、コマンドのすべてのRUI3がサポートされているわけではないため、すべてのコマンドマニュアルにあります。コマンドで利用可能なリストは、で取得できますか?デバイスから
コマンドの2つのカスタムがコマンドセットでデフォルトのRUI3に追加されました。
説明:自動伝送間隔を設定します
このコマンドにより、自動パケット送信の間に間隔を数秒単位に設定できます。 0に設定すると、自動パケット送信が無効になります。
| 指示 | 入力パラメーター | 返品値 | コードを返します |
|---|---|---|---|
| ATC+SENDINT? | - | ATC+SENDINT: "Get or Set the automatic send interval | OK |
| atc+sendint =? | - | <interval in seconds> | OK |
ATC+SENDINT = <Input Parameter> | <interval in seconds> | - | OKまたはAT_PARAM_ERROR |
例:
 ATC+SENDINT?

ATC+SENDINT: Get or Set the automatic send interval
OK

ATC+SENDINT=?

ATC+SENDINT:60
OK

ATC+SENDINT=60

OK
説明:デバイスのステータスを表示します
このコマンドにより、ユーザーは現在のデバイスステータスを取得できます。
| 指示 | 入力パラメーター | 返品値 | コードを返します |
|---|---|---|---|
| ATC+ステータス? | - | ATC+STATUS: Show LoRaWAN status | OK |
| ATC+status =? | - | <ステータス> | OK |
例:
 ATC+STATUS?

ATC+STATUS: Show LoRaWAN status
OK

// When in LoRaWAN mode:

ATC+STATUS=?
Device status:
   RAK4631
   Mode LPWAN
   Auto join enabled
   Network joined
LPWAN status:
   Dev EUI AC1F09FFFE09016C
   App EUI 70B3D57ED00201E1
   App Key 2B84E0B09B68E5CB42176FE753DCEE79
   Dev Addr 26021FB4
   NWS Key 323D155A000DF335307A16DA0C9DF53F
   Apps Key 3F6A66459D5EDCA63CBC4619CD61A11E
   OTAA enabled
   ADR disabled
   Public Network
   Dutycycle disabled
   Join trials 5
   TX Power 0
   DR 3
   Class 0
   Subband 1
   Fport 2
   Unconfirmed Message
   Region AS923-3
   Send Frequency 300

// When in LoRa P2P mode:

ATC+STATUS=?
Device status:
   RAK4631
   Mode P2P
   P2P frequency 916000000
   P2P TX Power 22
   P2P BW 125
   P2P SF 7
   P2P CR 0
   P2P Preamble length 8
   P2P Symbol Timeout 0
   Send Frequency 300
説明:ポート設定
このコマンドにより、ユーザーはポート設定にアクセスして構成できます。
| 指示 | 入力パラメーター | 返品値 | コードを返します |
|---|---|---|---|
| ATC+ポート? | - | AT+PORT=<Port><CR>. Get or Set the Port | OK |
| atc+port =? | - | 1-223 | わかりました |
ATC+PORT = <Input Parameter> | 1-223 | - | OKまたはAT_PARAM_ERROR |
例:
 ATC+PORT?

ATC+PORT: Get or Set the Port=[1..223]
OK

ATC+PORT=?

ATC+PORT:2
OK

ATC+PORT=2

OK
戻る
Wisblock API V1.1.2から始めて、ATコマンドは、コマンドで定義されたユーザーによって拡張できます。この新しい実装では、コマンド関数でWisblock APIのパーサー関数を使用します。さらに、 AT?使用されています。
述べる! rui3では、コマンドのカスタムがatではなくATCで呼び出されます!
ATコマンドを拡張するには、3つのステップが必要です。
コマンドのカスタムは、struct atcmd_t形式の配列にリストされています。各エントリは、atコマンドで構成されています。これは、コマンドがaで呼び出されたときに表示される説明テキストです。クエリの関数へのポインター、パラメーターで実行し、パラメーターなしで実行します。コマンドの2つのカスタムの例を次に示します。
 atcmd_t g_user_at_cmd_list_example[] = {
	/* |    CMD    |     AT+CMD?      |    AT+CMD=?    |  AT+CMD=value |  AT+CMD  |  Permissions  | */
	// GNSS commands
	{ " +SETVAL " , " Get/Set custom variable " , at_query_value, at_exec_value, NULL , " RW " },
	{ " +LIST " , " Show last packet content " , at_query_packet, NULL , NULL , " R " },
};

atcmd_t *g_user_at_cmd_list = g_user_at_cmd_list_example;
備考1
コマンドでのカスタムの構造は、RUI3互換性のために拡張されます。 Wisblock-API V1.xのために記述された古いコードは、この新しい構造に調整する必要があります。
備考2
ATコマンドによってサポートされていない関数の場合、アレイにNULLに配置する必要があります。
備考3
名前g_user_at_cmd_listは修正されており、変更できないか、カスタムコマンドが検出されません。
備考4
権限は文字列として与えられます。有効なエントリは「R」(読み取り専用)、「W」(書き込みのみ)、「RW」(読み取りと書き込み)です
コマンドでカスタムの数を持つ変数を提供する必要があります。
 /* * Number of user defined AT commands */
uint8_t g_user_at_cmd_num = sizeof (g_user_at_cmd_list_example) / sizeof ( atcmd_t );
述べる
名前g_user_at_cmd_numという名前が修正されており、変更できないか、カスタムコマンドが検出されません。
各カスタムコマンドについて、クエリと実行コマンドを記述する必要があります。これらの関数の名前は、コマンドのカスタムの配列で使用される関数名と一致する必要があります。 executeコマンドは、パラメーターとして、値の=の後にatコマンドの値を受信します。
クエリ関数( =? )は受信およびパラメーターではなく、常に0で返す必要があります。クエリ関数グローバルチャーアレイg_at_query_bufferのクエリの結果を保存すると、アレイは128文字であるATQUERY_SIZEの最大サイズを持っています。
パラメーターを使用して関数を実行する( =<value> )charアレイへのポインターとして値または設定を受信します。この配列には、ATコマンド自体のない値またはパラメーターのみが含まれます。たとえばATC+SETDEV=12000実行処理は120000のみを受け取ります。受信された値またはパラメーターの有効性を確認する必要があり、フォーマットの値が一致していない場合、 AT_ERRNO_PARA_VALを返す必要があります。値またはパラメーターが正しい場合、関数は0を返します。
パラメーターのない機能を実行して、アクションを実行し、実行が失敗した場合に成功した場合、またはAT_ERRNO_EXEC_FAILの場合、アクションの成功を0として返すために使用されます。
この例は、アプリケーションに変数を設定するために使用されます。
 /* ******************************************************************* */
// Example AT command to change the value of the variable new_val:
// Query the value AT+SETVAL=?
// Set the value AT+SETVAL=120000
// Second AT command to show last packet content
// Query with AT+LIST=?
/* ******************************************************************* */
int32_t new_val = 3000 ;

/* *
 * @brief Returns the current value of the custom variable
 *
 * @return int always 0
 */
static int at_query_value ()
{
	snprintf (g_at_query_buf, ATQUERY_SIZE, " Custom Value: %d " , new_val);
	return 0 ;
}

/* *
 * @brief Command to set the custom variable
 *
 * @param str the new value for the variable without the AT part
 * @return int 0 if the command was succesfull, 5 if the parameter was wrong
 */
static int at_exec_value ( char *str)
{
	new_val = strtol (str, NULL , 0 );
	MYLOG ( " APP " , " Value number >>%ld<< " , new_val);
	return 0 ;
}

/* *
 * @brief Example how to show the last LoRa packet content
 *
 * @return int always 0
 */
static int at_query_packet ()
{
	snprintf (g_at_query_buf, ATQUERY_SIZE, " Packet: %02X%02X%02X%02X " ,
			 g_lpwan_data. data_flag1 ,
			 g_lpwan_data. data_flag2 ,
			 g_lpwan_data. batt_1 ,
			 g_lpwan_data. batt_2 );
	return 0 ;
}

/* *
 * @brief List of all available commands with short help and pointer to functions
 *
 */
atcmd_t g_user_at_cmd_list_example[] = {
	/* |    CMD    |     AT+CMD?      |    AT+CMD=?    |  AT+CMD=value |  AT+CMD  |  Permission  | */
	// GNSS commands
	{ " +SETVAL " , " Get/Set custom variable " , at_query_value, at_exec_value, NULL , " RW " },
	{ " +LIST " , " Show last packet content " , at_query_packet, NULL , NULL , " R " },
};

atcmd_t *g_user_at_cmd_list = g_user_at_cmd_list_example;

/* * Number of user defined AT commands */
uint8_t g_user_at_cmd_num = sizeof (g_user_at_cmd_list_example) / sizeof ( atcmd_t );これらの5つの例は、APIの使用を説明しています。すべての例では、APIコールバックと追加機能(センサーの読み取り、IRQ処理、GNSSロケーションサービス)が独自のスケッチに分けられます。
Wisblock-API-V2は、次のPlatformioプロジェクトでも使用されています。
RAK4631で使用すると、BLEを介したファームウェアアップデートはすでにライブラリに含まれています。 RAK4631のファームウェアの更新は、Nordic NRFツールボックス(AndroidおよびiOSで使用可能)またはWisblock Toolbox(My Androidアプリケーション)を使用して実行できます。
更新の場合は、.pio/build/{device}フォルダーから作成された更新ファイル(通常はfiremware.zipと呼ばれる)をコピーして、電話にコピーして、アプリケーションのいずれかを使用してファームウェアを更新します。
BLE経由のファームウェアの更新が失敗した場合、バージョンv0.4.3でRAK4631の最新のブートローダーにデバイスを更新します。 Wisblock Repoで最新のブートローダーを見つけることができます
APIは、管理、Lorawanパケットの送信、BLE UARTデータの送信、およびイベントのトリガーを提供するためのいくつかの呼び出しを提供します。
void api_set_version(uint16_t sw_1 = 1, uint16_t sw_2 = 0, uint16_t sw_3 = 0);
この関数は、アプリケーションバージョンを設定するために呼び出すことができます。アプリケーションバージョンは、atコマンドで要求できます。バージョン番号は3桁からビルドされます。
sw_1 ==> APIの変更時にメジャーバージョンの増加 /逆互換ではないsw_2 ==> API変更 /後方互換のマイナーバージョンの増加sw_3 ==> bugfixでのパッチバージョンの増加、APIには影響はありませんapi_set_versionが呼び出されない場合、アプリケーションバージョンはデフォルトで1.0.0です。
void api_reset(void);
Wisblockコアモジュールのリセットを実行します
void api_wake_loop(uint16_t reason);
これは、イベントでループを覚醒させるために使用されます。 reason app.hで定義する必要があります。ループがアプリを覚醒させた後、 g_task_event_typeのreasonでapp_event_handler()を呼び出します。
例として、これを使用して、加速度計センサーの割り込みからデバイスを目覚めさせることができます。ここでは、例として、 accelerometer例コードからの抽出物があります。
accelerometer.inoでは、イベントが定義されています。最初の定義は、信号を設定することです。2つ目は、イベントが処理された後にイベントをクリアすることです。
 /* * Define additional events */
# define ACC_TRIGGER 0b1000000000000000
# define N_ACC_TRIGGER 0b0111111111111111
次に、 lis3dh_acc.inoで割り込みコールバック関数void acc_int_handler(void)でループがACC_TRIGGERで目が覚めます
 void acc_int_handler ( void )
{
	// Wake up the task to handle it
	api_wake_loop (ACC_TRIGGER);
}そして最後にaccelerometer.inoでイベントはapp_event_handler()で処理されます
	// ACC triggered event
	if ((g_task_event_type & ACC_TRIGGER) == ACC_TRIGGER)
	{
		g_task_event_type &= N_ACC_TRIGGER;
		MYLOG ( " APP " , " ACC IRQ wakeup " );
		// Reset ACC IRQ register
		get_acc_int ();

		// Set Status flag, it will trigger sending a packet
		g_task_event_type = STATUS;
}void api_log_settings(void);
この関数は、USB上のWisblockデバイスの完全な設定をリストするために呼び出すことができます。出力は次のように見えます:
Device status:
   RAK11310
   Auto join enabled
   Mode LPWAN
   Network joined
   Send Frequency 120
LPWAN status:
   Dev EUI AC1F09FFFE0142C8
   App EUI 70B3D57ED00201E1
   App Key 2B84E0B09B68E5CB42176FE753DCEE79
   Dev Addr 26021FB4
   NWS Key 323D155A000DF335307A16DA0C9DF53F
   Apps Key 3F6A66459D5EDCA63CBC4619CD61A11E
   OTAA enabled
   ADR disabled
   Public Network
   Dutycycle disabled
   Join trials 30
   TX Power 0
   DR 3
   Class 0
   Subband 1
   Fport 2
   Unconfirmed Message
   Region AS923-3
LoRa P2P status:
   P2P frequency 916000000
   P2P TX Power 22
   P2P BW 125
   P2P SF 7
   P2P CR 1
   P2P Preamble length 8
P2P Symbol Timeout 0void api_timer_stop(void)
MCUを頻繁に目覚めるタイマーを停止します。
void api_timer_restart(uint32_t new_time)
新しい値でタイマーを再起動します。値はミリ秒単位です
void api_read_credentials(void);
void api_set_credentials(void); LORA P2Pの設定をハードコードする必要がある場合(たとえば、頻度、帯域幅など)、これはsetup_app()で実行できます。最初に、保存された設定をapi_read_credentials(); 、設定を変更できます。変更した後、設定はapi_set_credentials()で保存する必要があります。 Wisblock APIが変更を保存する必要があるかどうかをチェックするため、アプリケーションをフラッシュした後、変更値は最初のブーツでのみ保存されます。
例:
 // Read credentials from Flash
api_read_credentials ();

// Make changes to the credentials
g_lorawan_settings.p2p_frequency = 916000000 ;			// Use 916 MHz to send and receive
g_lorawan_settings.p2p_bandwidth = 0 ;					// Bandwidth 125 kHz
g_lorawan_settings.p2p_sf = 7 ;							// Spreading Factor 7
g_lorawan_settings.p2p_cr = 1 ;							// Coding Rate 4/5
g_lorawan_settings.p2p_preamble_len = 8 ;				// Preample Length 8
g_lorawan_settings.p2p_tx_power = 22 ;					// TX power 22 dBi

// Save hard coded LoRaWAN settings
api_set_credentials ();
備考1
ハードコード化された設定はvoid setup_app(void)で設定する必要があります!
備考2
この方法で変更されたパラメーターは、コマンドまたはBLEで変更できるが、再起動後にリセットされる可能性があることに注意してください!
api_ble_printf()を使用して、BLE UARTを介してデータを送信できます。 print 、 println 、 printfがサポートされています。
述べる
このコマンドはRAK11310で利用できません!
デフォルトでは、BLE広告は、パワーアップ/リセット後30秒間しかアクティブであり、電力消費を削減します。 void restart_advertising(uint16_t timeout);広告はtimeout秒間再起動できます。
述べる
このコマンドはRAK11310で利用できません!
lmh_error_status send_lora_packet(uint8_t *data, uint8_t size, uint8_t fport = 0); Lorawanサーバーにデータパケットを送信するために使用されます。 *dataデータを含むバッファーへのポインターであり、 sizeパケットのサイズです。 fportが0の場合、g_lorawan_settings構造でfportdevenedが使用されます。
bool send_p2p_packet(uint8_t *data, uint8_t size); LORA P2Pを介してデータパケットを送信するために使用されます。 *dataデータを含むバッファーへのポインターであり、 sizeパケットのサイズです。
TXサイクル(RX1およびRX2 Windowsを含む)が終了した後、結果はグローバルフラグg_rx_fin_resultで保持され、イベントLORA_TX_FINがトリガーされ、 lora_data_handler()コールバックが呼び出されます。このコールバックでは、結果をチェックでき、必要に応じて対策を講じることができます。
Cayennelplは、MyDevicesによって設計された形式で、LorawanノードをIoTプラットフォームに統合します。
cayennelppライブラリは、ヨハン・ストッキングの元の研究に含まれていないいくつかのIPSOデータ型または他の人々によるフォークやサイドワークのほとんどを含む利用可能なデータ型を拡張します。これらの追加データ型は、mydevices cayenneによってサポートされていません。
Wisblock APIは、オリジナルと電子キャットの両方のデータ型を拡張して、Wisblockセンサーモジュールの幅広いサポートをよりよくサポートするいくつかのデータ型を使用しています。
拡張データ型を使用するには、Wisblock APIには必要なヘッダーファイルが既に含まれています。
Cayenne LPP関数を使用できるようにするには、クラスのインスタンスが必要です。
 /* * LoRaWAN packet */
WisCayenne g_solution_data ( 255 );データを追加する前に、パケットバッファーをリセットする必要があります
 // Reset the packet
g_solution_data.reset();Cayennelpp Libraryには、サポートされているさまざまなデータ型のAPI呼び出しがあります。詳細については、cayennelppapiを参照してください。これらのAPI呼び出しに加えて、Wisblock APIはそれらにさらに5つの呼び出しを追加します。これらのAPI呼び出しは、さまざまなGNSS形式とVOCセンサーデータ用です。
 uint8_t addGNSS_4 ( uint8_t channel, int32_t latitude, int32_t longitude, int32_t altitude);
uint8_t addGNSS_6 ( uint8_t channel, int32_t latitude, int32_t longitude, int32_t altitude);
uint8_t addGNSS_H ( int32_t latitude, int32_t longitude, int16_t altitude, int16_t accuracy, int16_t battery);
uint8_t addGNSS_T ( int32_t latitude, int32_t longitude, int16_t altitude, float accuracy, int8_t sats);
uint8_t addVoc_index ( uint8_t channel, uint32_t voc_index); /* *
* @brief Add GNSS data in Cayenne LPP standard format
*
* @param channel LPP channel
* @param latitude Latitude as read from the GNSS receiver
* @param longitude Longitude as read from the GNSS receiver
* @param altitude Altitude as read from the GNSS receiver
* @return uint8_t bytes added to the data packet
*/
uint8_t WisCayenne::addGNSS_4 ( uint8_t channel, int32_t latitude, int32_t longitude, int32_t altitude) /* *
* @brief Add GNSS data in custom Cayenne LPP format
* Requires changed decoder in LNS and visualization
* Does not work with Cayenne LPP MyDevices
*
* @param channel LPP channel
* @param latitude Latitude as read from the GNSS receiver
* @param longitude Longitude as read from the GNSS receiver
* @param altitude Altitude as read from the GNSS receiver
* @return uint8_t bytes added to the data packet
*/
uint8_t WisCayenne::addGNSS_6 ( uint8_t channel, int32_t latitude, int32_t longitude, int32_t altitude) /* *
* @brief Add GNSS data in Helium Mapper format
*
* @param channel LPP channel
* @param latitude Latitude as read from the GNSS receiver
* @param longitude Longitude as read from the GNSS receiver
* @param altitude Altitude as read from the GNSS receiver
* @param accuracy Accuracy of reading from the GNSS receiver
* @param battery Device battery voltage in V
* @return uint8_t bytes added to the data packet
*/
uint8_t WisCayenne::addGNSS_H ( int32_t latitude, int32_t longitude, int16_t altitude, int16_t accuracy, int16_t battery) /* *
* @brief Add GNSS data in Field Tester format
*
* @param latitude Latitude as read from the GNSS receiver
* @param longitude Longitude as read from the GNSS receiver
* @param altitude Altitude as read from the GNSS receiver
* @param accuracy Accuracy of reading from the GNSS receiver
* @param sats Number of satellites of reading from the GNSS receiver
* @return uint8_t bytes added to the data packet
*/
uint8_t WisCayenne::addGNSS_T ( int32_t latitude, int32_t longitude, int16_t altitude, float accuracy, int8_t sats) /* *
* @brief Add the VOC index
*
* @param channel VOC channel
* @param voc_index VOC index
* @return uint8_t bytes added to the data packet
*/
uint8_t WisCayenne::addVoc_index ( uint8_t channel, uint32_t voc_index)cayennelpのデータパケットは、常に<Channel #><Channel ID><data bytes>の形式です。
ロラワンサーバーで使用されるデータエンコーダーと、Wisblockセンサーによって収集された統合データを常に容易にするために、常に同じチャネル番号があります(これらのAPIが使用されている場合)。現在割り当てられているチャネル番号、チャネルID、および組み合わせを使用しているモジュールのリストは次のとおりです。
| データ | チャネル# | チャネルID | 長さ | コメント | 必要なモジュール | デコードされたフィールド名 |
|---|---|---|---|---|---|---|
| バッテリー値 | 1 | 116 | 2バイト | 0.01 V unsigned MSB | RAK4631 | Voltage_1 |
| 湿度 | 2 | 104 | 1バイト | %rh | Rak1901 | humidity_2 |
| 温度 | 3 | 103 | 2バイト | °Cで | Rak1901 | 温度_3 |
| 気圧 | 4 | 115 | 2バイト | HPA(MBAR) | Rak1902 | バロメーター_4 |
| イルミネンス | 5 | 101 | 2バイト | 1署名なし | Rak1903 | Illuminance_5 |
| 湿度2 | 6 | 104 | 1バイト | %rh | Rak1906 | humidity_6 |
| 温度2 | 7 | 103 | 2バイト | °Cで | Rak1906 | 温度_7 |
| 気圧2 | 8 | 115 | 2バイト | HPA(MBAR) | Rak1906 | バロメーター_8 |
| ガス抵抗2 | 9 | 2 | 2バイト | 0.01署名(KOHM) | Rak1906 | analog_9 |
| GNSSスタンド。解決 | 10 | 136 | 9バイト | 3バイトLON/LAT 0.0001°、3バイトALT 0.01メートル | Rak1910、Rak12500 | GPS_10 |
| GNSS強化解像度 | 10 | 137 | 11バイト | 4バイトLON/LAT 0.000001°、3バイトALT 0.01メートル | Rak1910、Rak12500 | GPS_10 |
| 土壌温度 | 11 | 103 | 2バイト | °Cで | RAK12023/RAK12035 | 温度_11 |
| 土壌湿度 | 12 | 104 | 1バイト | %rh | RAK12023/RAK12035 | humidity_12 |
| 土壌湿度生 | 13 | 2 | 2バイト | 0.01署名 | RAK12023/RAK12035 | analog_in_13 |
| 土壌データ有効 | 14 | 102 | 1バイト | ブール | RAK12023/RAK12035 | プレゼンス_14 |
| 照度2 | 15 | 101 | 2バイト | 1署名なし | RAK12010 | Illunance_15 |
| VOC | 16 | 138 | 2バイト | VOCインデックス | RAK12047 | VOC_16 |
| MQ2ガス | 17 | 2 | 2バイト | 0.01署名 | RAK12004 | analog_in_17 |
| MQ2ガス率 | 18 | 120 | 1バイト | 1-100%署名 | RAK12004 | パーセンテージ_18 |
| MG812ガス | 19 | 2 | 2バイト | 0.01署名 | RAK12008 | analog_in_19 |
| MG812ガス率 | 20 | 120 | 1バイト | 1-100%署名 | RAK12008 | パーセンテージ_20 |
| MQ3アルコールガス | 21 | 2 | 2バイト | 0.01署名 | RAK12009 | analog_in_21 |
| MQ3アルコールガスPERC。 | 22 | 120 | 1バイト | 1-100%署名 | RAK12009 | パーセンテージ_22 |
| TOF距離 | 23 | 2 | 2バイト | 0.01署名 | RAK12014 | analog_in_23 |
| 有効なTOFデータ | 24 | 102 | 1バイト | ブール | RAK12014 | プレゼンス_24 |
| ジャイロはトリガーされました | 25 | 134 | 6バイト | 軸ごとに2バイト、0.01°/s | RAK12025 | Gyrometer_25 |
| ジェスチャーが検出されました | 26 | 0 | 1バイト | ジェスチャーのIDを持つ1バイト | RAK14008 | Digital_in_26 |
| LTR390 UVI値 | 27 | 2 | 2バイト | 0.01署名 | RAK12019 | analog_in_27 |
| LTR390 UVS値 | 28 | 101 | 2バイト | 1署名なし | RAK12019 | Illuminance_28 |
| INA219電流 | 29 | 2 | 2バイト | 0.01署名 | RAK16000 | analog_29 |
| INA219電圧 | 30 | 2 | 2バイト | 0.01署名 | RAK16000 | Analog_30 |
| INA219パワー | 31 | 2 | 2バイト | 0.01署名 | RAK16000 | Analog_31 |
| 左のタッチパッド | 32 | 102 | 1バイト | ブール | RAK14002 | プレゼンス_32 |
| タッチパッドミドル | 33 | 102 | 1バイト | ブール | RAK14002 | プレゼンス_33 |
| タッチパッド右 | 34 | 102 | 1バイト | ブール | RAK14002 | プレゼンス_34 |
| SCD30 CO2濃度 | 35 | 125 | 2バイト | 1 ppm unsigned | RAK12037 | 濃度_35 |
| SCD30温度 | 36 | 103 | 2バイト | °Cで | RAK12037 | 温度_36 |
| SCD30湿度 | 37 | 104 | 1バイト | %rh | RAK12037 | humidity_37 |
| MLX90632センサー温度 | 38 | 103 | 2バイト | °Cで | RAK12003 | 温度_38 |
| MLX90632オブジェクト温度 | 39 | 103 | 2バイト | °Cで | RAK12003 | 温度_39 |
| PM 1.0値 | 40 | 103 | 2バイト | ug/m3で | RAK12003 | VOC_40 |
| PM 2.5値 | 41 | 103 | 2バイト | ug/m3で | RAK12003 | VOC_41 |
| PM 10値 | 42 | 103 | 2バイト | ug/m3で | RAK12003 | VOC_42 |
| 地震イベント | 43 | 102 | 1バイト | ブール | RAK12027 | プレゼンス_43 |
| 地震SI値 | 44 | 2 | 2バイト | アナログ10 * m/s | RAK12027 | Analog_44 |
| 地震PGA値 | 45 | 2 | 2バイト | アナログ10 * m/s2 | RAK12027 | Analog_45 |
| 地震シャットオフアラート | 46 | 102 | 1バイト | ブール | RAK12027 | プレゼンス_46 |
| lpp_channel_eq_collapse | 47 | 102 | 1バイト | ブール | RAK12027 | プレゼンス_47 |
| スイッチステータス | 48 | 102 | 1バイト | ブール | RAK13011 | プレゼンス_48 |
CursiveのチャネルIDは拡張形式であり、標準のCayenne LPPデータデコーダーによってサポートされていません。
使用済みのデータ形式の完全で更新されたリストは、rakwireless_standardized_payloadにあります
rakwireless_standardized_payloadリポジトリには、一致するデコーダーが含まれています。
ここで使用されるコードは、API-Test.inoの例です。
これらは、ユーザーアプリケーションとAPIインターフェイスに必要な含まれるものと定義です
この例では、ロラワンの資格情報を強調しました。複製されたノード資格情報を避けるためにそれをしないことを強くお勧めします
資格情報をセットアップするための代替オプションは次のとおりです
# include < Arduino.h >
/* * Add you required includes after Arduino.h */
# include < Wire.h >

// Debug output set to 0 to disable app debug output
# ifndef MY_DEBUG
# define MY_DEBUG 1
# endif

# ifdef NRF52_SERIES
# if MY_DEBUG > 0
# define MYLOG (tag, ...)
	do
	{
		if (tag)
			PRINTF ( " [%s] " , tag);
		PRINTF (__VA_ARGS__);
		PRINTF ( " n " );
		if (g_ble_uart_is_connected)
		{
			g_ble_uart. printf (__VA_ARGS__);
			g_ble_uart. printf ( " n " );
		}
	} while ( 0 )
# else
# define MYLOG (...)
# endif
# endif
# ifdef ARDUINO_ARCH_RP2040
# if MY_DEBUG > 0
# define MYLOG (tag, ...)
	do
	{
		if (tag)
			Serial. printf ( " [%s] " , tag);
		Serial. printf (__VA_ARGS__);
		Serial. printf ( " n " );
	} while ( 0 )
# else
# define MYLOG (...)
# endif
# endif

/* * Include the WisBlock-API-V2 */
# include < WisBlock-API-V2.h > // Click to install library: http://librarymanager/All#WisBlock-API-V2

/* * Define the version of your SW */
# define SW_VERSION_1 1 // major version increase on API change / not backwards compatible
# define SW_VERSION_2 0 // minor version increase on API change / backward compatible
# define SW_VERSION_3 0 // patch version increase on bugfix, no affect on API

/* *
   Optional hard-coded LoRaWAN credentials for OTAA and ABP.
   It is strongly recommended to avoid duplicated node credentials
   Options to setup credentials are
   - over USB with AT commands
   - over BLE with My nRF52 Toolbox
*/
uint8_t node_device_eui[ 8 ] = { 0x00 , 0x0D , 0x75 , 0xE6 , 0x56 , 0x4D , 0xC1 , 0xF3 };
uint8_t node_app_eui[ 8 ] = { 0x70 , 0xB3 , 0xD5 , 0x7E , 0xD0 , 0x02 , 0x01 , 0xE1 };
uint8_t node_app_key[ 16 ] = { 0x2B , 0x84 , 0xE0 , 0xB0 , 0x9B , 0x68 , 0xE5 , 0xCB , 0x42 , 0x17 , 0x6F , 0xE7 , 0x53 , 0xDC , 0xEE , 0x79 };
uint8_t node_nws_key[ 16 ] = { 0x32 , 0x3D , 0x15 , 0x5A , 0x00 , 0x0D , 0xF3 , 0x35 , 0x30 , 0x7A , 0x16 , 0xDA , 0x0C , 0x9D , 0xF5 , 0x3F };
uint8_t node_apps_key[ 16 ] = { 0x3F , 0x6A , 0x66 , 0x45 , 0x9D , 0x5E , 0xDC , 0xA6 , 0x3C , 0xBC , 0x46 , 0x19 , 0xCD , 0x61 , 0xA1 , 0x1E };
いくつかの関数のフォワード宣言(Platformioを使用する場合は必要)
 /* * Application function definitions */
void setup_app ( void );
bool init_app ( void );
void app_event_handler ( void );
void ble_data_handler ( void ) __attribute__((weak));
void lora_data_handler ( void );ここで、アプリケーション名はRak-Testに設定されています。名前は、NRF52一意のチップIDで拡張されます。この名前は、BLE広告で使用されます。
 /* * Application stuff */

/* * Set the device name, max length is 10 characters */
char g_ble_dev_name[ 10 ] = " RAK-TEST " ;
いくつかのフラグと信号が必要です
 /* * Flag showing if TX cycle is ongoing */
bool lora_busy = false ;

/* * Send Fail counter * */
uint8_t send_fail = 0 ;この関数は、アプリケーションの開始のまさに開始時に呼び出されます。この関数では、Arduino setup()が実行される前にすべてが必要なすべてのセットアップにする必要があります。これは、たとえばロラワン資格情報です。この例では、ロラワンの資格情報を強調しました。複製されたノード資格情報を避けるためにそれをしないことを強くお勧めします
資格情報をセットアップするための代替オプションは次のとおりです
g_enable_bleが設定されています。 Trueの場合、BLEインターフェイスが初期化されます。 falseの場合、BLEインターフェイスはアクティブになり、消費電力を削減できます。 void setup_app ( void )
{
Serial. begin ( 115200 );
time_t serial_timeout = millis ();
// On nRF52840 the USB serial is not available immediately
while (!Serial)
{
if (( millis () - serial_timeout) < 5000 )
{
delay ( 100 );
digitalWrite (LED_GREEN, ! digitalRead (LED_GREEN));
}
else
{
break ;
}
}
digitalWrite (LED_GREEN, LOW);
MYLOG ( " APP " , " Setup WisBlock API Example " );
# ifdef NRF52_SERIES
// Enable BLE
g_enable_ble = true ;
# endif
// Set firmware version
api_set_version (SW_VERSION_1, SW_VERSION_2, SW_VERSION_3);
// Optional
// Setup LoRaWAN credentials hard coded
// It is strongly recommended to avoid duplicated node credentials
// Options to setup credentials are
// -over USB with AT commands
// -over BLE with My nRF52 Toolbox
// Read LoRaWAN settings from flash
api_read_credentials ();
// Change LoRaWAN settings
g_lorawan_settings. auto_join = true ; // Flag if node joins automatically after reboot
g_lorawan_settings. otaa_enabled = true ; // Flag for OTAA or ABP
memcpy (g_lorawan_settings. node_device_eui , node_device_eui, 8 ); // OTAA Device EUI MSB
memcpy (g_lorawan_settings. node_app_eui , node_app_eui, 8 ); // OTAA Application EUI MSB
memcpy (g_lorawan_settings. node_app_key , node_app_key, 16 ); // OTAA Application Key MSB
memcpy (g_lorawan_settings. node_nws_key , node_nws_key, 16 ); // ABP Network Session Key MSB
memcpy (g_lorawan_settings. node_apps_key , node_apps_key, 16 ); // ABP Application Session key MSB
g_lorawan_settings. node_dev_addr = 0x26021FB4 ; // ABP Device Address MSB
g_lorawan_settings. send_repeat_time = 120000 ; // Send repeat time in milliseconds: 2 * 60 * 1000 => 2 minutes
g_lorawan_settings. adr_enabled = false ; // Flag for ADR on or off
g_lorawan_settings. public_network = true ; // Flag for public or private network
g_lorawan_settings. duty_cycle_enabled = false ; // Flag to enable duty cycle (validity depends on Region)
g_lorawan_settings. join_trials = 5 ; // Number of join retries
g_lorawan_settings. tx_power = 0 ; // TX power 0 .. 15 (validity depends on Region)
g_lorawan_settings. data_rate = 3 ; // Data rate 0 .. 15 (validity depends on Region)
g_lorawan_settings. lora_class = 0 ; // LoRaWAN class 0: A, 2: C, 1: B is not supported
g_lorawan_settings. subband_channels = 1 ; // Subband channel selection 1 .. 9
g_lorawan_settings. app_port = 2 ; // Data port to send data
g_lorawan_settings. confirmed_msg_enabled = LMH_UNCONFIRMED_MSG; // Flag to enable confirmed messages
g_lorawan_settings. resetRequest = true ; // Command from BLE to reset device
g_lorawan_settings. lora_region = LORAMAC_REGION_AS923_3; // LoRa region
// Save LoRaWAN settings
api_set_credentials ();この関数は、BLEとLORAがすでに初期化されている後に呼び出されます。理想的には、これはセンサーやアクチュエーターなどのアプリケーション固有のものを初期化する場所です。この例では、使用されていません
 /* *
 * @brief Application specific initializations
 *
 * @return true Initialization success
 * @return false Initialization failure
 */
bool init_app ( void )
{
	MYLOG ( " APP " , " init_app " );
	return true ;
}このコールバックは、ステータスイベントで呼び出されます。ステータスイベントは頻繁にトリガーされ、時間はsend_repeat_timeによって設定されます。ユーザー定義のイベントによってもトリガーされます。例RAK1904_EXAMPLE _ユーザー定義イベントの定義方法を参照してください。 _イベントフラグをリセットすることが重要です。たとえば、ステータスイベントはこのコードシーケンスによってリセットされます。
 if ((g_task_event_type & STATUS) == STATUS)
{
	g_task_event_type &= N_STATUS;
	...
}ステータスイベントは、ロラワンサーバーに頻繁にアップリンクパケットを送信するために使用されます。
この例コードでは、BLE広告も15秒間再起動します。それ以外の場合、BLE Adverstisingは、パワーアップ/リセット後30秒間しかアクティブです。
 void app_event_handler ( void )
{
  // Timer triggered event
  if ((g_task_event_type & STATUS) == STATUS)
  {
    g_task_event_type &= N_STATUS;
    MYLOG ( " APP " , " Timer wakeup " );

# ifdef NRF52_SERIES
    // If BLE is enabled, restart Advertising
    if (g_enable_ble)
    {
      restart_advertising ( 15 );
    }
# endif

    if (lora_busy)
    {
      MYLOG ( " APP " , " LoRaWAN TX cycle not finished, skip this event " );
    }
    else
    {

      // Dummy packet

      uint8_t dummy_packet[] = { 0x10 , 0x00 , 0x00 };

      lmh_error_status result = send_lora_packet (dummy_packet, 3 );
      switch (result)
      {
        case LMH_SUCCESS:
          MYLOG ( " APP " , " Packet enqueued " );
          // Set a flag that TX cycle is running
          lora_busy = true ;
          break ;
        case LMH_BUSY:
          MYLOG ( " APP " , " LoRa transceiver is busy " );
          break ;
        case LMH_ERROR:
          MYLOG ( " APP " , " Packet error, too big to send with current DR " );
          break ;
      }
    }
  }
}このコールバックは、BLE UARTで受信したデータを処理するために使用されます。 BLE UART機能が必要ない場合は、この機能を完全に削除できます。この例では、受信したBLE UARTデータをATコマンドインタープリターに転送します。これにより、USBポートまたはBLE UARTポートを介してコマンドで送信できます。
BLE通信は、RAK4631でのみサポートされています。 RAK11310にはBLEがありません。
# ifdef NRF52_SERIES
void ble_data_handler ( void )
{
  if (g_enable_ble)
  {
    /* ************************************************************ */
    /* ************************************************************ */
    // / todo BLE UART data arrived
    // / todo or forward them to the AT command interpreter
    // / todo parse them here
    /* ************************************************************ */
    /* ************************************************************ */
    if ((g_task_event_type & BLE_DATA) == BLE_DATA)
    {
      MYLOG ( " AT " , " RECEIVED BLE " );
      // BLE UART data arrived
      // in this example we forward it to the AT command interpreter
      g_task_event_type &= N_BLE_DATA;

      while (g_ble_uart. available () > 0 )
      {
        at_serial_input ( uint8_t (g_ble_uart. read ()));
        delay ( 5 );
      }
      at_serial_input ( uint8_t ( ' n ' ));
    }
  }
}
# endif このコールバックは、3つの異なるイベントで呼び出されます。
LorawanサーバーからのダウンリンクパケットまたはLORA P2Pパケットが到着した場合、イベントLORA_DATAがトリガーされます。この例では、データを解析していません。それらはログにのみ印刷され、BLE UARTを超えています(デバイスが接続されている場合)
イベントLORA_TX_FINは、RX1およびRX2 Windowsを含むアップリンクパケットの送信が終了した後にトリガーされます。確認されたパケットが送信された場合、グローバルフラグg_rx_fin_resultには、確認された伝送の結果が含まれています。 g_rx_fin_resultがTRUEの場合、Lorawan ServerはACK送信することでアップリンクパケットを認めました。それ以外の場合は、 g_rx_fin_resultがfalseに設定されており、パケットがlorawanサーバーによって受信されなかったことを示しています(範囲のg_rx_fin_resultはありませんが、パケットは空中で破損しました。
イベントLORA_JOIN_FINは、Join Request/Join Accept/Reject Cycleが終了した後に呼び出されます。 Global Flag g_task_event_typeには、Joinリクエストの結果が含まれています。 Trueの場合、ノードはネットワークに参加しました。 falseの場合、結合は成功しませんでした。この場合、結合サイクルを再起動するか、ノードがエラーを報告することができます。
 void lora_data_handler ( void )
{
  // LoRa data handling
  if ((g_task_event_type & LORA_DATA) == LORA_DATA)
  {
    /* ************************************************************ */
    /* ************************************************************ */
    // / todo LoRa data arrived
    // / todo parse them here
    /* ************************************************************ */
    /* ************************************************************ */
    g_task_event_type &= N_LORA_DATA;
    MYLOG ( " APP " , " Received package over LoRa " );
    char log_buff[g_rx_data_len * 3 ] = { 0 };
    uint8_t log_idx = 0 ;
    for ( int idx = 0 ; idx < g_rx_data_len; idx++)
    {
      sprintf (&log_buff[log_idx], " %02X " , g_rx_lora_data[idx]);
      log_idx += 3 ;
    }
    lora_busy = false ;
    MYLOG ( " APP " , " %s " , log_buff);
  }

  // LoRa TX finished handling
  if ((g_task_event_type & LORA_TX_FIN) == LORA_TX_FIN)
  {
    g_task_event_type &= N_LORA_TX_FIN;

    MYLOG ( " APP " , " LPWAN TX cycle %s " , g_rx_fin_result ? " finished ACK " : " failed NAK " );

    if (!g_rx_fin_result)
    {
      // Increase fail send counter
      send_fail++;

      if (send_fail == 10 )
      {
        // Too many failed sendings, reset node and try to rejoin
        delay ( 100 );
        sd_nvic_SystemReset ();
      }
    }

    // Clear the LoRa TX flag
    lora_busy = false ;
  }

  // LoRa Join finished handling
  if ((g_task_event_type & LORA_JOIN_FIN) == LORA_JOIN_FIN)
  {
    g_task_event_type &= N_LORA_JOIN_FIN;
    if (g_join_result)
    {
      MYLOG ( " APP " , " Successfully joined network " );
    }
    else
    {
      MYLOG ( " APP " , " Join network failed " );
      // / todo here join could be restarted.
      // lmh_join();
    }
  }
} Arduinoでは、付属のライブラリの動作を制御できる.inoファイルの設定を定義することはできません。デバッグログとBlue BLEの使用を変更するには、ライブラリソースフォルダーでファイルWisBlock-API-V2.hを開く必要があります。
API DEBUG( API_LOG() )を有効/無効にするには、ライブラリソースフォルダーでファイルWisBlock-API-V2.hを開きます。
探す
# define API_DEBUG 1ファイル内。
 0 -> No debug output
1 -> API debug output
アプリケーションデバッグ( MY_LOG() )を有効/無効にするには、例で見つけることができます(.inoファイルまたはapp.h)
# define MY_DEBUG 1ファイル内。
 0 -> No debug output
1 -> Application debug output
探す
# define NO_BLE_LED 1ファイルでWisBlock-API-V2
 0 -> the blue LED will be used to indicate BLE status
1 -> the blue LED will not used
述べる
RAK11310にはBLEがなく、青色のLEDは他の目的に使用できます。
デバッグ出力は、Platformio.ini API_DEBUGコントロールでDefinesによって制御できます。WisblockAPIのデバッグ出力
 0 -> No debug outpuy
1 -> WisBlock API debug output
MY_DEBUG 、アプリケーション自体のデバッグ出力を制御します
 0 -> No debug outpuy
1 -> Application debug output
NO_BLE_LED 、Blue BLE LEDの使用法を制御します。
 0 -> the blue LED will be used to indicate BLE status
1 -> the blue LED will not used
デバッグ出力と青色のLEDなしの例
 build_flags =
	- DAPI_DEBUG =0    ; 0 Disable WisBlock API debug output
	- DMY_DEBUG =0     ; 0 Disable application debug output
- DNO_BLE_LED =1 ; 1 Disable blue LED as BLE notificatorMITライセンスに基づいて公開されているライブラリ
クレジット:
コマンド関数で:Taylor Lee([email protected])
コードリリース
api_read_credentials()を追加しましたapi_set_credentials()フラッシュに保存しますWisBlock API LoRaWANに変更する

