Yolov5 Deepsort
1.0.0
この記事のアドレス:https://blog.csdn.net/weixin_44936889/article/details/112002152
Yolov5+DeepSortを使用して、車両の歩行者の追跡とカウントを実装すると、コードが検出器クラスにカプセル化されており、独自のプロジェクトに埋め込むのが簡単です。
コードアドレス(スターウェルカム):
https://github.com/sharpiless/yolov5-deepsort/
最終的な効果: 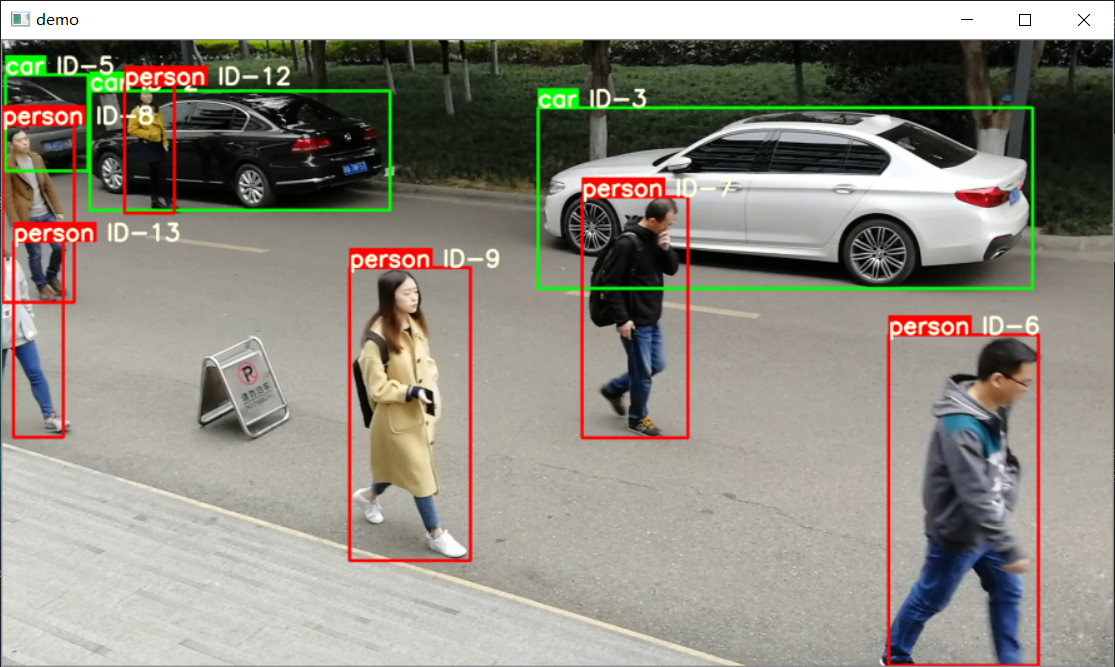
 class Detector ( baseDet ):

    def __init__ ( self ):
        super ( Detector , self ). __init__ ()
        self . init_model ()
        self . build_config ()

    def init_model ( self ):

        self . weights = 'weights/yolov5m.pt'
        self . device = '0' if torch . cuda . is_available () else 'cpu'
        self . device = select_device ( self . device )
        model = attempt_load ( self . weights , map_location = self . device )
        model . to ( self . device ). eval ()
        model . half ()
        # torch.save(model, 'test.pt')
        self . m = model
        self . names = model . module . names if hasattr (
            model , 'module' ) else model . names

    def preprocess ( self , img ):

        img0 = img . copy ()
        img = letterbox ( img , new_shape = self . img_size )[ 0 ]
        img = img [:, :, :: - 1 ]. transpose ( 2 , 0 , 1 )
        img = np . ascontiguousarray ( img )
        img = torch . from_numpy ( img ). to ( self . device )
        img = img . half ()  # 半精度
        img /= 255.0  # 图像归一化
        if img . ndimension () == 3 :
            img = img . unsqueeze ( 0 )

        return img0 , img

    def detect ( self , im ):

        im0 , img = self . preprocess ( im )

        pred = self . m ( img , augment = False )[ 0 ]
        pred = pred . float ()
        pred = non_max_suppression ( pred , self . threshold , 0.4 )

        pred_boxes = []
        for det in pred :

            if det is not None and len ( det ):
                det [:, : 4 ] = scale_coords (
                    img . shape [ 2 :], det [:, : 4 ], im0 . shape ). round ()

                for * x , conf , cls_id in det :
                    lbl = self . names [ int ( cls_id )]
                    if not lbl in [ 'person' , 'car' , 'truck' ]:
                        continue
                    x1 , y1 = int ( x [ 0 ]), int ( x [ 1 ])
                    x2 , y2 = int ( x [ 2 ]), int ( x [ 3 ])
                    pred_boxes . append (
                        ( x1 , y1 , x2 , y2 , lbl , conf ))

        return im , pred_boxes
self.tetectメソッドを呼び出して、画像と予測の結果を返す
 deepsort = DeepSort ( cfg . DEEPSORT . REID_CKPT ,
                    max_dist = cfg . DEEPSORT . MAX_DIST , min_confidence = cfg . DEEPSORT . MIN_CONFIDENCE ,
                    nms_max_overlap = cfg . DEEPSORT . NMS_MAX_OVERLAP , max_iou_distance = cfg . DEEPSORT . MAX_IOU_DISTANCE ,
                    max_age = cfg . DEEPSORT . MAX_AGE , n_init = cfg . DEEPSORT . N_INIT , nn_budget = cfg . DEEPSORT . NN_BUDGET ,
                    use_cuda = True )
self.updateメソッドを呼び出して、追跡結果を更新してください
python demo.py私の別のブログを参照してください:
[Xiaobai CV] Yolov5でステップバイステップで教えて、独自のデータセットをトレーニングします(Windows環境構成から展開をモデル化するまで)
トレーニング後、Weightsフォルダーに入れます
 from AIDetector_pytorch import Detector

det = Detector () result = det . feedCap ( im )ここで、IMはBGR画像です
返された結果は辞書で、結果['frame']が視覚的な画像を返します
Bステーション:https://space.bilibili.com/470550823
CSDN:https://blog.csdn.net/weixin_44936889
AIスタジオ:https://aistudio.baidu.com/aistudio/personalcenter/thirdview/67156
Github:https://github.com/sharpiless
GNU General Public License v3.0 Protocolに従って、ターゲット検出のソースを示します。


