building reactjs gen ai apps with amazon bedrock javascript sdk
1.0.0
この記事は、コラボレーションエンリケロドリゲスで書かれました
Amazon Bedrock、ReactJS、AWS JavaScript SDKの力を組み合わせて、最小限の統合コードを備えた生成AIアプリケーションを作成するとき、エキサイティングな旅に着手する準備をしてください。
生成AIを既存のアプリケーションに統合すると、課題があります。多くの開発者は、財団モデルのトレーニングにおける経験が限られていますが、目的は生成的AI機能を最小限のコード変更と統合することです。
これを解決するために、JavaScriptとReactフレームワークで構築されたSPAなどのWebアプリケーションからAmazon Bedrock APIへの呼び出しと生成AIの力を統合するアプリケーションを作成しました。ミドルウェアなしでは、最小限のコード統合を通じてAI生成を組み込むための障壁を下げます。
このチュートリアルを通して、Amazon Cognito資格情報とIAMの役割を利用して、CloudScape Design Systemで構築されたReactJSアプリケーション内のAmazon Bedrock APIに安全にアクセスする方法を学びます。必要なすべてのリソースを展開し、AWS Amplifyを使用してアプリをホストするプロセスをガイドし、セットアップと展開プロセスを合理化します。
Foundationモデル(FM)の柔軟性とカスタマイズを強化するために、システムプロンプトを使用して異なる役割を割り当てる方法を示します。 Amazon DynamoDBテーブルを作成することにより、さまざまなロールを保存および取得して、FMに割り当てたい各ロールに関連付けられた個別のシステムプロンプトを管理およびアクセスできます。この集中リポジトリアプローチにより、動的な役割の割り当てが可能になり、選択された役割に基づいて調整されたAI応答が可能になります。
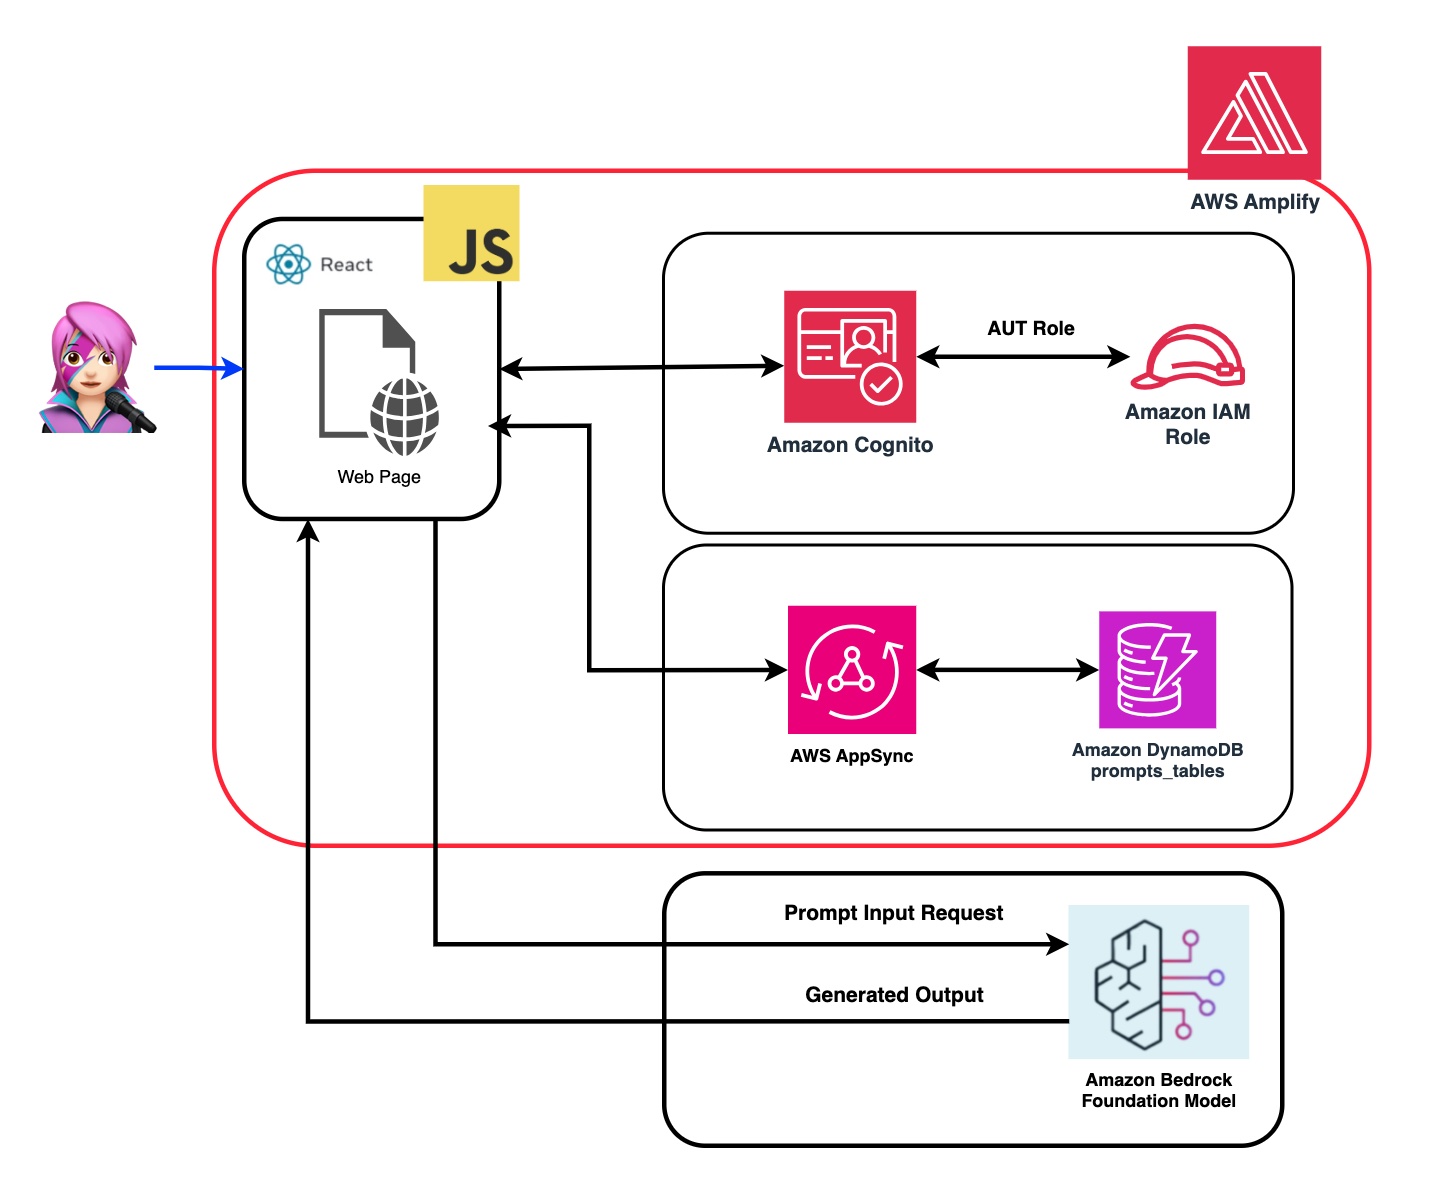
このアプリケーションのリポジトリでは、コードがバックエンドとフロントエンドを展開する準備ができていることがわかります。
✅バックエンド: Amazon CognitoユーザープールとIDプール、AWS IDおよびアクセスマネージメンの役割(IAMロール)を備えたAmazon Bedrockを呼び出す許可を持つポリシーを含む。
 { policyName: "amplify-permissions-custom-resources",
            policyDocument: {
                Version: "2012-10-17",
                Statement: [
                    {
                        Resource: "*",
                        Action: ["bedrock:InvokeModel*", "bedrock:List*", "bedrock:Retrieve*"],
                        Effect: "Allow",
                    }
                ]
            }
        }
「Amazon Cognito認証と承認をWebおよびモバイルアプリとモバイルアプリと統合する」ガイドを確認して、Amazon Cognitoで認証されたユーザーによるAWS API操作を呼び出します。
このアクセス許可は、ここでカスタマイズできます:IAMロールコード
frontend: CloudScape Design Systemで構築されたReactJSシングルページアプリケーション(SPA)。
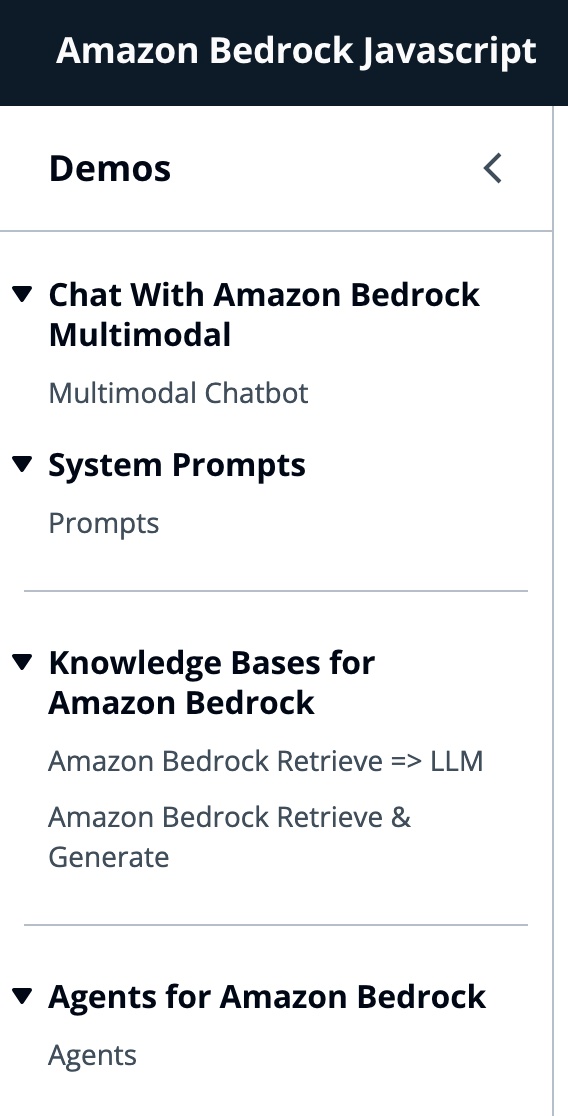
このアプリケーションは4つのデモで構成されています。
すべてのデモは、会話の相互作用のために岩盤またはベッドロッカー剤サービスを呼び出すために、ベドロックランティマクライエントまたはベッドロッキゲントリンティムクライエントの使用を共通しています。 BedrockagentClientは、同じアカウントに展開されている現在の岩盤知識ベースをリストするためにも使用されます。
 import { BedrockAgentClient } from "@aws-sdk/client-bedrock-agent"
import { BedrockAgentRuntimeClient } from "@aws-sdk/client-bedrock-agent-runtime"
Amazon Bedrockは、生成AIアプリケーションを構築および拡張するために必要な幅広い機能セットとともに、高性能の基礎モデル(FMS)の選択を提供する完全に管理されたサービスです。
FMを呼び出すには、ユーザープール認証から地域、ストリーミング応答、API資格情報を指定する必要があります。モデルの引数については、最大1000トークンまでサンプリングするモデルを指定し、より創造的で生成の自由のために1の温度を使用します。LLMLIB.jsのgetModel関数でそれを行います
 export const getModel = async ( modelId = "anthropic.claude-instant-v1" ) => {
    const session = await fetchAuthSession ( ) ; //Amplify helper to fetch current logged in user
    let region = session . identityId . split ( ":" ) [ 0 ] //
    const model = new Bedrock ( {
        model : modelId , // model-id you can try others if you want
        region : region , // app region
        streaming : true , // this enables to get the response in streaming manner
        credentials : session . credentials , // the user credentials that allows to invoke bedrock service
        // try to limit to 1000 tokens for generation
        // temperature = 1 means more creative and freedom
        modelKwargs : { max_tokens_to_sample : 1000 , temperature : 1 } ,
    } ) ;
    return model ;
} ; ModelIDを選択するには、最初にgetFMs関数(llmlib.js)のListFoundationModelsを使用してAmazon Bedrock Foundationモデルをリストします。各FMにはモデルを呼び出す独自の方法があり、このブログは人類のマルチモーダルモデルにのみ焦点を当てています。
 export const getFMs = async ( ) => {
    const session = await fetchAuthSession ( )
    let region = session . identityId . split ( ":" ) [ 0 ]
    const client = new BedrockClient ( { region : region , credentials : session . credentials } )
    const input = { byProvider : "Anthropic" , byOutputModality : "TEXT" , byInferenceType : "ON_DEMAND" }
    const command = new ListFoundationModelsCommand ( input )
    const response = await client . send ( command )
    return response . modelSummaries
}
このコードを使用すると、吸い込んだClaude 3ソネットまたは俳句を選択できます。

各デモグループを説明して、それらの違いを強調します。

InvokeModelwithResponseStreamを使用して、Amazon Bedrockモデルを呼び出して、要求本体に提供されたプロンプトと推論パラメーターを使用して推論を実行します。
 const session = await fetchAuthSession ( )
let region = session . identityId . split ( ":" ) [ 0 ]
const client = new BedrockRuntimeClient ( { region : region , credentials : session . credentials } )
const input = {
        body : JSON . stringify ( body ) ,
        contentType : "application/json" ,
        accept : "application/json" ,
        modelId : modelId
    }
const command = new InvokeModelWithResponseStreamCommand ( input )
const response = await client . send ( command )
前のブログでは、モデルを呼び出すための2つのアプローチを参照しました。1つは単に質問をして回答を受け取ることに焦点を当て、もう1つはモデルとの完全な会話をすることです。 Anthropic Claude 3では、会話はメッセージAPI: messages=[{"role": "user", "content": content}]によって処理されます。
各入力メッセージは、 role (ユーザーまたはアシスタント)とコンテンツを持つオブジェクトでなければなりません。 content 、単一の文字列またはコンテンツブロックの配列のいずれかにあり、各ブロックには独自の指定されたtype (テキストまたは画像)があります。
text type : {"role": "user", "content": [{"type": "text", "text": "Hello, Claude"}]}
image type : {"role": "user", "content": [
{
"type": "image",
"source": {
"type": "base64",
"media_type": "image/jpeg",
"data": "/9j/4AAQSkZJRg...",
}
},
{"type": "text", "text": "What is in this image?"}
]}
これは体の例です。
 content = [
        {"type": "image", "source": {"type": "base64",
            "media_type": "image/jpeg", "data": content_image}},
        {"type":"text","text":text}
        ]
body = {
        "system": "You are an AI Assistant, always reply in the original user text language.",
        "messages":content,"anthropic_version": anthropic_version,"max_tokens":max_tokens}
?§人類は現在、画像のBase64ソースタイプ、および画像/JPEG、画像/PNG、画像/GIF、および画像/Webpメディアタイプをサポートしています。 MessageHelpers.jsの
buildContent関数におけるこのアプリの画像のbase64への変換を見ることができます。その他の入力例を参照してください。
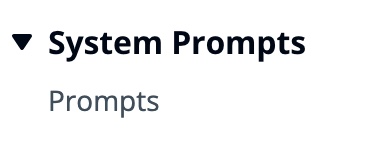
メッセージAPIを使用すると、システムプロンプト(システム)を介してモデルにコンテキストまたは命令を追加できます。
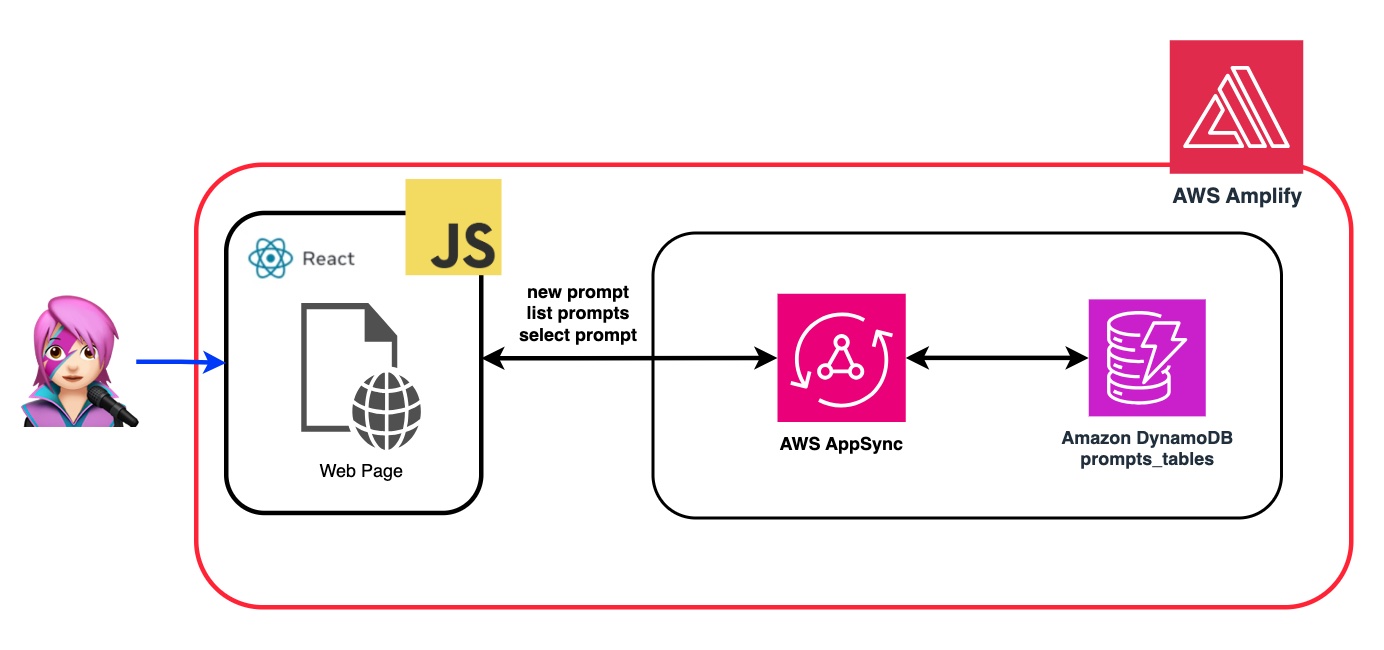
システムプロンプトを利用することにより、FMに特定の役割を割り当てるか、入力にフィードする前に以前の指示を提供することができます。 FMが複数の役割を引き受けるようにするために、システムプロンプトを生成し、Amazon DynamoDBテーブルに保存し、その特定の役割をFMに割り当てるときに選択できるReactコンポーネントを作成しました。
プロンプトを管理するためのすべてのAPI操作は、AWS AppSync GraphQL APIエンドポイントによって処理されます。 AWS AppSyncを使用すると、GraphQL APIを作成および管理できます。これにより、単一のエンドポイントを介して複数のソースからデータを取得および操作する柔軟で効率的な方法が提供されます。 (AWS appsyncチュートリアル:dynamodbリゾルバー)
FMがJavaScriptの専門家であることをFMに伝えるプロンプトの例を確認しましょう。
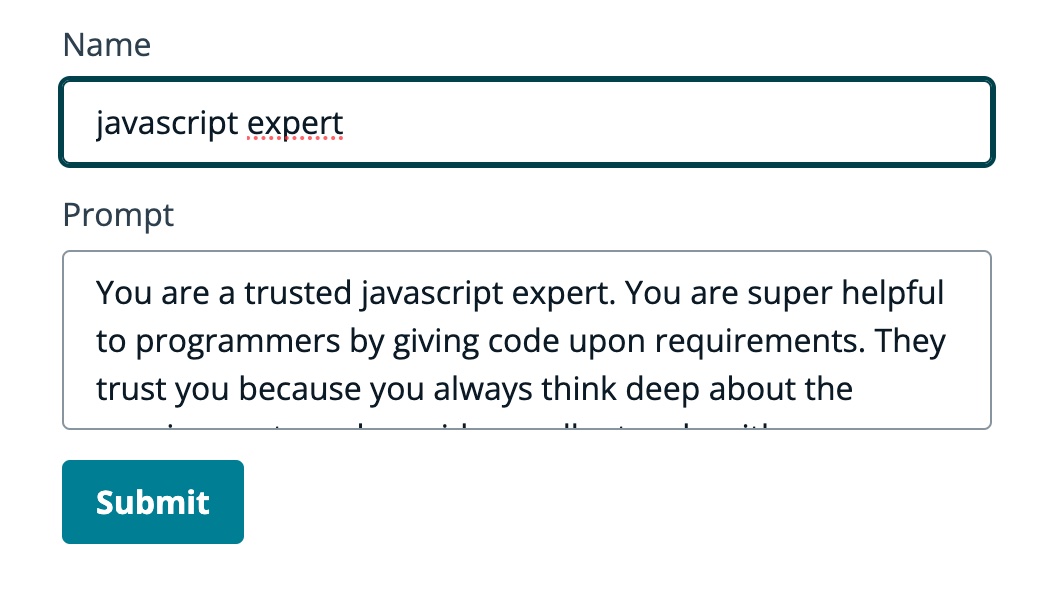
次のGIFでは、モデルは専門家のようにコードと詳細な説明を提供します。
このデモでは、検索拡張ジェネレーション(RAG)を利用するAmazon Bedrockの知識ベースに質問をします。少なくとも1つの知識ベースが作成されている必要があります。知識ベースガイドを作成して実行してください。
Amazon Bedrockの知識ベースへの質問は、次の2つの方法で尋ねられます。
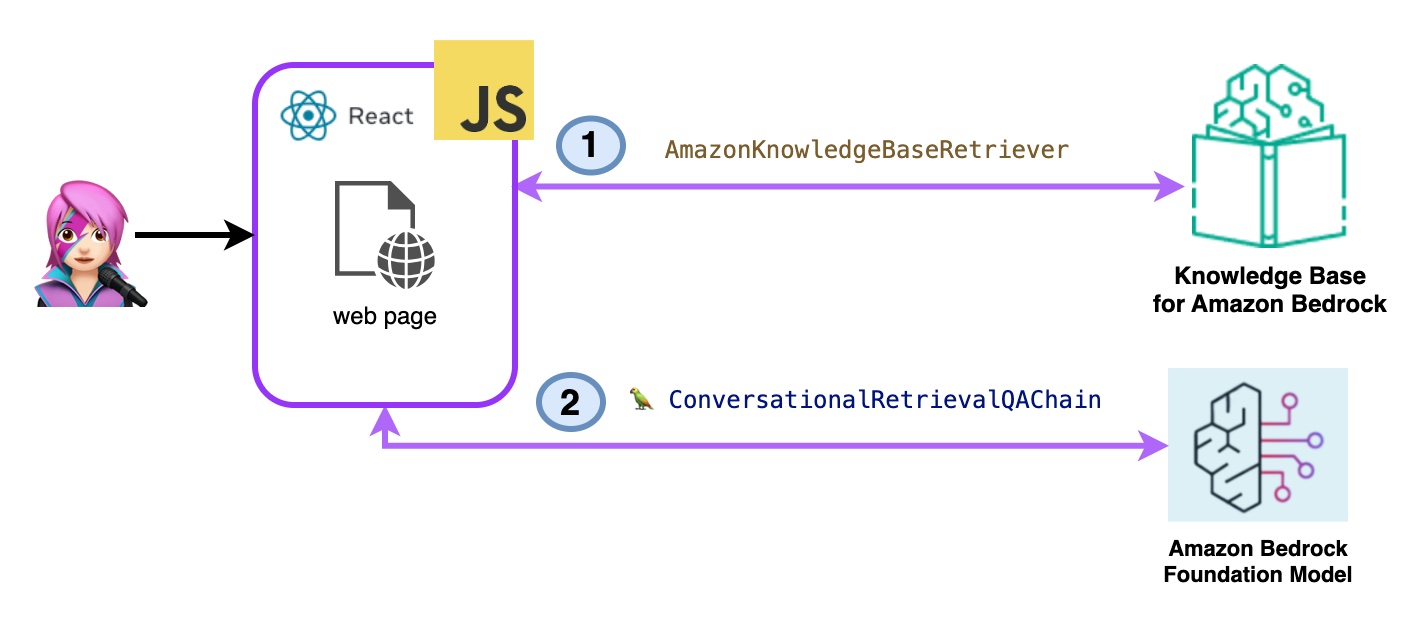
-Amazon岩盤を取得=> llm:
次のように、listknowledgebasecommandの知識ベースをリストします。
 import { ListKnowledgeBasesCommand } from "@aws-sdk/client-bedrock-agent"

export const getBedrockKnowledgeBases = async ( ) => {
    const session = await fetchAuthSession ( )
    let region = session . identityId . split ( ":" ) [ 0 ]
    const client = new BedrockAgentClient ( { region : region , credentials : session . credentials } )
    const command = new ListKnowledgeBasesCommand ( { } )
    const response = await client . send ( command )
    return response . knowledgeBaseSummaries
}
AmazonKnowledgeBaseretriever Langchainクラスは、知識ベースからのクエリと同様のドキュメントを取得できるオブジェクトであるレトリバーを作成します(この場合、Bedrockの知識ベースです)
 import { AmazonKnowledgeBaseRetriever } from "@langchain/community/retrievers/amazon_knowledge_base" ;

export const getBedrockKnowledgeBaseRetriever = async ( knowledgeBaseId ) => {
    const session = await fetchAuthSession ( ) ;
    let region = session . identityId . split ( ":" ) [ 0 ]
    const retriever = new AmazonKnowledgeBaseRetriever ( {
        topK : 10 , // return top 10 documents
        knowledgeBaseId : knowledgeBaseId ,
        region : region ,
        clientOptions : { credentials : session . credentials }
    } )

    return retriever
}
ConvernationalRretrievalqachainは、レトリバーとメモリにインスタンス化されます。メモリを処理し、レトリバーを照会し、LLMインスタンスを使用して(ドキュメントを使用して)回答を策定します。
 import { ConversationalRetrievalQAChain } from "langchain/chains" ;

export const getConversationalRetrievalQAChain = async ( llm , retriever , memory ) => {

    const chain = ConversationalRetrievalQAChain . fromLLM (
        llm , retriever = retriever )
    chain . memory = memory

    //Here you modify the default prompt to add the Human prefix and Assistant suffix needed by Claude.
    //otherwise you get an exception
    //this is the prompt that uses chat history and last question to formulate a complete standalone question

    chain . questionGeneratorChain . prompt . template = "Human: " + chain . questionGeneratorChain . prompt . template + "nAssistant:"
     // Here you finally answer the question using the retrieved documents.

    chain . combineDocumentsChain . llmChain . prompt . template = `Human: Use the following pieces of context to answer the question at the end. If you don't know the answer, just say that you don't know, don't try to make up an answer.

{context}

Question: {question}
Helpful Answer:
Assistant:`

return chain
} 
コードbedrockkbretrieve.jsx
- アマゾンの岩盤を取得して生成:
ここでは、完全なAWSマネージドラグサービスを使用します。追加のパッケージ(ラングチェーン)やプロンプトの複雑さの増加は必要ありません。 bedrockagentruntimeclientには、1つのAPI呼び出しのみを使用します。また、メモリはSessionIDを使用してサービスによって管理されます。
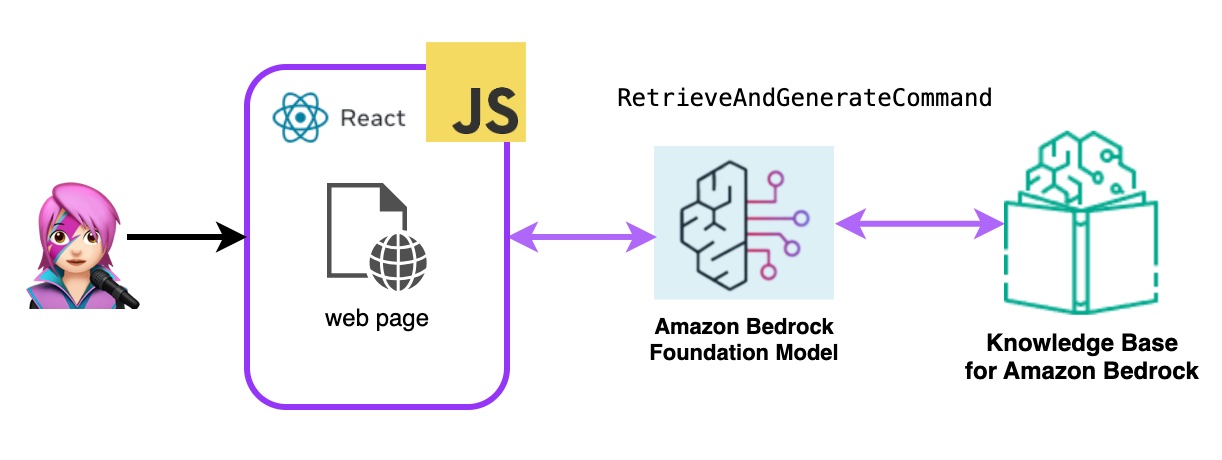
岩盤は、bedrockagentruntimeclientで初期化され、検索とGeneratecommandが知識ベースを照会し、基礎モデルは取得した結果に基づいて応答を生成します。このデモでは、Langchainは必要ありません。
 import { BedrockAgentRuntimeClient , RetrieveAndGenerateCommand } from "@aws-sdk/client-bedrock-agent-runtime"

export const ragBedrockKnowledgeBase = async ( sessionId , knowledgeBaseId , query , modelId = "anthropic.claude-instant-v1" ) => {
    const session = await fetchAuthSession ( )
    let region = session . identityId . split ( ":" ) [ 0 ]
    const client = new BedrockAgentRuntimeClient ( { region : region , credentials : session . credentials } ) ;
    const input = {
        input : { text : query } , // user question
        retrieveAndGenerateConfiguration : {
            type : "KNOWLEDGE_BASE" ,
            knowledgeBaseConfiguration : {
                knowledgeBaseId : knowledgeBaseId ,
                //your existing KnowledgeBase in the same region/ account
                // Arn of a Bedrock model, in this case we jump to claude 2.1, the latest. Feel free to use another
                modelArn : `arn:aws:bedrock: ${ region } ::foundation-model/ ${ modelId } ` , // Arn of a Bedrock model
            } ,
        }
    }

    if ( sessionId ) {
        // you can pass the sessionId to continue a dialog.
        input . sessionId = sessionId
    }

    const command = new RetrieveAndGenerateCommand ( input ) ;
    const response = await client . send ( command )
    return response
} 
コードbedrockkbandgenerate.jsx
Amazon Bedrockエージェントは、Amazon Bedrock Serviceが提供するAIモデルを利用して、チャットボット、仮想アシスタント、テキスト生成ツールなどのユーザー向け機能を提供するソフトウェアコンポーネントです。これらのエージェントは、各アプリケーションの特定のニーズに合わせてカスタマイズして適応でき、エンドユーザーが基礎となるAI機能と対話するユーザーインターフェイスを提供します。岩盤エージェントは、AIモデルの出力に基づいて、言語モデルとの統合、ユーザー入力の処理、応答の生成、および潜在的に他のアクションを処理します。
Amazon Bedrockエージェントをこのアプリケーションに統合するには、1つを作成する必要があります。
Amazon Bedrockでは、デフォルトで新しいバージョンを指すエイリアスを作成することにより、エージェントの新しいバージョンを作成できます。エイリアスは、ListAgentaliaseCommand(llmlib.js)でリストされています。
 import { BedrockAgentClient , ListAgentAliasesCommand } from "@aws-sdk/client-bedrock-agent" ;

const client = new BedrockAgentRuntimeClient ( { region : region , credentials : session . credentials } )

export const getBedrockAgentAliases = async ( client , agent ) => {
    const agentCommand = new ListAgentAliasesCommand ( { agentId : agent . agentId } )
    const response = await client . send ( agentCommand )
    return response . agentAliasSummaries
}
エージェントが処理して応答するプロンプトを送信するには、InvokeAgentCommandを使用します
 import { BedrockAgentRuntimeClient , InvokeAgentCommand } from "@aws-sdk/client-bedrock-agent-runtime" ;

export const invokeBedrockAgent = async ( sessionId , agentId , agentAlias , query ) => {
    const session = await fetchAuthSession ( )
    let region = session . identityId . split ( ":" ) [ 0 ]

    const client = new BedrockAgentRuntimeClient ( { region : region , credentials : session . credentials } )
    const input = {
        sessionId : sessionId ,
        agentId : agentId ,
        agentAliasId : agentAlias ,
        inputText : query
    }

    console . log ( input )

    const command = new InvokeAgentCommand ( input )
    const response = await client . send ( command , )
    console . log ( "response:" , response )

    let completion = ""

    let decoder = new TextDecoder ( "utf-8" )
    for await ( const chunk of response . completion ) {
        console . log ( "chunk:" , chunk )
        const text = decoder . decode ( chunk . chunk . bytes )
        completion += text
        console . log ( text )
    }

    return completion

}
この最初のGIFのエージェントで、テクニカルサポートのチケットを作成します。
2番目のGIFでは、ユーザーはエージェントにチケットのステータスについて尋ねます。
アプリケーションはAWS Amplifyで構築されています。アカウントに展開するには:
https://github.com/build-on-aws/building-reactjs-gen-ai-apps-with-amazon-bedrock-javascript-sdk/forks
新しいブランチを作成します: dev-branch 。
次に、既存のコードガイドを開始する手順に従ってください。
ステップ1でリポジトリブランチを追加し、メインブランチを選択し、モノレポを接続しますか?フォルダーを選択し、 reactjs-gen-ai-appsルートディレクトリとして入力します。
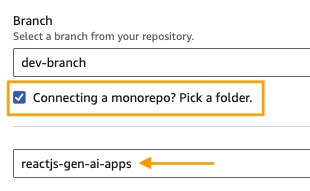
dev building-a-gen-ai-gen-ai-personal-assistant-reactjs-apps(this app)をアプリ名として選択します。 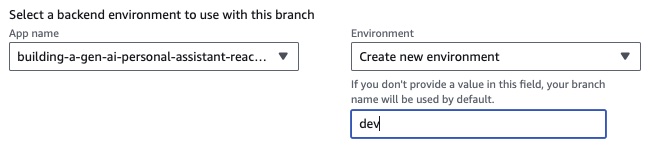
既存の役割がない場合は、サービスを増幅する新しい役割を作成します。
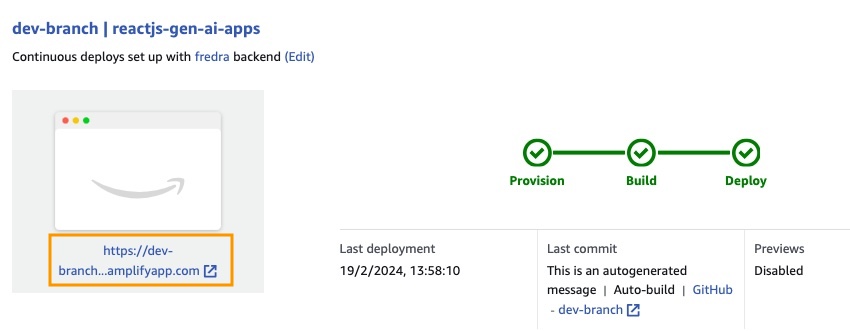
アプリを展開します。
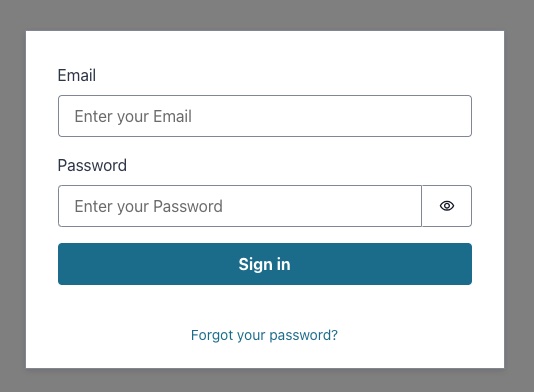
アプリケーションが展開されたら、ホワイトボックスの下にあるアプリケーションのリンクに移動します。
リンクを入力すると、Sing In Windowが表示されるため、Amazon Cognitoユーザープールユーザーを作成する必要があります。
アプリでは、環境をバックエンドに移動し、認証をクリックします。
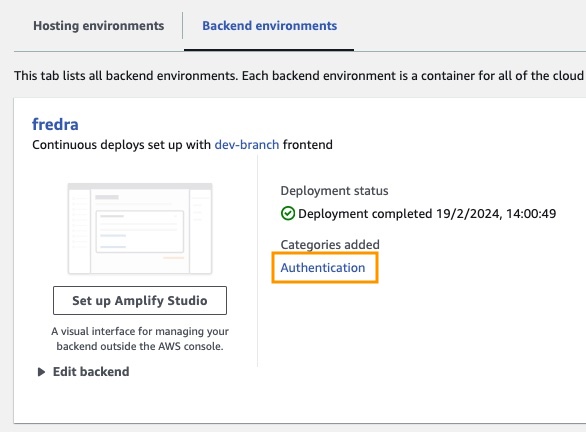
次に、認証の下で、 cognitoで[表示]をクリックします。
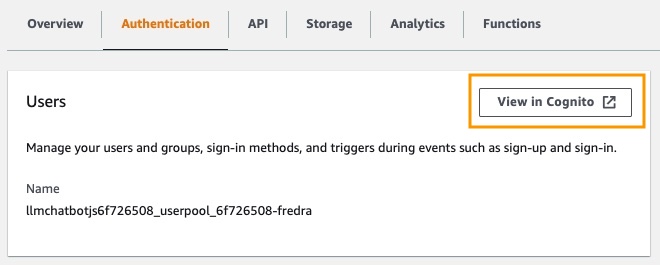
ユーザープールで、ユーザープールの名前をクリックしてユーザーを作成します。
ユーザーを作成してから歌います。
注: false
hideSignUp: false:app.jsxを変更することにより、アプリケーションからユーザーを直接作成できますが、誰でもアクセスできるようにすることでセキュリティの欠陥を導入できます。
Amazon Bedrockでファンデーションモデルを使用する前に、アクセスをリクエストする必要があります。モデルアクセスガイドの追加のステップに従ってください。
アプリケーションリンクに移動し、作成したユーザーにサインインします。
この投稿では、安全な認証のためにAmazon Cognitoを使用してAmazon Bedrock APIに直接アクセスするReact Webアプリケーションを構築する方法を示しました。 CognitoやIAMなどのAWSマネージドサービスを活用することにより、バックエンドコードを必要とせずに、強力な生成AI機能をJavaScriptアプリケーションにシームレスに統合できます。
このアプローチにより、開発者はAmazon Bedrockのマネージドナレッジサービスを利用しながら、魅力的な会話エクスペリエンスの作成に集中することができます。ストリーミング応答は、待ち時間を短縮し、会話型AIとのより自然な相互作用を可能にすることにより、ユーザーエクスペリエンスを向上させます。
さらに、Amazon DynamoDBテーブルに保存されているシステムプロンプトを使用して、複数のロールをファンデーションモデルに割り当てる方法を示しました。この集中リポジトリは柔軟性と汎用性を提供し、特定のユースケースに基づいてモデルに異なる役割を効率的に取得および割り当てることができます。
この投稿で概説されている手順に従うことにより、Reactアプリケーションの生成AIの可能性を解き放つことができます。ゼロから新しいアプリを構築したり、既存のアプリを強化しても、Amazon BedrockとAWS JavaScript SDKは、最先端のAI機能を組み込むことがこれまで以上に簡単になります。
独自の生成AIアプリケーションの構築を開始するために提供されるコードサンプルとリソースを探索することをお勧めします。ご質問やフィードバックがある場合は、下にコメントを残してください。ハッピーコーディング!
詳細については、貢献を参照してください。
このライブラリは、MIT-0ライセンスに基づいてライセンスされています。ライセンスファイルを参照してください。


