torchview
- TorchView 0.2.6
Torchview bietet die Visualisierung von Pytorch -Modellen in Form von visuellen Graphen. Die Visualisierung umfasst Tensoren, Module, Fackelfunktionen und Informationen wie Eingabe-/Ausgangsformen.
Pytorch -Version von plot_model of keras (und mehr)
Unterstützt Pytorch -Versionen

Zuerst müssen Sie Graphviz installieren,
pip install graphvizDamit die Python -Schnittstelle von Graphiz funktioniert, müssen Sie den Befehl DOT -Layout in Ihrem System arbeiten lassen. Wenn es noch nicht installiert ist, schlage ich vor, dass Sie die folgende Ablagerung in Ihrem Betriebssystem ausführen.
Debian-basierte Linux-Distriation (z. B. Ubuntu):
apt-get install graphvizFenster:
choco install graphvizmacos
brew install graphvizWeitere Informationen finden Sie hier
Fahren Sie dann mit PIP mit der Installation von Torchview fort
pip install torchviewoder wenn Sie über Conda wollen
conda install -c conda-forge torchviewOder wenn Sie die aktuellste Version wünschen, installieren Sie direkt bei Repo
pip install git+https://github.com/mert-kurttutan/torchview.git from torchview import draw_graph
model = MLP ()
batch_size = 2
# device='meta' -> no memory is consumed for visualization
model_graph = draw_graph ( model , input_size = ( batch_size , 128 ), device = 'meta' )
model_graph . visual_graph 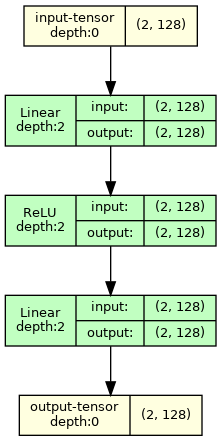
Weitere Beispiele finden Sie in Colab -Notizbüchern unten.
Einführung Notizbuch:
Computer Vision Modelle:
NLP -Modelle:
Hinweis: Ausgabe von Graphviz Visuals gibt Bilder mit gewünschten Größen zurück. Manchmal werden auf VSCODE einige Formen aufgrund von großer Größe und SVG -Rendern von VSCODE beschnitten. Um dies zu lösen, schlage ich vor, dass Sie Folgendes ausführen
 import graphviz
graphviz . set_jupyter_format ( 'png' )
Dieses Problem tritt nicht auf anderen Plattformen auf, z. B. JupyterLab oder Google Colab.
 def draw_graph (
    model : nn . Module ,
    input_data : INPUT_DATA_TYPE | None = None ,
    input_size : INPUT_SIZE_TYPE | None = None ,
    graph_name : str = 'model' ,
    depth : int | float = 3 ,
    device : torch . device | str | None = None ,
    dtypes : list [ torch . dtype ] | None = None ,
    mode : str | None = None ,
    strict : bool = True ,
    expand_nested : bool = False ,
    graph_dir : str | None = None ,
    hide_module_functions : bool = True ,
    hide_inner_tensors : bool = True ,
    roll : bool = False ,
    show_shapes : bool = True ,
    save_graph : bool = False ,
    filename : str | None = None ,
    directory : str = '.' ,
    ** kwargs : Any ,
) -> ComputationGraph :
    '''Returns visual representation of the input Pytorch Module with
    ComputationGraph object. ComputationGraph object contains:

    1) Root nodes (usually tensor node for input tensors) which connect to all
    the other nodes of computation graph of pytorch module recorded during forward
    propagation.

    2) graphviz.Digraph object that contains visual representation of computation
    graph of pytorch module. This graph visual shows modules/ module hierarchy,
    torch_functions, shapes and tensors recorded during forward prop, for examples
    see documentation, and colab notebooks.


    Args:
        model (nn.Module):
            Pytorch model to represent visually.

        input_data (data structure containing torch.Tensor):
            input for forward method of model. Wrap it in a list for
            multiple args or in a dict or kwargs

        input_size (Sequence of Sizes):
            Shape of input data as a List/Tuple/torch.Size
            (dtypes must match model input, default is FloatTensors).
            Default: None

        graph_name (str):
            Name for graphviz.Digraph object. Also default name graphviz file
            of Graph Visualization
            Default: 'model'

        depth (int):
            Upper limit for depth of nodes to be shown in visualization.
            Depth is measured how far is module/tensor inside the module hierarchy.
            For instance, main module has depth=0, whereas submodule of main module
            has depth=1, and so on.
            Default: 3

        device (str or torch.device):
            Device to place and input tensors. Defaults to
            gpu if cuda is seen by pytorch, otherwise to cpu.
            Default: None

        dtypes (list of torch.dtype):
            Uses dtypes to set the types of input tensor if
            input size is given.

        mode (str):
            Mode of model to use for forward prop. Defaults
            to Eval mode if not given
            Default: None

        strict (bool):
            if true, graphviz visual does not allow multiple edges
            between nodes. Mutiple edge occurs e.g. when there are tensors
            from module node to module node and hiding those tensors
            Default: True

        expand_nested(bool):
            if true shows nested modules with dashed borders

        graph_dir (str):
            Sets the direction of visual graph
            'TB' -> Top to Bottom
            'LR' -> Left to Right
            'BT' -> Bottom to Top
            'RL' -> Right to Left
            Default: None -> TB

        hide_module_function (bool):
            Determines whether to hide module torch_functions. Some
            modules consist only of torch_functions (no submodule),
            e.g. nn.Conv2d.
            True => Dont include module functions in graphviz
            False => Include modules function in graphviz
            Default: True

        hide_inner_tensors (bool):
            Inner tensor is all the tensors of computation graph
            but input and output tensors
            True => Does not show inner tensors in graphviz
            False => Shows inner tensors in graphviz
            Default: True

        roll (bool):
            If true, rolls recursive modules.
            Default: False

        show_shapes (bool):
            True => Show shape of tensor, input, and output
            False => Dont show
            Default: True

        save_graph (bool):
            True => Saves output file of graphviz graph
            False => Does not save
            Default: False

        filename (str):
            name of the file to store dot syntax representation and
            image file of graphviz graph. Defaults to graph_name

        directory (str):
            directory in which to store graphviz output files.
            Default: .

    Returns:
        ComputationGraph object that contains visualization of the input
        pytorch model in the form of graphviz Digraph object
''' from torchview import draw_graph
model_graph = draw_graph (
SimpleRNN (), input_size = ( 2 , 3 ),
graph_name = 'RecursiveNet' ,
roll = True
)
model_graph . visual_graph 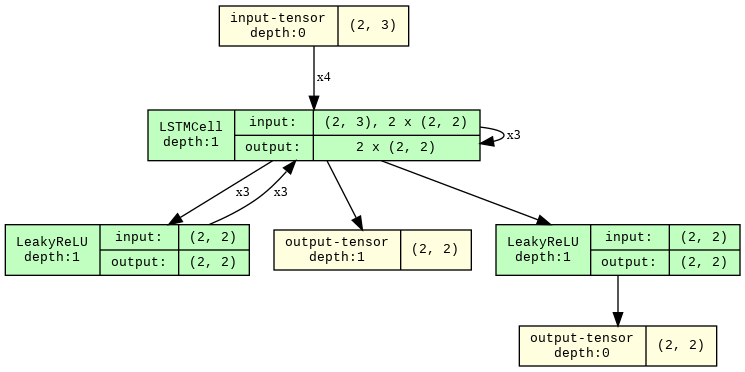
 # Show inner tensors and Functionals
model_graph = draw_graph (
    MLP (), input_size = ( 2 , 128 ),
    graph_name = 'MLP' ,
    hide_inner_tensors = False ,
    hide_module_functions = False ,
)

model_graph . visual_graph 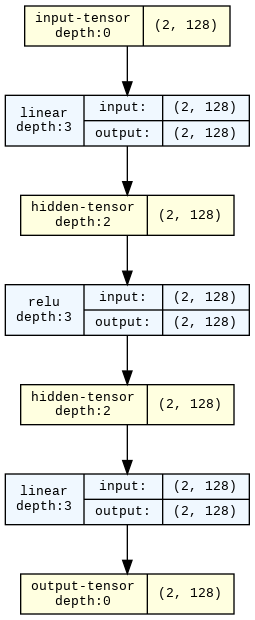
 import torchvision

model_graph = draw_graph ( resnet18 (), input_size = ( 1 , 3 , 32 , 32 ), expand_nested = True )
model_graph . visual_graph 
Alle Probleme und Zuganfragen werden sehr geschätzt! Wenn Sie sich fragen, wie Sie das Projekt aufbauen können:
pip install -r requirements-dev.txt . Wir verwenden die neuesten Versionen aller Entwicklerpakete.pytest aus.pytest --overwrite aus.pytest --no-output , um Ausgabedateistests zu überspringen __torch_function__ und subklassigen torch.Tensor zu verdanken. Vielen Dank an alle, die diese API entwickelt haben !! Hier bezieht sich auf Torch basierende Funktionen auf jede Funktion, die nur Fackelfunktionen und Module verwendet. Dies ist allgemeiner als Module. ↩


