brave chat server
1.0.0
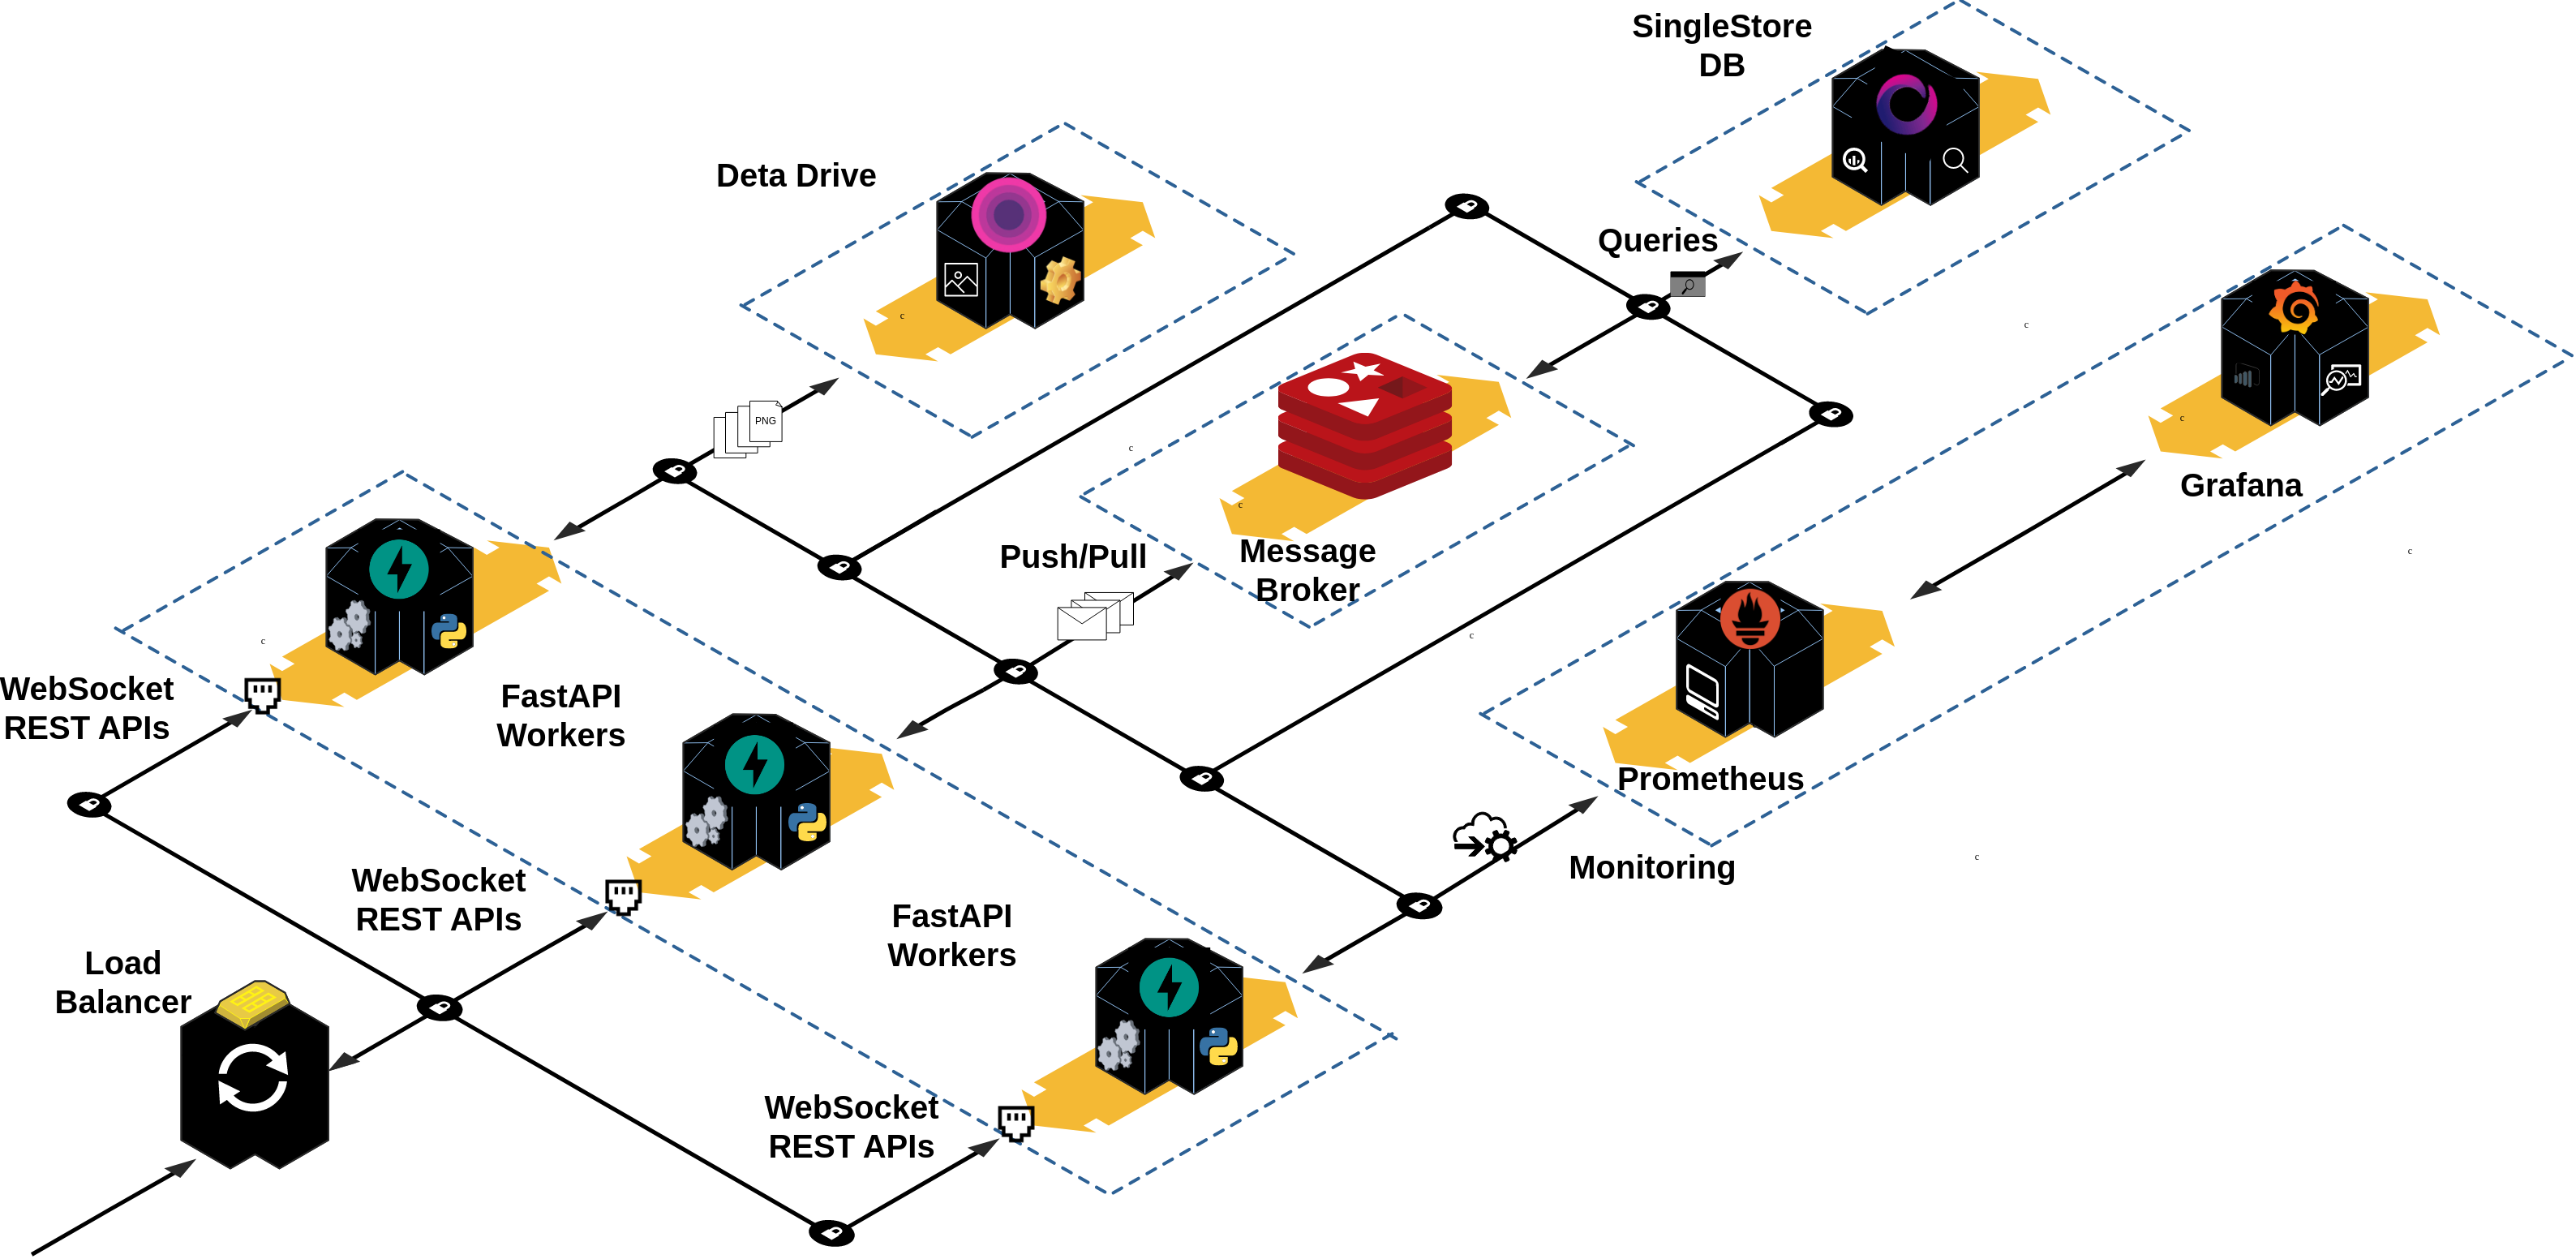
完全基於異步的後端,用於勇敢的聊天。這是一款多模型服務器,功能齊全,並支持所有常用的消息傳遞應用程序功能,例如一對一(私有)和房間消息傳遞。它使用戶可以發送文本和多媒體消息(例如圖像)。此外,用戶可以自由創建,加入和離開聊天室,每個人都可以在其中互相發送消息。
該項目支持以下功能:
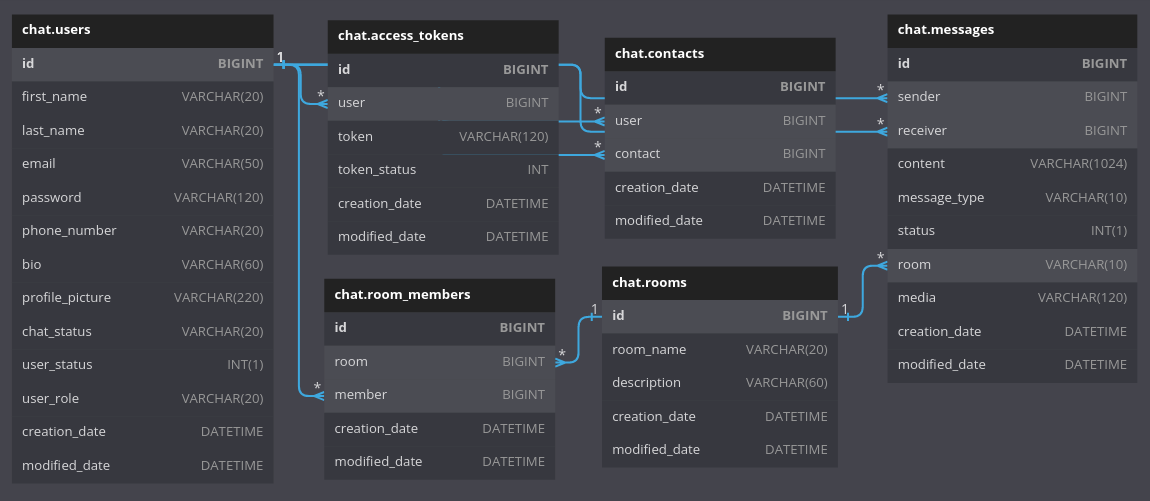
該項目使用多模型關係數據庫來存儲有關用戶的信息。每個數據表中的每個記錄都可以視為時間序列記錄,尤其是給定讀和寫入訪問率的messages表,給定每個記錄的創建日期和更新日期。
此外,正在實施基本的文本搜索以填充聊天列表視圖和房間列表視圖。聯繫人列表視圖支持用戶的名字,姓氏和電子郵件地址上的全文搜索。
您可以參考官方文檔以獲取有關數據庫和體系結構的更多信息。
❯ tree app .
├── auth # Package contains different config files for the `auth` app.
│ ├── crud.py # Module contains different CRUD operations performed on the database.
│ ├── models.py # Module contains different data models for ORM to interact with database.
│ ├── router.py # Module contains different routes for this api.
│ └── schemas.py # Module contains different schemas for this api for validation purposes.
├── chats # Package contains different config files for the `chats` app.
│ ├── crud.py # Module contains different CRUD operations performed on the database.
│ ├── models.py # Module contains different data models for ORM to interact with database.
│ ├── router.py # Module contains different routes for this api.
│ └── schemas.py # Module contains different schemas for this api for validation purposes.
├── config.py # Module contains the main configuration settings for project.
├── contacts # Package contains different config files for the `contacts` app.
│ ├── crud.py # Module contains different CRUD operations performed on the database.
│ ├── models.py # Module contains different data models for ORM to interact with the database.
│ ├── router.py # Module contains different routes for this api.
│ └── schemas.py # Module contains different schemas for this api for validation purposes.
├── __init__.py
├── main.py # Startup script. Starts uvicorn.
├── rooms # Package contains different config files for the `rooms` app.
│ ├── crud.py # Module contains different CRUD operations performed on the database.
│ ├── models.py # Module contains different models for ORMs to inteact with database..
│ ├── router.py # Module contains different routes for this api.
│ └── schemas.py # Module contains different schemas for this api for validation purposes.
├── users # Package contains different config files for the `users` app.
│ ├── crud.py # Module contains different CRUD operations performed on the database.
│ ├── models.py # Module contains different models for ORMs to inteact with database..
│ ├── router.py # Module contains different routes for this api.
│ └── schemas.py # Module contains different schemas for this api for validation purposes.
├── utils # Package contains different common utility modules for the whole project.
│ ├── constants.py
│ ├── crypt_util.py
│ ├── db_utils.py # A utility script that create, drop a test database used in the tests package.
│ ├── dependencies.py # A utility script that yield a session for each request to make the crud call work.
│ ├── engine.py # A utility script that initialize two sqlalchemy engines and set them as app state variables.
│ ├── full_text_search.py # A utility script to make sqlalchemy and singlestore compatible for implementing full text search on a given table.
│ ├── jwt_util.py # A utility script for JWT.
│ ├── mixins.py # A utility script that contains common mixins for different models.
│ └── pub_sub_handlers.py # A utility script that contains publishers and consumers handlers for the redis queue.
└── web_sockets # Package contains different config files for the `web_sockets` app.
└── router.py # Module contains different routes for the websockets. 配置,安裝主要依賴關係並運行項目的最佳方法是使用make 。因此,請確保您已在計算機上make和配置。如果不是這種情況,請轉到Stackoverflow上的此線程以將其安裝在Windows上,或將其安裝在Mac OS上。
在計算機上make安裝和配置後,您現在可以在此項目的根目錄下運行make以探索運行的不同可用命令:
make

Please use ' make <target> ' where < target > is one of:

venv                     Create a virtual environment
install                  Install the package and all required core dependencies
run                      Running the app locally
create-deta              Set up a new Deta Space environment
deploy-deta              Deploy the app on a Deta Micro
clean                    Remove all build, test, coverage and Python artifacts
lint                     Check style with pre-commit
test                     Run tests quickly with pytest
test-all                 Run tests on every Python version with tox
coverage                 Check code coverage quickly with the default Python
build                    Build docker containers services
up                       Spin up the containers
down Stop all running containersmake venv source .venv/bin/activatemake install注意:此命令將自動從.env.example中生成.env文件,卸載機器上的舊版本的詩歌,然後安裝最新版本1.2.2 ,然後安裝所需的主要依賴項。
您可以參考本教程,以創建單閘帳戶和MySQL chat數據庫。
相應地填寫.env文件中的以下環境變量:
 # Database
SINGLESTORE_USERNAME=admin
SINGLESTORE_PASSWORD=<database password>
SINGLESTORE_HOST=<database name>
SINGLESTORE_PORT=3306
SINGLESTORE_DATABASE=<database name>在Redis Cloud上創建一個免費帳戶。
根據您的帳戶憑據設置.env文件中的以下環境變量:
 # REDIS
# USER IN REDIS CLOUD
REDIS_USERNAME=default
# DATABASE PASSWORD
REDIS_PASSWORD=<database password>
# REDIS HOST
REDIS_HOST=<redis url>
# REDIS PORT
REDIS_PORT=15065sent-images和profile-images附加到此集合中,以存儲對話中發送的個人資料圖像和圖像。根據數據密鑰值在.env文件中設置以下環境變量:
 # Deta
DETA_PROJECT_KEY=使用openSSL生成一個秘密鍵,並在.env文件中更新其env var。
openssl rand -hex 128

afa1639545d53ecf83c9f8acf4704abe1382f9a9dbf76d2fd229d4795a4748712dbfe7cf1f0a812f1c0fad2d47c8343cd1017b22fc3bf43d052307137f6ba68cd2cb69748b561df846873a6257e3569d6307a7e022b82b79cb3d6e0fee00553d80913c1dcf946e2e91e1dfcbba1ed9f34c9250597c1f70f572744e91c68cbe76
# App config:
JWT_SECRET_KEY=afa1639545d53ecf83c9f8acf4704abe1382f9a9dbf76d2fd229d4795a4748712dbfe7cf1f0a812f1c0fad2d47c8343cd1017b22fc3bf43d052307137f6ba68cd2cb69748b561df846873a6257e3569d6307a7e022b82b79cb3d6e0fee00553d80913c1dcf946e2e91e1dfcbba1ed9f34c9250597c1f70f572744e91c68cbe76make run注意:您必須設置調試=信息才能訪問文檔。
首先,要運行整個平台,您必須使用以下命令克隆brave-chat子模塊:
git submodule update --init --recursive完成此操作後,請確保您在計算機上已安裝和配置V2,並運行以下命令來構建預定義的Docker服務(請確保您事先有.env文件):
使用
make build或簡單地運行:
docker compose build
完成此操作後,您可以旋轉容器:
使用
make up或運行:
docker compose up
等到客戶服務可用:
brave-chat-server-client-1 | Starting the development server...
您可以停止運行容器,但在單獨的終端會話上發出以下命令:
make down
http:// localhost:8000/docs
http:// localhost:8000/redocs
http:// localhost:8000/指標
http:// localhost:3001
http:// localhost:3000
您需要創建一個DETA帳戶以使用API的DETA版本。
確保您的機器上安裝了DETA CLI。如果不是這樣,只需運行以下命令(在Linux發行版或Mac上):
curl -fsSL https://get.deta.dev/space-cli.sh | sh手動添加/home/<user_name>/.detaspace/bin user_name>/.detaspace/bin到您的路徑:
export PATH= " /home/<user_name>/.detaspace/bin: $PATH "您可以運行以下命令來設置新的DETA空間環境:
make create-deta生成新的訪問令牌並將其粘貼到您的終端中:
您需要附加run: uvicorn main:app到Spacefile文件的末尾:
sed -i ' $ a run: uvicorn main:app ' Spacefile現在,您可以在DETA空間中部署它:
make deploy-deta然後,您可以使用DETA UI檢查日誌,並託管API的URL。
注意:
確保您的.env文件與有效的Env vars值相應地提供。
main.py文件用作DETA的入口點。 requirements.txt也是如此。
此按鈕只會部署服務器。
請注意,這種方法並不完美,因為在Docker World中,您只能為每個容器提供一項服務,並且您應該使用Docker-Compose來構建和運行兩個以上的容器(例如,一個用於服務器,另一個用於客戶端)。但是,Heroku不支持使用多個服務的Docker-Compose(數據庫等)。因此,在一個容器中運行兩個服務。
為此,請確保您已經在計算機上安裝並配置了Heroku CLI。如果不是這種情況,則可以使用以下命令在Ubuntu上安裝它:
sudo wget -qO- https://toolbelt.heroku.com/install-ubuntu.sh | sh現在,您需要安裝Heroku容器註冊表插件:
heroku plugins:install heroku-container-registry完成後,登錄您的註冊表:
heroku container:login現在,創建一個Heroku應用程序:
heroku create < a unique app name >您可以列出所有應用程序以驗證您最近的應用程序已創建:
heroku apps在.env文件中設置您的ENV變量。
構建您的容器圖像:
docker compose -f heroku-compose.yml build部署到Heroku:
heroku container:push web --app < your heroku app name > ; heroku logs --tail構建和推動完成後,您可以在單獨的外殼中運行以下命令與應用程序交互:
heroku open --app= < your app name >您可以參考Heroku Dev中心以獲取更多信息。快樂的herokuing!
該項目使用Websocket,不幸的是,Vercel的無服務器功能不支持。
不幸的是,該項目使用Websocket,而Netlify的無服務器功能不支持。
此外,由於該應用程序由服務器端渲染組成,因此無法在NetLify上運行FastAPI應用程序。當前僅在NetLify上允許客戶端渲染,這意味著您只能部署諸如文檔之類的靜態生成的網站。我試圖通過創建執行uvicorn main:app --reload 。但是,無服務器功能正在在不同的環境中部署。
以下軟件包是用於構建此項目的主要依賴項:
pythonfastapiuvicornpydanticSQLAlchemyPyJWTpasslibaiomysqlaioredispython-multipartdeta-pythonprometheus-fastapi-instrumentator 該項目供任何人開放:
該項目和隨附的材料可根據MIT LICENSE的條款和條件提供。


