brave chat server
1.0.0
용감한 채팅을위한 완전 비동기 기반 백엔드. 이 제품은 완전히 기능적이며 일대일 (개인) 및 룸 메시징과 같은 모든 일반적인 메시징 앱 기능을 지원하는 멀티 모델 서버입니다. 사용자는 텍스트 및 멀티미디어 메시지 (예 : 이미지)를 보낼 수 있습니다. 또한 사용자는 모든 사람이 서로 메시지 할 수있는 대화방을 자유롭게 만들고 가입하고 떠날 수 있습니다.
이 프로젝트는 다음과 같은 기능을 지원합니다.
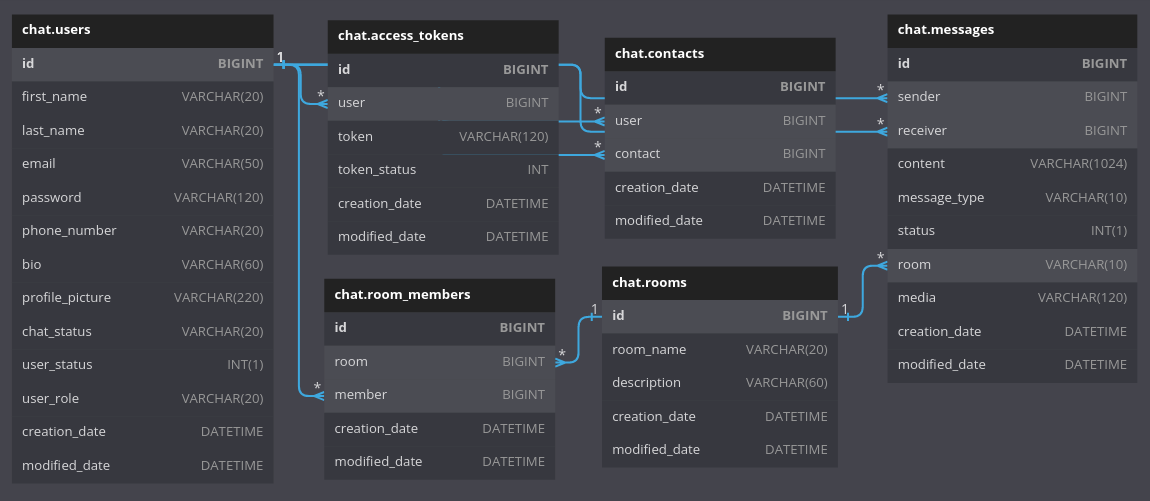
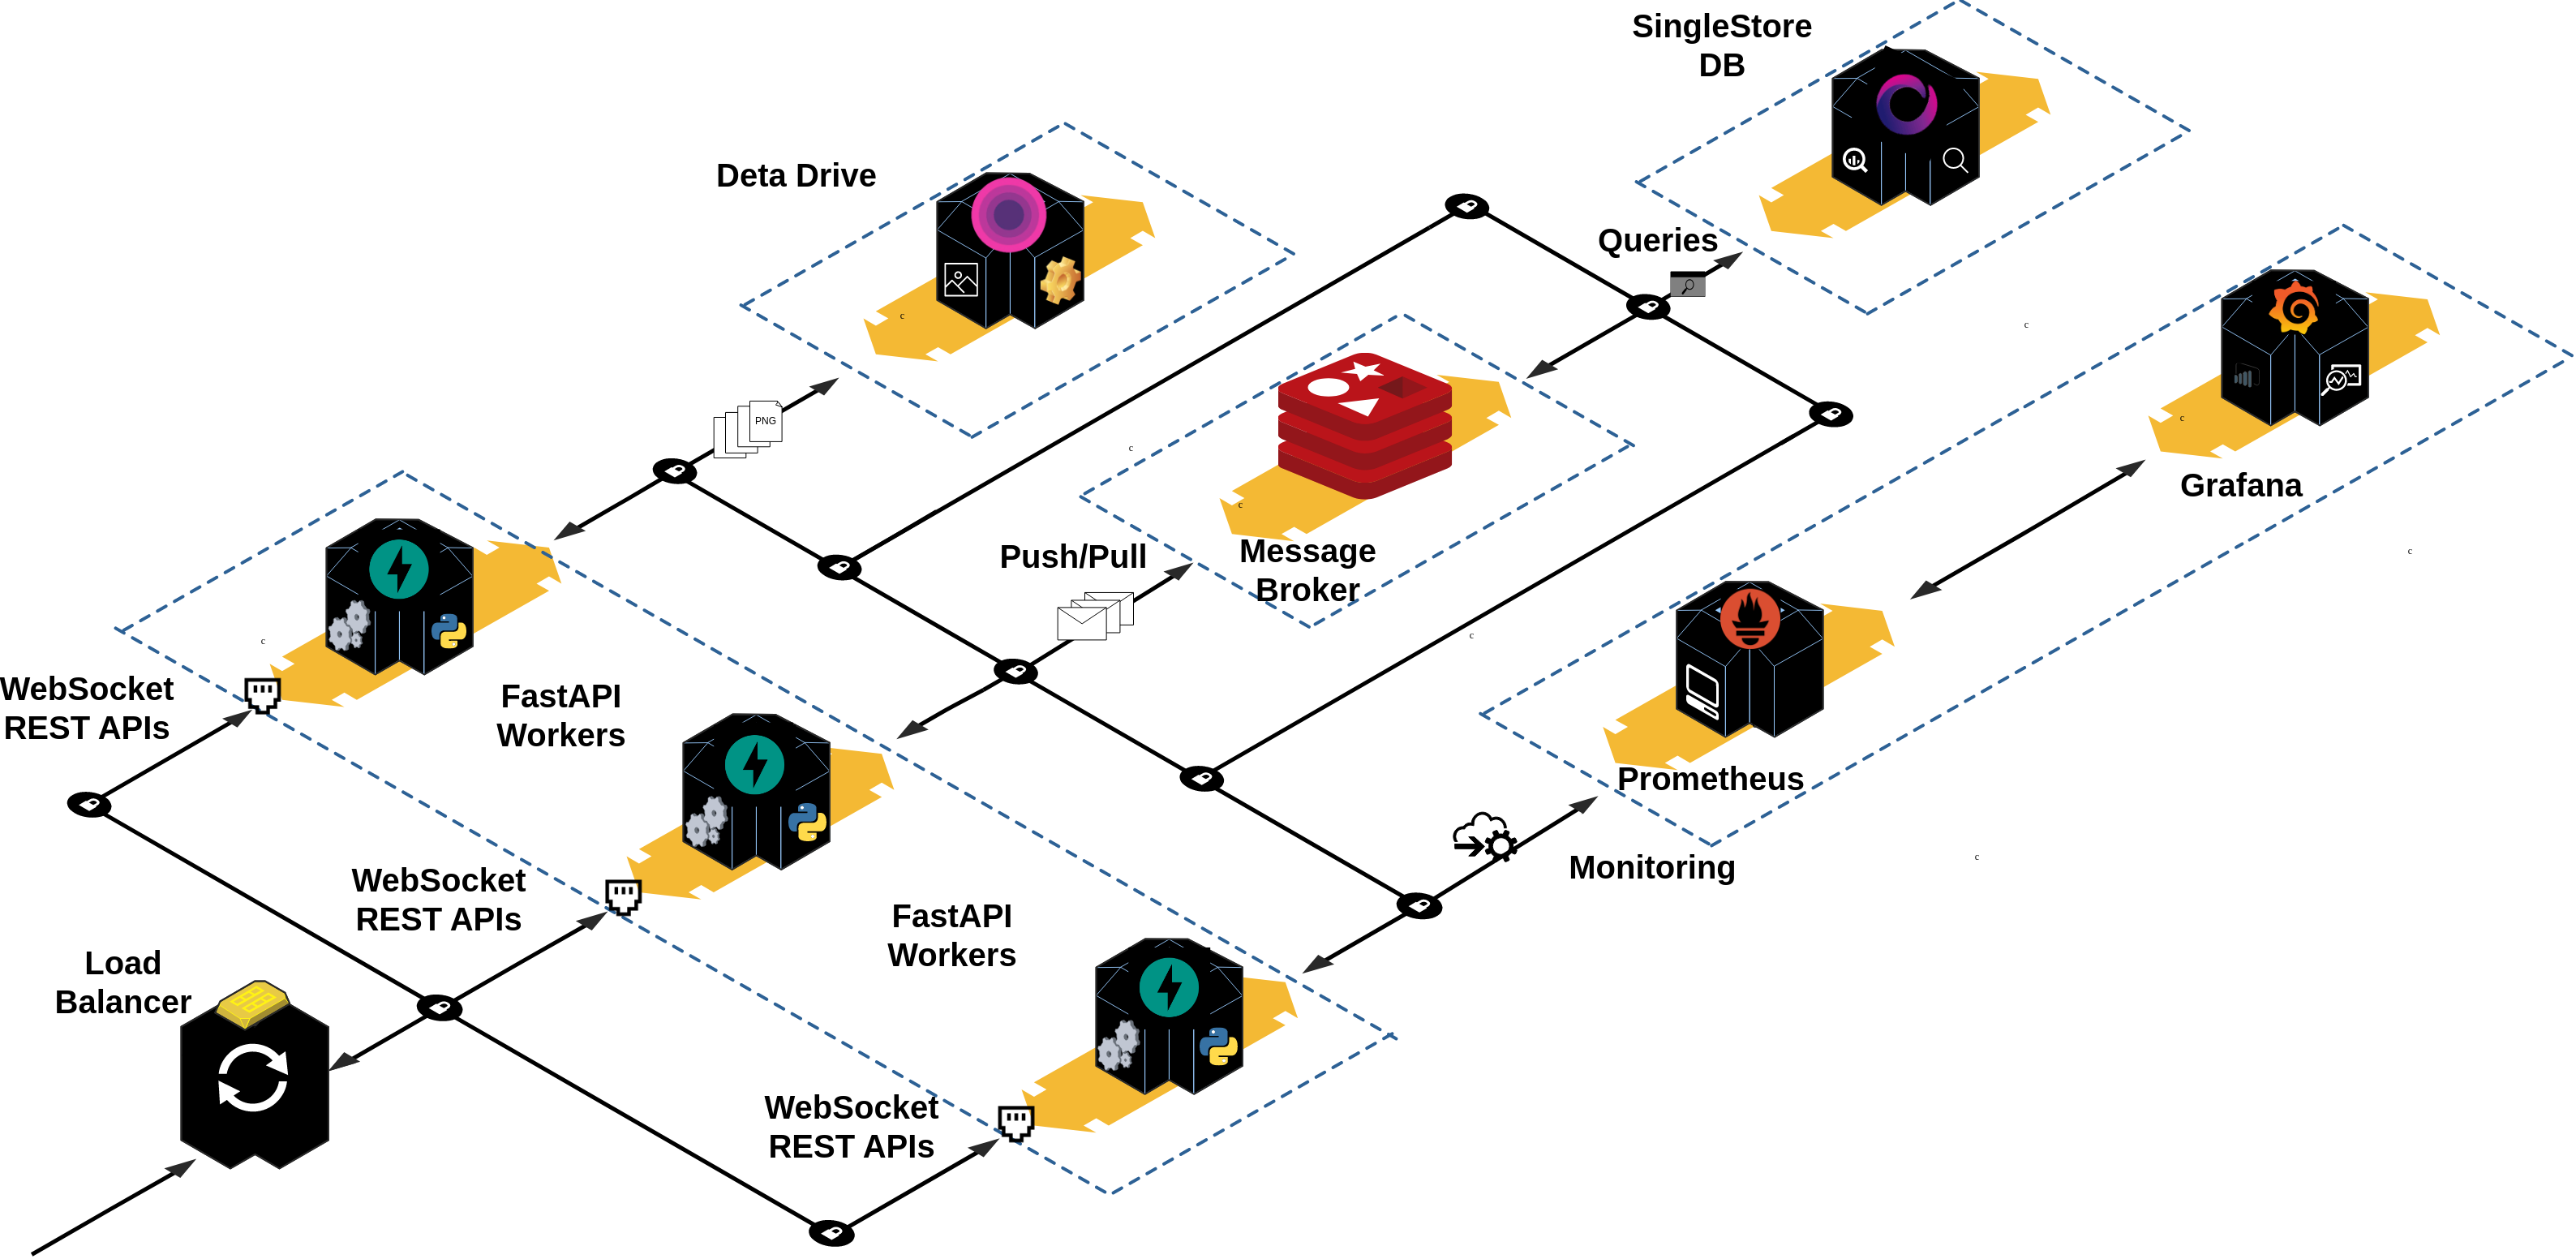
이 프로젝트는 멀티 모델 관계형 데이터베이스를 사용하여 사용자에 대한 정보를 저장합니다. 모든 데이터 테이블의 각 레코드는 각 레코드의 생성 날짜 및 업데이트 날짜가 주어지면 읽기 및 쓰기 액세스 속도가 주어진 메시지 테이블, 특히 messages 테이블로 간주 될 수 있습니다.
또한 채팅 목록보기 및 룸 목록보기를 채우기 위해 기본 텍스트 검색이 구현되고 있습니다. 연락처 목록보기는 사용자의 이름, 성 및 이메일 주소에서 전체 텍스트 검색을 지원합니다.
데이터베이스 및 아키텍처에 대한 자세한 내용은 공식 문서를 참조 할 수 있습니다.
❯ tree app .
├── auth # Package contains different config files for the `auth` app.
│ ├── crud.py # Module contains different CRUD operations performed on the database.
│ ├── models.py # Module contains different data models for ORM to interact with database.
│ ├── router.py # Module contains different routes for this api.
│ └── schemas.py # Module contains different schemas for this api for validation purposes.
├── chats # Package contains different config files for the `chats` app.
│ ├── crud.py # Module contains different CRUD operations performed on the database.
│ ├── models.py # Module contains different data models for ORM to interact with database.
│ ├── router.py # Module contains different routes for this api.
│ └── schemas.py # Module contains different schemas for this api for validation purposes.
├── config.py # Module contains the main configuration settings for project.
├── contacts # Package contains different config files for the `contacts` app.
│ ├── crud.py # Module contains different CRUD operations performed on the database.
│ ├── models.py # Module contains different data models for ORM to interact with the database.
│ ├── router.py # Module contains different routes for this api.
│ └── schemas.py # Module contains different schemas for this api for validation purposes.
├── __init__.py
├── main.py # Startup script. Starts uvicorn.
├── rooms # Package contains different config files for the `rooms` app.
│ ├── crud.py # Module contains different CRUD operations performed on the database.
│ ├── models.py # Module contains different models for ORMs to inteact with database..
│ ├── router.py # Module contains different routes for this api.
│ └── schemas.py # Module contains different schemas for this api for validation purposes.
├── users # Package contains different config files for the `users` app.
│ ├── crud.py # Module contains different CRUD operations performed on the database.
│ ├── models.py # Module contains different models for ORMs to inteact with database..
│ ├── router.py # Module contains different routes for this api.
│ └── schemas.py # Module contains different schemas for this api for validation purposes.
├── utils # Package contains different common utility modules for the whole project.
│ ├── constants.py
│ ├── crypt_util.py
│ ├── db_utils.py # A utility script that create, drop a test database used in the tests package.
│ ├── dependencies.py # A utility script that yield a session for each request to make the crud call work.
│ ├── engine.py # A utility script that initialize two sqlalchemy engines and set them as app state variables.
│ ├── full_text_search.py # A utility script to make sqlalchemy and singlestore compatible for implementing full text search on a given table.
│ ├── jwt_util.py # A utility script for JWT.
│ ├── mixins.py # A utility script that contains common mixins for different models.
│ └── pub_sub_handlers.py # A utility script that contains publishers and consumers handlers for the redis queue.
└── web_sockets # Package contains different config files for the `web_sockets` app.
└── router.py # Module contains different routes for the websockets. 구성, 기본 종속성을 설치하며 프로젝트를 실행하는 가장 좋은 방법은 make 사용하는 것입니다. 따라서 컴퓨터에 make 및 구성을 구성했는지 확인하십시오. 그렇지 않은 경우 StackoverFlow 의이 스레드로 가서 Windows 또는이 스레드를 설치하여 Mac OS에 설치하십시오.
컴퓨터에 make 및 구성된 상태 에서이 프로젝트의 루트 디렉토리에서 make 실행하여 사용 가능한 다양한 명령을 탐색 할 수 있습니다.
make

Please use ' make <target> ' where < target > is one of:

venv                     Create a virtual environment
install                  Install the package and all required core dependencies
run                      Running the app locally
create-deta              Set up a new Deta Space environment
deploy-deta              Deploy the app on a Deta Micro
clean                    Remove all build, test, coverage and Python artifacts
lint                     Check style with pre-commit
test                     Run tests quickly with pytest
test-all                 Run tests on every Python version with tox
coverage                 Check code coverage quickly with the default Python
build                    Build docker containers services
up                       Spin up the containers
down Stop all running containersmake venv source .venv/bin/activatemake install 참고 : 이 명령은 .env.example 에서 .env 파일을 자동으로 생성하고 컴퓨터에서 이전 버전의시를 제거한 다음 최신 버전 1.2.2 설치 한 다음 필요한 기본 종속성을 설치합니다.
이 튜토리얼을 참조하여 Singlestore 계정과 MySQL chat 데이터베이스를 만들 수 있습니다.
그에 따라 .env 파일의 다음 환경 변수를 작성하십시오.
 # Database
SINGLESTORE_USERNAME=admin
SINGLESTORE_PASSWORD=<database password>
SINGLESTORE_HOST=<database name>
SINGLESTORE_PORT=3306
SINGLESTORE_DATABASE=<database name>Redis Cloud에서 무료 계정을 만듭니다.
계정 자격 증명에 따라 다음 환경 변수를 .env 파일에 설정하십시오.
 # REDIS
# USER IN REDIS CLOUD
REDIS_USERNAME=default
# DATABASE PASSWORD
REDIS_PASSWORD=<database password>
# REDIS HOST
REDIS_HOST=<redis url>
# REDIS PORT
REDIS_PORT=15065sent-images 프로필 이미지와 이미지를 저장하기 위해이 컬렉션에 보낸 이미지 및 profile-images 의 두 드라이브를 첨부하십시오. 데이터 키 값에 따라 .env 파일에서 다음 환경 변수를 설정하십시오.
 # Deta
DETA_PROJECT_KEY=OpenSSL을 사용하여 비밀 키를 생성하고 .env 파일에서 ENV var를 업데이트하십시오.
openssl rand -hex 128

afa1639545d53ecf83c9f8acf4704abe1382f9a9dbf76d2fd229d4795a4748712dbfe7cf1f0a812f1c0fad2d47c8343cd1017b22fc3bf43d052307137f6ba68cd2cb69748b561df846873a6257e3569d6307a7e022b82b79cb3d6e0fee00553d80913c1dcf946e2e91e1dfcbba1ed9f34c9250597c1f70f572744e91c68cbe76
# App config:
JWT_SECRET_KEY=afa1639545d53ecf83c9f8acf4704abe1382f9a9dbf76d2fd229d4795a4748712dbfe7cf1f0a812f1c0fad2d47c8343cd1017b22fc3bf43d052307137f6ba68cd2cb69748b561df846873a6257e3569d6307a7e022b82b79cb3d6e0fee00553d80913c1dcf946e2e91e1dfcbba1ed9f34c9250597c1f70f572744e91c68cbe76make run참고 : 문서에 액세스하려면 디버그 = 정보를 설정해야합니다.
먼저, 전체 플랫폼을 실행하려면 다음 명령을 사용하여 brave-chat 하위 모듈을 복제해야합니다.
git submodule update --init --recursive작업이 완료되면 컴퓨터에 V2를 설치하고 구성했는지 확인하고 다음 명령을 실행하여 사전 정의 된 Docker 서비스를 작성하십시오 (미리 .env 파일이 있는지 확인).
Make 사용
make build또는 단순히 달리기 :
docker compose build
완료되면 컨테이너를 회전시킬 수 있습니다.
Make 사용
make up또는 달리기 :
docker compose up
클라이언트 서비스를 사용할 수있을 때까지 기다리십시오.
brave-chat-server-client-1 | Starting the development server...
달리는 컨테이너를 중지하지만 별도의 터미널 세션에서 다음 명령을 발행 할 수 있습니다.
make down
http : // localhost : 8000/docs
http : // localhost : 8000/Redocs
http : // localhost : 8000/metrics
http : // localhost : 3001
http : // localhost : 3000
Deta 버전의 API를 사용하려면 Deta 계정을 만들어야합니다.
컴퓨터에 Deta CLI가 설치되어 있는지 확인하십시오. 그렇지 않은 경우 다음 명령 (Linux 배포판 또는 Mac에서)을 실행하십시오.
curl -fsSL https://get.deta.dev/space-cli.sh | sh 수동으로 /home/<user_name>/.detaspace/bin 경로에 추가하십시오.
export PATH= " /home/<user_name>/.detaspace/bin: $PATH "새로운 Deta Space 환경을 설정하려면 다음 명령을 실행할 수 있습니다.
make create-deta새 액세스 토큰을 생성하여 터미널에 붙여 넣습니다.
run: uvicorn main:app Spacefile 파일의 끝까지 앱을 추가해야합니다.
sed -i ' $ a run: uvicorn main:app ' Spacefile이제 Deta Space에 배포 할 수 있습니다.
make deploy-deta그런 다음 DETA UI를 사용하여 로그를 확인하고 API가 호스팅되는 URL을 확인할 수 있습니다.
참고 :
.env 파일에 그에 따라 유효한 ENV VARS 값이 제공되어 있는지 확인하십시오.
main.py 파일은 Deta의 진입 점으로 사용됩니다. requirements.txt .
이 버튼은 서버 만 배포합니다.
Docker World에서는 각 컨테이너에 대해 하나의 서비스 만 있어야하며 Docker-Compose를 사용하여 2 개 이상의 컨테이너 (예 : 서버 용 및 클라이언트를위한 다른 하나)를 빌드하고 실행해야하기 때문에이 접근법은 완벽하지 않습니다. 그러나 Heroku는 여러 서비스 (데이터베이스 등 제외)를 사용하여 Docker-Compose를 지원하지 않습니다. 따라서 두 서비스를 하나의 컨테이너로 실행합니다.
그렇게하려면 컴퓨터에 이미 Heroku CLI를 설치하고 구성했는지 확인하십시오. 그렇지 않은 경우 다음 명령을 사용하여 Ubuntu에 설치할 수 있습니다.
sudo wget -qO- https://toolbelt.heroku.com/install-ubuntu.sh | sh이제 Heroku Container Registry 플러그인을 설치해야합니다.
heroku plugins:install heroku-container-registry완료되면 레지스트리에 로그인하십시오.
heroku container:login이제 Heroku 앱을 만듭니다.
heroku create < a unique app name >모든 앱을 나열하여 최근 앱이 생성되었는지 확인할 수 있습니다.
heroku apps ENV 변수를 .env 파일로 설정하십시오.
컨테이너 이미지 만들기 :
docker compose -f heroku-compose.yml buildHeroku에 배포 :
heroku container:push web --app < your heroku app name > ; heroku logs --tail빌드 및 푸시가 완료되면 별도의 쉘로 다음 명령을 실행하여 앱과 상호 작용할 수 있습니다.
heroku open --app= < your app name >자세한 내용은 Heroku Dev Center를 참조하십시오. 행복한 herokuing!
이 프로젝트는 불행히도 Vercel의 서버리스 기능에서 지원하지 않는 WebSockets를 사용합니다.
불행히도이 프로젝트는 NetLify의 서버리스 기능에서 지원되지 않는 WebSockets를 사용합니다.
또한 앱은 서버 측 렌더링으로 구성되므로 NetLify에서 FastApi 앱을 실행할 수 없습니다. 클라이언트 측 렌더링 만 현재 NetLify에서 허용되므로 문서와 같은 정적으로 생성 된 웹 사이트 만 배포 할 수 있습니다. uvicorn main:app --reload 백그라운드에서 실행하는 서버리스 기능을 만들어 주변을 해킹하려고했습니다. 그러나 서버리스 기능은 다른 환경에서 배포되고 있습니다.
다음 패키지는이 프로젝트를 구축하는 데 사용되는 주요 종속성입니다.
pythonfastapiuvicornpydanticSQLAlchemyPyJWTpasslibaiomysqlaioredispython-multipartdeta-pythonprometheus-fastapi-instrumentator 이 프로젝트는 누구나 기여할 수 있도록 열려 있습니다.
이 프로젝트와 함께 제공되는 자료는 MIT LICENSE 의 이용 약관에 따라 제공됩니다.


