react test demo
1.0.0
 # 先说一下示例怎么运行,先确定本机安装好 node 环境

# 安装项目依赖
npm install

# 首先启动 webpack-dev-server
npm run start-dev

# 上一个运行完毕后不要关闭,开一个新的命令行,启动 node server 服务
npm run start-server

#上述两个启动好后打开浏览器访问 http://localhost:3000 即可

# 跑测试用例
npm test

# 生成测试覆盖报告,跑完后看 coverage 子目录下的内容
npm run test-coverage

# 以上脚本定义都在 package.json 中
隨著Web 應用的複雜程度越來越高,很多公司越來越重視前端單元測試。我們看到的大多數教程都會講單元測試的重要性、一些有代表性的測試框架api 怎麼使用,但在實際項目中單元測試要怎麼下手?測試用例應該包含哪些具體內容呢?
本文從一個真實的應用場景出發,從設計模式、代碼結構來分析單元測試應該包含哪些內容,具體測試用例怎麼寫,希望看到的童鞋都能有所收穫。
該項目採用react技術棧,用到的主要框架包括: react 、 redux 、 react-redux 、 redux-actions 、 reselect 、 redux-saga 、 seamless-immutable 、 antd 。
這個應用場景從UI 層來講主要由兩個部分組成:
看到這裡有的童鞋可能會說:切!這麼簡單的界面和業務邏輯,還是真實場景嗎,還需要寫神馬單元測試嗎?
別急,為了保證文章的閱讀體驗和長度適中,能講清楚問題的簡潔場景就是好場景不是嗎?慢慢往下看。
在這個場景設計開發中,我們嚴格遵守redux單向數據流與react-redux的最佳實踐,並採用redux-saga來處理業務流, reselect來處理狀態緩存,通過fetch來調用後台接口,與真實的項目沒有差異。
分層設計與代碼組織如下所示:
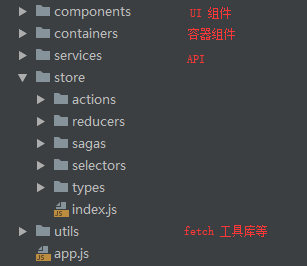
中間store中的內容都是redux相關的,看名稱應該都能知道意思了。
具體的代碼請看這裡。
先講一下用到了哪些測試框架和工具,主要內容包括:
jest ,測試框架enzyme ,專測react ui 層sinon ,具有獨立的fakes、spies、stubs、mocks 功能庫nock ,模擬HTTP Server如果有童鞋對上面這些使用和配置不熟的話,直接看官方文檔吧,比任何教程都寫的好。
接下來,我們就開始編寫具體的測試用例代碼了,下面會針對每個層面給出代碼片段和解析。那麼我們先從actions開始吧。
為使文章盡量簡短、清晰,下面的代碼片段不是每個文件的完整內容,完整內容在這裡。
業務裡面我使用了redux-actions來產生action ,這裡用工具欄做示例,先看一段業務代碼:
 import { createAction } from 'redux-actions' ;
import * as type from '../types/bizToolbar' ;

export const updateKeywords = createAction ( type . BIZ_TOOLBAR_KEYWORDS_UPDATE ) ;

// ...對於actions測試,我們主要是驗證產生的action對像是否正確:
 import * as type from '@/store/types/bizToolbar' ;
import * as actions from '@/store/actions/bizToolbar' ;

/* 测试 bizToolbar 相关 actions */
describe ( 'bizToolbar actions' , ( ) => {

    /* 测试更新搜索关键字 */
    test ( 'should create an action for update keywords' , ( ) => {
        // 构建目标 action
        const keywords = 'some keywords' ;
        const expectedAction = {
            type : type . BIZ_TOOLBAR_KEYWORDS_UPDATE ,
            payload : keywords
        } ;

        // 断言 redux-actions 产生的 action 是否正确
        expect ( actions . updateKeywords ( keywords ) ) . toEqual ( expectedAction ) ;
    } ) ;

    // ...
} ) ;
這個測試用例的邏輯很簡單,首先構建一個我們期望的結果,然後調用業務代碼,最後驗證業務代碼的運行結果與期望是否一致。這就是寫測試用例的基本套路。
我們在寫測試用例時盡量保持用例的單一職責,不要覆蓋太多不同的業務範圍。測試用例數量可以有很多個,但每個都不應該很複雜。
接著是reducers ,依然採用redux-actions的handleActions來編寫reducer ,這裡用表格的來做示例:
 import { handleActions } from 'redux-actions' ;
import Immutable from 'seamless-immutable' ;
import * as type from '../types/bizTable' ;

/* 默认状态 */
export const defaultState = Immutable ( {
    loading : false ,
    pagination : {
        current : 1 ,
        pageSize : 15 ,
        total : 0
    } ,
    data : [ ]
} ) ;

export default handleActions (
    {
        // ...

        /* 处理获得数据成功 */
        [ type . BIZ_TABLE_GET_RES_SUCCESS ] : ( state , { payload } ) => {
            return state . merge (
                {
                    loading : false ,
                    pagination : { total : payload . total } ,
                    data : payload . items
                } ,
                { deep : true }
            ) ;
        } ,

        // ...
    } ,
    defaultState
) ;
這裡的狀態對象使用了
seamless-immutable
對於reducer ,我們主要測試兩個方面:
action.type ,是否能返回當前狀態。下面是針對以上兩點的測試代碼:
 import * as type from '@/store/types/bizTable' ;
import reducer , { defaultState } from '@/store/reducers/bizTable' ;

/* 测试 bizTable reducer */
describe ( 'bizTable reducer' , ( ) => {

    /* 测试未指定 state 参数情况下返回当前缺省 state */
    test ( 'should return the default state' , ( ) => {
        expect ( reducer ( undefined , { type : 'UNKNOWN' } ) ) . toEqual ( defaultState ) ;
    } ) ;

    // ...

    /* 测试处理正常数据结果 */
    test ( 'should handle successful data response' , ( ) => {
        /* 模拟返回数据结果 */
        const payload = {
            items : [
                { id : 1 , code : '1' } ,
                { id : 2 , code : '2' }
            ] ,
            total : 2
        } ;
        /* 期望返回的状态 */
        const expectedState = defaultState
            . setIn ( [ 'pagination' , 'total' ] , payload . total )
            . set ( 'data' , payload . items )
            . set ( 'loading' , false ) ;

        expect (
            reducer ( defaultState , {
                type : type . BIZ_TABLE_GET_RES_SUCCESS ,
                payload
            } )
        ) . toEqual ( expectedState ) ;
    } ) ;

    // ...
} ) ;
這裡的測試用例邏輯也很簡單,依然是上面斷言期望結果的套路。下面是selectors 的部分。
selector的作用是獲取對應業務的狀態,這裡使用了reselect來做緩存,防止state未改變的情況下重新計算,先看一下表格的selector 代碼:
 import { createSelector } from 'reselect' ;
import * as defaultSettings from '@/utils/defaultSettingsUtil' ;

// ...

const getBizTableState = ( state ) => state . bizTable ;

export const getBizTable = createSelector ( getBizTableState , ( bizTable ) => {
    return bizTable . merge ( {
        pagination : defaultSettings . pagination
    } , { deep : true } ) ;
} ) ;
這裡的分頁器部分參數在項目中是統一設置,所以reselect 很好的完成了這個工作:如果業務狀態不變,直接返回上次的緩存。分頁器默認設置如下:
 export const pagination = {
    size : 'small' ,
    showTotal : ( total , range ) => ` ${ range [ 0 ] } - ${ range [ 1 ] } / ${ total } ` ,
    pageSizeOptions : [ '15' , '25' , '40' , '60' ] ,
    showSizeChanger : true ,
    showQuickJumper : true
} ;
那麼我們的測試也主要是兩個方面:
測試代碼如下:
 import Immutable from 'seamless-immutable' ;
import { getBizTable } from '@/store/selectors' ;
import * as defaultSettingsUtil from '@/utils/defaultSettingsUtil' ;

/* 测试 bizTable selector */
describe ( 'bizTable selector' , ( ) => {

    let state ;

    beforeEach ( ( ) => {
        state = createState ( ) ;
        /* 每个用例执行前重置缓存计算次数 */
        getBizTable . resetRecomputations ( ) ;
    } ) ;

    function createState ( ) {
        return Immutable ( {
            bizTable : {
                loading : false ,
                pagination : {
                    current : 1 ,
                    pageSize : 15 ,
                    total : 0
                } ,
                data : [ ]
            }
        } ) ;
    }

    /* 测试返回正确的 bizTable state */
    test ( 'should return bizTable state' , ( ) => {
        /* 业务状态 ok 的 */
        expect ( getBizTable ( state ) ) . toMatchObject ( state . bizTable ) ;

        /* 分页默认参数设置 ok 的 */
        expect ( getBizTable ( state ) ) . toMatchObject ( {
            pagination : defaultSettingsUtil . pagination
        } ) ;
    } ) ;

    /* 测试 selector 缓存是否有效 */
    test ( 'check memoization' , ( ) => {
        getBizTable ( state ) ;
        /* 第一次计算,缓存计算次数为 1 */
        expect ( getBizTable . recomputations ( ) ) . toBe ( 1 ) ;

        getBizTable ( state ) ;
        /* 业务状态不变的情况下,缓存计算次数应该还是 1 */
        expect ( getBizTable . recomputations ( ) ) . toBe ( 1 ) ;

        const newState = state . setIn ( [ 'bizTable' , 'loading' ] , true ) ;
        getBizTable ( newState ) ;
        /* 业务状态改变了,缓存计算次数应该是 2 了 */
        expect ( getBizTable . recomputations ( ) ) . toBe ( 2 ) ;
    } ) ;
} ) ;
測試用例依然很簡單有木有?保持這個節奏就對了。下面來講下稍微有點複雜的地方,sagas 部分。
這裡我用了redux-saga處理業務流,這裡具體也就是異步調用api 請求數據,處理成功結果和錯誤結果等。
可能有的童鞋覺得搞這麼複雜幹嘛,異步請求用個redux-thunk不就完事了嗎?別急,耐心看完你就明白了。
這裡有必要大概介紹下redux-saga的工作方式。 saga 是一種es6的生成器函數- Generator ,我們利用他來產生各種聲明式的effects ,由redux-saga引擎來消化處理,推動業務進行。
這裡我們來看看獲取表格數據的業務代碼:
 import { all , takeLatest , put , select , call } from 'redux-saga/effects' ;
import * as type from '../types/bizTable' ;
import * as actions from '../actions/bizTable' ;
import { getBizToolbar , getBizTable } from '../selectors' ;
import * as api from '@/services/bizApi' ;

// ...

export function * onGetBizTableData ( ) {
    /* 先获取 api 调用需要的参数:关键字、分页信息等 */
    const { keywords } = yield select ( getBizToolbar ) ;
    const { pagination } = yield select ( getBizTable ) ;

    const payload = {
        keywords ,
        paging : {
            skip : ( pagination . current - 1 ) * pagination . pageSize , max : pagination . pageSize
        }
    } ;

    try {
        /* 调用 api */
        const result = yield call ( api . getBizTableData , payload ) ;
        /* 正常返回 */
        yield put ( actions . putBizTableDataSuccessResult ( result ) ) ;
    } catch ( err ) {
        /* 错误返回 */
        yield put ( actions . putBizTableDataFailResult ( ) ) ;
    }
}不熟悉redux-saga的童鞋也不要太在意代碼的具體寫法,看註釋應該能了解這個業務的具體步驟:
state裡取到調用api 時需要的參數部分(搜索關鍵字、分頁),這裡調用了剛才的selector。那麼具體的測試用例應該怎麼寫呢?我們都知道這種業務代碼涉及到了api 或其他層的調用,如果要寫單元測試必須做一些mock 之類來防止真正調用api 層,下面我們來看一下怎麼針對這個saga 來寫測試用例:
 import { put , select } from 'redux-saga/effects' ;

// ...

/* 测试获取数据 */
test ( 'request data, check success and fail' , ( ) => {
    /* 当前的业务状态 */
    const state = {
        bizToolbar : {
            keywords : 'some keywords'
        } ,
        bizTable : {
            pagination : {
                current : 1 ,
                pageSize : 15
            }
        }
    } ;
    const gen = cloneableGenerator ( saga . onGetBizTableData ) ( ) ;

    /* 1. 是否调用了正确的 selector 来获得请求时要发送的参数 */
    expect ( gen . next ( ) . value ) . toEqual ( select ( getBizToolbar ) ) ;
    expect ( gen . next ( state . bizToolbar ) . value ) . toEqual ( select ( getBizTable ) ) ;

    /* 2. 是否调用了 api 层 */
    const callEffect = gen . next ( state . bizTable ) . value ;
    expect ( callEffect [ 'CALL' ] . fn ) . toBe ( api . getBizTableData ) ;
    /* 调用 api 层参数是否传递正确 */
    expect ( callEffect [ 'CALL' ] . args [ 0 ] ) . toEqual ( {
        keywords : 'some keywords' ,
        paging : { skip : 0 , max : 15 }
    } ) ;

    /* 3. 模拟正确返回分支 */
    const successBranch = gen . clone ( ) ;
    const successRes = {
        items : [
            { id : 1 , code : '1' } ,
            { id : 2 , code : '2' }
        ] ,
        total : 2
    } ;
    expect ( successBranch . next ( successRes ) . value ) . toEqual (
        put ( actions . putBizTableDataSuccessResult ( successRes ) ) ) ;
    expect ( successBranch . next ( ) . done ) . toBe ( true ) ;

    /* 4. 模拟错误返回分支 */
    const failBranch = gen . clone ( ) ;
    expect ( failBranch . throw ( new Error ( '模拟产生异常' ) ) . value ) . toEqual (
        put ( actions . putBizTableDataFailResult ( ) ) ) ;
    expect ( failBranch . next ( ) . done ) . toBe ( true ) ;
} ) ;
這個測試用例相比前面的複雜了一些,我們先來說下測試saga 的原理。前面說過saga 實際上是返回各種聲明式的effects ,然後由引擎來真正執行。所以我們測試的目的就是要看effects的產生是否符合預期。那麼effect到底是個神馬東西呢?其實就是字面量對象!
我們可以用在業務代碼同樣的方式來產生這些字面量對象,對於字面量對象的斷言就非常簡單了,並且沒有直接調用api 層,就用不著做mock 咯!這個測試用例的步驟就是利用生成器函數一步步的產生下一個effect ,然後斷言比較。
從上面的註釋3、4 可以看到,
redux-saga還提供了一些輔助函數來方便的處理分支斷點。
這也是我選擇redux-saga的原因:強大並且利於測試。
接下來就是api 層相關的了。前面講過調用後台請求是用的fetch ,我封裝了兩個方法來簡化調用和結果處理: getJSON() 、 postJSON() ,分別對應GET 、POST 請求。先來看看api 層代碼:
 import { fetcher } from '@/utils/fetcher' ;

export function getBizTableData ( payload ) {
    return fetcher . postJSON ( '/api/biz/get-table' , payload ) ;
}
業務代碼很簡單,那麼測試用例也很簡單:
 import sinon from 'sinon' ;
import { fetcher } from '@/utils/fetcher' ;
import * as api from '@/services/bizApi' ;

/* 测试 bizApi */
describe ( 'bizApi' , ( ) => {

    let fetcherStub ;

    beforeAll ( ( ) => {
        fetcherStub = sinon . stub ( fetcher ) ;
    } ) ;

    // ...

    /* getBizTableData api 应该调用正确的 method 和传递正确的参数 */
    test ( 'getBizTableData api should call postJSON with right params of fetcher' , ( ) => {
        /* 模拟参数 */
        const payload = { a : 1 , b : 2 } ;
        api . getBizTableData ( payload ) ;

        /* 检查是否调用了工具库 */
        expect ( fetcherStub . postJSON . callCount ) . toBe ( 1 ) ;
        /* 检查调用参数是否正确 */
        expect ( fetcherStub . postJSON . lastCall . calledWith ( '/api/biz/get-table' , payload ) ) . toBe ( true ) ;
    } ) ;
} ) ;
由於api 層直接調用了工具庫,所以這裡用sinon.stub()來替換工具庫達到測試目的。
接著就是測試自己封裝的fetch 工具庫了,這裡fetch 我是用的isomorphic-fetch ,所以選擇了nock來模擬Server 進行測試,主要是測試正常訪問返回結果和模擬服務器異常等,示例片段如下:
 import nock from 'nock' ;
import { fetcher , FetchError } from '@/utils/fetcher' ;

/* 测试 fetcher */
describe ( 'fetcher' , ( ) => {

    afterEach ( ( ) => {
        nock . cleanAll ( ) ;
    } ) ;

    afterAll ( ( ) => {
        nock . restore ( ) ;
    } ) ;

    /* 测试 getJSON 获得正常数据 */
    test ( 'should get success result' , ( ) => {
        nock ( 'http://some' )
            . get ( '/test' )
            . reply ( 200 , { success : true , result : 'hello, world' } ) ;

        return expect ( fetcher . getJSON ( 'http://some/test' ) ) . resolves . toMatch ( / ^hello.+$ / ) ;
    } ) ;

    // ...

    /* 测试 getJSON 捕获 server 大于 400 的异常状态 */
    test ( 'should catch server status: 400+' , ( done ) => {
        const status = 500 ;
        nock ( 'http://some' )
            . get ( '/test' )
            . reply ( status ) ;

        fetcher . getJSON ( 'http://some/test' ) . catch ( ( error ) => {
            expect ( error ) . toEqual ( expect . any ( FetchError ) ) ;
            expect ( error ) . toHaveProperty ( 'detail' ) ;
            expect ( error . detail . status ) . toBe ( status ) ;
            done ( ) ;
        } ) ;
    } ) ;

   /* 测试 getJSON 传递正确的 headers 和 query strings */
    test ( 'check headers and query string of getJSON()' , ( ) => {
        nock ( 'http://some' , {
            reqheaders : {
                'Accept' : 'application/json' ,
                'authorization' : 'Basic Auth'
            }
        } )
            . get ( '/test' )
            . query ( { a : '123' , b : 456 } )
            . reply ( 200 , { success : true , result : true } ) ;

        const headers = new Headers ( ) ;
        headers . append ( 'authorization' , 'Basic Auth' ) ;
        return expect ( fetcher . getJSON (
            'http://some/test' , { a : '123' , b : 456 } , headers ) ) . resolves . toBe ( true ) ;
    } ) ;

    // ...
} ) ;
基本也沒什麼複雜的,主要注意fetch 是promise 返回, jest的各種異步測試方案都能很好滿足。
剩下的部分就是跟UI 相關的了。
容器組件的主要目的是傳遞state 和actions,看下工具欄的容器組件代碼:
 import { connect } from 'react-redux' ;
import { getBizToolbar } from '@/store/selectors' ;
import * as actions from '@/store/actions/bizToolbar' ;
import BizToolbar from '@/components/BizToolbar' ;

const mapStateToProps = ( state ) => ( {
    ... getBizToolbar ( state )
} ) ;

const mapDispatchToProps = {
    reload : actions . reload ,
    updateKeywords : actions . updateKeywords
} ;

export default connect ( mapStateToProps , mapDispatchToProps ) ( BizToolbar ) ;那麼測試用例的目的也是檢查這些,這裡使用了redux-mock-store來模擬redux 的store :
 import React from 'react';
import { shallow } from 'enzyme';
import configureStore from 'redux-mock-store';
import BizToolbar from '@/containers/BizToolbar';

/* 测试容器组件 BizToolbar */
describe('BizToolbar container', () => {

    const initialState = {
        bizToolbar: {
            keywords: 'some keywords'
        }
    };
    const mockStore = configureStore();
    let store;
    let container;

    beforeEach(() => {
        store = mockStore(initialState);
        container = shallow(<BizToolbar store={store}/>);
    });

    /* 测试 state 到 props 的映射是否正确 */
    test('should pass state to props', () => {
        const props = container.props();

        expect(props).toHaveProperty('keywords', initialState.bizToolbar.keywords);
    });

    /* 测试 actions 到 props 的映射是否正确 */
    test('should pass actions to props', () => {
        const props = container.props();

        expect(props).toHaveProperty('reload', expect.any(Function));
        expect(props).toHaveProperty('updateKeywords', expect.any(Function));
    });
});
很簡單有木有,所以也沒啥可說的了。
這里以表格組件作為示例,我們將直接來看測試用例是怎麼寫。一般來說UI 組件我們主要測試以下幾個方面:
下面是測試用例代碼:
 import React from 'react';
import { mount } from 'enzyme';
import sinon from 'sinon';
import { Table } from 'antd';
import * as defaultSettingsUtil from '@/utils/defaultSettingsUtil';
import BizTable from '@/components/BizTable';

/* 测试 UI 组件 BizTable */
describe('BizTable component', () => {

    const defaultProps = {
        loading: false,
        pagination: Object.assign({}, {
            current: 1,
            pageSize: 15,
            total: 2
        }, defaultSettingsUtil.pagination),
        data: [{id: 1}, {id: 2}],
        getData: sinon.fake(),
        updateParams: sinon.fake()
    };
    let defaultWrapper;

    beforeEach(() => {
        defaultWrapper = mount(<BizTable {...defaultProps}/>);
    });

    // ...

    /* 测试是否渲染了正确的功能子组件 */
    test('should render table and pagination', () => {
        /* 是否渲染了 Table 组件 */
        expect(defaultWrapper.find(Table).exists()).toBe(true);
        /* 是否渲染了 分页器 组件,样式是否正确(mini) */
        expect(defaultWrapper.find('.ant-table-pagination.mini').exists()).toBe(true);
    });

    /* 测试首次加载时数据列表为空是否发起加载数据请求 */
    test('when componentDidMount and data is empty, should getData', () => {
        sinon.spy(BizTable.prototype, 'componentDidMount');
        const props = Object.assign({}, defaultProps, {
            pagination: Object.assign({}, {
                current: 1,
                pageSize: 15,
                total: 0
            }, defaultSettingsUtil.pagination),
            data: []
        });
        const wrapper = mount(<BizTable {...props}/>);

        expect(BizTable.prototype.componentDidMount.calledOnce).toBe(true);
        expect(props.getData.calledOnce).toBe(true);
        BizTable.prototype.componentDidMount.restore();
    });

    /* 测试 table 翻页后是否正确触发 updateParams */
    test('when change pagination of table, should updateParams', () => {
        const table = defaultWrapper.find(Table);
        table.props().onChange({current: 2, pageSize: 25});
        expect(defaultProps.updateParams.lastCall.args[0])
            .toEqual({paging: {current: 2, pageSize: 25}});
    });
});
得益於設計分層的合理性,我們很容易利用構造props來達到測試目的,結合enzyme和sinon ,測試用例依然保持簡單的節奏。
以上就是這個場景完整的測試用例編寫思路和示例代碼,文中提及的思路方法也完全可以用在Vue 、 Angular項目上。完整的代碼內容在這裡(重要的事情多說幾遍,各位童鞋覺得好幫忙去給個哈)。
最後我們可以利用覆蓋率來看下用例的覆蓋程度是否足夠(一般來說不用刻意追求100%,根據實際情況來定):
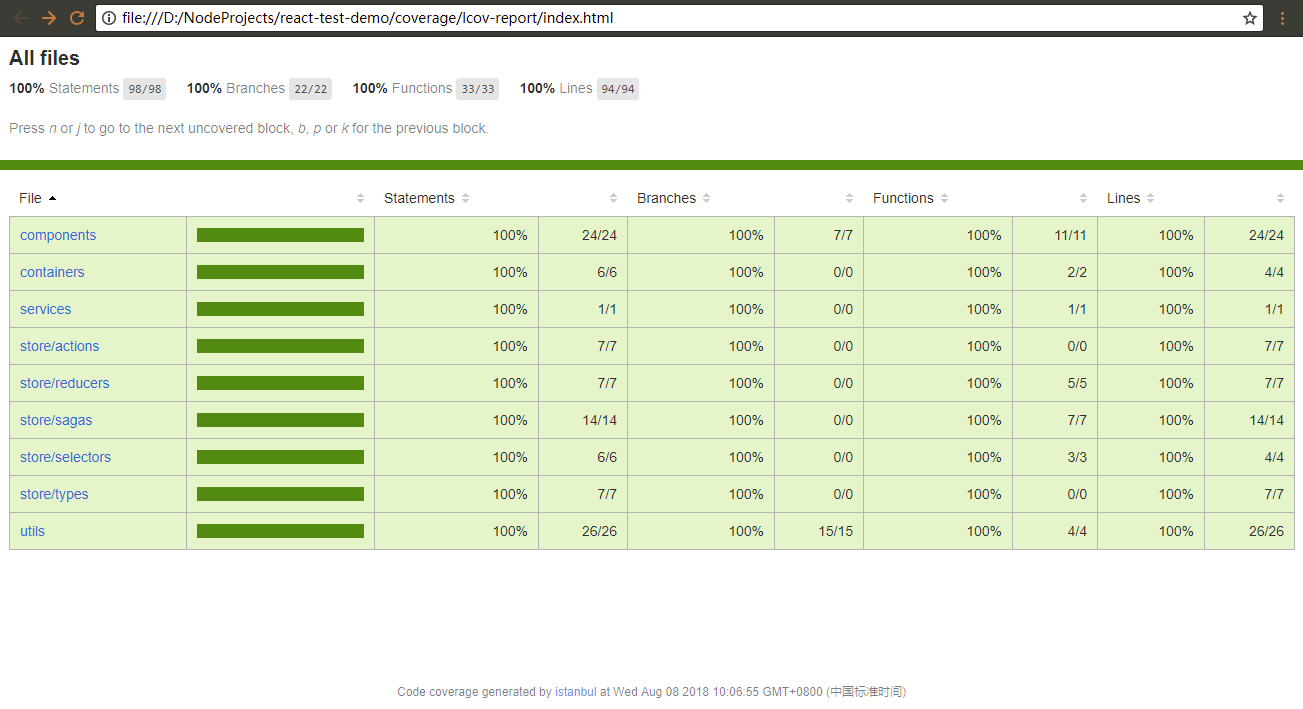
單元測試是TDD 測試驅動開發的基礎。從以上整個過程可以看出,好的設計分層是很容易編寫測試用例的,單元測試不單單只是為了保證代碼質量:他會逼著你思考代碼設計的合理性,拒絕麵條代碼?
借用Clean Code 的結束語:
2005 年,在參加於丹佛舉行的敏捷大會時,Elisabeth Hedrickson 遞給我一條類似Lance Armstrong 熱銷的那種綠色腕帶。這條腕帶上面寫著“沉迷測試”(Test Obsessed)的字樣。我高興地戴上,並自豪地一直系著。自從1999 年從Kent Beck 那兒學到TDD 以來,我的確迷上了測試驅動開發。
不過跟著就發生了些奇事。我發現自己無法取下腕帶。不僅是因為腕帶很緊,而且那也是條精神上的緊箍咒。那腕帶就是我職業道德的宣告,也是我承諾盡己所能寫出最好代碼的提示。取下它,彷彿就是違背了這些宣告和承諾似的。
所以它還在我的手腕上。在寫代碼時,我用余光瞟見它。它一直提醒我,我做了寫出整潔代碼的承諾。


