fbcp ili9341
1.0.0
Эра FBCP-ILI9341 подошла к концу. FBCP-ILI9341 был построен на вершине видеокурсинга Raspberry Pi Dispmanx.
Тем не менее, этот API уже некоторое время устарел Фондом Raspberry Pi и, наконец, устарел (= недоступен) на Raspberry Pi 5 и далее.
У более поздних дистрибутов Raspberry Pi больше не есть Dispmanx по умолчанию даже для PI0-PI4, но вместо этого Raspberry Pi перешел в более новый стек композиторов драйверов KMS, который имеет другую абстракцию для интеграции драйверов дисплея SPI. Другие люди разрабатывают драйверы дисплея SPI для PI, которые совместимы со стеком KMS. Перейдите в эту ветку форума Raspberry Pi, чтобы узнать больше.
Этот репозиторий хорошо считается архивированным/устаревшим, хотя я не отмечаю его архивное, используя функцию GitHub, поскольку эта функция, по-видимому, также сделает проблему трекера только для чтения. Не стесняйтесь продолжать обсуждать проблемы на трекере.
Этот репозиторий реализует драйвер для определенных ЖК-дисплеев на основе SPI для Raspberry Pi A, B, 2, 3, 4 и ноль.

Работа была мотивирована любопытством после просмотра этой серии видео на канале Retromancave YouTube:
В этих видео автобус SPI (GPIO) называется узким местом. Обновление на основе SPI отображает обновление через последовательную шину данных, передавая один бит на цикл тактового цикла на шине. Следовательно, дисплей 320x240x16bpp, следовательно, требует тактовой частоты шины SPI 73,728 МГц для достижения полной частоты обновления 60 кадров в секунду. Не многие контроллеры SPI LCD могут сообщить об этом быстрое на практике, но они ограничены, например, на тактовую частоту шины SPI 16-50 МГц, значительно ограничивая максимальную скорость обновления. Можем ли мы что -нибудь с этим сделать?
Проект FBCP-ILI9341 начался как драйвер дисплея для дисплея ADAFRUIT 2,8 "320x240 TFT с сенсорным экраном для Raspberry Pi-дисплея, который использует контроллер ILI9341. На этом дисплее FBCP-ILI9341 может достичь скорости обновления 60 кадров в секунду. Это отображается.
Учитывая, что шина SPI может быть так ограничена на пропускной способности, почему FBCP-ILI9341, кажется, может обновляться со скоростью до 60 кадров в секунду? То, как это достигается, является тем, что можно назвать адаптивными обновлениями потока дисплея . Вместо того, чтобы загружать каждый пиксель в каждом цикле обновления дисплея, на дисплей отправляются только фактически измененные пиксели на экране. Это выполнимо, потому что контроллер ILI9341, как многие другие популярные контроллеры, имеют функции интерфейса связи, которые позволяют определять частичные обновления экрана, вплоть до субректангл или даже отдельных уровней пикселей. Это позволяет превзойти предел полосы пропускания: например, в Quake, даже если это игра быстрого стимуляции, в среднем только около 46% всех пикселей при изменении экрана каждый визуализированный кадр. Некоторые части, такие как пользовательский интерфейс, остаются практически постоянными по нескольким кадрам.
Другие оптимизации также используются, чтобы выжать еще большую производительность:
#define NO_INTERLACING в файле config.h )Результатом является то, что шина SPI можно сохранить почти 100% насыщенность, ~ 94-97% обычного, чтобы максимизировать скорость использования шины, в то время как передача практически минимальное количество байтов, необходимых для описания каждой новой кадры.
Драйвер был проверен на работу (по крайней мере, в какой -то момент в прошлом) в следующих системах:
Хотя не все советы активно протестируются, так что, особенно на старых досках. (Исправление ошибок Добро пожаловать, используйте https://elinux.org/rpi_hardwarehistory, чтобы определить, на какой доске вы работаете)
Были протестированы следующие ЖК -дисплеи:
Проверьте следующие разделы, чтобы настроить драйвер.
Этот драйвер не использует драйвер рамного буфера Notro/FBTFT, поэтому это необходимо отключить, если он активен. То есть, если в вашем файле /boot/config.txt есть строки, которые выглядят как dtoverlay=pitft28r, ... , dtoverlay=waveshare32b, ... или dtoverlay=flexfb, ... , их следует удалить.
Эта программа не использует драйвер SPI по умолчанию, поэтому такая строка, как dtparam=spi=on in /boot/config.txt также должна быть удалена, чтобы она не вызовет конфликты.
Аналогичным образом, если у вас есть активные Dtoverlays, связанные с контроллером сенсорного контроллера, такие как dtoverlay=ads7846,... или что -то, что имеет директиву penirq= , их следует также удалить, чтобы избежать конфликтов. Было бы возможно добавить поддержку в FBCP-ILI9341, если кто-то хочет нанести удар.
Бегите в консоли вашего малинового пи:
sudo apt-get install cmake
cd ~
git clone https://github.com/juj/fbcp-ili9341.git
cd fbcp-ili9341
mkdir build
cd build
cmake [options] ..
make -j
sudo ./fbcp-ili9341
Обратите внимание, особенно две точки .. на линии Cmake, которая в данном случае обозначает «вверх один каталог» (вместо того, чтобы ссылаться на «Больше элементов, иди здесь»).
Смотрите следующий раздел, чтобы увидеть, что вводить в соответствии с [параметрами] .
Если вы запустили существующий драйвер fbcp , сначала убейте это, например, через sudo pkill fbcp (при запуске в SSH -подсказке или подключено к дисплею HDMI), эти два не могут работать одновременно. If /etc/rc.local или /etc/init.d содержит запись для запуска fbcp при загрузке, эта директива должна быть удалена.
Как правило, существует два способа настроить параметры сборки, в командной строке Cmake и в файле config.h.
В командной строке Cmake можно настроить следующие параметры:
При использовании одного из дисплеев, которые стекают сверху PI, который уже распознается FBCP-ILI9341, вам не нужно указывать задание GPIO, но код FBCP-ILI9341 уже есть. Передайте одну из следующих директив Cmake для шляп:
-DADAFRUIT_ILI9341_PITFT=ON : если вы работаете на Adafruit 2,8 "320x240 TFT с сенсорным экраном для Raspberry Pi (или Adafruit Pitft 2,2" Hat Mini Kit - 320x240 2.2 "TFT - No Touch Display, который является совместимым), передавать это 320x240 2.2" флаг.-DADAFRUIT_HX8357D_PITFT=ON : Если у вас есть Adafruit Pitft - собрано 480x320 3,5 "TFT+сенсорный экран для Raspberry Pi -дисплея, добавьте эту строку.-DFREEPLAYTECH_WAVESHARE32B=ON : Если вы работаете на устройстве Freeplay CM3 или Zero, пропустите этот флаг. (Это не шляпа, но все же предварительно настроенное назначение PIN))-DWAVESHARE35B_ILI9486=ON : Если указано, нацелен на Waveshare 3,5 "480x320 ILI9486 дисплей.-DTONTEC_MZ61581=ON : Если вы работаете на дисплее дисплея Tontec 3,5 "320x480, пропустите это.-DPIRATE_AUDIO_ST7789_HAT=ON : Если указано, нацелены-DWAVESHARE_ST7789VW_HAT=ON : Если указано, нацелены на дисплей HAT 240x240, 1,3 дюйма IPS Display Hat для Raspberry Pi с контроллером дисплея ST7789VW.-DWAVESHARE_ST7735S_HAT=ON : Если указано, нацеливается на шляпу с LCD 128x128, 1,44 дюйма для дисплея Raspberry Pi с контроллером дисплея ST7735S.-DKEDEI_V63_MPI3501=ON : Если указано, нацеливается на Kedei 3,5 -дюймовый SPI TFTLCD 480*320 16BIT/18BIT версии 6.3 2018/4/9 Дисплей с дисплей -контроллером MPI3501. Если вы подключили провода непосредственно на PI вместо использования шляпы из приведенного выше списка, вам необходимо будет использовать указания на конфигурацию ниже. В дополнение к указанию дисплея, вам также необходимо сообщить FBCP-ILI9341, кому вы подключили к подключению. Чтобы настроить контроллер дисплея, передайте один из:
-DILI9341=ON : Если вы работаете на любом другом общем дисплее ILI9341 или на дисплее WaveShare32B, который является автономным, а не на устройстве FreePlayTech CM3/Zero, передайте этот флаг.-DILI9340=ON . Если у вас есть дисплей ILI9340, передайте эту директиву. Чипсеты ILI9340 и ILI9341 очень похожи, но ILI9340 не поддерживает все функции на ILI9341, и они будут отключены или понижены.-DHX8357D=ON : Если у вас есть HX8357D -дисплей, передайте эту директиву.-DSSD1351=ON : Если у вас есть OLED -дисплей SSD1351, используйте это.-DST7735R=ON : Если у вас есть дисплей ST7735R, используйте это.-DST7789=ON .: Если у вас есть дисплей ST7789, используйте это.-DST7789VW=ON : Если у вас есть дисплей ST7789VW, используйте это.-DST7735S=ON : Если у вас есть дисплей ST7735S, используйте это.-DILI9486=ON .: Если у вас есть дисплей ILI9486, передайте эту директиву.-DILI9486L=ON : Если у вас есть дисплей ILI9486L, передайте эту директиву. Обратите внимание, что ILI9486 и ILI9486L совершенно разные, взаимно несовместимые чипы контроллера, поэтому будьте осторожны здесь, определяя, какой у вас есть. (Или просто попробуйте оба, не должны сломаться, если вы неверно идентифицированы)-DILI9488=ON : Если у вас есть дисплей ILI9488, передайте эту директиву.-DMPI3501=ON : Если указано, нацелен на дисплей с контроллером дисплея MPI3501.И, кроме того, передайте следующее для настройки используемых вами заданий GPIO:
-DGPIO_TFT_DATA_CONTROL=number : указывает/переопределяет, какой PIN GPIO использовать для строки Data/Control (DC) на 4-проводной связи SPI. Этот пин -номер указан в номерах PIN -контактов BCM. Если у вас есть 3-проводной SPI-дисплей, который не имеет строки данных/управления, установите это значение на -1 , IE -DGPIO_TFT_DATA_CONTROL=-1 чтобы сообщить FBCP-ILI9341 для Target 3-Wire ("9-BIT") SPI коммуникация.-DGPIO_TFT_RESET_PIN=number : указывает/переопределяет, какой PIN GPIO использовать для линии сброса дисплея. Этот пин -номер указан в номерах PIN -контактов BCM. Если опущен, предполагается, что дисплей не имеет штифта сброса и всегда включена.-DGPIO_TFT_BACKLIGHT=number : указывает/переопределяет, какой штифт GPIO использовать для линии подсветки дисплея. Этот пин -номер указан в номерах PIN -контактов BCM. Если опущен, предполагается, что дисплей не имеет контролируемой GPIO-штифта подсветки и всегда включена. Если это настроить, также см. Опцию #define BACKLIGHT_CONTROL в config.h .FBCP-ILI9341 всегда использует аппаратный порт SPI0, поэтому контакты MISO, MOSI, CLK и CE0 всегда одинаковы и не могут быть изменены. PIN -код MISO на самом деле не используется (по крайней мере, на данный момент), так что вы можете просто пропустить соединение. Если ваш дисплей является мошенничеством, который игнорирует линию включения чипа, вы также можете опустить подключение или также уйти, подключив ее к земле, если вам трудно упростить проводку (в зависимости от дисплея).
Чтобы получить хорошую производительность на дисплее, вы будете управлять дисплеями намного выше номинальных характеристик скорости (номинальные характеристики дают около ~ 10 кадров в секунду в зависимости от дисплея). Из -за этого вам нужно будет явно настроить целевую скорость, на которой вы хотите управлять дисплеем, потому что из -за производственных вариантов каждая копия дисплея достигает различной максимальной скорости. Не существует «скорости по умолчанию», которую будет использовать FBCP-ILI9341. Установка скорости выполняется с помощью опции
-DSPI_BUS_CLOCK_DIVISOR=even_number : Устанавливает номер дивизора часов, который наряду с опцией PI CORE_FREQ = в /boot/config.txt Указывает общую скорость, на которой управляется шина Display SPI SPI. SPI_frequency = core_freq/divisor . SPI_BUS_CLOCK_DIVISOR должен быть равномерным номером. По умолчанию PI 3B и Zero W core_freq составляет 400 МГц, и, как правило, значение -DSPI_BUS_CLOCK_DIVISOR=6 , кажется, является лучшим, что может сделать дисплей ILI9341. Попробуйте большее значение, если на дисплее показывается поврежденный выход или меньшее значение, чтобы получить более высокую полосу пропускания. См. ILI9341.H и Waveshare35B.H для точек данных при настройке максимальной производительности SPI. Безопасное начальное значение может быть чем -то вроде -DSPI_BUS_CLOCK_DIVISOR=30 . Есть несколько вариантов, чтобы явно сказать, на какую доску PI вы хотите нацелиться. Они должны быть автоматическими для вас и, как правило, не нужны, но например, если вы перекрестно компилируете другую плату PI из другой системы или хотите быть явным, вы можете попробовать:
-DSINGLE_CORE_BOARD=ON : передавать эту опцию, если вы работаете на PI, в котором есть только один аппаратный поток (PI Model A, PI Model B, Compute Module 1, PI Zero/Zero W). Если нет, автоснации.-DARMV6Z=ON : передайте эту опцию, чтобы специально оптимизировать для набора инструкций ARMV6Z (Pi 1a, 1a+, 1b, 1b+, Zero, Zero W). Если нет, автоснации.-DARMV7A=ON : передавать эту опцию, чтобы специально оптимизировать для набора инструкций ARMV7-A (PI 2B <Rev 1.2). Если нет, автоснации.-DARMV8A=ON : передайте эту опцию, чтобы специально оптимизировать для набора инструкций ARMV8-A (Pi 2b> = rev. 1.2, 3b, 3b+, cm3, cm3 lite, 4b, cm4, pi400). Если нет, автоснации. Следующие варианты сборки являются общими для всех дисплеев и PI -плат, они дополнительно настраивают сборку:
-DBACKLIGHT_CONTROL=ON : если установлен, позволяет FBCP-ILI9341 управлять подсветкой дисплея в заданном штифте подсветки. Дисплей будет спать после периода бездействия на экране. Если нет, то подсветка не трогается.-DDISPLAY_CROPPED_INSTEAD_OF_SCALING=ON : если установлен, и исходное видео кадр больше, чем разрешение видео -дисплея SPI, исходное видео представлено на дисплее SPI, вырезая его части во всех направлениях, а не масштабируется.-DDISPLAY_BREAK_ASPECT_RATIO_WHEN_SCALING=ON : При масштабировании источника видео на дисплей SPI масштабирование выполняется по умолчанию, следующее соотношение сторон, добавляя письма/столбцы по мере необходимости. Если это установлено, растяжение выполняется по отношению к разрыву.-DSTATISTICS=number : указывает уровень статистики наложения, чтобы показать на экране. 0: Отключено, 1: включено, 2: включено и покажите интервальный график скорости кадров. Значение по умолчанию составляет 1 (включено).-DUSE_DMA_TRANSFERS=OFF : Если указано, отключает с помощью DMA -передачи (за большие расходы по утраченному использованию ЦП). Пройдите эту директиву, если DMA дает некоторые проблемы, например, как шаг для устранения неполадок, если что -то не выглядит правильно.-DDMA_TX_CHANNEL=<num> : Определяет номер канала DMA для использования для команд SPI. Измените это, если вы найдете конфликт канала DMA.-DDMA_RX_CHANNEL=<num> : Указывает номер канала DMA для использования для команд приема SPI. Измените это, если вы найдете конфликт канала DMA.-DDISPLAY_SWAP_BGR=ON : Если эта опция передается, красный и синий цветовые каналы изменены (rgb <--> bgr). Некоторые дисплеи имеют противоположную цветную панель -макеты, которую контроллер дисплея не учитывает автоматически, поэтому определите это, если синие и красные смешиваются.-DDISPLAY_INVERT_COLORS=ON : Если эта опция передается, интерпретация значения цвета пикселя полностью изменена (белый = 0, черный = 31/63). По умолчанию: черный = 0, белый = 31/63. Пропустите эту опцию, если изображение дисплея выглядит как цветной негатив реальных цветов.-DDISPLAY_ROTATE_180_DEGREES=ON : если установлено, отображение вращается на 180 градусов. Это не влияет на выход HDMI, только вывод SPI -дисплея.-DLOW_BATTERY_PIN=<num> : указывает вывод GPIO, который можно опросить, чтобы получить состояние батареи. По умолчанию, когда это будет установлено, будет отображаться значок с низким батареей, если штифт потянут низко (см. config.h для способов, которыми это можно настроить). В дополнение к вышеуказанным директивам CMAKE, существуют различные определения, разбросанные по кодовой базе, в основном в Config.H, которые управляют различными параметрами времени выполнения. Отредактируйте их непосредственно для дальнейшей настройки поведения программы. В частности, после того, как вы закончите с настройкой, вы можете построить с опцией -DSTATISTICS=0 в строке конфигурации Cmake.
Вот полный пример того, что печатать для создания и запуска, если у вас есть Adafruit 2,8 "320x240 TFT с сенсорным экраном для Raspberry Pi с контроллером ILI9341:
 cd ~
sudo apt-get install cmake
git clone https://github.com/juj/fbcp-ili9341.git
cd fbcp-ili9341
mkdir build
cd build
cmake -DSPI_BUS_CLOCK_DIVISOR=6 -DADAFRUIT_ILI9341_PITFT=ON ..
make -j
sudo ./fbcp-ili9341
Если вышесказанное не работает, попробуйте указать -DSPI_BUS_CLOCK_DIVISOR=8 или =10 чтобы дисплей запустил немного медленнее, или попробуйте с -DUSE_DMA_TRANSFERS=OFF устранение неполадок, если DMA может быть проблемой. Если вы используете другой контроллер дисплея, чем ILI9341, используя гораздо более высокое значение, может потребоваться 30 или 40. При изменении вариантов Cmake вы можете переиздать линию директивы Cmake, не отклеивая или воссоздать каталог build . Однако вам может потребоваться вручную удалить файл cmakecache.txt между изменением параметров, чтобы избежать запоминания старых настроек.
Если вы хотите сделать полную перестройку с нуля, вы можете rm -rf build чтобы удалить каталог сборки и воссоздать его для чистого восстановления с нуля. В названии или месте этого каталога нет ничего особенного, это просто мое обычное соглашение. Вы также можете сделать сборку в каком-то другом каталоге относительно каталога FBCP-ILI9341, если хотите.
Чтобы настроить драйвер для запуска при запуске, отредактируйте файл /etc/rc.local в режиме sudo и добавьте строку
sudo /path/to/fbcp-ili9341/build/fbcp-ili9341 & до конца. Запишите необходимые Ampersand & в конце этой линии.
Например, если вы использовали шаги командной строки, перечисленные выше для построения, файл /etc/rc.local получит строку
sudo /home/pi/fbcp-ili9341/build/fbcp-ili9341 & Если имя пользователя вашей установки Raspberry Pi - это нечто иное, кроме pi по умолчанию, соответственно измените каталог, чтобы указать на домашний каталог пользователя. (Используйте pwd , чтобы узнать текущий каталог в терминале)
systemd В качестве альтернативы, вместо изменения /etc/rc.local , используйте предоставленный файл подразделения systemd , как ниже:
sudo install -m 0644 -t /etc fbcp-ili9341.conf
sudo install -m 0644 -t /etc/systemd/system fbcp-ili9341.service
sudo systemctl daemon-reload
sudo systemctl enable fbcp && sudo systemctl start fbcp Если размер вывода HDMI по умолчанию /dev/fb0 отличается от разрешения дисплея, размер исходного видео по умолчанию будет отменен, чтобы соответствовать размеру дисплея SPI. FBCP-ILI9341 будет управлять настройкой этого изменения, если это необходимо, и это будет сделано GPU, поэтому на производительность не следует влиять слишком сильно. Однако, если резолюции не совпадают, небольшой текст, вероятно, будет выглядеть неразборчивым. Изменение размера будет выполнено в соответствии с соотношением сторон, поэтому, если соотношения сторон не совпадают, на дисплее появятся горизонтальные или вертикальные черные границы. Если вы вообще не используете выход HDMI, вероятно, лучше настроить выход HDMI, чтобы соответствовать размеру дисплея SPI, чтобы пересечение не потребовалось. Это можно сделать, установив следующие строки в /boot/config.txt :
 hdmi_group=2
hdmi_mode=87
hdmi_cvt=320 240 60 1 0 0 0
hdmi_force_hotplug=1
Если ваш дисплей SPI имеет другое разрешение, чем 320x240, измените 320 240 часть на EG 480 320 .
Эти строки намекают на собственные приложения о режиме отображения по умолчанию и позволяют им отображаться в собственном разрешении дисплея TFT. Однако это может предотвратить использование разъема HDMI, если дисплей подключенного HDMI не поддерживает такого небольшого разрешения. В качестве компромисса, если как HDMI, так и SPI -дисплеи хотят использоваться одновременно, можно использовать некоторое другое совместимое разрешение, такое как 640x480. См. Документация Raspberry Pi HDMI для доступных вариантов для этого.
Скорость обновления дисплея продиктована тактовой скоростью шины SPI, к которой подключен дисплей. Из -за того, как работает чип BCM2835 на Raspberry Pi, не существует простой speed=xxx Mhz , который можно установить для определения скорости шины. Вместо этого скорость шины SPI получена из двух отдельных параметров: частота основной частоты BCM2835 SOC в целом ( core_freq in /boot/config.txt ) и настройки периферического CDIV (часовой дичь) SPI. Вместе полученная скорость шины SPI затем рассчитывается с помощью формулы SPI_speed=core_freq/CDIV .
Чтобы оптимизировать дисплей, чтобы работать как можно быстрее,
Отрегулируйте значение CDIV , передавая директиву -DSPI_BUS_CLOCK_DIVISOR=number в командной строке Cmake. Возможными значениями являются даже числа 2 , 4 , 6 , 8 , ... Обратите внимание, что, поскольку CDIV появляется в знаменателе в формуле для SPI_speed , меньшие значения приводят к более высокой скорости шины, тогда как более высокие значения делают дисплей медленнее. Первоначально, когда вы не знаете, как быстро может работать ваш дисплей, попробуйте начать с безопасной высокой настройки, такой как -DSPI_BUS_CLOCK_DIVISOR=30 , и перейдите к меньшим числам, чтобы найти максимальную скорость, с которой дисплей может справиться. См. Таблицу в конце Readme для конкретных наблюдаемых максимальных скоростей шины для разных дисплеев.
Обеспечить скорость турбо. Это важно для хорошей частоты кадров. На модели B Raspberry Pi 3 ядра BCM2835 работает по умолчанию при 400 МГц (в результате чего скорость SPI 400/CDIV MHZ), если для PI достаточно мощности, и если температура процессора не превышает термические ограничения. Если процессор простаивает, или напряжение является низким, ядро BCM2835 вместо этого вернется в состояние не-турбо 250 МГц, что приведет к скорости SPI 250/CDIV MHZ. Это влияние скорости турбо на производительность является значительным, поскольку 400 МГц против не-турбо 250 МГц выходит до +60% большей пропускной способности. Получение 60 кадров в секунду в Quask, Sonic или Tyrian часто требует этой турбо -частоты, но, например, игры и эмулированные игры C64 часто могут достигать 60 кадров в секунду даже при запасе 250 МГц. Если по какой-то причине не требуется защита от низкой напряжения, даже когда нужно кормить достаточным количеством мощности, вы можете принудительно принудительно турбо, когда присутствует низкое напряжение, устанавливая значение avoid_warnings=2 в файле /boot/config.txt .
Возможно, немного противоречиво, поднимитесь за ядро. Установка меньшей частоты ядра, чем турбо -400 МГц по умолчанию, может включить использование меньшего перегородка часов, чтобы получить более высокую результирующую скорость шины SPI. Например, если с по умолчанию core_freq=400 spi CDIV=8 работ (что приводит к скорости шины SPI 400MHz/8=50MHz ), но CDIV=6 нет ( 400MHz/6=66.67MHz было слишком много), вы можете попробовать опустить core_freq=360 и установить CDIV=6 чтобы получить эффективную скорость шины SPI 360MHz/6=60MHz , средняя земля между двумя, которые, возможно, могут работать. Опции балансировки core_freq= и CDIV позволяют найти максимальную скорость шины SPI до последних нескольких кГц, которую может терпеть контроллер дисплея. Можно также попробовать противоположное направление и разгонять, но тогда, конечно, есть все проблемы, которые возникают при разгоне. У недостатки есть недостаток, что это делает PI -бег медленнее в целом, так что это, безусловно, компромисс.
С другой стороны, желательно контролировать, сколько времени ЦП FBCP-ILI9341 разрешено использовать. Настройки сборки по умолчанию настроены, чтобы максимизировать скорость обновления дисплея за счет энергопотребления на PI 3B. На Pi Zero выполняется обратное, т.е. по умолчанию драйвер оптимизирует для сохранения батареи вместо максимальной скорости обновления дисплея. Следующие параметры можно контролировать, чтобы сбалансировать между этими двумя:
Основным вариантом управления использованием процессора по сравнению с аспектом производительности является опция #define ALL_TASKS_SHOULD_DMA в config.h . Включение этой опции значительно сократит использование процессора. Если этот вариант отключен, использование шины SPI максимизировалось, но использование процессора может составлять до 80%-120%. Когда эта опция включена, использование ЦП, как правило, составляет около 15-30%. Максимальное использование процессора происходит при просмотре видео или в быстро движущейся игре. Если на экране ничего не меняется, потребление процессора водителя должно опуститься очень близко к 0-5%. По умолчанию #define ALL_TASKS_SHOULD_DMA включен для Pi Zero, но отключен для PI 3B.
Опция CMAKE -DUSE_DMA_TRANSFERS=ON всегда должен быть включен для хорошего низкого использования ЦП. Если передачи DMA отключены, драйвер будет работать в режиме Opred SPI, в котором обычно используется полная специальная единая ядра времени процессора. Если передачи DMA вызывают проблемы, попробуйте настройку каналов DMA SEDENCE и приема для использования для связи SPI с -DDMA_TX_CHANNEL=<num> и -DDMA_RX_CHANNEL=<num> cmake.
Статистическое наложение распечатывает довольно подробную информацию о состоянии выполнения. Отключение наложения с помощью опции -DSTATISTICS=0 на Cmake повышает производительность и снижает использование ЦП. Если вы хотите продолжать печатать статистику, вы можете попробовать увеличить интервал с помощью опции #define STATISTICS_REFRESH_INTERVAL <timeInMicroseconds> в config.h.
Включение #define USE_GPU_VSYNC снижает потребление ЦП, но из -за Raspberrypi/Userland #440 может вызвать заикание. Отключение #defined USE_GPU_VSYNC производит меньше заикания, но из -за Raspberrypi/Userland #440 увеличивает энергопотребление ЦП.
Опция #define SELF_SYNCHRONIZE_TO_GPU_VSYNC_PRODUCED_NEW_FRAMES может использоваться в сочетании с #define USE_GPU_VSYNC чтобы попытаться найти среднюю землю между Raspberrypi/Userlard #440 -й выпусками - умеренно и мало заикающимися, не пытаясь употреблять слишком много CPU. Попробуйте экспериментировать с включением или отключением этой настройки.
Существует несколько параметров #define SAVE_BATTERY_BY_x в config.h, которые все по умолчанию будут включены. Это должно быть безопасно использовать всегда без компромиссов. Если вы испытываете проблемы, связанные с задержкой или результатами, вы можете попытаться переключить их для устранения неполадок.
Опция #define DISPLAY_FLIP_ORIENTATION_IN_SOFTWARE действительно вызывает немного дополнительного использования ЦП, поэтому отключение его немного осветляет загрузку ЦП.
Если ваша шина SPI -дисплея может работать очень быстро по сравнению с размером дисплея и объемом изменяющегося контента на экране, вы можете попытаться включить #define UPDATE_FRAMES_IN_SINGLE_RECTANGULAR_DIFF опция в config.h чтобы уменьшить использование ЦП за счет увеличения Количество байтов, отправленных через автобус. Наблюдалось, что это оказывает большое влияние на PI Zero, поэтому стоит проверить, особенно там.
Если шина дисплея SPI может работать очень очень быстро (или вам не волнует config.h кадров, но примерно на низком использовании процессора), вы можете попытаться включить #define UPDATE_FRAMES_WITHOUT_DIFFING вариант вообще. Это вернется к наивным полным обновлениям для абсолютно минимального общего использования процессора.
Опция #define RUN_WITH_REALTIME_THREAD_PRIORITY может быть включена, чтобы драйвер был запускаться при приоритете процесса в реальном времени. Однако это может заблокировать систему, но все еще доступно для расширенных экспериментов.
В display.h есть опция #define TARGET_FRAME_RATE <number> . Установка этого до меньшего значения, например, 30, будет торговать ставку обновления, чтобы снизить потребление процессора.
Приятный аспект FBCP-ILI9341 заключается в том, что он вводит очень небольшую задержку накладных расходов: на освежающем дисплее ILI9341 на 119 Гц, FBCP-ILI9341 получает пиксели в качестве ответа от ввода GPIO на экран, в течение менее 16,66 MSECS. У меня есть только камера записи 120 кадров в секунду, поэтому я не могу легко измерить задержки короче, но грубая статистическая оценка видеозаписей замедленного движения показывает, что эта задержка может составлять всего 2-3 мсек, в которой преобладает скорость обновления панели ~ 8,4 мс. ILI9341.
Это не означает, что общий вклад для отображения задержки в играх был бы настолько непосредственно. Краткое тестирование эмулированной игры NES по ретропии предполагает общую задержку около 60-80 мсек. Эта задержка вызвана накладными расходами на эмулятор игры NES и дополнительной задержкой, добавленной с помощью рендеринга Linux, Dispmanx и GPU, и снимка кадров GPU. (Если вы запустили FBCP-ILI9341 в качестве статической библиотеки, обходящей Dispmanx и стека GPU, непосредственно связав свой ввод GPIO и логику применения с FBCP-ILI9341, вы сможете спуститься на эти несколько MSEC общей задержки, как показано в Выше входное видео GPIO)
Интересно, что FBCP-ILI9341 на примерно ~ 33 мс. Быстрее, чем дешевый дисплей kedei HDMI. Задержка накладных расходов.
К сожалению, ограничение дисплеев, подключенных к SPI, состоит в том, что сигнал линии VSYNC не доступен на контроллерах дисплея, когда они работают в режиме SPI, поэтому невозможно сделать заблокированные обновления VSYNC, даже если полоса пропускания шины SPI на дисплее была достаточно быстрой быстро Полем Например, дисплеи 4 ILI9341, которые у меня есть, могут работать быстрее, чем 75 МГц, поэтому пропускная способность шины SPI все они смогут обновить полный кадр менее чем в интервале VSYNC, но невозможно синхронизировать обновления. vsync since the display controllers do not report it. (If you do know of a display that does actually expose a vsync clock signal even in SPI mode, you can try implementing support to locking on to it)
You can however choose between two distinct types of tearing artifacts: straight line tearing and diagonal tearing . Whichever looks better is a bit subjective, which is why both options exist. I prefer the straight line tearing artifact, it seems to be less intrusive than the diagonal tearing one. To toggle this, edit the option #define DISPLAY_FLIP_ORIENTATION_IN_SOFTWARE in config.h . When this option is enabled, fbcp-ili9341 produces straight line tearing, and consumes a tiny few % more CPU power. By default Pi 3B builds with straight line tearing, and Pi Zero with the faster diagonal tearing. Check out the video Latency and tearing test #2: GPIO input to display latency in fbcp-ili9341 and tearing modes to see in slow motion videos how these two tearing modes look like.
Another option that is known to affect how the tearing artifact looks like is the internal panel refresh rate. For ILI9341 displays this refresh rate can be adjusted in ili9341.h , and this can be set to range between ILI9341_FRAMERATE_61_HZ and ILI9341_FRAMERATE_119_HZ (default). Slower refresh rates produce less tearing, but have higher input-to-display latency, whereas higher refresh rates will result in the opposite. Again visually the resulting effect is a bit subjective.
To get tearing free updates, you should use a DPI display, or a good quality HDMI display. Beware that cheap small 3.5" HDMI displays such as KeDei do also tear - that is, even if they are controlled via HDMI, they don't actually seem to implement VSYNC timed internal operation.
Having no vsync is not all bad though, since with the lack of vsync, SPI displays have the opportunity to obtain smoother animation on content that is not updating at 60Hz. It is possible that content on the SPI display will stutter even less than what DPI or HDMI displays on the Pi can currently provide (although I have not been able to test this in detail, except for the KeDei case above).
The main option that affects smoothness of display updates is the #define USE_GPU_VSYNC line in config.h . If this is enabled, then the internal Pi GPU HDMI vsync clock is used to drive frames onto the display. The Pi GPU clock runs at a fixed rate that is independent of the content. This rate can be discovered by running tvservice -s on the Pi console, and is usually 59Hz or 60Hz. If your application renders at this rate, animation will look smooth, but if not, there will be stuttering. For example playing a PAL NES game that updates at 50Hz with HDMI clock set at 60Hz will cause bad microstuttering in video output if #define USE_GPU_VSYNC is enabled.
If USE_GPU_VSYNC is disabled, then a busy spinning GPU frame snapshotting thread is used to drive the updates. This will produce smoother animation in content that does not maintain a fixed 60Hz rate. Especially in OpenTyrian, a game that renders at a fixed 36fps and has slowly scrolling scenery, the stuttering caused by USE_GPU_VSYNC is particularly visible. Running on Pi 3B without USE_GPU_VSYNC enabled produces visually smoother looking scrolling on an Adafruit 2.8" ILI9341 PiTFT set to update at 119Hz, compared to enabling USE_GPU_VSYNC on the same setup. Without USE_GPU_VSYNC , the dedicated frame polling loop thread "finds" the 36Hz update rate of the game, and then pushes pixels to the display at this exact rate. This works nicely since SPI displays disregard vsync - the result is that frames are pushed out to the SPI display immediately as they become available, instead of pulling them at a fixed 60Hz rate like HDMI does.
A drawback is that this kind of polling consumes more CPU time than the vsync option. The extra overhead is around +34% of CPU usage compared to the vsync method. It also requires using a background thread, and because of this, it is not feasible to be used on a single core Pi Zero. If this polling was unnecessary, this mode would also work on a Pi Zero, and without the added +34% CPU overhead on Pi 3B. See the Known Issues section below for more details.

There are two other main options that affect frame delivery timings, #define SELF_SYNCHRONIZE_TO_GPU_VSYNC_PRODUCED_NEW_FRAMES and #define SAVE_BATTERY_BY_PREDICTING_FRAME_ARRIVAL_TIMES . Check out the video fbcp-ili9341 frame delivery smoothness test on Pi 3B and Adafruit ILI9341 at 119Hz for a detailed side by side comparison of these different modes. The conclusions drawn from the four tested scenarios in the video are:
1. vc_dispmanx_vsync_callback() (top left) , set #define USE_GPU_VSYNC and unset #define SELF_SYNCHRONIZE_TO_GPU_VSYNC_PRODUCED_NEW_FRAMES :
This mode uses the DispmanX HDMI vsync signal callback to drive frames to the display.
Плюсы:
Cons:
2. vc_dispmanx_vsync_callback() + self synchronization (top right) , set #define USE_GPU_VSYNC and #define SELF_SYNCHRONIZE_TO_GPU_VSYNC_PRODUCED_NEW_FRAMES :
This mode uses the GPU vsync signal, but also aims to find and synchronize to the edge trigger when content is producing frames. This is the default build mode on Pi Zero.
Плюсы:
Cons:
3. gpu polling thread + sleep heuristic (bottom left) , unset #define USE_GPU_VSYNC and set #define SAVE_BATTERY_BY_PREDICTING_FRAME_ARRIVAL_TIMES :
This mode runs a dedicated background thread that drives frames from the GPU to the SPI display. This is the default build mode on Pi 3B.
Плюсы:
Cons:
4. gpu polling thread without sleeping (bottom right) , unset #define USE_GPU_VSYNC and unset #define SAVE_BATTERY_BY_PREDICTING_FRAME_ARRIVAL_TIMES :
This mode runs the dedicated GPU thread as fast as possible, without attempting to sleep CPU.
Плюсы:
Cons:
Be aware of the following limitations:
vc_dispmanx_snapshot() API, and the obtained pixels are then routed on to the SPI-based display. This kind of polling is performed, since there does not exist an event-based mechanism to get new frames from the GPU as they are produced. The result is inefficient and can easily cause stuttering, since different applications produce frames at different paces. Ideally the code would ask the VideoCore API to receive finished frames in callback notifications immediately after they are rendered , but this kind of functionality does not exist in the current GPU driver stack. In the absence of such event delivery mechanism, the code has to resort to polling snapshots of the display framebuffer using carefully timed heuristics to balance between keeping latency and stuttering low, while not causing excessive power consumption. These heuristics keep continuously guessing the update rate of the animation on screen, and they have been tuned to ensure that CPU usage goes down to 0% when there is no detected activity on screen, but it is certainly not perfect. This GPU limitation is discussed at raspberrypi/userland#440. If you'd like to see fbcp-ili9341 operation reduce latency, stuttering and power consumption, please throw a (kind!) comment or a thumbs up emoji in that bug thread to share that you care about this, and perhaps Raspberry Pi engineers might pick the improvement up on the development roadmap. If this issue is resolved, all of the #define USE_GPU_VSYNC , #define SAVE_BATTERY_BY_PREDICTING_FRAME_ARRIVAL_TIMES and #define SELF_SYNCHRONIZE_TO_GPU_VSYNC_PRODUCED_NEW_FRAMES hacks from the previous section could be deleted from the driver, hopefully leading to a best of all worlds scenario without drawbacks. /boot/config.txt and configure all applications to never change that at runtime. 400/250=+60% as well. Therefore when choosing the SPI CDIV value to use, one has to pick one that works for both idle and turbo clock speeds. Conversely, the BCM core reverts to non-turbo speed when there is only light CPU load active, and this slows down the display, so if an application is graphically intensive but light on CPU, the SPI display bus does not get a chance to run at maximum speeds. A way to work around this is to force the BCM core to always stay in its turbo state with force_turbo=1 option in /boot/config.txt , but this has an unfortunate effect of causing the ARM CPU to always run in turbo speed as well, consuming excessive amounts of power. At the time of writing, there does not yet exist a good solution to have both power saving and good performance. This limitation is being discussed in more detail at raspberrypi/firmware#992. For more known issues and limitations, check out the bug tracker, especially the entries marked retired , for items that are beyond current scope.
By default fbcp-ili9341 builds with a statistics overlay enabled. See the video fbcp-ili9341 ported to ILI9486 WaveShare 3.5" (B) SpotPear 320x480 SPI display to find details on what each field means. Build with CMake option -DSTATISTICS=0 to disable displaying the statistics. You can also try building with CMake option -DSTATISTICS=2 to show a more detailed frame delivery timings histogram view, see screenshot and video above.
The fbcp part in the name means framebuffer copy ; specifically for the ILI9341 controller. fbcp-ili9341 is not actually a framebuffer copying driver, it does not create a secondary framebuffer that it would copy bytes across to from the primary framebuffer. It is also no longer a driver only for the ILI9341 controller. A more appropriate name might be userland-raspi-spi-display-driver or something like that, but the original name stuck.
Yes, it does, although not quite as well as on Pi 3B. If you'd like it to run better on a Pi Zero, leave a thumbs up at raspberrypi/userland#440 - hard problems are difficult to justify prioritizing unless it is known that many people care about them.
Edit the file config.h and comment out the line #define DISPLAY_OUTPUT_LANDSCAPE . This will make the display output in portrait mode, effectively rotating it by 90 degrees. Note that this only affects the pixel memory reading mode of the display. It is not possible to change the panel scan order to run between landscape and portrait, the SPI displays typically always scan in portrait mode. The result is that it will change the panel vsync tearing mode from "straight line tearing" over to "diagonal tearing" (see the section About Tearing above).
If you do not want to have diagonal tearing, but would prefer straight line tearing, then additionally enable the option #define DISPLAY_FLIP_ORIENTATION_IN_SOFTWARE in config.h . That will restore straight line tearing, but it will also increase overall CPU consumption.
Enable the option #define DISPLAY_ROTATE_180_DEGREES in config.h . This should rotate the SPI display to show up the other way around, while keeping the HDMI connected display orientation unchanged. Another option is to utilize a /boot/config.txt option display_rotate=2, which rotates both the SPI output and the HDMI output.
Note that the setting DISPLAY_ROTATE_180_DEGREES only affects the pixel memory reading mode of the display. It is not possible to flip the panel scan to run inverted by 180 degrees. This means that adjusting these settings will also have effects of changing the visual appearance of the vsync tearing artifact. If you have the ability to mount the display 180 degrees around in your project, it is recommended to do that instead of using the DISPLAY_ROTATE_180_DEGREES option.
Edit the file config.h in a text editor (a command line one such as pico , vim , nano , or SSH map the drive to your host), and find the appropriate line in the file. Add comment lines // in front of that text to disable the option, or remove the // characters to enable it.
After having edited and saved the file, reissue make -j in the build directory and restart fbcp-ili9341.
Some options are passed to the build from the CMake configuration script. You can run with make VERBOSE=1 to see which configuration items the CMake build is passing. See the above Configuring Build Options section to customize the CMake configure items. For example, to remove the statistics overlay, pass -DSTATISTICS=0 directive to CMake.
Building requires CMake to be installed on the Pi: try sudo apt-get install cmake .
Try deleting CMakeCache.txt between changing CMake settings.
Yes, both work fine. For linux command line terminal, the /dev/tty1 console should be set to output to Linux framebuffer 0 ( /dev/fb0 ). This is the default mode of operation and there do not exist other framebuffers in a default distribution of Raspbian, but if you have manually messed with the con2fbmap command in your installation, you may have inadvertently changed this configuration. Run con2fbmap 1 to see which framebuffer the /dev/tty1 console is outputting to, it should print console 1 is mapped to framebuffer 0 . Type con2fbmap 1 0 to reset console 1 back to outputting to framebuffer 0.
Likewise, the X windowing system should be configured to render to framebuffer 0. This is by default the case. The target framebuffer for X windowing service is usually configured via the FRAMEBUFFER environment variable before launching X. If X is not working by default, you can try overriding the framebuffer by launching X with FRAMEBUFFER=/dev/fb0 startx instead of just running startx .
I don't know, I don't currently have any to test. Perhaps the code does need some model specific configuration, or perhaps it might work out of the box. I only have Pi 3B, Pi 3B+, Pi Zero W and a Pi 3 Compute Module based systems to experiment on. Pi 2 B has been reported to work by users (#17).
If the display controller is one of the currently tested ones (see the list above), and it is wired up to run using 4-line SPI, then it should work. Pay attention to configure the Data/Control GPIO pin number correctly, and also specify the Reset GPIO pin number if the device has one.
If the display controller is not one of the tested ones, it may still work if it is similar to one of the existing ones. For example, ILI9340 and ILI9341 are practically the same controller. You can just try with a specific one to see how it goes.
If fbcp-ili9341 does not support your display controller, you will have to write support for it. fbcp-ili9341 does not have a "generic SPI TFT driver routine" that might work across multiple devices, but needs specific code for each. If you have the spec sheet available, you can ask for advice, but please do not request to add support to a display controller "blind", that is not possible.
Возможно. This is a more recent experimental feature that may not be as stable, and there are some limitations, but 3-wire ("9-bit") SPI display support is now available. If you have a 3-wire SPI display, ie one that does not have a Data/Control (DC) GPIO pin to connect, configure it via CMake with directive -DGPIO_TFT_DATA_CONTROL=-1 to tell fbcp-ili9341 that it should be driving the display with 3-wire protocol.
Current limitations of 3-wire communication are:
ALL_TASKS_SHOULD_DMA is currently not supported, there is an issue with DMA chaining that prevents this from being enabled. As result, CPU usage on 3-wire displays will be slightly higher than on 4-wire displays.OFFLOAD_PIXEL_COPY_TO_DMA_CPP is currently not supported. As a result, 3-wire displays may not work that well on single core Pis like Pi Zero.No. Those are completely different technologies altogether. It should be possible to port the driver algorithm to work on I2C however, if someone is interested.
At the moment one cannot utilize the XPT2046/ADS7846 touch controllers while running fbcp-ili9341, so touch is mutually incompatible with this driver. In order for fbcp-ili9341 to function, you will need to remove all dtoverlay s in /boot/config.txt related to touch.
I have done close to everything possible to my displays - cut power in middle of operation, sent random data and command bytes, set their operating voltage commands and clock timings to arbitrary high and low values, tested unspecified and reserved command fields, and driven the displays dozens of MHz faster than they managed to keep up with, and I have not yet done permanent damage to any of my displays or Pis.
Easiest way to do permanent damage is to fail at wiring, eg drive 5 volts if your display requires 3.3v, or short a connection, or something similar.
The one thing that fbcp-ili9341 stays clear off is that it does not program the non-volatile memory areas of any of the displays. Therefore a hard power off on a display should clear all performed initialization and reset the display to its initial state at next power on.
That being said, if it breaks, you'll get to purchase a new shiny one to replace it.
Yes, fbcp-ili9341 shows the output of the HDMI display on the SPI screen, and both can be attached at the same time. A HDMI display does not have to be connected however, although fbcp-ili9341 operation will still be affected by whatever HDMI display mode is configured. Check out tvservice -s on the command line to check what the current DispmanX HDMI output mode is.
At the moment fbcp-ili9341 has been developed to only display the contents of the main DispmanX GPU framebuffer over to the SPI display. That is, the SPI display will show the same picture as the HDMI output does. There is no technical restriction that requires this though, so if you know C/C++ well, it should be a manageable project to turn fbcp-ili9341 to operate as an offscreen display library to show a completely separate (non-GPU-accelerated) image than what the main HDMI display outputs. For example you could have two different outputs, eg a HUD overlay, a dashboard for network statistics, weather, temps, etc. showing on the SPI while having the main Raspberry Pi desktop on the HDMI.
In this kind of mode, you would probably strip the DispmanX bits out of fbcp-ili9341, and recast it as a static library that you would link to in your drawing application, and instead of snapshotting frames, you can then programmatically write to a framebuffer in memory from your C/C++ code.
Unfortunately there are a number of things to go wrong that all result in a white screen. This is probably the hardest part to diagnose. Some ideas:
This suggests that the power line or the backlight line might not be properly connected. Or if the backlight connects to a GPIO pin on the Pi (and not a voltage pin), then it may be that the pin is not in correct state for the backlight to turn on. Most of the LCD TFT displays I have immediately light up their backlight when they receive power. The Tontec one has a backlight GPIO pin that boots up high but must be pulled low to activate the backlight. OLED displays on the other hand seem to stay all black even after they do get power, while waiting for their initialization to be performed, so for OLEDs it may be normal for nothing to show up on the screen immediately after boot.
If the backlight connects to a GPIO pin, you may need to define -DGPIO_TFT_BACKLIGHT=<pin> in CMake command line or config.h , and edit config.h to enable #define BACKLIGHT_CONTROL .
fbcp-ili9341 runs a clear screen command at low speed as first thing after init, so if that goes through, it is a good sign. Try increasing -DSPI_BUS_CLOCK_DIVISOR= CMake option to a higher number to see if the display driving rate was too fast. Or try disabling DMA with -DUSE_DMA_TRANSFERS=OFF to see if this might be a DMA conflict.
This suggests same as above, increase SPI bus divisor or troubleshoot disabling DMA. If DMA is detected to be the culprit, try changing up the DMA channels. Double check that /boot/config.txt does not have any dtoverlay s regarding other SPI display drivers or touch screen controllers, and that it does NOT have a dtparam=spi=on line in it - fbcp-ili9341 does not use the Linux kernel SPI driver.
Make sure other fbcp programs are not running, or that another copy of fbcp-ili9341 is not running on the background.
This is likely caused by the program resizing the video resolution at runtime, which breaks DispmanX. See raspberrypi/userland#461 for more details.
Check that the Pi is powered off of a power supply that can keep up with the voltage, and the low voltage icon is not showing up. (remove any avoid_warnings=1/2 directive from /boot/config.txt if that was used to get rid of warnings overlay, to check that voltage is good) It has been observed that if there is not enough power supplied, the display can be the first to starve, while the Pi might keep on running fine. Try removing turbo settings or lowering the clock speed if you have overclocked to verify that the display crash is not power usage related.
Also try lowering SPI bus speed to a safe lower value, eg half of the maximum speed that the display was able to manage.
Double check the Data/Command (D/C) GPIO pin physically, and in CMake command line. Whenever fbcp-ili9341 refers to pin numbers, they are always specified in BCM pin numbers. Try setting a higher -DSPI_BUS_CLOCK_DIVISOR= value to CMake. Make sure no other fbcp programs or SPI drivers or dtoverlays are enabled.
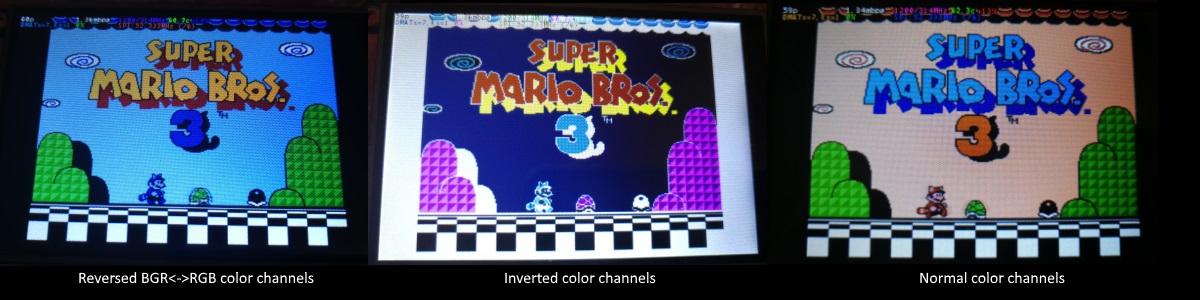
If the color channels are mixed (red is blue, blue is red, green is green) like shown on the left image, pass the CMake option -DDISPLAY_SWAP_BGR=ON to the build.
If the color intensities look wrong (white is black, black is white, color looks like a negative image) like seen in the middle image, pass the CMake option -DDISPLAY_INVERT_COLORS=ON to the build.
If the colors looks off in some other fashion, it is possible that the display is just being driven at a too high SPI bus speed, in which case try making the display run slower by choosing a higher -DSPI_BUS_CLOCK_DIVISOR= option to CMake. Especially on ILI9486 displays it has been observed that the colors on the display can become distorted if the display is run too fast beyond its maximum capability.
fbcp-ili9341 needs a few megabytes of GPU memory to function if DMA transfers are enabled. The gpu_mem boot config option dictates how much of the Pi's memory area is allocated to the GPU. By default this is 64MB, which has been observed to not leave enough memory for fbcp-ili9341 if HDMI is run at 1080p. If this error happens, try increasing GPU memory to eg 128MB by adding a line gpu_mem=128 in /boot/config.txt .
As the number of supported displays, Raspberry Pi device models, Raspbian/Retropie/Lakka OS versions, accompanied C++ compiler versions and fbcp-ili9341 build options have grown in number, there is a combinatorial explosion of all possible build modes that one can put the codebase through, so it is not easy to keep every possible combo tested all the time. Something may have regressed or gotten outdated. Stay calm, and report a bug.
You can also try looking through the commit history to find changes related to your configuration combo, to see if there's a mention of a known good commit in time that should work for your case. If you get an odd compiler error on cmake or make lines, those will usually be very easy to fix, as they are most of the time a result of some configurational oversight.
First, make sure the display is a 4-wire SPI and not a 3-wire one. A display is 4-wire SPI if it has a Data/Control (DC) GPIO line that needs connecting. Sometimes the D/C pin is labeled RS (Register Select). Support for 3-wire SPI displays does exist, but it is experimental and not nearly as well tested as 4-wire displays.
Second is the consideration about display speed. Below is a performance chart of the different displays I have tested. Note that these are sample sizes of one, I don't know how much sample variance there exists. Also I don't know if it is likely that there exists big differences between displays with same controller from different manufacturers. At least the different ILI9341 displays that I have are all quite consistent on performance, whether they are from Adafruit or WaveShare or from BuyDisplay.com.
| Продавец | Размер | Разрешение | Контроллер | Rated SPI Bus Speed | Obtained Bus Speed | Frame Rate |
|---|---|---|---|---|---|---|
| Adafruit PiTFT | 2.8" | 240x320 | ILI9341 | 10MHz | 294MHz/4=73.50MHz | 59.81 fps |
| Adafruit PiTFT | 2.2" | 240x320 | ILI9340 | 15.15MHz | 338MHz/4=84.50MHz | 68.76 fps |
| Adafruit PiTFT | 3.5" | 320x480 | HX8357D | 15.15MHz | 314MHz/6=52.33MHz | 21.29 fps |
| Adafruit OLED | 1.27" | 128x96 | SSD1351 | 20MHz | 360MHz/20=18.00MHz | 91.55 fps |
| Waveshare RPi LCD (B) IPS | 3.5" | 320x480 | ILI9486 | 15.15MHz | 255MHz/8=31.88MHz | 12.97 fps |
| maithoga TFT LCD | 3.5" | 320x480 | ILI9486L | 15.15MHz | 400MHz/8=50.00MHz | 13.56 fps* |
| BuyDisplay.com SPI TFT copy #1 | 3.2" | 240x320 | ILI9341 | 10MHz | 310MHz/4=77.50MHz | 63.07 fps |
| BuyDisplay.com SPI TFT copy #2 | 3.2" | 240x320 | ILI9341 | 10MHz | 300MHz/4=75.00MHz | 61.03 fps |
| Arduino A000096 LCD | 1.77" | 128x160 | ST7735R | 15.15MHz | 355MHz/6=59.16MHz | 180.56 fps |
| Tontec MZ61581-PI-EXT 2016.1.28 | 3.5" | 320x480 | MZ61581 | 128MHz | 280MHz/2=140.00MHz | 56.97 fps |
| Adafruit 240x240 Wide Angle TFT | 1.54" | 240x240 | ST7789 | ? | 340MHz/4=85.00MHz | 92.23 fps |
| WaveShare 240x240 Display HAT | 1.3" | 240x240 | ST7789VW | 62.5MHz | 338MHz/4=84.50MHz | 91.69 fps |
| WaveShare 128x128 Display HAT | 1.44" | 128x128 | ST7735S | 15.15MHz | (untested) | (untested) |
| KeDei v6.3 | 3.5" | 320x480 | MPI3501 | ? | 400MHz/12=33.333MHz | 4.8fps ** |
In this list, Rated SPI Bus Speed is the maximum clock speed that the display controller is rated to run at. The Obtained Bus Speed column lists the fastest SPI bus speed that was achieved in practice, and the core_freq BCM Core speed and SPI Clock Divider CDIV setting that was used to achieve that rate. Note how most display controllers can generally be driven much faster than what they are officially rated at in their spec sheets.
The Frame Rate column shows the worst case frame rate when full screen updates are being performed. This occurs for example when watching fullscreen video (that is not a flat colored cartoon). Because fbcp-ili9341 only sends over the pixels that have changed, displays such as HX8357D and ILI9486 can still be used to play many games at 60fps. Retro games work especially well.
All the ILI9341 displays work nice and super fast at ~70-80MHz. My WaveShare 3.5" 320x480 ILI9486 display runs really slow compared to its pixel resolution, ~32MHz only. See fbcp-ili9341 ported to ILI9486 WaveShare 3.5" (B) SpotPear 320x480 SPI display for a video of this display in action. Adafruit's 320x480 3.5" HX8357D PiTFTs is ~64% faster in comparison.
The ILI9486L controller based maithoga display runs a bit faster than ILI9486 WaveShare, 50MHz versus 31.88MHz, ie +56.8% bandwidth increase. However fps-wise maithoga reaches only 13.56 vs WaveShare 12.97 fps, because the bandwidth advantage is fully lost in pixel format differences: ILI9486L requires transmitting 24 bits per each pixel (R6G6B6 mode), whereas ILI9486 supports 16 bits per pixel R5G6B5 mode. This is reflected in the above chart refresh rate for the maithoga display (marked with a star).
If manufacturing variances turn out not to be high between copies, and you'd like to have a bigger 320x480 display instead of a 240x320 one, then it is recommended to avoid ILI9486, they indeed are slow.
The KeDei v6.3 display with MPI3501 controller takes the crown of being horrible, in all aspects imaginable. It is able to run at 33.33 MHz, but due to technical design limitations of the display (see #40), effective bus speed is halved, and only about 72% utilization of the remaining bus rate is achieved. DMA cannot be used, so CPU usage will be off the charts. Even though fbcp-ili9341 supports this display, level of support is expected to be poor, because the hardware design is a closed secret without open documentation publicly available from the manufacturer. Stay clear of KeDei or MPI3501 displays.
The Tontec MZ61581 controller based 320x480 3.5" display on the other hand can be driven insanely fast at up to 140MHz! These seem to be quite hard to come by though and they are expensive. Tontec seems to have gone out of business and for example the domain itontec.com from which the supplied instructions sheet asks to download original drivers from is no longer registered. I was able to find one from eBay for testing.
Search around, or ask the manufacturer of the display what the maximum SPI bus speed is for the device. This is the most important aspect to getting good frame rates, but unfortunately most web links never state the SPI speed rating, or they state it ridiculously low like in the spec sheets. Try and buy to see, or ask in some community forums from people who already have a particular display to find out what SPI bus speed it can achieve.
One might think that since Pi Zero is slower than a Pi 3, the SPI bus speed might not matter as much when running on a Pi Zero, but the effect is rather the opposite. To get good framerates on a Pi Zero, it should be paired with a display with as high SPI bus speed capability as possible. This is because the higher the SPI bus speed is, the more autonomously a DMA controller can drive it without CPU intervention. For the same reason, the interlacing technique does not (currently at least) perform well on a Pi Zero, so it is disabled there by default. ILI9341s run well on Pi Zero, ILI9486 on the other hand is quite difficult to combine with a Pi Zero.
Ultimately, it should be noted that parallel displays (DPI) are the proper method for getting fast framerates easily. SPI displays should only be preferred if display form factor is important and a desired product might only exist as SPI and not as DPI, or the number of GPIO pins that are available on the Pi is scarce that sacrificing dozens of pins to RGB data is not достижимый.
Hardware-wise, there are six different ways to connect displays to the Pi. Here are the pros and cons of each:
Displays are generally manufactured to utilize one specific interfacing method, with the exception that some displays have a both I²C and SPI modes that can be configured via soldering.
Fbcp-ili9341 driver is about interfacing with SPI displays. If your display utilizes some other connection mechanism, fbcp-ili9341 will not apply.
Software-wise, there are two possible alternatives to fbcp-ili9341:
The following links proved helpful when writing this:
If you would like to help push Raspberry Pi SPI display support further, there are always more things to do in the project. Here is a list of ideas and TODOs for recognized work items to contribute, roughly rated in order of increasing difficulty.
top / htop , or with a power meter off the wall and report the results.SPI_3WIRE_PROTOCOL + ALL_TASKS_SHOULD_DMA to work together, or 3) fix up SPI_3WIRE_PROTOCOL + OFFLOAD_PIXEL_COPY_TO_DMA_CPP to work together.ALL_TASKS_SHOULD_DMA mode to be always superior in performance and CPU usage so that the non- ALL_TASKS_SHOULD_DMA path can be dropped from the codebase. (probably requires the above chaining to function efficiently)This driver is licensed under the MIT License. See LICENSE.txt. In nonlegal terms, it's yours for both free and commercial projects, DIY packages, kickstarters, Etsys and Ebays, and you don't owe back a dime. Feel free to apply and derive as you wish.
If you found fbcp-ili9341 useful, it makes me happy to hear back about the projects it found a home in. If you did a build or a project where fbcp-ili9341 worked out, it'd be great to see a video or some photos or read about your experiences.
I hope you build something you enjoy!
Best way to discuss the driver is to open a GitHub issue. You may also be able to find me over at sudomod.com Discord channel.


