fbcp ili9341
1.0.0
Era FBCP-ILI9341 telah berakhir. FBCP-ILI9341 dibangun di atas Videocore Dispmanx API Raspberry Pi.
Namun, API ini telah ditinggalkan oleh Raspberry Pi Foundation untuk sementara waktu sekarang, dan akhirnya usang (= tidak tersedia) di Raspberry Pi 5 dan dan seterusnya.
Distro Raspberry Pi kemudian tidak lagi memiliki Dispmanx aktif secara default bahkan untuk PI0-PI4, tetapi Raspberry Pi telah pindah ke Stack Kompositor Driver KMS yang lebih baru, yang memiliki abstraksi berbeda untuk mengintegrasikan driver tampilan SPI. Orang lain sedang mengembangkan driver tampilan SPI untuk PI yang kompatibel dengan tumpukan KMS. Pergilah ke utas forum Raspberry Pi ini untuk mempelajari lebih lanjut.
Repositori ini baik untuk dianggap diarsipkan/basi, meskipun saya tidak menandainya diarsipkan menggunakan fitur GitHub, karena fitur itu tampaknya juga akan membuat pelacak masalah hanya membaca. Jangan ragu untuk terus mendiskusikan masalah pada pelacak.
Repositori ini mengimplementasikan driver untuk tampilan LCD berbasis SPI tertentu untuk raspberry pi a, b, 2, 3, 4 dan nol.

Pekerjaan itu dimotivasi oleh rasa ingin tahu setelah melihat serangkaian video ini di saluran YouTube Retromancave:
Dalam video ini, bus SPI (GPIO) disebut hambatan. SPI berbasis menampilkan pembaruan melalui bus data serial, mentransmisikan satu bit per siklus jam di bus. Tampilan 320x240x16bpp karenanya membutuhkan laju jam bus SPI 73.728MHz untuk mencapai frekuensi refresh 60fps penuh. Tidak banyak pengontrol LCD SPI yang dapat mengomunikasikan ini dalam praktiknya, tetapi dibatasi untuk EG kecepatan jam bus SPI 16-50MHz, menutup laju pembaruan maksimum secara signifikan. Bisakah kita melakukan sesuatu tentang ini?
Proyek FBCP-ILI9341 dimulai sebagai driver tampilan untuk ADAFRUIT 2.8 "320x240 TFT W/ Touch Screen untuk layar Raspberry Pi yang menggunakan pengontrol ILI9341. Pada tampilan itu, FBCP-ILI9341 dapat mencapai tingkat pembaruan 60FPS, tergantung pada kontennya, FBCP-ILI9341 dapat mencapai tingkat pembaruan 60FPS, tergantung pada kontennya pada seluruhnya di antara seluruhnya di antara seluruhnya pada tanggal satu di antara kedua pada tanggal satu pada tanggal satu di antara seluruhnya pada tanggal satu di antara ke dalam kontennya pada tanggal satu di antara ke dalam kontennya pada tanggal satu di antara seluruhnya di antara ke dalam kontennya pada tanggal satu pada tanggal satu di antara ke dalam kontennya pada tanggal satu pada tanggal satu di antara ke dalam kontennya pada tanggal satu di antara ke dalam kontennya pada tanggal satu pada tanggal satu pada tanggal satu di antara seluruhnya pada tanggal satu pada tanggal satu di antara seluruhnya pada tanggal satu pada tanggal satu di antara seluruh tanggal. yang sedang ditampilkan.
Mengingat bahwa bus SPI dapat begitu dibatasi pada bandwidth, bagaimana mungkin FBCP-ILI9341 tampaknya dapat memperbarui hingga 60fps? Cara ini dicapai adalah dengan apa yang bisa disebut pembaruan aliran display adaptif . Alih -alih mengunggah setiap piksel pada setiap siklus penyegaran tampilan, hanya piksel yang benar -benar diubah di layar yang dikirimkan ke layar. Ini bisa dilakukan karena pengontrol ILI9341, karena banyak pengontrol populer lainnya, memiliki fungsi antarmuka komunikasi yang memungkinkan menentukan pembaruan layar parsial, turun ke subrectangles atau bahkan tingkat piksel individu. Ini memungkinkan mengalahkan batas bandwidth: misalnya dalam gempa, meskipun ini adalah permainan mondar -mandir yang cepat, rata -rata hanya sekitar 46% dari semua piksel pada perubahan layar masing -masing bingkai yang diberikan. Beberapa bagian, seperti UI tetap praktis konstan di berbagai frame.
Optimalisasi lain juga digunakan untuk memeras lebih banyak kinerja:
#define NO_INTERLACING di file config.h )Hasilnya adalah bahwa bus SPI dapat dijaga hampir 100% saturasi, ~ 94-97% biasa, untuk memaksimalkan tingkat pemanfaatan bus, sementara hanya mentransmisikan secara praktis jumlah minimum byte yang diperlukan untuk menggambarkan setiap kerangka baru.
Pengemudi telah diperiksa untuk bekerja (setidaknya beberapa titik di masa lalu) pada sistem berikut:
Meskipun tidak semua papan diuji secara aktif, jadi YMMV terutama di papan yang lebih tua. (Perbaikan bug Selamat datang, gunakan https://elinux.org/rpi_hardwarehistory untuk mengidentifikasi papan mana yang Anda jalankan)
Tampilan LCD berikut telah diuji:
Periksa bagian berikut untuk mengatur pengemudi.
Driver ini tidak menggunakan driver NOTRO/FBTFT FRAMBUFFER, sehingga perlu dinonaktifkan jika aktif. Yaitu, jika file /boot/config.txt Anda memiliki baris yang terlihat seperti dtoverlay=pitft28r, ... , dtoverlay=waveshare32b, ... atau dtoverlay=flexfb, ... , itu harus dihapus.
Program ini tidak menggunakan driver SPI default, jadi garis seperti dtparam=spi=on dalam /boot/config.txt juga harus dihapus sehingga tidak akan menyebabkan konflik.
Demikian juga, jika Anda memiliki dtoverlay terkait pengontrol sentuh aktif, seperti dtoverlay=ads7846,... atau apa pun yang memiliki penirq= arahan, itu harus dihapus juga untuk menghindari konflik. Dimungkinkan untuk menambahkan dukungan sentuh ke FBCP-ILI9341 jika seseorang ingin menusuknya.
Jalankan di konsol Raspberry Pi Anda:
sudo apt-get install cmake
cd ~
git clone https://github.com/juj/fbcp-ili9341.git
cd fbcp-ili9341
mkdir build
cd build
cmake [options] ..
make -j
sudo ./fbcp-ili9341
Perhatikan terutama dua titik .. di garis cmake, yang menunjukkan "naik satu direktori" dalam hal ini (alih -alih merujuk pada "lebih banyak item pergi ke sini").
Lihat bagian selanjutnya untuk melihat apa yang harus dimasukkan di bawah [opsi] .
Jika Anda telah menjalankan driver fbcp yang ada, pastikan untuk menghapus EG itu melalui sudo pkill fbcp terlebih dahulu (saat berjalan di SSH Prompt atau terhubung ke layar HDMI), keduanya tidak dapat berjalan pada saat yang sama. If /etc/rc.local atau /etc/init.d berisi entri untuk memulai fbcp saat boot, arahan itu harus dihapus.
Umumnya ada dua cara untuk mengonfigurasi opsi build, di baris perintah cmake, dan di file config.h.
Pada baris perintah CMake, opsi berikut dapat dikonfigurasi:
Saat menggunakan salah satu tampilan yang menumpuk di atas PI yang sudah dikenali oleh FBCP-ILI9341, Anda tidak perlu menentukan penugasan pin GPIO, tetapi kode FBCP-ILI9341 sudah memiliki itu. Lulus salah satu arahan CMake berikut untuk topi:
-DADAFRUIT_ILI9341_PITFT=ON : Jika Anda menjalankan layar adafruit 2.8 "320x240 tft dengan raspberry pi (atau tft pitft 2.2" hat kit ini - 320x240 2.2 "TFT - Tanpa Layar Sentuh, Yang Kompatibel), yang disahkan ini), ini adalah kompatibel ini), melewati ini), melewati ini), melewati ini), melewati ini), melewati ini), melewati ini), melewati ini), melewati ini), melewati ini), melewati ini), melewati ini), melewati ini), melewati ini), disahkan ini) bendera.-DADAFRUIT_HX8357D_PITFT=ON : Jika Anda memiliki pitft Adafruit - dirakit 480x320 3.5 "TFT+TouchScreen untuk tampilan Raspberry Pi, tambahkan baris ini.-DFREEPLAYTECH_WAVESHARE32B=ON : Jika Anda berjalan di freePlay CM3 atau nol perangkat, lewati bendera ini. (Ini bukan topi, tapi masih merupakan penugasan pin yang telah dikonfigurasi sebelumnya)-DWAVESHARE35B_ILI9486=ON : jika ditentukan, menargetkan tampilan Waveshare 3.5 "480x320 ILI9486.-DTONTEC_MZ61581=ON : Jika Anda menjalankan tampilan tampilan LCD Tontec 3.5 "320x480, lewati ini.-DPIRATE_AUDIO_ST7789_HAT=ON : jika ditentukan, menargetkan audio bajak laut 240x240, 1.3inch IPS LCD Display Hat untuk Raspberry Pi dengan pengontrol tampilan ST7789-DWAVESHARE_ST7789VW_HAT=ON : Jika ditentukan, menargetkan topi tampilan 240x240, 1.3inch IPS LCD untuk raspberry pi dengan pengontrol tampilan ST7789VW.-DWAVESHARE_ST7735S_HAT=ON : Jika ditentukan, menargetkan topi tampilan LCD 128x128, 1.44inch untuk raspberry pi dengan pengontrol tampilan ST7735S.-DKEDEI_V63_MPI3501=ON : Jika ditentukan, menargetkan ketei 3,5 inci SPI TFTLCD 480*320 16bit/18bit Versi 6.3 2018/4/9 Tampilan dengan pengontrol tampilan MPI3501. Jika Anda menghubungkan kabel langsung pada PI alih -alih menggunakan topi dari daftar di atas, Anda harus menggunakan arahan konfigurasi di bawah ini. Selain menentukan tampilan, Anda juga perlu memberi tahu FBCP-ILI9341 pin gpio mana yang Anda kabel koneksi. Untuk mengonfigurasi pengontrol tampilan, lulus salah satu dari:
-DILI9341=ON : Jika Anda menjalankan layar ILI9341 generik lainnya, atau pada tampilan Waveshare32b yang mandiri dan bukan pada perangkat FreeplayTech CM3/Zero, lulus bendera ini.-DILI9340=ON : Jika Anda memiliki layar ILI9340, lewati arahan ini. Chipset ILI9340 dan ILI9341 sangat mirip, tetapi ILI9340 tidak mendukung semua fitur pada ILI9341 dan mereka akan dinonaktifkan atau diturunkan peringkatnya.-DHX8357D=ON : Jika Anda memiliki tampilan HX8357D, lewati arahan ini.-DSSD1351=ON : Jika Anda memiliki tampilan OLED SSD1351, gunakan ini.-DST7735R=ON : Jika Anda memiliki tampilan ST7735R, gunakan ini.-DST7789=ON : Jika Anda memiliki tampilan ST7789, gunakan ini.-DST7789VW=ON : Jika Anda memiliki tampilan ST7789VW, gunakan ini.-DST7735S=ON : Jika Anda memiliki tampilan ST7735S, gunakan ini.-DILI9486=ON : Jika Anda memiliki tampilan ILI9486, lewati arahan ini.-DILI9486L=ON : Jika Anda memiliki tampilan ILI9486L, lewati arahan ini. Perhatikan bahwa ILI9486 dan ILI9486L sangat berbeda, chip pengontrol yang saling tidak kompatibel, jadi berhati -hatilah di sini mengidentifikasi mana yang Anda miliki. (Atau coba keduanya, tidak boleh rusak jika Anda salah diidentifikasi)-DILI9488=ON : Jika Anda memiliki tampilan ILI9488, lewati arahan ini.-DMPI3501=ON : Jika ditentukan, menargetkan tampilan dengan pengontrol tampilan MPI3501.Dan selain itu, berikan yang berikut ini untuk menyesuaikan penugasan pin GPIO yang Anda gunakan:
-DGPIO_TFT_DATA_CONTROL=number : Menentukan/mengesampingkan pin GPIO mana yang akan digunakan untuk baris data/kontrol (DC) pada komunikasi SPI 4-kawat. Nomor pin ini ditentukan dalam nomor pin BCM. Jika Anda memiliki tampilan SPI 3-kawat yang tidak memiliki baris data/kontrol, atur nilai ini ke -1 , yaitu -DGPIO_TFT_DATA_CONTROL=-1 untuk memberi tahu FBCP-ILI9341 untuk menargetkan 3-wire ("9-bit") SPI komunikasi.-DGPIO_TFT_RESET_PIN=number : Menentukan/mengesampingkan pin GPIO mana yang akan digunakan untuk baris reset tampilan. Nomor pin ini ditentukan dalam nomor pin BCM. Jika dihilangkan, diasumsikan bahwa layar tidak memiliki pin reset, dan selalu aktif.-DGPIO_TFT_BACKLIGHT=number : Menentukan/mengesampingkan pin GPIO mana yang akan digunakan untuk garis lampu latar tampilan. Nomor pin ini ditentukan dalam nomor pin BCM. Jika dihilangkan, diasumsikan bahwa layar tidak memiliki pin lampu latar yang dikendalikan GPIO, dan selalu menyala. Jika mengatur ini, lihat juga opsi #define BACKLIGHT_CONTROL di config.h .FBCP-ILI9341 selalu menggunakan port perangkat keras SPI0, sehingga pin MISO, MOSI, CLK dan CE0 selalu sama dan tidak dapat diubah. Pin miso sebenarnya tidak digunakan (setidaknya saat ini), jadi Anda bisa melewatkan menghubungkan yang itu. Jika tampilan Anda adalah Rogue yang mengabaikan garis Enable Chip, Anda dapat menghilangkan menghubungkannya juga, atau mungkin juga dapat lolos dengan menghubungkannya ke ground jika Anda sulit menekan untuk menyederhanakan kabel (tergantung pada tampilan).
Untuk mendapatkan kinerja yang baik dari layar, Anda akan mengarahkan tampilan jauh di atas spesifikasi kecepatan yang dinilai (hasil spesifikasi pengenal sekitar ~ 10fps tergantung pada tampilan). Karena ini, Anda perlu secara eksplisit mengkonfigurasi kecepatan target yang ingin Anda kendarai tampilan, karena karena varian manufaktur, setiap salinan tampilan mencapai kecepatan maksimum yang berbeda. Tidak ada "kecepatan default" yang akan digunakan FBCP-ILI9341. Mengatur kecepatan dilakukan melalui opsi
-DSPI_BUS_CLOCK_DIVISOR=even_number : Mengatur nomor pembagi jam yang bersama dengan PI core_freq = opsi di /boot/config.txt menentukan kecepatan keseluruhan yang didorong oleh bus komunikasi SPI. SPI_frequency = core_freq/divisor . SPI_BUS_CLOCK_DIVISOR harus menjadi angka genap. Default PI 3B dan Zero W core_freq adalah 400MHz, dan umumnya nilai -DSPI_BUS_CLOCK_DIVISOR=6 tampaknya menjadi yang terbaik yang dapat dilakukan oleh tampilan ILI9341. Coba nilai yang lebih besar jika tampilan menunjukkan output korup, atau nilai yang lebih kecil untuk mendapatkan bandwidth yang lebih tinggi. Lihat ILI9341.H dan WAVESHARE35B.H untuk titik data tentang penyetelan kinerja SPI maksimum. Nilai awal yang aman bisa menjadi sesuatu seperti -DSPI_BUS_CLOCK_DIVISOR=30 . Ada beberapa opsi untuk secara eksplisit mengatakan papan PI mana yang ingin Anda targetkan. Ini harus di -autodeksi untuk Anda dan umumnya tidak diperlukan, tetapi misalnya jika Anda silang kompilasi untuk papan PI lain dari sistem lain, atau ingin eksplisit, Anda dapat mencoba:
-DSINGLE_CORE_BOARD=ON : Lewati opsi ini jika Anda menjalankan PI yang hanya memiliki satu utas perangkat keras (PI Model A, PI Model B, Hitung Modul 1, Pi Zero/Zero W). Jika tidak ada, Autodeteksi.-DARMV6Z=ON : Lewati opsi ini untuk secara khusus mengoptimalkan set instruksi ARMV6Z (PI 1A, 1A+, 1B, 1B+, nol, nol W). Jika tidak ada, Autodeteksi.-DARMV7A=ON : Lewati opsi ini untuk secara khusus mengoptimalkan untuk set instruksi ARMV7-A (PI 2B <Rev 1.2). Jika tidak ada, Autodeteksi.-DARMV8A=ON : Lewati opsi ini untuk secara khusus mengoptimalkan set instruksi ARMV8-A (pi 2b> = rev. 1.2, 3b, 3b+, cm3, cm3 lite, 4b, cm4, pi400). Jika tidak ada, Autodeteksi. Opsi build berikut ini umum untuk semua tampilan dan papan PI, mereka selanjutnya menyesuaikan build:
-DBACKLIGHT_CONTROL=ON : if diatur, memungkinkan FBCP-ILI9341 untuk mengontrol lampu latar tampilan di pin lampu latar yang diberikan. Layar akan tidur setelah periode tidak aktif di layar. Jika tidak, lampu latar tidak disentuh.-DDISPLAY_CROPPED_INSTEAD_OF_SCALING=ON : if diatur, dan bingkai video sumber lebih besar dari resolusi video tampilan SPI, video sumber disajikan pada tampilan SPI dengan memangkas bagian -bagiannya ke segala arah, alih -alih penskalaan yang sesuai.-DDISPLAY_BREAK_ASPECT_RATIO_WHEN_SCALING=ON : Saat skala sumber video ke tampilan SPI, penskalaan dilakukan secara default rasio aspek berikut, menambahkan kotak huruf/kotak pilar sesuai kebutuhan. Jika ini ditetapkan, peregangan dilakukan rasio aspek pemutusan.-DSTATISTICS=number : Menentukan tingkat statistik overlay untuk ditampilkan di layar. 0: Dinonaktifkan, 1: Diaktifkan, 2: Diaktifkan, dan tampilkan grafik interval frame rate juga. Nilai default adalah 1 (diaktifkan).-DUSE_DMA_TRANSFERS=OFF : Jika ditentukan, menonaktifkan menggunakan transfer DMA (dengan biaya besar penggunaan CPU yang hilang). Lewati arahan ini jika DMA memberikan beberapa masalah, misalnya sebagai langkah pemecahan masalah jika ada sesuatu yang tidak terlihat benar.-DDMA_TX_CHANNEL=<num> : Menentukan nomor saluran DMA yang akan digunakan untuk perintah kirim SPI. Ubah ini jika Anda menemukan konflik saluran DMA.-DDMA_RX_CHANNEL=<num> : Menentukan nomor saluran DMA yang akan digunakan untuk perintah penerima SPI. Ubah ini jika Anda menemukan konflik saluran DMA.-DDISPLAY_SWAP_BGR=ON : Jika opsi ini dilewati, saluran warna merah dan biru dibalik (RGB <-> BGR) pertukaran. Beberapa tampilan memiliki tata letak subpiksel panel warna yang berlawanan yang tidak diperhitungkan oleh pengontrol tampilan secara otomatis, jadi tentukan ini jika biru dan merah dicampur.-DDISPLAY_INVERT_COLORS=ON : Jika opsi ini dilewatkan, interpretasi nilai warna piksel dibalik (putih = 0, hitam = 31/63). Default: hitam = 0, putih = 31/63. Lewati opsi ini jika gambar tampilan terlihat seperti warna negatif dari warna yang sebenarnya.-DDISPLAY_ROTATE_180_DEGREES=ON : if diatur, tampilan diputar 180 derajat. Ini tidak mempengaruhi output HDMI, hanya output tampilan SPI.-DLOW_BATTERY_PIN=<num> : Menentukan pin GPIO yang dapat disurvei untuk mendapatkan status baterai. Secara default, ketika ini diatur, ikon baterai rendah akan ditampilkan jika pin ditarik rendah (lihat config.h untuk cara -cara di mana ini dapat diubah). Selain arahan CMake di atas, ada berbagai definisi yang tersebar di sekitar basis kode, sebagian besar di config.h, yang mengontrol opsi runtime yang berbeda. Edit yang secara langsung untuk selanjutnya menyetel perilaku program. Secara khusus, setelah Anda selesai dengan pengaturan, Anda mungkin ingin membangun dengan -DSTATISTICS=0 opsi di baris konfigurasi cmake.
Berikut adalah contoh lengkap tentang apa yang harus diketik dan dijalankan, jika Anda memiliki ADAFRUIT 2.8 "320x240 TFT W/ Layar Sentuh untuk Raspberry Pi dengan Pengontrol ILI9341:
 cd ~
sudo apt-get install cmake
git clone https://github.com/juj/fbcp-ili9341.git
cd fbcp-ili9341
mkdir build
cd build
cmake -DSPI_BUS_CLOCK_DIVISOR=6 -DADAFRUIT_ILI9341_PITFT=ON ..
make -j
sudo ./fbcp-ili9341
Jika hal di atas tidak berfungsi, coba tentukan -DSPI_BUS_CLOCK_DIVISOR=8 atau =10 untuk membuat layar berjalan sedikit lebih lambat, atau coba dengan -DUSE_DMA_TRANSFERS=OFF untuk memecahkan masalah jika DMA mungkin menjadi masalah. Jika Anda menggunakan pengontrol tampilan lain dari ILI9341, menggunakan nilai yang jauh lebih tinggi, seperti 30 atau 40 mungkin diperlukan. Saat mengubah opsi cmake, Anda dapat menerbitkan kembali garis arahan CMake tanpa harus menyatu atau menciptakan kembali direktori build . Namun Anda mungkin perlu menghapus file cmakecache.txt secara manual antara mengubah opsi untuk menghindari cmake mengingat pengaturan lama.
Jika Anda ingin melakukan pembangunan kembali penuh dari awal, Anda dapat rm -rf build untuk menghapus direktori build dan membuatnya kembali untuk pembangunan kembali yang bersih dari awal. Tidak ada yang istimewa tentang nama atau lokasi direktori ini, itu hanya konvensi saya yang biasa. Anda juga dapat melakukan build di beberapa direktori lain relatif terhadap direktori FBCP-ILI9341 jika Anda mau.
Untuk mengatur driver untuk diluncurkan saat startup, edit file /etc/rc.local dalam mode sudo , dan tambahkan baris
sudo /path/to/fbcp-ili9341/build/fbcp-ili9341 & sampai akhir. Catat Ampersand yang dibutuhkan & di akhir baris itu.
Misalnya, jika Anda menggunakan langkah baris perintah yang tercantum di atas untuk membangun, file /etc/rc.local akan menerima baris
sudo /home/pi/fbcp-ili9341/build/fbcp-ili9341 & Jika nama pengguna instalasi Raspberry Pi Anda adalah sesuatu yang lain selain pi default, ubah direktori sesuai untuk menunjuk ke direktori home pengguna. (Gunakan pwd untuk mengetahui direktori saat ini di terminal)
systemd Atau, alih -alih memodifikasi /etc/rc.local , gunakan file unit systemd yang disediakan seperti di bawah ini:
sudo install -m 0644 -t /etc fbcp-ili9341.conf
sudo install -m 0644 -t /etc/systemd/system fbcp-ili9341.service
sudo systemctl daemon-reload
sudo systemctl enable fbcp && sudo systemctl start fbcp Jika ukuran framebuffer HDMI default /dev/fb0 frameBuffer berbeda dari resolusi layar, ukuran video sumber akan secara default disambungkan kembali agar sesuai dengan ukuran layar SPI. FBCP-ILI9341 akan mengelola pengaturan rescaling ini jika diperlukan, dan itu akan dilakukan oleh GPU, sehingga kinerja tidak boleh terlalu banyak terkena dampak. Namun jika resolusi tidak cocok, teks kecil mungkin akan tampak tidak terbaca. Putar ulang akan dilakukan dengan cara pelestarian rasio aspek, jadi jika rasio aspek tidak cocok, baik perbatasan hitam horizontal atau vertikal akan muncul di layar. Jika Anda tidak menggunakan output HDMI sama sekali, mungkin yang terbaik adalah mengonfigurasi output HDMI agar sesuai dengan ukuran tampilan SPI sehingga rescaling tidak akan diperlukan. Ini dapat dilakukan dengan mengatur baris berikut di /boot/config.txt :
 hdmi_group=2
hdmi_mode=87
hdmi_cvt=320 240 60 1 0 0 0
hdmi_force_hotplug=1
Jika layar SPI Anda memiliki resolusi yang berbeda dari 320x240, ubah bagian 320 240 menjadi EG 480 320 .
Baris -baris ini mengisyaratkan aplikasi asli tentang mode tampilan default, dan membiarkannya membuat resolusi asli dari tampilan TFT. Namun ini dapat mencegah penggunaan konektor HDMI, jika tampilan yang terhubung HDMI tidak mendukung resolusi kecil seperti itu. Sebagai kompromi, jika tampilan HDMI dan SPI ingin digunakan secara bersamaan, beberapa resolusi lain yang kompatibel seperti 640x480 dapat digunakan. Lihat dokumentasi Raspberry Pi HDMI untuk opsi yang tersedia untuk melakukan ini.
Kecepatan penyegaran layar ditentukan oleh kecepatan jam bus SPI yang terhubung dengan layar. Karena cara chip BCM2835 pada raspberry pi berfungsi, tidak ada speed=xxx Mhz yang dapat diatur untuk menentukan kecepatan bus. Sebaliknya, kecepatan bus SPI berasal dari dua parameter terpisah: frekuensi inti dari BCM2835 SoC secara umum ( core_freq di /boot/config.txt ), dan pengaturan CDIV periferal SPI (pembagi jam). Bersama -sama, kecepatan bus SPI yang dihasilkan kemudian dihitung dengan rumus SPI_speed=core_freq/CDIV .
Untuk mengoptimalkan tampilan agar berjalan secepat mungkin,
Sesuaikan nilai CDIV dengan meneruskan arahan -DSPI_BUS_CLOCK_DIVISOR=number dalam baris perintah cmake. Nilai yang mungkin adalah angka 2 , 4 , 6 , 8 , ... Perhatikan bahwa karena CDIV muncul di denominator dalam rumus untuk SPI_speed , nilai yang lebih kecil menghasilkan kecepatan bus yang lebih tinggi, sedangkan nilai yang lebih tinggi membuat tampilan menjadi lebih lambat. Awalnya ketika Anda tidak tahu seberapa cepat tampilan Anda dapat berjalan, cobalah mulai dengan pengaturan tinggi yang aman, seperti -DSPI_BUS_CLOCK_DIVISOR=30 , dan bekerja dengan cara Anda ke angka yang lebih kecil untuk menemukan kecepatan maksimum yang dapat diatasi oleh layar. Lihat tabel di akhir readme untuk kecepatan bus maksimum yang diamati untuk tampilan yang berbeda.
Pastikan kecepatan turbo. Ini sangat penting untuk frame rate yang baik. Pada Raspberry Pi 3 Model B, inti BCM2835 berjalan secara default pada 400MHz (menghasilkan kecepatan SPI 400/CDIV MHz) jika ada daya yang cukup yang disediakan untuk PI, dan jika suhu CPU tidak melebihi batas termal. Jika CPU idle, atau tegangan rendah, inti BCM2835 akan kembali ke keadaan non-turbo 250MHz, menghasilkan kecepatan SPI 250/CDIV MHz. Efek kecepatan turbo pada kinerja ini signifikan, karena 400MHz vs non-turbo 250MHz keluar ke +60% dari lebih banyak bandwidth. Mendapatkan 60fps dalam gempa, sonik atau Tyrian sering kali membutuhkan frekuensi turbo ini, tetapi misalnya NE dan C64 yang ditiru game seringkali dapat mencapai 60fps bahkan dengan stok 250MHz. Jika karena beberapa alasan perlindungan di bawah tegangan sedang menendang bahkan ketika daya yang cukup harus diberi makan, Anda dapat memaksa turbo yang dapat mengaktifkan ketika tegangan rendah hadir dengan mengatur nilai avoid_warnings=2 dalam file /boot/config.txt .
Mungkin sedikit berlawanan dengan intuisi, underclock inti. Menetapkan frekuensi inti yang lebih kecil daripada Turbo 400MHz default dapat memungkinkan menggunakan pembagi jam yang lebih kecil untuk mendapatkan kecepatan bus SPI yang dihasilkan lebih tinggi. Misalnya, jika dengan core_freq=400 SPI CDIV=8 karya (menghasilkan kecepatan bus SPI 400MHz/8=50MHz ), tetapi CDIV=6 tidak ( 400MHz/6=66.67MHz terlalu banyak), Anda dapat mencoba menurunkan core_freq=360 dan atur CDIV=6 untuk mendapatkan kecepatan bus SPI yang efektif 360MHz/6=60MHz , jalan tengah antara keduanya yang mungkin berhasil. Menyeimbangkan core_freq= dan opsi CDIV memungkinkan seseorang untuk menemukan kecepatan bus SPI maksimum hingga beberapa kHz terakhir yang dapat ditoleransi oleh pengontrol tampilan. Seseorang juga dapat mencoba arah yang berlawanan dan overclock, tetapi itu tentu saja memiliki semua masalah yang muncul ketika overclocking. Underclocking memang memiliki kelemahan yang membuat PI berjalan lebih lambat secara keseluruhan, jadi ini tentu saja merupakan tradeoff.
Di sisi lain, diinginkan untuk mengontrol berapa banyak waktu CPU FBCP-ILI9341 diizinkan untuk digunakan. Pengaturan pembangunan default disetel untuk memaksimalkan laju penyegaran tampilan dengan mengorbankan konsumsi daya pada PI 3B. Pada pi nol, yang sebaliknya selesai, IE secara default driver mengoptimalkan untuk menghemat baterai alih -alih kecepatan pembaruan tampilan maksimal. Opsi berikut dapat dikontrol untuk menyeimbangkan antara keduanya:
Opsi utama untuk mengontrol penggunaan CPU vs kinerja adalah opsi #define ALL_TASKS_SHOULD_DMA di config.h . Mengaktifkan opsi ini akan sangat mengurangi penggunaan CPU. Jika opsi ini dinonaktifkan, pemanfaatan bus SPI dimaksimalkan tetapi penggunaan CPU dapat mencapai 80%-120%. Ketika opsi ini diaktifkan, penggunaan CPU umumnya hingga sekitar 15%-30%. Penggunaan CPU maksimal terjadi saat menonton video, atau memainkan permainan yang bergerak cepat. Jika tidak ada yang berubah di layar, konsumsi CPU dari pengemudi harus turun sangat dekat dengan 0-5%. Secara default #define ALL_TASKS_SHOULD_DMA diaktifkan untuk pi nol, tetapi dinonaktifkan untuk pi 3b.
Opsi CMAKE -DUSE_DMA_TRANSFERS=ON harus selalu diaktifkan untuk penggunaan CPU rendah yang baik. Jika transfer DMA dinonaktifkan, pengemudi akan dijalankan dalam mode SPI yang disurvei, yang umumnya menggunakan inti tunggal khusus dari waktu CPU. Jika transfer DMA menyebabkan masalah, coba sesuaikan DMA Kirim dan terima saluran untuk digunakan untuk komunikasi SPI dengan -DDMA_TX_CHANNEL=<num> dan -DDMA_RX_CHANNEL=<num> Opsi CMake.
Overlay statistik mencetak informasi yang cukup rinci tentang keadaan eksekusi. Menonaktifkan overlay dengan -DSTATISTICS=0 opsi untuk CMake meningkatkan kinerja dan mengurangi penggunaan CPU. Jika Anda ingin terus mencetak statistik, Anda dapat mencoba meningkatkan interval dengan #define STATISTICS_REFRESH_INTERVAL <timeInMicroseconds> opsi di config.h.
Mengaktifkan #define USE_GPU_VSYNC mengurangi konsumsi CPU, tetapi karena raspberrypi/userland #440 dapat menyebabkan kegagapan. Menonaktifkan #defined USE_GPU_VSYNC menghasilkan lebih sedikit gagap, tetapi karena raspberrypi/userland #440, meningkatkan konsumsi daya CPU.
Opsi #define SELF_SYNCHRONIZE_TO_GPU_VSYNC_PRODUCED_NEW_FRAMES dapat digunakan bersama dengan #define USE_GPU_VSYNC untuk mencoba menemukan jalan tengah antara raspberrypi/userland #440 masalah - moderat kecil hingga sedikit goncang sementara tidak mencoba untuk menyamar terlalu banyak CP. Coba bereksperimen dengan mengaktifkan atau menonaktifkan pengaturan ini.
Ada sejumlah opsi #define SAVE_BATTERY_BY_x di config.h, yang semuanya default untuk diaktifkan. Ini harus aman untuk selalu digunakan tanpa tradeoff. Jika Anda mengalami masalah terkait latensi atau kinerja, Anda dapat mencoba untuk mengubahnya untuk memecahkan masalah.
Opsi #define DISPLAY_FLIP_ORIENTATION_IN_SOFTWARE memang menyebabkan sedikit penggunaan CPU tambahan, sehingga menonaktifkannya akan sedikit meringankan beban CPU.
Jika bus tampilan SPI Anda dapat berjalan sangat cepat dibandingkan dengan ukuran tampilan dan jumlah konten yang berubah pada layar, Anda dapat mencoba mengaktifkan #define UPDATE_FRAMES_IN_SINGLE_RECTANGULAR_DIFF opsi di config.h untuk mengurangi penggunaan CPU dengan mengorbankan peningkatan peningkatan CPU Jumlah byte yang dikirim melalui bus. Ini telah diamati memiliki efek besar pada pi nol, jadi layak untuk dicoba terutama di sana.
Jika bus display SPI dapat berjalan benar -benar benar -benar cepat (atau Anda tidak peduli dengan frame rate, tetapi hanya tentang penggunaan CPU rendah), Anda dapat mencoba mengaktifkan opsi #define UPDATE_FRAMES_WITHOUT_DIFFING di config.h untuk melupakan delta adaptif diffing opsi sama sekali. Ini akan kembali ke pembaruan bingkai penuh naif untuk penggunaan CPU keseluruhan minimum.
Opsi #define RUN_WITH_REALTIME_THREAD_PRIORITY dapat diaktifkan untuk membuat pengemudi dijalankan pada prioritas proses realtime. Namun ini dapat mengunci sistem, tetapi masih tersedia untuk eksperimen lanjutan.
Di display.h ada opsi #define TARGET_FRAME_RATE <number> . Menetapkan ini ke nilai yang lebih kecil, seperti 30, akan menukar tingkat refresh untuk mengurangi konsumsi CPU.
Aspek yang menyenangkan dari FBCP-ILI9341 adalah bahwa ia memperkenalkan overhead latensi yang sangat sedikit: pada tampilan ILI9341 yang menyegarkan 119Hz, FBCP-ILI9341 mendapat piksel sebagai respons dari input GPIO ke layar dalam waktu kurang dari 16,66 msec. Saya hanya memiliki kamera perekaman 120fps, jadi tidak dapat dengan mudah mengukur penundaan lebih pendek dari itu, tetapi perkiraan statistik kasar rekaman video gerak lambat menunjukkan penundaan ini bisa serendah 2-3 msec, yang didominasi oleh laju refresh panel panel ~ 8.4msec dari ILI9341.
Ini tidak berarti bahwa input keseluruhan untuk menampilkan latensi dalam game akan sangat langsung. Menguji secara singkat permainan yang ditiru NES di Retropie menunjukkan latensi total sekitar 60-80 msec. Latensi ini disebabkan oleh overhead Emulator Game NES dan latensi ekstra yang ditambahkan oleh Linux, Dispmanx dan Rendering GPU, dan Snapshotting GPU Framebuffer. ; Video input GPIO di atas)
Menariknya, FBCP-ILI9341 sekitar ~ 33mscs lebih cepat dari layar HDMI 3,5 "dargi yang murah. Saya tidak tahu apakah ini adalah hasil dari tampilan HDMI darf Latensi overhead.
Sayangnya keterbatasan tampilan yang terhubung SPI adalah bahwa sinyal garis vSync tidak tersedia pada pengontrol tampilan saat mereka berjalan dalam mode SPI, sehingga tidak mungkin melakukan pembaruan terkunci vsync bahkan jika bandwidth bus SPI pada layar cukup cepat . For example, the 4 ILI9341 displays I have can all be run faster than 75MHz so SPI bus bandwidth-wise all of them would be able to update a full frame in less than a vsync interval, but it is not possible to synchronize the updates to vsync since the display controllers do not report it. (If you do know of a display that does actually expose a vsync clock signal even in SPI mode, you can try implementing support to locking on to it)
You can however choose between two distinct types of tearing artifacts: straight line tearing and diagonal tearing . Whichever looks better is a bit subjective, which is why both options exist. I prefer the straight line tearing artifact, it seems to be less intrusive than the diagonal tearing one. To toggle this, edit the option #define DISPLAY_FLIP_ORIENTATION_IN_SOFTWARE in config.h . When this option is enabled, fbcp-ili9341 produces straight line tearing, and consumes a tiny few % more CPU power. By default Pi 3B builds with straight line tearing, and Pi Zero with the faster diagonal tearing. Check out the video Latency and tearing test #2: GPIO input to display latency in fbcp-ili9341 and tearing modes to see in slow motion videos how these two tearing modes look like.
Another option that is known to affect how the tearing artifact looks like is the internal panel refresh rate. For ILI9341 displays this refresh rate can be adjusted in ili9341.h , and this can be set to range between ILI9341_FRAMERATE_61_HZ and ILI9341_FRAMERATE_119_HZ (default). Slower refresh rates produce less tearing, but have higher input-to-display latency, whereas higher refresh rates will result in the opposite. Again visually the resulting effect is a bit subjective.
To get tearing free updates, you should use a DPI display, or a good quality HDMI display. Beware that cheap small 3.5" HDMI displays such as KeDei do also tear - that is, even if they are controlled via HDMI, they don't actually seem to implement VSYNC timed internal operation.
Having no vsync is not all bad though, since with the lack of vsync, SPI displays have the opportunity to obtain smoother animation on content that is not updating at 60Hz. It is possible that content on the SPI display will stutter even less than what DPI or HDMI displays on the Pi can currently provide (although I have not been able to test this in detail, except for the KeDei case above).
The main option that affects smoothness of display updates is the #define USE_GPU_VSYNC line in config.h . If this is enabled, then the internal Pi GPU HDMI vsync clock is used to drive frames onto the display. The Pi GPU clock runs at a fixed rate that is independent of the content. This rate can be discovered by running tvservice -s on the Pi console, and is usually 59Hz or 60Hz. If your application renders at this rate, animation will look smooth, but if not, there will be stuttering. For example playing a PAL NES game that updates at 50Hz with HDMI clock set at 60Hz will cause bad microstuttering in video output if #define USE_GPU_VSYNC is enabled.
If USE_GPU_VSYNC is disabled, then a busy spinning GPU frame snapshotting thread is used to drive the updates. This will produce smoother animation in content that does not maintain a fixed 60Hz rate. Especially in OpenTyrian, a game that renders at a fixed 36fps and has slowly scrolling scenery, the stuttering caused by USE_GPU_VSYNC is particularly visible. Running on Pi 3B without USE_GPU_VSYNC enabled produces visually smoother looking scrolling on an Adafruit 2.8" ILI9341 PiTFT set to update at 119Hz, compared to enabling USE_GPU_VSYNC on the same setup. Without USE_GPU_VSYNC , the dedicated frame polling loop thread "finds" the 36Hz update rate of the game, and then pushes pixels to the display at this exact rate. This works nicely since SPI displays disregard vsync - the result is that frames are pushed out to the SPI display immediately as they become available, instead of pulling them at a fixed 60Hz rate like HDMI does.
A drawback is that this kind of polling consumes more CPU time than the vsync option. The extra overhead is around +34% of CPU usage compared to the vsync method. It also requires using a background thread, and because of this, it is not feasible to be used on a single core Pi Zero. If this polling was unnecessary, this mode would also work on a Pi Zero, and without the added +34% CPU overhead on Pi 3B. See the Known Issues section below for more details.

There are two other main options that affect frame delivery timings, #define SELF_SYNCHRONIZE_TO_GPU_VSYNC_PRODUCED_NEW_FRAMES and #define SAVE_BATTERY_BY_PREDICTING_FRAME_ARRIVAL_TIMES . Check out the video fbcp-ili9341 frame delivery smoothness test on Pi 3B and Adafruit ILI9341 at 119Hz for a detailed side by side comparison of these different modes. The conclusions drawn from the four tested scenarios in the video are:
1. vc_dispmanx_vsync_callback() (top left) , set #define USE_GPU_VSYNC and unset #define SELF_SYNCHRONIZE_TO_GPU_VSYNC_PRODUCED_NEW_FRAMES :
This mode uses the DispmanX HDMI vsync signal callback to drive frames to the display.
Pro:
Kontra:
2. vc_dispmanx_vsync_callback() + self synchronization (top right) , set #define USE_GPU_VSYNC and #define SELF_SYNCHRONIZE_TO_GPU_VSYNC_PRODUCED_NEW_FRAMES :
This mode uses the GPU vsync signal, but also aims to find and synchronize to the edge trigger when content is producing frames. This is the default build mode on Pi Zero.
Pro:
Kontra:
3. gpu polling thread + sleep heuristic (bottom left) , unset #define USE_GPU_VSYNC and set #define SAVE_BATTERY_BY_PREDICTING_FRAME_ARRIVAL_TIMES :
This mode runs a dedicated background thread that drives frames from the GPU to the SPI display. This is the default build mode on Pi 3B.
Pro:
Kontra:
4. gpu polling thread without sleeping (bottom right) , unset #define USE_GPU_VSYNC and unset #define SAVE_BATTERY_BY_PREDICTING_FRAME_ARRIVAL_TIMES :
This mode runs the dedicated GPU thread as fast as possible, without attempting to sleep CPU.
Pro:
Kontra:
Be aware of the following limitations:
vc_dispmanx_snapshot() API, and the obtained pixels are then routed on to the SPI-based display. This kind of polling is performed, since there does not exist an event-based mechanism to get new frames from the GPU as they are produced. The result is inefficient and can easily cause stuttering, since different applications produce frames at different paces. Ideally the code would ask the VideoCore API to receive finished frames in callback notifications immediately after they are rendered , but this kind of functionality does not exist in the current GPU driver stack. In the absence of such event delivery mechanism, the code has to resort to polling snapshots of the display framebuffer using carefully timed heuristics to balance between keeping latency and stuttering low, while not causing excessive power consumption. These heuristics keep continuously guessing the update rate of the animation on screen, and they have been tuned to ensure that CPU usage goes down to 0% when there is no detected activity on screen, but it is certainly not perfect. This GPU limitation is discussed at raspberrypi/userland#440. If you'd like to see fbcp-ili9341 operation reduce latency, stuttering and power consumption, please throw a (kind!) comment or a thumbs up emoji in that bug thread to share that you care about this, and perhaps Raspberry Pi engineers might pick the improvement up on the development roadmap. If this issue is resolved, all of the #define USE_GPU_VSYNC , #define SAVE_BATTERY_BY_PREDICTING_FRAME_ARRIVAL_TIMES and #define SELF_SYNCHRONIZE_TO_GPU_VSYNC_PRODUCED_NEW_FRAMES hacks from the previous section could be deleted from the driver, hopefully leading to a best of all worlds scenario without drawbacks. /boot/config.txt and configure all applications to never change that at runtime. 400/250=+60% as well. Therefore when choosing the SPI CDIV value to use, one has to pick one that works for both idle and turbo clock speeds. Conversely, the BCM core reverts to non-turbo speed when there is only light CPU load active, and this slows down the display, so if an application is graphically intensive but light on CPU, the SPI display bus does not get a chance to run at maximum speeds. A way to work around this is to force the BCM core to always stay in its turbo state with force_turbo=1 option in /boot/config.txt , but this has an unfortunate effect of causing the ARM CPU to always run in turbo speed as well, consuming excessive amounts of power. At the time of writing, there does not yet exist a good solution to have both power saving and good performance. This limitation is being discussed in more detail at raspberrypi/firmware#992. For more known issues and limitations, check out the bug tracker, especially the entries marked retired , for items that are beyond current scope.
By default fbcp-ili9341 builds with a statistics overlay enabled. See the video fbcp-ili9341 ported to ILI9486 WaveShare 3.5" (B) SpotPear 320x480 SPI display to find details on what each field means. Build with CMake option -DSTATISTICS=0 to disable displaying the statistics. You can also try building with CMake option -DSTATISTICS=2 to show a more detailed frame delivery timings histogram view, see screenshot and video above.
The fbcp part in the name means framebuffer copy ; specifically for the ILI9341 controller. fbcp-ili9341 is not actually a framebuffer copying driver, it does not create a secondary framebuffer that it would copy bytes across to from the primary framebuffer. It is also no longer a driver only for the ILI9341 controller. A more appropriate name might be userland-raspi-spi-display-driver or something like that, but the original name stuck.
Yes, it does, although not quite as well as on Pi 3B. If you'd like it to run better on a Pi Zero, leave a thumbs up at raspberrypi/userland#440 - hard problems are difficult to justify prioritizing unless it is known that many people care about them.
Edit the file config.h and comment out the line #define DISPLAY_OUTPUT_LANDSCAPE . This will make the display output in portrait mode, effectively rotating it by 90 degrees. Note that this only affects the pixel memory reading mode of the display. It is not possible to change the panel scan order to run between landscape and portrait, the SPI displays typically always scan in portrait mode. The result is that it will change the panel vsync tearing mode from "straight line tearing" over to "diagonal tearing" (see the section About Tearing above).
If you do not want to have diagonal tearing, but would prefer straight line tearing, then additionally enable the option #define DISPLAY_FLIP_ORIENTATION_IN_SOFTWARE in config.h . That will restore straight line tearing, but it will also increase overall CPU consumption.
Enable the option #define DISPLAY_ROTATE_180_DEGREES in config.h . This should rotate the SPI display to show up the other way around, while keeping the HDMI connected display orientation unchanged. Another option is to utilize a /boot/config.txt option display_rotate=2, which rotates both the SPI output and the HDMI output.
Note that the setting DISPLAY_ROTATE_180_DEGREES only affects the pixel memory reading mode of the display. It is not possible to flip the panel scan to run inverted by 180 degrees. This means that adjusting these settings will also have effects of changing the visual appearance of the vsync tearing artifact. If you have the ability to mount the display 180 degrees around in your project, it is recommended to do that instead of using the DISPLAY_ROTATE_180_DEGREES option.
Edit the file config.h in a text editor (a command line one such as pico , vim , nano , or SSH map the drive to your host), and find the appropriate line in the file. Add comment lines // in front of that text to disable the option, or remove the // characters to enable it.
After having edited and saved the file, reissue make -j in the build directory and restart fbcp-ili9341.
Some options are passed to the build from the CMake configuration script. You can run with make VERBOSE=1 to see which configuration items the CMake build is passing. See the above Configuring Build Options section to customize the CMake configure items. For example, to remove the statistics overlay, pass -DSTATISTICS=0 directive to CMake.
Building requires CMake to be installed on the Pi: try sudo apt-get install cmake .
Try deleting CMakeCache.txt between changing CMake settings.
Yes, both work fine. For linux command line terminal, the /dev/tty1 console should be set to output to Linux framebuffer 0 ( /dev/fb0 ). This is the default mode of operation and there do not exist other framebuffers in a default distribution of Raspbian, but if you have manually messed with the con2fbmap command in your installation, you may have inadvertently changed this configuration. Run con2fbmap 1 to see which framebuffer the /dev/tty1 console is outputting to, it should print console 1 is mapped to framebuffer 0 . Type con2fbmap 1 0 to reset console 1 back to outputting to framebuffer 0.
Likewise, the X windowing system should be configured to render to framebuffer 0. This is by default the case. The target framebuffer for X windowing service is usually configured via the FRAMEBUFFER environment variable before launching X. If X is not working by default, you can try overriding the framebuffer by launching X with FRAMEBUFFER=/dev/fb0 startx instead of just running startx .
I don't know, I don't currently have any to test. Perhaps the code does need some model specific configuration, or perhaps it might work out of the box. I only have Pi 3B, Pi 3B+, Pi Zero W and a Pi 3 Compute Module based systems to experiment on. Pi 2 B has been reported to work by users (#17).
If the display controller is one of the currently tested ones (see the list above), and it is wired up to run using 4-line SPI, then it should work. Pay attention to configure the Data/Control GPIO pin number correctly, and also specify the Reset GPIO pin number if the device has one.
If the display controller is not one of the tested ones, it may still work if it is similar to one of the existing ones. For example, ILI9340 and ILI9341 are practically the same controller. You can just try with a specific one to see how it goes.
If fbcp-ili9341 does not support your display controller, you will have to write support for it. fbcp-ili9341 does not have a "generic SPI TFT driver routine" that might work across multiple devices, but needs specific code for each. If you have the spec sheet available, you can ask for advice, but please do not request to add support to a display controller "blind", that is not possible.
Mungkin. This is a more recent experimental feature that may not be as stable, and there are some limitations, but 3-wire ("9-bit") SPI display support is now available. If you have a 3-wire SPI display, ie one that does not have a Data/Control (DC) GPIO pin to connect, configure it via CMake with directive -DGPIO_TFT_DATA_CONTROL=-1 to tell fbcp-ili9341 that it should be driving the display with 3-wire protocol.
Current limitations of 3-wire communication are:
ALL_TASKS_SHOULD_DMA is currently not supported, there is an issue with DMA chaining that prevents this from being enabled. As result, CPU usage on 3-wire displays will be slightly higher than on 4-wire displays.OFFLOAD_PIXEL_COPY_TO_DMA_CPP is currently not supported. As a result, 3-wire displays may not work that well on single core Pis like Pi Zero.No. Those are completely different technologies altogether. It should be possible to port the driver algorithm to work on I2C however, if someone is interested.
At the moment one cannot utilize the XPT2046/ADS7846 touch controllers while running fbcp-ili9341, so touch is mutually incompatible with this driver. In order for fbcp-ili9341 to function, you will need to remove all dtoverlay s in /boot/config.txt related to touch.
I have done close to everything possible to my displays - cut power in middle of operation, sent random data and command bytes, set their operating voltage commands and clock timings to arbitrary high and low values, tested unspecified and reserved command fields, and driven the displays dozens of MHz faster than they managed to keep up with, and I have not yet done permanent damage to any of my displays or Pis.
Easiest way to do permanent damage is to fail at wiring, eg drive 5 volts if your display requires 3.3v, or short a connection, or something similar.
The one thing that fbcp-ili9341 stays clear off is that it does not program the non-volatile memory areas of any of the displays. Therefore a hard power off on a display should clear all performed initialization and reset the display to its initial state at next power on.
That being said, if it breaks, you'll get to purchase a new shiny one to replace it.
Yes, fbcp-ili9341 shows the output of the HDMI display on the SPI screen, and both can be attached at the same time. A HDMI display does not have to be connected however, although fbcp-ili9341 operation will still be affected by whatever HDMI display mode is configured. Check out tvservice -s on the command line to check what the current DispmanX HDMI output mode is.
At the moment fbcp-ili9341 has been developed to only display the contents of the main DispmanX GPU framebuffer over to the SPI display. That is, the SPI display will show the same picture as the HDMI output does. There is no technical restriction that requires this though, so if you know C/C++ well, it should be a manageable project to turn fbcp-ili9341 to operate as an offscreen display library to show a completely separate (non-GPU-accelerated) image than what the main HDMI display outputs. For example you could have two different outputs, eg a HUD overlay, a dashboard for network statistics, weather, temps, etc. showing on the SPI while having the main Raspberry Pi desktop on the HDMI.
In this kind of mode, you would probably strip the DispmanX bits out of fbcp-ili9341, and recast it as a static library that you would link to in your drawing application, and instead of snapshotting frames, you can then programmatically write to a framebuffer in memory from your C/C++ code.
Unfortunately there are a number of things to go wrong that all result in a white screen. This is probably the hardest part to diagnose. Some ideas:
This suggests that the power line or the backlight line might not be properly connected. Or if the backlight connects to a GPIO pin on the Pi (and not a voltage pin), then it may be that the pin is not in correct state for the backlight to turn on. Most of the LCD TFT displays I have immediately light up their backlight when they receive power. The Tontec one has a backlight GPIO pin that boots up high but must be pulled low to activate the backlight. OLED displays on the other hand seem to stay all black even after they do get power, while waiting for their initialization to be performed, so for OLEDs it may be normal for nothing to show up on the screen immediately after boot.
If the backlight connects to a GPIO pin, you may need to define -DGPIO_TFT_BACKLIGHT=<pin> in CMake command line or config.h , and edit config.h to enable #define BACKLIGHT_CONTROL .
fbcp-ili9341 runs a clear screen command at low speed as first thing after init, so if that goes through, it is a good sign. Try increasing -DSPI_BUS_CLOCK_DIVISOR= CMake option to a higher number to see if the display driving rate was too fast. Or try disabling DMA with -DUSE_DMA_TRANSFERS=OFF to see if this might be a DMA conflict.
This suggests same as above, increase SPI bus divisor or troubleshoot disabling DMA. If DMA is detected to be the culprit, try changing up the DMA channels. Double check that /boot/config.txt does not have any dtoverlay s regarding other SPI display drivers or touch screen controllers, and that it does NOT have a dtparam=spi=on line in it - fbcp-ili9341 does not use the Linux kernel SPI driver.
Make sure other fbcp programs are not running, or that another copy of fbcp-ili9341 is not running on the background.
This is likely caused by the program resizing the video resolution at runtime, which breaks DispmanX. See raspberrypi/userland#461 for more details.
Check that the Pi is powered off of a power supply that can keep up with the voltage, and the low voltage icon is not showing up. (remove any avoid_warnings=1/2 directive from /boot/config.txt if that was used to get rid of warnings overlay, to check that voltage is good) It has been observed that if there is not enough power supplied, the display can be the first to starve, while the Pi might keep on running fine. Try removing turbo settings or lowering the clock speed if you have overclocked to verify that the display crash is not power usage related.
Also try lowering SPI bus speed to a safe lower value, eg half of the maximum speed that the display was able to manage.
Double check the Data/Command (D/C) GPIO pin physically, and in CMake command line. Whenever fbcp-ili9341 refers to pin numbers, they are always specified in BCM pin numbers. Try setting a higher -DSPI_BUS_CLOCK_DIVISOR= value to CMake. Make sure no other fbcp programs or SPI drivers or dtoverlays are enabled.
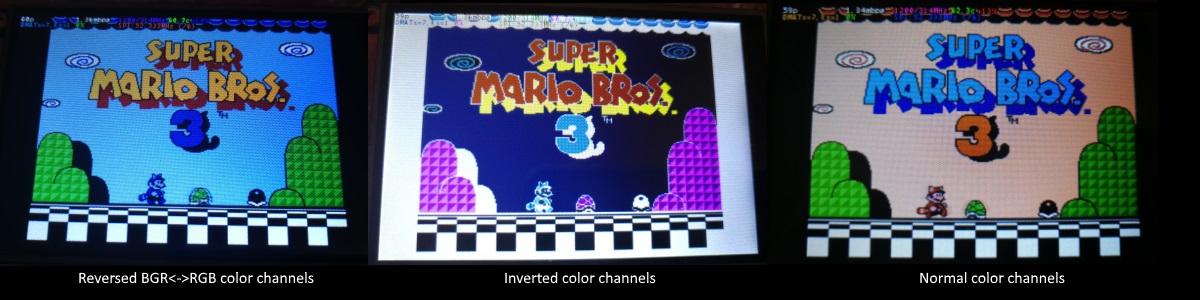
If the color channels are mixed (red is blue, blue is red, green is green) like shown on the left image, pass the CMake option -DDISPLAY_SWAP_BGR=ON to the build.
If the color intensities look wrong (white is black, black is white, color looks like a negative image) like seen in the middle image, pass the CMake option -DDISPLAY_INVERT_COLORS=ON to the build.
If the colors looks off in some other fashion, it is possible that the display is just being driven at a too high SPI bus speed, in which case try making the display run slower by choosing a higher -DSPI_BUS_CLOCK_DIVISOR= option to CMake. Especially on ILI9486 displays it has been observed that the colors on the display can become distorted if the display is run too fast beyond its maximum capability.
fbcp-ili9341 needs a few megabytes of GPU memory to function if DMA transfers are enabled. The gpu_mem boot config option dictates how much of the Pi's memory area is allocated to the GPU. By default this is 64MB, which has been observed to not leave enough memory for fbcp-ili9341 if HDMI is run at 1080p. If this error happens, try increasing GPU memory to eg 128MB by adding a line gpu_mem=128 in /boot/config.txt .
As the number of supported displays, Raspberry Pi device models, Raspbian/Retropie/Lakka OS versions, accompanied C++ compiler versions and fbcp-ili9341 build options have grown in number, there is a combinatorial explosion of all possible build modes that one can put the codebase through, so it is not easy to keep every possible combo tested all the time. Something may have regressed or gotten outdated. Stay calm, and report a bug.
You can also try looking through the commit history to find changes related to your configuration combo, to see if there's a mention of a known good commit in time that should work for your case. If you get an odd compiler error on cmake or make lines, those will usually be very easy to fix, as they are most of the time a result of some configurational oversight.
First, make sure the display is a 4-wire SPI and not a 3-wire one. A display is 4-wire SPI if it has a Data/Control (DC) GPIO line that needs connecting. Sometimes the D/C pin is labeled RS (Register Select). Support for 3-wire SPI displays does exist, but it is experimental and not nearly as well tested as 4-wire displays.
Second is the consideration about display speed. Below is a performance chart of the different displays I have tested. Note that these are sample sizes of one, I don't know how much sample variance there exists. Also I don't know if it is likely that there exists big differences between displays with same controller from different manufacturers. At least the different ILI9341 displays that I have are all quite consistent on performance, whether they are from Adafruit or WaveShare or from BuyDisplay.com.
| Penjual | Ukuran | Resolusi | Pengontrol | Rated SPI Bus Speed | Obtained Bus Speed | Frame rate |
|---|---|---|---|---|---|---|
| Adafruit PiTFT | 2.8" | 240x320 | ILI9341 | 10MHz | 294MHz/4=73.50MHz | 59.81 fps |
| Adafruit PiTFT | 2.2" | 240x320 | ILI9340 | 15.15MHz | 338MHz/4=84.50MHz | 68.76 fps |
| Adafruit PiTFT | 3.5" | 320x480 | HX8357D | 15.15MHz | 314MHz/6=52.33MHz | 21.29 fps |
| Adafruit OLED | 1.27" | 128x96 | SSD1351 | 20MHz | 360MHz/20=18.00MHz | 91.55 fps |
| Waveshare RPi LCD (B) IPS | 3.5" | 320x480 | ILI9486 | 15.15MHz | 255MHz/8=31.88MHz | 12.97 fps |
| maithoga TFT LCD | 3.5" | 320x480 | ILI9486L | 15.15MHz | 400MHz/8=50.00MHz | 13.56 fps* |
| BuyDisplay.com SPI TFT copy #1 | 3.2" | 240x320 | ILI9341 | 10MHz | 310MHz/4=77.50MHz | 63.07 fps |
| BuyDisplay.com SPI TFT copy #2 | 3.2" | 240x320 | ILI9341 | 10MHz | 300MHz/4=75.00MHz | 61.03 fps |
| Arduino A000096 LCD | 1.77" | 128x160 | ST7735R | 15.15MHz | 355MHz/6=59.16MHz | 180.56 fps |
| Tontec MZ61581-PI-EXT 2016.1.28 | 3.5" | 320x480 | MZ61581 | 128MHz | 280MHz/2=140.00MHz | 56.97 fps |
| Adafruit 240x240 Wide Angle TFT | 1.54" | 240x240 | ST7789 | ? | 340MHz/4=85.00MHz | 92.23 fps |
| WaveShare 240x240 Display HAT | 1.3" | 240x240 | ST7789VW | 62.5MHz | 338MHz/4=84.50MHz | 91.69 fps |
| WaveShare 128x128 Display HAT | 1.44" | 128x128 | ST7735S | 15.15MHz | (belum dicoba) | (belum dicoba) |
| KeDei v6.3 | 3.5" | 320x480 | MPI3501 | ? | 400MHz/12=33.333MHz | 4.8fps ** |
In this list, Rated SPI Bus Speed is the maximum clock speed that the display controller is rated to run at. The Obtained Bus Speed column lists the fastest SPI bus speed that was achieved in practice, and the core_freq BCM Core speed and SPI Clock Divider CDIV setting that was used to achieve that rate. Note how most display controllers can generally be driven much faster than what they are officially rated at in their spec sheets.
The Frame Rate column shows the worst case frame rate when full screen updates are being performed. This occurs for example when watching fullscreen video (that is not a flat colored cartoon). Because fbcp-ili9341 only sends over the pixels that have changed, displays such as HX8357D and ILI9486 can still be used to play many games at 60fps. Retro games work especially well.
All the ILI9341 displays work nice and super fast at ~70-80MHz. My WaveShare 3.5" 320x480 ILI9486 display runs really slow compared to its pixel resolution, ~32MHz only. See fbcp-ili9341 ported to ILI9486 WaveShare 3.5" (B) SpotPear 320x480 SPI display for a video of this display in action. Adafruit's 320x480 3.5" HX8357D PiTFTs is ~64% faster in comparison.
The ILI9486L controller based maithoga display runs a bit faster than ILI9486 WaveShare, 50MHz versus 31.88MHz, ie +56.8% bandwidth increase. However fps-wise maithoga reaches only 13.56 vs WaveShare 12.97 fps, because the bandwidth advantage is fully lost in pixel format differences: ILI9486L requires transmitting 24 bits per each pixel (R6G6B6 mode), whereas ILI9486 supports 16 bits per pixel R5G6B5 mode. This is reflected in the above chart refresh rate for the maithoga display (marked with a star).
If manufacturing variances turn out not to be high between copies, and you'd like to have a bigger 320x480 display instead of a 240x320 one, then it is recommended to avoid ILI9486, they indeed are slow.
The KeDei v6.3 display with MPI3501 controller takes the crown of being horrible, in all aspects imaginable. It is able to run at 33.33 MHz, but due to technical design limitations of the display (see #40), effective bus speed is halved, and only about 72% utilization of the remaining bus rate is achieved. DMA cannot be used, so CPU usage will be off the charts. Even though fbcp-ili9341 supports this display, level of support is expected to be poor, because the hardware design is a closed secret without open documentation publicly available from the manufacturer. Stay clear of KeDei or MPI3501 displays.
The Tontec MZ61581 controller based 320x480 3.5" display on the other hand can be driven insanely fast at up to 140MHz! These seem to be quite hard to come by though and they are expensive. Tontec seems to have gone out of business and for example the domain itontec.com from which the supplied instructions sheet asks to download original drivers from is no longer registered. I was able to find one from eBay for testing.
Search around, or ask the manufacturer of the display what the maximum SPI bus speed is for the device. This is the most important aspect to getting good frame rates, but unfortunately most web links never state the SPI speed rating, or they state it ridiculously low like in the spec sheets. Try and buy to see, or ask in some community forums from people who already have a particular display to find out what SPI bus speed it can achieve.
One might think that since Pi Zero is slower than a Pi 3, the SPI bus speed might not matter as much when running on a Pi Zero, but the effect is rather the opposite. To get good framerates on a Pi Zero, it should be paired with a display with as high SPI bus speed capability as possible. This is because the higher the SPI bus speed is, the more autonomously a DMA controller can drive it without CPU intervention. For the same reason, the interlacing technique does not (currently at least) perform well on a Pi Zero, so it is disabled there by default. ILI9341s run well on Pi Zero, ILI9486 on the other hand is quite difficult to combine with a Pi Zero.
Ultimately, it should be noted that parallel displays (DPI) are the proper method for getting fast framerates easily. SPI displays should only be preferred if display form factor is important and a desired product might only exist as SPI and not as DPI, or the number of GPIO pins that are available on the Pi is scarce that sacrificing dozens of pins to RGB data is not bisa dilakukan.
Hardware-wise, there are six different ways to connect displays to the Pi. Here are the pros and cons of each:
Displays are generally manufactured to utilize one specific interfacing method, with the exception that some displays have a both I²C and SPI modes that can be configured via soldering.
Fbcp-ili9341 driver is about interfacing with SPI displays. If your display utilizes some other connection mechanism, fbcp-ili9341 will not apply.
Software-wise, there are two possible alternatives to fbcp-ili9341:
The following links proved helpful when writing this:
If you would like to help push Raspberry Pi SPI display support further, there are always more things to do in the project. Here is a list of ideas and TODOs for recognized work items to contribute, roughly rated in order of increasing difficulty.
top / htop , or with a power meter off the wall and report the results.SPI_3WIRE_PROTOCOL + ALL_TASKS_SHOULD_DMA to work together, or 3) fix up SPI_3WIRE_PROTOCOL + OFFLOAD_PIXEL_COPY_TO_DMA_CPP to work together.ALL_TASKS_SHOULD_DMA mode to be always superior in performance and CPU usage so that the non- ALL_TASKS_SHOULD_DMA path can be dropped from the codebase. (probably requires the above chaining to function efficiently)This driver is licensed under the MIT License. See LICENSE.txt. In nonlegal terms, it's yours for both free and commercial projects, DIY packages, kickstarters, Etsys and Ebays, and you don't owe back a dime. Feel free to apply and derive as you wish.
If you found fbcp-ili9341 useful, it makes me happy to hear back about the projects it found a home in. If you did a build or a project where fbcp-ili9341 worked out, it'd be great to see a video or some photos or read about your experiences.
I hope you build something you enjoy!
Best way to discuss the driver is to open a GitHub issue. You may also be able to find me over at sudomod.com Discord channel.


