module simplenews
1.0.0
Magento 2 Module development or Magento 2 SimpleNews Module Create a full-fledged Module Step by Step. You could just follow my code to create this module from the scratch. Or you can directly download the compressed tar file and install it and play it.
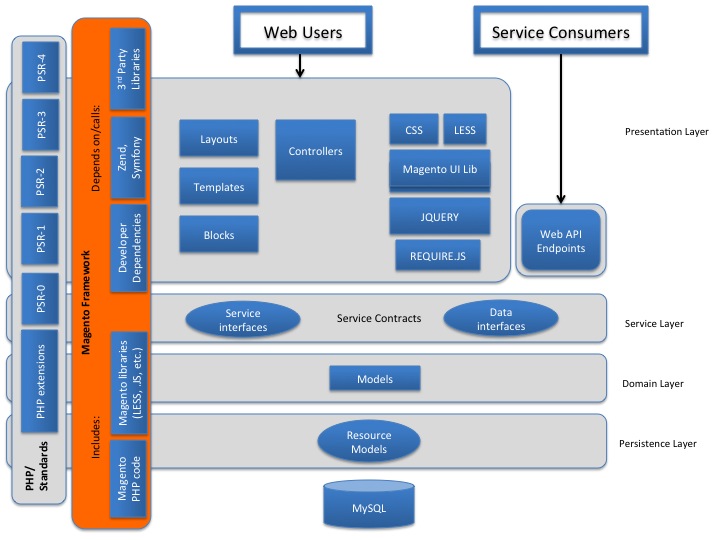
Persistence layer: describes resource model, which is responsible for extracting and modifying data in the database using CRUD requests.Additional business logic capabilities are also implemented here, for example, data validation and database functions implementation.
Domain layer: responsible for the business logic, which does not contain resource-specific or database-specific information. Domain layer can also include service contracts.Each data model at the level of domain layer depends on the resource model, which is responsible for accessing the database.
Service layer: interlayer between presentation layer and domain layer. It implements service contracts, which are defined using PHP interfaces. Service contracts allow to add or change business logic resource model using dependency injection file (di.xml). Service layer is also used for granting access to API (REST/SOAP or other modules).Service interface is declared in /Api namespace of the module. Data (entity) interface is declared in /Api/Data. Data entities are data structures passed to and returned from service interfaces.
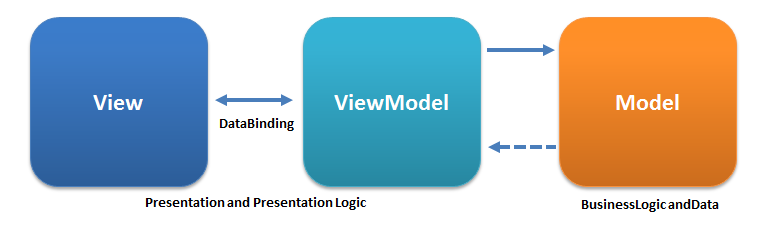
Presentation Layer: upper layer. It contains all the View elements (including layouts, blocks, templates, css, js) and controllers.Presentation Layer usually calls service layer using service contracts. But, depending on the implementation, it may overlap with business logic.
Api or Api/Data: Service contracts, defining service interfaces & data interfaces
Adapter:Classes follow adapter pattern & wrap around classes from third-party libraries allow to use functionality from third-party libraries in code by converting the third-party class interfaces into an interface that is expected by native code.( module-search/Adapter/)
Block: ViewModels of our MVVM architecture
Collector: module-deploy/Collector/Collector.php
Command: directory is used for storing the PHP files that are responsible for console programs execution. In our case, Console/Command/ImagesResizeCommand.php processes commands for product images resizing.
Controller: Responsible for handling the user’s flow while interacting with the system
Config: module-deploy/Config/BundleConfig.php
Cron: We use the directory to store the files, which are later executed on the Cron launching.
CustomerData: directory contains PHP files responsible for processing information for sections. Magento 2 has a special functionality, which allows for processing, updating and transferring the information asynchronously.
etc: Configuration XML files module defines itself & its parts (routes, models, blocks, observers, and cron jobs) within this folder, also be used by non-core modules to override the functionality of core modules.
Exception: (module-sales/Exception/)
Files: Sample file (module-inventory-import-export/Files/)
fixtures: Sample Data module (module-sales-sample-data/fixtures/orders.csv)
Gateway: (module-paypal/Gateway)
Helper: Classes that hold code used in more than one application layer. For example, in the Cms module, helper classes are responsible for preparing HTML for presentation to the browser.
i18n: Holds internationalization CSV files, used for translation
Indexer: IndexHandler (module-inventory-indexer/Indexer)
Model: For Models and ResourceModels
Observer: Holds Observers, or Models which are “observing” system events. Usually, when such an event is fired, the observer instantiates a Model to handle the necessary business logic for such an event.
Package: module-deploy/Package
Pricing: Final price model (module-msrp-grouped-product/Pricing)
Process: module-deploy/Process
Plugin: directory comprises plugin files allow us to modify certain module’s functions if necessary described in the configuration file: vendor/magento/module-catalog/etc/di.xml
SearchAdapter: module-elasticsearch/SearchAdapter
ReportXml :vendor/magento/module-analytics/ReportXml
Setup: Migration classes, responsible for schema & data creation
Service: [exam] (module-media-storage/Service/ImageResize.php,module-deploy/ or module-catalog-url-rewrite/Service/V1/StoreViewService.php )
src : vendor/magento/magento2-functional-testing-framework/src/Magento/
Strategy: module-deploy/Strategy
Source: module-deploy/Source
Test: Unit tests
Ui: Elements such as grids & forms used in admin application
view – Layout (XML) files & template (PHTML) files for front-end & admin application contains template files, CSS and JS files, module media files. These files are located in subfolders depending on the area of use: adminhtml, frontend or base (common files for the administrative and frontal parts of the site). These subdirectories, in turn, including static view files, design templates, email templates, and layout files:
ViewModel: (module-sales/ViewModel)
In this module, we will use BDCrops for Vendor name and SimpleNews for ModuleName. So we need to make this folder: app/code/BDC/SimpleNews
Magento 2 looks for configuration information for each module in that module’s etc directory. We need to create folder etc and add module.xml:
Create etc/module.xml And the content for this file:
```
<?xml version="1.0"?>
<config xmlns:xsi="http://www.w3.org/2001/XMLSchema-instance" xsi:noNamespaceSchemaLocation="urn:magento:framework:Module/etc/module.xsd">
    <module name="BDC_SimpleNews" setup_version="1.0.0" />
</config>
```
In this file, we register a module with name BDC_SimpleNews and the version is 1.0.0.
All Magento 2 module must be registered in the Magento system through the magento ComponentRegistrar class. This file will be placed in module root directory. In this step, we need to create this file:
Create registration.php and insert this following code into it:
MagentoFrameworkComponentComponentRegistrar::register(
    MagentoFrameworkComponentComponentRegistrar::MODULE,
    'BDC_SimpleNews', __DIR__
);
Modules in vendor folder would update using composer And all the modules in app/code would not be updated through composer That's why when you need to override any module you add it in app/code
Create composer.json and insert this following code into it:
```
{
  "name": "bdc/module-simplenews",
  "description": "BDCrops SimpleNews module for Magento 2 extensions.",
  "type": "magento2-module",
  "version": "1.0.3",
  "license": [
      "OSL-3.0",
      "AFL-3.0"
  ],
"authors": [{
          "name": "Abdul Matin",
          "email": "[email protected]",
		      "company": "BDCrops Inc"
      }
  ],
"homepage": "https://www.bdcrops.com",
  "autoload": {
      "files": [
          "registration.php"
      ],
      "psr-4": {
          "BDC\SimpleNews\": ""
      }
  }
}

```
Create etc/db_schema.xml & insert this following code into it:
```
<?xml version="1.0"?>
<schema xmlns:xsi="http://www.w3.org/2001/XMLSchema-instance" xsi:noNamespaceSchemaLocation="urn:magento:framework:Setup/Declaration/Schema/etc/schema.xsd">

<table name="bdc_simplenews" resource="default" engine="innodb" comment="SimpleNews Table">
  <column xsi:type="smallint" name="id" padding="6" unsigned="false" nullable="false" identity="true" comment="ID"/>
  <column xsi:type="varchar" name="title" nullable="false" length="255" comment="Title"/>
  <column xsi:type="varchar" name="summary" nullable="false" length="255" comment="Summary"/>
  <column xsi:type="varchar" name="description" nullable="false" length="255" comment="Descrition"/>
  <column xsi:type="timestamp" name="created_at" nullable="false" default="CURRENT_TIMESTAMP" on_update="false" comment="Created Datetime"/>
  <column xsi:type="timestamp" name="updated_at" nullable="false" default="CURRENT_TIMESTAMP" on_update="true" comment="Updated Datetime"/>
  <column xsi:type="smallint" name="status"  padding="2" unsigned="false" nullable="false" comment="Status"/>
  <constraint xsi:type="primary" referenceId="PRIMARY">   <column name="id"/> </constraint>
</table>
</schema>
```
Tutarials module-declarative
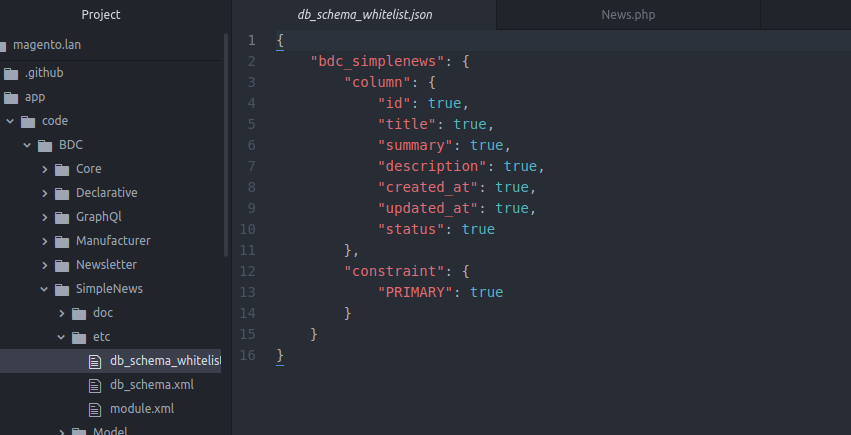
You will not be able to run a declarative mode without creating a schema whitelist. Note: it is recommended to generate a new whitelist for every release for the double-check purposes.Before running the upgrade command you need to add your schema to db_whitelist_schema.json file by running the following command. For that, you need a /etc/db_schema_whitelist.json file that will store all the content added with declarative schema. To generate this file, run:

php bin/magento setup:db-declaration:generate-whitelist [options]
php bin/magento setup:db-declaration:generate-whitelist --module-name=vendor_module
php bin/magento setup:db-declaration:generate-whitelist --module-name=BDC_SimpleNews
Now, there are db_whitelist_schema.json file will be create in /vendor/module/etc folder.
By finish above step, you have created an empty module. Now we will enable it in Magento environment.Before enable the module, we must check to make sure Magento has recognize our module or not by enter the following at the command line:
php bin/magento module:status
If you follow above step, you will see this in the result:
List of disabled modules:
BDC_SimpleNews
This means the module has recognized by the system but it is still disabled. Run this command to enable it:
php bin/magento module:enable BDC_SimpleNews
The module has enabled successfully if you saw this result:
The following modules has been enabled:
- BDC_SimpleNews
This’s the first time you enable this module so Magento require to check and upgrade module database. We need to run this comment:
php bin/magento setup:upgrade
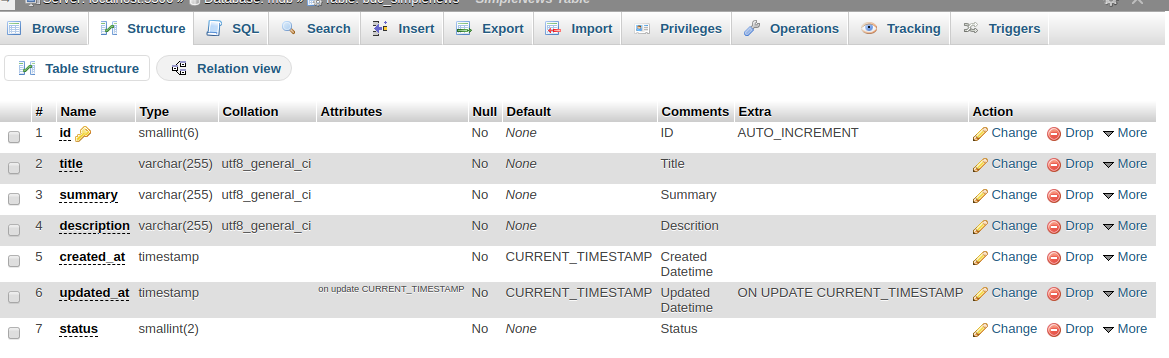
Now you can check under Stores -> Configuration -> Advanced -> Advanced that the module is present.
Also you can check Database Table from PhpMyAdmin or Your Favorite tools:
Since in the old method, we used to write scripts in Install Schema or Upgrade schema when a table was created, but now in the new version, this will be done through Patch system.A data patch is a class that contains data modification instructions. It is defined in a /<Module_Name> /Setup/Patch/Data/<Patch_Name>.php file and implements MagentoSetupModelPatchDataPatchInterface. A schema patch contains custom schema modification instructions. These modifications can be complex. It is defined in a/<Module_Name>/Setup/Patch/Schema/<Patch_Name>.php file and implements MagentoSetupModelPatchSchemaPatchInterface. So to add data to the bdc_simplenews table create AddData.php file inside folder BDC/SimpleNews/Setup/Patch/Data and write the following code
Create Setup/Patch/Data/AddData.php
```
<?php

namespace BDCSimpleNewsSetupPatchData;

use MagentoFrameworkSetupPatchDataPatchInterface;
use MagentoFrameworkSetupPatchPatchVersionInterface;
use MagentoFrameworkModuleSetupMigration;
use MagentoFrameworkSetupModuleDataSetupInterface;

class AddData implements DataPatchInterface, PatchVersionInterface {
    private $news;
    public function __construct( BDCSimpleNewsModelNews $news ) {
        $this->news = $news;
    }
    public function apply(){
    	$newsData = [];
    	$newsData['title'] = "BDC News Head1";
    	$newsData['summary'] = "BDC News Summary";
    	$newsData['description'] = "BDCrops Inc description evulation of bangladesh";
    	//$newsData['status'] = 1;

    	$this->news->addData($newsData);
    	$this->news->getResource()->save($this->news);

    }
    public static function getDependencies() {   return []; }
    public static function getVersion() { return '2.0.0'; }
    public function getAliases() {   return []; }

}

```
We need to create these files to insert, update, delete and get data in the database.
Create model file: Model/News.php:
```
<?php
// These files to insert, update, delete and get data in the database.
namespace BDCSimpleNewsModel;
use MagentoFrameworkModelAbstractModel;

class News extends AbstractModel{
    /**
     * News constructor.
     * @param MagentoFrameworkModelContext $context
     * @param MagentoFrameworkRegistry $registry
     * @param MagentoFrameworkModelResourceModelAbstractResource|null $resource
     * @param MagentoFrameworkDataCollectionAbstractDb|null $resourceCollection
     * @param array $data
     */
    public function __construct(
        MagentoFrameworkModelContext $context,
        MagentoFrameworkRegistry $registry,
        MagentoFrameworkModelResourceModelAbstractResource $resource = null,
        MagentoFrameworkDataCollectionAbstractDb $resourceCollection = null,
        array $data = [] ) {
        parent::__construct($context, $registry, $resource, $resourceCollection, $data);
    }

   /**
    * (non-PHPdoc)
    * @see MagentoFrameworkModelAbstractModel::_construct()
    */
    public function _construct(){
        $this->_init('BDCSimpleNewsModelResourceNews');
    }

    /**
     * Loading news data
     *
     * @param   mixed $key
     * @param   string $field
     * @return  $this
     */
    public function load($key, $field = null) {
      if ($field === null) {
        $this->_getResource()->load($this, $key, 'id');
        return $this;
      }
      $this->_getResource()->load($this, $key, $field);
      return $this;
    }
}

```
CRUD Models in Magento 2 can manage data in database easily, you don’t need to write many line of code to create a CRUD. CRUD is stand for Create, Read, Update and Delete. The Magento ORM is used by the Repository implementations that are part of the Magento 2 service contracts. This is an important variation from Magento 1, as a module should no longer rely on other modules using a specific ORM, and instead of it use only the entity repositories. The service contracts will be covered in more details in the second part of the article.The Magento ORM is built around models, resource models, and resource collections. The Magento ORM elements are following:
The ORM gives you a possibility to create, load, update, and delete data in a database. A collection in Magento is a class that implements both the IteratorAggregate and the Countable PHP5 SPL interfaces. Collections are widely used in Magento to store a set of objects of a specific type.
Models are like a black box which provides a layer of abstraction on top of the resource models. The fetching, extraction, and manipulation of data occur through models. As a rule of thumb, every entity we create (i.e. every table we create in our database) should have its own model class. Every model extends the MagentoFrameworkModelAbstractModelclass, which inherits the MagentoFrameworkDataObjectclass, hence, we can call the setDataand getData functions on our model, to get or set the data of a model respectively. class only has one method, _ construct(), when we call the _ init()method, and pass the resource model’s name as its paramete
Create resource model Model/Resource/News.php:
```
<?php

namespace BDCSimpleNewsModelResource;

use MagentoFrameworkModelResourceModelDbAbstractDb;

class News extends AbstractDb {
    /**
     * Define main table
     */
    protected function _construct() { $this->_init('bdc_simplenews', 'id'); }
}

```
All of the actual database operations are executed by the resource model. Every model must have a resource model, since all of the methods of a resource model expects a model as its first parameter. All resource models must extend the MagentoFrameworkModelResourceModelDbAbstractDbclass. here also has one method, <__ construct>, where we call the <_ initmethod>, and pass two parameters to it. The name of the table in the database, and the name of the primary column in that table. Resource Model. In Magento 2, the model class defines the methods an end-user-programmer will use to interact with a model’s data. A resource model class contains the methods that will actually fetch the information from the database. Each CRUD model in Magento 2 has a corresponding resource model class.
Every CRUD resource model class extends the MagentoFrameworkModelResourceModelDbAbstractDb class. This base class contains the basic logic for fetching information from a single database table. For a basic model like ours, the only thing a resource model must do is call the _ init method from _ construct. The _ init method for a resource model accepts two arguments. The first is the name of the database table (bdc_simplenews), and the second is the ID column for the model (id). While it’s beyond the scope of this article, Magento 2’s active record implementation contains no method for linking tables via primary keys. How to use multiple database tables is up to each individual module developer, and a resource model will typically contain the SQL generating methods needed to fetch information from related tables.
Create collection Model/Resource/News/Collection.php:
```
<?php
namespace BDCSimpleNewsModelResourceNews;

use MagentoFrameworkModelResourceModelDbCollectionAbstractCollection;
class Collection extends AbstractCollection {
    /**
     * Define model & resource model
     */
    protected function _construct(){
        $this->_init('BDCSimpleNewsModelNews', 'BDCSimpleNewsModelResourceNews');
    }
}

```
Collections are used when we want to fetch multiple rows from our table. Meaning collections
With a model and resource model, you have everything you need to fetch and save individual models into the database. However, there are times where you’ll want to fetch multiple models of a particular type. To solve this problem, every CRUD model in Magento 2 has a corresponding resource model collection. A collection collects individual models. It’s considered a resource model since it builds the SQL code necessary to pull information from a database table. All collections in Magento 2 extend the base MagentoFrameworkModelResourceModelDbCollectionAbstractCollection collection class. Like a model and resource model, a collection resource model must call the _ init method. A collection resource model’s _ init method accepts two arguments. The first is the model that this collection collects. The second is that collected model’s resource model. We create a new Magento 2 block an inject MagentoCatalogModelResourceModelProductCollectionFactory class. This is needed to get a collection from factory. A getProductCollection returns a new product collection. This method does the following:
We will find how to create a frontend route, admin route and how to use route to rewrite controller.
<!--Use router 'standard' for frontend route-->
    <router id="standard">
        <!--Define a custom route with id and frontName-->
        <route frontName="samplenews" id="samplenews">
            <!--The module which this route match to-->
            <module name="BDC_SampleNews"/>
        </route>
    </router>
Please look into the code, you will see it’s very simple to register a route. You must use the standard router for the frontend. This route will have a child which define the module for it and 2 attributes:
The id attribute is a unique string which will identify this route. You will use this string to declare the layout handle for the action of this module The frontName attribute is also a unique string which will be shown on the url request. For example, if you declare a route like this: The url to this module should be:
http://example.com/index.php/samplenews/controller/action And the layout handle for this action is: samplenews_controller_action.xml So with this example path, you must create the action class in this folder:
{namespace}/{module}/Controller/{Controller}/{Action}.php

http://example.com/<router_name>/<controller_name>/<action_name>
The Router is used to assign a URL to a corresponding controller and action. In this module, we need to create a route for frontend area. So we need to add this file:
Create etc/frontend/routes.xml:
~~~
<?xml version="1.0"?>
<config xmlns:xsi="http://www.w3.org/2001/XMLSchema-instance"
xsi:noNamespaceSchemaLocation="../../../../../../lib/internal/Magento/Framework/
App/etc/routes.xsd">
    <router id="standard">
        <route id="news" frontName="news">
            <module name="BDC_SimpleNews" />
        </route>
    </router>
</config>
~~~
After define the route, the URL path to our module will be: http://example.com/news/
Routers: define name for a module which we can use in the url to find the module and execute the controller action.
Controllers:Controllers in Magento 2 differ from typical controllers in MVC applications. Magento 2 controllers are responsible for only one specific URL and contain only one execute method. This method is responsible for returning result object and occasional processing of input POST data. All controllers inherit MagentoFrameworkAppActionAction class. The required controller is searched in the Base Router, and then it’s called in the Front Controller.
Responses: The controller in Magento 2 can return several response types depending on the purpose and the necessary result.
Frontend route: Please look into the code, you will see it’s very simple to register a route. You must use the standard router for the frontend. This route will have a child which define the module for it and 2 attributes:
In this part, we will talk about Factory Object for model. As you know in OOP, a factory method will be used to instantiate an object. In Magento, the Factory Object do the same thing.
The Factory class name is the name of Model class and append with the ‘Factory’ word. So for our example, we will have NewsFactory class. You must not create this class. Magento will create it for you. Whenever Magento’s object manager encounters a class name that ends in the word ‘Factory’, it will automatically generate the Factory class in the var/generation folder if the class does not already exist. You will see the factory class:
use BDCSimpleNewsModelNewsFactory;
var/generation/<vendor_name>/<module_name>/Model/ClassFactory.php
var/generation/BDC/SimpleNew/Model/NewsFactory.php
To instantiate a model object we will use automatic constructor dependency injection to inject a factory object, then use factory object to instantiate the model object.
Magento 2 authorizes you to register global variable that supports the static registry method. Magento 1, as well as Magento 2, authorize you to register global variable that supports the static registry method. To implement that, maybe you used to work with Mage::register() and Mage::registry() in Magento 1, but now in Magento 2 platform, there is a difference in running the registry. You will be required to apply MagentoFrameworkRegistry, that accepts the settings and the registry of the restored data. However, first of all, you need to learn how to create or use the own custom registry and also show you how to retrieve global Magento 2 registry objects like current product, category, cms page, cms block, etc. And that is lucky because all of them will be referred here. The topic today will help you be familiar with Magento 2 registry objects.
/**
  * @var MagentoFrameworkRegistry
  */

 protected $_registry;
 /**
 * ...
 * ...
 * @param MagentoFrameworkRegistry $registry,
 */
public function __construct(
    ...,
    ...,
    MagentoFrameworkRegistry $registry,
    ...) {
    $this->_registry = $registry;
    ...
    ...
}

 /**
 * Setting custom variable in registry to be used
 *
 */
public function setCustomVariable() {
     $this->registry->register('custom_var', 'Added Value');
}

/**
 * Retrieving custom variable from registry
 * @return string
 */
public function getCustomVariable() {
     return $this->registry->registry('custom_var');
}
Create controller Controller/Index/Index.php:
  <?php

  namespace BDCSimpleNewsControllerIndex;

  use MagentoFrameworkAppActionAction;
  use MagentoFrameworkAppActionContext;
  use BDCSimpleNewsModelNewsFactory;

  class Index extends Action {
      /**
       * @var BDCSimpleNewsModelNewsFactory
       */
      protected $_modelNewsFactory;
      /**
       * @param Context $context
       * @param NewsFactory $modelNewsFactory
       */
      public function __construct(
          Context $context,
          NewsFactory $modelNewsFactory ) {
          parent::__construct($context);
          $this->_modelNewsFactory = $modelNewsFactory;
      }
      public function execute(){
          /**
           * When Magento get your model, it will generate a Factory class
           * for your model at var/generaton folder and we can get your
           * model by this way
           */
          $newsModel = $this->_modelNewsFactory->create();

          // Load the item with ID is 1
          $item = $newsModel->load(1);
          var_dump($item->getData());

          // Get news collection
          $newsCollection = $newsModel->getCollection();
          // Load all data of collection
          var_dump($newsCollection->getData());
      }
  }

  ```
</details>
After define the Controller, the URL path to our module will be: http://example.com/news/ below data

$this->_forward('action', 'controller', 'Other_Module')
public function __construct(
   $pageFactory MagentoFrameworkViewResultPageFactory
) {
   $this->pageResultFactory = $pageFactory
}
public function execute()
{
   return $this->pageResultFactory->create();
}
public function __construct(
   MagentoFrameworkControllerResultRaw $rawResultFactory ,
) {
   $this->rawResultFactory = $rawResultFactory;
}
public function execute()
{
   $result = $this->rawResultFactory->create();
   $result->setHeader('Content-Type', 'text/xml');
   $result->setContents('<root><block></block></root>);
   return $result;
}
public function __construct(
   MagentoFrameworkControllerResultForwardFactory $resultForwardFactory
) {
   $this->resultForwardFactory = $resultForwardFactory;
}
public function execute()
{
   $result = $this->resultForwardFactory->create();
   $result->forward('noroute');
   return $result;
}
public function __construct(
   MagentoFrameworkControllerResultRedirectFactory $resultRedirectFactory
) {
   $this->resultRedirectFactory = $resultRedirectFactory;
}
public function execute()
{
   $result = $this->resultRedirectFactory->create();
   $result->setPath('*/*/index');
   return $result;
}
If your Magento installation has a hierarchy of websites, stores, or views, you can set the context, or “scope” of a configuration setting to apply to a specific part of the installation. The context of many database entities can also be assigned a specific scope to determine how it is used in the store hierarchy. To learn more, see: Product Scope and Price Scope.
Some configuration settings such as postal code, have a [global] scope because the same value is used throughout the system. The [website] scope applies to any stores below that level in the hierarchy, including all stores and their views. Any item with the scope of [store view] can be set differently for each store view, which is typically used to support multiple languages.
Unless the store is running in Single Store Mode, the scope of each configuration setting appears in small text below the field label. If your installation includes multiple websites, stores or views, you should always choose the Store View where the settings apply before making any changes.
An important, but less good documented feature of Magento 2 is how to write and get config values by scope. You will find tons of code samples on how do this globally. Sometime you need to do different settings for different stores programmatically. So here is how this works.
Magento saves all adminhtml settings in core_config table in your Magento database. There you can get values by its path, a string which indicates path to and a variable name. With this path, you can get or set values by Magento 2 core methods. For this you need to use:
The following sample code shows how to write store config values by scope:
class WriteConfig {
    protected $_logger;
    protected $_storeManager;
    protected $_configWriter;

    public function __construct(
        PsrLogLoggerInterface $logger,
        MagentoFrameworkAppConfigStorageWriterInterface $configWriter,
        MagentoStoreModelStoreManagerInterface $storeManager ){
        $this->_logger = $logger;
        $this->_configWriter = $configWriter;
        $this->_storeManager = $storeManager;
    }

    public function setConfig($value) {
        //for all websites
        $websites = $this->_storeManager->getWebsites();
        $scope = "websites";
        foreach($websites as $website) {
            echo $website->getId().":n";

            $this->_configWriter->save('my_section/something/configvaluename', $value, $scope, $website->getId());
        }

        return $this;
    }
}
You just need to call setConfig() method with a given value. This method stores this value into a defined path for all websites. So it generates a new setting (line in core_config table) for each defined website. This is done by using third and fourth param on save method. You use a unique path, a value, a scope and the id of this scope. If you do not use scope, you will wirte the value to default (store id 0). You can store values to scopes “website” or “store“.
Now it is time to read the data by store. You can do this with the following sample code:
class ReadConfig
{
    protected $_scopeConfig;

    public function __construct(
        MagentoFrameworkAppHelperContext $context,
        MagentoFrameworkAppConfigScopeConfigInterface $scopeConfig
    ){
        $this->_scopeConfig = $scopeConfig;
        parent::__construct($context);
    }

    public function getConfig() {
        return $this->_scopeConfig->getValue("my_section/something/configvaluename", "websites");
    }
}
It is quite easy, you only need to use getValue() method and add a second param with scope (here we use website scope). This will return the stored value for the current website.
There are 2 main places for storing configuration values In Magento 2: database (the core_config_data table) and XML files. The configurations, stored in the database can be changed via the administrator panel, while the data, located in the XML files are of a technical nature and can be changed only by a developer.
It’s easy to use configuration files in Magento 2. Configuration files include:
Magento/Framework/Config provides the following interfaces for developers:
Magento 2 provides two types of validation for XML configuration files: validation before a merging and validation after a merging. It can be either the same or different schemes. To create a custom configuration file, you need to create the following elements:
product_types.xml module of Magento_Catalog as an example of a custom configuration file. Each module can add its own product type using the product_types.xml file and these files will be validated and merged.
The system.xml is a configuration file which is used to create configuration fields in Magento 2 System Configuration. You will need this if your module has some settings which the admin needs to set. You can go to Store -> Setting -> Configuration to check how it look like.The magento 2 system configuration page is divided logically in few parts: Tabs, Sections, Groups, Fields.

Each field in system.xml after create will not have any value. When you call them, you will receive ‘null’ result. So for the module, we will need to set the default value for the field and you will call the value without go to config, set value and save it. This default value will be saved in config.xml which is located in etc folder. Let’s create it for this simple configuration: etc/config.xml
<default>
    <section>
        <group>
            <field>{value}</field>
        </group>
    </section>
</default>
First all of let’s save value and flush cache, then you can get saved value from database. In the system.xml, we have added 2 fields: enable and display_text. So the path should be: samplenews/general/enable samplenews/general/display_text Simple calling:ex
$this->scopeConfig->getValue('samplenews/general/enable', MagentoStoreModelScopeInterface::SCOPE_STORE);
$this->scopeConfig->getValue('samplenews/general/display_text', MagentoStoreModelScopeInterface::SCOPE_STORE);
Create fileetc/adminhtml/system.xml Purpose: This file will declare your configurations in Stores > Settings > Configuration section) and insert this following code into it:
```
<?xml version="1.0"?>
<config xmlns:xsi="http://www.w3.org/2001/XMLSchema-instance" xsi:noNamespaceSchemaLocation="../../../Backend/etc/system_file.xsd">
    <system>
        <tab id="bdc" translate="label" sortOrder="1">
            <label>BDC</label>
        </tab>
        <section id="simplenews" translate="label" sortOrder="1" showInDefault="1" showInWebsite="1" showInStore="1">
            <label>Simple News</label>
            <tab>bdc</tab>
            <resource>BDC_SimpleNews::system_config</resource>
            <group id="general" translate="label" type="text" sortOrder="1" showInDefault="1" showInWebsite="1" showInStore="1">
                <label>General Settings</label>
                <field id="enable_in_frontend" translate="label" type="select" sortOrder="1" showInDefault="1" showInWebsite="1" showInStore="1">
                    <label>Enable in frontend</label>
                    <source_model>MagentoConfigModelConfigSourceYesno</source_model>
                </field>
                <field id="head_title" translate="label comment" type="text" sortOrder="2" showInDefault="1" showInWebsite="1" showInStore="1">
                    <label>Head title</label>
                    <comment>Fill head title of news list page at here</comment>
                    <validate>required-entry</validate>
                </field>
                <field id="lastest_news_block_position" translate="label" type="select" sortOrder="3" showInDefault="1" showInWebsite="1" showInStore="1">
                    <label>Lastest news block position</label>
                    <source_model>BDCSimpleNewsModelSystemConfigLastestNewsPosition</source_model>
                </field>
            </group>
        </section>
    </system>
</config>
```
System configuration values in Magento 2 are stored in the core_config_data database table, which is exactly the same as in Magento 1. But the xml config files differ. The system.xml is a configuration file which is used to create configuration fields in Magento 2 System Configuration. the system config file is at etc/adminhtml/system.xml
The system.xml is a configuration file which is used to create configuration fields in Magento 2 System Configuration. You will need this if your module has some settings which the admin needs to set. You can go to Store -> Setting -> Configuration to check how it look like.
Create file Model/System/Config/LastestNews/Position.php:
```
<?php
namespace BDCSimpleNewsModelSystemConfigLastestNews;
use MagentoFrameworkOptionArrayInterface;
class Position implements ArrayInterface{
    const LEFT      = 1;
    const RIGHT     = 2;
    const DISABLED  = 0;

    /**
     * Get positions of lastest news block
     *
     * @return array
     */
    public function toOptionArray(){
        return [
            self::LEFT => __('Left'),
            self::RIGHT => __('Right'),
            self::DISABLED => __('Disabled')
        ];
    }
}

```
Create file etc/acl.xml (Purpose: This file will create a role for your configuration section) and insert this following code into it:
```
<?xml version="1.0"?>
<config xmlns:xsi="http://www.w3.org/2001/XMLSchema-instance"
xsi:noNamespaceSchemaLocation="../../../../../lib/internal/Magento/Framework/Acl/etc/acl.xsd">
    <acl>
        <resources>
            <resource id="Magento_Backend::admin">
                <resource id="Magento_Backend::stores">
                    <resource id="Magento_Backend::stores_settings">
                        <resource id="Magento_Config::config">
                            <resource id="BDC_SimpleNews::system_config" title="Simple News Section" />
                        </resource>
                    </resource>
                </resource>
            </resource>
        </resources>
    </acl>
</config>
```
Create file etc/config.xml and insert this following code into it:
```
<?xml version="1.0"?>
<config xmlns:xsi="http://www.w3.org/2001/XMLSchema-instance"
xsi:noNamespaceSchemaLocation="../../Core/etc/config.xsd">
    <default>
        <simplenews>
            <general>
                <enable_in_frontend>1</enable_in_frontend>
                <head_title>BDC - Simple News</head_title>
                <lastest_news_position>1</lastest_news_position>
            </general>
        </simplenews>
    </default>
</config>

```
Magento 2, the Helper can be called in controllers, models, views and even in other helpers. Helpers can be considered as global and always available elements. They can even be created as single objects’ instances. Besides, they can be called everywhere once you inject them in the class. Helpers are mainly created to offer methods for the most common functionalities. For instance, you can use helpers to build logs in the application of Magento. Magento 2 Helper Class includes various functions and methods which are used commonly throughout the application. All the methods which have been declared as Helpers can be called anywhere including file, model, block, controller class or from another helper in Magento 2.
In the early version of Magento 2, a Helper Factory is available, which enables developers to instantiate helper methods. Besides, you can use the below code to use ObjectManager to instantiate the Helper Factory.
$object_manager = MagentoCoreModelObjectManager::getInstance();
$helper_factory = $object_manager->get('MagentoCoreModelFactoryHelper');
$helper = $helper_factory->get('MagentoCoreHelperData');
However, this code still exist some problems. Luckly, a better concept has been introducted which is Dependency Injection in Magento 2.
Using this concept, the environment will create and provide you an object instead of instantiating it. For instance, if a class is written like the following:
class Helper{
   public function __contruct(Helper $xyz){
       $this->xyz= $xyz;
   }
}
In the Helper class constructor, an object of Helper class is auto-created and assigned the reference, $xyz. This is Dependency Injection.
Via this concept, high-value loose coupling modules together concept is provided by Magento 2. If you want to inject it into a specific class, just add an object to the constructor of it. However, you need to remember that you cannot inject one dependency twice.
Create file: Helper/Data.php and insert this following code into it:
<?php

namespace BDCSimpleNewsHelper;

use MagentoFrameworkAppHelperAbstractHelper;
use MagentoFrameworkAppConfigScopeConfigInterface;
use MagentoFrameworkAppHelperContext;
use MagentoStoreModelScopeInterface;

class Data extends AbstractHelper {
 const XML_PATH_ENABLED      = 'simplenews/general/enable_in_frontend';
 const XML_PATH_HEAD_TITLE   = 'simplenews/general/head_title';
 const XML_PATH_LASTEST_NEWS = 'simplenews/general/lastest_news_block_position';

 /**
   * @var MagentoFrameworkAppConfigScopeConfigInterface
   */
  protected $_scopeConfig;

  /**
   * @param Context $context
   * @param ScopeConfigInterface $scopeConfig
   */
  public function __construct(
     Context $context,
     ScopeConfigInterface $scopeConfig ) {
     parent::__construct($context);
     $this->_scopeConfig = $scopeConfig;
  }

 /**
   * Check for module is enabled in frontend
   *
   * @return bool
   */
 public function isEnabledInFrontend($store = null){
    return $this->_scopeConfig->getValue(
       self::XML_PATH_ENABLED,
       ScopeInterface::SCOPE_STORE
    );
 }

 /**
   * Get head title for news list page
   *
   * @return string
   */
 public function getHeadTitle() {
    return $this->_scopeConfig->getValue(
       self::XML_PATH_HEAD_TITLE,
       ScopeInterface::SCOPE_STORE
    );
 }

 /**
   * Get lastest news block position (Left, Right, Disabled)
   *
   * @return int
   */
 public function getLastestNewsBlockPosition() {
    return $this->_scopeConfig->getValue(
       self::XML_PATH_LASTEST_NEWS,
       ScopeInterface::SCOPE_STORE
    );
 }
}
<add id="BDC_SimpleNews::news" title="Manage News" module="BDC_SimpleNews" sortOrder="10" action="bdc_simplenews/news" resource="BDC_SimpleNews::news" parent="BDC_SimpleNews::samplenews"/>
id attribute is the identifier for this note. It’s a unique string and should follow the format: {Vendor_ModuleName}::{menu_description}.
title attribute is the text which will be shown on the menu bar.
module attribute is defined the module which this menu is belong to.
sortOrder attribute is defined the position of the menu. Lower value will display on top of menu.
parent attribute is an Id of other menu node. It will tell Magento that this menu is a child of another menu. In this example, we have parent=”BDC_SampleNews::samplenews”, so we - know this menu “Manage News” is a child of “Hello World” menu and it will show inside of Hello World menu.
action attribute will define the url of the page which this menu link to. As we talk above, the url will be followed this format {router_name}{controller_folder}{action_name}. - In this example, this menu will link to the module SampleNews, controller News and action Index
resource attribute is used to defined the ACL rule which the admin user must have in order to see and access this menu. We will find more detail about ACL in other topic.
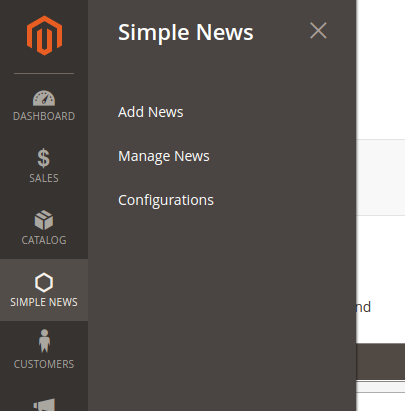
Create file: etc/adminhtml/menu.xml (Purpose: The menu item of your module will be declared here) and insert this following code into it:
```
<?xml version="1.0"?>
<config xmlns:xsi="http://www.w3.org/2001/XMLSchema-instance"
xsi:noNamespaceSchemaLocation="../../../Backend/etc/menu.xsd">
<menu>
    <add id="BDC_SimpleNews::main_menu" title="Simple News"
        module="BDC_SimpleNews" sortOrder="20"
        resource="BDC_SimpleNews::simplenews" />
    <add id="BDC_SimpleNews::add_news" title="Add News"
        module="BDC_SimpleNews" sortOrder="1" parent="BDC_SimpleNews::main_menu"
        action="simplenews/news/new" resource="BDC_SimpleNews::manage_news" />
    <add id="BDC_SimpleNews::manage_news" title="Manage News"
        module="BDC_SimpleNews" sortOrder="2" parent="BDC_SimpleNews::main_menu"
        action="simplenews/news/index" resource="BDC_SimpleNews::manage_news" />
    <add id="BDC_SimpleNews::configuration" title="Configurations"
        module="BDC_SimpleNews" sortOrder="3" parent="BDC_SimpleNews::main_menu"
        action="adminhtml/system_config/edit/section/simplenews"
        resource="BDC_SimpleNews::configuration" />
</menu>
</config>
```
This route will be same as the frontend route but you must declare it in adminhtml folder with router id is admin. File: app/code/BDC/SampleNews/etc/adminhtml/routes.xml
The url of the admin page is the same structure with frontend page, but the admin_area name will be added before route_frontName to recognize this is a admin router. For example, the url of admin cms page:
http://example.com/index.php/admin/bdc_samplenews/controller/action The controller action for admin page will be added inside of the folder Controller/Adminhtml. For example for above url:
{namespace}/{module}/Controller/Adminhtml/{Controller}/{Action}.php

<!--Use router 'admin' for admin route -->
    <router id="admin">
        <!--Define a custom route with id and frontName -->
        <route id="bdc_samplenews" frontName="bdc_samplenews">
            <!--The module which this route match to-->
            <module name="BDC_SampleNews"/>
        </route>
    </router>
Create file etc/adminhtml/routes.xml Purpose: The router of your module for backend will be declared here insert this following code into it:
```
<?xml version="1.0"?>

<config xmlns:xsi="http://www.w3.org/2001/XMLSchema-instance"
xsi:noNamespaceSchemaLocation="../../../../../../lib/internal/Magento/
Framework/App/etc/routes.xsd">
    <router id="admin">
        <route id="simplenews" frontName="simplenews">
            <module name="BDC_SimpleNews" />
        </route>
    </router>
</config>

```
http://example.com/index.php/admin/simplenews/controller/action {namespace}/{module}/Controller/Adminhtml/{Controller}/{Action}.php
As in the Admin Menu and System Configuration article, you saw that we alway have a resource attribute when create it. Now we will register that resources to the system, so Magento can realize and let us set a role for them. To register the resource, we use the acl.xml file which located in
app/code/{namespace}/{module}/etc/acl.xml
As a module developer, ACL rules present a few interesting challenges. First, there are several places that you, as a module developer, are expected to add ACL rule checks to your module. A few examples
Every URL endpoint/controller in the admin application must implement an _ isAllowed method that determines if a user can access the URL endpoint.
Every Menu Item in the left hand navigation also has a specific ACL rule that controls whether or not the menu displays for the logged in user. This is often the same rule from _ isAllowed)
Every configuration field in System -> Configuration has a specific ACL rule that controls whether or not the menu displays
Despite being required fields, there are no hard and fast rules as to how a module developer should setup and structure their own rules. Also, a module developer will likely want additional rules that are specific to their module. This article can’t answer these hard questions for you, but we will show you how to check the current user against a specific ACL rule, look up ID values for existing rules, and how to create your own tree of ACL rules.
Magento_Backend::admin: Our resource will be placed as child of Magento_Backend::admin. Each resource will have an Id, title and sortOrder attribute:
Id: attribute is the identify of this resource. You can use this when define resource in Admin menu, configuration and limit access to your module controller. This is a unique string and should be in this format: Vendor_ModuleName::resource_name.
Title: attribute is the label of this resource when showing in resource tree.
sortOrder: attribute define the position of this resource in tree.
Open this file etc/acl.xml and modify the source code into here like this:
```
<?xml version="1.0"?>

<config xmlns:xsi="http://www.w3.org/2001/XMLSchema-instance" xsi:noNamespaceSchemaLocation="../../../../../lib/internal/Magento/
Framework/Acl/etc/acl.xsd">
  <acl>
      <resources>
          <resource id="Magento_Backend::admin">
              <resource id="BDC_SimpleNews::simplenews" title="Simple News" sortOrder="100">
                  <resource id="BDC_SimpleNews::add_news" title="Add News" sortOrder="1" />
                  <resource id="BDC_SimpleNews::manage_news" title="Manage News" sortOrder="2" />
                  <resource id="BDC_SimpleNews::configuration" title="Configurations" sortOrder="3" />
              </resource>
              <resource id="Magento_Backend::stores">
                  <resource id="Magento_Backend::stores_settings">
                      <resource id="Magento_Config::config">
                          <resource id="BDC_SimpleNews::system_config" title="Simple News Section" />
                      </resource>
                  </resource>
              </resource>
          </resource>
      </resources>
  </acl>
</config>

```
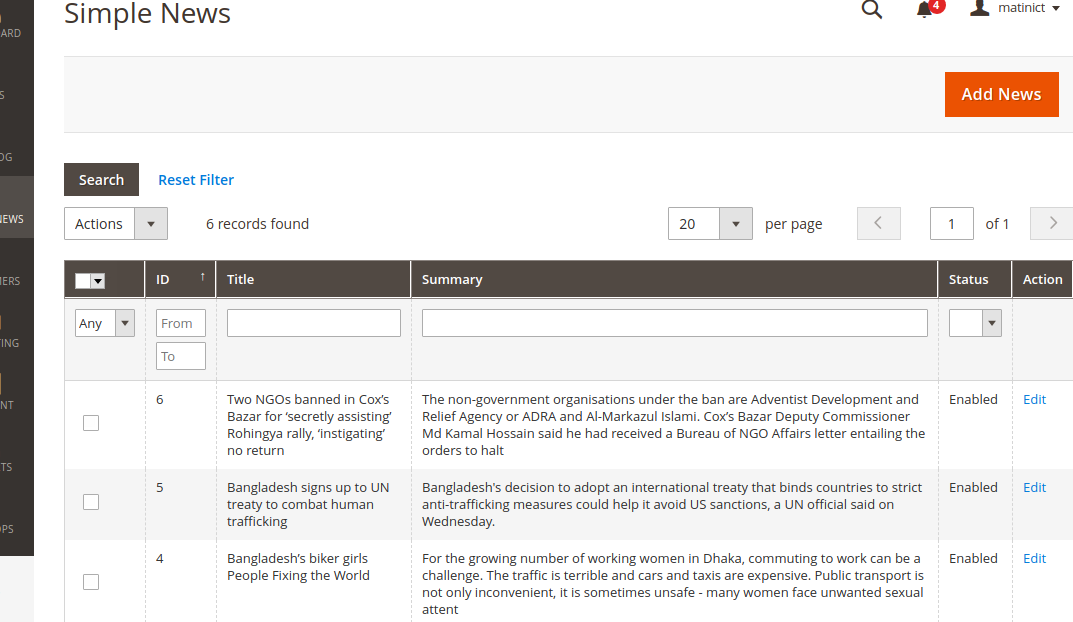
Create file: view/adminhtml/layout/simplenews_news_index.xml (Purpose: This file is used to declare grid container block) and insert this following code into it:
<?xml version="1.0"?>

<page xmlns:xsi="http://www.w3.org/2001/XMLSchema-instance" xsi:noNamespaceSchemaLocation="../../../../../../../lib/internal/Magento/Framework/View/Layout/etc/page_configuration.xsd">
 <update handle="formkey"/>
 <update handle="simplenews_news_grid_block"/>
 <body>
     <referenceContainer name="content">
         <block class="BDCSimpleNewsBlockAdminhtmlNews"
             name="bdc_simplenews_news.grid.container" />
     </referenceContainer>
 </body>
</page>
Create file: app/code/BDC/SimpleNews/view/adminhtml/layout/simplenews_news_grid_block.xml (Purpose: This file is used to declare the content of grid block) and insert this following code into it:
```
<?xml version="1.0"?>

<page xmlns:xsi="http://www.w3.org/2001/XMLSchema-instance" xsi:noNamespaceSchemaLocation="../../../../../../../lib/internal/Magento/Framework/View/Layout/etc/page_configuration.xsd">
    <body>
      <referenceBlock name="bdc_simplenews_news.grid.container">
         <block class="MagentoBackendBlockWidgetGrid" name="bdc_simplenews_news.grid"
             as="grid">
             <arguments>
                 <argument name="id" xsi:type="string">newsGrid</argument>
                 <argument name="dataSource" xsi:type="object">BDCSimpleNewsModelResourceNewsCollection</argument>
                 <argument name="default_sort" xsi:type="string">id</argument>
                 <argument name="default_dir" xsi:type="string">desc</argument>
                 <argument name="save_parameters_in_session" xsi:type="boolean">true</argument>
                 <argument name="use_ajax" xsi:type="boolean">true</argument>
                 <argument name="grid_url" xsi:type="url" path="*/*/grid">
                     <param name="_current">1</param>
                 </argument>
             </arguments>
                <block class="MagentoBackendBlockWidgetGridMassaction"
                    name="bdc_simplenews_news.grid.massaction" as="grid.massaction">
                    <arguments>
                        <argument name="massaction_id_field" xsi:type="string">id</argument>
                        <argument name="form_field_name" xsi:type="string">news</argument>
                        <argument name="options" xsi:type="array">
                            <item name="delete" xsi:type="array">
                                <item name="label" xsi:type="string" translate="true">Delete</item>
                                <item name="url" xsi:type="string">*/*/massDelete</item>
                                <item name="confirm" xsi:type="string" translate="true">Are you sure you want to delete?</item>
                            </item>
                        </argument>
                    </arguments>
                </block>
                <block class="MagentoBackendBlockWidgetGridColumnSet"
                    name="bdc_simplenews_news.grid.columnSet" as="grid.columnSet">
                    <arguments>
                        <argument name="rowUrl" xsi:type="array">
                            <item name="path" xsi:type="string">*/*/edit</item>
                            <item name="extraParamsTemplate" xsi:type="array">
                                <item name="id" xsi:type="string">getId</item>
                            </item>
                        </argument>
                    </arguments>
                    <block class="MagentoBackendBlockWidgetGridColumn" as="id">
                        <arguments>
                            <argument name="header" xsi:type="string" translate="true">ID</argument>
                            <argument name="type" xsi:type="string">number</argument>
                            <argument name="id" xsi:type="string">id</argument>
                            <argument name="index" xsi:type="string">id</argument>
                        </arguments>
                    </block>
                    <block class="MagentoBackendBlockWidgetGridColumn" as="title">
                        <arguments>
                            <argument name="header" xsi:type="string" translate="true">Title</argument>
                            <argument name="index" xsi:type="string">title</argument>
                        </arguments>
                    </block>
                    <block class="MagentoBackendBlockWidgetGridColumn" as="summary">
                        <arguments>
                            <argument name="header" xsi:type="string" translate="true">Summary</argument>
                            <argument name="index" xsi:type="string">summary</argument>
                        </arguments>
                    </block>
                    <block class="MagentoBackendBlockWidgetGridColumn" as="status">
                        <arguments>
                            <argument name="header" xsi:type="string" translate="true">Status</argument>
                            <argument name="index" xsi:type="string">status</argument>
                            <argument name="type" xsi:type="string">options</argument>
                            <argument name="options" xsi:type="options" model="BDCSimpleNewsModelSystemConfigStatus"/>
                        </arguments>
                    </block>
                    <block class="MagentoBackendBlockWidgetGridColumn" as="action" acl="BDC_SimpleNews::manage_news">
                        <arguments>
                            <argument name="id" xsi:type="string">action</argument>
                            <argument name="header" xsi:type="string" translate="true">Action</argument>
                            <argument name="type" xsi:type="string">action</argument>
                            <argument name="getter" xsi:type="string">getId</argument>
                            <argument name="filter" xsi:type="boolean">false</argument>
                            <argument name="sortable" xsi:type="boolean">false</argument>
                            <argument name="index" xsi:type="string">stores</argument>
                            <argument name="is_system" xsi:type="boolean">true</argument>
                            <argument name="actions" xsi:type="array">
                                <item name="view_action" xsi:type="array">
                                    <item name="caption" xsi:type="string" translate="true">Edit</item>
                                    <item name="url" xsi:type="array">
                                        <item name="base" xsi:type="string">*/*/edit</item>
                                    </item>
                                    <item name="field" xsi:type="string">id</item>
                                </item>
                            </argument>
                            <argument name="header_css_class" xsi:type="string">col-actions</argument>
                            <argument name="column_css_class" xsi:type="string">col-actions</argument>
                        </arguments>
                    </block>
                </block>
         </block>
      </referenceBlock>
    </body>
</page>

```
Create file: app/code/BDC/SimpleNews/view/adminhtml/layout/simplenews_news_grid.xml (Purpose: This file is used to declare the content of grid when you use ajax to reload the grid) and insert this following code into it:
<?xml version="1.0"?>
<page xmlns:xsi="http://www.w3.org/2001/XMLSchema-instance" xsi:noNamespaceSchemaLocation="../../../../../../../lib/internal/Magento/Framework/View/Layout/etc/layout_generic.xsd">
    <update handle="formkey" />
    <update handle="simplenews_news_grid_block" />
    <container name="root">
        <block class="MagentoBackendBlockWidgetGridContainer" name="bdc_simplenews_news.grid.container" template="Magento_Backend::widget/grid/container/empty.phtml"/>
    </container>
</page>
Create file: app/code/BDC/SimpleNews/Model/System/Config/Status.php (Purpose: This file is used to get News status options) and insert this following code into it:
```
<?php

namespace BDCSimpleNewsModelSystemConfig;

use MagentoFrameworkOptionArrayInterface;

class Status implements ArrayInterface {
    const ENABLED  = 1;
    const DISABLED = 0;
    /**
     * @return array
     */
    public function toOptionArray(){
        $options = [
            self::ENABLED => __('Enabled'),
            self::DISABLED => __('Disabled')
        ];

        return $options;
    }
}

```
Create file: app/code/BDC/SimpleNews/Block/Adminhtml/News.php (Purpose: This is the block file of grid container) and insert this following code into it:
```
<?php
namespace BDCSimpleNewsModelSystemConfig;
use MagentoFrameworkOptionArrayInterface;
class Status implements ArrayInterface {
    const ENABLED  = 1;
    const DISABLED = 0;
    /**
     * @return array
     */
    public function toOptionArray(){
        $options = [
            self::ENABLED => __('Enabled'),
            self::DISABLED => __('Disabled')
        ];

        return $options;
    }
}

```
Create file: app/code/BDC/SimpleNews/Model/System/Config/Status.php (Purpose: check) and insert this following code into it:
```
<?php

namespace BDCSimpleNewsModelSystemConfig;

use MagentoFrameworkOptionArrayInterface;

class Status implements ArrayInterface {
    const ENABLED  = 1;
    const DISABLED = 0;
    /**
     * @return array
     */
    public function toOptionArray(){
        $options = [
            self::ENABLED => __('Enabled'),
            self::DISABLED => __('Disabled')
        ];

        return $options;
    }
}

```
Create file: app/code/BDC/SimpleNews/Controller/Adminhtml/News.php (Purpose: I use this file as a root controller and the action classes will be extended this controller) and insert this following code into it:
```
<?php
namespace BDCSimpleNewsBlockAdminhtml;
use MagentoBackendBlockWidgetGridContainer;

class News extends Container{
   /**
     * Constructor
     *
     * @return void
     */
   protected function _construct(){
        $this->_controller = 'adminhtml_news';
        $this->_blockGroup = 'BDC_SimpleNews';
        $this->_headerText = __('Manage News');
        $this->_addButtonLabel = __('Add News');
        parent::_construct();
    }
}

```
Create file: app/code/BDC/SimpleNews/Controller/Adminhtml/News/Index.php (Purpose: This is the index action) and insert this following code into it:
```
<?php

namespace BDCSimpleNewsControllerAdminhtmlNews;

use BDCSimpleNewsControllerAdminhtmlNews;

class Index extends News{
    /**
     * @return void
     */
   public function execute(){
      if ($this->getRequest()->getQuery('ajax')) {
            $this->_forward('grid');
            return;
        }
        /** @var MagentoBackendModelViewResultPage $resultPage */
        $resultPage = $this->_resultPageFactory->create();
        $resultPage->setActiveMenu('BDC_SimpleNews::main_menu');
        $resultPage->getConfig()->getTitle()->prepend(__('Simple News'));

        return $resultPage;
   }
}

```
Create file: app/code/BDC/SimpleNews/Controller/Adminhtml/News/Grid.php (Purpose: This is the grid action which is used for loading grid by ajax) and insert this following code into it:
```
<?php

namespace BDCSimpleNewsControllerAdminhtmlNews;

use BDCSimpleNewsControllerAdminhtmlNews;

class Grid extends News {
   /**
     * @return void
     */
   public function execute() {
      return $this->_resultPageFactory->create();
   }
}

```
Create file: app/code/BDC/SimpleNews/view/adminhtml/layout/simplenews_news_edit.xml (Purpose: This file is used to declare blocks which used on editing page) and insert this following code into it:
<?xml version="1.0"?>
<page xmlns:xsi="http://www.w3.org/2001/XMLSchema-instance"
layout="admin-2columns-left" xsi:noNamespaceSchemaLocation="../../../../../../../lib/internal/Magento/Framework/View/Layout/etc/page_configuration.xsd">
    <body>
        <referenceContainer name="left">
            <block class="BDCSimpleNewsBlockAdminhtmlNewsEditTabs"  name="bdc_simplenews_news.edit.tabs"/>
        </referenceContainer>
        <referenceContainer name="content">
            <block class="BDCSimpleNewsBlockAdminhtmlNewsEdit"
                name="bdc_simplenews_news.edit"/>
        </referenceContainer>
    </body>
</page>
Create file: app/code/BDC/SimpleNews/view/adminhtml/layout/simplenews_news_create.xml and insert this following code into it:
```
<?xml version="1.0"?>

<layout xmlns:xsi="http://www.w3.org/2001/XMLSchema-instance"
xsi:noNamespaceSchemaLocation="../../../../../Magento/Core/etc/layout_single.xsd">
    <update handle="simplenews_news_edit"/>
</layout>

```
Create file: app/code/BDC/SimpleNews/Block/Adminhtml/News/Edit.php (Purpose: This is the block file of form container) and insert this following code into it:
```
<?php

namespace BDCSimpleNewsBlockAdminhtmlNews;

use MagentoBackendBlockWidgetFormContainer;
use MagentoBackendBlockWidgetContext;
use MagentoFrameworkRegistry;

class Edit extends Container
{
 /**
   * Core registry
   *
   * @var MagentoFrameworkRegistry
   */
  protected $_coreRegistry = null;

  /**
   * @param Context $context
   * @param Registry $registry
   * @param array $data
   */
  public function __construct(
      Context $context,
      Registry $registry,
      array $data = []
  ) {
      $this->_coreRegistry = $registry;
      parent::__construct($context, $data);
  }

  /**
   * Class constructor
   *
   * @return void
   */
  protected function _construct()
  {
      $this->_objectId = 'id';
      $this->_controller = 'adminhtml_news';
      $this->_blockGroup = 'BDC_SimpleNews';

      parent::_construct();

      $this->buttonList->update('save', 'label', __('Save'));
      $this->buttonList->add(
          'saveandcontinue',
          [
              'label' => __('Save and Continue Edit'),
              'class' => 'save',
              'data_attribute' => [
                  'mage-init' => [
                      'button' => [
                          'event' => 'saveAndContinueEdit',
                          'target' => '#edit_form'
                      ]
                  ]
              ]
          ],
          -100
      );
      $this->buttonList->update('delete', 'label', __('Delete'));
  }

  /**
   * Retrieve text for header element depending on loaded news
   *
   * @return string
   */
  public function getHeaderText()
  {
      $newsRegistry = $this->_coreRegistry->registry('simplenews_news');
      if ($newsRegistry->getId()) {
          $newsTitle = $this->escapeHtml($newsRegistry->getTitle());
          return __("Edit News '%1'", $newsTitle);
      } else {
          return __('Add News');
      }
  }

  /**
   * Prepare layout
   *
   * @return MagentoFrameworkViewElementAbstractBlock
   */
  protected function _prepareLayout()
  {
      $this->_formScripts[] = "
          function toggleEditor() {
              if (tinyMCE.getInstanceById('news_content') == null) {
                  tinyMCE.execCommand('mceAddControl', false, 'news_content');
              } else {
                  tinyMCE.execCommand('mceRemoveControl', false, 'news_content');
              }
          };
      ";

      return parent::_prepareLayout();
  }
}

```
Create file: app/code/BDC/SimpleNews/Block/Adminhtml/News/Edit/Tabs.php (Purpose: This file will declare tabs at left column of the editing page) and insert this following code into it:
```
<?php

namespace BDCSimpleNewsBlockAdminhtmlNews;

use MagentoBackendBlockWidgetFormContainer;
use MagentoBackendBlockWidgetContext;
use MagentoFrameworkRegistry;

class Edit extends Container
{
   /**
     * Core registry
     *
     * @var MagentoFrameworkRegistry
     */
    protected $_coreRegistry = null;

    /**
     * @param Context $context
     * @param Registry $registry
     * @param array $data
     */
    public function __construct(
        Context $context,
        Registry $registry,
        array $data = []
    ) {
        $this->_coreRegistry = $registry;
        parent::__construct($context, $data);
    }

    /**
     * Class constructor
     *
     * @return void
     */
    protected function _construct()
    {
        $this->_objectId = 'id';
        $this->_controller = 'adminhtml_news';
        $this->_blockGroup = 'BDC_SimpleNews';

        parent::_construct();

        $this->buttonList->update('save', 'label', __('Save'));
        $this->buttonList->add(
            'saveandcontinue',
            [
                'label' => __('Save and Continue Edit'),
                'class' => 'save',
                'data_attribute' => [
                    'mage-init' => [
                        'button' => [
                            'event' => 'saveAndContinueEdit',
                            'target' => '#edit_form'
                        ]
                    ]
                ]
            ],
            -100
        );
        $this->buttonList->update('delete', 'label', __('Delete'));
    }

    /**
     * Retrieve text for header element depending on loaded news
     *
     * @return string
     */
    public function getHeaderText()
    {
        $newsRegistry = $this->_coreRegistry->registry('simplenews_news');
        if ($newsRegistry->getId()) {
            $newsTitle = $this->escapeHtml($newsRegistry->getTitle());
            return __("Edit News '%1'", $newsTitle);
        } else {
            return __('Add News');
        }
    }

    /**
     * Prepare layout
     *
     * @return MagentoFrameworkViewElementAbstractBlock
     */
    protected function _prepareLayout()
    {
        $this->_formScripts[] = "
            function toggleEditor() {
                if (tinyMCE.getInstanceById('news_content') == null) {
                    tinyMCE.execCommand('mceAddControl', false, 'news_content');
                } else {
                    tinyMCE.execCommand('mceRemoveControl', false, 'news_content');
                }
            };
        ";

        return parent::_prepareLayout();
    }
}

```
Create file: app/code/BDC/SimpleNews/Block/Adminhtml/News/Edit/Form.php (Purpose: This file will declare form information) and insert this following code into it:
```
<?php

namespace BDCSimpleNewsBlockAdminhtmlNews;

use MagentoBackendBlockWidgetFormContainer;
use MagentoBackendBlockWidgetContext;
use MagentoFrameworkRegistry;

class Edit extends Container
{
   /**
     * Core registry
     *
     * @var MagentoFrameworkRegistry
     */
    protected $_coreRegistry = null;

    /**
     * @param Context $context
     * @param Registry $registry
     * @param array $data
     */
    public function __construct(
        Context $context,
        Registry $registry,
        array $data = []
    ) {
        $this->_coreRegistry = $registry;
        parent::__construct($context, $data);
    }

    /**
     * Class constructor
     *
     * @return void
     */
    protected function _construct()
    {
        $this->_objectId = 'id';
        $this->_controller = 'adminhtml_news';
        $this->_blockGroup = 'BDC_SimpleNews';

        parent::_construct();

        $this->buttonList->update('save', 'label', __('Save'));
        $this->buttonList->add(
            'saveandcontinue',
            [
                'label' => __('Save and Continue Edit'),
                'class' => 'save',
                'data_attribute' => [
                    'mage-init' => [
                        'button' => [
                            'event' => 'saveAndContinueEdit',
                            'target' => '#edit_form'
                        ]
                    ]
                ]
            ],
            -100
        );
        $this->buttonList->update('delete', 'label', __('Delete'));
    }

    /**
     * Retrieve text for header element depending on loaded news
     *
     * @return string
     */
    public function getHeaderText()
    {
        $newsRegistry = $this->_coreRegistry->registry('simplenews_news');
        if ($newsRegistry->getId()) {
            $newsTitle = $this->escapeHtml($newsRegistry->getTitle());
            return __("Edit News '%1'", $newsTitle);
        } else {
            return __('Add News');
        }
    }

    /**
     * Prepare layout
     *
     * @return MagentoFrameworkViewElementAbstractBlock
     */
    protected function _prepareLayout()
    {
        $this->_formScripts[] = "
            function toggleEditor() {
                if (tinyMCE.getInstanceById('news_content') == null) {
                    tinyMCE.execCommand('mceAddControl', false, 'news_content');
                } else {
                    tinyMCE.execCommand('mceRemoveControl', false, 'news_content');
                }
            };
        ";

        return parent::_prepareLayout();
    }
}

```
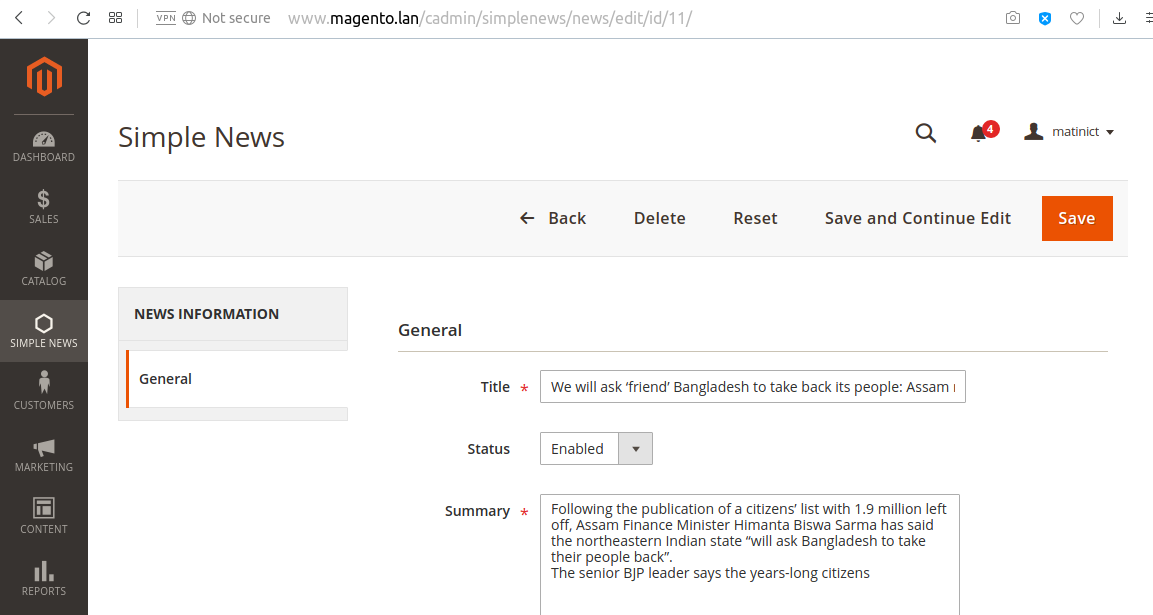
Create file: app/code/BDC/SimpleNews/Block/Adminhtml/News/Edit/Tab/Info.php (Purpose: This file will declare fields in form) and insert this following code into it:
```
<?php

namespace BDCSimpleNewsBlockAdminhtmlNews;

use MagentoBackendBlockWidgetFormContainer;
use MagentoBackendBlockWidgetContext;
use MagentoFrameworkRegistry;

class Edit extends Container
{
 /**
   * Core registry
   *
   * @var MagentoFrameworkRegistry
   */
  protected $_coreRegistry = null;

  /**
   * @param Context $context
   * @param Registry $registry
   * @param array $data
   */
  public function __construct(
      Context $context,
      Registry $registry,
      array $data = []
  ) {
      $this->_coreRegistry = $registry;
      parent::__construct($context, $data);
  }

  /**
   * Class constructor
   *
   * @return void
   */
  protected function _construct()
  {
      $this->_objectId = 'id';
      $this->_controller = 'adminhtml_news';
      $this->_blockGroup = 'BDC_SimpleNews';

      parent::_construct();

      $this->buttonList->update('save', 'label', __('Save'));
      $this->buttonList->add(
          'saveandcontinue',
          [
              'label' => __('Save and Continue Edit'),
              'class' => 'save',
              'data_attribute' => [
                  'mage-init' => [
                      'button' => [
                          'event' => 'saveAndContinueEdit',
                          'target' => '#edit_form'
                      ]
                  ]
              ]
          ],
          -100
      );
      $this->buttonList->update('delete', 'label', __('Delete'));
  }

  /**
   * Retrieve text for header element depending on loaded news
   *
   * @return string
   */
  public function getHeaderText()
  {
      $newsRegistry = $this->_coreRegistry->registry('simplenews_news');
      if ($newsRegistry->getId()) {
          $newsTitle = $this->escapeHtml($newsRegistry->getTitle());
          return __("Edit News '%1'", $newsTitle);
      } else {
          return __('Add News');
      }
  }

  /**
   * Prepare layout
   *
   * @return MagentoFrameworkViewElementAbstractBlock
   */
  protected function _prepareLayout()
  {
      $this->_formScripts[] = "
          function toggleEditor() {
              if (tinyMCE.getInstanceById('news_content') == null) {
                  tinyMCE.execCommand('mceAddControl', false, 'news_content');
              } else {
                  tinyMCE.execCommand('mceRemoveControl', false, 'news_content');
              }
          };
      ";

      return parent::_prepareLayout();
  }
}

```
Create file: app/code/BDC/SimpleNews/Controller/Adminhtml/News/NewAction.php (Purpose: This is the new action) and insert this following code into it:
```
<?php

namespace BDCSimpleNewsControllerAdminhtmlNews;

use BDCSimpleNewsControllerAdminhtmlNews;

class NewAction extends News
{
   /**
     * Create new news action
     *
     * @return void
     */
   public function execute()
   {
      $this->_forward('edit');
   }
}

```
Create file: app/code/BDC/SimpleNews/Controller/Adminhtml/News/Edit.php (Purpose: This is the edit action for editing news page) and insert this following code into it:
  ```
  <?php

  namespace BDCSimpleNewsControllerAdminhtmlNews;

  use BDCSimpleNewsControllerAdminhtmlNews;

  class Edit extends News
  {
     /**
       * @return void
       */
     public function execute()
     {
        $newsId = $this->getRequest()->getParam('id');
          /** @var BDCSimpleNewsModelNews $model */
          $model = $this->_newsFactory->create();

          if ($newsId) {
              $model->load($newsId);
              if (!$model->getId()) {
                  $this->messageManager->addError(__('This news no longer exists.'));
                  $this->_redirect('*/*/');
                  return;
              }
          }

          // Restore previously entered form data from session
          $data = $this->_session->getNewsData(true);
          if (!empty($data)) {
              $model->setData($data);
          }
          $this->_coreRegistry->register('simplenews_news', $model);

          /** @var MagentoBackendModelViewResultPage $resultPage */
          $resultPage = $this->_resultPageFactory->create();
          $resultPage->setActiveMenu('BDC_SimpleNews::main_menu');
          $resultPage->getConfig()->getTitle()->prepend(__('Simple News'));

          return $resultPage;
     }
  }

  ```
Create file: app/code/BDC/SimpleNews/Controller/Adminhtml/News/Save.php (Purpose: This is the save action) and insert this following code into it:
```
<?php

namespace BDCSimpleNewsControllerAdminhtmlNews;

use BDCSimpleNewsControllerAdminhtmlNews;

class Edit extends News
{
 /**
   * @return void
   */
 public function execute()
 {
    $newsId = $this->getRequest()->getParam('id');
      /** @var BDCSimpleNewsModelNews $model */
      $model = $this->_newsFactory->create();

      if ($newsId) {
          $model->load($newsId);
          if (!$model->getId()) {
              $this->messageManager->addError(__('This news no longer exists.'));
              $this->_redirect('*/*/');
              return;
          }
      }

      // Restore previously entered form data from session
      $data = $this->_session->getNewsData(true);
      if (!empty($data)) {
          $model->setData($data);
      }
      $this->_coreRegistry->register('simplenews_news', $model);

      /** @var MagentoBackendModelViewResultPage $resultPage */
      $resultPage = $this->_resultPageFactory->create();
      $resultPage->setActiveMenu('BDC_SimpleNews::main_menu');
      $resultPage->getConfig()->getTitle()->prepend(__('Simple News'));

      return $resultPage;
 }
}

```
Create file: app/code/BDC/SimpleNews/Controller/Adminhtml/News/Delete.php (Purpose: This is the delete action) and insert this following code into it:
```
<?php

namespace BDCSimpleNewsControllerAdminhtmlNews;

use BDCSimpleNewsControllerAdminhtmlNews;

class Delete extends News
{
 /**
  * @return void
  */
 public function execute()
 {
    $newsId = (int) $this->getRequest()->getParam('id');

    if ($newsId) {
       /** @var $newsModel MageworldSimpleNewsModelNews */
       $newsModel = $this->_newsFactory->create();
       $newsModel->load($newsId);

       // Check this news exists or not
       if (!$newsModel->getId()) {
          $this->messageManager->addError(__('This news no longer exists.'));
       } else {
             try {
                // Delete news
                $newsModel->delete();
                $this->messageManager->addSuccess(__('The news has been deleted.'));

                // Redirect to grid page
                $this->_redirect('*/*/');
                return;
             } catch (Exception $e) {
                 $this->messageManager->addError($e->getMessage());
                 $this->_redirect('*/*/edit', ['id' => $newsModel->getId()]);
             }
          }
    }
 }
}

```
Create file: app/code/BDC/SimpleNews/Controller/Adminhtml/News/MassDelete.php (Purpose: This file is used for deleting multi items on grid) and insert this following code into it:
```
<?php
namespace BDCSimpleNewsControllerAdminhtmlNews;
use BDCSimpleNewsControllerAdminhtmlNews;

class MassDelete extends News {
 /**
  * @return void
  */
 public function execute()
 {
    // Get IDs of the selected news
    $newsIds = $this->getRequest()->getParam('news');

      foreach ($newsIds as $newsId) {
          try {
             /** @var $newsModel MageworldSimpleNewsModelNews */
              $newsModel = $this->_newsFactory->create();
              $newsModel->load($newsId)->delete();
          } catch (Exception $e) {
              $this->messageManager->addError($e->getMessage());
          }
      }

      if (count($newsIds)) {
          $this->messageManager->addSuccess(
              __('A total of %1 record(s) were deleted.', count($newsIds))
          );
      }

      $this->_redirect('*/*/index');
 }
}

```

<?xml version="1.0" encoding="UTF-8"?>

<page xmlns:xsi="http://www.w3.org/2001/XMLSchema-instance" layout="3columns"
xsi:noNamespaceSchemaLocation="../../../../../../../lib/internal/Magento/Framework/View/Layout/etc/page_configuration.xsd">
   <head>
      <css src="BDC_SimpleNews::css/style.css" />
   </head>
    <body>
       <referenceContainer name="sidebar.main">
         <block class="BDCSimpleNewsBlockLastestLeft" name="lestest.news.left"
             before="-" />
       </referenceContainer>

       <referenceContainer name="sidebar.additional">
         <block class="BDCSimpleNewsBlockLastestRight" name="lestest.news.right"
             before="-" />
       </referenceContainer>
    </body>
</page>
<?xml version="1.0"?>
<page xmlns:xsi="http://www.w3.org/2001/XMLSchema-instance" layout="3columns" xsi:noNamespaceSchemaLocation="urn:magento:framework:View/Layout/etc/page_configuration.xsd">
    <update handle="news_news" />
    <body>
        <referenceBlock name="content">
            <block template="BDC_SimpleNews::list.phtml" class="BDCSimpleNewsBlockNewsList" name="bdc_simplenews_block_news_list"/>
        </referenceBlock>
    </body>
</page>
<?php

namespace BDCSimpleNewsBlock;

use MagentoFrameworkViewElementTemplate;
use BDCSimpleNewsModelNewsFactory;

class NewsList extends Template
{
   /**
    * @var BDCSimpleNewsModelNewsFactory
    */
   protected $_newsFactory;

   /**
    * @param TemplateContext $context
    * @param NewsFactory $newsFactory
    * @param array $data
    */
   public function __construct(
      TemplateContext $context,
      NewsFactory $newsFactory,
      array $data = []
   ) {
        $this->_newsFactory = $newsFactory;
        parent::__construct($context, $data);
   }

   /**
     * Set news collection
     */
    protected  function _construct()
    {
        parent::_construct();
        $collection = $this->_newsFactory->create()->getCollection()
            ->setOrder('id', 'DESC');
        $this->setCollection($collection);
    }

   /**
     * @return $this
     */
    protected function _prepareLayout()
    {
        parent::_prepareLayout();
        /** @var MagentoThemeBlockHtmlPager */
        $pager = $this->getLayout()->createBlock(
           'MagentoThemeBlockHtmlPager','simplenews.news.list.pager'
        );
        $pager->setLimit(5)
            ->setShowAmounts(false)
            ->setCollection($this->getCollection());
        $this->setChild('pager', $pager);
        $this->getCollection()->load();

        return $this;
    }

   /**
     * @return string
     */
    public function getPagerHtml()
    {
        return $this->getChildHtml('pager');
    }
}
<div class="simplenews">
   <?php
      $newsCollection = $block->getCollection();
      if ($newsCollection->getSize() > 0) :
   ?>
      <div class="toolbar top">
         <?php echo $block->getPagerHtml(); ?>
      </div>

      <ul>
         <?php foreach ($newsCollection as $news) : ?>
            <li>
               <div class="simplenews-list">
                  <a class="news-title" href="<?php echo $this->getUrl('news/index/view',
 ['id' => $news->getId()]) ?>"><?php echo $news->getTitle() ?></a>
                  <div class="simplenews-list-content">
                     <?php echo $news->getSummary() ?>
                  </div>
               </div>
            </li>
         <?php endforeach; ?>
      </ul>

      <div style="clear: both"></div>

      <div class="toolbar-bottom">
         <div class="toolbar bottom">
            <?php echo $block->getPagerHtml(); ?>
         </div>
      </div>
   <?php else : ?>
      <p><?php echo __('Have no article!') ?></p>
   <?php endif; ?>
</div>
<?php

namespace BDCSimpleNewsControllerIndex;

use BDCSimpleNewsControllerNews;

class Index extends News
{

    public function execute()
    {
        $pageFactory = $this->_pageFactory->create();

        $pageFactory->getConfig()->getTitle()->set($this->_dataHelper->getHeadTitle());

        //Add breadcrumb
        $breadcrumbs = $pageFactory->getLayout()->getBlock('breadcrumbs');
        $breadcrumbs->addCrumb('home', ['label'=>__('Home'), 'title'=>__('Home'), 'link'=>$this->_url->getUrl('')]);
        $breadcrumbs->addCrumb('simplenews', ['label'=>__('Simple News'), 'title'=>__('Simple News')]);

        return $pageFactory;
    }
}
.simplenews > ul {
   list-style: none;
   padding: 0;
}
.simplenews > ul li {
   padding: 10px 5px;
   margin: 0;
   background-color: #fff;
   border-bottom: 1px #c4c1bc solid;
   display: inline-block;
   width: 100%;
}
.simplenews > ul li:last-child {
   border-bottom: none;
}
.simplenews-list {
   float: left;
   position: relative;
   margin-left: 10px;
   width: 100%;
}
.simplenews-list a.news-title {
   font-weight: bold;
}
.simplenews-list a.news-title:hover {
   text-decoration: none;
}
.block-simplenews .block-title {
   margin: 0px 0px 20px;
}
.block-simplenews-heading {
   font-size: 18px;
   font-weight: 300;
}
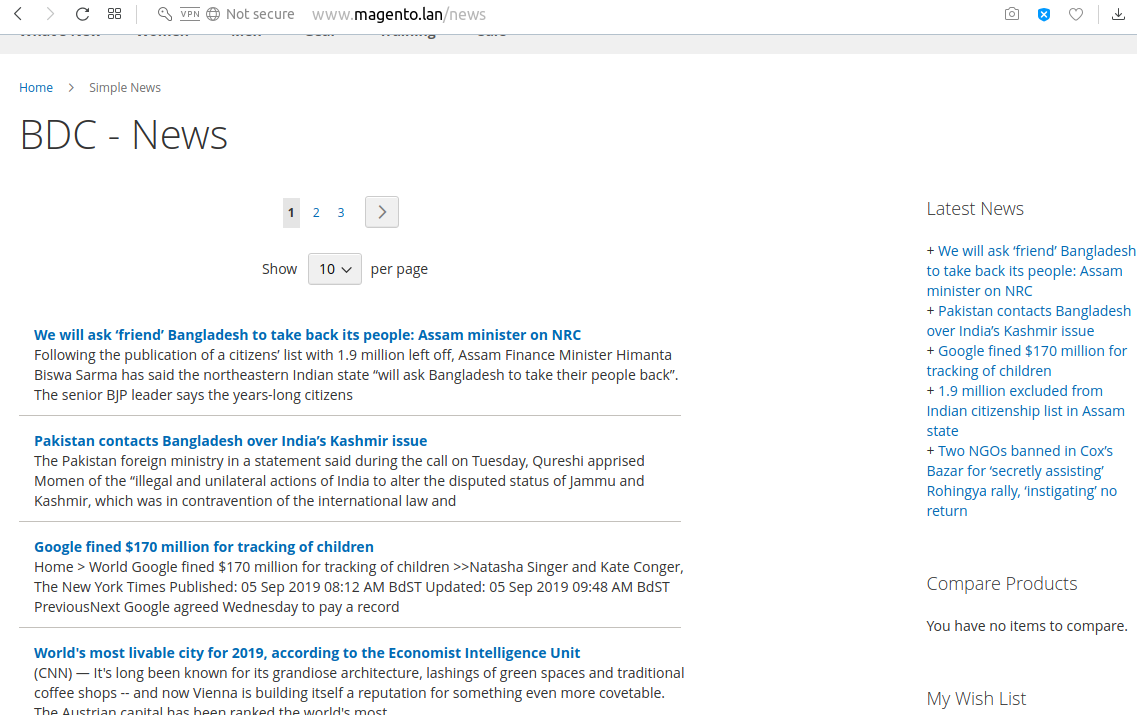
<?xml version="1.0" encoding="UTF-8"?>

<page xmlns:xsi="http://www.w3.org/2001/XMLSchema-instance" layout="3columns"
xsi:noNamespaceSchemaLocation="../../../../../../../lib/internal/Magento/Framework/View/Layout/etc/page_configuration.xsd">
    <update handle="news_news" />
    <body>
        <referenceContainer name="content">
            <block class="BDCSimpleNewsBlockView" name="bdc_simplenews_news_view"
                template="BDC_SimpleNews::view.phtml" />
        </referenceContainer>
    </body>
</page>
<?php

namespace BDCSimpleNewsControllerIndex;

use BDCSimpleNewsControllerNews;

class View extends News
{
    public function execute()
    {
	// Get news ID
        $newsId = $this->getRequest()->getParam('id');
	// Get news data
        $news = $this->_newsFactory->create()->load($newsId);
	// Save news data into the registry
        $this->_objectManager->get('MagentoFrameworkRegistry')
            ->register('newsData', $news);

        $pageFactory = $this->_pageFactory->create();

        // Add title
        $pageFactory->getConfig()->getTitle()->set($news->getTitle());

        // Add breadcrumb
        /** @var MagentoThemeBlockHtmlBreadcrumbs */
        $breadcrumbs = $pageFactory->getLayout()->getBlock('breadcrumbs');
        $breadcrumbs->addCrumb('home',
            [
                'label' => __('Home'),
                'title' => __('Home'),
                'link' => $this->_url->getUrl('')
            ]
        );
        $breadcrumbs->addCrumb('simplenews',
            [
                'label' => __('Simple News'),
                'title' => __('Simple News'),
                'link' => $this->_url->getUrl('news')
            ]
        );
        $breadcrumbs->addCrumb('news',
            [
                'label' => $news->getTitle(),
                'title' => $news->getTitle()
            ]
        );

        return $pageFactory;
    }
}
<?php
   $news = $block->getNewsInformation();
?>
<div class="mw-simplenews">
   <?php echo $news->getDescription() ?>
</div>
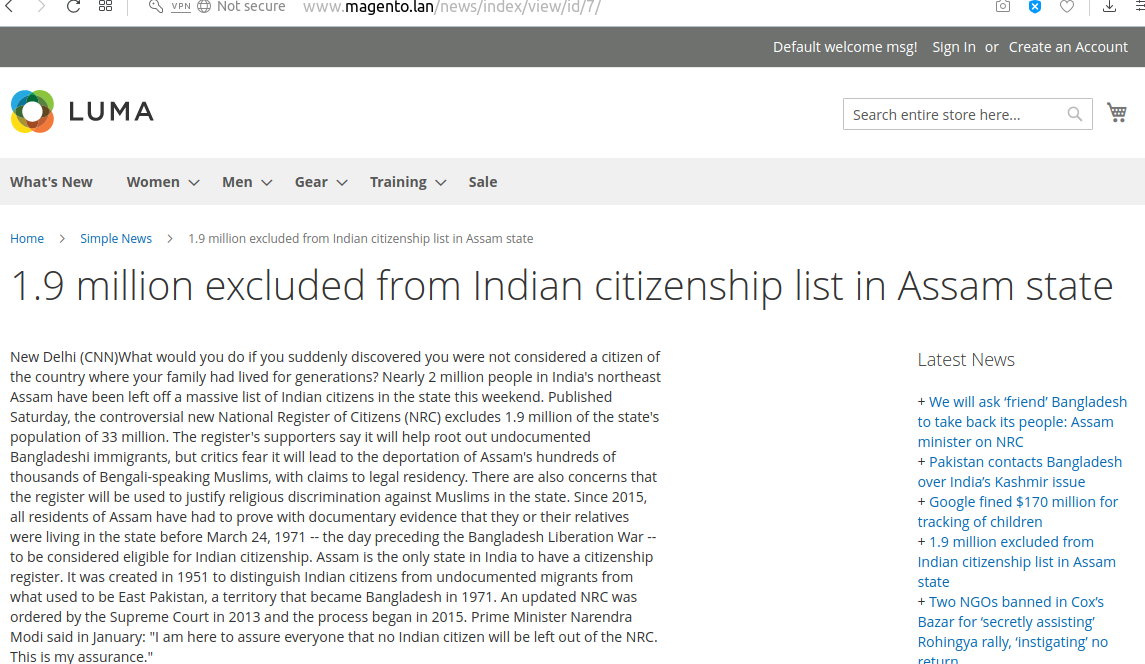
<?xml version="1.0" encoding="UTF-8"?>

<page xmlns:xsi="http://www.w3.org/2001/XMLSchema-instance" layout="3columns"
xsi:noNamespaceSchemaLocation="../../../../../../../lib/internal/Magento/Framework/View/Layout/etc/page_configuration.xsd">
   <head>
      <css src="BDC_SimpleNews::css/style.css" />
   </head>
    <body>
       <referenceContainer name="sidebar.main">
         <block class="BDCSimpleNewsBlockLastestLeft" name="lestest.news.left"
             before="-" />
       </referenceContainer>

       <referenceContainer name="sidebar.additional">
         <block class="BDCSimpleNewsBlockLastestRight" name="lestest.news.right"
             before="-" />
       </referenceContainer>
    </body>
</page>
<?php

namespace BDCSimpleNewsBlock;

use MagentoFrameworkViewElementTemplate;
use BDCSimpleNewsHelperData;
use BDCSimpleNewsModelNewsFactory;
use BDCSimpleNewsModelSystemConfigStatus;

class Lastest extends Template
{
   /**
    * @var BDCSimpleNewsHelperData
    */
   protected $_dataHelper;

   /**
    * @var BDCSimpleNewsModelNewsFactory
    */
   protected $_newsFactory;

   /**
    * @param TemplateContext $context
    * @param Data $dataHelper
    * @param NewsFactory $newsFactory
    */
   public function __construct(
      TemplateContext $context,
      Data $dataHelper,
      NewsFactory $newsFactory
   ) {
      $this->_dataHelper = $dataHelper;
      $this->_newsFactory = $newsFactory;
      parent::__construct($context);
   }

   /**
    * Get five latest news
    *
    * @return BDCSimpleNewsModelResourceNewsCollection
    */
   public function getLatestNews()
   {
      // Get news collection
      $collection = $this->_newsFactory->create()->getCollection();
      $collection->addFieldToFilter(
         'status',
         ['eq' => Status::ENABLED]
      );
      $collection->getSelect()
         ->order('id DESC')
         ->limit(5);

      return $collection;
   }
}
<?php

namespace BDCSimpleNewsBlockLastest;

use BDCSimpleNewsBlockLastest;
use BDCSimpleNewsModelSystemConfigLastestNewsPosition;

class Left extends Lastest
{
   public function _construct()
   {
      $position = $this->_dataHelper->getLastestNewsBlockPosition();
      // Check this position is applied or not
      if ($position == Position::LEFT) {
         $this->setTemplate('BDC_SimpleNews::lastest.phtml');
      }
   }
}
<?php

namespace BDCSimpleNewsBlockLastest;

use BDCSimpleNewsBlockLastest;
use BDCSimpleNewsModelSystemConfigLastestNewsPosition;

class Right extends Lastest
{
   public function _construct()
   {
      $position = $this->_dataHelper->getLastestNewsBlockPosition();
      // Check this position is applied or not
      if ($position == Position::RIGHT) {
         $this->setTemplate('BDC_SimpleNews::lastest.phtml');
      }
   }
}
<?php
   $latestNews = $block->getLatestNews();
   if ($latestNews->getSize() > 0) :
?>
   <div class="block block-simplenews">
      <div class="block-title">
         <strong class="block-simplenews-heading"><?php echo __('Latest News') ?></strong>
      </div>

      <div class="block-content">
         <?php foreach ($latestNews as $news) : ?>
            <div>
               <span>+ </span>
               <a href="<?php echo $this->getUrl('news/index/view', ['id' => $news->getId()])
?>">
                  <span><?php echo $news->getTitle() ?></span>
               </a>
            </div>
         <?php endforeach; ?>
      </div>
   </div>
<?php endif; ?>
Adding a new command to CLI is based on passing on the argument from the XML level to the class MagentoFrameworkConsoleCommandList. Dependency Injection comes in handy here. Let’s
Edit/Create etc/di.xml:
<?xml version="1.0"?>
<config xmlns:xsi="http://www.w3.org/2001/XMLSchema-instance" xsi:noNamespaceSchemaLocation="urn:magento:framework:ObjectManager/etc/config.xsd">
   <type name="MagentoFrameworkConsoleCommandList">
       <arguments>
           <argument name="commands" xsi:type="array">
             <item name="bdc_simplenews_create" xsi:type="object">BDCSimpleNewsConsoleCommandNewsCreate</item>
           </argument>
       </arguments>
   </type>
</config>
We add the object responsible for executing the script to the class MagentoFrameworkConsoleCommandList. The constructor of this class is simply an array where class objects are passed on in a similar manner as in the above example.
Let’s proceed to the next step – creating a class for our new command and a helper responsible for adding a new user:
Create Console/Command/NewsCreate.php:
<?php
namespace BDCSimpleNewsConsoleCommand;

use SymfonyComponentConsoleCommandCommand;
use SymfonyComponentConsoleInputInputOption;
use SymfonyComponentConsoleInputInputInterface;
use SymfonyComponentConsoleOutputOutputInterface;
use BDCSimpleNewsHelperNews;

class NewsCreate extends Command {
    protected $newsHelper;

    public function __construct(News $newsHelper)
    {
        $this->newsHelper = $newsHelper;
        parent::__construct();
    }

    protected function configure()
    {
        $this->setName('bdcrops:news:create')
            ->setDescription('Create New News')
            ->setDefinition($this->getOptionsList());
    }

    protected function execute(InputInterface $input, OutputInterface $output)
    {
        $output->writeln('<info>Creating new news...</info>');
        $this->newsHelper->setData($input);
        $this->newsHelper->execute();

        $output->writeln('');
        $output->writeln('<info>News created with the following data:</info>');
        $output->writeln('<comment>News ID: ' . $this->newsHelper->getNewsId());
        $output->writeln('<comment>Title: ' . $input->getOption(News::KEY_TITLE));
        $output->writeln('<comment>Summary: ' . $input->getOption(News::KEY_SUMMARY));
        $output->writeln('<comment>Description: ' . $input->getOption(News::KEY_DESC));

       }

    protected function getOptionsList(){
        return [
            new InputOption(News::KEY_TITLE, null, InputOption::VALUE_REQUIRED, '(Required) News Title'),
            new InputOption(News::KEY_SUMMARY, null, InputOption::VALUE_REQUIRED, '(Required) News Summary'),
            new InputOption(News::KEY_DESC, null, InputOption::VALUE_REQUIRED, '(Required) News Description'),

            ];
    }
}
Create Helper/News.php:
```
<?php
namespace BDCSimpleNewsHelper;

use MagentoFrameworkAppHelperContext;
use MagentoStoreModelStoreManagerInterface;
use MagentoFrameworkAppState;
use BDCSimpleNewsModelNewsFactory;
use SymfonyComponentConsoleInputInput;
use MagentoFrameworkAppHelperAbstractHelper;

class News extends AbstractHelper {
    const KEY_TITLE = 'news-title';
    const KEY_SUMMARY = 'news-summary';
    const KEY_DESC = 'news-description';
    protected $storeManager;
    protected $state;
    protected $newsFactory;
    protected $data;
    protected $newsId;

    public function __construct(
        Context $context,
        StoreManagerInterface $storeManager,
        State $state,
        NewsFactory $newsFactory ) {
        $this->storeManager = $storeManager;
        $this->state = $state;
        $this->newsFactory = $newsFactory;

        parent::__construct($context);
    }

    public function setData(Input $input) {
        $this->data = $input;
        return $this;
    }

    public function execute() {
        $this->state->setAreaCode('frontend');
        $news = $this->newsFactory->create();
        $news
            ->setTitle($this->data->getOption(self::KEY_TITLE))
            ->setSummary($this->data->getOption(self::KEY_SUMMARY))
            ->setDescription($this->data->getOption(self::KEY_DESC))

            ;
        $news->save();

        $this->newsId = $news->getId();

        // if($this->data->getOption(self::KEY_SENDEMAIL)) {
        //     $news->sendNewAccountEmail();
        // }
    }

    public function getNewsId() {
        return (int)$this->newsId;
    }
}
```
The execute() method adds a new user. If any data is incorrect at this stage (i.e. too short password), the script will stop and the console will show an Exception.
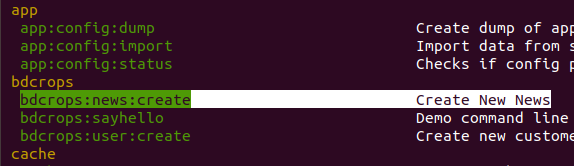
php bin/magento bdcrops:news:create --news-title="Matin Cli News" --news-summary="summary 1" --news-description="News Description 1"

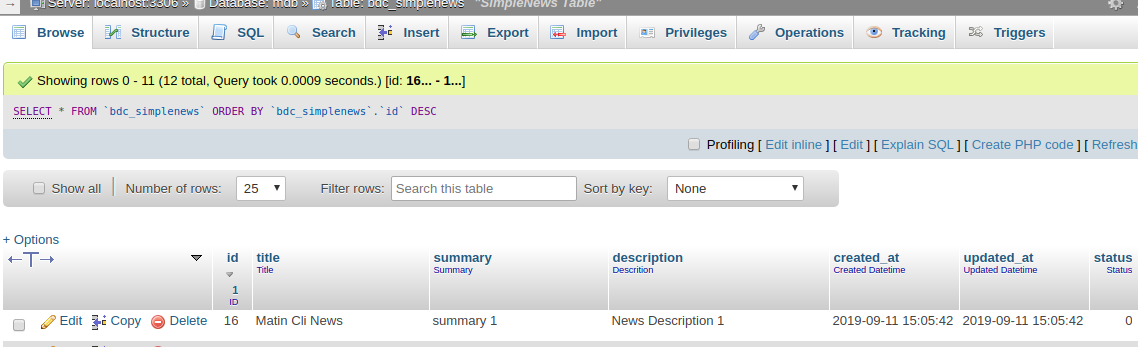
Create a crontab.xml file in the following file path and set a time schedule to run the custom cron code which is defined default.
Create etc/crontab.xml:
```
<?xml version="1.0"?>
<config xmlns:xsi="http://www.w3.org/2001/XMLSchema-instance" xsi:noNamespaceSchemaLocation="urn:magento:module:Magento_Cron:etc/crontab.xsd">
    <group id="bdc_crongroup">
        <job name="bdcAddNews" instance="BDCSimpleNewsCronAddNews" method="execute">
            <!-- <config_path>bdc/general/cron_expression</config_path> -->
            <schedule>* * * * *</schedule>
        </job>
    </group>
</config>

```
Here when defining the crontab for the module we need to define the group name too. Here group_name is the name of the cron group. The group name doesn’t have to be unique and we can run the cron for one group at a time.
Here,
group id: is a cron group name. job name: is a Unique ID for this cron job. instance: is a class to be instantiated (classpath). method: is a method in job instance to call. schedule: is a schedule in cron format.
* * * * * command to be executed
| | | | |
| | | | +----- Day of week (0 - 7) (Sunday=0 or 7)
| | | +------- Month (1 - 12)
| | +--------- Day of month (1 - 31)
| +----------- Hour (0 - 23)
+------------- Minute (0 - 59)
This file contains the custom cron code and which will be executed while the cron runs in Magento 2.
Create Cron/AddNews.php:
```
<?php
namespace BDCSimpleNewsCron;

use BDCSimpleNewsModelNewsFactory;
//use BDCSimpleNewsModelConfig;
class AddNews {
    private $newsFactory;
    public function __construct(NewsFactory $newsFactory) {
        $this->newsFactory = $newsFactory;
    }
    public function execute(){
        $this->newsFactory->create()
            ->setTitle('Scheduled News')
            ->setSummary('Scheduled News setSummary ' . date('Ymd'))
            ->setDescription('Scheduled News setDescription ' . date('Ymd'))
            ->save();
    }
}

```
After completing the above steps run the below SSH command in your Magento 2 installed root directory to run the Magento 2 cron jobs
php bin/magento cache:flush
php bin/magento cron:run
To check whether the cron is working properly, go to db
SELECT * FROM `cron_schedule`
SELECT * FROM `cron_schedule` where `job_code` LIKE "%bdc%"
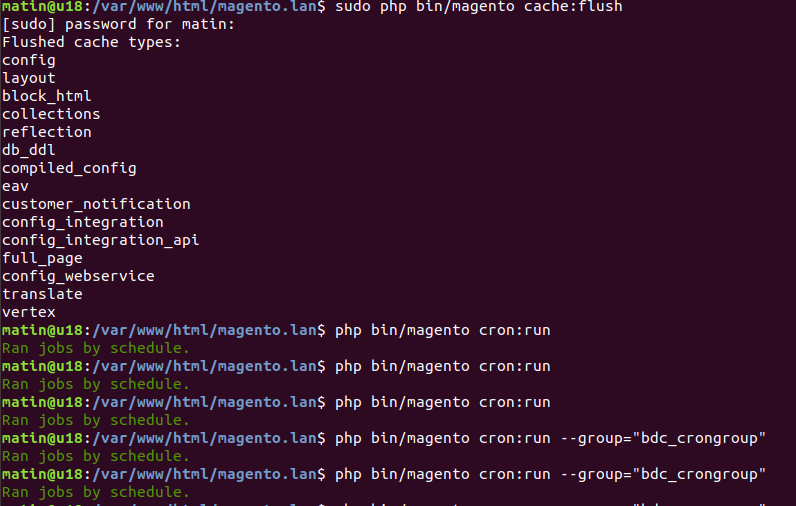
Declare a new group and specify its configuration options (all of which run in the store’s view scope) through the cron_groups.xml file, located at: //module-/etc/cron_groups.xml
Create etc/cron_groups.xml:
```
<?xml version="1.0"?>
<config xmlns:xsi="http://www.w3.org/2001/XMLSchema-instance" xsi:noNamespaceSchemaLocation="urn:magento:module:BlogTreat_CustomCron:etc/cron_groups.xsd">
    <group id="bdc_crongroup">
        <schedule_generate_every>1</schedule_generate_every>
        <schedule_ahead_for>4</schedule_ahead_for>
        <schedule_lifetime>2</schedule_lifetime>
        <history_cleanup_every>10</history_cleanup_every>
        <history_success_lifetime>60</history_success_lifetime>
        <history_failure_lifetime>600</history_failure_lifetime>
    </group>
</config>

```
Where:
You can check your new cron group in admin panel at: Stores -> Configuration -> Advanced -> System -> Cron (Scheduled Tasks)
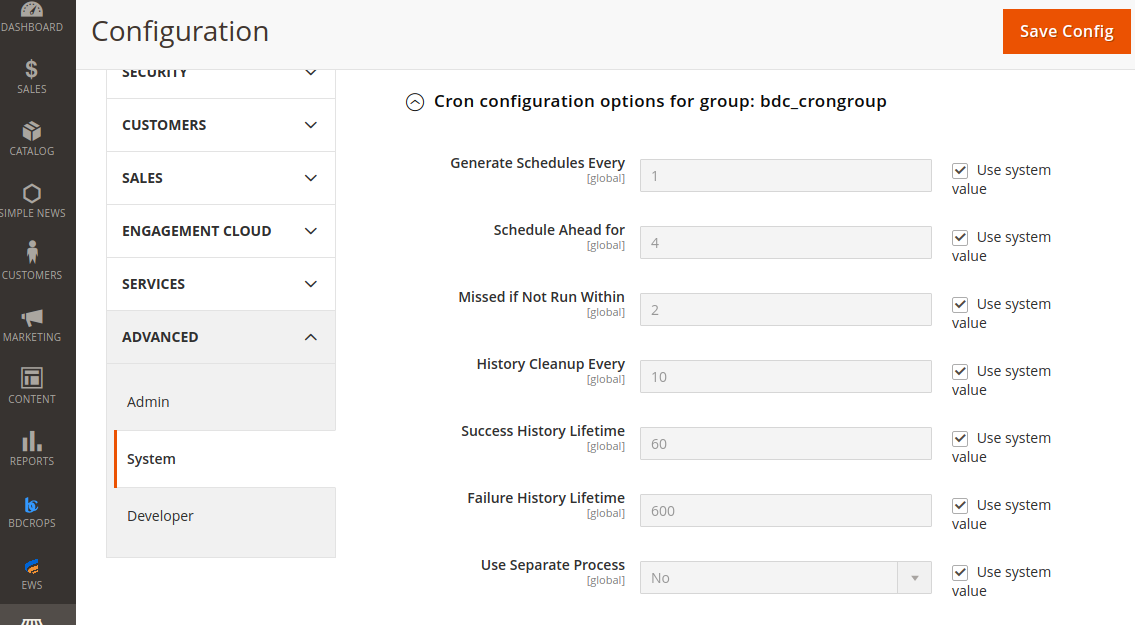
After completing the above steps run the below SSH command in your Magento 2 installed root directory to run the Magento 2 specific group of cron jobs only.
php bin/magento cron:run --group="bdc_crongroup"
To check whether the cron is working properly, go to Database & run below query.
SELECT * FROM `cron_schedule` where `job_code` LIKE "%bdc%"

SELECT * FROM `bdc_simplenews` ORDER BY `id` DESC
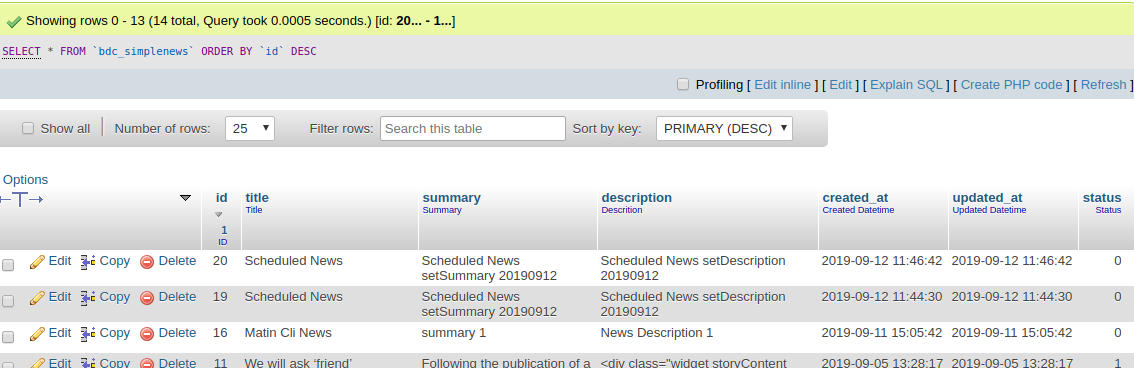
Cron job is a great feature which is used to do the specific task automatically in exact time and date without manual working. The cron job is the perfect choice to do the repeated action every date or every week.Magento 2 uses cron jobs for,
<schedule>* * * * * </schedule> ?Schedule is the time the cron will run. In this example, it run in each minute.
* * * * * *
| | | | | |
| | | | | +-- Year              (range: 1900-3000)
| | | | +---- Day of the Week   (range: 1-7, 1 standing for Monday)
| | | +------ Month of the Year (range: 1-12)
| | +-------- Day of the Month  (range: 1-31)
| +---------- Hour              (range: 0-23)
+------------ Minute            (range: 0-59)
Magento 2 API framework allows developers to create new services for communicating with Magento 2 stores. It supports REST and SOAP web services and is based on CRUD operations (Create, Read, Update, Delete) and a Search Model.
At the moment, Magento 2 uses the following three authentication methods as is described in Magento 2 REST API documentation.
According to the Magento 2 API documentation, these authentication methods can only access the resources assigned to them. Magento 2 API framework first checks whether the call has appropriate authorization to perform the request. The API framework also supports field filtering of API responses to preserve cellular bandwidth. Developers use Magento 2 APIs for a wide range of tasks. For instance, you can create a shopping app and integrate it with your Magento 2 store. You can also build a web app which your employee could use to help customers make purchases. With the help of APIs, you can integrate your Magento 2 store with CRMs, ERPs or POS systems.
Using REST API in Magento 2 is a piece of cake. But for that, you need to understand the flow to call APIs in PHP. If you want to use token-based Magento 2 REST API, first you will need to authenticate and get the token from Magento 2. Then, you will have to pass it in the header of every request you perform. To get started with the REST API in Magento 2 using token-based authentication, you will need to create a web service User Role and register that role to a new Magento 2 Admin User. Keep in mind that creating a new role and user is necessary because it’s not a good practice to use Magento Owner User in a web service.
When it comes to e-Commerce websites, APIs play the big role of reading and writing information from and to the server. Be it a customer’s name or his already saved credit card details, every piece of information shown to the end user has to either read from or written to the web server. This is taken care by REST and SOAP APIs. REST and SOAP are models for web services, however, one that’s most recommend for eCommerce websites. Though REST is fast, efficient and simple, SOAP is standardized, secure and apt for payments.
To create a web service role in Magento 2, follow these steps:
Now, create a new user for the newly created role through these steps:
As I mentioned earlier, I will authenticate REST API through Token authentication. This means that I will pass a username and password in the initial connection and receive the token . This token will be saved in a variable, which will be passed in the header for further calls.
You can fetch almost everything using Magento 2 REST API. The List of REST APIs for Magento EE and CE is a good guide on this topic.To demonstrate the API, I am going to get all the installed modules on a Magento 2 store. Here is the script:
  ```
  <?php
  //API URL for authentication
  $apiURL="http://www.magento.lan/rest/V1/news/admin/token";
  //parameters passing with URL
  $data = array("username" => "apiaccess", "password" => "api@123");
  $data_string = json_encode($data);
  $ch = curl_init($apiURL);
  curl_setopt($ch, CURLOPT_CUSTOMREQUEST, "POST");
  curl_setopt($ch, CURLOPT_POSTFIELDS, $data_string);
  curl_setopt($ch, CURLOPT_RETURNTRANSFER, true);
  curl_setopt($ch, CURLOPT_HTTPHEADER, array("Content-Type: application/json","Content-Length: ".strlen($data_string)));
  $token = curl_exec($ch);
  //decoding generated token and saving it in a variable
  $token=  json_decode($token);
  //******************************************//
  //Using above token into header
  $headers = array("Authorization: Bearer ".$token);
  //API URL to get all Magento 2 modules
  $requestUrl='http://www.magento.lan/rest/V1/news';
  $ch = curl_init($requestUrl);
  curl_setopt($ch, CURLOPT_HTTPHEADER, $headers);
  curl_setopt($ch, CURLOPT_RETURNTRANSFER, true);
  $result = curl_exec($ch);
  //decoding result
  $result=  json_decode($result);
  //printing result
  print_r($result);

  ```
A Web API is an application programming interface for either a web server or a web browser. It is a web development concept, usually limited to a web application's client-side (including any web frameworks being used), and thus usually does not include web server or browser implementation details such as SAPIs or APIs unless publicly accessible by a remote web application.
Supports developers to use web services that communicate with the Magento system. For instance, a developer can create a customer account, product record through web service. Key features include:
APIs can be used to perform a wide array of tasks ex:
Register web service on Magento Admin following general steps to set up to enable web services.
routes are defined in etc/webapi.xml within a module, and although the structure of the definition xml is directed by the requirements of the REST API, the SOAP API uses the same definitions.
The following shows the route configuration for fetching a CMS block, as defined in BDC_SimpleNews::etc/webapi.xml:
<routes> <route url="/V1/news" method="GET">
        <service class="BDCSimpleNewsApiNewsRepositoryInterface" method="getList"/>
        <resources> <resource ref="anonymous"/> </resources>
    </route>
</routes>
Create app/code/BDC/SimpleNews/etc/webapi.xml
```
<?xml version="1.0"?>
<routes>
    <route url="/V1/news" method="GET">
        <service class="BDCSimpleNewsApiNewsRepositoryInterface" method="getList"/>
        <resources> <resource ref="anonymous"/> </resources>
    </route>
</routes>
```
In the route tag the url attribute defines the route as /V1/cmsBlock/:blockId where the :blockId part represents an id parameter to be supplied. The method attribute defines the HTTP verb the route uses as ‘GET’ (other available verbs are PUT, POST and DELETE).
In the service tag the class attribute associates the service contract MagentoCmsApiBlockRepositoryInterface with the route, and the method attribute defines the method to call upon the object provided by the service contract.
Repositories give service requestors the ability to perform create, read, update, and delete (CRUD) operations on entities or a list of entities. A repository is an example of a service contract, and its implementation is part of the domain layer.
Repositories are service contracts which are interface classes & helps to hide business logic from controller,model & helper, defined repository file which is an interface class & model file in which define methods declared in repository class.To create module’s repository, firstly have to define it in di.xml file at path: app/code/BDC/SimpleNews/etc/di.xml
<preference type="BDCSimpleNewsModelNews" for="BDCSimpleNewsApiDataNewsInterface"/>
<preference type="BDCSimpleNewsModelNewsRepository" for="BDCSimpleNewsApiNewsRepositoryInterface"/>
Final file look like as below:
```
<?xml version="1.0"?>
<config xmlns:xsi="http://www.w3.org/2001/XMLSchema-instance" xsi:noNamespaceSchemaLocation="urn:magento:framework:ObjectManager/etc/config.xsd">
   <type name="MagentoFrameworkConsoleCommandList">
       <arguments>
           <argument name="commands" xsi:type="array">
             <item name="bdc_simplenews_create" xsi:type="object">BDCSimpleNewsConsoleCommandNewsCreate</item>
           </argument>
       </arguments>
   </type>
  <preference type="BDCSimpleNewsModelNews" for="BDCSimpleNewsApiDataNewsInterface"/>
  <preference type="BDCSimpleNewsModelNewsRepository" for="BDCSimpleNewsApiNewsRepositoryInterface"/>

</config>

```
An interface defines the repository with all logical read and write operations for a specific entity. You can see an example of such a repository interface in the diagram. The interface gets implemented by one or more classes that provide data store specific implementations of each interface method Now, we need to create an interface and model, please note that you need to take care of the comments as well.
Repositories are service contracts which are interface classes & helps to hide your business logic from controller,model and helper.
A service contract must define data interfaces, which preserve data integrity, and service interfaces, which hide business logic from service requestors.
Data interfaces: define functions that return information about data entities, return search results, and set validation rules and return validation results. You must define the data interfaces for a service contract in the Api/Data subdirectory for a module.
Service interfaces: include management, repository, and metadata interfaces. You must define the service interfaces for a service contract in the Api subdirectory for a module.
Create Api/NewsRepositoryInterface.php
<?php

namespace BDCSimpleNewsApi;

interface NewsRepositoryInterface {
    /**
     * @return BDCSimpleNewsApiDataNewsInterface[]
     */
    public function getList();
}
An interface allows unrelated classes to implement the same set of methods, regardless of their positions in the class inheritance hierarchy. An interface enables you to model multiple inheritance because a class can implement more than one interface whereas it can extend only one class.
Define data interfaces in the Api/Data subdirectory for a module.Ex. data interfaces for the Customer module are in the /app/code/Magento/Customer/Api/Data subdirectory.
Now, we need to create an interface and model, please note that you need to take care of the comments as well.
Create app/code/BDC/SimpleNews/Api/Data/NewsInterface.php & insert this following code into it:
```
<?php

namespace BDCSimpleNewsApiData;

interface NewsInterface {
  /**
   * @return string
   */
  public function getTitle();

  /**
   * @return string|null
   */
  public function getSummary();

  /**
   * @return string|null
   */
  public function getDescription();
}

```
Get Collection in means showing the items in your store when run the command. With the code snippet in this topic, request the specific number of the news as you need. Let’s start calling the news in Magento 2 now!
Create app/code/BDC/SimpleNews/Model/NewsRepository.php & insert this following code into it:
```
<?php
namespace BDCSimpleNewsModel;

use BDCSimpleNewsApiNewsRepositoryInterface;
use BDCSimpleNewsModelResourceNewsCollectionFactory;

class NewsRepository implements NewsRepositoryInterface {
  private $collectionFactory;
  public function __construct(CollectionFactory $collectionFactory){
      $this->collectionFactory = $collectionFactory;
  }
  public function getList() {
      return $this->collectionFactory->create()->getItems();
  }
}

```
As mentioned above, the configuration is conveniently used by both the REST and SOAP APIs. However, the means of accessing resources differs quite a lot.The full REST resource URL is the easiest to determine as it just needs prefixing with ‘http://www.yourdomain.com/rest/’, so in the example above, assuming the news needed has an entity id of 1, the resource url would be ‘http://www.yourdomain.com/rest/V1/news/1’.
Testing as guest: To test REST you can go to http://{domain_name}/rest/V1/{method}/{attribute}/{value}.
Example: http://magento2.loc/rest/V1/hello/name/Matin.
This is how response should look like for this example:
http://www.magento.lan/rest/V1/news
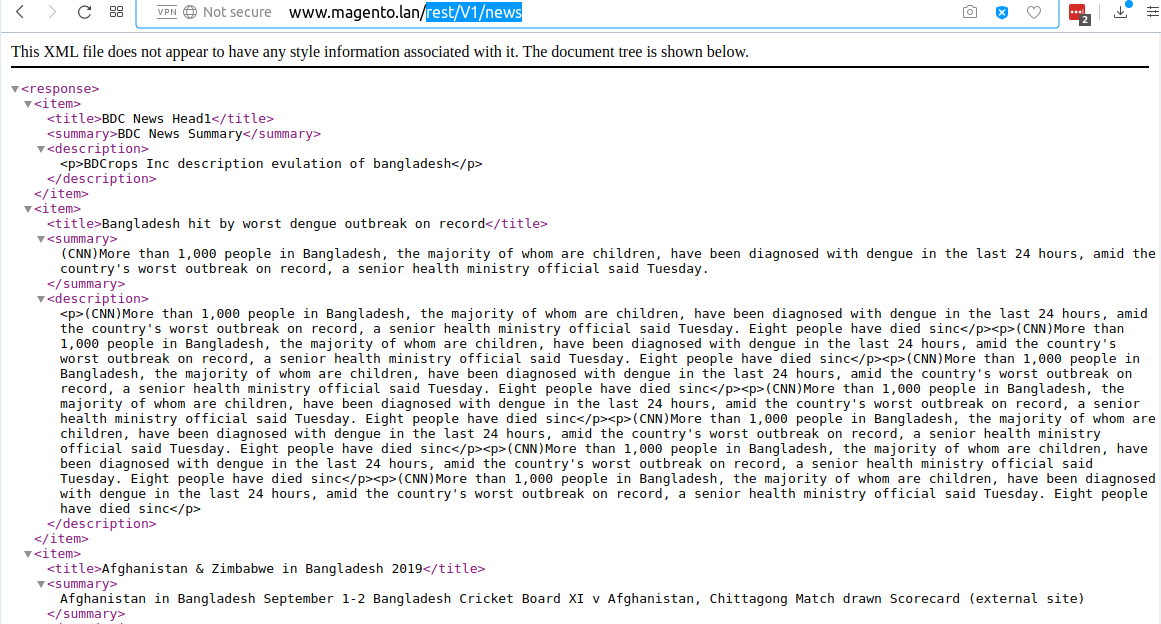
Here is small code that will test same API call but with SOAP(Not implements):
<?php
$proxy = new SoapClient('http://www.magento.lan/index.php/soap/default?wsdl&services=/V1/news');
$result = $proxy->bdcSimpleNewsV1();
var_dump($result);
Response for SOAP
object(stdClass)#2 (1) {
  ["result"]=>
  string(10) "..."
}
If we don’t set anonymous in resource of webapi.xml, we need to set existing Magento resource or create our own. We can do that by adding acl.xml to etc.
ACL – etc/acl.xml
<resource id="Magento_Backend::admin">
 <resource id="BDC_SimpleNews::news" title="News API" translate="title" sortOrder="110" />
</resource>
In this case we need to add BDC_SimpleNews::news to webapi.xml resource instead anonymous.
Magento 2 Dependency injection is used to replace the Magento 1.x Mage class when you convert to work with Magento 2. The Dependency injection design pattern creates an external environment where you can inject dependencies into an object. Thanks to that, there is no longer to create the objects manually. Namely, as when object A calls object or value B, this means B is a dependency of A
If you are working with Magento 2 Dependency Injection, you should take look at Magento 2 Dependency Inversion Principle because this principle will restrict the direct working between the high level and low level classes. At that time, the interaction will implement via an interface of the low level classes as an abstract layer.
Specifically, the di.xml file takes responsibility for mapping an interface dependency to a preferred implementation class. It can be said that with Magento 2 Dependency Inversion Principle, the dependency of the coding will be reduced significantly due to the abstract layer.
Object manager - Dependency Injection Container Object Manager is called as Dependency Injection Container, Magento 2 service class which contains and handle the dependencies between the objects. During the class construction, the object manager injects the appropriate dependency as defined in the di.xml file.
Constructor signature dependencies In Magento 2, the class definition use constructor signature to get information (type and number of dependencies).
Compiling dependencies All information related to Magento 2 Dependency Injection are collected in a class and saved in files by a code complier tool. And then the ObjectManager will get this information to generate concrete objects in the application.
Magento 2 Dependency Injection includes two types: Constructor Injection and Method Injection. You can see the following code snippet to learn more about both of them.
Constructor injection As the above example, $menuItemFactory and $menu are the dependencies that will be added to an object’s class through the constructor injection. Besides, remember that the constructor injection is required to declare all optional and required of an object.
Method injection About Method Injection, you will use it when an object makes clear a dependency in one of its methods. As if tracking in the referred instance, $command is the dependency passed into the class through the processCommand method.
Groups of Object In Magento 2, the object is divided into two groups: injectable and non-injectable (newable) objects. What are they?
Injectable Objects About the injectable Objects, you can call as services or objects which will show the dependencies in their constructors and are created by the object manager via the configuration in the di.xml file. And you can use these injectable objects to request other injectable services in the constructors.
Non-injectable Objects Non-injectable (Newable) Objects are a bit similar to the injectable objects when they also expose the dependencies in their constructors, however, the newables are allowed to request other newables objects like Entities, Value Objects. In addition, you cannot demand the newable objects for keeping a reference to an injectable object.
This is the detialed information related to Magento 2 Dependency Injection design pattern. Wish you have a great time with it!
By default, there are three different ways to override core functionalities.
We write log after news item save .
Edit Helper/News.php look like:
```
<?php
namespace BDCSimpleNewsHelper;

use MagentoFrameworkAppHelperContext;
use MagentoStoreModelStoreManagerInterface;
use MagentoFrameworkAppState;
use BDCSimpleNewsModelNewsFactory;
use SymfonyComponentConsoleInputInput;
use PsrLogLoggerInterface;


class News extends MagentoFrameworkAppHelperAbstractHelper {
    const KEY_TITLE = 'news-title';
    const KEY_SUMMARY = 'news-summary';
    const KEY_DESC = 'news-description';

    protected $storeManager;
    protected $state;
    protected $newsFactory;
    protected $data;
    protected $newsId;
    protected $logger;


    public function __construct(
        Context $context,
        StoreManagerInterface $storeManager,
        State $state,
        NewsFactory $newsFactory,
        LoggerInterface $logger ) {
            $this->storeManager = $storeManager;
            $this->state = $state;
            $this->logger = $logger;

            $this->newsFactory = $newsFactory;

        parent::__construct($context);
    }

    public function setData(Input $input){
        $this->data = $input;
        return $this;
    }

    public function execute() {
        $this->state->setAreaCode('frontend');
        $news = $this->newsFactory->create();
        $news->setTitle($this->data->getOption(self::KEY_TITLE))
            ->setSummary($this->data->getOption(self::KEY_SUMMARY))
            ->setDescription($this->data->getOption(self::KEY_DESC));
        $news->save();
        $this->logger->debug('DI: '.$news->getTitle());

    }

    public function getNewsId(){
        return (int)$this->newsId;
    }
}

```
Create Helper/BdcDebug.php Insert :
```
<?php
namespace BDCSimpleNewsHelper;

use MonologLogger;
use MagentoFrameworkLoggerHandlerBase;

class BdcDebug extends Base{
    /**
     * @var string
     */
    protected $fileName = '/var/log/bdc_debug.log';

    /**
     * @var int
     */
    protected $loggerType = Logger::DEBUG;
}

```
Although both of them are used for overriding the core modules, the way to use them is completely different.
With Preference, it must extend a core class. Preference can rewrite function. When you declare a Preference, your new class is expected to be a complete implementation of the class you want to override.
While a plugin allows you to execute your functions before, after or around (before & after) the core function is executed. It's NOT really rewritten function like Preference.
Since your plugin class doesn’t replace the core class, in case there are many plugins hooked onto a target class, Magento 2 just executes them sequentially based on the sortOrder parameter in your file di.xml.
Class preferences basically do the same thing in Magento 2 that rewrites did in Magento 1. It states a preference for one class over another, which allows you to specify which class/type is selected by Magento’s object manager. This means that you can override which method you want from the class, along with the methods that this class extends.
- Model class
- Block Class
- Controller Class
app/code/BDC/SimpleNews/etc/di.xml add below code :
<preference type="BDCSimpleNewsHelperBdcDebug" for="MagentoFrameworkLoggerHandlerDebug"/>
Argument types:object Node Formats: {typeName}
{typeName}
<type name="MagentoFrameworkLoggerMonolog">
    <arguments>
        <argument name="handlers"  xsi:type="array">
            <item name="debug" xsi:type="object">BDCSimpleNewsHelperBdcDebug</item>
        </argument>
    </arguments>
</type>
Within Magento 2, classes can depend on each other using constructor-based Dependency Injection. And instead of only allowing static dependencies (class A injects class B), Magento offers a configuration system that allows one dependency to be replaced with another (class B is swapped out for class C). One of these configurations is Virtual Types.
Virtual Types are defined in a file di.xml which might be located in numerous places - for instance, the etc/ folder of your own module. Virtual Types are in essence new PHP classes (but actually they are not, they are just links), that extend upon their original class while overriding the original class its constructor arguments by adding those in the di.xml file.
Once you realize that a Virtual Types is nothing more than a new PHP child object (as if there was an actual class generating it), it makes you wonder why you should do this through XML. Maybe it is easier to simply create a new PHP class in your module and modify things there? The end result is the same: There is a new object of a new type. (Note that this new class still needs to be used somewhere else to become useful. Typically this is done by using an XML Type to modify the constructor arguments of yet another class and inject this new virtual class in it.)
I personally favour new PHP classes over new Virtual Types. However, once the original class has a lengthy constructor, a new PHP class would require you to duplicate all parent dependencies in its own constructor and pass them on to its parent - and perhaps all of that trouble is only needed for replacing one of those dependencies. A Virtual Type is quicker: It requires some XML, yes, but it allows you to single out only that dependency that you actually need to be replaced. The more complex the original constructor, the better it is to use a Virtual Type. (That being said, the more complex the original constructor, the more this original constructor needs to be cleaned up - with references to SOLID.)
Now let's go to the main point of this blog: Virtual Types are identical to PHP classes created on the fly by the Object Manager. And just like all PHP classes, we have specific rules to stick to and namespacing is one of them. So why not use namespaces?
Let's take a dummy example without namespaces:
<virtualType name="bdcVirtualSomeClass" type="BDCExampleSomeClass">
</virtualType>
And now let's see a namespaced version:
<virtualType name="BDCExampleSomeClassVirtual" type="BDCExampleSomeClass">
</virtualType>
To me, the namespaced version looks a lot cleaner. Remember that defining this Virtual Type is only half of the story - if you don't intend to use it elsewhere, it just as well can be removed again. It only becomes useful once it is applied elsewhere, for instance using a Type:
<type name="MagentoFrameworkSomeExistingClass">
    <arguments>
        <argument name="someDep" xsi:type="object">BDCExampleSomeClassVirtual</argument>
    </arguments>
</type>
Once others start debugging the class MagentoFrameworkSomeExistingClass, they might bump into the someDep argument and now, thanks to namespaces, the name of this Virtual Type identifies exactly who put that dependency there. This is why we have namespaces.
However, this might also become confusing if the Virtual Type actually looks too similar to a PHP class. I always tend to click through my PhpStorm environment with the generated/ folder excluded from my project. Once in a while, I bump into a class that is not there. And if Magento does not die at that moment, I assume it is something that is generated. Once the class has the word Factory or Proxy in it, this confirms my assumption. Wouldn't it make sense to also include the word Virtual in the namespaced name of a Virtual Type?
This leads to the following classes that would suggest that the PHP class actually is a VirtualType:
BDCExampleSomeClassVirtual
BDCExampleVirtualSomeClass
BDCExampleSomeClassVirtual
BDCExampleVirtualTypeSomeClass
BDCExampleSomeClassVirtualType
Obviously, there are many more variations. But just make sure to add the word Virtual in there.
<virtualType name="bdcLogger" type="MagentoFrameworkLoggerMonolog">
    <arguments>
        <argument name="handlers"  xsi:type="array">
            <item name="debug" xsi:type="object">BDCSimpleNewsHelperBdcDebug</item>
        </argument>
    </arguments>
</virtualType>
<type name="BDCSimpleNewsHelperNews">
     <arguments>  <argument name="logger" xsi:type="object">bdcLogger</argument> </arguments>
 </type>
Finaly etc/di.xml look like ;
```
<?xml version="1.0"?>
<config xmlns:xsi="http://www.w3.org/2001/XMLSchema-instance" xsi:noNamespaceSchemaLocation="urn:magento:framework:ObjectManager/etc/config.xsd">
   <type name="MagentoFrameworkConsoleCommandList">
       <arguments>
           <argument name="commands" xsi:type="array">
             <item name="bdc_simplenews_create" xsi:type="object">BDCSimpleNewsConsoleCommandNewsCreate</item>
           </argument>
       </arguments>
   </type>
  <preference type="BDCSimpleNewsModelNews" for="BDCSimpleNewsApiDataNewsInterface"/>
  <preference type="BDCSimpleNewsModelNewsRepository" for="BDCSimpleNewsApiNewsRepositoryInterface"/>
  <!-- <preference type="BDCSimpleNewsHelperBdcDebug" for="MagentoFrameworkLoggerHandlerDebug"/> -->

  <!-- <type name="MagentoFrameworkLoggerMonolog">
      <arguments>
          <argument name="handlers"  xsi:type="array">
              <item name="debug" xsi:type="object">BDCSimpleNewsHelperBdcDebug</item>
          </argument>
      </arguments>
  </type> -->

  <virtualType name="bdcLogger" type="MagentoFrameworkLoggerMonolog">
      <arguments>
          <argument name="handlers"  xsi:type="array">
              <item name="debug" xsi:type="object">BDCSimpleNewsHelperBdcDebug</item>
          </argument>
      </arguments>
  </virtualType>
  <type name="BDCSimpleNewsHelperNews">
       <arguments>  <argument name="logger" xsi:type="object">bdcLogger</argument> </arguments>
   </type>
</config>
```
Run
php bin/magento cache:flush
php bin/magento bdcrops:news:create --news-title="News preference" --news-summary="summary preference 1" --news-description="News preference Description 1"
Now check var/log/bdc_debug.log all log are write there
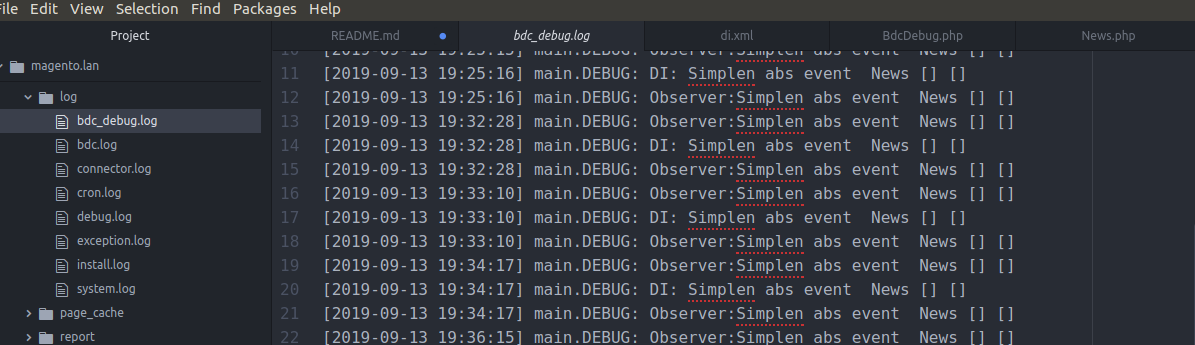
devdocs
Events are dispatched by Magento modules on the trigger of a specific action. Not only that, Magento also allows you to also create your own custom event that can be dispatched in your code. When the action is triggered, it will pass data to the relevant observer configured for the dispatched event. Magento 2 events can be dispatched using MagentoFrameworkEventManager class and it can be obtained through the dependency injection by defining the dependency in your constructor.
Observers are used to catch the action which was triggered from events. In observers, you can set the required functionality or logic that is to be executed in response.
Magento 2 observers can be created by lacing your class file under the Module-Root/Observer directory. Your observer class should implement the following;
MagentoFrameworkEventObserverInterface and define its execution function.
Now let’s start with the execution!
Let’s assume that you want to change the background color of your store if the customer is not logged in.
Working with Magento 2 observers is one of many different ways of extending the core functionality of a Magento 2 powered eCommerce store. Thanks to Observers, you can run your custom codes in response to a specific Magento event or even with a custom event. You can choose other options such as extending and overriding the core modules, copying the core class to the local directory and put it in the same directory path it was in core directory and modify the core class directly. However, creating an observer is the number one choice
Observers are used for catching the action which was triggered before or after events. In observers, you can set the required functionality or logic that is to be executed in response.
Magento 2 observers can be created by lacing your class file under the Module-Root/Observer directory. Your observer class should implement the following: MagentoFrameworkEventObserverInterface and define its execution function.
Make sure you have registered the new module to test it before, we will practice on this module. I will use my module SampleEvent. And then, I will use an observer to customize the product name on the product view page.
Make your observer efficient: You should try to keep your observer small and efficient by avoiding complex computations if you can. Because having complex computations in your observer can slow down application processes.
Don’t include business logic: Your observer should not contain logic other than what is needed for it to run. Business logic should be encapsulated in other classes that your observer uses.
Declare observer in the appropriate scope:
For the frontend events, declare observers in etc/frontend/events.xml, this event will be only used in the frontend. You can't use this event in the backend.
For the backend events, declare observers in etc/adminhtml/events.xml, this event will be only used in the backend. This event can't be used in the frontend.
Use the global etc/events.xml file only when an event can occur on both the frontend and the backend.
You can put events.xml in etc > webapi_rest > events.xml while handling Rest API request.
You can put events.xml in etc > webapi_soap > events.xml while handling Soap API request.
You can put events.xml in etc > crontab > events.xml while handling scheduled jobs only.
You can put events.xml in etc > setup > events.xml while Magento or extensions are being installed or upgraded.
controller_action_predispatch - executes before each controller dispatching.
controller_action_newsdispatch_{full_action_name} - executes after a controller with specific {full_action_name}.
controller_action_newsdispatch_{route_name} - executes after each controller with specific {route_name}.
controller_action_newsdispatch - executes after each controller dispatching.
Edit Helper/News.php:
<?php
namespace BDCSimpleNewsHelper;

use MagentoFrameworkAppHelperContext;
use MagentoStoreModelStoreManagerInterface;
use MagentoFrameworkAppState;
use BDCSimpleNewsModelNewsFactory;
use SymfonyComponentConsoleInputInput;
use PsrLogLoggerInterface;
use MagentoFrameworkEventManagerInterface;

class News extends MagentoFrameworkAppHelperAbstractHelper {
    const KEY_TITLE = 'news-title';
    const KEY_SUMMARY = 'news-summary';
    const KEY_DESC = 'news-description';

    protected $storeManager;
    protected $state;
    protected $newsFactory;
    protected $data;
    protected $newsId;
    protected $logger;
    protected $eventManager;
    // $eventManager


    public function __construct(
        Context $context,
        StoreManagerInterface $storeManager,
        State $state,
        NewsFactory $newsFactory,
        LoggerInterface $logger,
        ManagerInterface $eventManager) {
            $this->storeManager = $storeManager;
            $this->state = $state;
            $this->logger = $logger;
            $this->eventManager = $eventManager;
            $this->newsFactory = $newsFactory;

        parent::__construct($context);
    }

    public function setData(Input $input){
        $this->data = $input;
        return $this;
    }

    public function execute() {
        $this->state->setAreaCode('frontend');
        $news = $this->newsFactory->create();
        $news->setTitle($this->data->getOption(self::KEY_TITLE))
            ->setSummary($this->data->getOption(self::KEY_SUMMARY))
            ->setDescription($this->data->getOption(self::KEY_DESC));
        $news->save();
        $this->logger->debug('DI: '.$news->getTitle());
        // EventCode...
        $this->eventManager->dispatch('bdc_simplenews_save_after', ['object' => $news]);
        $this->newsId = $news->getId();

        // if($this->data->getOption(self::KEY_SENDEMAIL)) {
        //     $news->sendNewAccountEmail();
        // }
    }

    public function getNewsId(){
        return (int)$this->newsId;
    }
}
Usually, models extend the MagentoFrameworkModelAbstractModel class. It gives an ability to observe a predefined set of model events. And the model should have AbstractModel::_ eventPrefix attribute specified for observing events of a specific model. The attribute's value equals to "core_abstract" by default.
Also, in models we have AbstractModel::_ eventObject attribute that gives an ability to specify a name of the current model’s instance for different model-specific events.
A list of the global models events:
model_load_before - executes before each model is loader. Here we can get an access to the following event’s data.
$observer->getField() - gets currently processed model’s field name.
$observer->getValue() - gets currently processed model’s field value.
model_load_after - executes after each model loading.
model_save_after - executes after each model saving.
model_save_before - executes before each model saving.
clean_cache_by_tags - executes after model related cache tags are cleaned.
model_delete_before - executes before model is deleted.
model_delete_after - executes after model is deleted.
model_save_commit_after - executes after the models saving transaction is committed.
model_delete_commit_after - executes after the models saving transaction commit is deleted.
In this mentioned events, we can get an access to the following data:
$observer->getObject()
List model-specific events:
{event_prefix}_load_before – executes before model with {event_prefix} is loaded.
{event_prefix}_load_after – executes after model with {event_prefix} is loaded.
{event_prefix}_save_before – executes before model with {event_prefix} is saved.
{event_prefix}_save_after – executes after model with {event_prefix} is saved.
{event_prefix}_delete_before – executes before model with {event_prefix} is deleted.
{event_prefix}_delete_after – executes after model with {event_prefix} is deleted.
{event_prefix}_save_commit_after – executes after model’s data with {event_prefix} is committed.
{event_prefix}_delete_commit_after – executes after model’s data commit with {event_prefix} is deleted.
{event_prefix}_clear – executes when a model object is being prepared for correct deleting by the garbage collector.
Furthermore, we can get an access to the following event data from each of them:
$observer->getDataObject() – gets the current model reference.
$observer->get{event_object} – gets an event object for the current model.
If you want to find an event in code, you can do this.
Example: You need an event save_before or save after.
Create an event observer to hook in the event [model prefix]_ save_before. In here we will have observer variable, this variable could get the Model of model which we need to save data on it.
And then we can use setData(‘column_name’,[new value]) to adjust the data of a column before saving to the database.
So why can we do that?
What is Model Prefix: in object Model, we have a property, this is protected $_ eventPrefix; (You can see in the model, if you don’t have it, you can create it). It’s is a string type. Getting the value and join it with _ save_before, we will have an event name.
EG: protected $ _ eventPrefix = 'abc'; => Event Observer = 'abc_save_before'.
You can declare another event:
[prefix]_ load_before
[prefix]_ save_after
[prefix]_ load_after
These events are default and always available with a model, If you want to use a custom event, you can use eventManager->dispatch(‘event_name’,$data);
OR Model/News.php just add protected $_ eventPrefix = 'bdc_simplenews'; This event eventPrefix is used by abstract model to generate events automatically.Finaly script look like below:
```
<?php

// These files to insert, update, delete and get data in the database.

namespace BDCSimpleNewsModel;

use MagentoFrameworkModelAbstractModel;

class News extends AbstractModel{
  protected $_eventPrefix = 'bdc_simplenews';
    /**
     * News constructor.
     * @param MagentoFrameworkModelContext $context
     * @param MagentoFrameworkRegistry $registry
     * @param MagentoFrameworkModelResourceModelAbstractResource|null $resource
     * @param MagentoFrameworkDataCollectionAbstractDb|null $resourceCollection
     * @param array $data
     */
    public function __construct(
        MagentoFrameworkModelContext $context,
        MagentoFrameworkRegistry $registry,
        MagentoFrameworkModelResourceModelAbstractResource $resource = null,
        MagentoFrameworkDataCollectionAbstractDb $resourceCollection = null,
        array $data = []
    ) {
        parent::__construct($context, $registry, $resource, $resourceCollection, $data);
    }

   /**
    * (non-PHPdoc)
    * @see MagentoFrameworkModelAbstractModel::_construct()
    */
    public function _construct() {
        $this->_init('BDCSimpleNewsModelResourceNews');
    }

    /**
     * Loading news data
     *
     * @param   mixed $key
     * @param   string $field
     * @return  $this
     */
    public function load($key, $field = null) {
    	if ($field === null) {
    		$this->_getResource()->load($this, $key, 'id');
    		return $this;
    	}
    	$this->_getResource()->load($this, $key, $field);
    	return $this;
    }
}
```
Create Observer/Logger.php
<?php

namespace BDCSimpleNewsObserver;

use MagentoFrameworkEventObserver;
use MagentoFrameworkEventObserverInterface;
use PsrLogLoggerInterface;

class Logger implements ObserverInterface {
    private $logger;

    public function __construct(LoggerInterface $logger){
        $this->logger = $logger;
    }
    public function execute(Observer $observer){
        $this->logger->debug("Observer:".
            $observer->getEvent()->getObject()->getTitle()
        );
    }
}
create etc/events.xml
<?xml version="1.0"?>
<config xmlns:xsi="http://www.w3.org/2001/XMLSchema-instance" xsi:noNamespaceSchemaLocation="urn:magento:framework:Event/etc/events.xsd">
    <event name="bdc_simplenews_save_after">
        <observer name="bdcLogger" instance="BDCSimpleNewsObserverLogger" />
    </event>
</config>
- name – the observer registration name (it is important that the names do not coincide);
- instance – the class, which method will be executed when a specific even occurs;
- method – the method being executed.
add etc/di.xml
<type name="BDCSimpleNewsObserverLogger">
     <arguments>  <argument name="logger" xsi:type="object">bdcLogger</argument> </arguments>
 </type>
Finally etc/di.xml look like:
<?xml version="1.0"?>
<config xmlns:xsi="http://www.w3.org/2001/XMLSchema-instance" xsi:noNamespaceSchemaLocation="urn:magento:framework:ObjectManager/etc/config.xsd">
   <type name="MagentoFrameworkConsoleCommandList">
       <arguments>
           <argument name="commands" xsi:type="array">
             <item name="bdc_simplenews_create" xsi:type="object">BDCSimpleNewsConsoleCommandNewsCreate</item>
           </argument>
       </arguments>
   </type>
  <preference type="BDCSimpleNewsModelNews" for="BDCSimpleNewsApiDataNewsInterface"/>
  <preference type="BDCSimpleNewsModelNewsRepository" for="BDCSimpleNewsApiNewsRepositoryInterface"/>
  <!-- <preference type="BDCSimpleNewsHelperBdcDebug" for="MagentoFrameworkLoggerHandlerDebug"/> -->

  <!-- <type name="MagentoFrameworkLoggerMonolog">
      <arguments>
          <argument name="handlers"  xsi:type="array">
              <item name="debug" xsi:type="object">BDCSimpleNewsHelperBdcDebug</item>
          </argument>
      </arguments>
  </type> -->

  <virtualType name="bdcLogger" type="MagentoFrameworkLoggerMonolog">
      <arguments>
          <argument name="handlers"  xsi:type="array">
              <item name="debug" xsi:type="object">BDCSimpleNewsHelperBdcDebug</item>
          </argument>
      </arguments>
  </virtualType>
  <type name="BDCSimpleNewsHelperNews">
       <arguments>  <argument name="logger" xsi:type="object">bdcLogger</argument> </arguments>
   </type>

   <type name="BDCSimpleNewsObserverLogger">
        <arguments>  <argument name="logger" xsi:type="object">bdcLogger</argument> </arguments>
    </type>

</config>
Run
php bin/magento cache:flush
php bin/magento bdcrops:news:create --news-title="News Observer" --news-summary="summary Observer 1" --news-description="News Observer Description 1"
Now check var/log/bdc_debug.log all log are write there
A plugin is a great way to expand or edit a public method’s behavior by using code before, after or around method. First of all, please get an object that provides permission to all public methods of the observed method’s class. Interception is a software design pattern that is used when we want to insert code dynamically without necessarily changing the original class behavior. The interception pattern in Magento 2 is implemented via plugins. Plugins are an amazing tool in Magento 2. They allow you to change the behavior of methods for classes without having to rewrite the classes as we did above. There are 3 different ways to use a plugin to change method behavior. You may have heard them on Sesame Street: - Before - After - Around
For a module developer as you, Magento 2 Interception plugin allows:
di.xml file in your module declares a plugin for a class object:
<config>
    <type name="{ObservedType}">
      <plugin name="{pluginName}" type="{PluginClassName}" sortOrder="1" disabled="false" />
    </type>
</config>
More Details :
name – Using this attribute, you can provide a unique and recognizable name value that is specific to the plugin.
sortOrder – This attribute determines the order of execution when multiple plugins are observing the same method.
disabled – The default value of this attribute is set to false, but if it is set to true, it will disable the current plugin, and it will not get executed.
type – This attribute points to the class that we will be using to implement the before, after or around the listener.
Assuming we are writing a plugin for a specific method, let’s choose a random method under Customer.php class, the getName() method. We define the before, after and around listeners for the getName() method by writing the naming conventions as follows.
Before + getName() => beforeGetName();
After + getName()  => afterGetName();
Around + getName() => aroundGetName();
create Plugin/Logger.php
```
<?php
namespace BDCSimpleNewsPlugin;
use BDCSimpleNewsConsoleCommandNewsCreate;
use SymfonyComponentConsoleInputInputInterface;
use SymfonyComponentConsoleOutputOutputInterface;

class Logger{
    /**
     * @var OutputInterface
     */
    private $output;
    public function beforeRun(
        NewsCreate $command,
        InputInterface $input,
        OutputInterface $output) {
            $output->writeln('beforeExecute');
    }
    public function aroundRun(
        NewsCreate $command,
        Closure $proceed,
        InputInterface $input,
        OutputInterface $output) {
            $output->writeln('aroundExecute before call');
            $proceed->call($command, $input, $output);
            $output->writeln('aroundExecute after call');
            $this->output = $output;
    }

    //public function afterRun(NewsCreate $command){
        //$this->output->writeln('afterExecute');
    //}
}
```
add code app/code/BDC/SimpleNews/etc/di.xml
<type name="BDCSimpleNewsConsoleCommandNewsCreate">
        <plugin name="bdcLoggerp" type="BDCSimpleNewsPluginLogger"/>
    </type>
Finally etc/di.xml look like:
```
<?xml version="1.0"?>
<config xmlns:xsi="http://www.w3.org/2001/XMLSchema-instance" xsi:noNamespaceSchemaLocation="urn:magento:framework:ObjectManager/etc/config.xsd">
   <type name="MagentoFrameworkConsoleCommandList">
       <arguments>
           <argument name="commands" xsi:type="array">
             <item name="bdc_simplenews_create" xsi:type="object">BDCSimpleNewsConsoleCommandNewsCreate</item>
           </argument>
       </arguments>
   </type>
  <preference type="BDCSimpleNewsModelNews" for="BDCSimpleNewsApiDataNewsInterface"/>
  <preference type="BDCSimpleNewsModelNewsRepository" for="BDCSimpleNewsApiNewsRepositoryInterface"/>
  <!-- <preference type="BDCSimpleNewsHelperBdcDebug" for="MagentoFrameworkLoggerHandlerDebug"/> -->

  <!-- <type name="MagentoFrameworkLoggerMonolog">
      <arguments>
          <argument name="handlers"  xsi:type="array">
              <item name="debug" xsi:type="object">BDCSimpleNewsHelperBdcDebug</item>
          </argument>
      </arguments>
  </type> -->

  <virtualType name="bdcLogger" type="MagentoFrameworkLoggerMonolog">
      <arguments>
          <argument name="handlers"  xsi:type="array">
              <item name="debug" xsi:type="object">BDCSimpleNewsHelperBdcDebug</item>
          </argument>
      </arguments>
  </virtualType>
  <type name="BDCSimpleNewsHelperNews">
       <arguments>  <argument name="logger" xsi:type="object">bdcLogger</argument> </arguments>
   </type>

   <type name="BDCSimpleNewsObserverLogger">
        <arguments>  <argument name="logger" xsi:type="object">bdcLogger</argument> </arguments>
    </type>

    <type name="BDCSimpleNewsConsoleCommandNewsCreate">
            <plugin name="bdcLoggerp" type="BDCSimpleNewsPluginLogger"/>
        </type>

</config>
```
Run
php bin/magento cache:flush
php bin/magento bdcrops:news:create --news-title="News Plugin" --news-summary="summary Plugin 1" --news-description="News Plugin Description 1"
Now check var/log/bdc_debug.log all log are write there
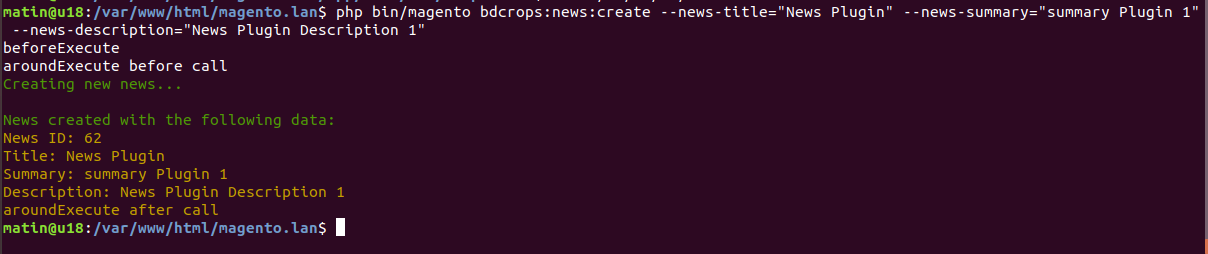
<block template="BDC_SimpleNews::list.phtml" class="BDCSimpleNewsBlockNewsList" name="bdc_simplenews_block_news_list"/>
Change as below:
<block template="BDC_SimpleNews::list.phtml" class="BDCSimpleNewsBlockNewsList" name="bdc_simplenews_block_news_list">
  <arguments>
      <argument name="label" xsi:type="string">Head Line: </argument>
  </arguments>
</block>
<?php echo $block->getLabel(); ?>
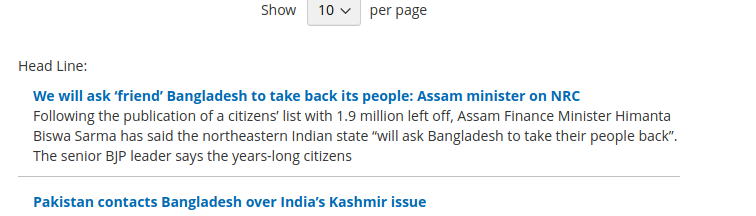
RequireJS is a javascript module system. It implements the Asynchronous Module Definition (AMD) standard for javascript modules. In the terms of AMD, a javascript module provides a way to Run a javascript program that doesn’t default to the global namespace Share javascript code and data between named modules and programs That’s all RequireJS does. You may use a RequireJS module that implements some special bit of functionality, but its not RequireJS that provides that functionality. RequireJS is the pneumatic tube that ensures the functionality is delivered to you.
var config = {
  "map": {
    "*": { "<default_component>": "<custom_component>" }
  }
};
 var config = {
     "shim": {
     "3-rd-party-plugin": ["jquery"]
     }
 };
var config = {
    "deps": [
        "jquery"
    ]
};
Here, It loads the [jquery] as soon as the require define()’d is called.
var config = {
	"baseUrl": "bdcrops/test"
};

require( ["sample/sample1", "https://code.jquery.com/jquery-3.1.1.min.js", "sample2.js"],
    function(samplemodule) {
    }
);
Here, samplemodule is reffered to bdcrops/test/sample/sample1.js, “https://code.jquery.com/jquery-3.1.1.min.js” is loaded from the url which is specified and sample2.js is loaded from the same directory.
var config = {
	"baseUrl": "bdcrops/test",
	"paths": {
        "sample": "web/js"
    },
};

require( ["sample/sample1"],
    function(samplemodule) {
    }
);
Now, samplemodule is reffered to the file at path “bdcrops/test/web/js/sample1.js”
var config = {
    "map": {
        '*': {
			'sample': 'sample1.js'
		}
    }
    config: {
        "testData":{
            "color":'red'
        }
    }
};
Now in your js file you can access this value by using :console.log(require.s.contexts._ .config.testData.color);It will gives you the “red” in output.
A Magento 2 RequireJS “mixin” allows you to programmatically listen for the initial instantiation of any RequireJS module and manipulate that module before returning it.
requireJS configuration create app/code/BDC/SimpleNews/view/frontend/requirejs-config.js
copy validation lib to mododule lib/web/mage/validation.js ==>app/code/BDC/SimpleNews/view/frontend/web/js/validation.js Change massages about 1684 line as
$.validator.messages = $.extend($.validator.messages, {
    required: $.mage.__('This is a required field Custome.'),
var config = {
    'map': {
        '*': {
            'mage/validation': 'BDC_SimpleNews/js/validation'
        }
    }
};


var config = {
    'map': {
        '*': {
            'mage/validation': 'BDC_SimpleNews/js/validation'
        }
    },
    config: {
        mixins: {
            'BDC_SimpleNews/js/validation': {
                'BDC_SimpleNews/js/validation-mixin': true
            }
        }
    }
};
define(function () {
    'use strict';

    var extension = {
        isValid: function () {
            return true;
        }
    };

    return function (target) {
        return target.extend(extension);
    };
});
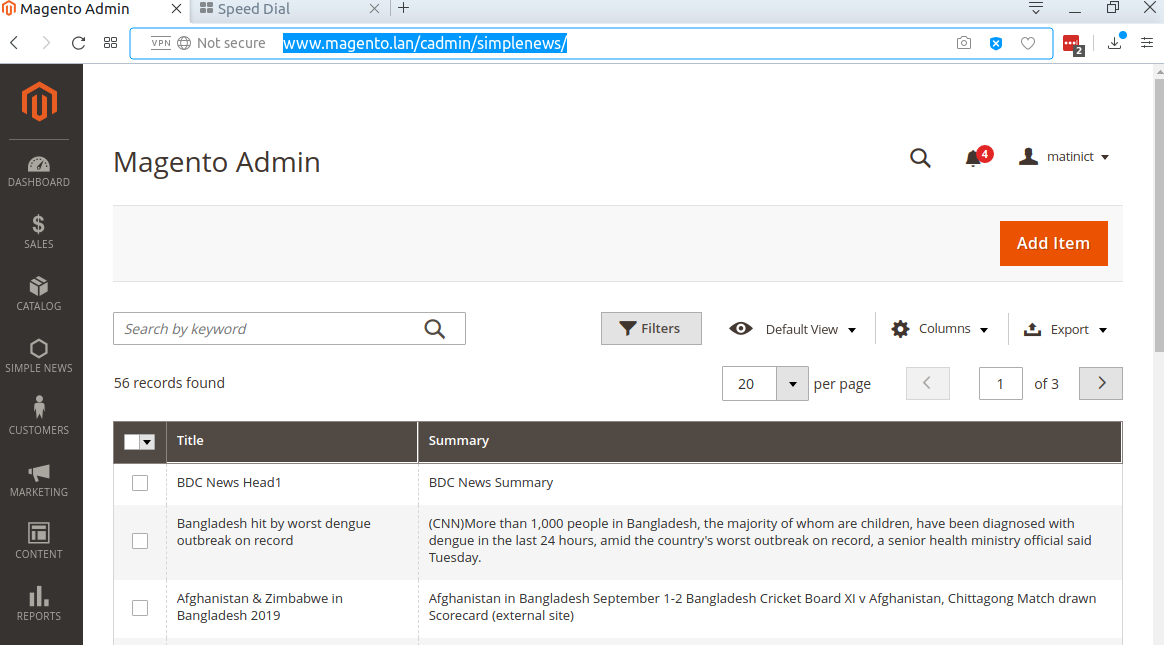
As you know, Magento 2 Grid is a kind of table which listing the items in your database table and provide you some features like: sort, filter, delete, update item, etc. The samplenews for this is the grid of products, grid of customer.Magento 2 provide two ways to create Admin Grid:
Declare resource in dependency injection file Now we will create di.xml file which will connect to the Model to get the data for our grid. File: app/code/BDC/SampleNews/etc/di.xml
Create layout file For the action bdc_simplenews/news/index, we will create a layout file name bdc_samplenews_news_index.xml
Create component layout file As declaration in layout file, we will create a component file bdc_samplenews_news_listing.xml
You have just find how to add a Magento 2 Grid by using Component. Now we will see how to do it by using normal layout/block file.
Create block for this grid File: app/code/BDC/SampleNews/Block/Adminhtml/News.php
Create layout file Now we will need a layout file to connect with Grid Block and render the grid. Let’s create this file:app/code/BDC/SampleNews/view/adminhtml/layout/bdc_samplenews_news_index.xml
Create layout file Now we will need a layout file to connect with Grid Block and render the grid. Let’s create this file: app/code/BDC/SampleNews/view/adminhtml/layout/bdc_samplenews_news_index.xml
-Argument: data_sources to use (which makes the links between your grid and the database) with the tag js_config. We also declare the spinner, that is the name of the tag "columns" that will be used in our grid. We then declare our buttons in the buttons tag with a name, a label, a class and a target url.
dataSource: dataProvider (the object that will fetch our data in database). With a "class" tag to define the name of the object to be used. This object will be defined later in the di.xml (dependency node file). We give a name to our dataSource via the "name" attribute and then we give it the field to use as the id for the grid in the database ("primaryFieldName") and for the request ("requestFieldName"). We then define in "config" the component to use (here "Magento_Ui/js/grid/provider") and the identifier in our bdd "indexField" which here has the value "pfay_contacts_id".
columns: It was defined above in the "spinner" section of the "argument" section, here it is named listing_columns. This area will allow us to define our columns with the identifier to be used to find oneself, the type of fields and filters to use for the grid, the type of sorting that will be used and a label.
The bookmarks allows you to save the state of the listing which you modified with the element "columns_control" previously created. Here is how to integrate the "bookmark" in the "container" :
<bookmark name="bookmarks">
    <argument name="data" xsi:type="array">
        <item name="config" xsi:type="array">
            <item name="component" xsi:type="string">Magento_Ui/js/grid/controls/bookmarks/bookmarks</item>
            <item name="displayArea" xsi:type="string">dataGridActions</item>
            <item name="storageConfig" xsi:type="array">
                <item name="saveUrl" xsi:type="url" path="*/*/save"/>
                <item name="deleteUrl" xsi:type="url" path="*/*/delete"/>
                <item name="namespace" xsi:type="string">contact_test_listing</item>
            </item>
        </item>
    </argument>
</bookmark>
The pagination of the grid under magento2 is super well done and very easy to integrate, it is enough just to pay attention to the 2 paths "provider" and "selectProvider". Here is the code to insert:
 <paging name="listing_paging">
    <argument name="data" xsi:type="array">
        <item name="config" xsi:type="array">
            <item name="storageConfig" xsi:type="array">
                <!-- we put here the path to the bookmarks element -->
                <item name="provider" xsi:type="string">contacts_test_listing.contacts_test_listing.listing_top.bookmarks</item>
                <item name="namespace" xsi:type="string">current.paging</item>
            </item>
            <!-- we put here the path to the element pfay_contact_ids of contacts_test_columns  element -->
            <item name="selectProvider" xsi:type="string">contacts_test_listing.contacts_test_listing.contacts_test_columns.pfay_contacts_id</item>
            <item name="displayArea" xsi:type="string">bottom</item>
        </item>
    </argument>
</paging>
To be able to filter the table can sometimes be practical, for that a "filter" element can be added to the magento grid. Here's how to do it:
<filters name="listing_filters">
    <argument name="data" xsi:type="array">
        <item name="config" xsi:type="array">
            <item name="storageConfig" xsi:type="array">
                <item name="provider" xsi:type="string">contacts_test_listing.contacts_test_listing.listing_top.bookmarks</item>
                <item name="namespace" xsi:type="string">curren.filters</item>
            </item>
            <item name="childDefaults" xsi:type="array">
                <item name="provider" xsi:type="string">contacts_test_listing.contacts_test_listing.listing_top.listing_filters</item>
                <item name="imports" xsi:type="array">
                    <item name="visible" xsi:type="string">contacts_test_listing.contacts_test_listing.listing_top.bookmarks:current.columns.${ $.index }.visible</item>
                </item>
            </item>
        </item>
    </argument>
</filters>
By default, it takes all the fields available on the grid, it knows how to filter with the "filter" item of your "columns" like these:
ici type text : text
ici type textRange : textRange
You want to be able to select several lines of your grid to delete them all at once or do another specific processing on all the lines selected at the same time? The Mass Actions are made for this. First of all it will be necessary to add the inputs on the edge of our grid to be able to select the lines, so in "columns" add this before the "column":
<selectionsColumn name="ids">
    <argument name="data" xsi:type="array">
        <item name="config" xsi:type="array">
            <!-- define which field will be used as ID -->
            <item name="indexField" xsi:type="string">pfay_contacts_id</item>
        </item>
    </argument>
</selectionsColumn>
You now see the checkboxes on the side that allow you to select multiple lines. Here is how to integrate the selectbox which allows to select the action to be performed once we have selected our lines:
<massaction name="listing_massaction">
  <argument name="data" xsi:type="array">
      <item name="config" xsi:type="array">
          <!-- we put here the path to the element pfay_contact_ids of contacts_test_columns  element -->
          <item name="selectProvider" xsi:type="string">contacts_test_listing.contacts_test_listing.contacts_test_columns.ids</item>
          <item name="displayArea" xsi:type="string">bottom</item>
          <item name="indexField" xsi:type="string">pfay_contacts_id</item>
      </item>
  </argument>
  <action name="delete">
      <argument name="data" xsi:type="array">
          <item name="config" xsi:type="array">
              <item name="type" xsi:type="string">delete</item>
              <item name="label" xsi:type="string" translate="true">Delete Selected</item>
              <item name="url" xsi:type="url" path="*/*/massDelete"/>
              <item name="confirm" xsi:type="array">
                  <item name="title" xsi:type="string" translate="true">Delete all selected contacts</item>
                  <item name="message" xsi:type="string" translate="true">Do you want to delete all the selected contacts?</item>
              </item>
          </item>
      </argument>
  </action>
</massaction>
Here it is the same, we have to be careful on what we enter as a path for the "selectProvider" and we add the actions following each other. In order to prepare the next tutorial, we will create the MassDelete controller. This is where we will be redirected when we select our action (//massDelete).
To create a search field on the magento admin, you must add an optional element in the container that will be called "filterSearch" like this: In
<!-- Filter Search -->
<filterSearch name="fulltext">
  <argument name="data" xsi:type="array">
      <item name="config" xsi:type="array">
          <item name="provider" xsi:type="string">contacts_test_listing.contacts_test_listing_data_source</item>
          <item name="chipsProvider" xsi:type="string">contacts_test_listing.contacts_test_listing.listing_top.listing_filters_chips</item>
          <item name="storageConfig" xsi:type="array">
              <item name="provider" xsi:type="string">contacts_test_listing.contacts_test_listing.listing_top.bookmarks</item>
              <item name="namespace" xsi:type="string">current.search</item>
          </item>
      </item>
  </argument>
</filterSearch>
For the searchbar to work you have to update your table to add the index.
1.grid collections
2.listing component configuration
Create Controller/Adminhtml/Index/Index.php
<?php

namespace BDCSimpleNewsControllerAdminhtmlIndex;

use MagentoFrameworkControllerResultFactory;

class Index extends MagentoBackendAppAction {
    public function execute() {
        return $this->resultFactory->create(ResultFactory::TYPE_PAGE);
    }
}
Create Model/Resource/News/Grid/Collection.php
```
<?php
namespace BDCSimpleNewsModelResourceNewsGrid;

use MagentoFrameworkDataCollectionDbFetchStrategyInterface as FetchStrategy;
use MagentoFrameworkDataCollectionEntityFactoryInterface as EntityFactory;
use MagentoFrameworkEventManagerInterface as EventManager;
use PsrLogLoggerInterface as Logger;
use  MagentoFrameworkViewElementUiComponentDataProviderSearchResult;

class Collection extends SearchResult {
    public function __construct(
        EntityFactory $entityFactory,
        Logger $logger,
        FetchStrategy $fetchStrategy,
        EventManager $eventManager,
        $mainTable = 'bdc_simplenews',
        $resourceModel = 'BDCSimpleNewsModelResourceNews' ) {
        parent::__construct(
            $entityFactory,
            $logger,
            $fetchStrategy,
            $eventManager,
            $mainTable,
            $resourceModel
        );
    }
}

```
Edit etc/di.xml
<type name="MagentoFrameworkViewElementUiComponentDataProviderCollectionFactory">
    <arguments>
        <argument name="collections" xsi:type="array">
            <item name="bdc_news_grid_data_source" xsi:type="string">BDCSimpleNewsModelResourceNewsGridCollection</item>
        </argument>
    </arguments>
</type>
Create view/adminhtml/layout/simplenews_index_index.xml
<?xml version="1.0"?>
<page xmlns:xsi="http://www.w3.org/2001/XMLSchema-instance" xsi:noNamespaceSchemaLocation="urn:magento:framework:View/Layout/etc/page_configuration.xsd">
    <body>
        <referenceContainer name="content">
            <uiComponent name="bdc_news_grid"/>
        </referenceContainer>
    </body>
</page>
Create view/adminhtml/ui_component/bdc_news_grid.xml
```
<?xml version="1.0" encoding="UTF-8"?>
<listing xmlns:xsi="http://www.w3.org/2001/XMLSchema-instance" xsi:noNamespaceSchemaLocation="urn:magento:module:Magento_Ui:etc/ui_configuration.xsd">
    <argument name="data" xsi:type="array">
        <item name="js_config" xsi:type="array">
            <item name="provider" xsi:type="string">bdc_news_grid.bdc_news_grid_data_source</item>
            <item name="deps" xsi:type="string">bdc_news_grid.bdc_news_grid_data_source</item>
        </item>
        <item name="spinner" xsi:type="string">bdc_news_columns</item>
        <item name="buttons" xsi:type="array">
            <item name="add" xsi:type="array">
                <item name="name" xsi:type="string">add</item>
                <item name="label" xsi:type="string" translate="true">Add News</item>
                <item name="class" xsi:type="string">primary</item>
                <item name="url" xsi:type="string">*/news/new</item>
            </item>
        </item>
    </argument>
    <dataSource name="bdc_news_grid_data_source">
        <argument name="dataProvider" xsi:type="configurableObject">
            <argument name="class" xsi:type="string">MagentoFrameworkViewElementUiComponentDataProviderDataProvider</argument>
            <argument name="name" xsi:type="string">bdc_news_grid_data_source</argument>
            <argument name="primaryFieldName" xsi:type="string">id</argument>
            <argument name="requestFieldName" xsi:type="string">id</argument>
            <argument name="data" xsi:type="array">
                <item name="config" xsi:type="array">
                    <item name="update_url" xsi:type="url" path="mui/index/render"/>
                    <item name="component" xsi:type="string">Magento_Ui/js/grid/provider</item>
                </item>
            </argument>
        </argument>
    </dataSource>
    <listingToolbar name="listing_top">
        <bookmark name="bookmarks"/>
        <columnsControls name="columns_controls"/>
        <exportButton name="export_button"/>
        <filterSearch name="fulltext"/>
        <filters name="listing_filters"/>
        <paging name="listing_paging"/>
        <!-- <frontendLink name="frontend_link"/> -->
    </listingToolbar>
    <columns name="bdc_news_columns">
        <argument name="data" xsi:type="array">
            <item name="config" xsi:type="array">
                <item name="childDefaults" xsi:type="array">
                    <item name="fieldAction" xsi:type="array">
                        <item name="provider" xsi:type="string">bdc_news_grid.bdc_news_grid.bdc_news_columns.actions</item>
                        <item name="target" xsi:type="string">applyAction</item>
                        <item name="params" xsi:type="array">
                            <item name="0" xsi:type="string">view</item>
                            <item name="1" xsi:type="string">${ $.$data.rowIndex }</item>
                        </item>
                    </item>
                </item>
            </item>
        </argument>
        <selectionsColumn name="ids">
            <argument name="data" xsi:type="array">
                <item name="config" xsi:type="array">
                    <item name="indexField" xsi:type="string">id</item>
                </item>
            </argument>
        </selectionsColumn>
        <column name="title">
            <argument name="data" xsi:type="array">
                <item name="config" xsi:type="array">
                    <item name="filter" xsi:type="string">text</item>
                    <item name="label" xsi:type="string" translate="true">Title</item>
                </item>
            </argument>
        </column>
        <column name="summary">
            <argument name="data" xsi:type="array">
                <item name="config" xsi:type="array">
                    <item name="filter" xsi:type="string">text</item>
                    <item name="label" xsi:type="string" translate="true">Summary</item>
                </item>
            </argument>
        </column>
    </columns>
</listing>

```
Clean Cache & Run
http://www.magento.lan/cadmin/simplenews/

New & save controllers
UI data provider form
Form ui component configuration
Create Ui/DataProvider.php
```
<?php

namespace BDCSimpleNewsUi;

use MagentoUiDataProviderAbstractDataProvider;

class DataProvider extends AbstractDataProvider{
    protected $collection;
    public function __construct(
        $name,
        $primaryFieldName,
        $requestFieldName,
        $collectionFactory,
        array $meta = [],
        array $data = [] ) {
        parent::__construct($name, $primaryFieldName, $requestFieldName, $meta, $data);
        $this->collection = $collectionFactory->create();
    }

    public function getData() {
        $result = [];
        foreach ($this->collection->getItems() as $item) {
            $result[$item->getId()]['general'] = $item->getData();
        }
        return $result;
    }
}

```
Create Controller/Adminhtml/Index/Index.php
```
<?php

namespace BDCSimpleNewsControllerAdminhtmlIndex;

use MagentoFrameworkControllerResultFactory;

class Index extends MagentoBackendAppAction {
    public function execute() {
        return $this->resultFactory->create(ResultFactory::TYPE_PAGE);
    }
}

```
Create Controller/Adminhtml/Index/NewAction.php
```
<?php

namespace BDCSimpleNewsControllerAdminhtmlIndex;

use MagentoFrameworkControllerResultFactory;

class NewAction extends MagentoBackendAppAction{
    public function execute() {
        return $this->resultFactory->create(ResultFactory::TYPE_PAGE);
    }
}

```
Create Controller/Adminhtml/Index/Save.php
```
<?php

namespace BDCSimpleNewsControllerAdminhtmlIndex;

use BDCSimpleNewsModelNewsFactory;

class Save extends MagentoBackendAppAction {
    private $newsFactory;

    public function __construct(
        MagentoBackendAppActionContext $context,
        NewsFactory $newsFactory
    ) {
        $this->newsFactory = $newsFactory;
        parent::__construct($context);
    }

    public function execute(){
        $this->newsFactory->create()
            ->setData($this->getRequest()->getNewsValue()['general'])->save();
        return $this->resultRedirectFactory->create()->setPath('simplenews/index/index');
    }
}

```
create view/adminhtml/layout/simplenews_index_index.xml
```
<?xml version="1.0"?>
<page xmlns:xsi="http://www.w3.org/2001/XMLSchema-instance" xsi:noNamespaceSchemaLocation="urn:magento:framework:View/Layout/etc/page_configuration.xsd">
    <body>
        <referenceContainer name="content">
            <uiComponent name="bdc_news_grid"/>
        </referenceContainer>
    </body>
</page>
```
create view/adminhtml/ui_component/bdc_news_grid.xml
```
check admin panel as
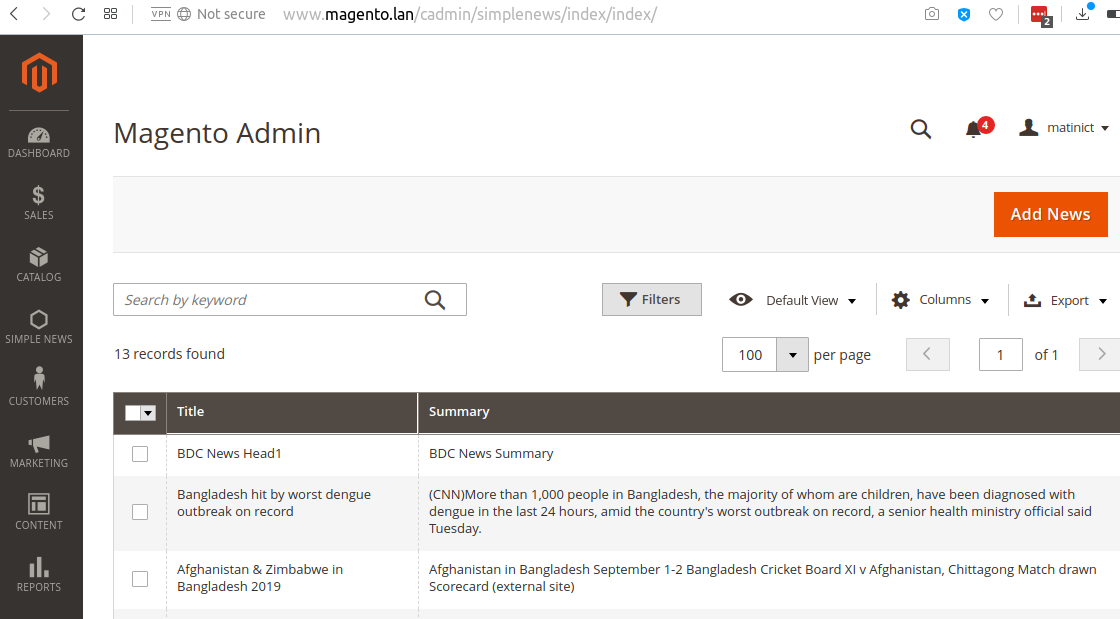
create view/adminhtml/layout/simplenews_index_new.xml
```
<?xml version="1.0"?>
<page layout="admin-2columns-left" xmlns:xsi="http://www.w3.org/2001/XMLSchema-instance" xsi:noNamespaceSchemaLocation="urn:magento:framework:View/Layout/etc/page_configuration.xsd">
    <body>
        <referenceContainer name="content">
            <uiComponent name="bdc_news_form"/>
        </referenceContainer>
    </body>
</page>
```
create view/adminhtml/ui_component/bdc_news_form.xml
```
<?xml version="1.0" encoding="UTF-8"?>
<form xmlns:xsi="http://www.w3.org/2001/XMLSchema-instance" xsi:noNamespaceSchemaLocation="urn:magento:module:Magento_Ui:etc/ui_configuration.xsd">
    <argument name="data" xsi:type="array">
        <item name="js_config" xsi:type="array">
            <item name="provider" xsi:type="string">bdc_news_form.bdc_news_form_data_source</item>
            <item name="deps" xsi:type="string">bdc_news_form.bdc_news_form_data_source</item>
        </item>
        <item name="label" xsi:type="string" translate="true">General</item>
        <item name="layout" xsi:type="array">
            <item name="type" xsi:type="string">tabs</item>
            <item name="navContainerName" xsi:type="string">left</item>
        </item>
        <item name="buttons" xsi:type="array">
            <item name="save" xsi:type="array">
                <item name="name" xsi:type="string">save</item>
                <item name="label" xsi:type="string" translate="true">Save</item>
                <item name="class" xsi:type="string">primary</item>
                <item name="url" xsi:type="string">*/*/save</item>
            </item>
        </item>
    </argument>
    <dataSource name="bdc_news_form_data_source">
        <argument name="dataProvider" xsi:type="configurableObject">
            <argument name="class" xsi:type="string">BDCSimpleNewsUiDataProvider</argument>
            <argument name="name" xsi:type="string">bdc_news_form_data_source</argument>
            <argument name="primaryFieldName" xsi:type="string">id</argument>
            <argument name="requestFieldName" xsi:type="string">id</argument>
            <argument name="collectionFactory" xsi:type="object">BDCSimpleNewsModelResourceNewsCollectionFactory</argument>
            <argument name="data" xsi:type="array">
                <item name="config" xsi:type="array">
                    <item name="submit_url" xsi:type="url" path="simplenews/index/save"/>
                </item>
            </argument>
        </argument>
        <argument name="data" xsi:type="array">
            <item name="js_config" xsi:type="array">
                <item name="component" xsi:type="string">Magento_Ui/js/form/provider</item>
            </item>
        </argument>
    </dataSource>
    <fieldset name="general">
        <argument name="data" xsi:type="array">
            <item name="config" xsi:type="array">
                <item name="label" xsi:type="string" translate="true">General</item>
            </item>
        </argument>
        <field name="title">
            <argument name="data" xsi:type="array">
                <item name="config" xsi:type="array">
                    <item name="label" xsi:type="string" translate="true">Title</item>
                    <item name="dataType" xsi:type="string">text</item>
                    <item name="formElement" xsi:type="string">input</item>
                    <item name="validation" xsi:type="array">
                        <item name="required-entry" xsi:type="boolean">true</item>
                    </item>
                </item>
            </argument>
        </field>
        <field name="summary">
            <argument name="data" xsi:type="array">
                <item name="config" xsi:type="array">
                    <item name="label" xsi:type="string" translate="true">Summary</item>
                    <item name="dataType" xsi:type="string">text</item>
                    <item name="formElement" xsi:type="string">input</item>
                </item>
            </argument>
        </field>
    </fieldset>
</form>

```
edit etc/adminhtml/menu.xml add below code
<add id="BDC_SimpleNews::manage_newsui" title="Manage News UI Grid"
    module="BDC_SimpleNews" sortOrder="3" parent="BDC_SimpleNews::main_menu"
    action="simplenews" resource="BDC_SimpleNews::manage_newsui" />
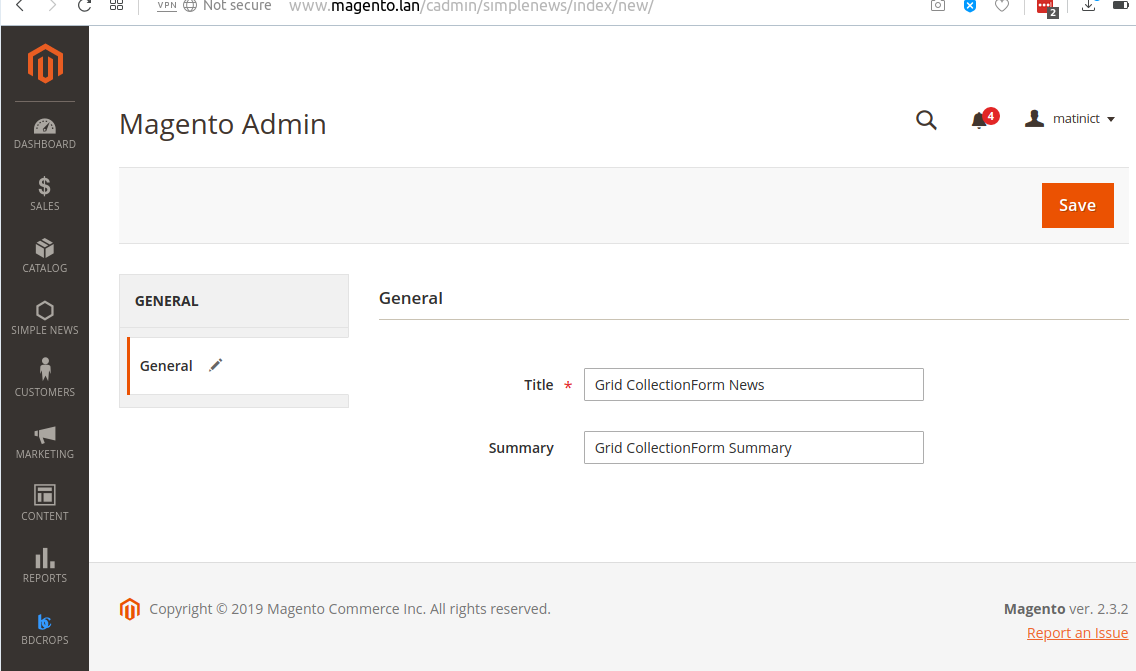
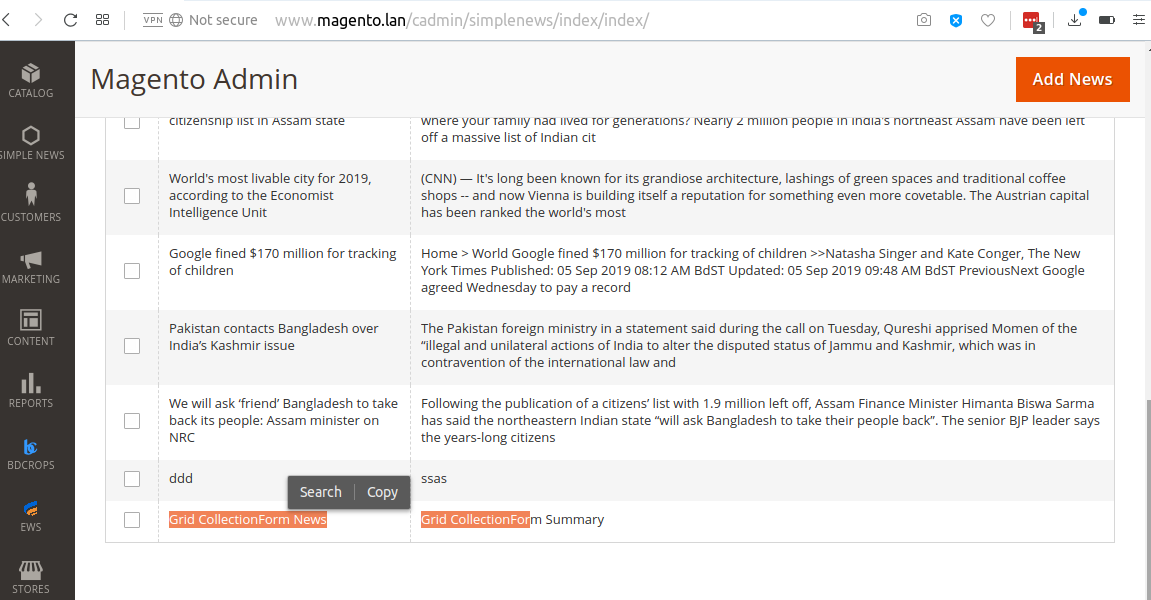
Copy To app/code/BDC/SimpleNews/view/adminhtml/layout/sales_order_index.xml <==vendor/magento/module-sales/view/adminhtml/layout/sales_order_grid.xml
Create view/adminhtml/ui_component/sales_order_grid.xml
```
<?xml version="1.0" encoding="UTF-8"?>
<listing xmlns:xsi="http://www.w3.org/2001/XMLSchema-instance" xsi:noNamespaceSchemaLocation="urn:magento:module:Magento_Ui:etc/ui_configuration.xsd">
    <columns name="sales_order_columns">
        <column name="created_at">
            <argument name="data" xsi:type="array">
                <item name="config" xsi:type="array">
                    <item name="dateFormat" xsi:type="string">MMM dd, YYYY</item>
                </item>
            </argument>
        </column>
        <!-- <column name="base_tax_amount" class="MagentoSalesUiComponentListingColumnPrice">
            <argument name="data" xsi:type="array">
                <item name="config" xsi:type="array">
                    <item name="filter" xsi:type="string">textRange</item>
                    <item name="label" xsi:type="string" translate="true">Base Tax Amount</item>
                </item>
            </argument>
        </column> -->
    </columns>
</listing>

```
Edit etc/di.xml
<virtualType name="MagentoSalesModelResourceModelOrderGrid">
    <arguments>
        <argument name="columns" xsi:type="array">
            <item name="base_tax_amount" xsi:type="string">sales_order.base_tax_amount</item>
        </argument>
    </arguments>
</virtualType>
Add new field 'base_tax_amount' on table sales_order_grid(add filed PhpMyAdmin)
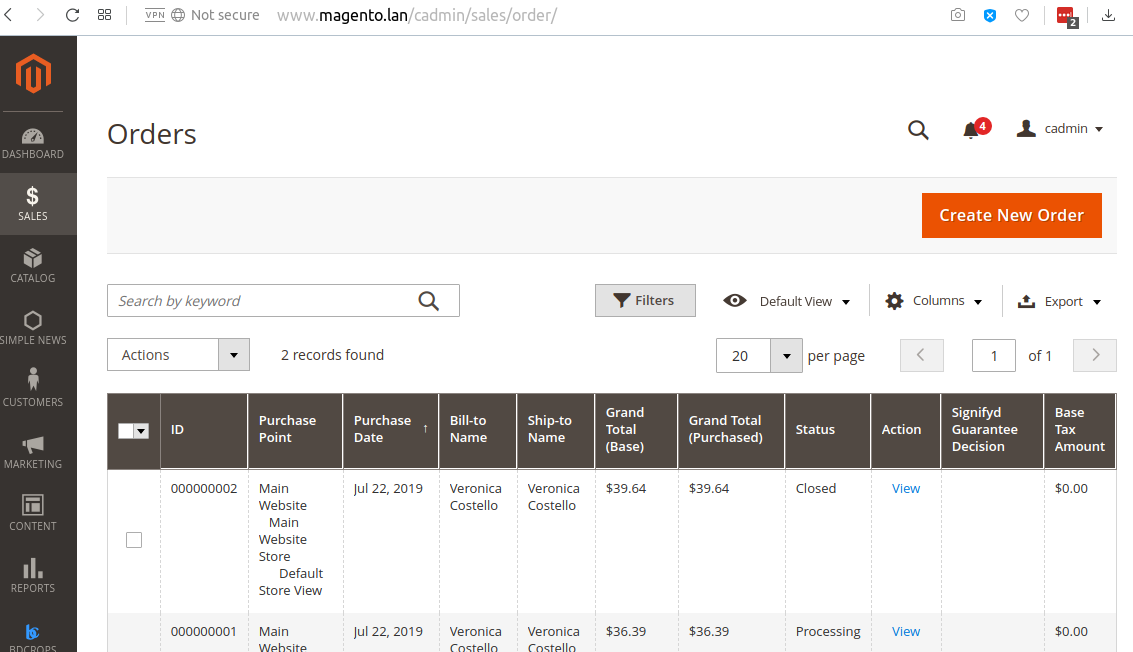
Magento transforms data such as products, categories, and so on, to improve the performance of your storefront. As data changes, the transformed data must be updated—or reindexed. Magento has a very sophisticated architecture that stores lots of merchant data (including catalog data, prices, users, stores, and so on) in many database tables. To optimize storefront performance, Magento accumulates data into special tables using indexers.
For example, suppose you change the price of an item from $8.99 to $6.99. Magento must reindex the price change to display it on your storefront.
Without indexing, Magento would have to calculate the price of every product on the fly—taking into account shopping cart price rules, bundle pricing, discounts, tier pricing, and so on. Loading the price for a product would take a long time, possibly resulting in cart abandonment.
php bin/magento indexer:reindex
https://devdocs.magento.com/guides/v2.3/extension-dev-guide/declarative-schema/
https://onilab.com/blog/declarative-schema-magento-2-3-and-higherProducts
https://www.mage-world.com/blog/create-a-module-with-custom-database-table-in-magento-2.html
http://techjeffyu.com/blog/magento-2-a-full-magento-2-module
https://github.com/codingarrow/M2/tree/master/BDC/SimpleNews


