mrcp plugin with freeswitch
1.0.0
Github is not logged in every day. If you have any questions, please contact [email protected] and reply in your spare time. Thank you!
This is my first Github project. I would like to thank the Cotin website "Building a Simple Intelligent Customer Service System" (I), (II), and (II) for the help of the construction process. Before reading this tutorial, you can read these three articles first. This tutorial adjusts the construction order based on this and gives more operation details, error handling and other construction descriptions.
Use FreeSWITCH to accept user mobile phone calls, use the iFLYTEK Open Platform (xfyun) plug-in to integrate the iFLYTEK Open Platform (xfyun) plug-in to perform voice recognition (ASR), and call voice synthesis (TTS) based on custom business logic to build a simple end-to-end voice call center.

FreeSWITCH in this example is compiled and installed in the MacOS High Sierra 10.13.4 system version. It is not installed using software packages. For the specific installation steps, please see the official website installation introduction. Other platforms such as Linux (Ubuntu, CentOS) should be successfully installed.
The following are the steps for source code compilation and installation:
1. Download the FreeSWITCH source code:
 cd /usr/local/src
git clone -b v1.6 https://freeswitch.org/stash/scm/fs/freeswitch.git freeswitch
2. Install the dependency library
brew install autoconf
brew install automake
brew install libtool
brew install pkg-config
brew install speexdsp
brew install speex
brew install libldns-dev
brew install OpenSSL
brew install pcre
brew install pkgconfig sqlite3
brew install lua
brew install opus
brew install libsndfile
Note: For other system platforms, please confirm the dependency library content by yourself. Possible search results: Ubuntu/CentOS FreeSWITCH installation dependencies. Under ubuntu: libtool not found.
3. Compile and install
 cd freeswitch/
# 先执行 bootstrap.sh,生成configure文件
./bootstrap.sh
./configure --prefix=/usr/local/freeswitch
make
make install
make cd-sounds-install
make cd-moh-install
4. Run
 cd /usr/local/freeswitch/bin
./freeswitch
You can start the application.
Note: Problems that may occur during installation. Errors in configure.
FreeSWITCH is configured with 1000-1019 (20) users by default, with a default password of 1234. You can jump to the verification step of "Step 4 Test and Verification" in advance, log in and dial 5000, and you can hear the sample voice menu guide for the default IVR.
The UniMRCP Server in this example is compiled and installed in CentOS 7. Thanks to the UniMRCP Server source code that has been written to integrate the iFLYTEK SDK provided by Github user cotinyang.
1. Download UniMRCP Server Plugin Demo source code:
 cd /opt
git clone https://github.com/cotinyang/MRCP-Plugin-Demo.git MRCP-Plugin-Demo
2. Compilation preparation environment
 cd MRCP-Plugin-Demo/unimrcp-deps-1.5.0
# # 编译可能出现错误, 注释掉:107 ~ 109, getopt的set,其中存在不识别的option
# # 编译生成apr, apr-util, target path: ./libs
./build-dep-libs.sh
Note: 1. You need to enter y twice during the process and confirm it; 2. In addition, we have forked a project that we maintain ourselves for this demo project, with the address being https://github.com/wangkaisine/MRCP-Plugin-Demo You can also use the source code of this address.
3. Compile and install unimrcp
 cd unimrcp-1.5.0
./bootstrap
# # 如果不能自动检测apr,apr-util,请在configure中增加 option:--with-apr=/path/apr --with-apr-util=/path/apr-util/
# # apr, apr-util由./build-dep-libs.sh 生成
./configure
make
make install
You can see the installed unimrcp in /usr/local/.
4. Test run
 cd /usr/local/unimrcp/bin
./unimrcpserver -o 3
You can use client to verify
 cd /usr/local/unimrcp/bin
./unimrcpclient
> help
usage:

- run [app_name] [profile_name] (run demo application)
       app_name is one of ' synth ' , ' recog ' , ' bypass ' , ' discover '
       profile_name is one of ' uni2 ' , ' uni1 ' , ...

       examples:
           run synth
           run recog
           run synth uni1
           run recog uni1

- loglevel [level] (set loglevel, one of 0,1...7)

- quit, exit
Enter help to enter, give the usage method, enter run recog to run the speech recognition test, and run synth to perform speech synthesis test.
1. iFlytek Development Platform SDK Download
Since the SDK package downloaded from iFLYTEK open platform is associated with users and applications created by users, it is necessary to delete all files and folders in third-party/xfyun, and re-download and unzip your own SDK. The directory and source code are basically the same.
You need to register and log in to the iFLYTEK Open Platform, enter the console page, and create an application;
Get your APPID in the My Apps interface and “Add a new service” for the app, select the required “voice dictation” and “online voice synthesis” services (required in this example);
Click "SDK Download" on the right, and confirm in the jump page that "Select App" has selected the application you created, "Select the AI capabilities you need" select the above two services, and click "SDK Download" to wait for the SDK to be generated and completed download.
Unzip and replace all files and folders under MRCP-Plugin-Demo/unimrcp-1.5.0/plugins/third-party/xfyun/.
Note: Select "Linux" to create the application platform in the application page.
2.plugin writing and translation
This step will tell you how to write the plug-in code for unimrcp, that is, how to get the files and related configurations of the xfyun_recog and xfyun_xynth folders in the MRCP-Plugin-Demo/unimrcp-1.5.0/plugins folders. If you are not paying attention to this detail at the moment, you can skip this step to step 4.
In fact, the above MRCP-Plugin-Demo code is the plugin code that downloads Unimrcp 1.5.0 and Unimrcp Deps 1.5.0 on the official website of Unimrcp and adds on this basis.
First edit the configure.ac file and the macro definition used in the Makefile in the following. The XFyun recognizer plugin is added as follows:
dnl XFyun recognizer plugin.
UNI_PLUGIN_ENABLED(xfyunrecog)

AM_CONDITIONAL([XFYUNRECOG_PLUGIN],[test " ${enable_xfyunrecog_plugin} " = " yes " ])

...

plugins/xfyun-recog/Makefile

...

echo XFyun recognizer plugin....... : $enable_xfyunrecog_plugin
Note: Among them, ··· are other default configurations in this file. Please find the corresponding location to fill in.
Correspondingly, the addition of XFyun synthesizer plugin is as follows:
dnl XFyun synthesizer plugin.
UNI_PLUGIN_ENABLED(xfyunsynth)

AM_CONDITIONAL([XFYUNSYNTH_PLUGIN],[test " ${enable_xfyunsynth_plugin} " = " yes " ])

···

plugins/xfyun-synth/Makefile

···

echo XFyun synthesizer plugin...... : $enable_xfyunsynth_plugin
Added source code and directory
In the plugins directory, create a new xfyun-recog directory and create a new src directory under this directory. You can copy demo_recog_engine.c to this directory and change it to xfyun_recog_engine.c, and modify the xfyun_recog_engine.c file (a modified part known: modify the appid to the appid you download the sdk yourself, otherwise an error will be reported: QISRAudioWrite failed! error code:10407), and create and modify it in the xfyun-synth directory.
Create a new Makefile.am file in the xfyun-recog folder, with the following content:
AM_CPPFLAGS                = $( UNIMRCP_PLUGIN_INCLUDES )

plugin_LTLIBRARIES         = xfyunrecog.la

xfyunrecog_la_SOURCES       = src/xfyun_recog_engine.c
xfyunrecog_la_LDFLAGS       = $( UNIMRCP_PLUGIN_OPTS )
                              -L $( top_srcdir ) /plugins/third-party/xfyun/libs/x64
                              -lmsc -ldl -lpthread -lrt -lstdc++
xfyunrecog_ladir            = $( libdir )
xfyunrecog_la_DATA          = $( top_srcdir ) /plugins/third-party/xfyun/libs/x64/libmsc.so


include $( top_srcdir ) /build/rules/uniplugin.am

UNIMRCP_PLUGIN_INCLUDES     += -I $( top_srcdir ) /plugins/third-party/xfyun/include
Correspondingly, create a new Makefile.am folder under the fyun-synth folder, with the following content:
AM_CPPFLAGS                = $( UNIMRCP_PLUGIN_INCLUDES )

plugin_LTLIBRARIES         = xfyunsynth.la

xfyunsynth_la_SOURCES       = src/xfyun_synth_engine.c
xfyunsynth_la_LDFLAGS       = $( UNIMRCP_PLUGIN_OPTS )
                              -L $( top_srcdir ) /plugins/third-party/xfyun/libs/x64
                              -lmsc -ldl -lpthread -lrt
xfyunsynth_ladir            = $( libdir )

include $( top_srcdir ) /build/rules/uniplugin.am

UNIMRCP_PLUGIN_INCLUDES     += -I $( top_srcdir ) /plugins/third-party/xfyun/include
Modify the Makefile.am file in the plugins folder, and add the contents of xfyun-recog as follows:
 if XFYUNRECOG_PLUGIN
SUBDIRS               += xfyun-recog
endif
Correspondingly, the content added to xfyun-synth is as follows:
 if XFYUNRECOG_PLUGIN
SUBDIRS               += xfyun-synth
endif
Modify the conf/unimrcpserver.xml file, and change from enabling demo engine by default to enabling our two engines.
xfyun-recog is modified as follows:
< engine id = " Demo-Recog-1 " name = " demorecog " enable = " false " />
< engine id = " XFyun-Recog-1 " name = " xfyunrecog " enable = " true " />
Correspondingly, xfyun-synth is modified as follows:
< engine id = " Demo-Synth-1 " name = " demorecog " enable = " false " />
< engine id = " XFyun-Synth-1 " name = " xfyunsynth " enable = " true " />
At the same time, if you are ready to connect UniMRCP Server and FreeSWITCH, you should configure the server's IP address in conf/unimrcpserver.xml, that is, the subnet access address of the current UniMRCP installation.
Recompile and install unimrcp (Step 2 3).
When you start the following problem:
- Failed to Load DSO: /usr/local/unimrcp/lib/libmsc.so: undefined symbol: _ZTVN10__cxxabiv117__class_type_infoE
fix:-lstdc++
- ./unimrcpserver: error while loading shared libraries: libsofia-sip-ua.so.0: cannot open shared object file: No such file or directory
fix:
在etc/ld.so.conf 内容增加: /usr/local/lib
ldconfig 将ld.so.conf读入cacheConfigure FreeSWITCH
We need to connect both the FreeSWITCH that handles user voice calls and the unimrcp server that sends requests to xfyun engine.
1. Configure the unimrcp module and load it automatically;
 # 编辑/usr/local/src/freeswitch/modules.conf文件,找到要安装的模块,去掉前面的注释符号#
cd /usr/local/src/freeswitch
vim modules.conf
# asr_tts/mod_unimrcp
asr_tts/mod_unimrcp

# 执行make mod_xxx-install命令,这样就编译相应模块,并把编译后的动态库安装的/usr/local/freeswitch/mod目录下
make mod_unimrcp-install

# 编辑/usr/local/freeswitch/conf/autoload_configs/modules.conf.xml,去掉注释符号,如果没有发现对应模块,则添加
< load module= " mod_unimrcp " / >
2. Set the profile file and the conf file;
Create a new unimrcpserver-mrcp-v2.xml configuration file in the /usr/local/freeswitch/conf/mrcp_profiles directory:
< include >
  <!-- UniMRCP Server MRCPv2 -->
  <!-- 后面我们使用该配置文件,均使用 name 作为唯一标识,而不是文件名 -->
  < profile name = " unimrcpserver-mrcp2 " version = " 2 " >
    <!-- MRCP 服务器地址 -->
    < param name = " server-ip " value = " 192.168.1.23 " />
    <!-- MRCP SIP 端口号 -->
    < param name = " server-port " value = " 8060 " />
    < param name = " resource-location " value = " " />

    <!-- FreeSWITCH IP、端口以及 SIP 传输方式 -->
    < param name = " client-ip " value = " 192.168.1.24 " />
    < param name = " client-port " value = " 5069 " />
    < param name = " sip-transport " value = " udp " />


    < param name = " speechsynth " value = " speechsynthesizer " />
    < param name = " speechrecog " value = " speechrecognizer " />
    <!-- param name="rtp-ext-ip" value="auto"/ -->
    < param name = " rtp-ip " value = " 192.168.1.24 " />
    < param name = " rtp-port-min " value = " 4000 " />
    < param name = " rtp-port-max " value = " 5000 " />
    < param name = " codecs " value = " PCMU PCMA L16/96/8000 " />

    <!-- Add any default MRCP params for SPEAK requests here -->
    < synthparams >
    </ synthparams >

    <!-- Add any default MRCP params for RECOGNIZE requests here -->
    < recogparams >
      <!-- param name="start-input-timers" value="false"/ -->
    </ recogparams >
  </ profile >
</ include >
Configure the /usr/local/freeswitch/conf/autoload_configs/unimrcp.conf.xml file:
< configuration name = " unimrcp.conf " description = " UniMRCP Client " >
  < settings >
    <!-- UniMRCP profile to use for TTS -->
    < param name = " default-tts-profile " value = " unimrcpserver-mrcp2 " />
    <!-- UniMRCP profile to use for ASR -->
    < param name = " default-asr-profile " value = " unimrcpserver-mrcp2 " />
    <!-- UniMRCP logging level to appear in freeswitch.log.  Options are:
         EMERGENCY|ALERT|CRITICAL|ERROR|WARNING|NOTICE|INFO|DEBUG -->
    < param name = " log-level " value = " DEBUG " />
    <!-- Enable events for profile creation, open, and close -->
    < param name = " enable-profile-events " value = " false " />

    < param name = " max-connection-count " value = " 100 " />
    < param name = " offer-new-connection " value = " 1 " />
    < param name = " request-timeout " value = " 3000 " />
  </ settings >

  < profiles >
    < X-PRE-PROCESS cmd = " include " data = " ../mrcp_profiles/*.xml " />
  </ profiles >

</ configuration >
Note: 1. The server-ip in unimrcpserver-mrcp-v2.xml is the host ip started by unimrcpserver; 2. The client-ip and rtp-ip are the hosts started by FreeSWITCH, and the client-port FreeSWITCH port accessed by the mobile phone as the client is 5060 by default, which is different from the two; 3. The profile name in unimrcpserver-mrcp-v2.xml should be the same as the default-tts-profile in unimrcp.conf.xml and the default-ars-profile (some documents say that the xml file name in mrcp_profiles must also be consistent with these two, which is actually non-essential).
Attenion: It is important to deploy unimrcpserver and freeswitch on the same network segment. It is best to perform the test on the same physical machine when deploying it.
3. Configure IVR and scripts.
Add the following configuration in /usr/local/freeswitch/conf/dialplan/default.xml:
< extension name = " unimrcp " >
    < condition field = " destination_number " expression = " ^5001$ " >
   	    < action application = " answer " />
        < action application = " lua " data = " names.lua " />
    </ condition >
</ extension >
Add the names.lua script in the /usr/local/freeswitch/scripts directory:
 session : answer ()

-- freeswitch.consoleLog("INFO", "Called extension is '".. argv[1]"'n")
welcome = " ivr/ivr-welcome_to_freeswitch.wav "
menu = " ivr/ivr-this_ivr_will_let_you_test_features.wav "
--
grammar = " hello "
no_input_timeout = 80000
recognition_timeout = 80000
confidence_threshold = 0.2
--
session : streamFile ( welcome )
-- freeswitch.consoleLog("INFO", "Prompt file is n")

tryagain = 1
 while ( tryagain == 1 ) do
 --
       session : execute ( " play_and_detect_speech " , menu .. " detect:unimrcp {start-input-timers=false,no-input-timeout= " .. no_input_timeout .. " ,recognition-timeout= " .. recognition_timeout .. " } " .. grammar )
       xml = session : getVariable ( ' detect_speech_result ' )
 --
       if ( xml == nil ) then
               freeswitch . consoleLog ( " CRIT " , " Result is 'nil' n " )
               tryagain = 0
       else
               freeswitch . consoleLog ( " CRIT " , " Result is ' " .. xml .. " ' n " )
               tryagain = 0
    end
end
 --
 -- put logic to forward call here
 --
 session : sleep ( 250 )
 session : set_tts_params ( " unimrcp " , " xiaofang " );
 session : speak ( "今天天气不错啊" );
 session : hangup ()
We need to add a hello.gram syntax file to the /usr/local/freeswitch/grammar directory. It can be empty. It must meet the Speech Recognition Syntax Specification 1.0 standard (referred to as SRGS1.0 for short). This syntax file ASR engine can be used when recognizing it.
<? xml version = " 1.0 " encoding = " utf-8 " ?>
< grammar version = " 1.0 " xml : lang = " zh-cn " root = " Menu " tag-format = " semantics/1.0 "
      xmlns=http://www.w3.org/2001/06/grammar
    xmlns:sapi= " http://schemas.microsoft.com/Speech/2002/06/SRGSExtensions " ><!- 这些都是必不可少的-->
  < rule id = " city " scope = " public " >
    < one-of >     <!-- 匹配其中一个短语-->
      < item >北京</ item >
      < item >上海</ item >
    </ one-of >
  </ rule >
  < rule id = " cross " scope = " public " >
    < one-of >
      < item >到</ item >
      < item >至</ item >
      < item >飞往</ item >
    </ one-of >
  </ rule >
  < rule id = " Menu " scope = " public " >
    < item >
      < ruleref uri = " #date " />         <!--指定关联的其他规则的节点-->
      < tag >out.date = reles.latest();</ tag >
    </ item >
    < item repeat = " 0-1 " >从</ item >    <!--显示1次或0次-->
    < item >
      < ruleref uri = " #city " />
      < tag >out.city = rulels.latest();</ tag >
    </ item >
    < item >
      < ruleref uri = " #cross " />
      < tag >out.cross = rulels.latest();</ tag >
    </ item >
    < item >
      < ruleref uri = " #city " />
      < tag >out.city = rulels.latest();</ tag >
    </ item >
  </ rule >
</ grammar >
Note: In the lua script, "play_and_detect_speech" calls the ASR service, and "speak" calls the TTS service. I encountered problems during configuration startup.
Download the test tool: Adore SIP Client
Search for "Adore SIP Client" in the App Store (for other mobile phone systems, please go to the corresponding application market) and download it.
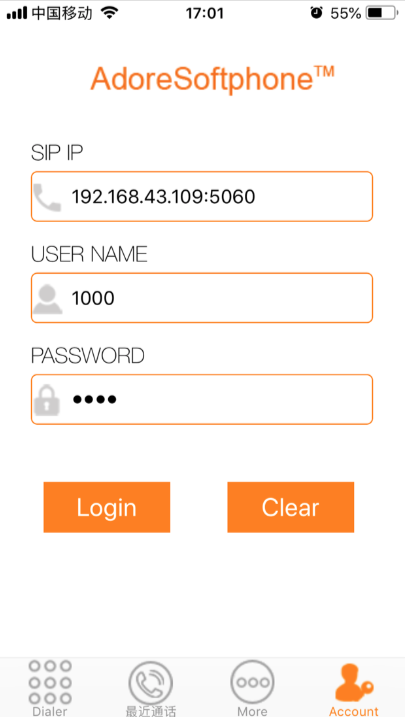
Among them, SIP IP is the host IP and port enabled by FreeSWITCH service (default is 5060), USER NAME can be selected as 1000-1019 as mentioned above, and PASSWORD is 1234 by default. Click "Login" (please make sure the network connected to the phone is in the same subnet as FreeSWITCH), and dial 5001 for language test verification (if you jumped from the first step, please dial 5000).
FreeSWITCH Home Page: https://freeswitch.com/
Unimrcp homepage: http://www.unimrcp.org/
Apache APR: https://apr.apache.org/
iFLYTEK SDK package import method: https://doc.xfyun.cn/msc_linux/SDK%E5%8C%85%E5%AF%BC%E5%85%A5.html


