shopping cart k8s
1.0.0
Building microservices application (Shopping Cart Application - Polyglot for services) using Kubernetes + Istio with its ecosystem parts.
Disclamation
- Should have
MINIKUBE_HOMEenvironment variable in your machine, and value should point toC:users<your name>- Should run powershell script to create
minikubemachine inC:drive.- If it threw the exception that it couldn't find out
minikubemachine in Hyper-V so just simply delete everything in<user>/.minikubefolder, but we could keepcachefolder to avoid download everything from scratch, then runs it subsequently.
Using minikube for Windows in this project, but you can use Mac or Linux version as well
Download the appropriate package of your minikube at https://github.com/kubernetes/minikube/releases (Used v0.25.2 for this project)
Install it into your machine (Windows 10 in this case)
After installed minikube, then run
Hyper-V
> minikube start --kubernetes-version="v1.9.0" --vm-driver=hyperv --hyperv-virtual-switch="minikube_switch" --cpus=4 --memory=4096 --v=999 --alsologtostderr
Then start with full option
> minikube start --extra-config=apiserver.Features.EnableSwaggerUI=true,apiserver.Authorization.Mode=RBAC,apiserver.Admission.PluginNames=NamespaceLifecycle,LimitRanger,ServiceAccount,DefaultStorageClass,DefaultTolerationSeconds,MutatingAdmissionWebhook,ValidatingAdmissionWebhook,ResourceQuota --v=999 --alsologtostderr
VirtualBox v5.2.8
> minikube start --vm-driver="virtualbox" --kubernetes-version="v1.10.0" --cpus=4 --memory 4096 --extra-config=apiserver.authorization-mode=RBAC,apiserver.Features.EnableSwaggerUI=true,apiserver.Admission.PluginNames=NamespaceLifecycle,LimitRanger,ServiceAccount,DefaultStorageClass,DefaultTolerationSeconds,MutatingAdmissionWebhook,ValidatingAdmissionWebhook,ResourceQuota --v=7 --alsologtostderr
Download the appropriate package of Istio at https://github.com/istio/istio/releases
Upzip it into your disk, let say D:istio
cd into D:istio, then run
> kubectl create -f install/kubernetes/istio.yaml

or

> kubectl create -f install/kubernetes/istio-auth.yaml
Notes: set istiobinistioctl.exe to the PATH of the windows.
> kubectl apply -f https://getambassador.io/yaml/ambassador/ambassador-rbac.yaml
> kubectl apply -f https://getambassador.io/yaml/ambassador/ambassador-no-rbac.yaml
> cd k8s
> istioctl kube-inject -f istio-shopping-cart.yaml | kubectl apply -f -
> kubectl apply -f ambassador-service.yaml
Notes: for some reason, I couldn't run the no-rbac mode on my local development.
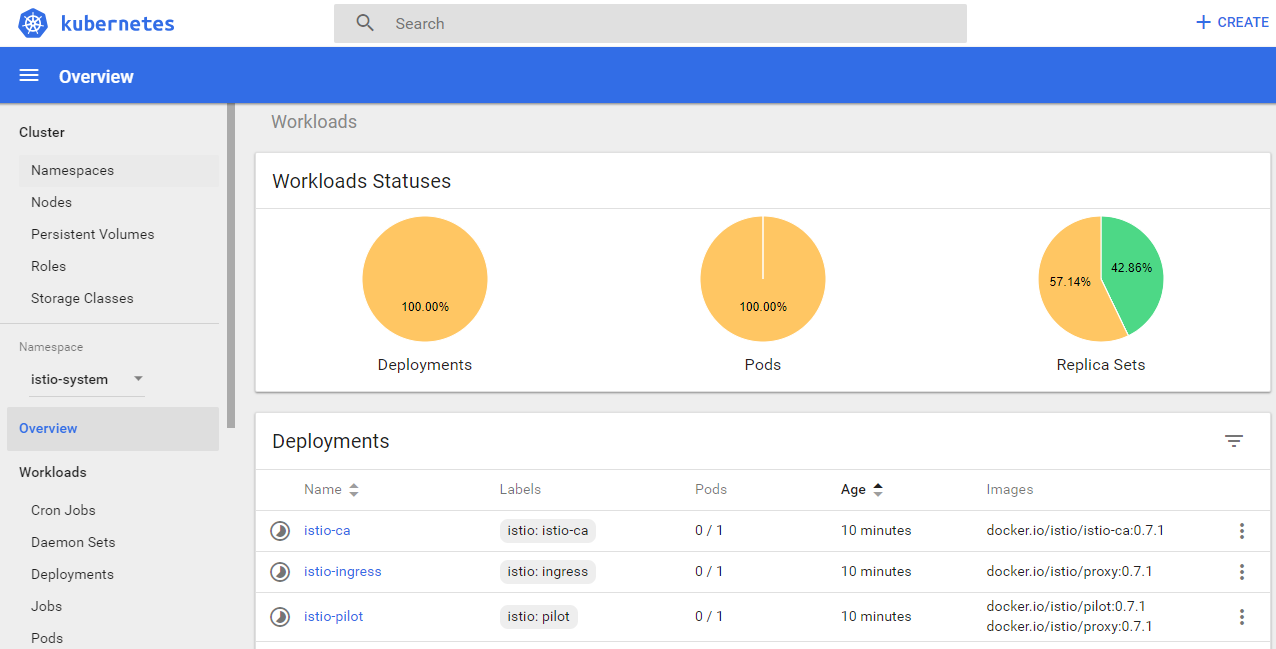
> minikube dashboard
> kubectl get svc -n istio-system
> export GATEWAY_URL=$(kubectl get po -l istio-ingress -n istio-system -o jsonpath='{.items[0].status.hostIP}'):$(kubectl get svc istio-ingress -n istio-system -o jsonpath='{.spec.ports[0].nodePort}')
> curl $GETWAY_URL
> choco install kubernetes-helm
> cd <git repo>
> helm init
> helm repo update
> helm version
> helm install --name my-rabbitmq --set rbacEnabled=false stable/rabbitmq
Now we can use amqp://my-rabbitmq.default.svc.cluster.local:5672 on Kubernetes Cluster, but what if we want to leverage it for the local development. The solution is port-forward it to our localhost as
> kubectl get pods | grep rabbitmq | awk '{print $1;}'
> kubectl port-forward <pod name just got> 15672
Or port-forward 5672 on Kubernetes (amqp protocol) to localhost:5672
> kubectl port-forward <pod name just got> 1234:5672
Now we have
> amqp://root:[email protected]:1234
> helm install --name my-redis stable/redis
> minikube docker-env
> @FOR /f "tokens=*" %i IN ('minikube docker-env') DO @%i
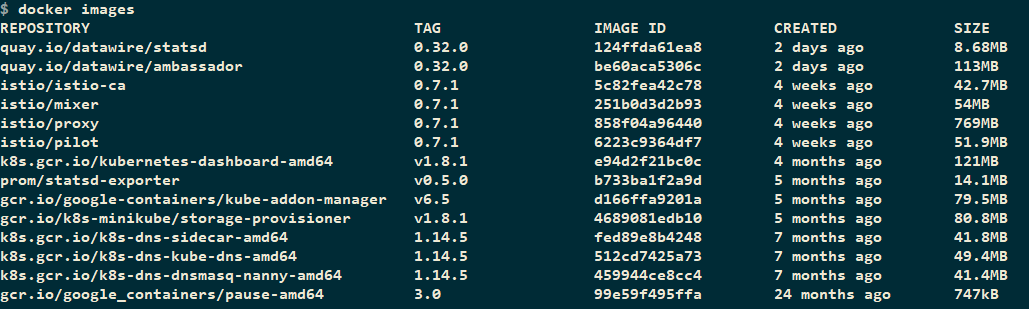
From now on, we can type docker images to list out all images in Kubernetes local node.
> powershell -f build-all.ps1
> cd k8s
> kubectl apply -f shopping-cart.yaml

> cd k8s
> istioctl kube-inject -f shopping-cart.yaml | kubectl apply -f -
In Deployment

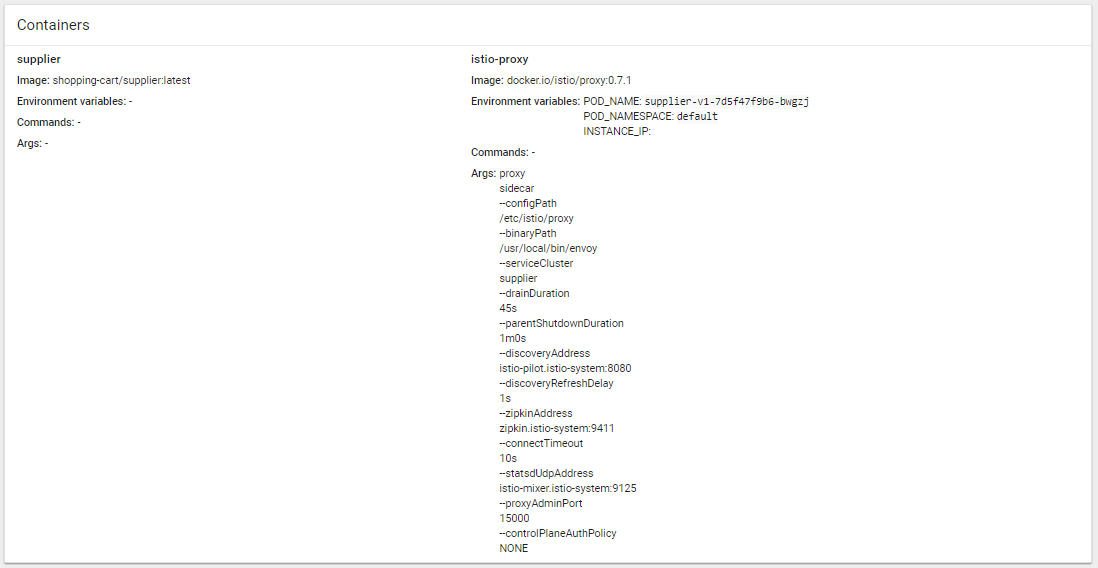
In each Pod
> minikube ip
> kubectl get svc ambassador -o jsonpath='{.spec.ports[0].nodePort}'
Finally, open browser with <IP>:<PORT>
Microservices
www.<IP>.xip.io:<PORT>/c/swagger/. For example, http://www.192.168.1.6.xip.io:32097/c/swagger/www.<IP>.xip.io:<PORT>/s/www.<IP>.xip.io:<PORT>/id/account/login or www.<IP>.xip.io:<PORT>/id/.well-known/openid-configurationwww.<IP>.xip.io:<PORT>/e/> powershell -f build-all.ps1
> kubectl delete -f shopping-cart.yaml
> kubectl apply -f shopping-cart.yaml
> cd istioinstallkubernetesaddons
> kubectl apply -f prometheus.yaml
> cd istioinstallkubernetesaddons
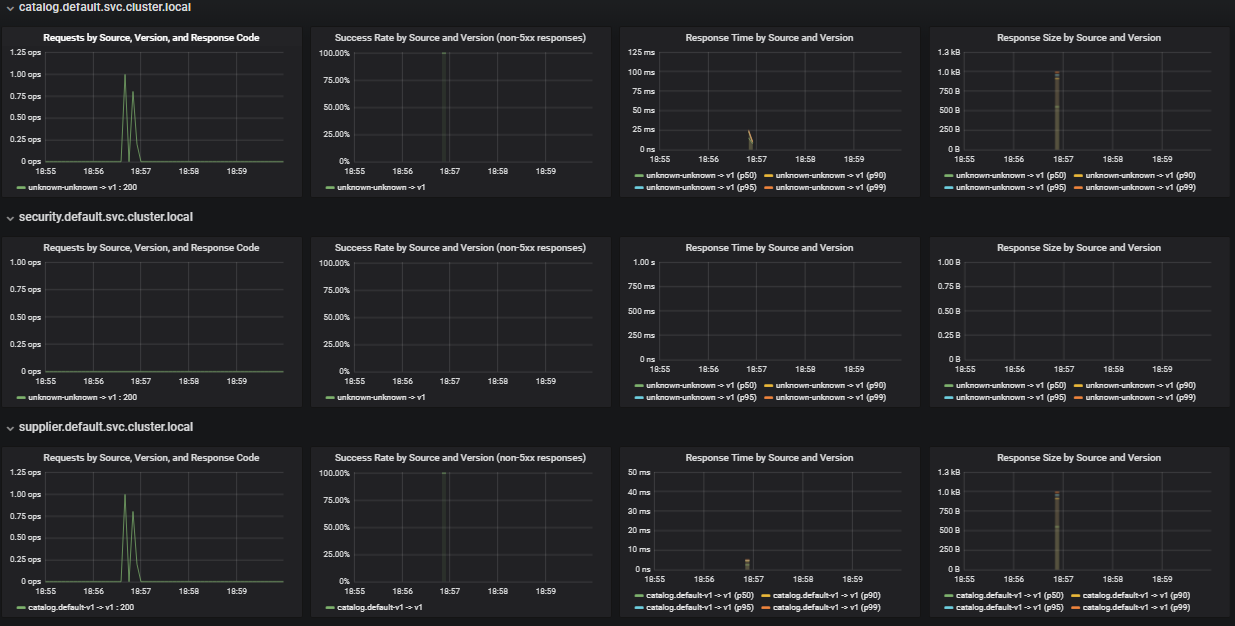
> kubectl apply -f grafana.yaml
> kubectl -n istio-system port-forward $(kubectl -n istio-system get pod -l app=grafana -o jsonpath='{.items[0].metadata.name}') 3000:3000 &
> curl http://localhost:3000
TODO
TODO
> kubectl apply -f "https://cloud.weave.works/k8s/scope.yaml?k8s-version=v1.9.0"
port-forward it out as following> kubectl get -n weave pod --selector=weave-scope-component=app -o jsonpath='{.items..metadata.name}'
> kubectl port-forward -n <weave scope name> 4040
http://localhost:4040> kubectl get pods
> kubectl exec <pod name> env
Let say we have a profile named minikube19, then just type the command as below
> kubectl config use-context minikube19

Switched to context "minikube19".
> minikube config set profile minikube19
ssh into that machine, then sudo apt-get install docker.iokubectl> apt-get update && apt-get install -y apt-transport-https
> curl -s https://packages.cloud.google.com/apt/doc/apt-key.gpg | apt-key add -
> cat <<EOF >/etc/apt/sources.list.d/kubernetes.list
deb http://apt.kubernetes.io/ kubernetes-xenial main
EOF
> apt-get update
> apt-get install -y kubectl
minikube> curl -Lo minikube https://storage.googleapis.com/minikube/releases/v0.27.0/minikube-linux-amd64 && chmod +x minikube && sudo mv minikube /usr/local/bin/
> alias k='kubectl'
> alias mk='/usr/local/bin/minikube'
> minikube start --vm-driver="virtualbox" --kubernetes-version="v1.9.0" --cpus=4 --memory 4096 --extra-config=apiserver.authorization-mode=RBAC --v=7 --alsologtostderr
> sysctl net.ipv4.ip_forward=1
> iptables -t nat -A PREROUTING -p tcp -d <VM IP> --dport 30000 -j DNAT --to-destination 192.168.99.100:30000
> iptables -t nat -A POSTROUTING -j MASQUERADE
> sudo iptables -t nat -v -x -n -L
> sudo dhclient eth0 -v
Install samba on ubuntu VM
socat on Ubuntu Server
> sudo apt-get install socat
> socat -v tcp-listen:30000,fork tcp:192.168.99.100:30000
> wget https://bin.equinox.io/c/4VmDzA7iaHb/ngrok-stable-linux-amd64.zip
> unzip ngrok-stable-linux-amd64.zip
> mk dashboard --url
> ./ngrok http 192.168.99.100:30000 -region ap
> sudo iptables -I INPUT -p tcp --dport 2375 -j ACCEPT
or
> sudo ufw allow 2375
then
> nc -l 2375


