full stack on prem cv mlops
1.0.0
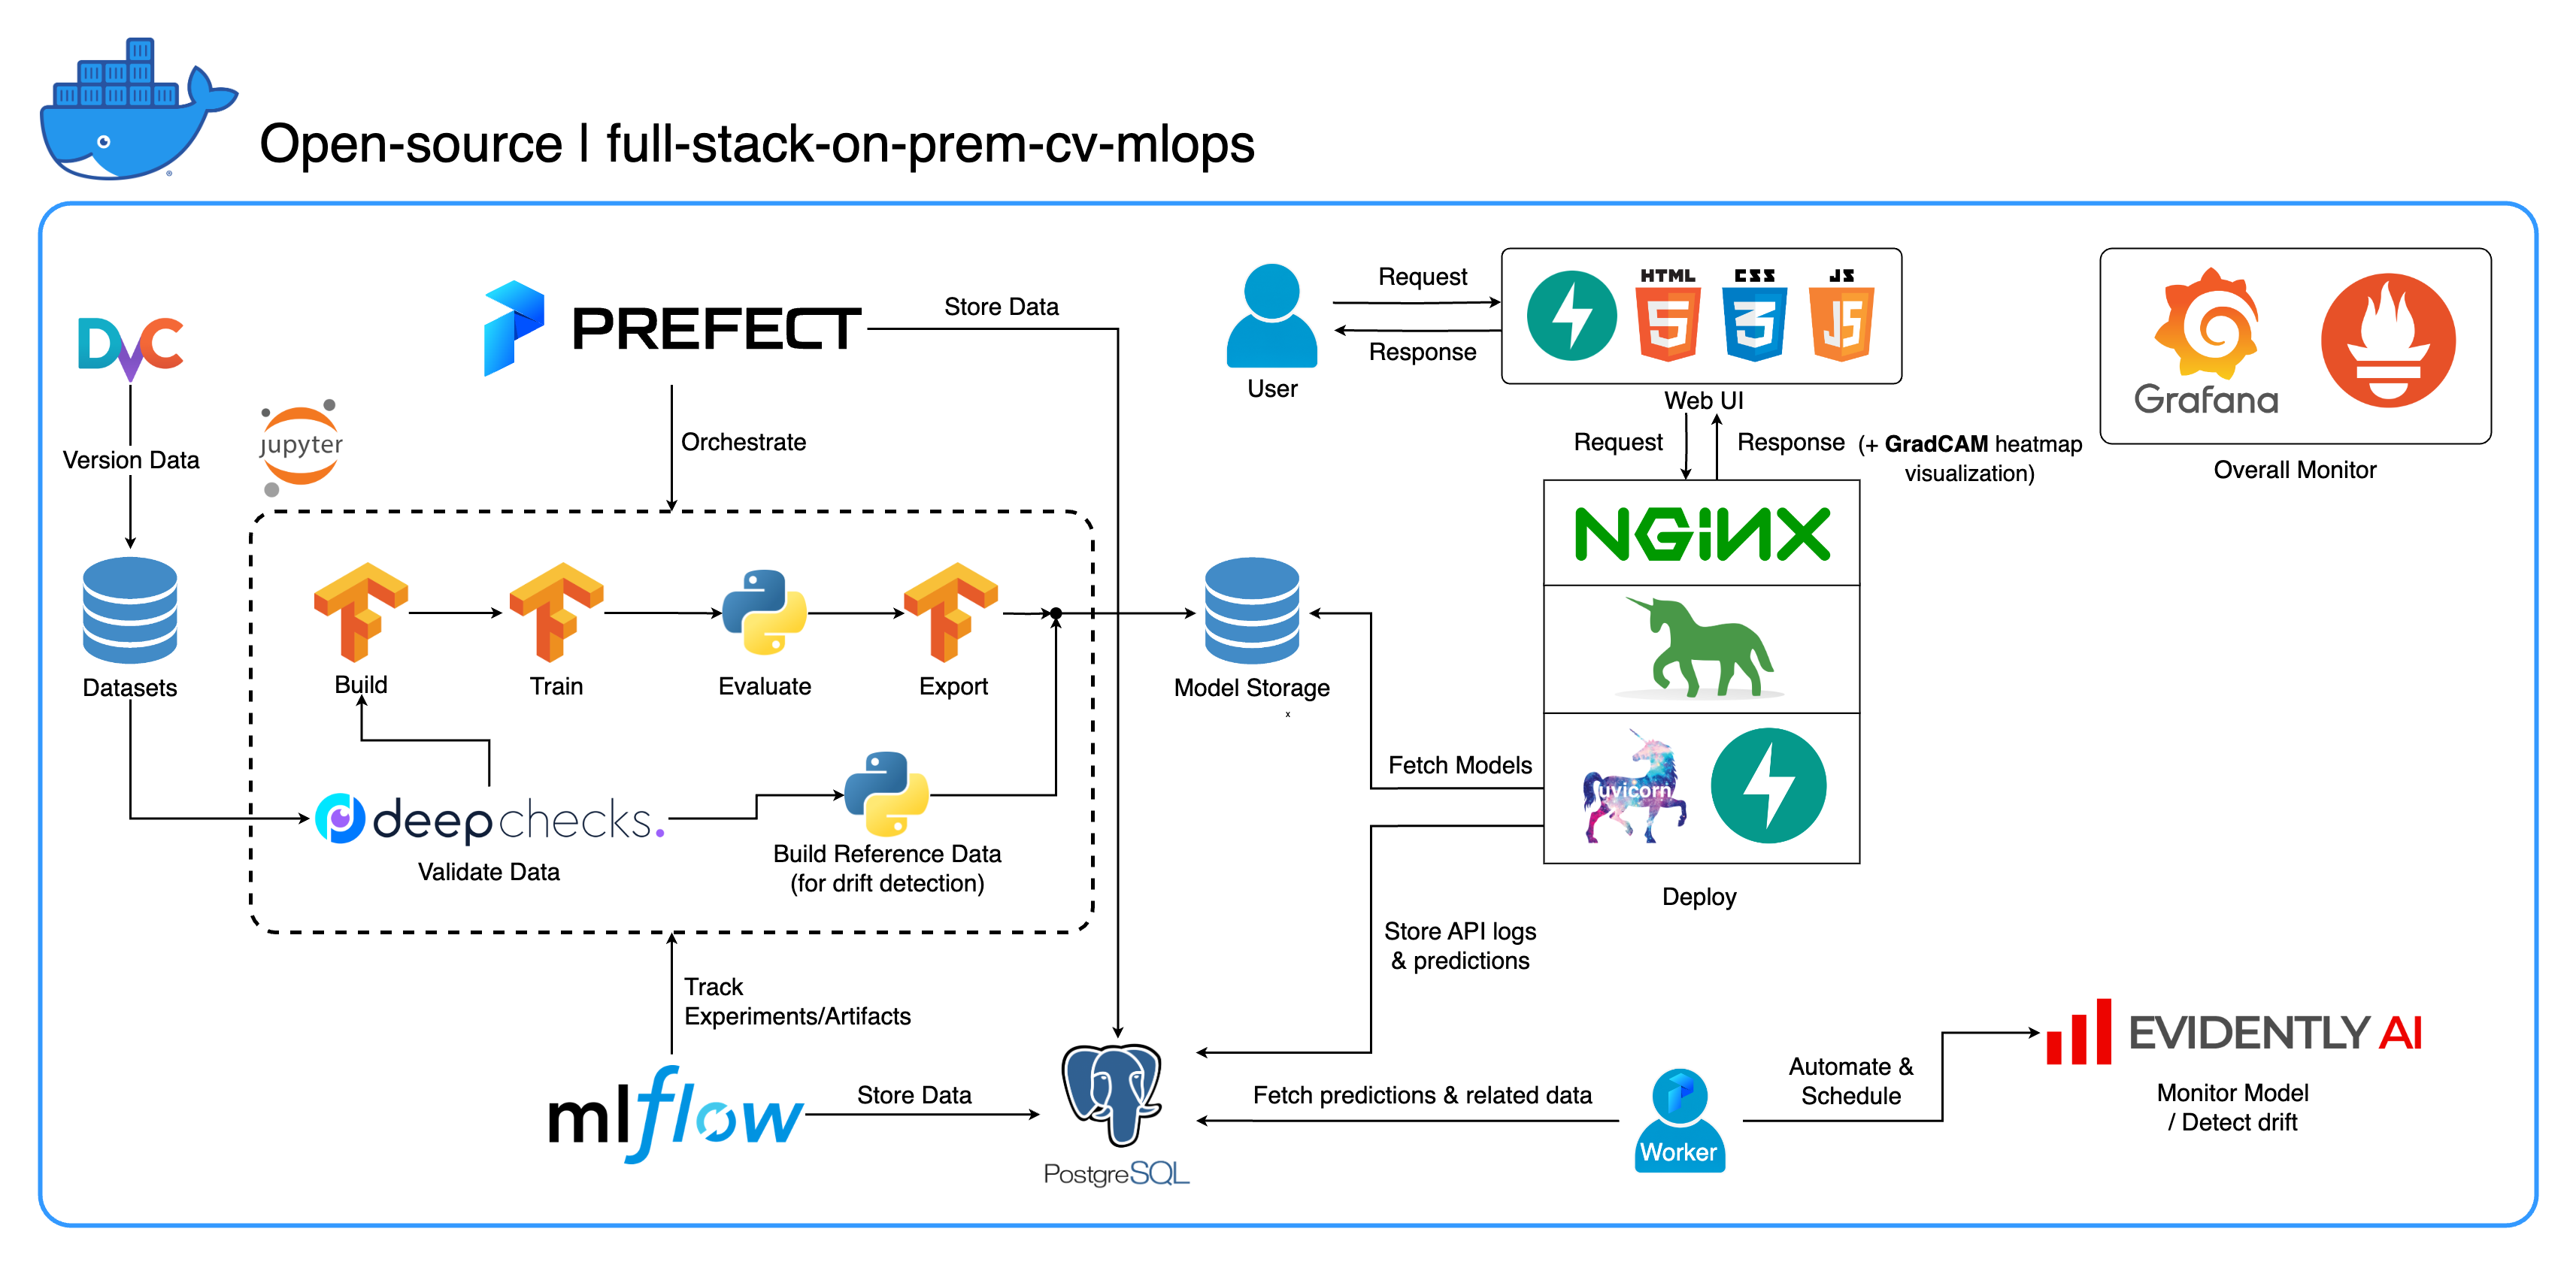
Welcome to our comprehensive on-premises MLOps ecosystem designed specifically for Computer Vision tasks, with a primary focus on image classification. This repository equips you with everything you need, from a development workspace in Jupyter Lab/Notebook to production-level services. The best part? It only takes "1 config and 1 command" to run the whole system from building the model to deployment! We've integrated numerous best practices to ensure scalability and reliability while maintaining flexibility. While our primary use case revolves around image classification, our project structure can easily adapt to a wide range of ML/DL developments, even transitioning from on-premises to cloud!
Another goal is to show how to integrate all these tools and make them work together in one full system. If you're interested in specific components or tools, feel free to cherry-pick what suits your project's needs.
The entire system is containerized into a single Docker Compose file. To set it up, all you have to do is run docker-compose up! This is a fully on-premises system, which means no need for a cloud account, and it won't cost you a dime to use the entire system!
We highly recommend watching the demo videos in the Demo videos section to get a comprehensive overview and understand how to apply this system to your projects. These videos contain important details that might be too long and not clear enough to cover here.
Demo: https://youtu.be/NKil4uzmmQc
In-depth technical walkthrough: https://youtu.be/l1S5tHuGBA8
Resources in the video:
To use this repository, you only need Docker. For reference, we use Docker version 24.0.6, build ed223bc and Docker Compose version v2.21.0-desktop.1 on Mac M1.
We've implemented several best practices in this project:
tf.data for TensorFlowimgaug lib for greater flexibility in augmentation options than core functions from TensorFlowos.env for important or service-level configslogging module instead of print.env for variables in docker-compose.ymldefault.conf.template for Nginx to elegantly apply environment variables in Nginx config (new feature in Nginx 1.19)Most of the ports can be customized in the .env file at the root of this repository. Here are the defaults:
123456789)[email protected], pw: SuperSecurePwdHere)admin, pw: admin)You have to consider comment those platform: linux/arm64 lines in docker-compose.yml if you not using an ARM-based computer (we're using Mac M1 for development). Otherwise, this system is not gonna work.
--recurse-submodules flag in your command: git clone --recurse-submodules https://github.com/jomariya23156/full-stack-on-prem-cv-mlopsdeploy section under jupyter service in docker-compose.yml and change the base image in services/jupyter/Dockerfile from ubuntu:18.04 to nvidia/cuda:11.4.3-cudnn8-devel-ubuntu20.04 (the text is there in the file, you just need to comment and uncomment) to leverage your GPU(s). You might also need to install nvidia-container-toolkit on the host machine to make it work. For Windows/WSL2 users, we found this article very helpful.docker-compose up or docker-compose up -d to detach the terminal.datasets/animals10-dvc and follow the steps in the How to use section.http://localhost:8888/labcd ~/workspace/docker-compose.yml) conda activate computer-viz-dlpython run_flow.py --config configs/full_flow_config.yamltasks directoryflows directoryrun_flow.py at the root of the repo.start(config) function in your flow file. This function accepts the config as a Python dict and then basically calls the specific flow in that file.datasets directory and they all should have the same directory structure as the one inside this repo.central_storage at ~/ariya/ should contain at least 2 subdirectories named models and ref_data. This central_storage serves the object storage purpose of storing all staged files to be used across developing and deploying environments. (This is one of the things you could consider changing to a cloud storage service in case you want to deploy on-cloud and make it more scalable)IMPORTANT Conventions to be SUPER EXTRA CAREFUL if you want to change (because these things are tied and used in different parts of the system):
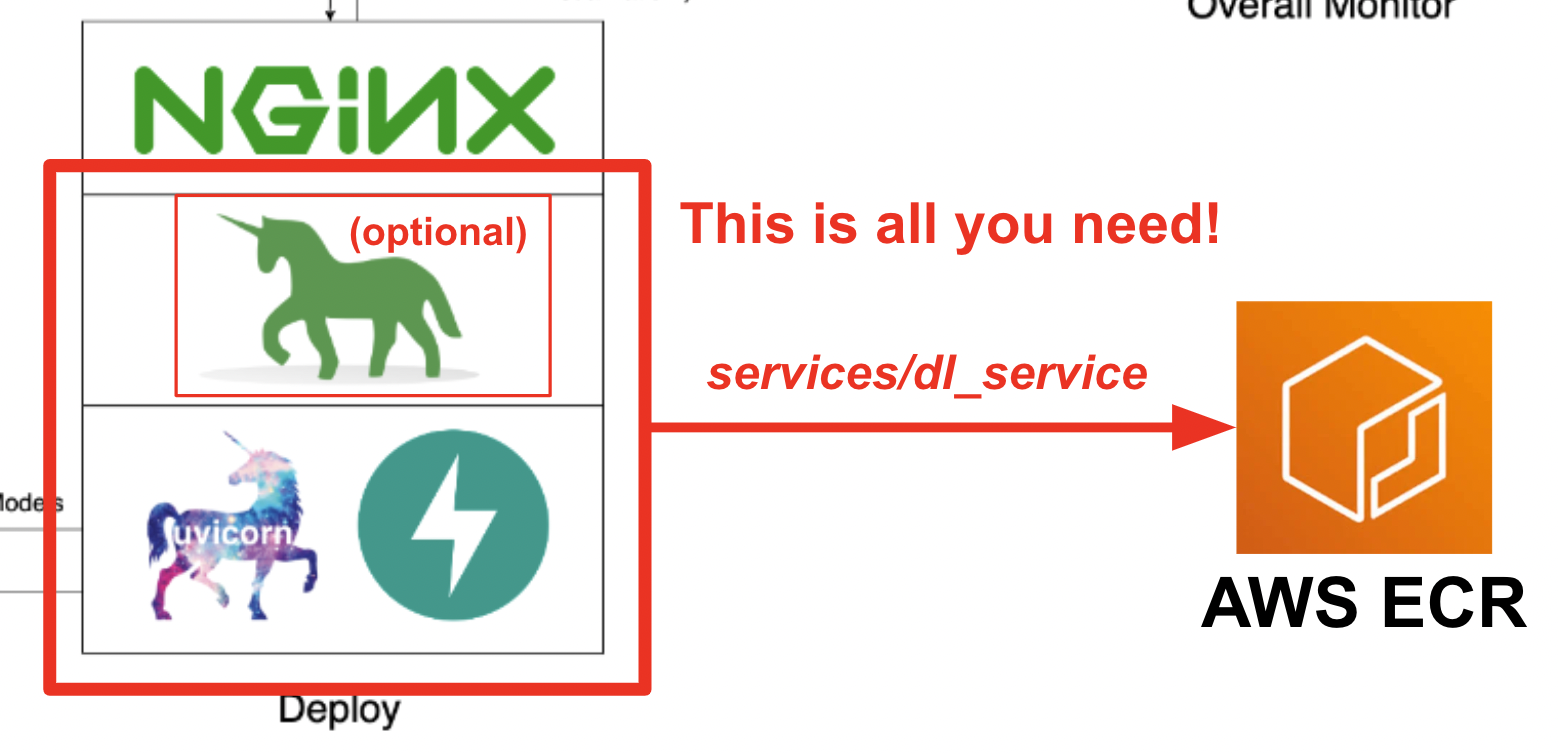
central_storage path -> Inside there should be models/ ref_data/ subdirectories<model_name>.yaml, <model_name>_uae, <model_name>_bbsd, <model_name>_ref_data.parquetcurrent_model_metadata_file and monitor_pool_namecomputer-viz-dl (default value), with all the required packages for this repository. All the Python commands/codes are supposed to be run within this Jupyter.central_storage volume acts as the central file storage used throughout development and deployment. It mainly contains model files (including drift detectors) and reference data in Parquet format. At the end of the model training step, new models are saved here, and the deployment service pulls models from this location. (Note: This is an ideal place to replace with cloud storage services for scalability.)model section in the config to build a classifier model. The model is built with TensorFlow and its architecture is hardcoded at tasks/model.py:build_model.dataset section in the config to prepare a dataset for training. DvC is used in this step to check the consistency of the data in the disk compared with the version specified in the config. If there are changes, it converts it back to the specified version programmatically. If you want to keep the changes, in case you're experimenting with the dataset, you can set dvc_checkout field in the config to false so that DvC won't do its things.train section in the config to build a data loader and start the training process. Experiment info and artifacts are tracked and logged with MLflow. Note: the result report (in a .html file) from DeepChecks is also uploaded to the training experiment on MLflow for the convention.model section in the config.central_storage (in this case, it's just making a copy to central_storage location. This is the step you can change to uploading files to cloud storage)model/drift_detection section in the config.central_storage.central_storage.central_storage. (this is one concern discussed in the tutorial demo video, watch it for more detail)current_model_metadata_file storing model metadata file name ended with .yaml and monitor_pool_name storing the work pool name for deploying Prefect worker and flows.cd into deployments/prefect-deployments and run prefect --no-prompt deploy --name {deploy_name} using inputs from the deploy/prefect section in the config.Since everything is already dockerized and containerized in this repo, converting the service from on-prem to on-cloud is pretty straightforward. When you finish developing and testing your service API, you can just spin off services/dl_service by building the container from its Dockerfile, and push it to a cloud container registry service (AWS ECR, for example). That's it!
Note: There is one potential problem in the service code if you want to use it in a real production environment. I have addressed it in the in-depth video and I recommend you to spend some time watching the whole video.
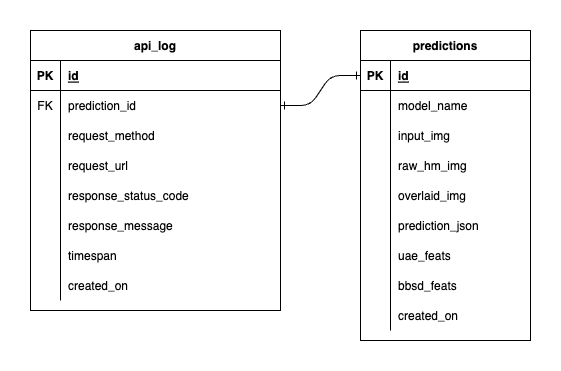
We have three databases inside PostgreSQL: one for MLflow, one for Prefect, and one that we've created for our ML model service. We won't delve into the first two, as they are self-managed by those tools. The database for our ML model service is the one we've designed ourselves.
To avoid overwhelming complexity, we've kept it simple with only two tables. The relationships and attributes are shown in the ERD below. Essentially, we aim to store essential details about incoming requests and our service's responses. All these tables are created and manipulated automatically, so you don't need to worry about manual setup.
Noteworthy: input_img, raw_hm_img, and overlaid_img are base64-encoded images stored as strings. uae_feats and bbsd_feats are arrays of embedding features for our drift detection algorithms.
ImportError: /lib/aarch64-linux-gnu/libGLdispatch.so.0: cannot allocate memory in static TLS block error, try export LD_PRELOAD=/lib/aarch64-linux-gnu/libGLdispatch.so.0 then rerun your script.

