django tasks manager
v1.0.1
Eine super einfache Django & Sellerie -Integration - diese Bibliothek wird aktiv von AppSED unterstützt.
Merkmale:
Celery TasksView LOGSMinimal Configurationusers_in_db() - Listen Sie alle registrierten Benutzer aufexecute_script() - Lassen Sie Benutzer die in CELERY_SCRIPTS_DIR (CFG -Parameter) definierten Skripte ausführen.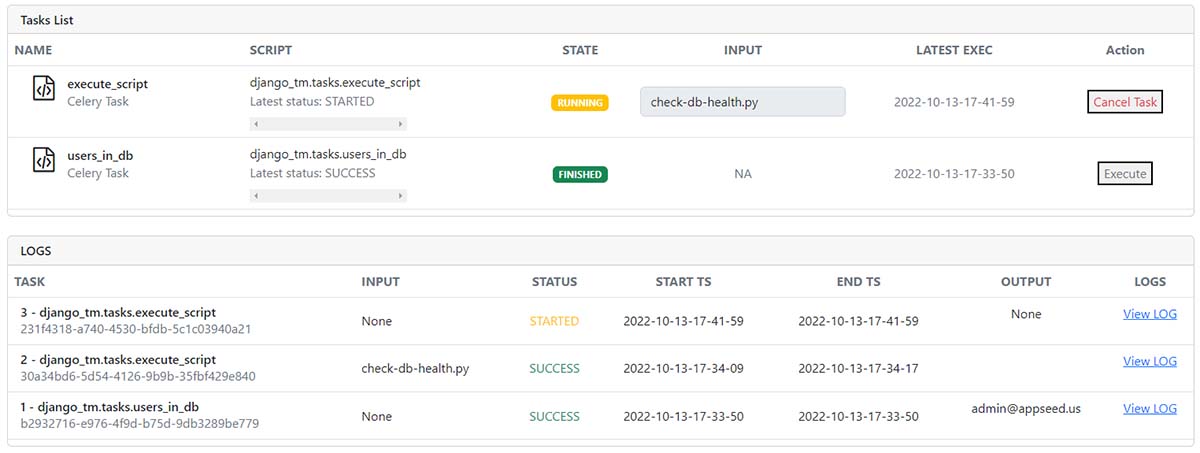
Installieren Sie das Paket über
PIP
$ pip install django-tasks-manager
// OR
$ pip install git+https://github.com/app-generator/django-tasks-manager.git
Fügen Sie das neue Routing ein
 # core/urls.py

from django . urls import path , include     # <-- UPDATE: Add 'include' HELPER

urlpatterns = [
    ...

    path ( "" , include ( "django_tm.urls" )),  # <-- New Routes

    ...
]
Erstellen von Scrips & Logs -Verzeichnissen - Der empfohlene Ort befindet sich in der Wurzel des Projekts:
$ mkdir celery_scripts # Used in Settings -> CELERY_SCRIPTS_DIR
$ mkdir celery_logs # Used in Settings -> CELERY_SCRIPTS_DIRKonfiguration Aktualisieren Sie das Import
oshinzufügen
import os # <-- NEWKonfiguration aktualisieren : Fügen Sie die neuen Apps hinzu
 INSTALLED_APPS = [
    ...
    'django_tm' ,              # Django Tasks Manager   # <-- NEW
    'django_celery_results' ,  # Django Celery Results  # <-- NEW
]
Konfiguration aktualisieren : Fügen Sie die neuen Vorlagen hinzu
 TEMPLATE_DIR_TASKS = os . path . join ( BASE_DIR , "django_tm/templates" )     # <-- NEW

TEMPLATES = [
    {
        'BACKEND' : 'django.template.backends.django.DjangoTemplates' ,
        'DIRS' : [ TEMPLATE_DIR_TASKS ],                                  # <-- Updated
        'APP_DIRS' : True ,
    },
]
Konfiguration Aktualisieren : New Celery_ Abschnitt
 #############################################################
# Celery configurations
# https://docs.celeryq.dev/en/stable/django/first-steps-with-django.html

# !!!
# BASE_DIR points to the ROOT of the project
# Note: make sure you have 'os' object imported
# !!!

# !!!
# BASE_DIR = os.path.dirname(os.path.dirname(__file__))
# !!!

# Working Directories required write permission
CELERY_SCRIPTS_DIR        = os . path . join ( BASE_DIR , "celery_scripts" )
CELERY_LOGS_DIR           = os . path . join ( BASE_DIR , "celery_logs"    )

CELERY_BROKER_URL         = os . environ . get ( "CELERY_BROKER" , "redis://localhost:6379" )
CELERY_RESULT_BACKEND     = os . environ . get ( "CELERY_BROKER" , "redis://localhost:6379" )

CELERY_TASK_TRACK_STARTED = True
CELERY_TASK_TIME_LIMIT    = 30 * 60
CELERY_CACHE_BACKEND      = "django-cache"
CELERY_RESULT_BACKEND     = "django-db"
CELERY_RESULT_EXTENDED    = True
CELERY_RESULT_EXPIRES     = 60 * 60 * 24 * 30 # Results expire after 1 month
CELERY_ACCEPT_CONTENT     = [ "json" ]
CELERY_TASK_SERIALIZER    = 'json'
CELERY_RESULT_SERIALIZER  = 'json'

#############################################################
#############################################################
Starten Sie die App
$ # Set up the database
$ python manage.py makemigrations
$ python manage.py migrate
$
$ # Create the superuser
$ python manage.py createsuperuser
$
$ # Start the application (development mode)
$ python manage.py runserver # default port 8000superuser authentifizierenTasks zu: http://127.0.0.1:8000/tasksStarten Sie den Sellerie -Manager (ein weiteres Terminal) und aktualisieren Sie die Umgebung
Exportieren Sie DJANGO_SETTINGS_MODULE mit dem in manage.py angegebenen Wert
$ export DJANGO_SETTINGS_MODULE=cfg.settings Der verwendete exportieren sollte von manage.py werden.py:
 def main ():

    """Run administrative tasks."""
    os . environ . setdefault ( "DJANGO_SETTINGS_MODULE" , "cfg.settings" )  # <-- VALUE to be exported

    try :
        from django . core . management import execute_from_command_line
    except ImportError as exc :
        ...
Hinweis : Redis -Server wird auf Port 6379 (Standard) erwartet. Wenn Redis auf einem anderen PORT ausgeführt wird, aktualisieren Sie bitte die Konfiguration: CELERY_BROKER_URL und CELERY_RESULT_BACKEND .
$ celery --app=django_tm.celery.app worker --loglevel=info
View all tasks
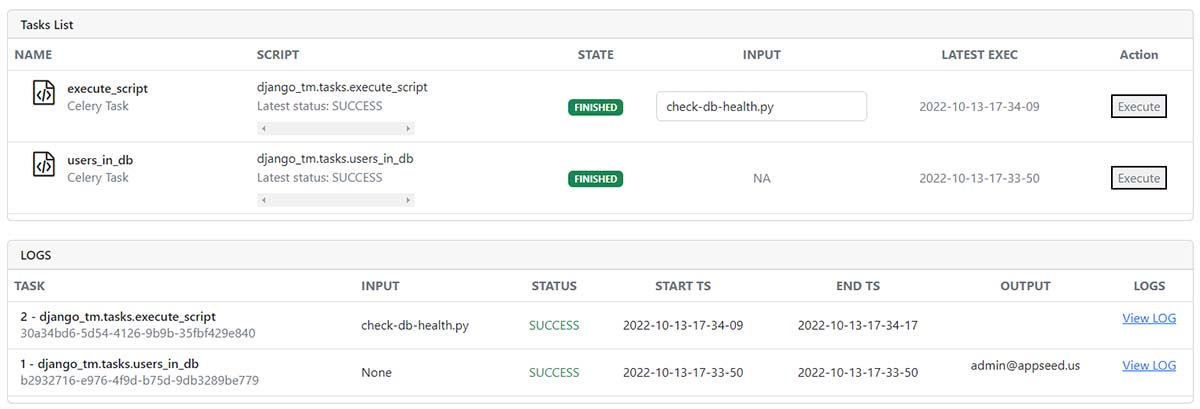
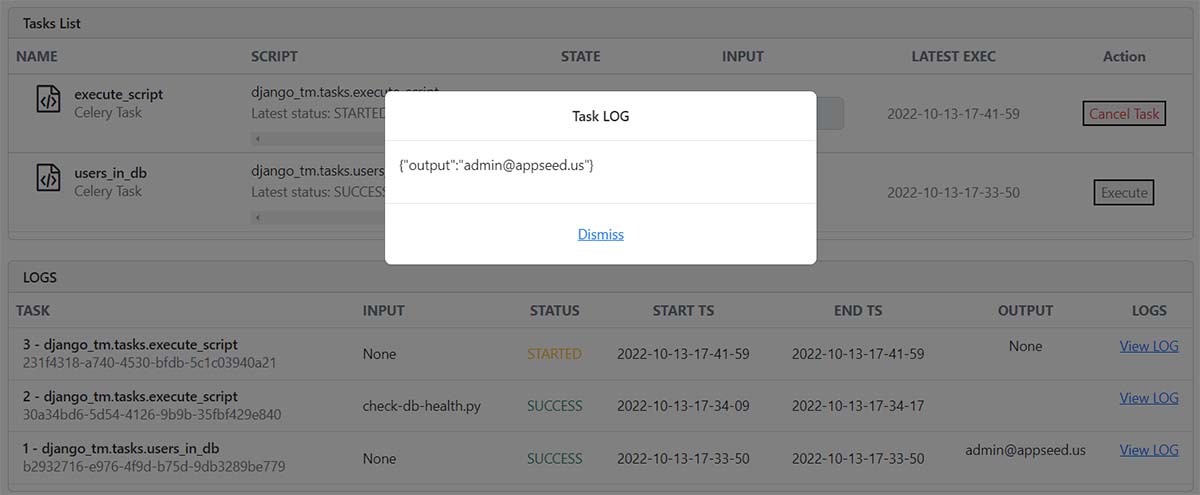
View Task LOG
free sample , das erklärt:Project Creation (minimale Dateien hinzugefügt)Install und generieren Django CoreDjango-TM (dieses Paket)Update ConfigurationStart the appTasks ManagerDjango Tasks Manager - Open -Source -Bibliothek von AppSED bereitgestellt


