
在Angular 中,表單有兩種類型,分別為模板驱动和模型驱动。 【相關教學推薦:《angular教學】
1.1 概述
表單的控制逻辑寫在组件模板中,適合简单的表單類型。
1.2 快速上手
1)、引入依賴模組FormsModule
import { FormsModule } from "@angular/forms"

@NgModule({
  imports: [FormsModule],
})
export class AppModule {}
2)、將DOM 表單轉換為ngForm
<form #f="ngForm" (submit)="onSubmit(f)"></form>
3)、宣告表單欄位為ngModel
<form #f= "ngForm" (submit)="onSubmit(f)">
  <input type="text" name="username" ngModel />
  <button>提交</button>
</form>
4)、取得表單欄位值
import { NgForm } from "@angular/forms"

export class AppComponent {
  onSubmit(form: NgForm) {
    console.log(form.value) // {username: ''}
  }
}
5)、表單分組
<form #f="ngForm" (submit)="onSubmit(f)">
  <div ngModelGroup="user">
    <input type="text" name="username" ngModel />
  </div>
  <div ngModelGroup="contact">
    <input type="text" name="phone" ngModel />
  </div>
  <button>提交</button>
</form>
import { NgForm } from "@angular/forms"
export class AppComponent {
onSubmit(form: NgForm) {
console.log(form.value) // {contact: {phone: ''}, user:{username: ''}}
}
} 1.3 表單驗證
<form #f="ngForm" (submit)="onSubmit(f)">
  <input type="text" name="username" ngModel required pattern="d" />
  <button>提交</button>
</form>
export class AppComponent {
  onSubmit(form: NgForm) {
    // 查看表單整體是否驗證通過console.log(form.valid)
  }
}
<!-- 表單整體未通過驗證時停用提交表單--> <button type="submit" [disabled]="f.invalid">提交</button>
在元件範本中顯示表單項目未通過時的錯誤訊息。
<form #f="ngForm" (submit)="onSubmit(f)">
  <input #username="ngModel" />
  <div *ngIf="username.touched && !username.valid && username.errors">
    <div *ngIf="username.errors.required">請填入使用者名稱</div>
    <div *ngIf="username.errors.pattern">不符合正規規則</div>
  </div>
</form>
指定表單項目未通過驗證時的樣式。
input.ng-touched.ng-invalid {
  border: 2px solid red;
}2.1 概述
表單的控制逻辑寫在组件类中,對驗證邏輯有更多的控制權,適合复杂的表單的類型。
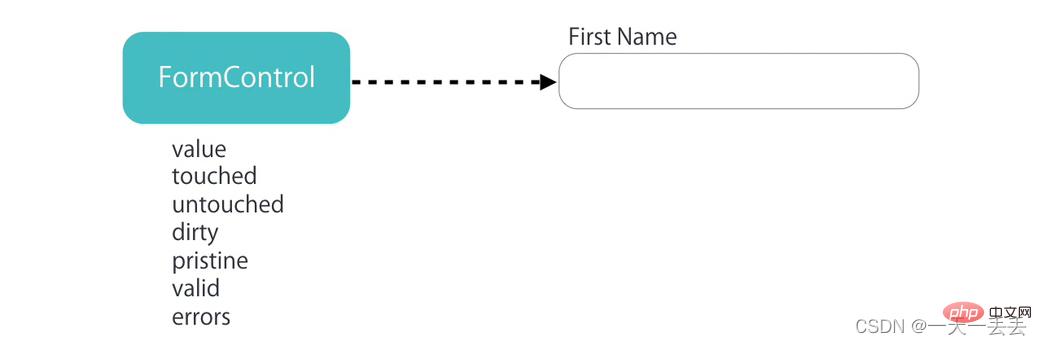
在模型驅動表單中,表單欄位需要是FormControl類別的實例,實例物件可以验证表单字段位中的值,值是否被修改過等等
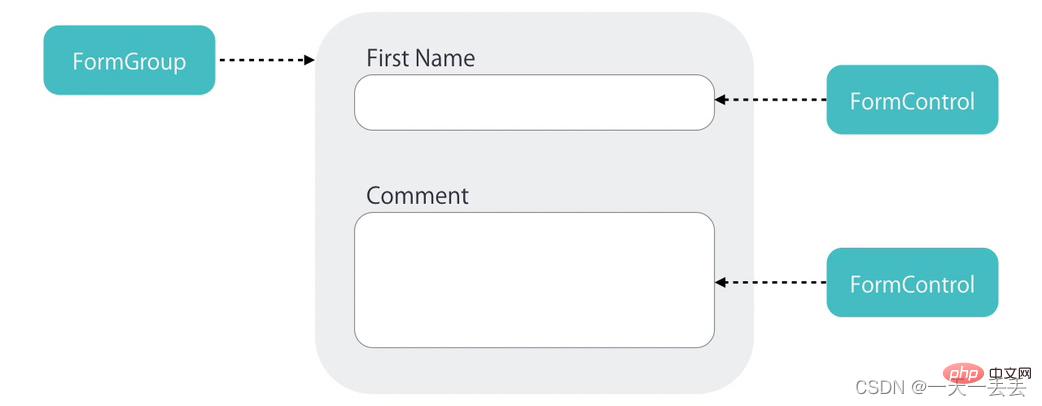
一組表單欄位構成整個表單,整個表單需要是FormGroup類別的實例,它可以對表單進行整体驗證。
FormControl:表單組中的一個表單項目
FormGroup:表單組,表單至少是一個FormGroup
FormArray:用於複雜表單,可以動態添加表單項目或表單組,在表單驗證時,FormArray 中有一項沒通過,整體沒通過。
2.2 快速上手
1)、引入ReactiveFormsModule
import { ReactiveFormsModule } from "@angular/forms"

@NgModule({
  imports: [ReactiveFormsModule]
})
export class AppModule {}
2)、在元件類別中建立FormGroup 表單控制物件
import { FormControl, FormGroup } from "@angular/forms"

export class AppComponent {
  contactForm: FormGroup = new FormGroup({
    name: new FormControl(),
    phone: new FormControl()
  })
}
3)、關聯元件範本中的表單
<form [formGroup]="contactForm" (submit)="onSubmit()">
  <input type="text" formControlName="name" />
  <input type="text" formControlName="phone" />
  <button>提交</button>
</form>
4)、取得表單值
export class AppComponent {
  onSubmit() {
    console.log(this.contactForm.value)
  }
}
5)、設定表單預設值
contactForm: FormGroup = new FormGroup({
  name: new FormControl("預設值"),
  phone: new FormControl(15888888888)
})
6)、表單分組
contactForm: FormGroup = new FormGroup({
  fullName: new FormGroup({
    firstName: new FormControl(),
    lastName: new FormControl()
  }),
  phone: new FormControl()
})
<form [formGroup]="contactForm" (submit)="onSubmit()">
<div formGroupName="fullName">
<input type="text" formControlName="firstName" />
<input type="text" formControlName="lastName" />
</div>
<input type="text" formControlName="phone" />
<button>提交</button>
</form> onSubmit() {
console.log(this.contactForm.value.name.username)
console.log(this.contactForm.get(["name", "username"])?.value)
} 2.3 FormArray
需求:在頁面中預設顯示一組聯絡方式,透過點擊按鈕可以新增更多聯絡方式群組。
import { Component, OnInit } from "@angular/core"
import { FormArray, FormControl, FormGroup } from "@angular/forms"
@Component({
  selector: "app-root",
  templateUrl: "./app.component.html",
  styles: []
})
export class AppComponent implements OnInit {
  // 表單contactForm: FormGroup = new FormGroup({
    contacts: new FormArray([])
  })

  get contacts() {
    return this.contactForm.get("contacts") as FormArray
  }

  // 新增聯絡方式addContact() {
    // 聯絡方式const myContact: FormGroup = new FormGroup({
      name: new FormControl(),
      address: new FormControl(),
      phone: new FormControl()
    })
    // 在聯絡方式數組中新增聯絡方式this.contacts.push(myContact)
  }

  // 刪除聯絡方式removeContact(i: number) {
    this.contacts.removeAt(i)
  }

  ngOnInit() {
    // 新增預設的聯絡方式this.addContact()
  }

  onSubmit() {
    console.log(this.contactForm.value)
  }
}
<form [formGroup]="contactForm" (submit)="onSubmit()">
<div formArrayName="contacts">
<div
*ngFor="let contact of contacts.controls; let i = index"
[formGroupName]="i"
>
<input type="text" formControlName="name" />
<input type="text" formControlName="address" />
<input type="text" formControlName="phone" />
<button (click)="removeContact(i)">刪除聯絡人</button>
</div>
</div>
<button (click)="addContact()">新增聯絡方式</button>
<button>提交</button>
</form> 2.4 內建表單驗證器
1)、使用內建驗證器提供的驗證規則驗證表單欄位
import { FormControl, FormGroup, Validators } from "@angular/forms"

contactForm: FormGroup = new FormGroup({
  name: new FormControl("預設值", [
    Validators.required,
    Validators.minLength(2)
  ])
})
2)、取得整體表單是否驗證通過
onSubmit() {
  console.log(this.contactForm.valid)
}
<!-- 表單整體未驗證通過時禁用表單按鈕--> <button [disabled]="contactForm.invalid">提交</button>
3)、在元件範本中顯示為驗證通過時的錯誤訊息
get name() {
  return this.contactForm.get("name")!
}
<form [formGroup]="contactForm" (submit)="onSubmit()">
<input type="text" formControlName="name" />
<div *ngIf="name.touched && name.invalid && name.errors">
<div *ngIf="name.errors.required">請填入姓名</div>
<div *ngIf="name.errors.maxlength">
姓名長度不能大於{{ name.errors.maxlength.requiredLength }} 實際填入長度為{{ name.errors.maxlength.actualLength }}
</div>
</div>
</form> 2.5 自訂同步表單驗證器
自訂驗證器的類型是TypeScript
類別中包含具體的驗證方法,驗證方法必須為靜態方法
驗證方法有一個參數control,類型為AbstractControl。其實就是FormControl 類別的實例對象的類型
如果驗證成功,返回null
如果驗證失敗,返回對象,對像中的屬性即為驗證標識,值為true,標識該項驗證失敗
驗證方法的返回值為ValidationErrors | null
import { AbstractControl, ValidationErrors } from "@angular/forms"

export class NameValidators {
  // 欄位值不能包含空格static cannotContainSpace(control: AbstractControl): ValidationErrors | null {
    // 驗證未通過if (/s/.test(control.value)) return { cannotContainSpace: true }
    // 驗證透過return null
  }
}
import { NameValidators } from "./Name.validators"
contactForm: FormGroup = new FormGroup({
name: new FormControl("", [
Validators.required,
NameValidators.cannotContainSpace
])
}) <div *ngIf="name.touched && name.invalid && name.errors"> <div *ngIf="name.errors.cannotContainSpace">姓名中不能包含空格</div> </div>
2.6 自訂非同步表單驗證器
import { AbstractControl, ValidationErrors } from "@angular/forms"
import { Observable } from "rxjs"

export class NameValidators {
  static shouldBeUnique(control: AbstractControl): Promise<ValidationErrors | null> {
    return new Promise(resolve => {
      if (control.value == "admin") {
         resolve({ shouldBeUnique: true })
       } else {
         resolve(null)
       }
    })
  }
}
contactForm: FormGroup = new FormGroup({
name: new FormControl(
"",
[
Validators.required
],
NameValidators.shouldBeUnique
)
}) <div *ngIf="name.touched && name.invalid && name.errors"> <div *ngIf="name.errors.shouldBeUnique">用戶名重複</div> </div> <div *ngIf="name.pending">正在偵測姓名是否重複</div>
2.7 FormBuilder
建立表單的快捷。
this.fb.control :表單項目
this.fb.group :表單群組,表單至少是一個FormGroup
this.fb.array :用於複雜表單,可以動態新增表單項目或表單組,在表單驗證時,FormArray 中有一個項沒通過,整體沒通過。
import { FormBuilder, FormGroup, Validators } from "@angular/forms"

export class AppComponent {
  contactForm: FormGroup
  constructor(private fb: FormBuilder) {
    this.contactForm = this.fb.group({
      fullName: this.fb.group({
        firstName: ["", [Validators.required]],
        lastName: [""]
      }),
      phone: []
    })
  }
}
2.8 監聽表單值的變化
實際工作中,我們常常需要根據某個表單值得變化而進行相應的處理,一般可以使用ngModalChange或表單來實現
2.8.1 ngModalChange
<div>
  <input type="text" [(ngModal)]="name" (ngModalChange)="nameChange()" />
</div>
import { FormControl, FormGroup } from "@angular/forms"

export class AppComponent {
  public name = 'a';
  public nameChange() {
  }
}
angular官方不建議使用ngModalChange。
2.8.2 表單控制
<div [formGroup]="contactForm">
  <input type="text" formControlName="name" />
</div>
import { FormControl, FormGroup } from "@angular/forms"

export class AppComponent {
  contactForm: FormGroup = new FormGroup({
    name: new FormControl()
  })

	ngOnInt() {
		this.contactForm.get("name").valueChanges.subscribe(data => {
			console.log(data);
		}
	}
}
2.9 練習
1)、取得一組複選框中選取的值
<form [formGroup]="form" (submit)="onSubmit()">
  <label *ngFor="let item of Data">
    <input type="checkbox" [value]="item.value" (change)="onChange($event)" />
    {{ item.name }}
  </label>
  <button>提交</button>
</form>
import { Component } from "@angular/core"
import { FormArray, FormBuilder, FormGroup } from "@angular/forms"
interface Data {
name: string
value: string
}
@Component({
selector: "app-checkbox",
templateUrl: "./checkbox.component.html",
styles: []
})
export class CheckboxComponent {
Data: Array<Data> = [
{ name: "Pear", 值: "pear" },
{ name: "Plum", 值: "plum" },
{ name: "Kiwi", 值: "kiwi" },
{ name: "Apple", 值: "apple" },
{ name: "Lime", 值: "lime" }
]
form: FormGroup
constructor(private fb: FormBuilder) {
this.form = this.fb.group({
checkArray: this.fb.array([])
})
}
onChange(event: Event) {
const target = event.target as HTMLInputElement
const checked = target.checked
const value = target.value
const checkArray = this.form.get("checkArray") as FormArray
if (checked) {
checkArray.push(this.fb.control(value))
} else {
const index = checkArray.controls.findIndex(
control => control.value === value
)
checkArray.removeAt(index)
}
}
onSubmit() {
console.log(this.form.value)
}
} 2)、取得單一選取框中選取的值
export class AppComponent {
  form: FormGroup

  constructor(public fb: FormBuilder) {
    this.form = this.fb.group({ gender: "" })
  }

  onSubmit() {
    console.log(this.form.value)
  }
}
<form [formGroup]="form" (submit)="onSubmit()"> <input type="radio" value="male" formControlName="gender" /> Male <input type="radio" value="female" formControlName="gender" /> Female <button type="submit">Submit</button> </form>
2.10 其他
patchValue:設定表單控制項的值(可以設定全部,也可以設定其中某一個,其他不受影響)
setValue:設定表單控制項的值(設定全部,不能排除任何一個)
valueChanges:當表單控制項的值發生變化時被觸發的事件
reset:表單內容置空