在nodejs中,archiver用來將一些檔案壓縮打包成zip格式或tar格式的壓縮包;archiver是一個能跨平台實作打包功能的模組,打包的格式是zip和tar,可以利用「npm install archiver」語句在使用前安裝模組。

本文操作環境:Windows10系統、nodejs 12.19.0版、Dell G3電腦。
有時候我們需要將一些檔案壓縮打包成zip格式或tar格式的壓縮包,也有可能需要將目錄打包。在Node.js中就可以用到archiver這個第三方包來進行操作。
archiver是個在nodejs中能跨平台實作打包功能的模組,可以打zip和tar包,是比較好用的三方模組。
使用前先安裝archiver模組。
代碼如下:
npm install archiver引入:
// 由於需要讀取檔案需要fs模組,也必須導入const fs = require('fs');const archiver = require('archiver');基本使用如下:
// 第一步,導入必要的模組const fs = require('fs');const archiver = require('archiver');// 第二步,建立可寫流來寫入資料const output = fs.createWriteStream (__dirname + "/hello.zip");// 將壓縮套件儲存到目前專案的目錄下,且壓縮套件名稱為test.zipconst archive = archiver('zip', {zlib: {level: 9}}) ;// 設定壓縮等級// 第三步,建立管道連接archive.pipe(output);// 第四步,壓縮指定檔案var stream = fs.createReadStream(__dirname + "/hello.txt");//讀取目前目錄下的hello.txtarchive.append(stream, {name: 'hello.txt'});// 第五步,完成壓縮archive.finalize();執行程式碼成功後,就會在專案的所在目錄下產生一個名為hello.zip壓縮包,該壓縮包內就是壓縮的檔案hello.txt。
壓縮檔案可以使用archive.append()和archive.file()來操作。
壓縮單一檔案的API如下:
// 新增一個檔案到壓縮包,透過可寫流的方式讀取資料附加檔案const file1 = __dirname + '/file1.txt';archive.append(fs.createReadStream(file1), { name: 'file1.txt ' });//新增一個檔案到壓縮包,透過將字串寫入到檔案的方式附加檔案archive.append('string cheese!', { name: 'file2.txt' });// 新增一個檔案到壓縮包,透過Buffer資料的方式附加檔案const buffer3 = Buffer.from('buff it!');archive.append(buffer3, { name: 'file3.txt' });// 新增一個檔案到壓縮包,直接傳入檔案路徑archive.file('file1.txt', { name: 'file4.txt' });完整的例子如下:
// 第一步,導入必要的模組const fs = require('fs');const archiver = require('archiver');// 第二步,建立可寫流來寫入資料const output = fs.createWriteStream (__dirname + "/hello.zip");// 將壓縮套件儲存到目前專案的目錄下,且壓縮套件名稱為test.zipconst archive = archiver('zip', {zlib: {level: 9}}) ;// 設定壓縮等級// 第三步,建立管道連接archive.pipe(output);// 第四步,壓縮指定檔案archive.append(fs.createReadStream(__dirname + '/hello.txt'), { name: 'hello.txt'});// 檔案流archive.append('index.html', {name: 'index.html'});// 檔案路徑archive.append(Buffer.from("這是Buffer格式的資料"), {name: 'buffer.txt'});// Buffer物件archive.append("直接傳入字串", {name: 'string.txt'});// 字串/ / 第五步,完成壓縮archive.finalize();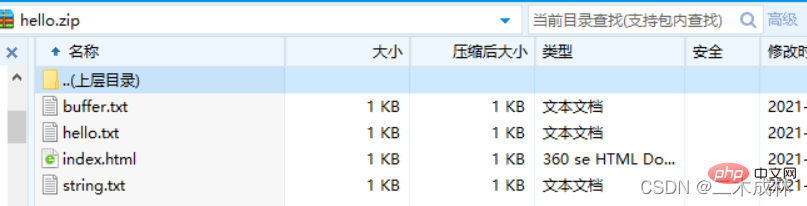 注意:archive.append()第二個參數{name: 'hello.txt'}是將壓縮包中對應的檔案重新命名。
如果要壓縮多個文件,直接呼叫archive.append()方法附加文件即可,這些附加的文件都會被加入到壓縮包中。如例:
// 第一步,導入必要的模組const fs = require('fs');const archiver = require('archiver');// 第二步,建立可寫流來寫入資料const output = fs.createWriteStream (__dirname + "/hello.zip");// 將壓縮套件儲存到目前專案的目錄下,且壓縮套件名稱為test.zipconst archive = archiver('zip', {zlib: {level: 9}}) ;// 設定壓縮等級// 第三步,建立管道連接archive.pipe(output);// 第四步,壓縮多個檔案到壓縮包中archive.append('index.html', {name: ' index.html'});archive.append('hello.js', {name: 'hello.js'});archive.append('hello.html', {name: 'hello.html'});archive .append('db.json', {name: 'db.json'});// 第五步,完成壓縮archive.finalize();
如果要壓縮目錄,則需要使用archive.directory()來完成。 API如下:
// 將指定目錄打包壓縮到壓縮包中,並且重新命名為new-subdir,並且subdir目錄下的所有檔案仍然在new-subdir目錄下,而不是在壓縮包的根目錄下archive.directory('subdir /', 'new-subdir');// 將指定目錄下的所有檔案打包壓縮到壓縮包中,而這些檔案在壓縮包的根目錄,而非子目錄中archive.directory('subdir/', false);完整實例如下:
// 第一步,導入必要的模組const fs = require('fs');const archiver = require('archiver');// 第二步,建立可寫流來寫入資料const output = fs.createWriteStream (__dirname + "/hello.zip");// 將壓縮套件儲存到目前專案的目錄下,且壓縮套件名稱為test.zipconst archive = archiver('zip', {zlib: {level: 9}}) ;// 設定壓縮等級// 第三步,建立管道連接archive.pipe(output);// 第四步,壓縮目錄到壓縮包中archive.directory('public/', 'new-public'); archive.directory('demo/', false);// 第五步,完成壓縮archive.finalize();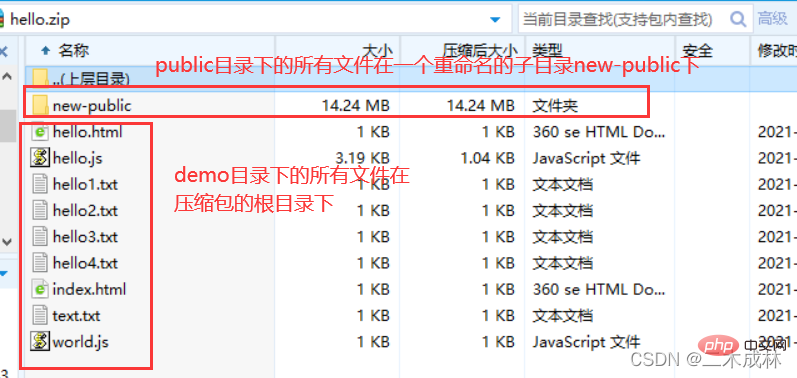
推薦學習:《nodejs影片教學》
以上就是nodejs中archiver怎麼用的詳細內容,更多請關注本站其它相關文章!