phoenix chat example
1.0.0

嘗試一下:鳳凰城chat .fly.dev
用於在鳳凰城建造,測試和部署聊天應用程序的分步教程!
page_controller_test.exsuser_socket.js中註釋線excoveralls作為(開發)依賴性添加到mix.exscoveralls.json的新文件Presence以跟踪誰在線聊天應用程序是實時示例的"Hello World" 。
可悲的是,大多數示例應用程序顯示了一些基本知識,然後忽略其餘的...? ♀️
因此,初學者通常會失去或困惑他們下一步應該做什麼或學習!
很少有教程考慮測試,部署,文檔或其他“增強”,這都是構建和運行應用程序“現實世界”的一部分;因此,這些主題是我們將涵蓋的“填補空白”。
我們編寫了本教程是Phoenix鳳凰, Ecto和Channels最簡單方法,任何人都可以遵循的實踐例子。
這是我們希望在學習Elixir , Phoenix示例/教程...如果您覺得有用,請感謝!
一個簡單的逐步教程,向您展示瞭如何:
mix phx.new chat “ Generator”命令)Fly.io您可以向人們展示您的創作!最初,我們故意跳過配置文件和“ Phoenix Internals ”,因為您(初學者)不需要知道它們即可開始。但是請放心,我們會在需要時返回他們。我們贊成“及時”學習(當您需要時)學習,因為我們正在學習某些東西是明顯而實用的。
這個示例是針對“我的第一個鳳凰”應用程序的完整初學者。
我們嘗試盡可能少地假設,但是如果您認為我們“跳過一步”或出於任何原因感到“卡住”,或者有任何疑問(與此示例有關),請在Github上打開一個問題!
@dwyl和Phoenix社區都非常適合初學者,因此不要害怕/害羞。
另外,通過提出問題,您正在幫助每個人或可能與同一件事相處的每個人!
這些說明向您展示瞭如何從頭開始創建聊天應用程序。
brew install elixir注意:如果您已經在Mac上安裝了
Elixir,並且只想升級到最新版本,請運行:brew upgrade elixir
mix archive.install hex phx_new基本的長生不母語法知識將有所幫助,
請參閱:Dwyl/ Learn-Elixir
基本的JavaScript知識是有利的(但不是必不可少的,因為“前端”代碼非常基本且受到良好的評價)。請參閱:Dwyl/Javascript-The Good-Parts Notes
檢查您具有最新版本的Elixir (在終端中運行以下命令):
elixir -v您應該看到類似的東西:
Erlang/OTP 25 [erts-13.1.1] [source] [64-bit] [smp:10:10] [ds:10:10:10] [async-threads:1] [jit] [dtrace]

Elixir 1.14.1 (compiled with Erlang/OTP 25)檢查您有最新版本的Phoenix :
mix phx.new -v您應該看到:
Phoenix installer v1.7.0-rc.2注意:如果您的
Phoenix版本更新,請隨時更新此文檔!我們會盡力保持最新狀態...但是您的貢獻始終歡迎!
在本教程中,我們使用Phoenix 1.7-RC2,這是
Phoenix 1.7的第二個版本候選者。在撰寫本文時,如果您安裝了鳳凰,則最新的穩定版本不是v1.7。要使用此版本,請遵循官方指南(不用擔心,它只是在運行一個命令!) - > https://www.phoenixframework.org/blog/blog/phoenix-1.7-realed但是,如果您在發布後讀取此書,則將為您安裝
v1.7,並且應該在終端中查看Phoenix installer v1.7.0。
確認PostgreSQL正在運行(因此該應用程序可以存儲聊天消息)運行以下命令:
lsof -i :5432您應該看到類似於以下的輸出:
COMMAND  PID  USER   FD  TYPE DEVICE                  SIZE/OFF NODE NAME
postgres 529 Nelson  5u  IPv6 0xbc5d729e529f062b      0t0  TCP localhost:postgresql (LISTEN)
postgres 529 Nelson 6u IPv4 0xbc5d729e55a89a13 0t0 TCP localhost:postgresql (LISTEN)這告訴我們PostgreSQL在TCP端口5432 (默認端口)上“偵聽”
如果lsof命令在您的終端中未產生任何結果,請運行:
pg_isready它應該打印以下內容:
/tmp:5432 - accepting connections隨著所有這些“飛行前檢查”的執行,讓我們飛起來!
在嘗試從頭開始構建聊天應用程序之前,請克隆並運行完成的工作版本,以了解期望的內容。
在您的終端中運行以下命令以克隆回購:
git clone [email protected]:dwyl/phoenix-chat-example.git更改為phoenix-chat-example目錄,並使用此命令同時安裝Elixir和Node.js依賴項:
 cd phoenix-chat-example
mix setup使用命令運行鳳凰應用程序:
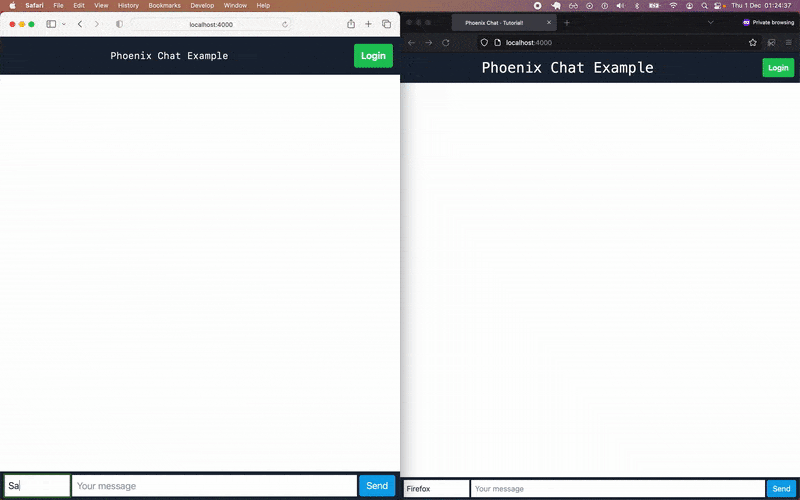
mix phx.server如果您打開localhost:4000在另外兩個Web瀏覽器中,則一旦您擊中Enter密鑰,就可以看到所有聊天消息在所有瀏覽器中顯示:
現在您已經確認完成的Phoenix Chat應用程序在您的計算機上有效,現在該從頭開始構建它了!
更改目錄:
cd ..開始建造!
在您的Localhost上的終端程序中,鍵入以下命令創建應用程序:
mix phx.new chat --no-mailer --no-dashboard --no-gettext這將創建目錄結構和項目文件。
我們正在使用
--no-mailer--no-dashboard--no-gettext參數運行mix phx.new命令,因為我們不希望我們的項目生成郵件文件,以包含Phoenix.LiveDashboard並生成gettext文件(fori18n)。
當被要求“獲取和安裝依賴關係?[yn]”時,
在您的終端中輸入Y ,然後輸入Enter (返回)鍵。
您應該看到: 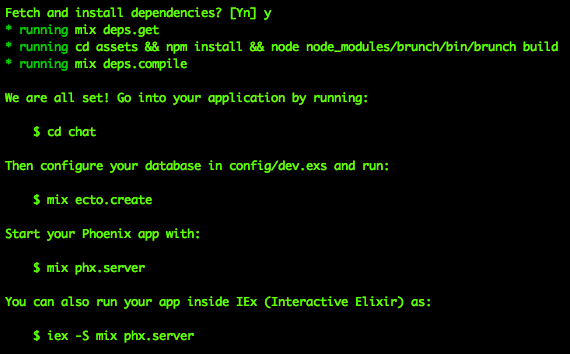
通過運行建議命令將目錄更改為chat目錄:
cd chat現在運行以下命令:
mix setup注意:此時已經有一個“應用程序”,它只是沒有做任何事情(尚未做)...
您可以在終端中運行mix phx.server不用擔心是否看到錯誤
消息,這是因為我們還沒有創建數據庫。
我們將在步驟6中照顧好!
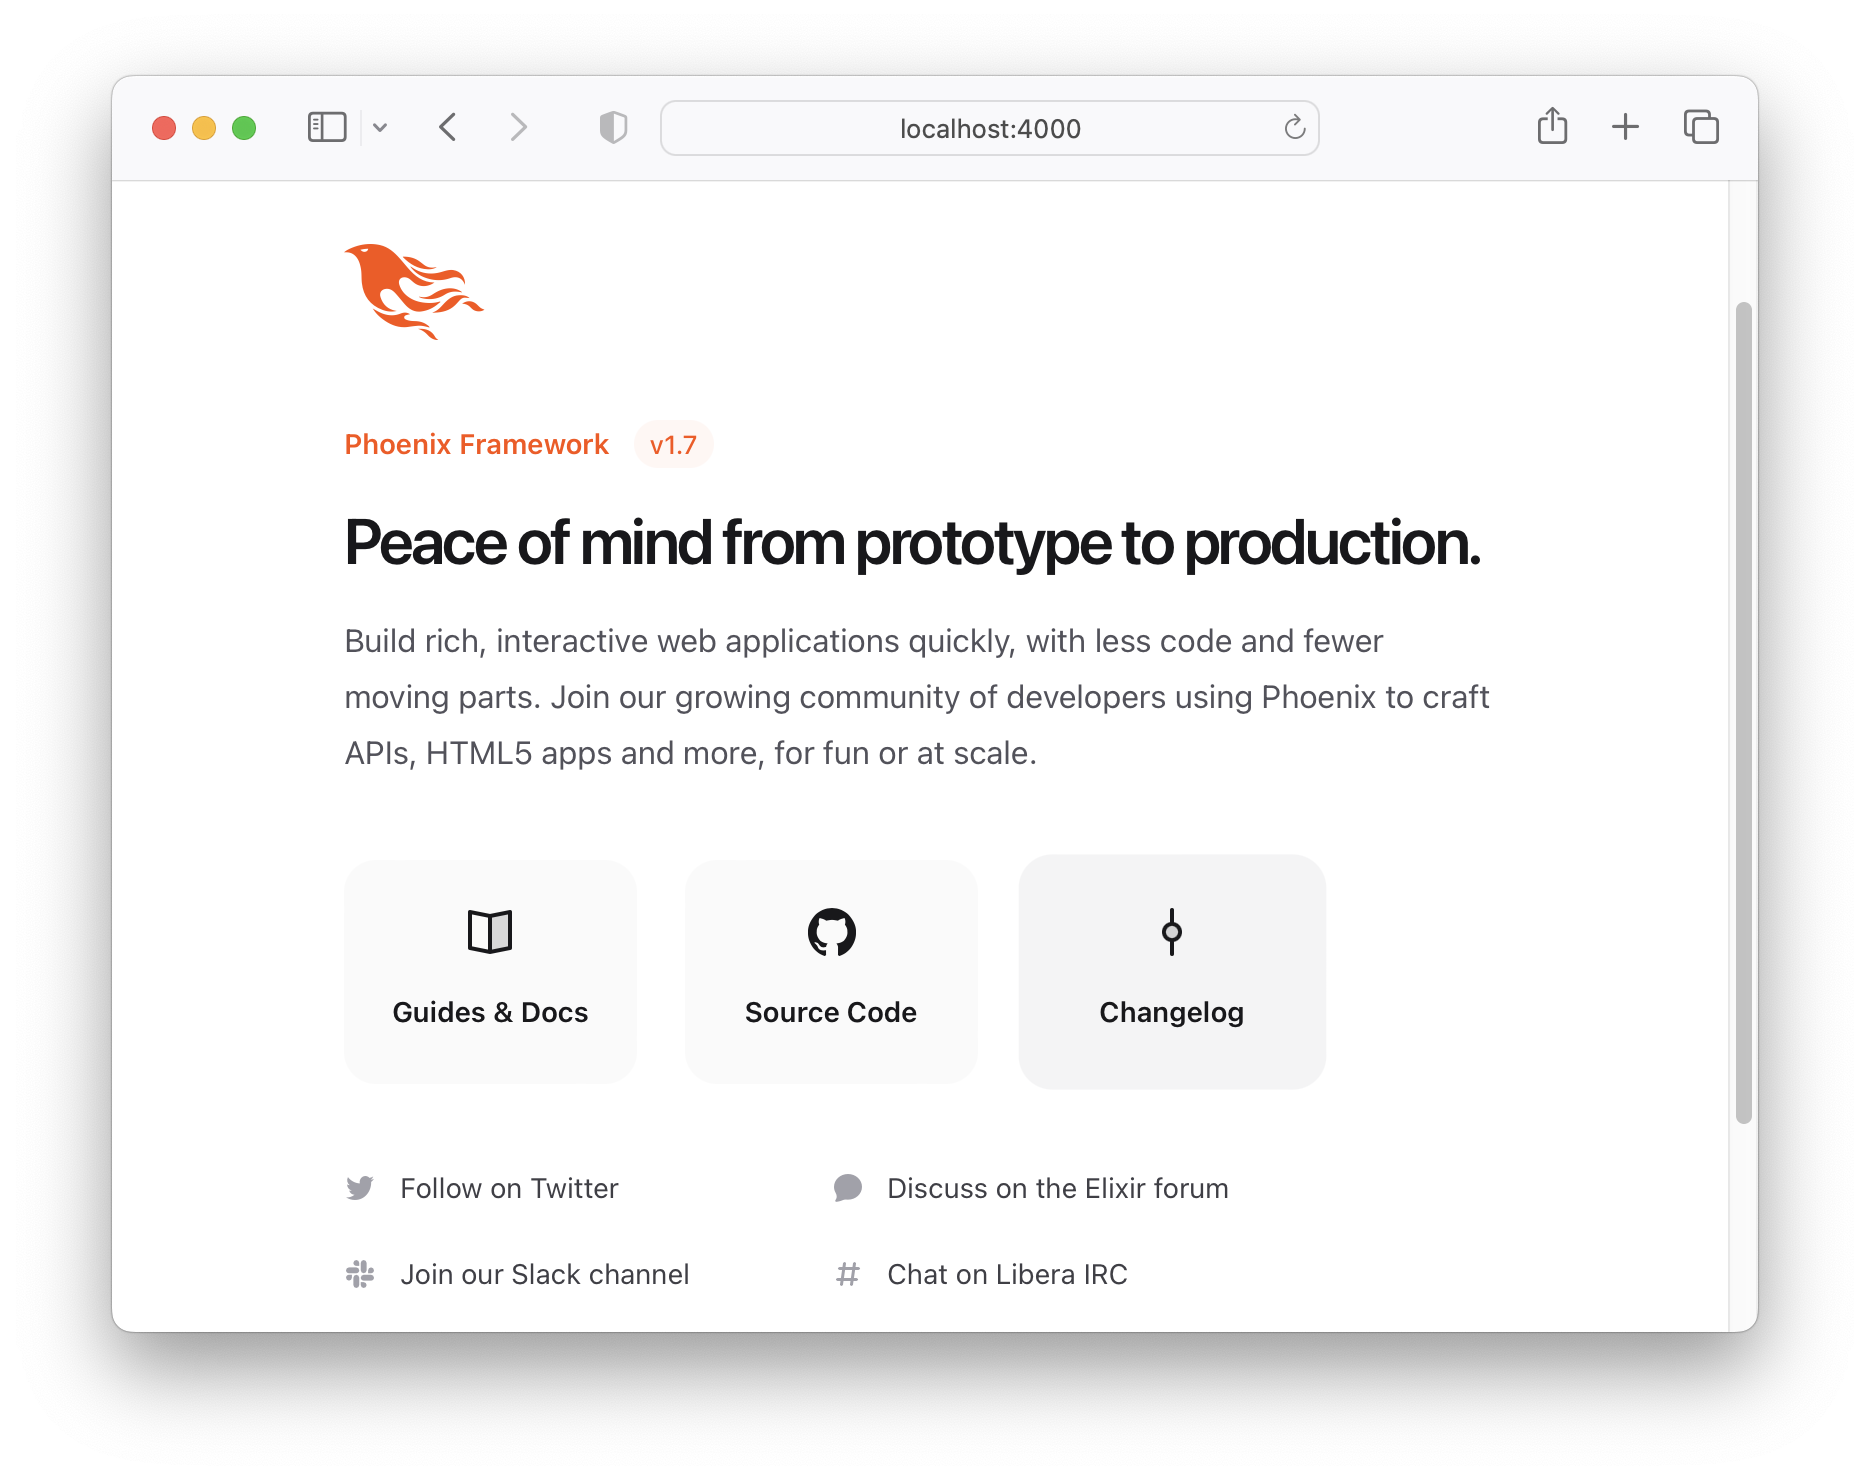
目前,打開http:// localhost:4000在瀏覽器中
您會看到default“歡迎來到鳳凰”主頁:
使用CTRL + C命令在您的終端中關閉Phoenix服務器。
在您的終端窗口中,運行以下命令:
mix test
您應該看到類似於以下的輸出:
Generated chat app
.....
Finished in 0.02 seconds (0.02s async, 0.00s sync)
5 tests, 0 failures

Randomized with seed 84184現在,我們已經確認一切都在起作用(所有測試都通過),讓我們繼續進行有趣的部分!
生成要在聊天應用中使用的(WebSocket)頻道:
mix phx.gen.channel Room如果提示您確認安裝新的套接字處理程序類型
y並點擊[Enter]鍵。
這將創建三個文件:
 * creating lib/chat_web/channels/room_channel.ex
* creating test/chat_web/channels/room_channel_test.exs
* creating test/support/channel_case.ex除了創建兩個文件外:
 * creating lib/chat_web/channels/user_socket.ex
* creating assets/js/user_socket.js room_channel.ex文件處理接收/發送消息, room_channel_test.exs測試與頻道的基本交互。此後,我們將重點關注創建的socket文件。 (不用擔心,我們將在下面的步驟14中查看測試文件!)
我們被告知,我們需要在應用程序中更新一個代碼:
Add the socket handler to your ` lib/chat_web/endpoint.ex ` , for example:

    socket " /socket " , ChatWeb.UserSocket,
      websocket: true,
      longpoll: false

For the front-end integration, you need to import the ` user_socket.js `
in your ` assets/js/app.js ` file:

import " ./user_socket.js "發電機要求我們在前端導入客戶端代碼。讓我們稍後再做。現在,打開lib/chat_web/endpoint.ex文件並按照說明進行操作。
之後,打開名為/lib/chat_web/channels/user_socket.ex的文件
並更改行:
channel "room:*" , ChatWeb.RoomChannel到:
channel "room:lobby" , ChatWeb.RoomChannel在此處檢查更改。
這將確保將發送到"room:lobby"的任何消息都路由到我們的RoomChannel 。
以前"room" "room.*
有關Phoenix頻道的更多詳細信息,(我們強烈建議您)閱讀:https://hexdocs.pm/phoenix/channels.html
打開/lib/chat_web/controllers/page_html/home.html.heex文件
和複製 - 帕斯特(或鍵入)以下代碼:
 <!-- The list of messages will appear here: -->
< div class =" mt-[4rem] " >
  < ul id =" msg-list " phx-update =" append " class =" pa-1 " > </ ul >
</ div >

< footer class =" bg-slate-800 p-2 h-[3rem] fixed bottom-0 w-full flex justify-center " >
  < div class =" w-full flex flex-row items-center text-gray-700 focus:outline-none font-normal " >
    < input type =" text " id =" name " placeholder =" Name " required
        class =" grow-0 w-1/6 px-1.5 py-1.5 " />

    < input type =" text " id =" msg " placeholder =" Your message " required
      class =" grow w-2/3 mx-1 px-2 py-1.5 " />

    < button id =" send " class =" text-white bold rounded px-3 py-1.5 w-fit
        transition-colors duration-150 bg-sky-500 hover:bg-sky-600 " >
      Send
    </ button >
  </ div >
</ footer >這是我們將用來輸入聊天消息的基本形式。
w-full的課程和items-center是用於樣式表格的TailwindCSS類。
Phoenix默認情況下包括尾風,因此您可以使用應用程序/IDEA/“ MVP”進行上下操作!
如果您是
Tailwind,請參閱:Dwyl/ Dwyl/ Learn-Tailwind如果您對所使用的任何
Tailwind班有疑問,請花2分鐘搜索或搜索官方文檔(Supper!)文檔:Tailwindcss.com/docs,然後如果您仍然陷入困境,請打開問題。
您的home.html.heex模板文件應該像這樣: /lib/chat_web/controllers/page_html/home.html.heex
打開lib/chat_web/components/layouts/root.html.heex文件並找到<body>標籤。用以下代碼替換<body>的內容:
  < body class =" bg-white antialiased min-h-screen flex flex-col " >
    < header class =" bg-slate-800 w-full h-[4rem] top-0 fixed flex flex-col justify-center z-10 " >
      < div class =" flex flex-row justify-center items-center " >
        < h1 class =" w-4/5 md:text-3xl text-center font-mono text-white " >
          Phoenix Chat Example
        </ h1 >
      </ div >
    </ header >
    < %= @inner_content % >
</ body >您的root.html.heex模板文件應該像這樣: /lib/chat_web/components/layouts/root.html.heex
在此步驟結束時,如果您運行Phoenix Server mix phx.server ,並在瀏覽器中查看應用程序,則看起來像這樣:
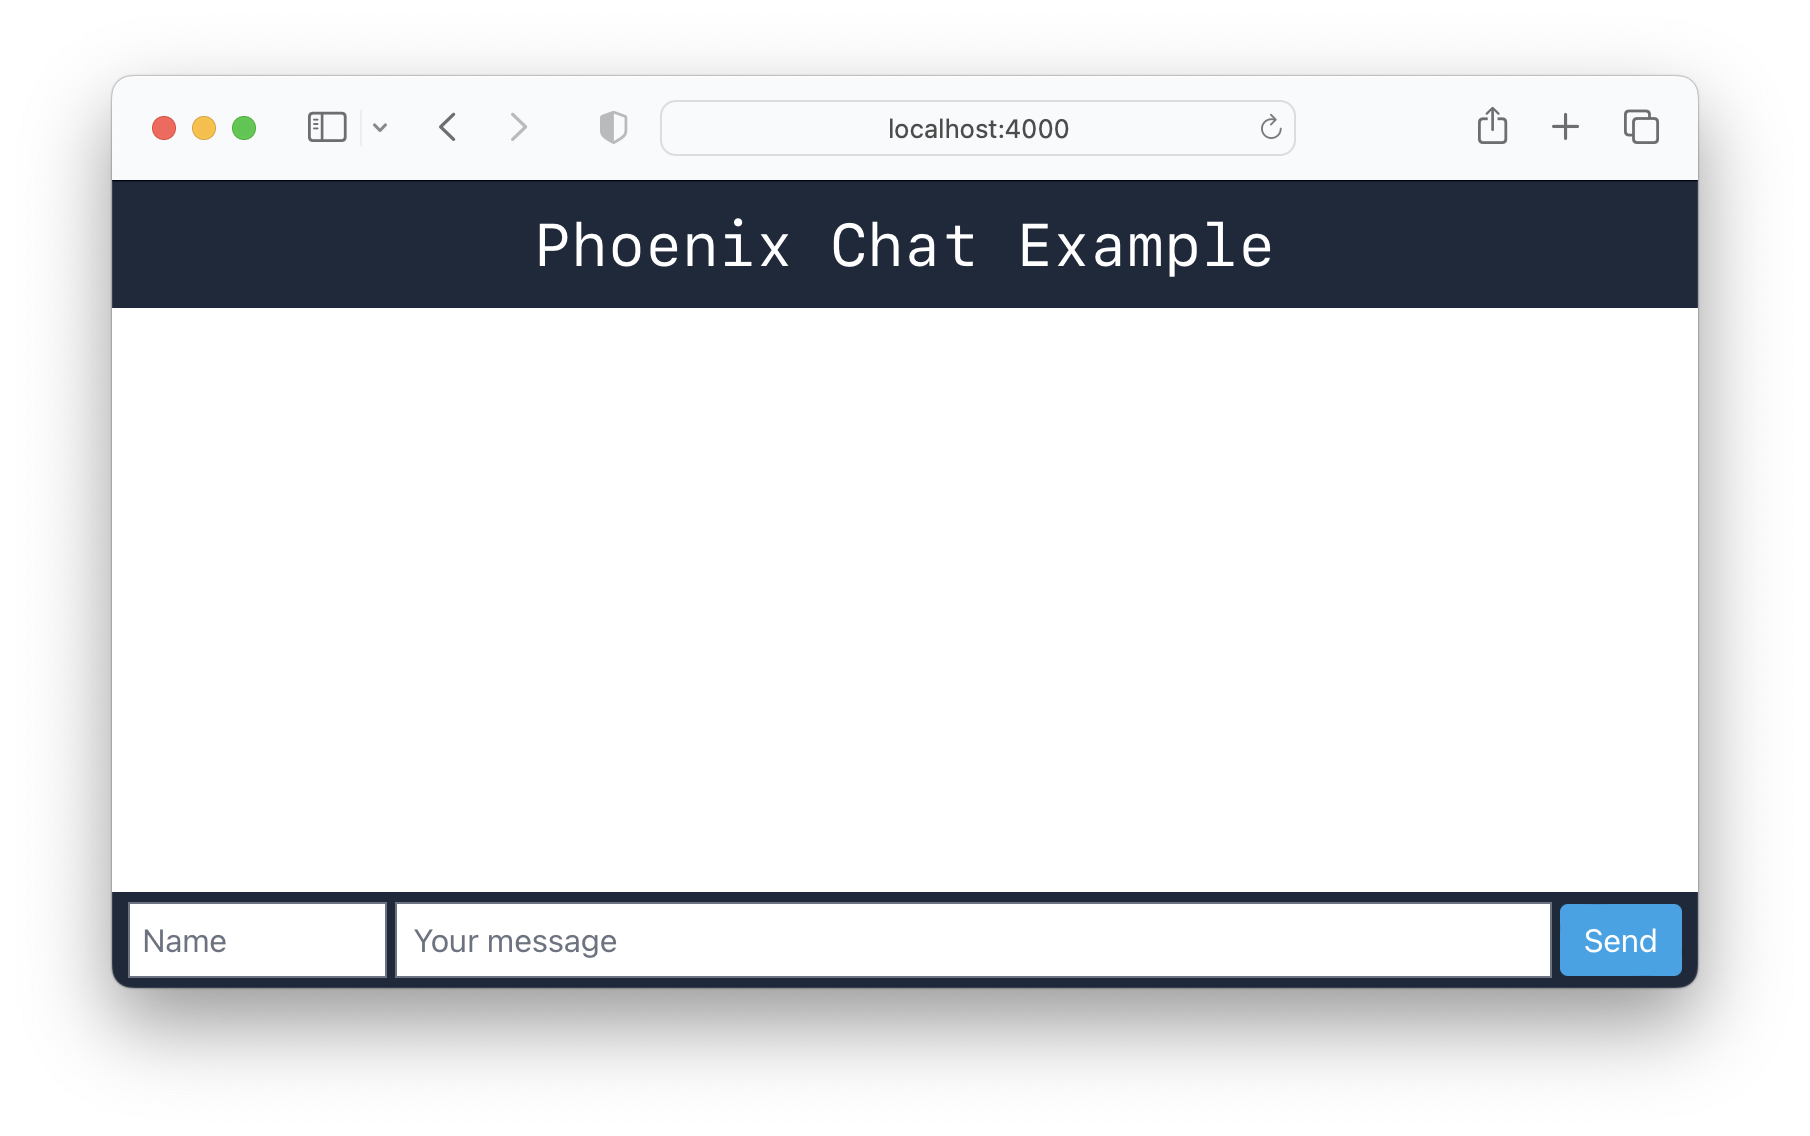
因此,它已經開始看起來像一個基本的聊天應用程序。可悲的是,由於我們更改了home.html.heex的page_controller_test.exs 。
運行命令:
mix test 1) test GET / (ChatWeb.PageControllerTest)
test/chat_web/controllers/page_controller_test.exs:4
Assertion with =~ failed
code: assert html_response(conn, 200) =~ "Peace of mind from prototype to production"
值得慶幸的是,這很容易解決。
page_controller_test.exs打開test/chat_web/controllers/page_controller_test.exs文件並替換行:
assert html_response ( conn , 200 ) =~ "Peace of mind from prototype to production"和:
assert html_response ( conn , 200 ) =~ "Phoenix Chat Example"現在,如果您再次進行測試,它們將通過:
mix test
樣本輸出:
 ........
Finished in 0.1 seconds (0.09s async, 0.06s sync)
8 tests, 0 failures

Randomized with seed 275786
打開assets/js/app.js ,不按口吃和更改行:
import socket from "./user_socket.js"借助該行的無語,我們的應用程序將導入socket.js文件,這將為我們提供WebSocket功能。
然後將以下JavaScript(“客戶端”)代碼添加到文件底部:
 /* Message list code */
const ul = document . getElementById ( 'msg-list' ) ;    // list of messages.
const name = document . getElementById ( 'name' ) ;      // name of message sender
const msg = document . getElementById ( 'msg' ) ;        // message input field
const send = document . getElementById ( 'send' ) ;      // send button

const channel = socket . channel ( 'room:lobby' , { } ) ;  // connect to chat "room"
channel . join ( ) ; // join the channel.

// Listening to 'shout' events
channel . on ( 'shout' , function ( payload ) {
  render_message ( payload )
} ) ;


// Send the message to the server on "shout" channel
function sendMessage ( ) {

  channel . push ( 'shout' , {
    name : name . value || "guest" , // get value of "name" of person sending the message. Set guest as default
    message : msg . value ,          // get message text (value) from msg input field.
    inserted_at : new Date ( )      // date + time of when the message was sent
  } ) ;

  msg . value = '' ;                // reset the message input field for next message.
  window . scrollTo ( 0 , document . documentElement . scrollHeight ) // scroll to the end of the page on send
}

// Render the message with Tailwind styles
function render_message ( payload ) {

  const li = document . createElement ( "li" ) ; // create new list item DOM element

  // Message HTML with Tailwind CSS Classes for layout/style:
  li . innerHTML = `
  <div class="flex flex-row w-[95%] mx-2 border-b-[1px] border-slate-300 py-2">
    <div class="text-left w-1/5 font-semibold text-slate-800 break-words">
      ${ payload . name }
      <div class="text-xs mr-1">
        <span class="font-thin"> ${ formatDate ( payload . inserted_at ) } </span>
        <span> ${ formatTime ( payload . inserted_at ) } </span>
      </div>
    </div>
    <div class="flex w-3/5 mx-1 grow">
      ${ payload . message }
    </div>
  </div>
  `
  // Append to list
  ul . appendChild ( li ) ;
}

// Listen for the [Enter] keypress event to send a message:
msg . addEventListener ( 'keypress' , function ( event ) {
  if ( event . key === `Enter` && msg . value . length > 0 ) { // don't sent empty msg.
    sendMessage ( )
  }
} ) ;

// On "Send" button press
send . addEventListener ( 'click' , function ( event ) {
  if ( msg . value . length > 0 ) { // don't sent empty msg.
    sendMessage ( )
  }
} ) ;

// Date formatting
function formatDate ( datetime ) {
  const m = new Date ( datetime ) ;
  return m . getUTCFullYear ( ) + "/"
    + ( "0" + ( m . getUTCMonth ( ) + 1 ) ) . slice ( - 2 ) + "/"
    + ( "0" + m . getUTCDate ( ) ) . slice ( - 2 ) ;
}

// Time formatting
function formatTime ( datetime ) {
  const m = new Date ( datetime ) ;
  return ( "0" + m . getUTCHours ( ) ) . slice ( - 2 ) + ":"
    + ( "0" + m . getUTCMinutes ( ) ) . slice ( - 2 ) + ":"
    + ( "0" + m . getUTCSeconds ( ) ) . slice ( - 2 ) ;
}
花一點時間閱讀JavaScript代碼,並確認您對其正在做什麼的理解。
希望在線評論是不言自明的,但是如果有什麼尚不清楚的話,請詢問!
此時,您的app.js文件應該看起來像這樣: /assets/js/app.js
user_socket.js中註釋線默認情況下,Phoenix Channel(客戶端)將訂閱通用房: "topic:subtopic" 。由於我們不會使用它,因此我們可以通過簡單地在user_socket.js文件中評論一些行來避免在瀏覽器/控制台中看到任何"unable to join: unmatched topic"錯誤。打開編輯器中的文件並找到以下行:
 let channel = socket . channel ( "room:42" , { } )
channel . join ( )
  . receive ( "ok" , resp => { console . log ( "Joined successfully" , resp ) } )
  . receive ( "error" , resp => { console . log ( "Unable to join" , resp ) } )
評論台詞,以免執行它們:
 //let channel = socket.channel("room:42", {})
//channel.join()
//  .receive("ok", resp => { console.log("Joined successfully", resp) })
// .receive("error", resp => { console.log("Unable to join", resp) })您的user_socket.js現在應該看起來像這樣: /assets/js/user_socket.js
如果您以後決定整理聊天應用程序,則可以從文件中
delete這些註釋的行。
我們只是將它們保留為參考如何加入頻道和接收消息。
如果您正在運行該應用程序,請嘗試填寫name和message字段,然後單擊Enter (或按Send )。
該消息應出現在不同的窗口上!
這樣做,我們可以繼續。
如果我們不想保存聊天歷史記錄,我們可以立即部署此應用程序,我們將完成!
實際上,如果沒有任何歷史記錄,則可能是“用例”/“功能”聊天...請參閱:http://www.psstchat.com/。
但是我們假設大多數聊天應用程序都會保存歷史記錄,以便加入“頻道”的
new人們可以看到歷史和短暫“缺席”的人可以“趕上”歷史。
在您的終端中運行以下命令:
mix phx.gen.schema Message messages name:string message:string您應該看到以下輸出:
 * creating lib/chat/message.ex
* creating priv/repo/migrations/20230203114114_create_messages.exs

Remember to update your repository by running migrations:

    $ mix ecto.migrate
讓我們分解該命令以清晰:
mix phx.gen.schema混合命令創建一個新的架構(數據庫表)Message - 在我們的消息“收集”中記錄的單數名稱messages - 集合的名稱(或數據庫表)name:string - 發送消息的人的名稱,存儲為string 。message:string - 該人發送的消息,也存儲為string 。 creating lib/chat/message.ex行為我們的消息數據庫表創建“架構”。
另外,創建了一個遷移文件,例如: creating priv/repo/migrations/20230203114114_create_messages.exs “遷移”實際上在我們的數據庫中創建了數據庫表。
在您的終端運行以下命令以創建messages表:
mix ecto.migrate對於上下文,我們建議閱讀:hexdocs.pm/ecto_sql/ ecto.migration .html
您應該在終端中看到以下內容:
11:42:10.130 [info] == Running 20230203114114 Chat.Repo.Migrations.CreateMessages.change/0 forward

11:42:10.137 [info] create table messages
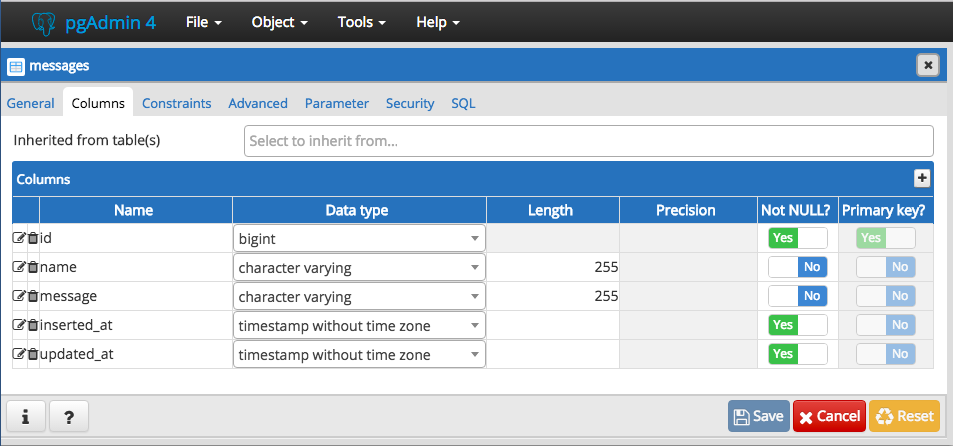
11:42:10.144 [info] == Migrated 20230203114114 in 0.0s如果您打開PostgreSQL GUI(例如:PGADMIN ),您會發現已在chat_dev數據庫中創建了消息表:
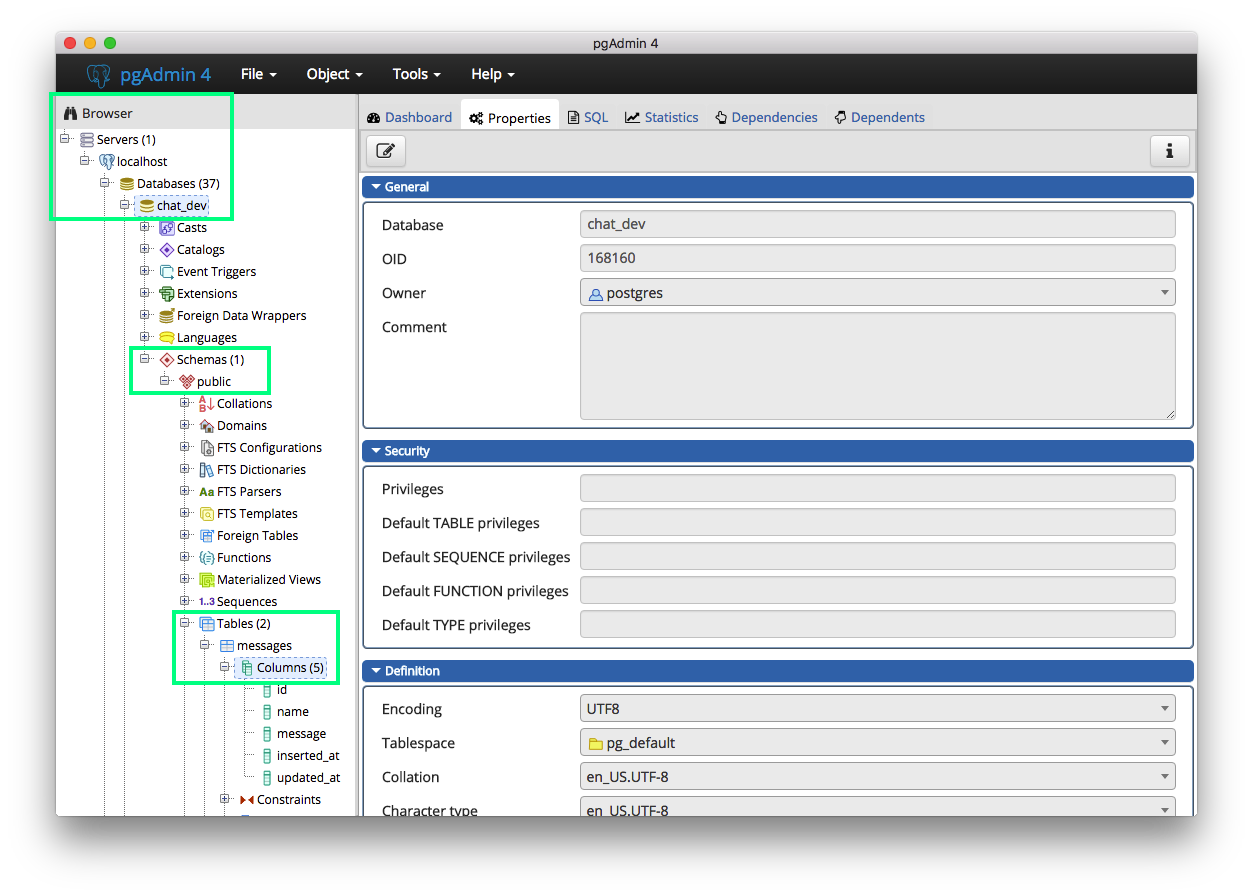
您可以通過“右鍵單擊”( ctrl + click Mac )在messages表上查看表格架,然後選擇“屬性”:
注意:對於第7、8和9節,我們將拿出我們的代碼如何“處理”聊天應用程序中可能發生的不同事件。
Phoenix在Elixir的流程通信中抽象了許多基礎消息邏輯(有關Elixir流程方式的更多信息,請在此處閱讀)。
在Phoenix中,從客戶端發送的事件/消息會根據事件名稱自動路由到相應的處理程序功能,從而使消息處理無縫且直接!
打開lib/chat_web/channels/room_channel.ex文件和函數def handle_in("shout", payload, socket) do內部添加以下行:
Chat.Message . changeset ( % Chat.Message { } , payload ) |> Chat.Repo . insert 使您的功能最終看起來像這樣:
 def handle_in ( "shout" , payload , socket ) do
  Chat.Message . changeset ( % Chat.Message { } , payload ) |> Chat.Repo . insert
  broadcast socket , "shout" , payload
  { :noreply , socket }
end如果您早些時候注意到,在我們的assets/js/app.js文件中,我們使用函數sendMessage()將消息推向“ shout”事件的服務器。
Phoenix將消息路由到服務器端handle_in("shout", payload, socket)功能,因為事件名稱與“ shout”相匹配。
在此功能中,我們處理有效載荷(這是消息文本和任何其他數據),然後將其插入我們的數據庫中。整潔的!
打開lib/chat/message.ex文件和導入Ecto.Query :
 defmodule Chat.Message do
  use Ecto.Schema
  import Ecto.Changeset
  import Ecto.Query # add Ecto.Query
然後添加一個新功能:
 def get_messages ( limit \ 20 ) do
  Chat.Message
  |> limit ( ^ limit )
  |> order_by ( desc: :inserted_at )
  |> Chat.Repo . all ( )
end此功能接受單個參數limit ,僅返回固定/最大記錄數。它使用ECTO的all功能來獲取數據庫中的所有記錄。 Message是我們要獲取記錄的模式/表的名稱,限制是要獲取的記錄的最大記錄數。
在/lib/chat_web/channels/room_channel.ex文件中創建一個新功能:
 @ impl true
def handle_info ( :after_join , socket ) do
  Chat.Message . get_messages ( )
  |> Enum . reverse ( ) # revers to display the latest message at the bottom of the page
  |> Enum . each ( fn msg -> push ( socket , "shout" , % {
      name: msg . name ,
      message: msg . message ,
      inserted_at: msg . inserted_at ,
    } ) end )
  { :noreply , socket } # :noreply
end在文件的頂部,將join功能更新為以下內容:
 def join ( "room:lobby" , payload , socket ) do
  if authorized? ( payload ) do
    send ( self ( ) , :after_join )
    { :ok , socket }
  else
    { :error , % { reason: "unauthorized" } }
  end
end注意:像第7節一樣,鳳凰城知道當服務器發送內部消息時要調用此功能
:after_join。我們在
lib/chat_web/channels/room_channel.ex中的join/3函數發送:當客戶端成功連接到"room:lobby"主題時,:after_join message到頻道過程。
啟動Phoenix服務器(如果尚未運行):
mix phx.server注意:編譯需要幾秒鐘。
在您的終端中,您應該看到:
[info] Running ChatWeb.Endpoint with cowboy 2.8.0 at 0.0.0.0:4000 (http)
[info] Access ChatWeb.Endpoint at http://localhost:4000

webpack is watching the files…這告訴我們,我們的代碼編譯(如預期)和聊天應用程序在TCP端口4000上運行!
在兩個單獨的瀏覽器窗口中打開聊天網絡應用程序:http:// localhost:4000
(如果您的計算機只有一個瀏覽器,請嘗試使用一個“隱身”選項卡)
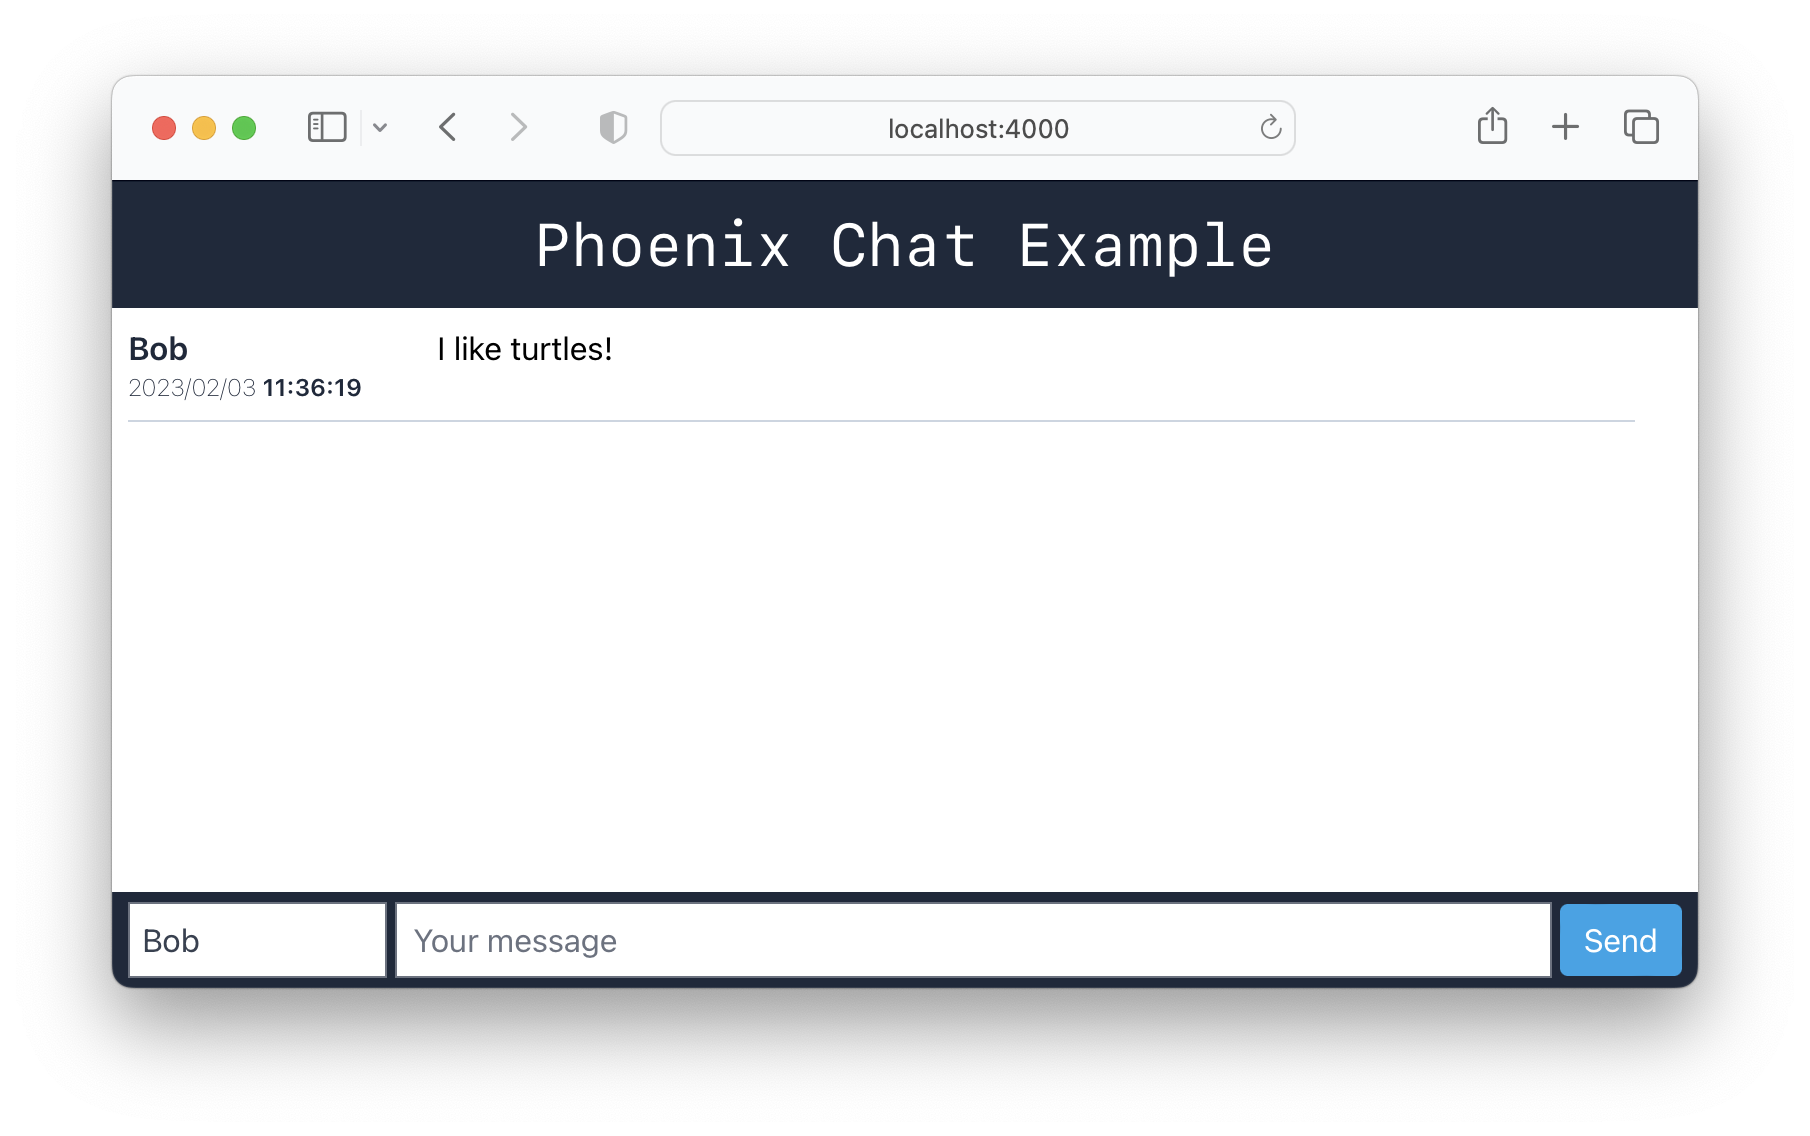
您應該能夠在兩個瀏覽器窗口之間發送消息: 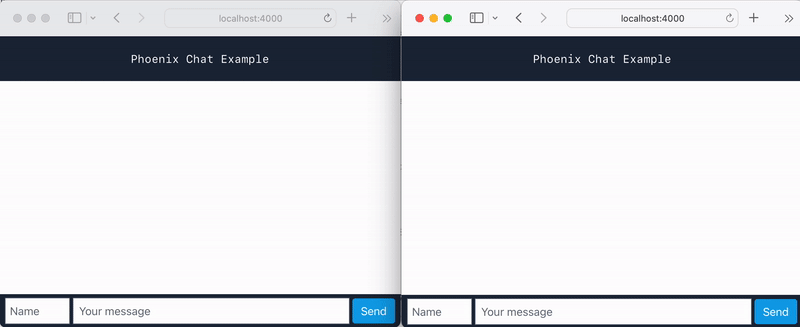
恭喜!您有一個用鳳凰編寫的工作(基本)聊天應用程序!
聊天(消息)歷史記錄保存!
這意味著您可以刷新瀏覽器或加入其他瀏覽器,您仍然會看到歷史記錄!
自動測試是確保Web應用程序可靠性的最佳方法之一。
注意:如果您是自動測試或“測試驅動開發”(“ TDD”)的全新的,我們建議閱讀/遵循“基本”教程: github.com/dwyl/
鳳凰城的測試很快(並行進行測試! ),易於開始! ExUnit測試框架是內置的,因此沒有關於使用哪種框架或樣式的“決策/辯論”。
如果您從未見過或寫過ExUnit的測試,請不要擔心,如果您過去寫過任何類型的自動測試,則語法應該很熟悉。
每當您創建新的Phoenix應用程序或添加新功能(例如通道)時,Phoenix就會為您生成新的測試。
我們使用mix test命令運行測試:
 ... ... ..
Finished in 0.1 seconds ( 0.05 s async , 0.06 s sync )
8 tests , 0 failures

Randomized with seed 157426在這種情況下,這些測試都沒有失敗。 ( 8個測試, 0失敗)
值得花一點時間(或只要您需要!)才能了解/room_channel_test.exs文件中正在發生的事情。如果尚未打開它,請閱讀測試說明和代碼。
對於一些上下文,我們建議閱讀:https://hexdocs.pm/phoenix/ testing_channels .html
讓我們看/test/chat_web/channels/room_channel_test.exs中的第一個測試:
 test "ping replies with status ok" , % { socket: socket } do
  ref = push socket , "ping" , % { "hello" => "there" }
  assert_reply ref , :ok , % { "hello" => "there" }
end該測試從setup函數(在文件的第6行上)獲取socket ,並將將push功能調用到可變ref push的結果僅在socket上僅按下消息(映射%{"hello" => "there"} )到"ping"主題。
處理"ping"主題的handle_in函數子句:
 def handle_in ( "ping" , payload , socket ) do
  { :reply , { :ok , payload } , socket }
end只需用您發送的有效載荷回复,因此在我們的測試中,我們可以使用assert_reply宏來斷言ref等於:ok, %{"hello" => "there"}
注意:如果您有疑問或需要任何幫助理解其他測試的幫助,請在Github上打開一個問題,我們很樂意進一步擴展!
(我們只是試圖使該教程合理地“簡短”,因此初學者不會被任何事物“不知所措” ...)
通常,我們可以通過閱讀測試並查看測試中的“差距”在哪裡來了解有關應用程序(或API )的很多信息。
值得慶幸的是,我們只能通過幾個步驟來實現這一目標:
excoveralls作為(開發)依賴性添加到mix.exs打開您的mix.exs文件並找到“ deps”函數:
defp deps do
在最後一行的末尾添加一個逗號,然後將以下行添加到列表末尾:
{ :excoveralls , "~> 0.15.2" , only: [ :test , :dev ] } # tracking test coverage此外,查找def project do部分(朝向mix.exs的頂部),並將以下行添加到列表:
 test_coverage : [ tool : E xCoveralls ] ,
preferred_cli_env: [
  coveralls : :test ,
  "coveralls.detail": :test ,
  "coveralls.post": :test ,
  "coveralls.html": :test
]然後,將依賴項安裝在我們剛剛添加到mix.exs excoveralls上:
mix deps.get您應該看到:
Resolving Hex dependencies...
Dependency resolution completed:
* Getting excoveralls (Hex package)
... etc.coveralls.json的新文件在聊天項目的“ root”(基本目錄)中,創建一個名為coveralls.json和Copy-Paste的新文件以下內容:
{
  "coverage_options" : {
    "minimum_coverage" : 100
  },
  "skip_files" : [
    " test/ " ,
    " lib/chat/application.ex " ,
    " lib/chat_web.ex " ,
    " lib/chat_web/telemetry.ex " ,
    " lib/chat_web/components/core_components.ex " ,
    " lib/chat_web/channels/user_socket.ex "
  ]
}
該文件非常基本,它指示coveralls應用程序需要100%的minimum_coverage (即所有測試1 ),並忽略test/目錄中的文件以進行覆蓋範圍檢查。我們還忽略了諸如application.ex , telemetry.ex , core_components.ex和user_socket.ex之類的文件,因為它們與我們項目的功能無關。
1我們認為,在為我們所有代碼編寫測試的測試中,在較少的錯誤之後,為我們的所有代碼撰寫測試值得。
蟲子很昂貴,測試便宜,信心/可靠性是無價的。
要通過覆蓋範圍運行測試,請將以下命令複製到您的終端:
MIX_ENV = test mix do coveralls . json
用於Windows:
$ env :MIX_ENV = "test" ; mix do coveralls . json
您應該看到:
Randomized with seed 527109
----------------
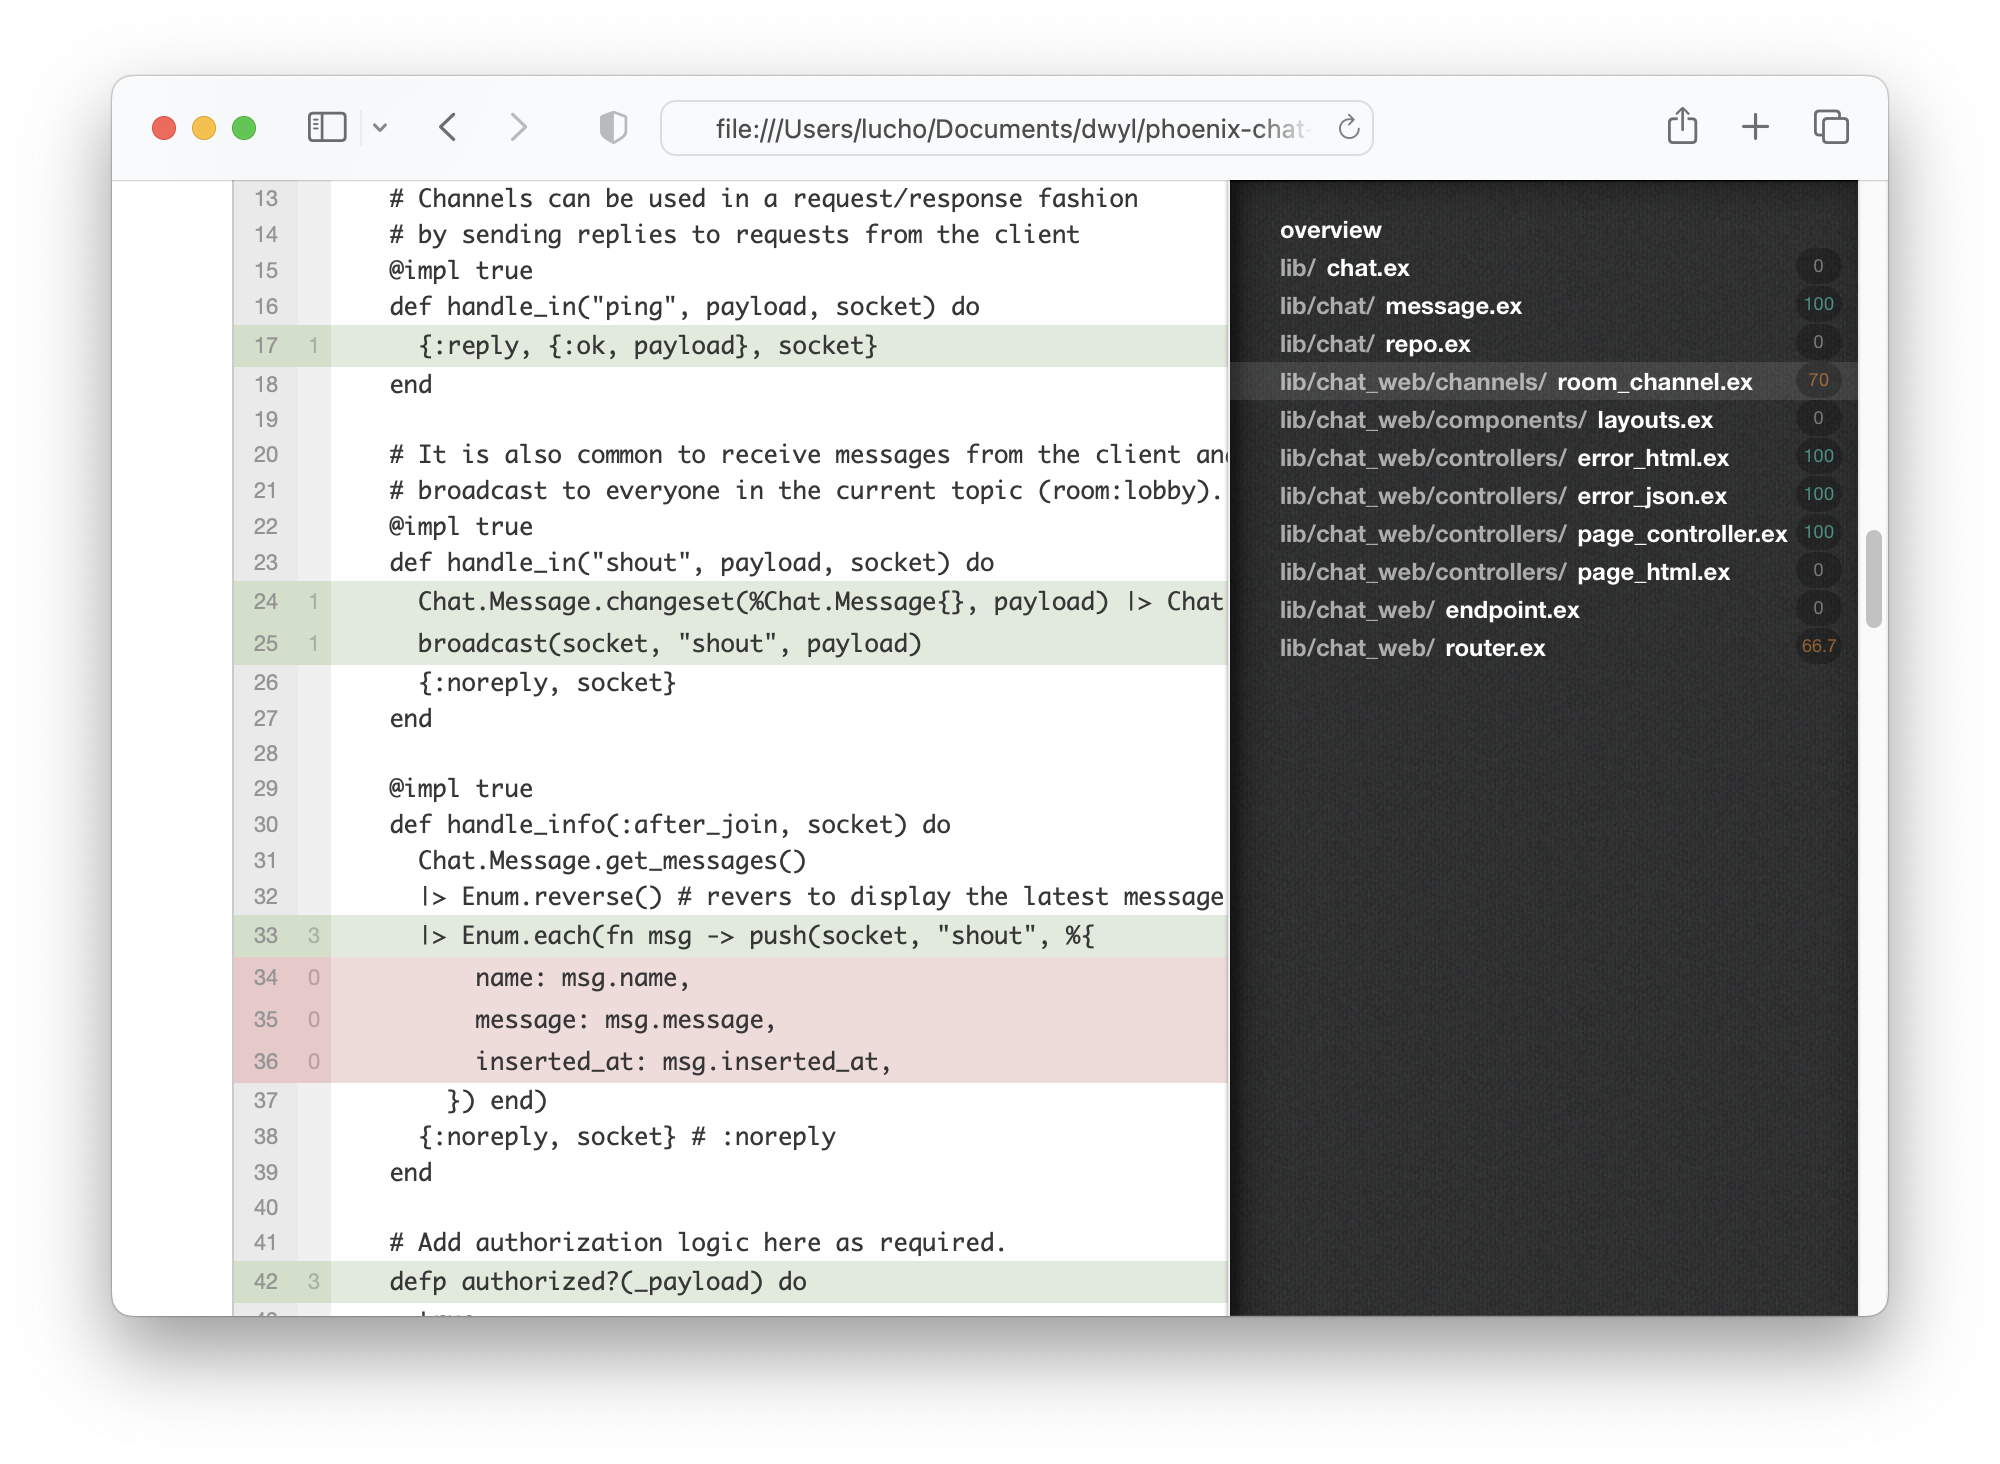
COV FILE LINES RELEVANT MISSED
100.0% lib/chat.ex 9 0 0
100.0% lib/chat/message.ex 26 4 0
100.0% lib/chat/repo.ex 5 0 0
70.0% lib/chat_web/channels/room_channel.ex 46 10 3
100.0% lib/chat_web/components/layouts.ex 5 0 0
100.0% lib/chat_web/controllers/error_html.ex 19 1 0
100.0% lib/chat_web/controllers/error_json.ex 15 1 0
100.0% lib/chat_web/controllers/page_controller 9 1 0
100.0% lib/chat_web/controllers/page_html.ex 5 0 0
100.0% lib/chat_web/endpoint.ex 49 0 0
66.7% lib/chat_web/router.ex 27 3 1
[TOTAL] 80.0%
----------------
正如我們在這裡可以的那樣,我們編寫的測試“涵蓋” /lib中只有80%的代碼行。
要查看Web瀏覽器中的覆蓋範圍,請運行以下內容:
MIX_ENV = test mix coveralls . html ; open cover / excoveralls . html這將在您的默認Web瀏覽器中打開覆蓋範圍報告(HTML):
打開test/chat_web/channels/room_channel_test.exs文件,並添加以下測試:
 test ":after_join sends all existing messages" , % { socket: socket } do
  # insert a new message to send in the :after_join
  payload = % { name: "Alex" , message: "test" }
  Chat.Message . changeset ( % Chat.Message { } , payload ) |> Chat.Repo . insert ( )

  { :ok , _ , socket2 } = ChatWeb.UserSocket
    |> socket ( "person_id" , % { some: :assign } )
    |> subscribe_and_join ( ChatWeb.RoomChannel , "room:lobby" )

  assert socket2 . join_ref != socket . join_ref
end最後,在lib/chat_web/router.ex中,請評論以下代碼。
  pipeline :api do
    plug :accepts , [ "json" ]
end由於我們沒有使用此信息:api ,因此無需測試它。
現在,當您運行MIX_ENV=test mix do coveralls.json :您應該看到:
 Randomized with seed 15920
----------------
COV    FILE                                        LINES RELEVANT   MISSED
100.0% lib/chat.ex                                     9        0        0
100.0% lib/chat/message.ex                            26        4        0
100.0% lib/chat/repo.ex                                5        0        0
100.0% lib/chat_web/channels/room_channel.ex          46       10        0
100.0% lib/chat_web/components/layouts.ex              5        0        0
100.0% lib/chat_web/controllers/error_html.ex         19        1        0
100.0% lib/chat_web/controllers/error_json.ex         15        1        0
100.0% lib/chat_web/controllers/page_controller        9        1        0
100.0% lib/chat_web/controllers/page_html.ex           5        0        0
100.0% lib/chat_web/endpoint.ex                       49        0        0
100.0% lib/chat_web/router.ex                         27        2        0
[TOTAL] 100.0%
----------------
該測試只是在subscribe_and_join之前創建一條消息,因此數據庫中有一條消息,可以發送到加入聊天的任何CLIEN。
這樣一來:after_join至少有一條消息, Enum.each至少將調用一次。
有了我們的應用程序,已全面測試!
我們可以擴展該項目以支持基本身份驗證。如果您想了解如何以簡單/快速的方式實現身份驗證,請參見:auth.md
Presence以跟踪誰在線使用Phoenix的最大優勢之一是您可以輕鬆跟踪過程和頻道。
這為毫不費力地展示誰在網上鋪平了道路!
如果您有興趣開發此功能,我們已經在presence.md中創建了一個指南。 ?
連續集成使您可以自動運行測試以檢查/確認您的應用程序正在按預期工作(部署之前)。這樣可以防止偶然地“破壞”您的應用程序。
值得慶幸的是,這些步驟非常簡單。
有關示例ci.yml ,請參見:
.github/workflows/ci.yml
fly.io的部署需要幾分鐘,我們建議遵循官方指南: fly.io/docs/elixir/
部署後,您將能夠在任何網絡/移動瀏覽器中查看/使用您的應用程序。
例如: phoenix-chat .fly.dev/

如果您發現此示例有用,請github存儲庫,所以我們(和其他人)知道您喜歡它!
如果您想了解更多Phoenix和LiveView的魔力,請考慮閱讀我們的初學者教程:github.com/dwyl/ phoenix-liveview-counter-tutorial
對於使用LiveView的聊天應用程序的版本,您可以閱讀以下存儲庫:github.com/dwyl/ phoenix-liveview-chat-chat-example
感謝您與我們一起學習! ☀️
此存儲庫的靈感來自 @chrismccord的簡單聊天示例:https://github.com/chrismccord/phoenix_chat_chat_example❤️
在撰寫時,克里斯的示例最後一次更新於2018年2月20日,並使用鳳凰1.3請參見:essugn/40。
鳳凰1.3和1.6(最新版本)之間存在很多差異(打破變化)。
我們的教程使用Phoenix 1.6.2 (截至2021年10月)。我們的希望是,通過撰寫(並維持)逐步的初學者專注的教程,我們為長生素/鳳凰社的社區做出了貢獻,而沒有將PR堆積在Chris的回購上。


