comms uikit react
v0.5.12
dolby.io通信Uikit for React旨在幫助React開發人員根據Dolby.io Communications SDK的Web構建應用程序的複雜性。
該軟件包由四個基本元素組成:
Providers :與Dolby.io Communications API和州管理初始化集成的主要組成部分。Hooks :負責視頻通話應用程序視頻呼叫邏輯的功能。UI components :涵蓋視頻會議應用程序最受歡迎模式的組件。Conference components :具有內置邏輯的UI組件,用於最廣泛使用的視頻通話/實時事件功能。如果您希望通過查看本指南的完整代碼示例開始,請參見此處的示例。
有關組件及其使用的完整列表,請轉到文檔文件夾。
以下dolby.io示例項目展示了UIKIT的行動:
該UI套件經過測試,可與以下瀏覽器版本最佳合作
本指南演示瞭如何使用UI組件快速構建基於Dolby.io Communications SDK應用程序的基本組件。在移至“添加組件”部分之前,請確保將您的應用程序連接到dolby.io部分。
添加視頻呼叫組件中所示的每個組件可以獨立於其他組件構建。每個部分中的代碼塊僅包含該單個組件的代碼,並將組件從其他部分排除。
如果您希望通過查看包含本指南中所有功能的完整代碼樣本來開始,請參見此處的示例。
注意:本指南的記憶是記住的。如果願意,您可以將紗線交換為NPM或其他軟件包管理器。
 # Create a new React application
npx create-react-app my-app

# Change into the app directory
cd my-app

# Install UI kit
yarn add @voxeet/voxeet-web-sdk @dolbyio/comms-uikit-react

# Start the dev server
yarn run start要設置您的dolby.io帳戶,請轉到dolby.io儀表板並填寫表格。確認您的電子郵件地址後,您將被登錄。
您將需要生成客戶端訪問令牌才能運行此應用。按照步驟獲取令牌。
轉到儀表板,找到應用程序菜單項, 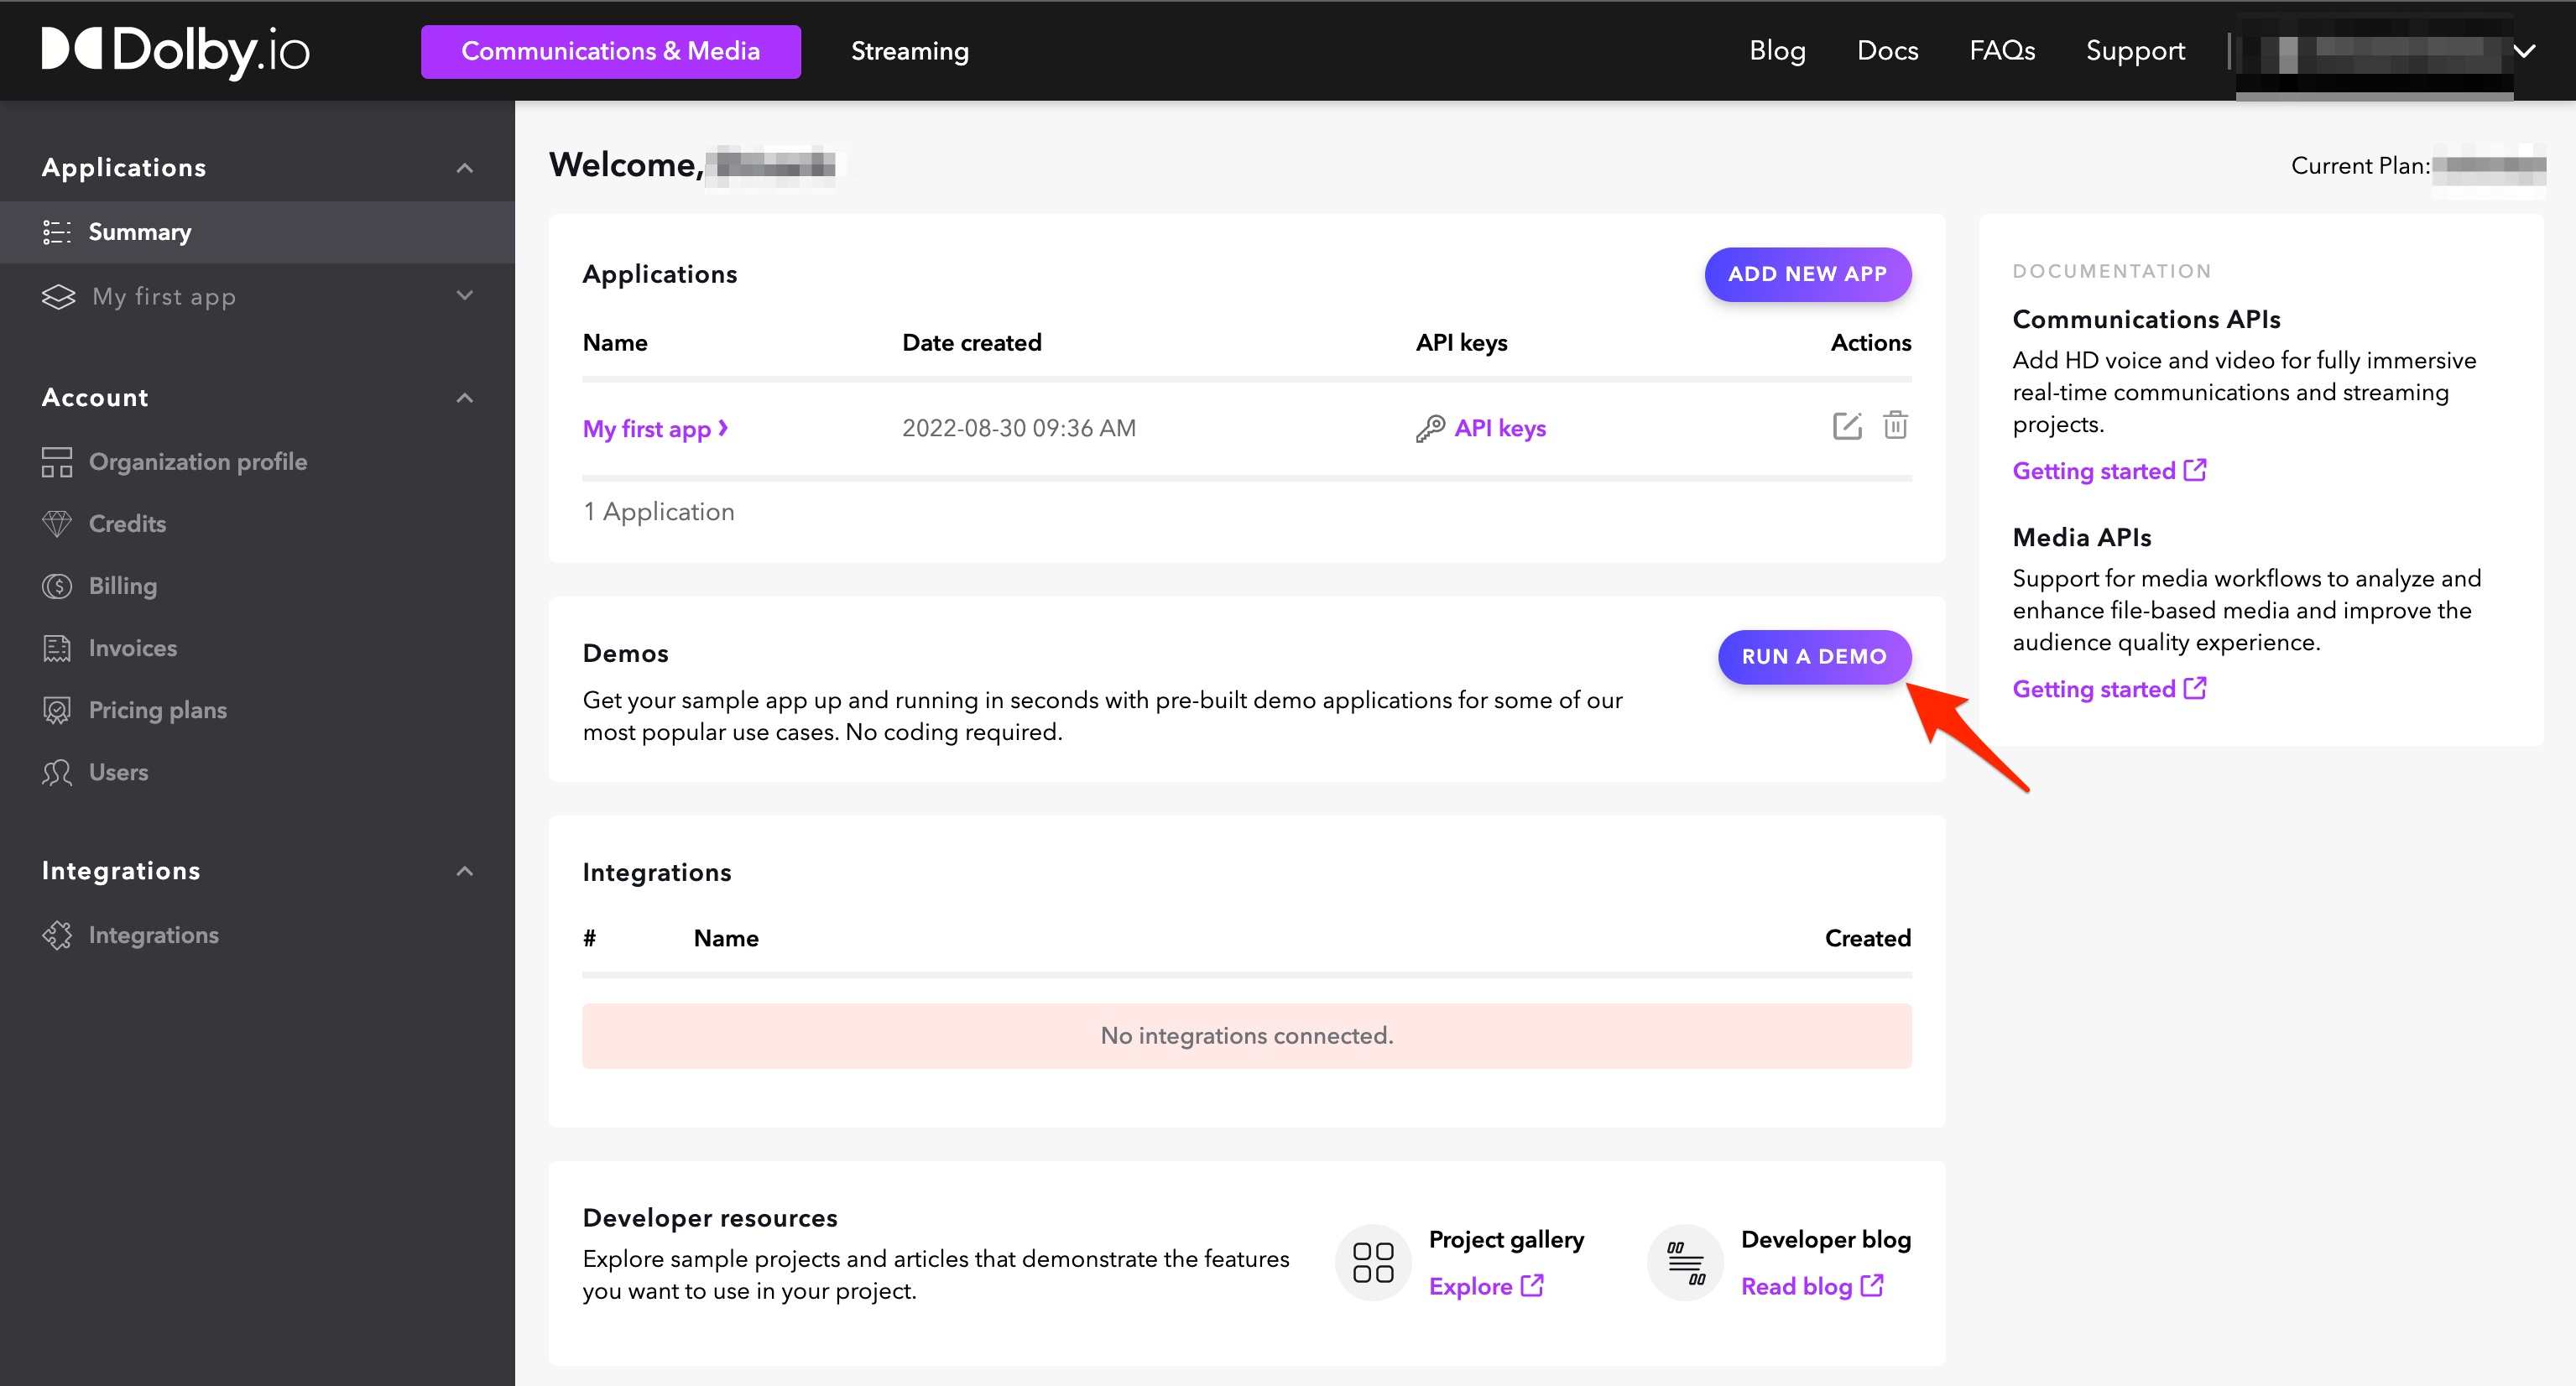
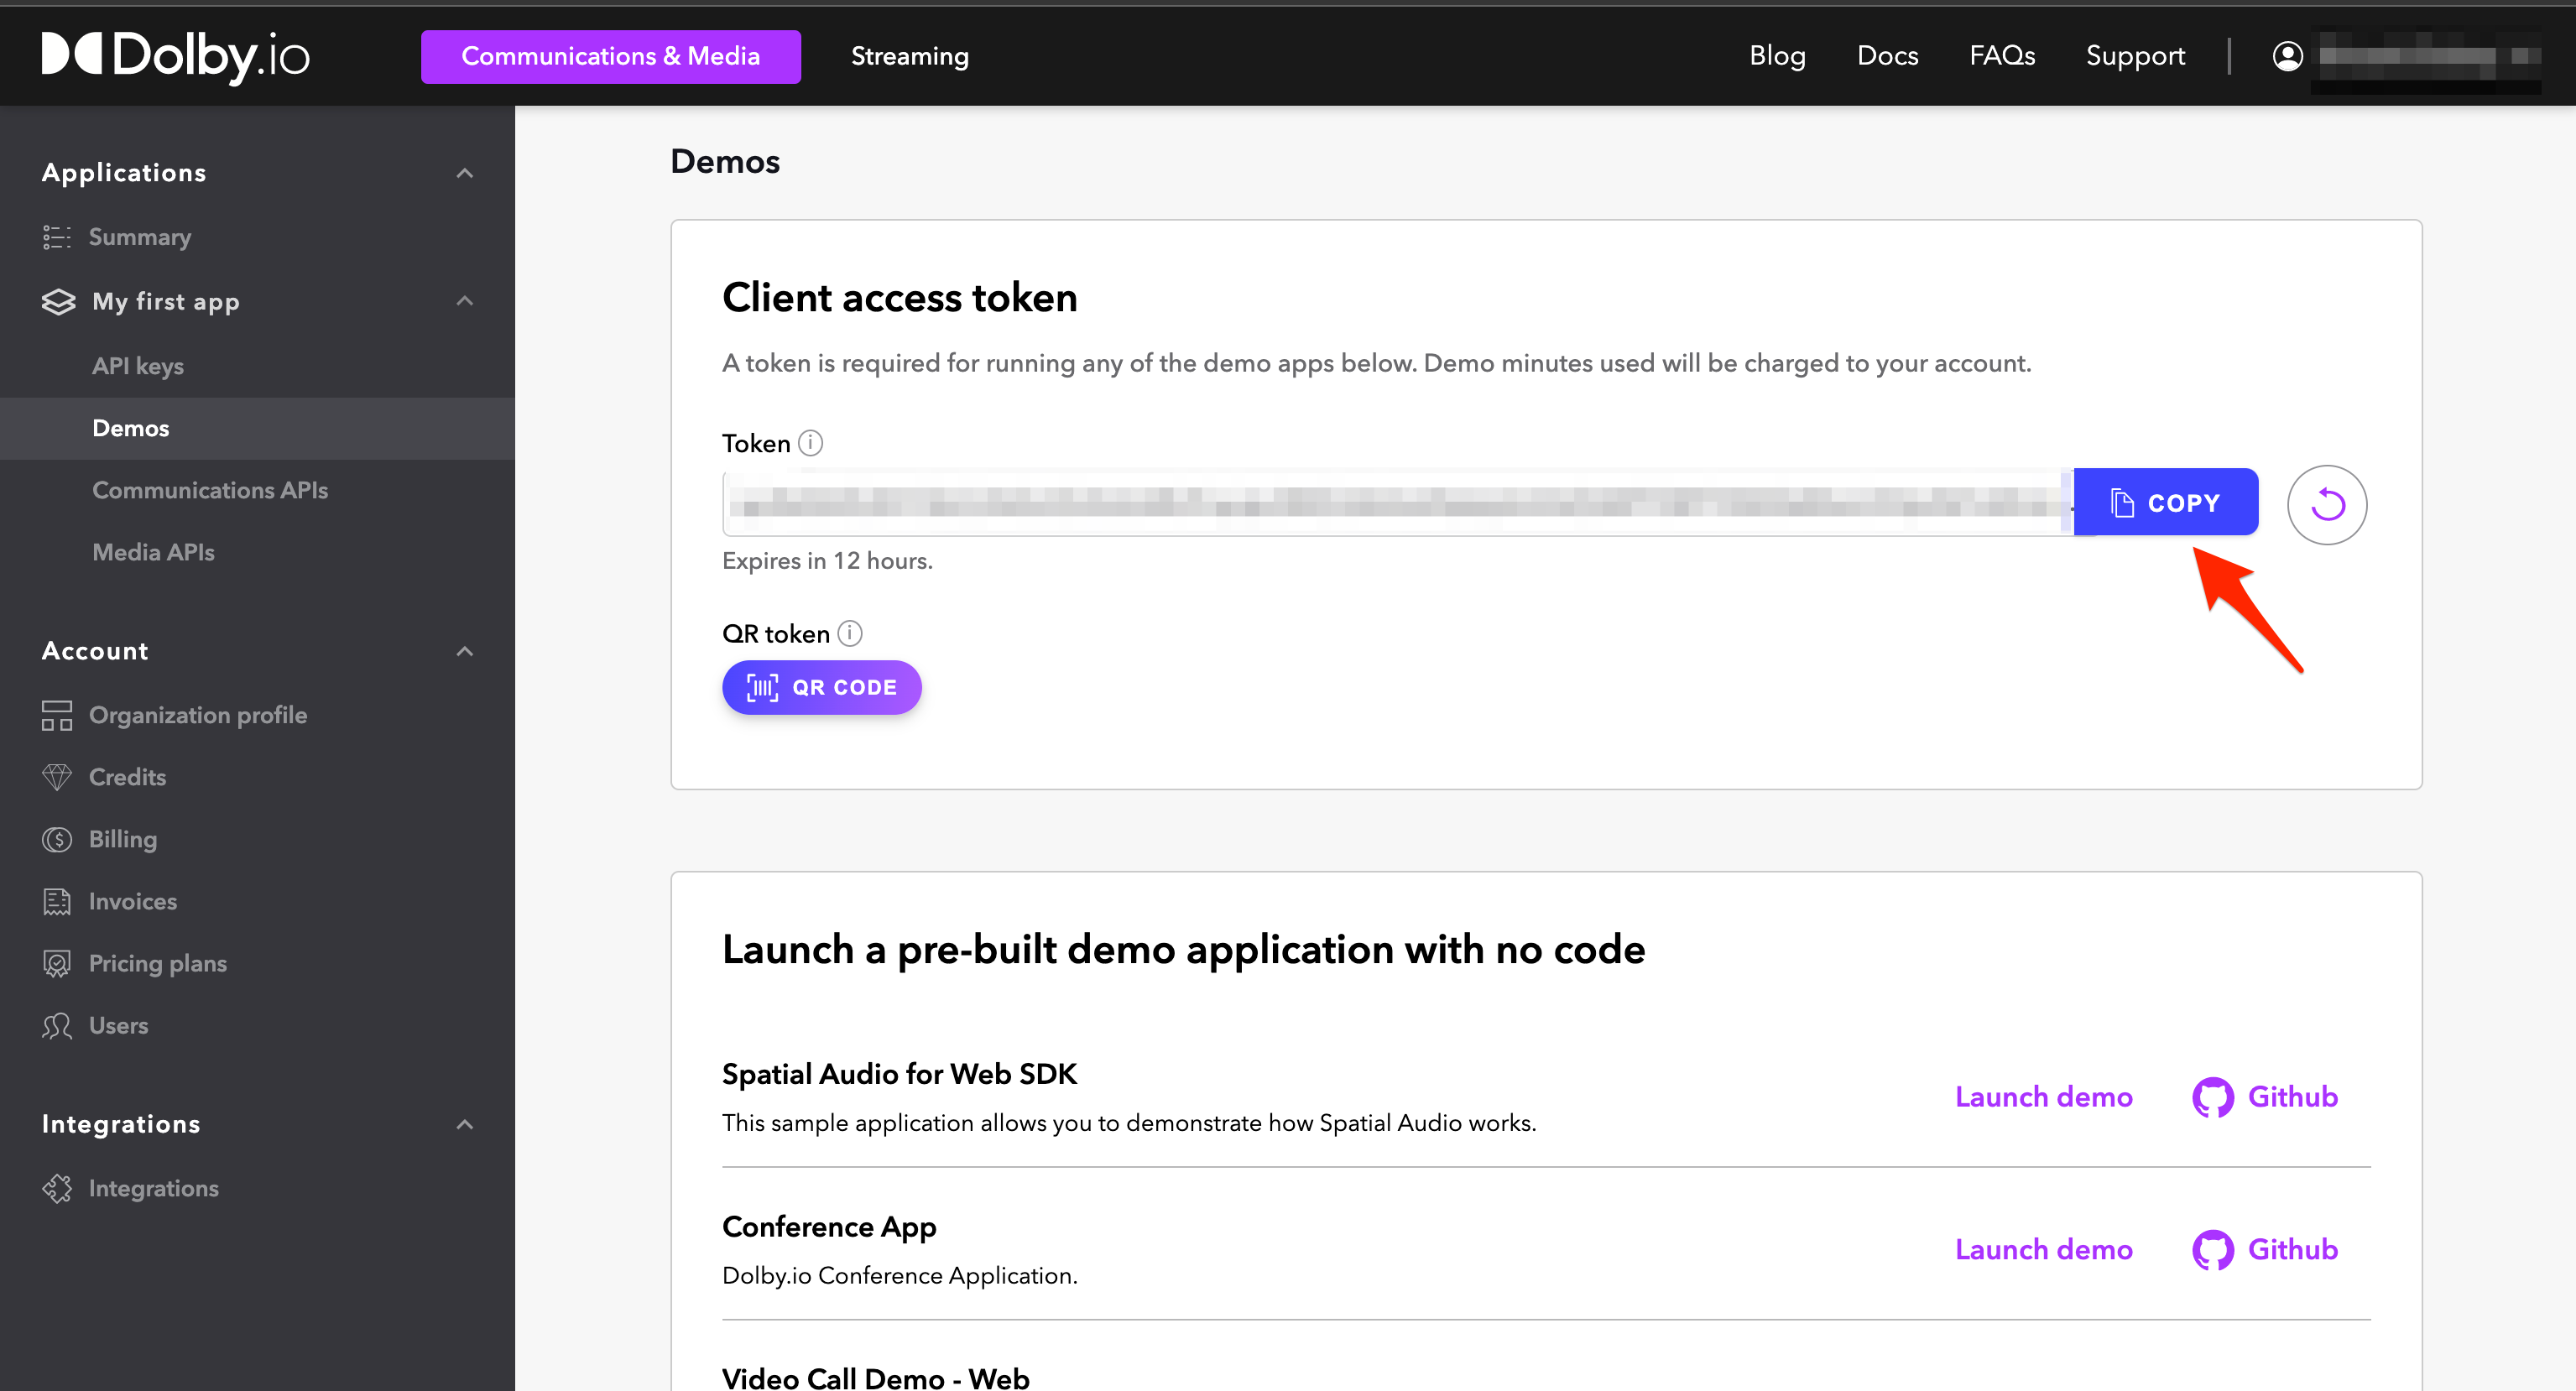
在下一個屏幕上,有一個令牌字段,您可以將客戶端訪問令牌複製到剪貼板。生成的令牌在指示的時間內是有效的。
本節將指導您連接到dolby.io API,這將使我們的通信相關功能使用。
dolby.io集成由CommsProvider組件(用於與我們的API進行通信)提供,該組件應在您的Web應用程序的根部導入和配置,例如。 src/App.js 。用dolby.io儀表板替換令牌訪問token的佔位符價值。
出於此演示的目的,您將僅在
src/App.js中工作。該文件遵循以下結構:
Import statementsGlobal variablesAppBase ComponentContent ComponentApp
 // src/App.js

// 1. Import `CommsProvider` and `ThemeProvider` from the UI kit.
import { CommsProvider , InfoBar } from '@dolbyio/comms-uikit-react' ;

// 2. Define the `CommsProvider` configuration. We need two properties, a `token` and an async function that refreshes it.
const token = 'YOUR_CLIENT_ACCESS_TOKEN_HERE' ;
const refreshToken = async ( ) => token ;

// 3. Create wrapper with `CommsProvider` for entire app. Pass the `token` and `refreshToken` properties.

const AppBase = ( { children } ) => {
  return (
    < CommsProvider token = { token } refreshToken = { refreshToken } >
      { children }
    </ CommsProvider >
  ) ;
} ;

// 4. Create `Content` component. It will be main component of our app. Wrap it with previously created `AppBase`. We'll also add a fixed height to the content as we'll need this later in the guide.

function Content ( ) {
  // 5. Define styles for the main content and button containers
  const contentContainerStyle = {
    minHeight : '100vh' ,
    gap : '10px' ,
    display : 'flex' ,
    flexDirection : 'column' ,
    alignItems : 'stretch' ,
    justifyContent : 'center' ,
    backgroundColor : '#14141A' ,
    padding : '20px 0' ,
    boxSizing : 'border-box' ,
  } ;
  const buttonContainerStyle = {
    display : 'flex' ,
    alignItems : 'center' ,
    justifyContent : 'center' ,
  } ;

  return (
    < div className = "App" style = { contentContainerStyle } >
      < InfoBar text = "Voxeet Web SDK has been initialized." style = { { margin : '0 auto' } } />
      ...
    </ div >
  ) ;
}

// 6. Connect `BaseApp` with `Content` component.

const App = ( ) => {
  return (
    < AppBase >
      < Content />
    </ AppBase >
  ) ;
} ;

export default App ;
這種方法僅用於演示目的。要正確初始化您的應用程序以進行生產,請參閱API身份驗證和客戶端身份驗證。
會話是客戶端應用程序與dolby.io通信API之間的連接。
Session 。 import { Session } from '@dolbyio/comms-uikit-react' ;Content組件中定義Session配置。您應該使用participantInfo對象提供名稱,例如。建立會議的參與者的名字。 const participantInfo = { name : 'John Doe' } ;Session組件插入Content組件中的返回語句中。 < Session participantInfo = { participantInfo } >
< InfoBar text = "Session has been created." style = { { margin : '0 auto' } } />
</ Session >如果您想使用自己的組件創建會話,請參考使用掛鉤。
一旦您的應用程序連接到Dolby.io,就可以訪問其功能。
會話將參與者彼此聯繫起來,使他們能夠使用音頻和/或視頻進行通信。
Conference ,UI套件的JoinConferenceButton和LeaveConferenceButton 。從React導入useState 。 import { Conference , JoinConferenceButton , LeaveConferenceButton } from '@dolbyio/comms-uikit-react' ;
import { useState } from 'react' ;Content組件中定義JoinConferenceButton配置。 joinOptions屬性允許您指定是否可以使用音頻和/或啟用視頻加入會議,除了會議名稱和用戶名(通常是當前用戶的名稱),所有參與者都可以看到。 const joinOptions = {
constraints : {
audio : true ,
video : true ,
} ,
} ;JoinOrLeave 。插入Conference , JoinConferenceButton和LeaveConferenceButton組件,以及joinOptions和meetingName名稱。當沒有會議ID和Conference (包括LeaveConferenceButton )時,我們想向JoinConferenceButton展示。您可以自定義每個相應的連接/離開按鈕的toolipText屬性。現在,在Content組件中的返回語句中插入<JoinOrLeave>組件(即嵌套在Session中)。我們還將setConferenceId作為回調,以回到兩個按鈕的onSuccess屬性,這些按鈕將在操作成功時設置(或未設置)會議ID。
重要的是:渲染組件將使用dolby.io建立一個呼叫,如果您在此演示中使用免費會議記錄,請記住離開會議或完成完成後關閉“瀏覽器”選項卡!
 const JoinOrLeave = ( ) => {
  const [ conferenceId , setConferenceId ] = useState ( ) ;

  return ! conferenceId ? (
    < div style = { buttonContainerStyle } >
      < JoinConferenceButton
        joinOptions = { joinOptions }
        meetingName = "My Meeting"
        username = { participantInfo . name }
        tooltipText = "Join Meeting"
        onSuccess = { ( id ) => setConferenceId ( id ) }
      >
        Join Video Call
      </ JoinConferenceButton >
    </ div >
  ) : (
    < Conference id = { conferenceId } >
      < div style = { buttonContainerStyle } >
        < LeaveConferenceButton tooltipText = "Leave Meeting" onSuccess = { ( ) => setConferenceId ( null ) } />
      </ div >
    </ Conference >
  ) ;
} ;
如果您想使用自己的組件創建,加入或離開會議,請參閱USECERFERY掛鉤。
假定下面的所有視頻調用組件都包裹在駐留在Session組件中的Conference組件中。這些組件都在Content組件中定義和渲染。請參閱下面的骨骼:
 // import { Session, Conference } from '@dolbyio/comms-uikit-react';
< Session participantInfo = { participantInfo } >
  < Conference id = { conferenceId } > ... </ Conference >
</ Session >
Conference組件包含其他可選屬性,包括alias(字符串),audio(布爾),video(bool),liveRecording(bool)。
ParticipantsList列表組件可以顯示當前會議及其狀態的參與者列表,例如。參與者目前是否講話。
ParticipantsList 。 import { ParticipantsList } from '@dolbyio/comms-uikit-react' ;ParticipantsList列表組件插入Conference中的任何地方。您可以自定義每個參與者顯示的文本屬性及其狀態。 < ParticipantsList localText = "you" muteText = "mute" unmuteText = "unmute" soundOnText = "sound on" soundOffText = "sound off" />如果您想使用自己的組件展示參與者,請參閱USE -Particant鉤子。
ParticipantsGrid Grid組件在網格瓷磚佈局中顯示會議參與者的視頻流。
ParticipantsGrid 。 import { ParticipantsGrid } from '@dolbyio/comms-uikit-react' ;Conference內部任何地方的ParticipantsGrid localText 。 < ParticipantsGrid localText = "you" additionalContainerStyle = { { height : 400 } } /> LocalToggleAudioButton和LocalToggleVideoButton組件使本地參與者可以打開或關閉麥克風和相機。
LocalToggleAudioButton和LocalToggleVideoButton 。 import { LocalToggleAudioButton , LocalToggleVideoButton } from '@dolbyio/comms-uikit-react' ;LocalToggleAudioButton和LocalToggleVideoButton組件插入Conference中的任何地方。 < div style = { buttonContainerStyle } >
< LocalToggleAudioButton />
< LocalToggleVideoButton />
</ div >如果您想使用自己的組件控制音頻或視頻,請參閱Useaudio和UseVideo鉤子。
本地參與者可以使用CameraSelect , MicrophoneSelect和SpeakersSelect選擇組件更改其首選相機,麥克風或輸出揚聲器。
CameraSelect , MicrophoneSelect和SpeakersSelect 。 import { CameraSelect , MicrophoneSelect , SpeakersSelect } from '@dolbyio/comms-uikit-react' ;Conference內的任何地方,插入CameraSelect , MicrophoneSelect和SpeakersSelect的組件,以及label和placeholder屬性。您可以自定義label道具顯示的文本(組件上方顯示的)和placeholder符道具(當未選擇選項時顯示)。 < CameraSelect label = "Camera" placeholder = "Choose a camera" labelColor = "white" />
< MicrophoneSelect label = "Microphone" placeholder = "Choose a microphone" labelColor = "white" / >
< SpeakersSelect label = "Speaker" placeholder = "Choose a speaker" labelColor = "white" />如果您想使用自己的組件來控制輸入設備,請參閱USECAMERA,USEMECTROPHONE和USESPEAKER掛鉤。
您可以直接在應用程序中使用已安裝的VoxeedSDK API,而無需依賴我們的Uikit組件。讓我們增強我們的示例應用程序,以觀察參與者的狀態。
useEffect 。 import VoxeetSDK from '@voxeet/voxeet-web-sdk' ;
import { useEffect } from 'react' ;Content組件。此掛鉤訂閱了Voxeet SDK的participantUpdated事件。定義處理程序的效果。在這裡,您可以通過控制台觀察參與者的狀態和音頻狀態。 useEffect ( ( ) => {
// define the event handler here
const handler = ( participant ) => {
console . log ( participant . info . name , 'status:' , participant . status ) ;
console . log ( participant . info . name , 'has audio enabled:' , participant . audioTransmitting ) ;
} ;
// register the handler for 'participantUpdated' event
VoxeetSDK . conference . on ( 'participantUpdated' , handler ) ;
return ( ) => {
// unregister the handler
VoxeetSDK . conference . removeListener ( 'participantUpdated' , handler ) ;
} ;
} , [ ] ) ;您可以在此處了解有關Voxeet WebDK的更多信息
在此處下載示例源代碼。
請參閱其他配置選項指南,以了解更多有關其他功能的信息,包括:
Dolby.io通信Uikit for React及其存儲庫是根據MIT許可證的。在使用@dolbyio/comms-uikit-react軟件包之前,請查看並接受杜比軟件許可協議。
第三方許可證可以在這裡找到。
©Dolby,2023年


