ha tts bluetooth speaker
1.0.0
该项目为家庭助手提供了一个媒体播放器(自定义组件),该媒体助理通过蓝牙扬声器播放TTS(文本到语音)。
如果您正在使用HA的蓝牙设备跟踪器(用于检测),则该项目还提供了一个替换蓝牙跟踪器,允许两个组件可以很好地播放。
由于蓝牙跟踪器不断扫描设备,因此在扫描时可能会破坏蓝牙扬声器上的音频播放。这些自定义组件共同努力,以确保其中只有一个在任何给定时间访问蓝牙。
流是这样的:
sudo apt-get install pulseaudio pulseaudio-module-bluetooth bluez mplayer sox libsox-fmt-mp3
 sudo adduser pi pulse-access
sudo adduser homeassistant pulse-access
在/etc/pulse/system.pa中,将以下内容添加到文件底部:
 ### Bluetooth Support
.ifexists module-bluetooth-discover.so
load-module module-bluetooth-discover
.endif

#set-card-profile bluez_card.00_2F_AD_12_0D_42 a2dp_sink
最后一部分是坚持A2DP的设置,以防您的蓝牙似乎默认为另一个配置文件。我之所以评论出来,是因为它似乎很薄弱。
如果您的音频被切断,您可能需要删除此行:
 ### Automatically suspend sinks/sources that become idle for too long
#load-module module-suspend-on-idle
创建file /etc/systemd/system/pulseaudio.service ,然后添加以下内容:
 [Unit]
Description=Pulse Audio

[Service]
Type=simple
Environment=DBUS_SESSION_BUS_ADDRESS=unix:path=/run/dbus/system_bus_socket
ExecStart=/usr/bin/pulseaudio --system --disallow-exit --disable-shm --exit-idle-time=-1

[Install]
WantedBy=multi-user.target
使服务能够在启动时间开始。
 sudo systemctl daemon-reload
sudo systemctl enable pulseaudio.service
让脉冲用户访问蓝牙接口
edit /etc/dbus-1/system.d/bluetooth.conf /system.d/bluetooth.conf
添加以下行:
  <policy user="pulse">
    <allow send_destination="org.bluez"/>
    <allow send_interface="org.bluez.MediaEndpoint1"/>
  </policy>
 sudo bluetoothctl
scan on
pair 00:2F:AD:12:0D:42
trust 00:2F:AD:12:0D:42
connect 00:2F:AD:12:0D:42
quit
创建文件[PATH_TO_YOUR_HOME_ASSSISTANT]/scripts/pair_bluetooth.sh ,然后将以下内容添加到其中。确保用蓝牙扬声器替换蓝牙地址。
 #!/bin/bash

bluetoothctl << EOF
connect 00:2F:AD:12:0D:42
EOF
确保授予脚本执行权限。
sudo chmod a+x [PATH_TO_YOUR_HOME_ASSSISTANT]/scripts/pair_bluetooth.sh
在/etc/rc.local中,将以下内容添加到文件的末尾以在启动时运行脚本:
 # Pair Bluetooth devices
[PATH_TO_YOUR_HOME_ASSSISTANT]/scripts/pair_bluetooth.sh

exit 0
复制TTS蓝牙扬声器组件(从此Github repo中),然后将其保存到您的家庭助手配置目录。
custom_components/tts_bluetooth_speaker/media_player.py
仅当您使用蓝牙跟踪器时,此步骤才适用。
复制蓝牙跟踪器组件并将其保存到您的主助手配置目录。
custom_components/bluetooth_tracker/device_tracker.py
pactl list sinks
您应该看到类似的东西:
 Sink #1
        State: SUSPENDED
        Name: bluez_sink.00_2F_AD_12_0D_42.a2dp_sink
如果它说headSet_head_unit,则可以切换到A2DP配置文件,如下所示:
pactl set-card-profile bluez_card.00_2F_AD_12_0D_42 a2dp_sink
再次检查并使用A2DP进行验证。
使用命令行测试如果Mplayer可以流到A2DP
mplayer -ao pulse::bluez_sink.00_2F_AD_12_0D_42.a2dp_sink -channels 2 -volume 100 /some/mp3file.mp3
到这个阶段(重新启动后),您应该能够开始使用HA中的TTS蓝牙扬声器。
以下是如何配置组件的示例。您需要指定扬声器的蓝牙地址,并选择设置volume级(必须在0到1之间)。如果您发现扬声器没有播放音频的第一部分(即播放时缺少第一秒),那么您可以选择在原始tts音频hsing pre_silence_duration和post_silence_duration选项(必须在0到60秒之间)。如果您更改了TTS缓存目录(在TTS配置中),则应将cache_dir设置为匹配。
 media_player:
  - platform: tts_bluetooth_speaker
    address: [BLUETOOTH_ADDRESS]   # Required - for example, 00:2F:AD:12:0D:42
    volume: 0.45                   # Optional - default is 0.5
#    pre_silence_duration: 1       # Optional - No. of seconds silence before the TTS (default is 0)
#    post_silence_duration: 0.5    # Optional - No. of seconds silence after the TTS (default is 0)
#    cache_dir: /tmp/tts           # Optional - make sure it matches the same setting in TTS config
如果您使用的是蓝牙跟踪器,则可能已经在配置中已经存在了:
 device_tracker:
  - platform: bluetooth_tracker
为了测试所有功能,您可以在HA Frontend中使用开发人员工具>服务通过蓝牙扬声器播放TTS消息:
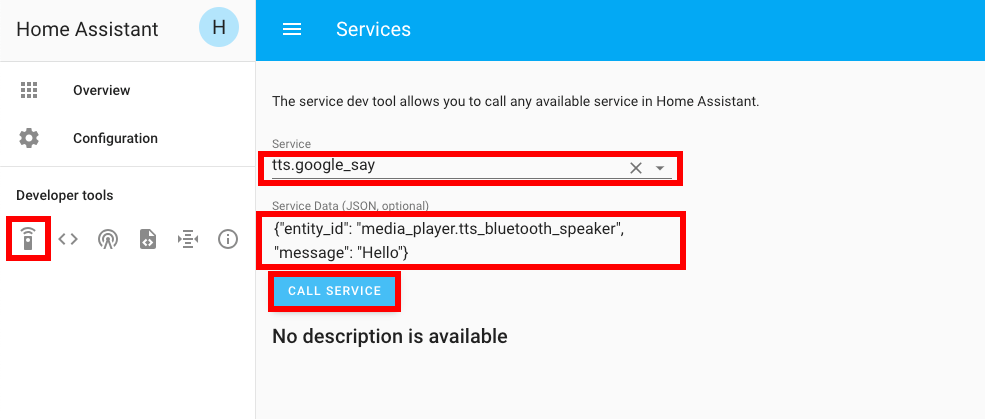
{ "entity_id": "media_player.tts_bluetooth_speaker", "message": "Hello" }
测试它的另一种方法是添加一个自动化,该自动化在启动HA时播放TTS消息:
 automation:
  - alias: Home Assistant Start
    trigger:
      platform: homeassistant
      event: start
    action:
      - delay: '00:00:10'
      - service: tts.google_translate_say
        data:
          entity_id: media_player.tts_bluetooth_speaker
          message: 'Home Assistant has started'


