wundergraph
Release wunderctl 0.180.0
快速启动•网站•文档•示例•博客
爱wundergraph?在github上给我们一个!
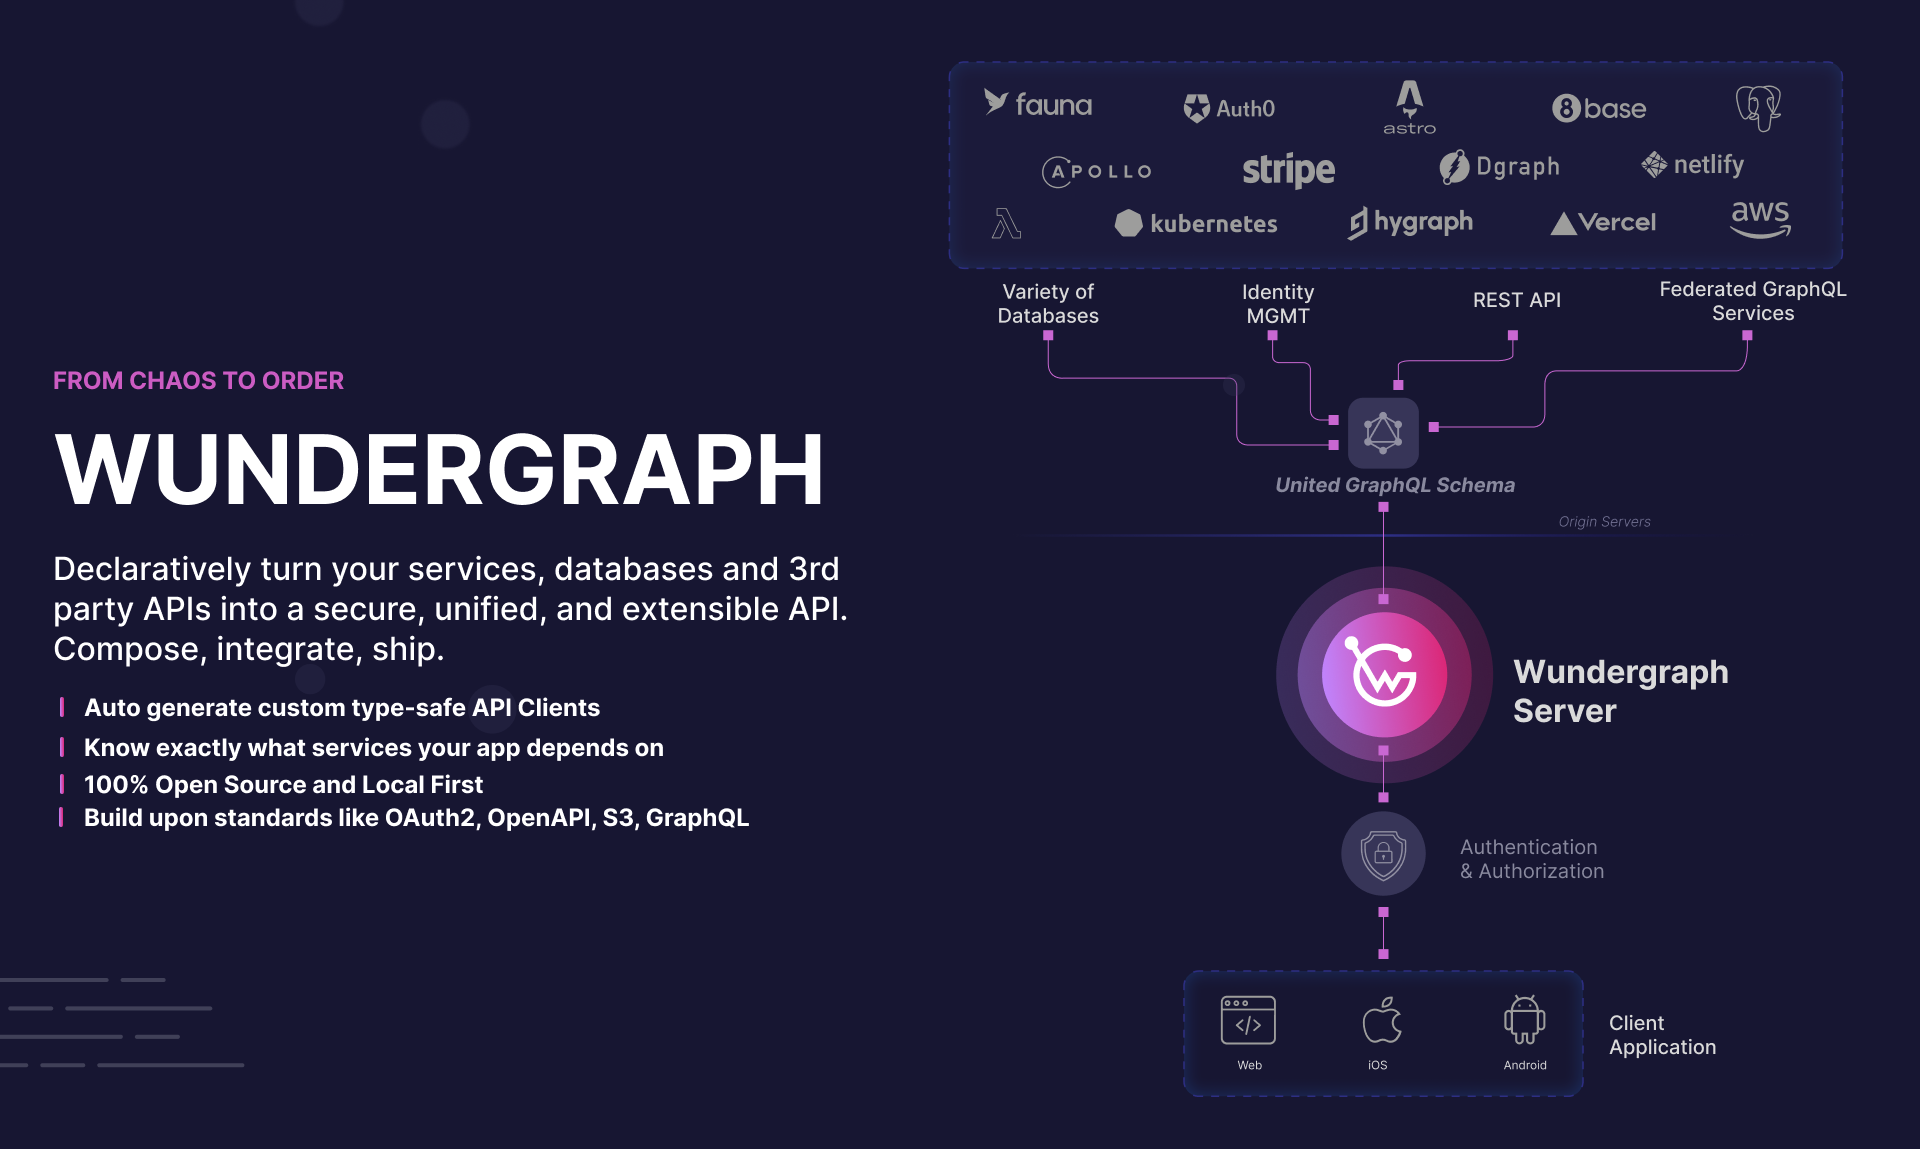
WunderGraph是Frontend(BFF)框架的后端,旨在通过API组成优化开发人员工作流。
Wundergraph以其核心将API网关和BFF与包装管理器的概念相结合,使API组合与NPM安装一样简单。我们的咒语是:构成,不要整合。
API组成是一种新模式,可让您与异质的API相互作用,就好像它们是单个统一的API一样。这不仅消除了很多胶水代码,还可以使您对应用程序的API依赖关系进行推理。您是否真的知道您的应用程序取决于什么API和服务? WunderGraph可以轻松地为您回答这个问题,甚至可以为您的应用程序使用的API和端点以及API依赖提供的服务质量提供分析和可观察性。
这是Wundergraph的工作方式:
 // .wundergraph/wundergraph.config.ts

import { NextJsTemplate } from '@wundergraph/nextjs/dist/template' ;

// introspect a PostgreSQL database
const pg = introspect . postgresql ( {
  apiNamespace : 'pg' ,
  databaseURL : new EnvironmentVariable ( 'PG_DATABASE_URL' ) ,
} ) ;

// introspect the Stripe API using OpenAPI
const stripe = introspect . openApiV2 ( {
  apiNamespace : 'stripe' ,
  source : {
    kind : 'file' ,
    filePath : './stripe.yaml' ,
  } ,
  headers : ( builder ) => builder . addClientRequestHeader ( 'Authorization' , `Bearer ${ process . env . STRIPE_SECRET_KEY } ` ) ,
} ) ;

// introspect the Shopify Storefront API using GraphQL
const shopify = introspect . graphql ( {
  apiNamespace : 'shopify' ,
  url : 'https://my-shop.myshopify.com/api/2021-07/graphql.json' ,
  headers : ( builder ) =>
    builder . addStaticHeader ( 'X-Shopify-Storefront-Access-Token' , new EnvironmentVariable ( 'SHOPIFY_STOREFRONT_TOKEN' ) ) ,
} ) ;

configureWunderGraphApplication ( {
  // compose the APIs into a unified WunderGraph API
  apis : [ pg , stripe , shopify ] ,

  // generate type-safe clients for your Frontend
  codeGenerators : [
    {
      templates : [ new NextJsTemplate ( ) ] ,
      path : '../web/components/generated' ,
    } ,
  ] ,
} ) ;
WunderGraph允许您创建一个内省的代码管道,并将多个API组合到统一的API中。这使得无需单击即可更新API依赖性。
通过组合替代的API,WunderGraph在所有API上生成统一的GraphQl模式。我们要做的就是定义一个操作并从我们的前端打电话。您可以创建GraphQl操作或打字稿操作。两者都是类型的安全。打字稿操作允许您添加自定义逻辑,例如来自多个API的数据,定义自定义输入验证,等等。
| GraphQl | 打字稿 |
 # .wundergraph/operations/users/ByID.graphql
query ( $id : String ! ) {
  user : pg_findFirstUser ( where : { id : { equals : $id } }) {
    id
    email
    name
    bio
  }
} | // .wundergraph/operations/users/CustomByID.ts
import { createOperation , z } from '../../generated/wundergraph.factory' ;
export default createOperation . query ( {
// Input validation
input : z . object ( {
id : z . string ( ) ,
} ) ,
handler : async ( { input } ) => {
// Call into your virtual graph, type-safe
const { errors , data } = await operations . query ( {
operationName : 'users/ByID' ,
input : {
id : input . id ,
} ,
} ) ;
return {
... data ,
} ;
} ,
} ) ; |
在定义操作时,WunderGraph会自动为前端生成类型安全客户端,并支持所有主要前端框架,例如React,NextJ,Remix,Astro,Astro,Svelte,Svelte,Svelte,Expo,Vue等...
 // web/pages/profile.ts

import { useQuery } from '../../components/generated/nextjs' ;

export default async function ProfilePage ( props ) {
  const { data } = await useQuery ( {
    operationName : 'users/CustomByID' , // or 'users/ByID'
    input : {
      id : props . params . id ,
    } ,
  } ) ;

  return (
    < div >
      < h1 > { data . user . id } < / h1>
      < p > { data . user . name } < / p>
    < / div >
  ) ;
}
同样,您现在可以添加身份验证,授权,文件上传等...
从头开始开始的最简单方法是使用以下命令:
npx create-wundergraph-app my-project --example nextjs如果您已经有一个现有项目,则可以通过运行来添加WunderGraph:
npx create-wundergraph-app --init我们有一个全面的示例清单,可以让您入门。尝试它们的最佳方法是克隆单声波。
WunderGraph由三个核心组成部分组成:
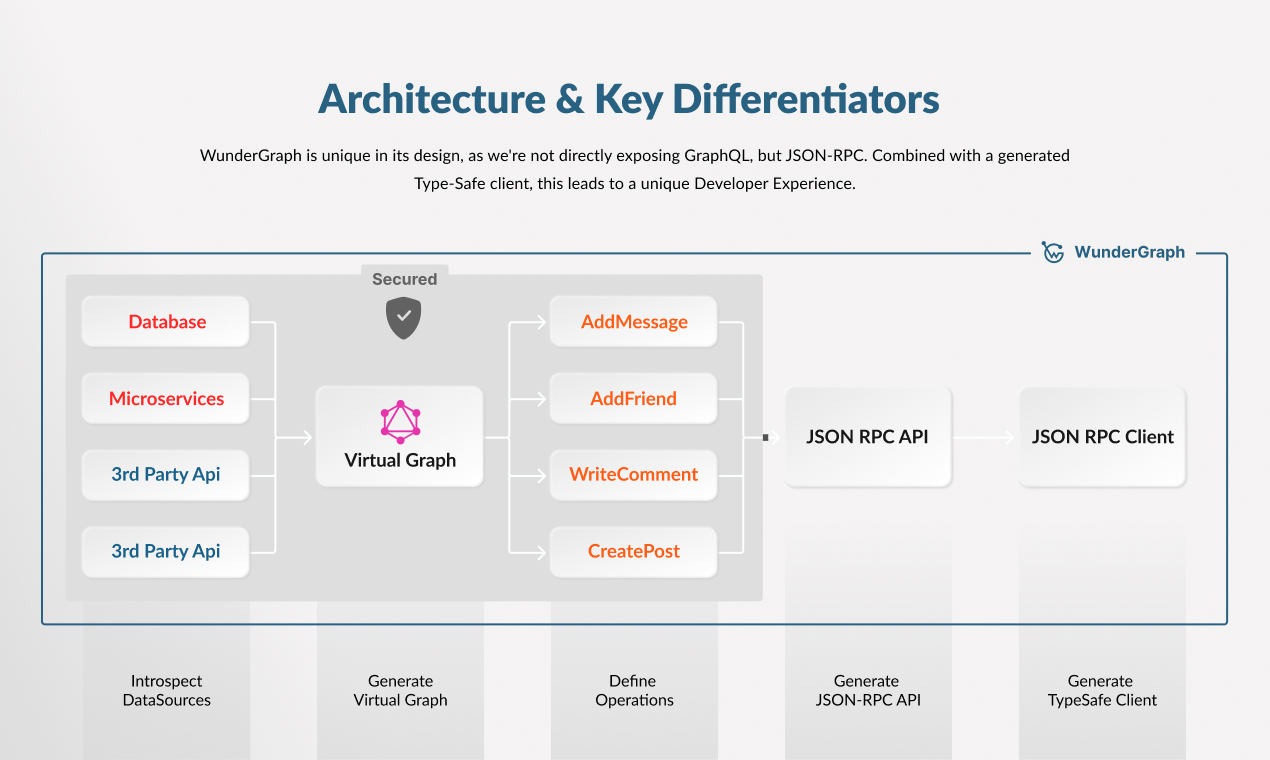
您可以了解有关WunderGraph架构的更多信息,以及为什么我们在“架构”部分中以这种方式构建它。
本节提供了有关WunderGraph的工作原理及其最为中心的组件的高级概述。要进行更全面的介绍,请访问架构文档。
初始化WunderGraph应用程序后,您有一个NPM软件包和.wundergraph文件夹。该文件夹包含以下文件:
wundergraph.config.ts wundergraph应用程序的主要配置文件。添加数据源等等。wundergraph.operations.ts为特定或所有操作配置身份验证,缓存等。wundergraph.server.ts挂钩服务器,用于挂接网关的不同生命周期事件。作为WunderGraph的用户,您可以将数据源和身份验证配置添加到wundergraph.config.ts文件中。然后,您将通过在.wundergraph/operations/ Directory中创建*.graphql或*.ts文件来定义操作。使用GraphQL,您可以直接与数据源的GraphQL模式进行交互。如果您想添加更多自定义化,也可以使用Typescript来定义自定义操作。
然后将所有操作汇编为JSON-RPC,并由Wundergraph Gateway提供。您可以使用一个生成的类型安全客户端之一,也可以使用Postman Collection或OpenAPI规范尝试API,该规范将在.wundergraph/generated目录中生成。
阅读贡献.md,以了解如何为wundergraph做出贡献。
我们感谢所有安全报告。请阅读Security.md,以了解如何向WunderGraph报告任何安全问题。
我们是一个小型但不断发展的API爱好者团队,很高兴能帮助您获得与API合作的最佳开发人员体验。我们的支持计划是为了帮助您的团队充分利用Wundergraph的量身定制的。我们喜欢与客户建立密切的关系,使我们能够不断改进产品并快速迭代。我们的销售团队可以与您讨论您的项目需求,定价信息,支持计划和定制功能。
使用此链接与我们的销售团队联系以进行演示。


