nest next
1.0.0
渲染模块以添加对Nestjs的NextJ支持。
NEST-NENDEXT提供了一个Nestjs模块,将Next.js集成到Nest.js应用程序中,它允许通过Nestjs Controllers渲染Next.js页面,并向页面提供初始道具。
yarn add nest-next

# or

npm install nest-nextreactreact-domnext如果您将Next.js与TypeScript一起使用,那么很可能是这种情况,您还需要安装React和React-Dom的打字稿类型。
将RenderModule导入应用程序的根模块,然后调用Forrootasync方法。
 import { Module } from '@nestjs/common' ;
import Next from 'next' ;
import { RenderModule } from 'nest-next' ;

@ Module ( {
  imports : [
    RenderModule . forRootAsync ( Next ( { dev : process . env . NODE_ENV !== 'production' } ) ) ,
    ...
  ] ,
  ...
} )
export class AppModule { }RenderModule接受配置选项作为Forrotasync方法中的第二个参数。
 interface RenderOptions {
  viewsDir : null | string ;
  dev : boolean ;
} 默认情况下,渲染器将从/pages/views dir提供页面。由于下一步的限制, /pages目录是不可配置的,但是/pages目录中的目录是可配置的。
viewsDir选项确定pages内部的文件夹要从中呈现。默认情况下,值为/views ,但可以将其更改或设置为从pages的根部渲染。
默认情况下,除非选项被覆盖,否则开发模式将设置为true 。当前,开发模式确定在发送到下一个之前应如何序列化错误。
下一个9添加了内置的零孔子打字稿支持。通常,此更改通常很棒,但是接下来需要TSCONFIG中的特定设置,这些设置与服务器所需的内容不相容。但是,可以在tsconfig.server.json文件中轻松覆盖这些设置。
如果您存在意外令牌的问题,则在构建生产时不会发出文件,有关allowJs和declaration没有一起使用的警告以及其他与打字稿相关的错误;请参阅完整配置的示例项目中的tsconfig.server.json文件。
可以将它们转发到Next的请求处理程序中,而不是让NEST处理响应。
 RenderModule . forRootAsync (
  Next ( {
    dev : process . env . NODE_ENV !== 'production' ,
    dir : resolve ( __dirname , '..' ) ,
  } ) ,
  { passthrough404 : true , viewsDir : null } ,
) ,
有关更多背景,请参见此讨论。
RenderModule覆盖了快速/快速渲染。要在控制器中渲染一个页面,请从@nestjs/common导入渲染装饰器,并将其添加到将渲染页面的方法中。页面的路径相对于/pages目录。
 import { Controller , Get , Render } from '@nestjs/common' ;

@ Controller ( )
export class AppController {
  @ Get ( )
  @ Render ( 'Index' )
  public index ( ) {
    // initial props
    return {
      title : 'Next with Nest' ,
    } ;
  }
}
此外,渲染函数可在RES对象上提供。
@ Controller ( )
export class AppController {
  @ Get ( )
  public index ( @ Res ( ) res : RenderableResponse ) {
    res . render ( 'Index' , {
      title : 'Next with Nest' ,
    } ) ;
  }
}
渲染函数呈现为视图,以及传递给页面的初始道具。
render = ( view : string , initialProps ?: any ) => any ;可以从getInitialProps方法中的上下文查询方法访问发送到下一个的初始道具。
 import { NextPage , NextPageContext } from 'next' ;

// The component's props type
type PageProps = {
  title : string ;
} ;

// extending the default next context type
type PageContext = NextPageContext & {
  query : PageProps ;
} ;

// react component
const Page : NextPage < PageProps > = ( { title } ) => {
  return (
    < div >
      < h1 > { title } < / h1>
    < / div >
  ) ;
} ;

// assigning the initial props to the component's props
Page . getInitialProps = ( ctx : PageContext ) => {
  return {
    title : ctx . query . title ,
  } ;
} ;

export default Page ;默认情况下,将使用Next的错误渲染器来处理和渲染错误,该错误渲染器使用可自定义的_ERROR页面。此外,可以通过设置自己的错误处理程序来拦截错误。
可以将自定义错误处理程序设置为覆盖或增强默认行为。这可以用于记录错误或呈现不同响应之类的内容。
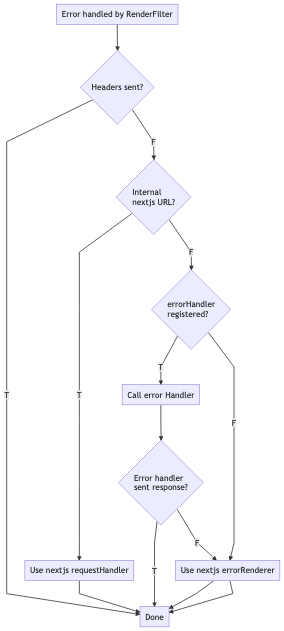
在您的自定义错误处理程序中,您可以选择仅拦截和检查错误或发送自己的响应。如果从错误处理程序发送响应,则考虑完成请求,并且错误不会转发到Next的错误渲染器。如果未在错误处理程序中发送响应,则处理程序返回错误后,将错误转发到错误渲染器。有关视觉说明,请参见下面的请求流。
 export type ErrorHandler = (
  err : any ,
  req : any ,
  res : any ,
  pathname : any ,
  query : ParsedUrlQuery ,
) => Promise < any > ; 您可以通过从Nest的容器中获取RenderService来设置错误处理程序。
 // in main.ts file after registering the RenderModule

const main ( ) => {
  ...

  // get the RenderService
  const service = server . get ( RenderService ) ;

  service . setErrorHandler ( async ( err , req , res ) => {
    // send JSON response
    res . send ( err . response ) ;
  } ) ;

  ...
} 图像链接到较大版本
可以在示例文件夹中查看完全设置项目
接下来,从页面目录渲染页面。 NEST源代码可以保留在默认/src文件夹中
 /src
  /main.ts
  /app.module.ts
  /app.controller.ts
/pages
  /views
    /Index.jsx
/components
  ...
babel.config.js
next.config.js
nodemon.json
tsconfig.json
tsconfig.server.json
接下来,从“ UI”子标记中的页面目录中渲染页面。 NEST项目在“服务器”文件夹中。为了使“ UI”和“ Server”项目之间的属性类型安全,在两个项目之外都有一个称为“ DTO”的文件夹。在“开发”期间,它的变化触发了两个项目的触发重新编译。
 /server
  /src
    /main.ts
    /app.module.ts
    /app.controller.ts
  nodemon.json
  tsconfig.json
  ...
/ui
  /pages
    /index.tsx
    /about.tsx
  next-env.d.ts
  tsconfig.json
  ...
/dto
  /src
    /AboutPage.ts
    /IndexPage.ts
  package.json
要运行此项目,必须按任何顺序构建“ UI”和“服务器”项目。 “ DTO”项目将由“服务器”项目隐式构建。这两个构建后,“服务器”项目可以以开发或生产模式启动。
重要的是,“ ui”引用“ dto”参考typeScript文件(“ src”文件夹中的.ts文件),而不是声明文件(“ dist”文件夹中的.d.t.ts文件),这一点很重要,这是由于如何以与服务器相同的方式编译的。
目前,接下来的“捕获所有路线”页面无法正常工作。有关详细信息,请参见第101期。
为了确保您的更改通过测试套件。要运行测试套件docker ,需要进行docker-compose 。运行npm run test以运行测试。剧作家将安装带有必需的软件包。要在下一个开发模式下运行测试运行npm run test-dev 。您还可以指定NODE_VERSION和Major NEXT_VERSION变量以在特定环境中运行测试。
麻省理工学院许可证
版权(c)2018年至今的凯尔·麦卡锡(Kyle McCarthy)
特此免费授予获得此软件副本和相关文档文件副本(“软件”)的任何人,以无限制处理该软件,包括无限制的使用权,复制,复制,修改,合并,合并,发布,分发,分发,分发,订婚,和/或允许软件的副本,并允许对以下条件提供以下条件,以下是以下条件。
上述版权通知和此许可通知应包含在软件的所有副本或大量部分中。
该软件是“原样”提供的,没有任何形式的明示或暗示保证,包括但不限于适销性,特定目的的适用性和非侵权的保证。在任何情况下,作者或版权持有人都不应对任何索赔,损害赔偿或其他责任责任,无论是在合同,侵权的诉讼中还是其他责任,是由软件,使用或与软件中的使用或其他交易有关的。


