iOS Debug Hacks
1.0.0

中文
调试的声誉很差。我的意思是,如果开发人员对该程序有完整的了解,那么就不会有任何错误,并且首先不会调试他们,对吗?
不要这样思考。
就此而言,您的软件或任何软件中总会有错误。您的产品经理对您的测试覆盖范围没有解决。实际上,将调试视为修复破碎的事物的过程实际上是一种有毒的思维方式,从而在心理上阻碍了您的分析能力。
相反,您应该将调试视为更好地理解程序的过程。这是一个微妙的差异,但是如果您真正相信它,任何以前的调试的苦恼都会消失。
自从COBOL语言的创始人格雷斯·霍珀(Grace Hopper)发现了中继计算机中的世界第一个错误以来,软件开发中的错误从未停止。正如《高级Apple调试与反向工程》的序言》告诉我们:开发人员不想认为如果对软件的工作方式有很好的了解,就不会有错误。因此,调试几乎是软件开发生命周期中不可避免的阶段。
如果您向没有经验的程序员询问如何定义调试,他可能会说:“调试是您为软件问题找到解决方案的事情”。他是对的,但这只是真正调试的一小部分。
这是真正调试的步骤:
在上述步骤中,最重要的步骤是第一步:找出问题。显然,这是其他步骤的先决条件。
研究表明,经验丰富的程序员花在调试上的时间来定位相同的缺陷,大约有200年的缺乏经验的程序员。这意味着调试经验在编程效率方面具有巨大的不同。我们有很多有关软件设计的书籍,不幸的是,很少有人会介绍调试,甚至在学校的课程中。
随着多年来的调试器的改善,程序员的编码样式会彻底更改。当然,调试器无法替代良好的思维,思维无法替代出色的调试器,最完美的组合是出色的调试器,具有良好的思维。
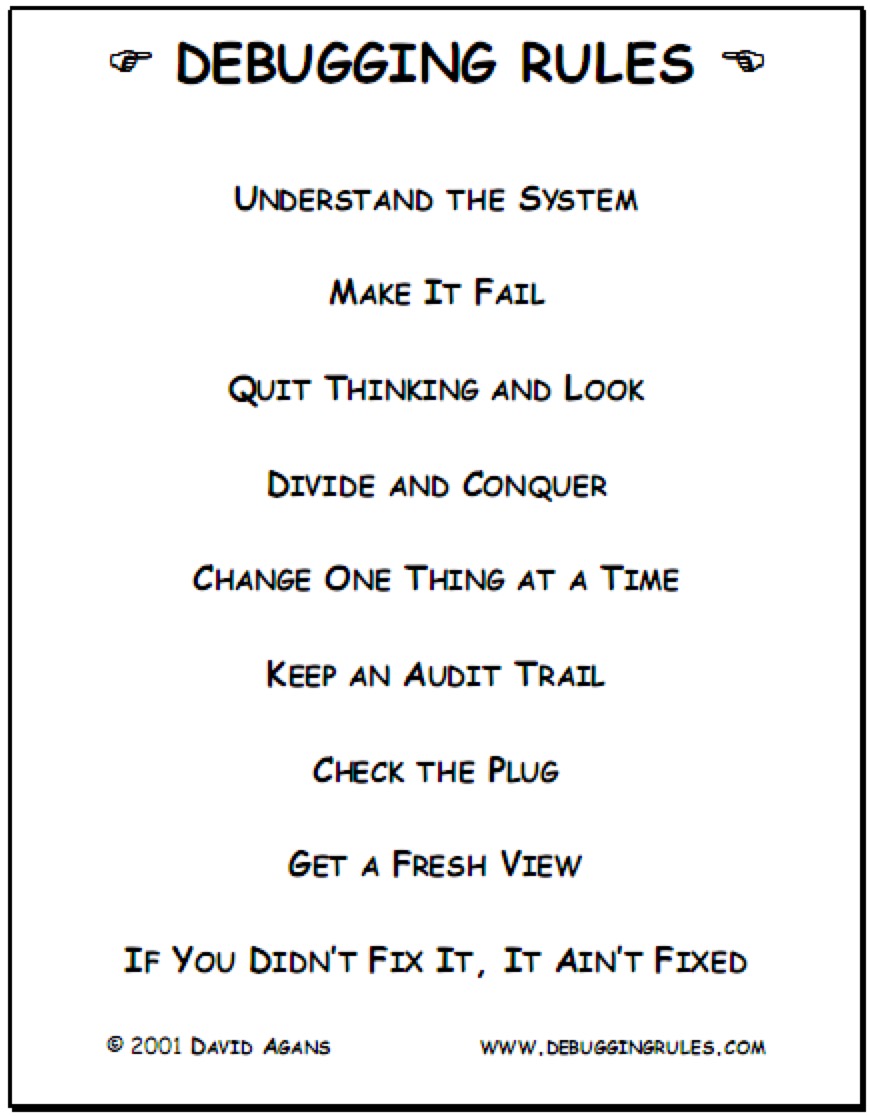
以下图是书中描述的九个调试规则<debugging:即使找到最难以捉摸的软件和硬件问题>的9个必不可少的规则>。
尽管作为iOS程序员,但工作中的大多数时间都不会处理组装语言,但是了解程序集仍然非常有帮助,尤其是在调试系统框架或没有源代码的第三方框架时。
Assembly语言是一种低级机器的编程语言,可以将其视为用于各种CPU的机器说明的集合。程序员可以使用汇编语言直接控制计算机硬件系统。并且以汇编语言编写的程序具有许多优点,例如快速执行速度和少占据的内存。
到目前为止,在Apple平台X86和ARM上广泛使用了两个主要架构。在使用ARM组装语言的移动设备中,这主要是因为ARM是一个减少的指令集计算(RISC)体系结构,具有低功耗优势。当Mac OS之类的桌面平台时,使用X86体系结构。 iOS模拟器上安装的应用程序实际上是在模拟器内部作为Mac OS应用程序运行,这意味着模拟器像容器一样工作。由于我们的案件在iOS模拟器中进行了调试,因此主要的研究目标是X86组装语言。
x86汇编语言演变成两个语法分支:intel(x86平台文档中的原始使用)和at&t。英特尔在MS-DOS和Windows家族中占主导地位,而AT&T在Unix家族中很常见。英特尔和AT&T之间的语法有很大的差异,例如变量,恒定,寄存器的访问,间接地址和偏移。尽管它们的语法差异很大,但硬件系统是相同的,这意味着其中一个可以无缝迁移到另一个。由于XCode上使用了AT&T汇编语言,因此我们将在下面的AT&T上关注AT&T 。
请注意,Intel语法用于Hopper拆卸和IDA Pro的拆卸工具。
Belows是英特尔和AT&T之间的区别:
操作数的前缀:在AT&T语法中, %用作寄存器名称的前缀, $用作即时操作数的前缀,而在Intel中不使用前缀和直接操作数。另一个区别是添加0x作为AT&T中十六进制的前缀。下图展示了其前缀之间的区别:
| AT&T | 英特尔 |
|---|---|
| movq%rax,%rbx | MOV RBX,RAX |
| addq $ 0x10,%rsp | 添加RSP,010H |
在英特尔语法中,
h后缀用于十六进制操作数,b后缀用于二元操作数。
操作数:在AT&T语法中,第一个操作数是源操作数,第二操作数是目标操作数。但是,在英特尔语法中,操作数的顺序相反。从这一点开始,根据我们的阅读习惯,AT&T的语法对我们来说更舒适。
地址模式:与英特尔语法进行比较,很难读取AT&T的间接地址模式。但是,地址计算的算法相同: address = disp + base + index * scale 。 base代表基地地址, disp代表偏移地址, index * scale确定元素的位置, scale是元素的大小,元素的大小只能是两个元素。 disp/base/index/scale都是可选的, index的默认值为0,而scale的默认值为1。现在,让我们查看地址计算的指令: %segreg: disp(base,index,scale) for at&t for at&t和segreg: [base+index*scale+disp] 。实际上,上面的两个说明都属于段地址模式。 segreg代表段寄存器,当CPU的数字能力超过寄存器'数字时,通常以实际模式使用。例如,CPU可以解决20位空间,但寄存器只有16位。要实现20位空间,需要使用另一种寻址模式: segreg:offset 。使用此地址模式,偏移地址将为segreg * 16 + offset ,但比平面内存模式更为复杂。在保护模式下,该地址在线性地址空间下,这意味着可以忽略段的基础地址。
| AT&T | 英特尔 |
|---|---|
| MOVQ 0XB57751(%RIP),%RSI | MOV RSI,QWORD PTR [RIP+0xB57751H] |
| Leaq(%RAX,%RBX,8),%rdi | lea rdi,qword ptr [rax+rbx*8] |
如果立即操作数在
disp或scale的位置,则可以省略$。在英特尔语法中,需要在内存操作数之前添加byte ptr,word ptr,dword ptr和qword ptr。
opcode的后缀:在AT&T语法中,所有Opcodes都有一个后缀来指定大小。通常有四种后缀: b , w , l和q b表示8位字节, w表示16位单词, l表示32位双词。 32位数字也称为长达16位的长词。 q代表64位四词。下图说明了AT&T和Intel中数据过渡指令(MOV)的语法。
| AT&T | 英特尔 |
|---|---|
| movb%al,%bl | MOV BL,AL |
| movw%ax,%bx | mov bx,斧头 |
| movl%eax,%ebx | MOV EBX,EAX |
| movq%rax,%rbx | MOV RBX,RAX |
如我们所知,内存用于存储CPU的指令和数据。内存本质上是字节数组。尽管内存访问的速度非常快,但我们仍然需要一个较小,更快的存储单元来加快CPU的指令执行,这是注册。在执行指令期间,所有数据均临时存储在寄存器中。这就是为什么登记为命名的原因。
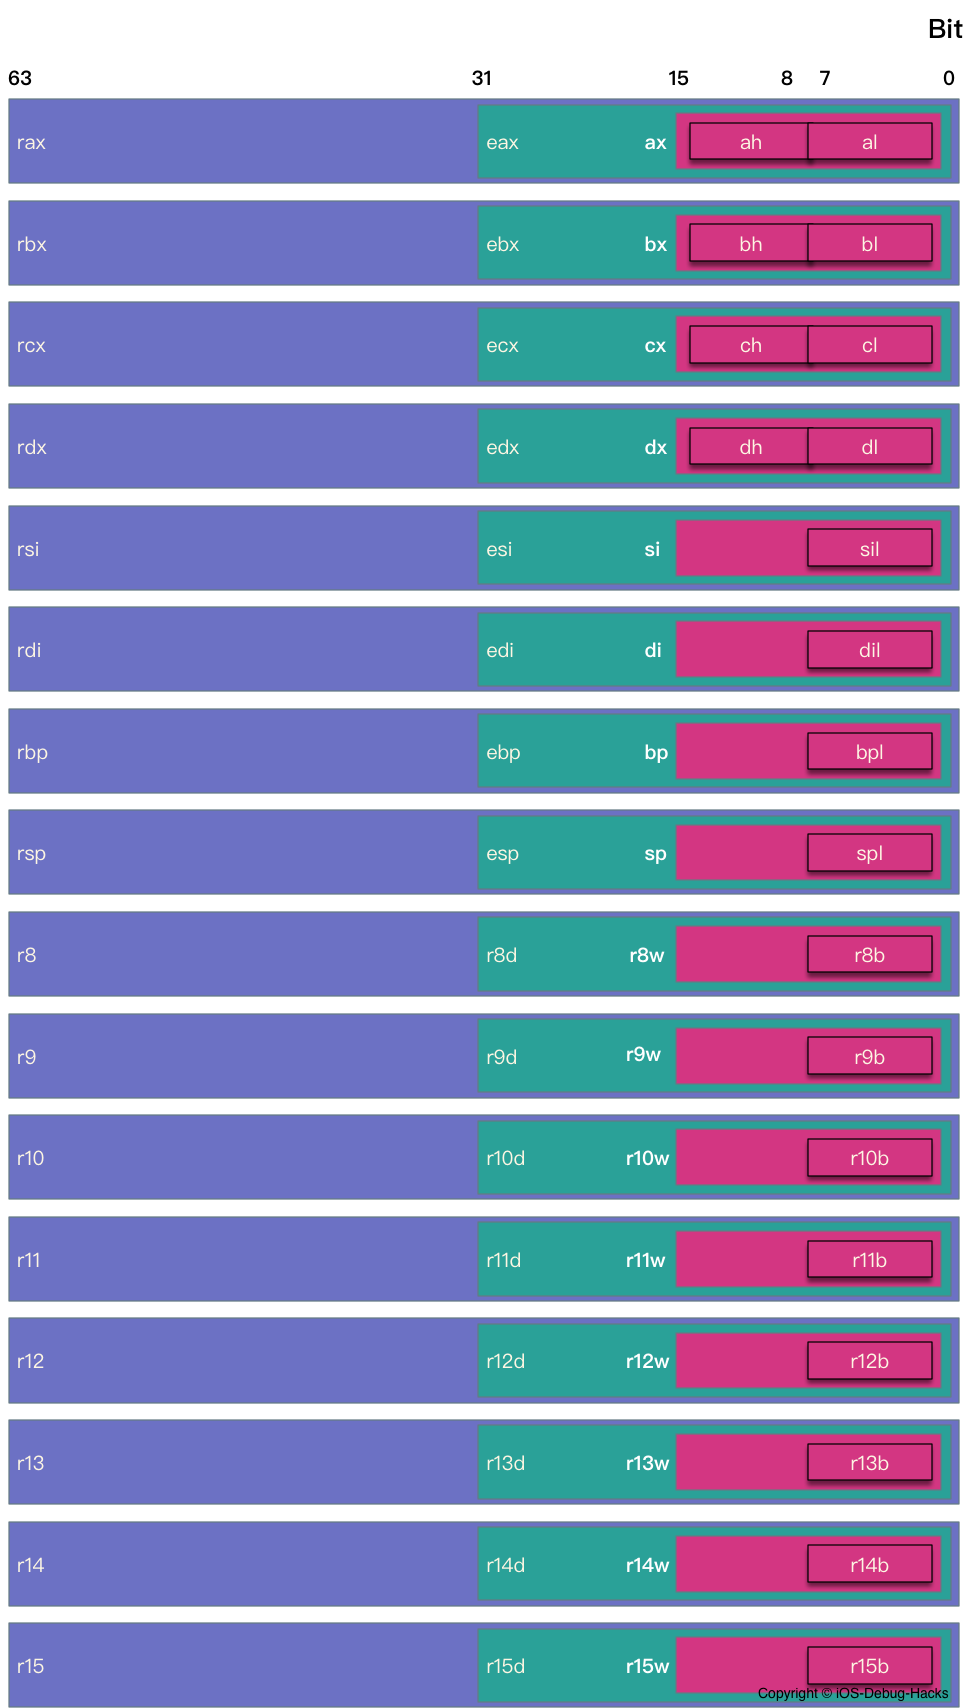
当处理器从16位增长到32位时,也将8个寄存器扩展到32位。之后,当使用扩展寄存器时,将E前缀添加到原始寄存器名称中。 32位处理器是英特尔体系结构32位,即IA32。如今,主要处理器是64位Intel体系结构,该体系结构从IA32扩展,称为X86-64。由于IA32已经过去,因此本文仅关注X86-64。请注意,在X86-64中,寄存器的数量从8延长到16。仅仅因为该扩展名,程序状态可以存储在寄存器中而不是堆栈中。因此,内存访问的频率大大降低。
在X86-64中,有16位64位的通用寄存器和16个浮动指针登记册。此外,CPU还有另外一个64位指令指针寄存器称为rip 。它旨在存储下一个执行指令的地址。还有其他一些未被广泛使用的寄存器,我们不打算在本文中谈论它们。在16个通用寄存器中,其中8个来自IA32:RAX,rcx,rdx rbx rbx rsi rsi rdi rdi rdi rsp和rbp。由于X86-64为R8 -R15,其他八个通用寄存器是新添加的。 16个浮动寄存器为XMM0 -XMM15。
当前的CPU为8088,该寄存器也从16位扩展到32位,最后延伸到64位。因此,该程序仍然可以访问寄存器的低8位或16位或32位。
下图说明了x86-64的16个一般寄存器:
在LLDB中使用register read命令可以将当前堆栈帧的寄存器数据转储。
例如,我们可以使用以下命令在寄存器中显示所有数据:
register read -a or register read --all
 General Purpose Registers:
       rax = 0x00007ff8b680c8c0
       rbx = 0x00007ff8b456fe30
       rcx = 0x00007ff8b6804330
       rdx = 0x00007ff8b6804330
       rdi = 0x00007ff8b456fe30
       rsi = 0x000000010cba6309  "initWithTask:delegate:delegateQueue:"
       rbp = 0x000070000f1bcc90
       rsp = 0x000070000f1bcc18
        r8 = 0x00007ff8b680c8c0
        r9 = 0x00000000ffff0000
       r10 = 0x00e6f00100e6f080
       r11 = 0x000000010ca13306  CFNetwork`-[__NSCFURLLocalSessionConnection initWithTask:delegate:delegateQueue:]
       r12 = 0x00007ff8b4687c70
       r13 = 0x000000010a051800  libobjc.A.dylib`objc_msgSend
       r14 = 0x00007ff8b4433bd0
       r15 = 0x00007ff8b6804330
       rip = 0x000000010ca13306  CFNetwork`-[__NSCFURLLocalSessionConnection initWithTask:delegate:delegateQueue:]
    rflags = 0x0000000000000246
        cs = 0x000000000000002b
        fs = 0x0000000000000000
        gs = 0x0000000000000000
       eax = 0xb680c8c0
       ebx = 0xb456fe30
       ecx = 0xb6804330
       edx = 0xb6804330
       edi = 0xb456fe30
       esi = 0x0cba6309
       ebp = 0x0f1bcc90
       esp = 0x0f1bcc18
       r8d = 0xb680c8c0
       r9d = 0xffff0000
      r10d = 0x00e6f080
      r11d = 0x0ca13306
      r12d = 0xb4687c70
      r13d = 0x0a051800
      r14d = 0xb4433bd0
      r15d = 0xb6804330
        ax = 0xc8c0
        bx = 0xfe30
        cx = 0x4330
        dx = 0x4330
        di = 0xfe30
        si = 0x6309
        bp = 0xcc90
        sp = 0xcc18
       r8w = 0xc8c0
       r9w = 0x0000
      r10w = 0xf080
      r11w = 0x3306
      r12w = 0x7c70
      r13w = 0x1800
      r14w = 0x3bd0
      r15w = 0x4330
        ah = 0xc8
        bh = 0xfe
        ch = 0x43
        dh = 0x43
        al = 0xc0
        bl = 0x30
        cl = 0x30
        dl = 0x30
       dil = 0x30
       sil = 0x09
       bpl = 0x90
       spl = 0x18
       r8l = 0xc0
       r9l = 0x00
      r10l = 0x80
      r11l = 0x06
      r12l = 0x70
      r13l = 0x00
      r14l = 0xd0
      r15l = 0x30

Floating Point Registers:
     fctrl = 0x037f
     fstat = 0x0000
      ftag = 0x00
       fop = 0x0000
     fioff = 0x00000000
     fiseg = 0x0000
     fooff = 0x00000000
     foseg = 0x0000
     mxcsr = 0x00001fa1
  mxcsrmask = 0x0000ffff
     stmm0 = {0x00 0x00 0x00 0x00 0x00 0x00 0x00 0x00 0xff 0xff}
     stmm1 = {0x00 0x01 0x00 0x00 0x00 0x00 0x00 0x00 0xff 0xff}
     stmm2 = {0x00 0x00 0x00 0x00 0x00 0x00 0x00 0x00 0x00 0x00}
     stmm3 = {0x00 0x00 0x00 0x00 0x00 0x00 0x00 0x00 0x00 0x00}
     stmm4 = {0x00 0x00 0x00 0x00 0x00 0x00 0xbc 0x87 0x0b 0xc0}
     stmm5 = {0x00 0x00 0x00 0x00 0x00 0x00 0x00 0x00 0x00 0x00}
     stmm6 = {0x00 0x00 0x00 0x00 0x00 0x00 0x78 0xbb 0x0b 0x40}
     stmm7 = {0x00 0x00 0x00 0x00 0x00 0x00 0x00 0x00 0x00 0x00}
      ymm0 = {0x00 0x00 0x00 0x00 0x00 0x00 0x00 0x00 0x00 0x00 0x00 0x00 0x00 0x00 0x00 0x00 0x00 0x00 0x00 0x00 0x00 0x00 0x00 0x00 0x00 0x00 0x00 0x00 0x00 0x00 0x00 0x00}
      ymm1 = {0x00 0x00 0x00 0x00 0x00 0x00 0x00 0x00 0x00 0x00 0x00 0x00 0x00 0x00 0x00 0x00 0x00 0x00 0x00 0x00 0x00 0x00 0x00 0x00 0x00 0x00 0x00 0x00 0x00 0x00 0x00 0x00}
      ymm2 = {0x00 0x00 0x00 0x00 0x00 0x00 0x00 0x00 0x00 0x00 0x00 0x00 0x00 0x00 0x00 0x00 0x00 0x00 0x00 0x00 0x00 0x00 0x00 0x00 0x00 0x00 0x00 0x00 0x00 0x00 0x00 0x00}
      ymm3 = {0x00 0x00 0x00 0x00 0x00 0x00 0x00 0x00 0x00 0x00 0x00 0x00 0x00 0x00 0x00 0x00 0x00 0x00 0x00 0x00 0x00 0x00 0x00 0x00 0x00 0x00 0x00 0x00 0x00 0x00 0x00 0x00}
      ymm4 = {0x00 0x00 0x00 0x00 0x00 0x00 0x00 0x00 0x00 0x00 0x00 0x00 0x00 0x00 0x00 0x00 0x00 0x00 0x00 0x00 0x00 0x00 0x00 0x00 0x00 0x00 0x00 0x00 0x00 0x00 0x00 0x00}
      ymm5 = {0x00 0x00 0x00 0x00 0x00 0x00 0x00 0x00 0x00 0x00 0x00 0x00 0x00 0x00 0x00 0x00 0x00 0x00 0x00 0x00 0x00 0x00 0x00 0x00 0x00 0x00 0x00 0x00 0x00 0x00 0x00 0x00}
      ymm6 = {0x00 0x00 0x00 0x00 0x00 0x00 0x00 0x00 0x00 0x00 0x00 0x00 0x00 0x00 0x00 0x00 0x00 0x00 0x00 0x00 0x00 0x00 0x00 0x00 0x00 0x00 0x00 0x00 0x00 0x00 0x00 0x00}
      ymm7 = {0x00 0x00 0x00 0x00 0x00 0x00 0x00 0x00 0x00 0x00 0x00 0x00 0x00 0x00 0x00 0x00 0x00 0x00 0x00 0x00 0x00 0x00 0x00 0x00 0x00 0x00 0x00 0x00 0x00 0x00 0x00 0x00}
      ymm8 = {0x00 0x00 0x00 0x00 0x00 0x00 0x00 0x00 0x00 0x00 0x00 0x00 0x00 0x00 0x00 0x00 0x00 0x00 0x00 0x00 0x00 0x00 0x00 0x00 0x00 0x00 0x00 0x00 0x00 0x00 0x00 0x00}
      ymm9 = {0x00 0x00 0x00 0x00 0x00 0x00 0x00 0x00 0x00 0x00 0x00 0x00 0x00 0x00 0x00 0x00 0x00 0x00 0x00 0x00 0x00 0x00 0x00 0x00 0x00 0x00 0x00 0x00 0x00 0x00 0x00 0x00}
     ymm10 = {0x00 0x00 0x00 0x00 0x00 0x00 0x00 0x00 0x00 0x00 0x00 0x00 0x00 0x00 0x00 0x00 0x00 0x00 0x00 0x00 0x00 0x00 0x00 0x00 0x00 0x00 0x00 0x00 0x00 0x00 0x00 0x00}
     ymm11 = {0x00 0x00 0x00 0x00 0x00 0x00 0x00 0x00 0x00 0x00 0x00 0x00 0x00 0x00 0x00 0x00 0x00 0x00 0x00 0x00 0x00 0x00 0x00 0x00 0x00 0x00 0x00 0x00 0x00 0x00 0x00 0x00}
     ymm12 = {0x00 0x00 0x00 0x00 0x00 0x00 0x00 0x00 0x00 0x00 0x00 0x00 0x00 0x00 0x00 0x00 0x00 0x00 0x00 0x00 0x00 0x00 0x00 0x00 0x00 0x00 0x00 0x00 0x00 0x00 0x00 0x00}
     ymm13 = {0x00 0x00 0x00 0x00 0x00 0x00 0x00 0x00 0x00 0x00 0x00 0x00 0x00 0x00 0x00 0x00 0x00 0x00 0x00 0x00 0x00 0x00 0x00 0x00 0x00 0x00 0x00 0x00 0x00 0x00 0x00 0x00}
     ymm14 = {0x00 0x00 0x00 0x00 0x00 0x00 0x00 0x00 0x00 0x00 0x00 0x00 0x00 0x00 0x00 0x00 0x00 0x00 0x00 0x00 0x00 0x00 0x00 0x00 0x00 0x00 0x00 0x00 0x00 0x00 0x00 0x00}
     ymm15 = {0x00 0x00 0x00 0x00 0x00 0x00 0x00 0x00 0x00 0x00 0x00 0x00 0x00 0x00 0x00 0x00 0x00 0x00 0x00 0x00 0x00 0x00 0x00 0x00 0x00 0x00 0x00 0x00 0x00 0x00 0x00 0x00}
      xmm0 = {0x00 0x00 0x00 0x00 0x00 0x00 0x00 0x00 0x00 0x00 0x00 0x00 0x00 0x00 0x00 0x00}
      xmm1 = {0x00 0x00 0x00 0x00 0x00 0x00 0x00 0x00 0x00 0x00 0x00 0x00 0x00 0x00 0x00 0x00}
      xmm2 = {0x00 0x00 0x00 0x00 0x00 0x00 0x00 0x00 0x00 0x00 0x00 0x00 0x00 0x00 0x00 0x00}
      xmm3 = {0x00 0x00 0x00 0x00 0x00 0x00 0x00 0x00 0x00 0x00 0x00 0x00 0x00 0x00 0x00 0x00}
      xmm4 = {0x00 0x00 0x00 0x00 0x00 0x00 0x00 0x00 0x00 0x00 0x00 0x00 0x00 0x00 0x00 0x00}
      xmm5 = {0x00 0x00 0x00 0x00 0x00 0x00 0x00 0x00 0x00 0x00 0x00 0x00 0x00 0x00 0x00 0x00}
      xmm6 = {0x00 0x00 0x00 0x00 0x00 0x00 0x00 0x00 0x00 0x00 0x00 0x00 0x00 0x00 0x00 0x00}
      xmm7 = {0x00 0x00 0x00 0x00 0x00 0x00 0x00 0x00 0x00 0x00 0x00 0x00 0x00 0x00 0x00 0x00}
      xmm8 = {0x00 0x00 0x00 0x00 0x00 0x00 0x00 0x00 0x00 0x00 0x00 0x00 0x00 0x00 0x00 0x00}
      xmm9 = {0x00 0x00 0x00 0x00 0x00 0x00 0x00 0x00 0x00 0x00 0x00 0x00 0x00 0x00 0x00 0x00}
     xmm10 = {0x00 0x00 0x00 0x00 0x00 0x00 0x00 0x00 0x00 0x00 0x00 0x00 0x00 0x00 0x00 0x00}
     xmm11 = {0x00 0x00 0x00 0x00 0x00 0x00 0x00 0x00 0x00 0x00 0x00 0x00 0x00 0x00 0x00 0x00}
     xmm12 = {0x00 0x00 0x00 0x00 0x00 0x00 0x00 0x00 0x00 0x00 0x00 0x00 0x00 0x00 0x00 0x00}
     xmm13 = {0x00 0x00 0x00 0x00 0x00 0x00 0x00 0x00 0x00 0x00 0x00 0x00 0x00 0x00 0x00 0x00}
     xmm14 = {0x00 0x00 0x00 0x00 0x00 0x00 0x00 0x00 0x00 0x00 0x00 0x00 0x00 0x00 0x00 0x00}
     xmm15 = {0x00 0x00 0x00 0x00 0x00 0x00 0x00 0x00 0x00 0x00 0x00 0x00 0x00 0x00 0x00 0x00}

Exception State Registers:
    trapno = 0x00000003
       err = 0x00000000
  faultvaddr = 0x000000010bb91000
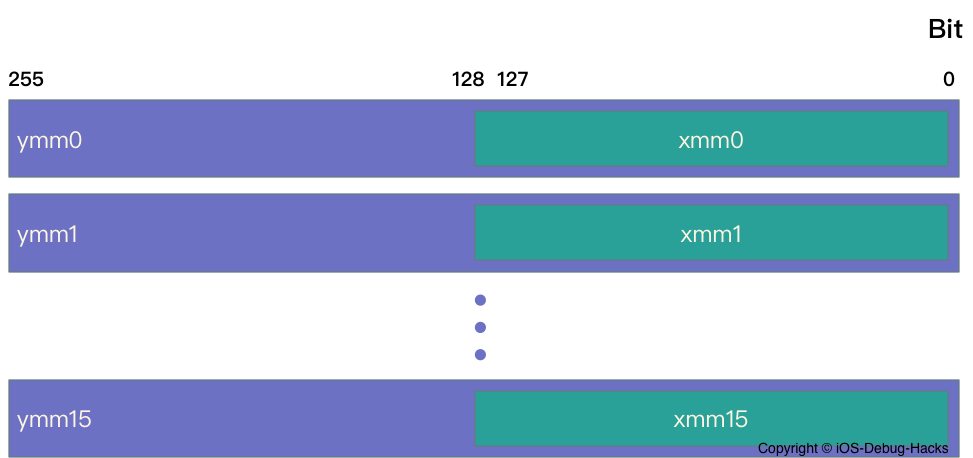
如我们所知,X86-64中有16个浮动指针寄存器:XMM0 -XMM15。实际上,还有其他一些细节。在register read -a命令的输出中,您可能会注意到除XMM寄存器组外,还有STMM和YMM寄存器。 STMM是ST寄存器的别名,ST是X86中FPU(浮点数单元)的寄存器,以处理浮动数据。 FPU包含一个浮点指针寄存器,该寄存器具有8个80位浮动指针寄存器:ST0 -ST7。我们可以观察到STMM寄存器的输出为80位,这可以证明STMM寄存器是ST寄存器。 XMM为128位寄存器,YMM寄存器为256位,是XMM的扩展名。实际上,XMM寄存器是YMM寄存器的低128位。像EAX寄存器一样,是RAX寄存器的低32位。在奔腾III中,英特尔发布了一个名为SSE(流simd扩展)的指令集,该指令是MMX的扩展。 SSE中添加了八个新的128位寄存器(XMM0 -XMM7)。 AVX(高级向量扩展)指令集是SSE的扩展架构。同样在AVX中,将128位寄存器XMM扩展到256位寄存器YMM。
函数调用包括参数传递和控制从一个汇编单元到另一个汇编单元的传输。在功能调用过程中,数据传递,局部变量分配和释放由Stack执行。分配给单个功能调用的堆栈称为堆栈帧。
OS X X86-64的函数呼叫约定与文章中描述的约定相同:System V Application二进制接口AMD64架构处理器补充。因此,如果您对此感兴趣,可以参考它。
在LLDB调试期间,我们可以使用bt命令打印当前线程的堆栈跟踪,如下:
 (lldb) bt
* thread #1, queue = 'com.apple.main-thread', stop reason = breakpoint 1.1
  * frame #0: 0x00000001054e09d4 TestDemo`-[ViewController viewDidLoad](self=0x00007fd349558950, _cmd="viewDidLoad") at ViewController.m:18
    frame #1: 0x00000001064a6931 UIKit`-[UIViewController loadViewIfRequired] + 1344
    frame #2: 0x00000001064a6c7d UIKit`-[UIViewController view] + 27
    frame #3: 0x00000001063840c0 UIKit`-[UIWindow addRootViewControllerViewIfPossible] + 61
    // many other frames are ommitted here
实际上, bt命令在堆栈框架上是可行的。堆栈框架保留了函数的返回地址和本地变量,这些函数可以看作是函数执行的上下文。众所周知,堆堆积在上升,而堆栈向下生长,这是从数量的记忆地址到小编号的记忆地址。调用函数后,为函数调用分配了一个独立的堆栈帧。 RBP寄存器(称为帧指针)总是指向最新分配的堆栈框架(高地址)的末尾。 RSP寄存器(称为堆栈指针)总是指向最新分配的堆栈框架(低地址)的顶部。以下是框架堆栈的图表:
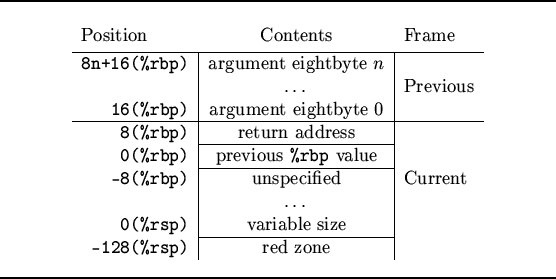
左列Position是使用间接地址模式的内存地址。 Content是地址在Position点上的值。根据上图中堆栈框架的结构,函数调用过程可以描述为以下几个步骤:
步骤2和3实际上属于call指令。此外,步骤4和步骤5可以在汇编指令中描述如下:
 TestDemo`-[ViewController viewDidLoad]:
    0x1054e09c0 <+0>:  pushq  %rbp //step 4
    0x1054e09c1 <+1>:  movq   %rsp, %rbp //step 5
很容易注意到,这两个步骤都与每个函数调用一起。上图有另一个细节:RSP寄存器下方有一个红色区域,该区域被ABI称为红色区域。它是保留的,不得通过信号或中断处理程序进行修改。因此,由于可以在函数调用过程中对其进行修改,因此,叶功能函数,这意味着那些从未调用其他功能的函数可以将此区域用于临时数据。
 UIKit`-[UIViewController loadViewIfRequired]:
    0x1064a63f1 <+0>:    pushq  %rbp
    0x1064a63f2 <+1>:    movq   %rsp, %rbp
    0x1064a63f5 <+4>:    pushq  %r15
    0x1064a63f7 <+6>:    pushq  %r14
    0x1064a63f9 <+8>:    pushq  %r13
    0x1064a63fb <+10>:   pushq  %r12
    0x1064a63fd <+12>:   pushq  %rbx
在上面的说明中,从0x1064a63f5到0x1064a63fd的说明属于步骤6。有一种称为函数保存寄存器的寄存器,这意味着它们属于呼叫函数,但需要调用函数才能保留其值。从下面的汇编说明中,我们可以看到RBX,RSP和R12 -R15都属于此类寄存器。
    0x1064a6c4b <+2138>: addq   $0x1f8, %rsp              ; imm = 0x1F8
    0x1064a6c52 <+2145>: popq   %rbx
    0x1064a6c53 <+2146>: popq   %r12
    0x1064a6c55 <+2148>: popq   %r13
    0x1064a6c57 <+2150>: popq   %r14
    0x1064a6c59 <+2152>: popq   %r15
    0x1064a6c5b <+2154>: popq   %rbp
    0x1064a6c5c <+2155>: retq
    0x1064a6c5d <+2156>: callq  0x106d69e9c               ; symbol stub for: __stack_chk_fail
调用函数的指令是call ,请参阅以下:
call function
参数中的function是文本段中的过程。 Call指令可以分为两个步骤。第一步是在堆栈上推开call指令的下一个指令地址。在这里,下一个地址实际上是在调用函数完成后的返回地址。第二步是跳到function 。 call指令等同于以下两个说明:
 push next_instruction
jmp  function
以下是iOS模拟器中call指令的示例:
    0x10915c714 <+68>:  callq  0x1093ca502               ; symbol stub for: objc_msgSend
    0x105206433 <+66>:  callq  *0xb3cd47(%rip)           ; (void *)0x000000010475e800: objc_msgSend
上面的代码显示了两种call指令的用法。在第一个用法中,操作数是一个内存地址,它实际上是Mach-O文件的符号存根。它可以通过动态链接器搜索函数的符号。在第二次用法中,实际上是通过间接地址模式获得的操作数。此外,在AT&T语法中,需要将“跳/呼叫指令(或与程序员计数器相关的跳跃)中的直接操作数*添加到前缀中。
通常, ret指令用于将过程从调用函数返回到调用函数。该指令从堆栈顶部弹出地址,然后跳回该地址并继续执行。在上面的示例中,它跳回next_instruction 。在执行ret指令之前,寄存器属于调用功能。在函数调用过程的步骤6中已经提到了这一点。
大多数功能都具有可以是整数,浮点,指针等的参数。此外,函数通常具有返回值,可以表明执行结果是成功或失败的。在OSX中,最多可以通过RDI,RSI,RDX,RCX,R8和R9的寄存器传递。超过6个参数的函数怎么样?当然,这种情况存在。如果发生这种情况,则可以使用堆栈以相反的顺序保留其余参数。 OSX具有八个浮点寄存器,可允许超过8个浮点参数。
关于函数的返回值, rax寄存器用于保存整数返回值。如果返回值为浮点,则应使用XMM0 -XMM1寄存器。下图清楚地说明了函数调用期间的寄存器使用情况。

preserved across function calls表示是否需要在函数调用中保存寄存器。我们可以看到,除了上述RBX,R12 -R15寄存器之外,RSP和RBP寄存器也属于Callee Saved寄存器。这是因为这两个寄存器保留了指向程序堆栈的重要位置指针。
接下来,我们将按照一个真实的示例来说明函数调用中的说明。以CocoaLumberjack中的宏DDLogError为例。当调用此宏时,类方法log:level:flag:context:file:function:line:tag:format:被调用。以下代码和说明是关于DDLogError的呼叫和相应的汇编说明:
 - (IBAction)test:(id)sender {
    DDLogError(@"TestDDLog:%@", sender);
}
    0x102c568a3 <+99>:  xorl   %edx, %edx
    0x102c568a5 <+101>: movl   $0x1, %eax
    0x102c568aa <+106>: movl   %eax, %r8d
    0x102c568ad <+109>: xorl   %eax, %eax
    0x102c568af <+111>: movl   %eax, %r9d
    0x102c568b2 <+114>: leaq   0x2a016(%rip), %rcx       ; "/Users/dev-aozhimin/Desktop/TestDDLog/TestDDLog/ViewController.m"
    0x102c568b9 <+121>: leaq   0x2a050(%rip), %rsi       ; "-[ViewController test:]"
    0x102c568c0 <+128>: movl   $0x22, %eax
    0x102c568c5 <+133>: movl   %eax, %edi
    0x102c568c7 <+135>: leaq   0x2dce2(%rip), %r10       ; @"eTestDDLog:%@"
    0x102c568ce <+142>: movq   0x33adb(%rip), %r11       ; (void *)0x0000000102c8ad18: DDLog
    0x102c568d5 <+149>: movq   0x34694(%rip), %rbx       ; ddLogLevel
    0x102c568dc <+156>: movq   -0x30(%rbp), %r14
    0x102c568e0 <+160>: movq   0x332f9(%rip), %r15       ; "log:level:flag:context:file:function:line:tag:format:"
    0x102c568e7 <+167>: movq   %rdi, -0x48(%rbp)
    0x102c568eb <+171>: movq   %r11, %rdi
    0x102c568ee <+174>: movq   %rsi, -0x50(%rbp)
    0x102c568f2 <+178>: movq   %r15, %rsi
    0x102c568f5 <+181>: movq   %rcx, -0x58(%rbp)
    0x102c568f9 <+185>: movq   %rbx, %rcx
    0x102c568fc <+188>: movq   -0x58(%rbp), %r11
    0x102c56900 <+192>: movq   %r11, (%rsp)
    0x102c56904 <+196>: movq   -0x50(%rbp), %rbx
    0x102c56908 <+200>: movq   %rbx, 0x8(%rsp)
    0x102c5690d <+205>: movq   $0x22, 0x10(%rsp)
    0x102c56916 <+214>: movq   $0x0, 0x18(%rsp)
    0x102c5691f <+223>: movq   %r10, 0x20(%rsp)
    0x102c56924 <+228>: movq   %r14, 0x28(%rsp)
    0x102c56929 <+233>: movb   $0x0, %al
    0x102c5692b <+235>: callq  0x102c7d2be               ; symbol stub for: objc_msgSend
由于Objective-C的所有功能都将变成objc_msgSend函数的调用,因此log:level:flag:context:file:function:line:tag:format:方法最终变成以下代码:
objc_msgSend(DDLog, @selector(log:level:flag:context:file:function:line:tag:format:), asynchronous, level, flag, context, file, function, line, tag, format, sender)
我们已经提到最多6个寄存器可以用于参数传递。多余的参数可以使用堆栈进行通过。由于以上函数具有6个以上的参数,因此参数传递将同时使用寄存器和堆栈。下面有两个表描述寄存器的详细用法和堆栈,以通过DDLogError函数调用的参数传递。
| 一般登记册 | 价值 | 参数 | 组装说明 | 评论 |
|---|---|---|---|---|
| rdi | ddlog | 自己 | 0x102C568EB <+171>:MOVQ%R11,%rdi | |
| RSI | “日志:级别:标志:上下文:文件:函数:line:tag:格式:” | OP | 0x102C568F2 <+178>:MOVQ%R15,%RSI | |
| RDX | 0 | 异步 | 0x102C568A3 <+99>:XORL%EDX,%EDX | Xorl是独家或操作。在这里,它用于清除EDX寄存器 |
| rcx | 18446744073709551615 | 等级 | 0x102C568F9 <+185>:movq%rbx,%rcx | (ddloglevelall或nsuintegermax) |
| R8 | 1 | 旗帜 | 0x102C568AA <+106>:movl%eax,%r8d | ddlogflagerror |
| R9 | 0 | 语境 | 0x102C568AF <+111>:movl%eax,%r9d |
| 堆栈框架偏移 | 价值 | 参数 | 组装说明 | 评论 |
|---|---|---|---|---|
| (%RSP) | “ /users/dev-aozhimin/desktop/testddlog/testddlog/viewcontroller.m” | 文件 | 0x102C56900 <+192>:MOVQ%R11,(%RSP) | |
| 0x8(%RSP) | “ - [ViewController测试:]” | 功能 | 0x102C56908 <+200>:MOVQ%RBX,0x8(%RSP) | |
| 0x10(%RSP) | 0x22 | 线 | 0x102C5690D <+205>:MOVQ $ 0x22,0x10(%RSP) | Ddlogerror的相应调用在第34行 |
| 0x18(%RSP) | 0x0 | 标签 | 0x102C56916 <+214>:MOVQ $ 0x0,0x18(%RSP) | 零 |
| 0x20(%RSP) | “ testddlog:%@” | 格式 | 0x102C5691F <+223>:MOVQ%R10,0x20(%RSP) | |
| 0x28(%RSP) | 发件人 | 可变参数的第一个参数 | 0x102C56924 <+228>:MOVQ%R14,0x28(%RSP) | Uibutton的实例 |
如果寄存器的值是字符串,例如
rsi寄存器中的op参数,则可以通过po (char *) $rsi命令在LLDB中直接打印字符串。否则,po $rsi可用于以整数格式打印值。
在汇编语言的帮助下,我们可以研究一些低级知识,这些知识在调试过程中非常必要。我非常努力地介绍与集会相关的知识。但是,集会的知识层次结构太大了,无法在一篇文章中描述。请参考上述参考文献。此外,也强烈建议使用CSAPP的第三章 - 机器级别表示。这是一种罕见的好材料。
本文说明了通过真实情况调试的过程。一些细节已更改以保护个人隐私。
当我开发登录SDK时,我们要谈论的问题正在发生。一位用户声称该应用在登录页面中按了“ QQ”按钮时崩溃了。当我们讨论此问题时,我们发现如果未安装QQ应用程序,则发生了崩溃。当用户按QQ按钮需要登录时,QQ登录SDK试图在我们的应用程序中启动授权网页。在这种情况下,出现未认可的选择器错误[TCWebViewController setRequestURLStr:] 。
PS:要关注这个问题,下面未列出不必要的业务调试信息。同时, Aadebug用作我们的应用程序名称。
这是此崩溃的堆栈痕迹:
 Terminating app due to uncaught exception 'NSInvalidArgumentException', reason: '-[TCWebViewController setRequestURLStr:]: unrecognized selector sent to instance 0x7fe25bd84f90'
*** First throw call stack:
(
	0   CoreFoundation                      0x0000000112ce4f65 __exceptionPreprocess + 165
	1   libobjc.A.dylib                     0x00000001125f7deb objc_exception_throw + 48
	2   CoreFoundation                      0x0000000112ced58d -[NSObject(NSObject) doesNotRecognizeSelector:] + 205
	3   AADebug                             0x0000000108cffefc __ASPECTS_ARE_BEING_CALLED__ + 6172
	4   CoreFoundation                      0x0000000112c3ad97 ___forwarding___ + 487
	5   CoreFoundation                      0x0000000112c3ab28 _CF_forwarding_prep_0 + 120
	6   AADebug                             0x000000010a663100 -[TCWebViewKit open] + 387
	7   AADebug                             0x000000010a6608d0 -[TCLoginViewKit loadReqURL:webTitle:delegate:] + 175
	8   AADebug                             0x000000010a660810 -[TCLoginViewKit openWithExtraParams:] + 729
	9   AADebug                             0x000000010a66c45e -[TencentOAuth authorizeWithTencentAppAuthInSafari:permissions:andExtraParams:delegate:] + 701
	10  AADebug                             0x000000010a66d433 -[TencentOAuth authorizeWithPermissions:andExtraParams:delegate:inSafari:] + 564
………………………………………………………………………………………………………………………………………………………………………………………………………………………………………………………………………………………………………………………………………………………………………………………………

Lines of irrelevant information are removed here

………………………………………………………………………………………………………………………………………………………………………………………………………………………………………………………………………………………………………………………………………………………………………………………………
236
14  libdispatch.dylib                   0x0000000113e28ef9 _dispatch_call_block_and_release + 12
	15  libdispatch.dylib                   0x0000000113e4949b _dispatch_client_callout + 8
	16  libdispatch.dylib                   0x0000000113e3134b _dispatch_main_queue_callback_4CF + 1738
	17  CoreFoundation                      0x0000000112c453e9 __CFRUNLOOP_IS_SERVICING_THE_MAIN_DISPATCH_QUEUE__ + 9
	18  CoreFoundation                      0x0000000112c06939 __CFRunLoopRun + 2073
	19  CoreFoundation                      0x0000000112c05e98 CFRunLoopRunSpecific + 488
	20  GraphicsServices                    0x0000000114a13ad2 GSEventRunModal + 161
	21  UIKit                               0x0000000110d3f676 UIApplicationMain + 171
	22  AADebug                             0x0000000108596d3f main + 111
	23  libdyld.dylib                       0x0000000113e7d92d start + 1
)
libc++abi.dylib: terminating with uncaught exception of type NSException
在谈论调试之前,让我们熟悉Objective-C中的信息转发。众所周知,Objective-C使用消息传递结构而不是函数调用。关键区别在于,在消息结构中,运行时决定将执行哪些函数,而不是编译时间。这意味着,如果将未识别的消息发送到一个对象,则在编译时间内将不会发生任何事情。在运行时,当它收到一种不了解的方法时,一个对象会通过消息转发,该过程旨在使您作为开发人员讲述消息如何处理未知消息。
在消息转发过程中,通常涉及四种方法:
+ (BOOL)resolveInstanceMethod:(SEL)sel :当将未知消息传递给对象时,将调用此方法。此方法将选择未找到的选择器并返回布尔值,以指示现在是否可以将实例方法添加到可以处理该选择器的类中。如果课程可以处理此选择器,请返回是,则消息转发过程已完成。此方法通常用于以动态的方式访问Coredata中NSManagedObjects的@Dynamic属性。 + (BOOL)resolveClassMethod:(SEL)sel方法与上述方法相似,唯一的区别是该类方法,另一种是实例方法。
- (id)forwardingTargetForSelector:(SEL)aSelector :此方法提供了用于处理未知消息的第二个接收器,并且比forwardInvocation: 。该方法可用于模仿多个继承的某些功能。请注意,无法使用转发路径的这一部分来操纵消息。如果在发送到替换接收器之前需要更改消息,则必须使用完整的转发机制。
- (NSMethodSignature *)methodSignatureForSelector:(SEL)aSelector :如果转发算法已经到了这么远,则开始了完整的转发机制。 NSMethodSignature由此方法返回,该方法在ASElector参数中包括方法描述。请注意,如果要在消息转发过程中创建一个包含选择器,目标和参数的NSInvocation对象,则需要覆盖此方法。
- (void)forwardInvocation:(NSInvocation *)anInvocation :该方法的实现必须包含以下部分:找出可以处理andevocation消息的对象;将消息发送到该对象,AnInInvocation保存返回值,运行时将返回值发送到原始消息发送者。实际上,通过简单地更改调用目标并将其调用,我们几乎没有这样做,可以通过forwardingTargetForSelector:方法。
通常,将用于消息转发的前两种方法称为快速转发,因为它提供了一种更快的方法来进行消息转发。为了区分快速转发,方法3和4被称为正常转发或常规转发。它要慢得多,因为它必须创建NSInInvocation对象才能完成消息转发。
注意:如果未覆盖
methodSignatureForSelector方法,或者返回的NSMethodSignaturenil为零,则不会调用forwardInvocation,并且消息转发已通过do do dodoesNotRecognizeSelectorextered终止。我们可以从下面的__forwarding__函数的源代码中看到它。
消息转发过程可以通过流程图描述,请参见下文。
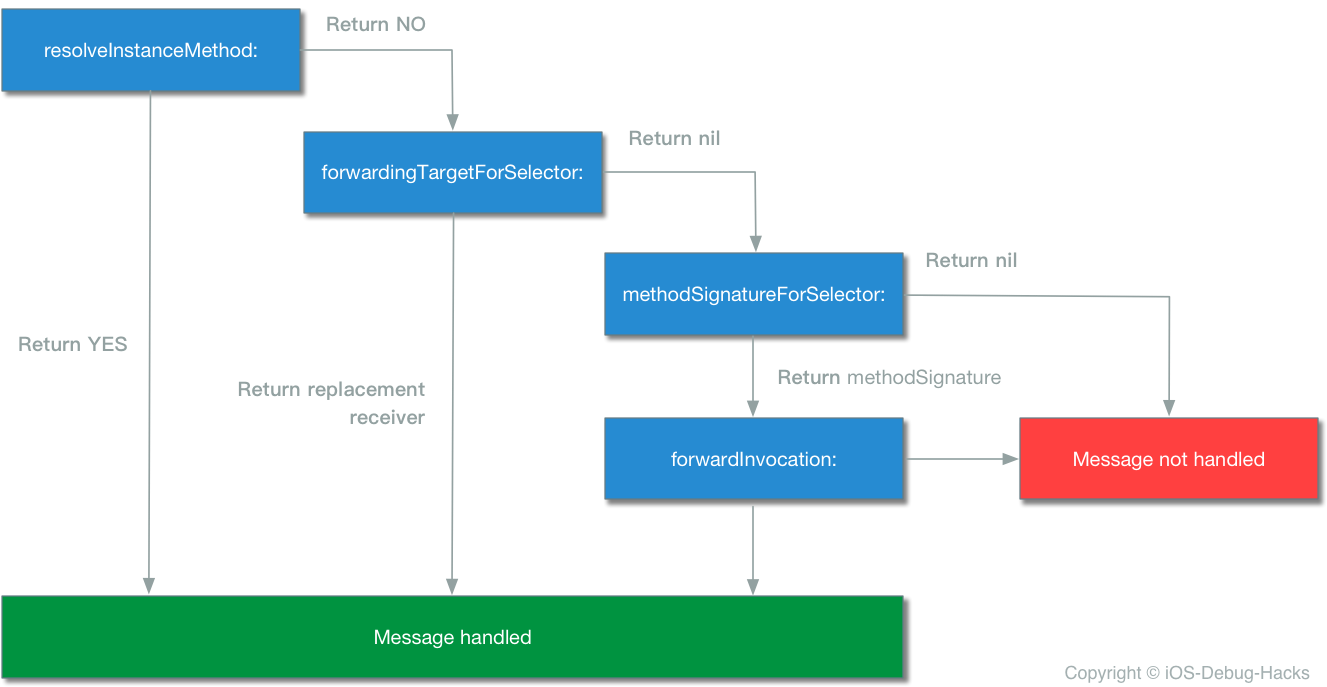
就像流程图中所述,在每个步骤中,接收器都有机会处理消息。每个步骤都比之前的步骤昂贵。最好的做法是尽早处理消息转发过程。如果通过整个过程未处理消息,则提出了doesNotRecognizeSeletor误差以说明对象无法识别选择器。
是时候完成理论部分并回到问题了。
根据Trace堆栈中的TCWebViewController信息,我们自然将其与Tencent SDK Tencentopenapi.Framework相关联,但是我们最近没有更新Tencent SDK,这意味着崩溃并不是由Tencentopenapi.framework引起的。
首先,我们对代码进行了分配,并获得了TCWebViewController类的结构
 @class TCWebViewController : UIViewController<UIWebViewDelegate, NSURLConnectionDelegate, NSURLConnectionDataDelegate> {
    @property webview
    @property webTitle
    @property requestURLStr
    @property error
    @property delegate
    @property activityIndicatorView
    @property finished
    @property theData
    @property retryCount
    @property hash
    @property superclass
    @property description
    @property debugDescription
    ivar _nloadCount
    ivar _webview
    ivar _webTitle
    ivar _requestURLStr
    ivar _error
    ivar _delegate
    ivar _xo
    ivar _activityIndicatorView
    ivar _finished
    ivar _theData
    ivar _retryCount
    -setError:
    -initWithNibName:bundle:
    -dealloc
    -stopLoad
    -doClose
    -viewDidLoad
    -loadReqURL
    -viewDidDisappear:
    -shouldAutorotateToInterfaceOrientation:
    -supportedInterfaceOrientations
    -shouldAutorotate
    -webViewDidStartLoad:
    -webViewDidFinishLoad:
    -webView:didFailLoadWithError:
    -webView:shouldStartLoadWithRequest:navigationType:
}
从静态分析结果中, requestURLStr TCWebViewController没有setter和getter方法。因为以前的应用程序中没有这样的崩溃,所以我们提出了一个想法:以动态的方式实现了TCWebViewController中的属性,该属性使用@dynamic告诉编译器在编译时间内为属性生成getter和setter在编译时间内生成getter and setter,但在运行时在运行时间中动态创建的核心数据框架框架像核心数据框架一样?然后,我们决定深入了解我们的猜测是否正确。在我们的跟踪过程中,我们发现tencentopenapi.framework中的NSObject有一个类别NSObject(MethodSwizzlingCategory) 。在此类别中,有一个方法switchMethodForCodeZipper ,其实现取代了QQmethodSignatureForSelector和forwardInvocation方法的methodSignatureForSelector和QQforwardInvocation方法。
 void +[ NSObject switchMethodForCodeZipper ]( void * self, void * _cmd) {
    rbx = self;
    objc_sync_enter (self);
    if (*( int8_t *)_g_instance == 0x0 ) {
            [ NSObject swizzleMethod: @selector ( methodSignatureForSelector: ) withMethod: @selector ( QQmethodSignatureForSelector: )];
            [ NSObject swizzleMethod: @selector ( forwardInvocation: ) withMethod: @selector ( QQforwardInvocation: )];
            *( int8_t *)_g_instance = 0x1 ;
    }
    rdi = rbx;
    objc_sync_exit (rdi);
    return ;
}然后,我们一直在跟踪QQmethodSignatureForSelector方法,其中有一个名为_AddDynamicPropertysSetterAndGetter的方法。从名称来看,我们可以轻松地获得此方法是动态添加setter和getter方法。发现的可以实质性地验证我们的原始猜测是正确的。
 void * -[ NSObject QQmethodSignatureForSelector: ]( void * self, void * _cmd, void * arg2) {
    r14 = arg2;
    rbx = self;
    rax = [ self QQmethodSignatureForSelector: rdx];
    if (rax == 0x0 ) {
            rax = sel_getName (r14);
            _AddDynamicPropertysSetterAndGetter ();
            rax = 0x0 ;
            if ( 0x0 != 0x0 ) {
                    rax = [rbx methodSignatureForSelector: r14];
            }
    }
    return rax;
}但是,为什么在TCWebViewController类中无法识别设置器?是因为在我们开发此版本期间涵盖了QQMethodSignatureForSelector方法吗?但是,即使我们在代码中无处不在,我们也找不到线索。那非常令人失望。到目前为止,静态分析已经进行。下一步是使用LLDB动态调试Tencent SDK,以找出在消息转发过程中创建Getter和Setter的路径。
如果我们尝试通过LLDB命令在
setRequestURLStr上设置断点,我们将发现我们无法做到。原因是因为在编译时间内不可用二传器。这也可以验证我们的原始猜测。
根据崩溃堆栈跟踪,我们可以得出结论setRequestURLStr在-[TCWebViewKit open]方法中,这意味着崩溃发生在Tencent SDK期间发生,检查是否已安装了QQ应用程序并打开身份验证网页进度。
然后,我们使用下面的LLDB命令在此方法上设置断点:
br s -n "-[TCWebViewKit open]"
br s是breakpoint set的缩写,-n表示根据其后的方法名称设置断点,该方法具有相同的行为,其行为具有符号断点,br s -F也可以设置断点。b -[TCWebViewKit open]也可以在这里工作,但是b这是_regexp-break的缩写,它使用正则表达式设置断点。最后,我们还可以在内存地址(例如br s -a 0x000000010940b24e上设置断点,如果可用的地址可用,它可以帮助您调试块。
到现在为止,断点已成功设置。
Breakpoint 34: where = AADebug`-[TCWebViewKit open], address = 0x0000000103157f7d
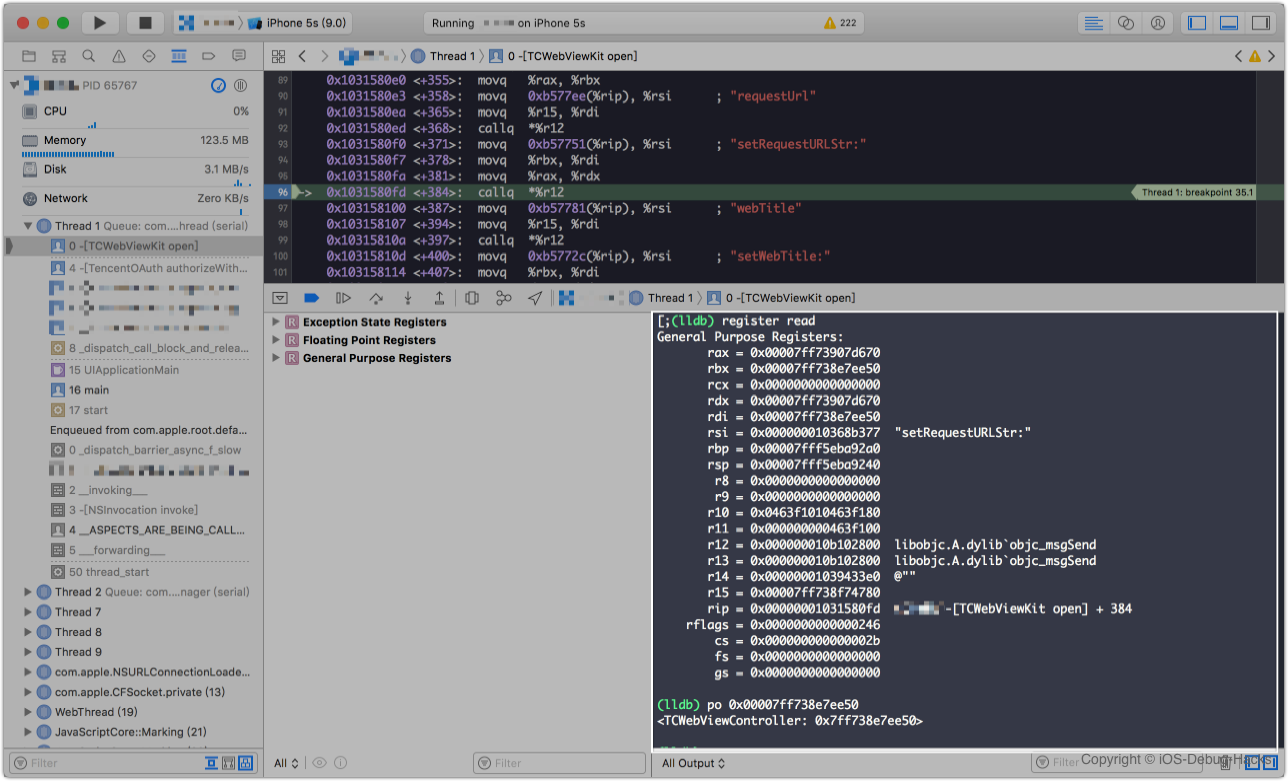
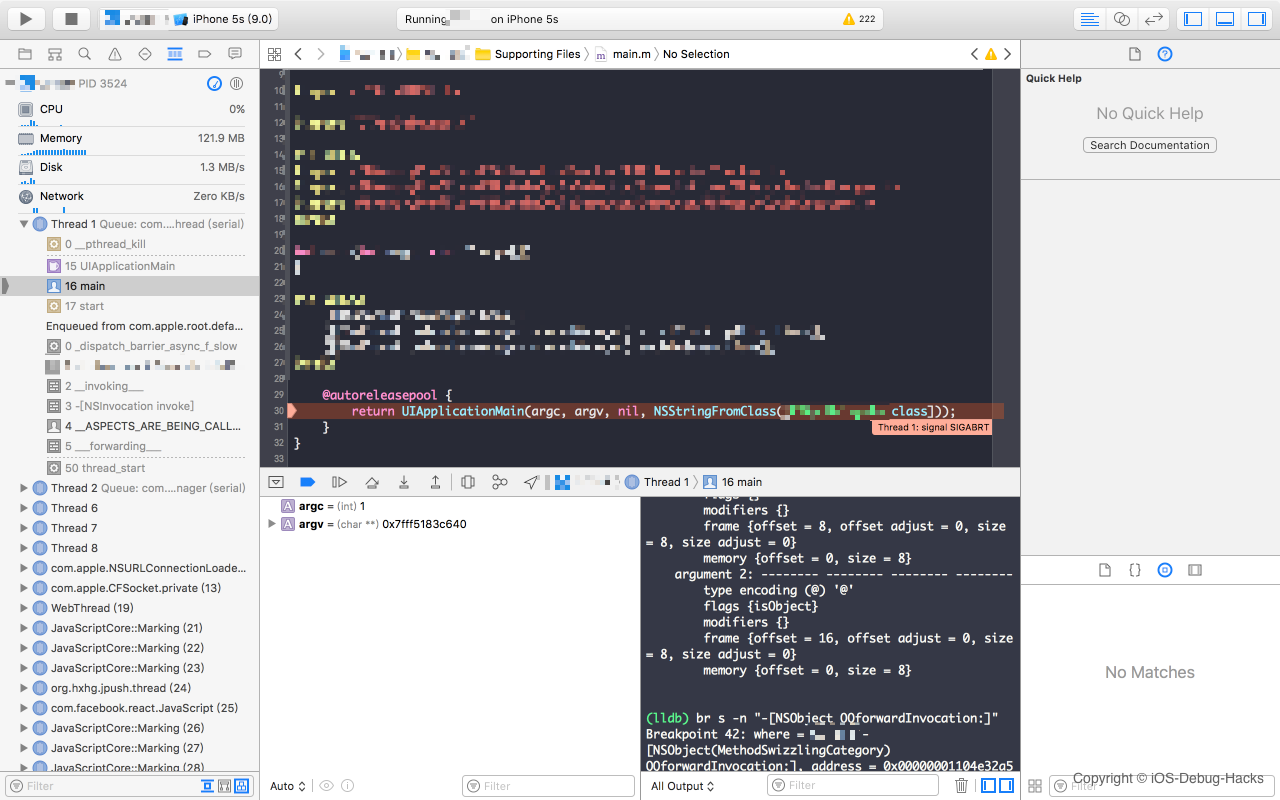
当应用程序启动Web身份验证页面时,该项目将在此断点上停止。请参阅以下:

当应用程序在模拟器上运行时,将捕获此屏幕截图,因此汇编代码基于X64。如果您使用的是iPhone设备,则汇编代码应为ARM。但是分析方法对他们来说是相同的,请注意。
在第96行上设置断点,此汇编代码是setRequestURLStr方法调用,然后打印rbx寄存器的内容,然后我们可以观察到TCWebViewController实例保存在此寄存器中。
接下来,我们可以使用LLDB设置QQmethodSignatureForSelector方法的断点:
br s -n "-[NSObject QQmethodSignatureForSelector:]"
在LLDB中输入c以使断点继续下去,然后断点将在QQmethodSignatureForSelector方法内停止,这可以证明我们先前关于QQmethodSignatureForSelector方法与代码冲突的猜测是无效的。
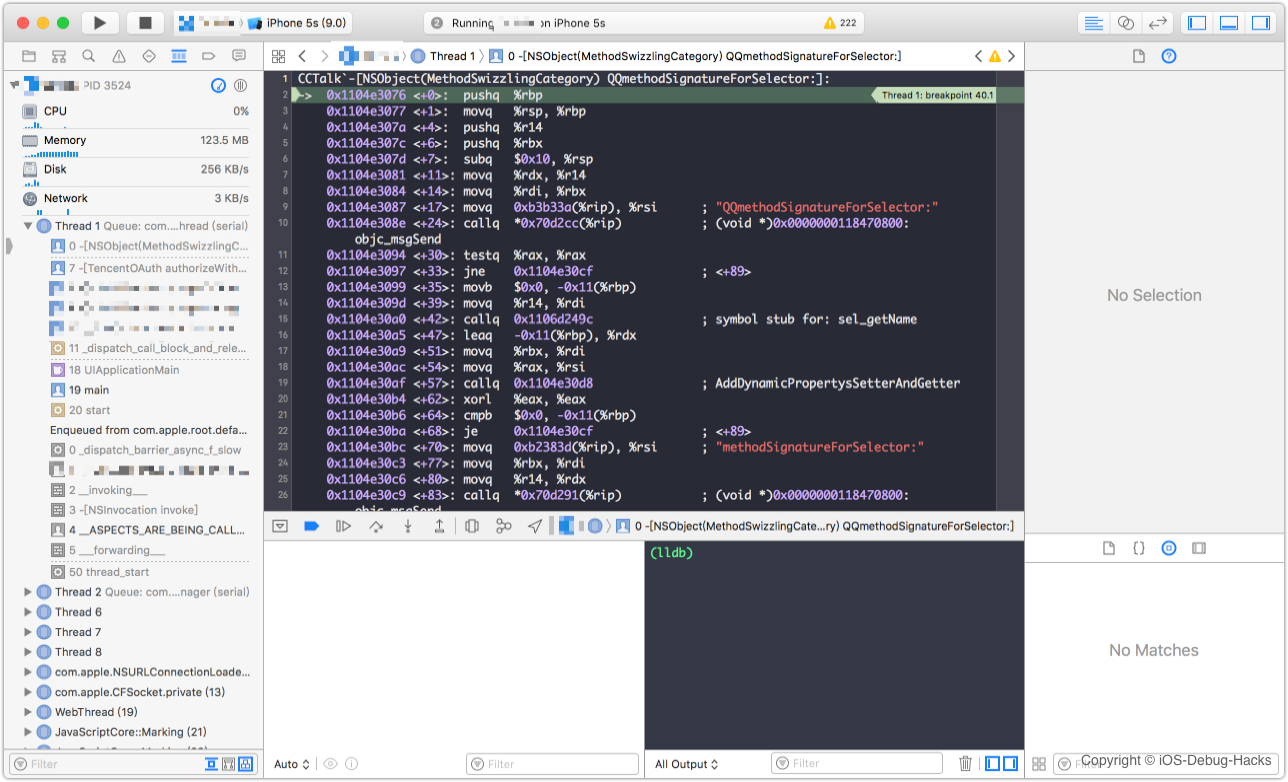
在QQmethodSignatureForSelector方法的末尾设置一个断点,即第31行的retq命令。然后打印寄存器rax的内存地址,请参阅下面的屏幕截图:
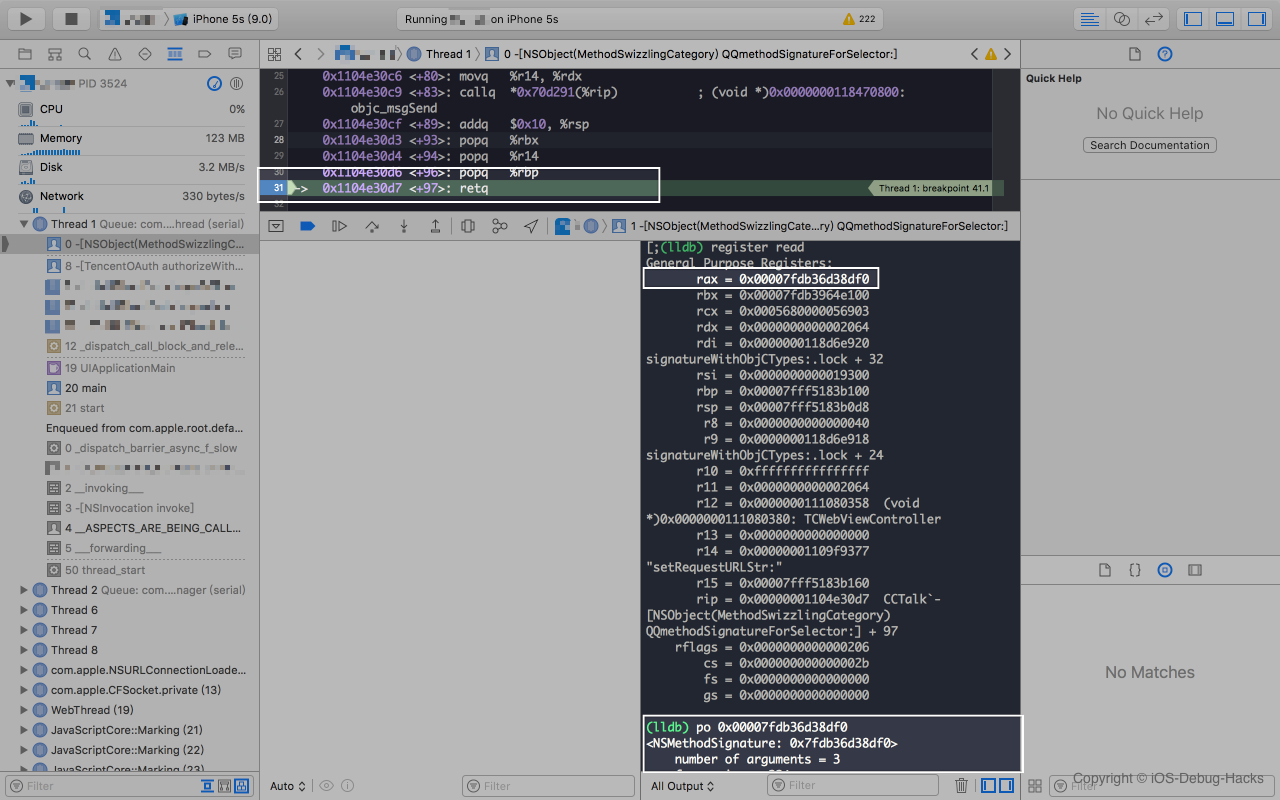
通过打印内存地址0x00007fdb36d38df0寄存器RAX的rax , NSMethodSignature对象可以返回。根据X86汇编语言的设计大会,返回值保存在寄存器rax中。显然,调用了QQmethodSignatureForSelector方法并返回正确的值,这意味着我们需要继续跟踪问题。
通过LLDB在QQforwardInvocation上设置断点:
br s -n "-[NSObject QQforwardInvocation:]"
设置断点后,继续执行程序,应用程序崩溃。并且尚未调用QQforwardInvocation方法。这样,我们可以得出结论, QQforwardInvocation方法与我们的代码冲突。
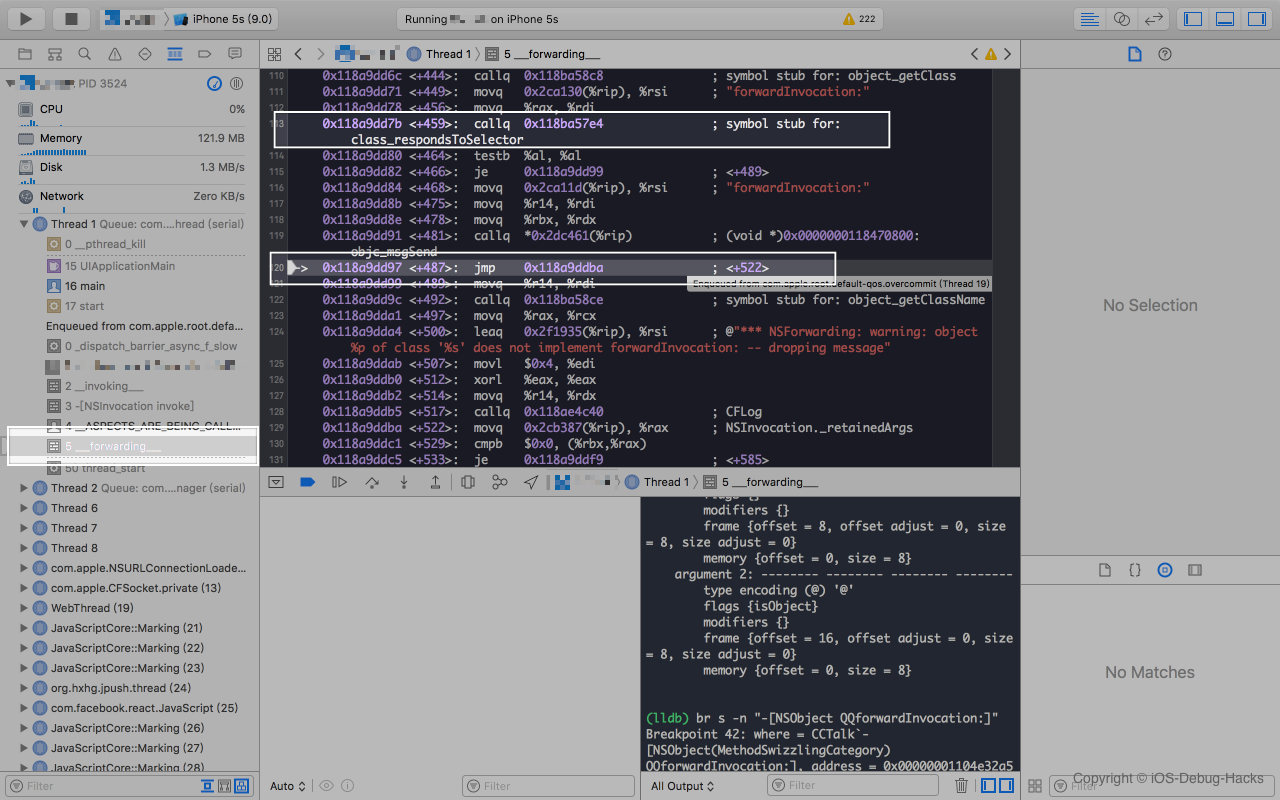
___forwarding___函数包含消息转发机制的整个实现,从Objective-C消息发送与转发机制原理中选择了代码。在本文中,在forwardingTargetForSelector forwarding和receiver时,有一个判断是不正确的。这应该是forwardingTarget和receiver之间的判断。请参阅下面的代码:
 int __forwarding__(void *frameStackPointer, int isStret) {
  id receiver = *(id *)frameStackPointer;
  SEL sel = *(SEL *)(frameStackPointer + 8);
  const char *selName = sel_getName(sel);
  Class receiverClass = object_getClass(receiver);

  // call forwardingTargetForSelector:
  if (class_respondsToSelector(receiverClass, @selector(forwardingTargetForSelector:))) {
    id forwardingTarget = [receiver forwardingTargetForSelector:sel];
    if (forwardingTarget && forwardingTarget != receiver) {
    	if (isStret == 1) {
    		int ret;
    		objc_msgSend_stret(&ret,forwardingTarget, sel, ...);
    		return ret;
    	}
      return objc_msgSend(forwardingTarget, sel, ...);
    }
  }

  // Zombie Object
  const char *className = class_getName(receiverClass);
  const char *zombiePrefix = "_NSZombie_";
  size_t prefixLen = strlen(zombiePrefix); // 0xa
  if (strncmp(className, zombiePrefix, prefixLen) == 0) {
    CFLog(kCFLogLevelError,
          @"*** -[%s %s]: message sent to deallocated instance %p",
          className + prefixLen,
          selName,
          receiver);
    <breakpoint-interrupt>
  }

  // call methodSignatureForSelector first to get method signature , then call forwardInvocation
  if (class_respondsToSelector(receiverClass, @selector(methodSignatureForSelector:))) {
    NSMethodSignature *methodSignature = [receiver methodSignatureForSelector:sel];
    if (methodSignature) {
      BOOL signatureIsStret = [methodSignature _frameDescriptor]->returnArgInfo.flags.isStruct;
      if (signatureIsStret != isStret) {
        CFLog(kCFLogLevelWarning ,
              @"*** NSForwarding: warning: method signature and compiler disagree on struct-return-edness of '%s'.  Signature thinks it does%s return a struct, and compiler thinks it does%s.",
              selName,
              signatureIsStret ? "" : not,
              isStret ? "" : not);
      }
      if (class_respondsToSelector(receiverClass, @selector(forwardInvocation:))) {
        NSInvocation *invocation = [NSInvocation _invocationWithMethodSignature:methodSignature frame:frameStackPointer];

        [receiver forwardInvocation:invocation];

        void *returnValue = NULL;
        [invocation getReturnValue:&value];
        return returnValue;
      } else {
        CFLog(kCFLogLevelWarning ,
              @"*** NSForwarding: warning: object %p of class '%s' does not implement forwardInvocation: -- dropping message",
              receiver,
              className);
        return 0;
      }
    }
  }

  SEL *registeredSel = sel_getUid(selName);

  // if selector already registered in Runtime
  if (sel != registeredSel) {
    CFLog(kCFLogLevelWarning ,
          @"*** NSForwarding: warning: selector (%p) for message '%s' does not match selector known to Objective C runtime (%p)-- abort",
          sel,
          selName,
          registeredSel);
  } // doesNotRecognizeSelector
  else if (class_respondsToSelector(receiverClass,@selector(doesNotRecognizeSelector:))) {
    [receiver doesNotRecognizeSelector:sel];
  }
  else {
    CFLog(kCFLogLevelWarning ,
          @"*** NSForwarding: warning: object %p of class '%s' does not implement doesNotRecognizeSelector: -- abort",
          receiver,
          className);
  }

  // The point of no return.
  kill(getpid(), 9);
}
基本上,我们可以通过阅读解码代码来清楚了解:在消息转发过程中首次调用forwardingTargetForSelector方法以获取替换接收器,这也称为快速转发阶段。如果forwardingTarget返回零或返回相同的接收器,则消息转发会变成常规转发阶段。基本上,调用methodSignatureForSelector方法获取方法签名,然后将其与frameStackPointer一起使用以实例invocation对象。然后呼叫forwardInvocation: receiver的方法,并将上一个invocation对象作为参数传递。最后,如果未实现methodSignatureForSelector方法,并且已经在运行时系统中注册了selector , doesNotRecognizeSelector:将被调用以丢弃错误。
从崩溃堆栈跟踪中仔细检查___forwarding___ forwarding___,我们可以注意到,它被称为整个消息转发路径中的第二个路径,这意味着当调用forwardInvocation时调用NSInvocation对象。
您还可以在断点之后逐步执行命令,以观察汇编代码的执行路径,应观察到相同的结果。
当调用forwardInvocation时执行哪种方法?从堆栈跟踪中,我们可以看到一个名为__ASPECTS_ARE_BEING_CALLED__的方法。查看整个项目的这种方法,我们最终发现了forwardInvocation是通过Aspects框架吸引的。
 static void aspect_swizzleForwardInvocation ( Class klass) {
    NSCParameterAssert (klass);
    // If there is no method, replace will act like class_addMethod.
    IMP originalImplementation = class_replaceMethod (klass, @selector ( forwardInvocation: ), ( IMP )__ASPECTS_ARE_BEING_CALLED__, " v@:@ " );

    if (originalImplementation) {
        class_addMethod (klass, NSSelectorFromString (AspectsForwardInvocationSelectorName), originalImplementation, " v@:@ " );
    }
    AspectLog ( @" Aspects: %@ is now aspect aware. " , NSStringFromClass (klass));
}
// This is the swizzled forwardInvocation: method.
static void __ASPECTS_ARE_BEING_CALLED__ (__unsafe_unretained NSObject *self, SEL selector, NSInvocation *invocation) {
NSLog ( @" selector: %@ " , NSStringFromSelector (invocation. selector ));
NSCParameterAssert (self);
NSCParameterAssert (invocation);
SEL originalSelector = invocation. selector ;
SEL aliasSelector = aspect_aliasForSelector (invocation. selector );
invocation. selector = aliasSelector;
AspectsContainer *objectContainer = objc_getAssociatedObject (self, aliasSelector);
AspectsContainer *classContainer = aspect_getContainerForClass ( object_getClass (self), aliasSelector);
AspectInfo *info = [[AspectInfo alloc ] initWithInstance: self invocation: invocation];
NSArray *aspectsToRemove = nil ;
// Before hooks.
aspect_invoke (classContainer. beforeAspects , info);
aspect_invoke (objectContainer. beforeAspects , info);
// Instead hooks.
BOOL respondsToAlias = YES ;
if (objectContainer. insteadAspects . count || classContainer. insteadAspects . count ) {
aspect_invoke (classContainer. insteadAspects , info);
aspect_invoke (objectContainer. insteadAspects , info);
} else {
Class klass = object_getClass (invocation. target );
do {
if ((respondsToAlias = [klass instancesRespondToSelector: aliasSelector])) {
[invocation invoke ];
break ;
}
} while (!respondsToAlias && (klass = class_getSuperclass (klass)));
}
// After hooks.
aspect_invoke (classContainer. afterAspects , info);
aspect_invoke (objectContainer. afterAspects , info);
// If no hooks are installed, call original implementation (usually to throw an exception)
if (!respondsToAlias) {
invocation. selector = originalSelector;
SEL originalForwardInvocationSEL = NSSelectorFromString (AspectsForwardInvocationSelectorName);
if ([ self respondsToSelector: originalForwardInvocationSEL]) {
(( void ( *)( id , SEL , NSInvocation *))objc_msgSend)(self, originalForwardInvocationSEL, invocation);
} else {
[ self doesNotRecognizeSelector: invocation.selector];
}
}
// Remove any hooks that are queued for deregistration.
[aspectsToRemove makeObjectsPerformSelector: @selector ( remove )];
}由于TCWebViewController是Tencent SDK的私人类,因此不太可能直接挂上其他类。但是它的超类可能会吸引,这也可能影响该课程。有了这个猜想,我们一直在挖掘。最终,答案浮出水面!通过删除或评论挂接UIViewController代码,该应用程序通过QQ登录时不会崩溃。到目前为止,我们绝对确定坠机是由Aspects框架所涉及的。
doesNotRecognizeSelector:错误是由__ASPECTS_ARE_BEING_CALLED__方法用于替换forwardInvocation:通过方面的方法。 The implementation of __ASPECTS_ARE_BEING_CALLED__ method has the corresponding time slice for before, instead and after the hooking in Aspect . Among above code, aliasSelector is a SEL which is handled by Aspects , like aspects__setRequestURLStr: .
In Instead hooks part, invocation.target will be checked if it can respond to aliasSelector. If subclass cannot respond, the superclass will be checked, the superclass's superclass, until root class. Since the aliasSelector cannot be responded, respondsToAlias is false. Then originalSelector is assigned to be a selector of invocation. Next objc_msgSend invokes the invocation to call the original SEL. Since TCWebViewController cannot respond the originalSelector:setRequestURLStr: method, it finally runs to ASPECTS_ARE_BEING_CALLED method of Aspects and doesNotRecognizeSelector: method is threw accordingly, which is the root cause of the crash we talked about in the beginning of this article.
Some careful reader might already realize the crash could be involved with Aspects, since seeing line ASPECTS_ARE_BEING_CALLED at line 3 of the crash stack trace. The reason I still listed all the attempts here is that I hope you can learn how to locate a problem from a third-part framework without source code through static analysis and dynamic analysis. Hope the tricks and technology mentioned in this article can be helpful for you.
There are two available ways to fix the crash. One is hooking the method of Aspects which is less invasive, for example Method Swizzling, then the setter creation during the message forwarding process for TencentOpenAPI would not be interrupted. Another is replace forwardInvocation: with ours implementation, if both aliasSelector and ``originalSelector cannot response to the message forwarding, we can forward the message forwarding path back into the original path. Refer to the code below:
     if (!respondsToAlias) {
          invocation. selector = originalSelector;
          SEL originalForwardInvocationSEL = NSSelectorFromString (AspectsForwardInvocationSelectorName);
         (( void ( *)( id , SEL , NSInvocation *))objc_msgSend)(self, originalForwardInvocationSEL, invocation);
      }
In fact, Aspects has conflicts with JSPatch . Since the implementation of these two SDK are similar too, doesNotRecognizeSelector: happens too when they are used together. Please Refer to 微信读书的文章.
The root cause of this crash is the conflict between Aspects and TencentOpenAPI frameworks. The life cycle method of UIViewController class is hooked by Aspects, and the forwardInvocation method is replaced with the Aspects's implementation. Also, because of the superclass of TCWebViewController is UIViewController class. As a result, QQforwardInvocation method of TCWebViewController class is hooked by Aspects too. That leads to the message forwarding process failed, thus, the creation of getter and setter fails too.
This case tells us, we should not only learn how to use a third-part framework, but also need to look into the mechanism of it. Only then, we can easily to locate the problem we meet during our work.
We introduce different kinds of tips in this article, but we hope you can also master a way of thinking when debugging. Skills are easy to be learned, but the way you think when resolving problem is not easy to be formed. It takes time and practice. Besides kinds of debugging techniques, you also have to have a good sense of problem analysis, then the problem will be handy for you.
Special thanks to below readers, I really appreciate your support and valuable suggestions.


