JAW
v4
颚
网站|文档|设置|爬行者|快速开始码头(示例)
基于ESPRIMA解析器的JavaScript的属性图的开源,原型实现以及Estree spidermonkey规范。 JAW可用于分析Web应用程序和基于JavaScript的程序的客户端。
该项目已根据GNU AFFERO GENERAL PUBLIC LICENSE V3.0许可。请参阅此处以获取更多信息。
Jaw在https://soheilkhodayari.github.io/jaw/上提供了一个GitHub页面网站。
发行说明:
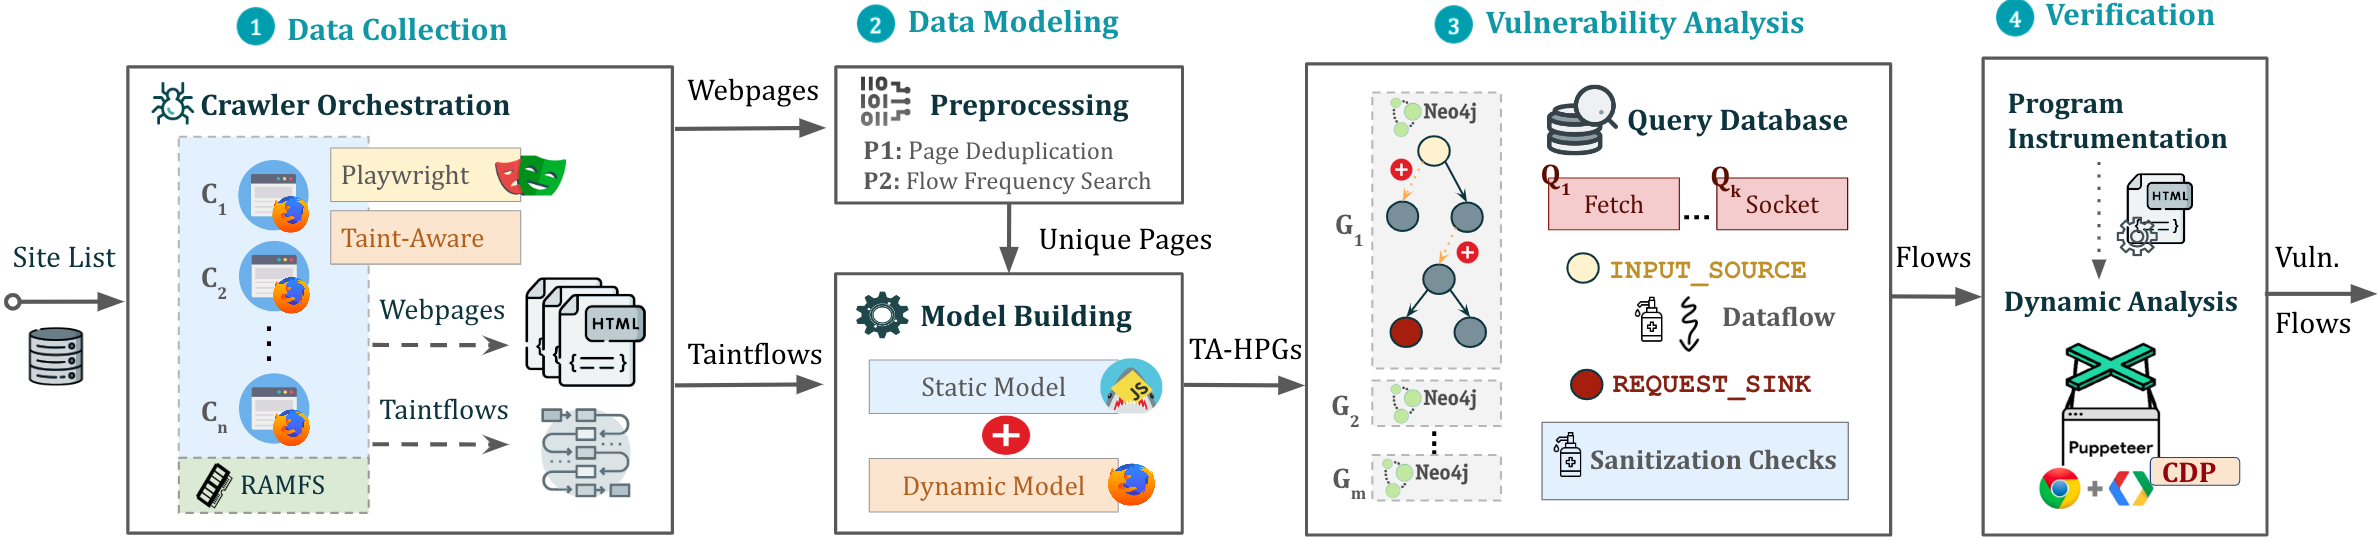
JAW-V2分支。JAW-V1分支。下颌的结构如下所示。
下巴可以以两种不同的方式使用:
任意JavaScript分析:通过指定程序的文件系统path来建模和分析任何JavaScript程序。
Web应用程序分析:通过提供单个种子URL来分析Web应用程序。
使用收集的Web资源创建混合程序图(HPG),该图将导入到NEO4J数据库中。
可选地,为HPG构造模块提供语义类型的映射到自定义JavaScript语言令牌,从而根据其目的促进JavaScript函数的分类(例如,HTTP请求函数)。
查询构建的Neo4j图数据库以进行各种分析。 JAW为数据流分析,控制流分析,可及性分析和模式匹配提供实用程序遍历。这些遍历可用于开发自定义安全分析。
下巴还包括用于检测客户端CSRF的内置遍历,DOM CLOBBERing和请求劫持漏洞。
输出将存储在与输入的文件夹中。
安装脚本依赖以下先决条件:
npm package manager (节点JS)的最新版本python 3.xpip软件包经理之后,通过以下方式安装必要的依赖项
$ ./install.sh有关detailed安装说明,请参阅此处。
您可以通过以下方式在背景屏幕中运行管道的实例:
$ python3 -m run_pipeline --conf=config.yamlCLI提供以下选项:
 $ python3 -m run_pipeline -h

usage: run_pipeline.py [-h] [--conf FILE] [--site SITE] [--list LIST] [--from FROM] [--to TO]

This script runs the tool pipeline.

optional arguments:
  -h, --help            show this help message and exit
  --conf FILE, -C FILE  pipeline configuration file. (default: config.yaml)
  --site SITE, -S SITE  website to test; overrides config file (default: None)
  --list LIST, -L LIST  site list to test; overrides config file (default: None)
  --from FROM, -F FROM  the first entry to consider when a site list is provided; overrides config file (default: -1)
  --to TO, -T TO        the last entry to consider when a site list is provided; overrides config file (default: -1)
输入配置: JAW期望.yaml配置文件作为输入。有关示例,请参见Config.yaml。
暗示。配置文件指定不同的通行证(例如,爬网,静态分析等),可以为每个漏洞类启用或禁用。这样可以单独或以不同的顺序运行工具构建块(例如,首先爬网,然后进行安全分析)。
要运行一个快速示例,演示如何构建属性图并在其上运行Cypher查询,请执行:
$ python3 -m analyses.example.example_analysis --input= $( pwd ) /data/test_program/test.js该模块收集测试所需的数据(即,网页的javascript代码和状态值)。如果要测试文件系统上已经有的特定Javascipt文件,则可以跳过此步骤。
Jaw具有基于硒(JAW-V1),Puppeteer(JAW-V2,V3)和剧作家(JAW-V3)的爬虫。对于大多数最新功能,建议使用uppeteer或基于剧作的版本。
该网络爬行者采用Foxhound(Firefox的乐器版本),在通过网页导航时执行动态污点跟踪。要启动爬行者,请做:
$ cd crawler
$ node crawler-taint.js --seedurl=https://google.com --maxurls=100 --headless=true --foxhoundpath= < optional-foxhound-executable-path > foxhoundpath默认设置为以下目录: crawler/foxhound/firefox包含一个名为firefox的二进制文件。
注意:您需要使用此版本的Foxhound构建。 JAW-V3版本中包含Ubuntu构建。
要启动爬行者,请做:
$ cd crawler
$ node crawler.js --seedurl=https://google.com --maxurls=100 --browser=chrome --headless=true
请参阅此处以获取更多信息。
要启动爬行者,请做:
$ cd crawler/hpg_crawler
$ vim docker-compose.yaml # set the websites you want to crawl here and save
$ docker-compose build
$ docker-compose up -d有关更多信息,请在此处参考hpg_crawler的文档。
要为给定(一组)JavaScript文件生成HPG,请执行:
 $ node engine/cli.js  --lang=js --graphid=graph1 --input=/in/file1.js --input=/in/file2.js --output=$(pwd)/data/out/ --mode=csv

optional arguments:
  --lang: 	language of the input program
  --graphid:  an identifier for the generated HPG
  --input: 	path of the input program(s)
  --output: 	path of the output HPG, must be i
  --mode: 	determines the output format (csv or graphML)
要在Neo4J图形数据库(Docker实例)内导入HPG,请执行:
 $ python3 -m hpg_neo4j.hpg_import --rpath=<path-to-the-folder-of-the-csv-files> --id=<xyz> --nodes=<nodes.csv> --edges=<rels.csv>
$ python3 -m hpg_neo4j.hpg_import -h

usage: hpg_import.py [-h] [--rpath P] [--id I] [--nodes N] [--edges E]

This script imports a CSV of a property graph into a neo4j docker database.

optional arguments:
  -h, --help  show this help message and exit
  --rpath P   relative path to the folder containing the graph CSV files inside the `data` directory
  --id I      an identifier for the graph or docker container
  --nodes N   the name of the nodes csv file (default: nodes.csv)
  --edges E   the name of the relations csv file (default: rels.csv)
为了为hpg_crawler的输出创建一个混合属性图并在本地NEO4J实例中导入它,您也可以做:
$ python3 -m engine.api < path > --js= < program.js > --import= < bool > --hybrid= < bool > --reqs= < requests.out > --evts= < events.out > --cookies= < cookies.pkl > --html= < html_snapshot.html >参数规范:
<path> :通往包含程序文件的文件夹的绝对路径(必须在engine/outputs文件夹下方)。--js=<program.js> :用于分析的JavaScript程序的名称(默认: js_program.js )。--import=<bool> :是否应将构造的属性图导入到活动的Neo4J数据库(默认值:true)。--hybrid=bool :是否启用了混合模式(默认值: false )。这意味着测试仪希望通过输入任何HTML快照,射击事件,HTTP请求和cookie的文件来丰富属性图。--reqs=<requests.out> :仅对于混合模式,包含obsevered网络请求序列的文件的名称,将字符串false传递以排除(default: request_logs_short.out )。--evts=<events.out> :仅对于混合模式,包含射击事件序列的文件的名称,将字符串false传递到排除(默认: events.out )。--cookies=<cookies.pkl> :仅对于混合模式,包含cookie的文件的名称,将字符串false传递到排除(默认: cookies.pkl )。--html=<html_snapshot.html> :仅对于混合模式,包含DOM树快照的文件的名称,将字符串false传递以排除(默认: html_rendered.html )。有关更多信息,您可以使用图形构造API提供的帮助CLI:
$ python3 -m engine.api -h然后可以使用Cypher或NeoModel ORM查询构造的HPG。
您应该在analyses/<ANALYSIS_NAME>中放置并运行查询。
您可以使用NeoModel ORM查询HPG。写查询:
example_query_orm.py在analyses/example文件夹中。 $ python3 -m analyses.example.example_query_orm 有关更多信息,请参阅此处。
您可以使用Cypher编写自定义查询。为了这:
example_query_cypher.py在analyses/example文件夹中。 $ python3 -m analyses.example.example_query_cypher有关更多信息,请参阅此处。
本节介绍了如何配置和使用JAW进行漏洞检测以及如何解释输出。下颌包含用于检测客户端CSRF和DOM CLOBBERING的独立查询
步骤1。在输入config.yaml文件中启用漏洞类的分析组件:
 request_hijacking :
  enabled : true
  # [...]

open_redirect :
  enabled : false
  # [...]

domclobbering :
  enabled : false
  # [...]

cs_csrf :
  enabled : false
# [...]步骤2。使用以下方式运行管道的实例:
$ python3 -m run_pipeline --conf=config.yaml暗示。您可以在不同screen s下运行多个管道的实例:
$ screen -dmS s1 bash -c ' python3 -m run_pipeline --conf=conf1.yaml; exec sh '
$ screen -dmS s2 bash -c ' python3 -m run_pipeline --conf=conf2.yaml; exec sh '
$ # [...]要自动生成并行配置文件,您可以使用generate_config.py脚本。
输出将存储在称为sink.flows.out的文件中,以与输入的文件夹中。例如,对于客户端的CSRF,对于每个检测到的HTTP请求,下颌输出标记与构建请求(即,程序切片)元素关联的语义类型集(又称语义标签或标签)集的条目。例如,通过window.location Point可以原谅具有语义类型['WIN.LOC']的HTTP请求。但是,标记为['NON-REACH']的请求是不可原谅的。
示例输出条目如下:
 [*] Tags: ['WIN.LOC']
[*] NodeId: {'TopExpression': '86', 'CallExpression': '87', 'Argument': '94'}
[*] Location: 29
[*] Function: ajax
[*] Template: ajaxloc + "/bearer1234/"
[*] Top Expression: $.ajax({ xhrFields: { withCredentials: "true" }, url: ajaxloc + "/bearer1234/" })

1:['WIN.LOC'] variable=ajaxloc
	0 (loc:6)- var ajaxloc = window.location.href
此条目显示,在第29行上,有一个$.ajax呼叫表达式,并且此呼叫表达式触发了ajaxloc + "/bearer1234/的URL模板值的ajax请求,其中参数ajaxloc是一个程序slice slice slice slice slice slice在第6行中读取['WIN.LOC']在window.location.href中的读取其值。
为了简化JAW的测试过程并确保您的设置准确,我们提供了一个简单的node.js Web应用程序,您可以使用该应用程序测试下JAW。
首先,通过以下方式安装依赖项:
$ cd tests/test-webapp
$ npm install
然后,在新屏幕中运行应用程序:
$ screen -dmS jawwebapp bash -c ' PORT=6789 npm run devstart; exec sh '有关更多信息,请访问我们的Wiki页面。以下是用于快速访问的目录。
拉力请求总是受到欢迎。该项目旨在是一个安全,热情的空间,预计贡献者将遵守《行为守则》。
如果您使用下巴进行学术研究,我们鼓励您引用以下论文:
 @inproceedings{JAW,
  title = {JAW: Studying Client-side CSRF with Hybrid Property Graphs and Declarative Traversals},
  author= {Soheil Khodayari and Giancarlo Pellegrino},
  booktitle = {30th {USENIX} Security Symposium ({USENIX} Security 21)},
  year = {2021},
  address = {Vancouver, B.C.},
  publisher = {{USENIX} Association},
}
下巴已经走了很长一段路,我们想在这里给贡献者一个当之无愧的喊叫!
@tmbrbr, @c01gide,@jndre和sepehr mirzaei。


