learning p5 js
1.0.0
介绍
第1课 - 开始
第2课 - 您需要知道的一切
第3课 - 组织
第4课 - 更多相同
第5课 - 将所有内容放在一起
第6课 - 世界围绕着你
学习处理是一本用于处理的介绍性工作簿/教科书,它是在Java顶部建立的。
但是,没有学习P5.JS书,这意味着没有基于JavaScript的学习处理版本。只有Dan Shiffman的学习处理代码移植到P5.js。尽管这本书看起来可能是在目标上,并且通常推荐这本书作为P5.js的介绍。
此存储库是一种解决该问题的尝试。我将浏览学习处理书,链接到适当的Shiffman P5.JS存储簿中的链接,链接到最相关的编码火车视频,并发布我自己的练习代码。
当书中未涵盖的相关主题时,我还会偶尔会出现“绕道”。例如,命令行,使用github等。这些“弯路”可能最终会淹没项目的初始目标,但我们会看到。
我认为这将有助于我的学习过程,希望这对偶然发现此存储库的其他人有帮助。
我开始认为这可能成为类似于Odin Project或FreecodeCamp的开源项目。
也许可以在徽标,西摩·帕特特(Seymour Papert)和学习编码方式的历史上进行部分?首先,这启发了处理。
另请参见约翰·梅达(John Maeda)的数字设计 - 将艺术和技术捆绑在一起,并将计算机本身视为一种艺术媒介。
该视频关于响应式编程的视频启发了John Resig在可汗学院的课程。
P5.JS当前正在从事响应式编程工作吗?我想我可能已经看过一个视频。检查Dan Shiffman的Brickbreaker的视频。
D用于数字。使用这本书的普林斯顿课程。较新的班级网站。了解数字世界看起来D的更新版本是用于数字世界。 - 有趣的是,此介绍性类中不允许使用笔记本电脑,即使这是编码的类
布雷特·维克多(Bret Victor)对可汗学院(Khan Academy)和加工的批评也非常启发。很长。我必须阅读几次。
文章的一些注释:
请参阅此编码火车视频,以了解Dan Shiffman对P5.JS起源的解释,以及如何使用P5.JS进行编码。
请注意,以上视频引用以后已弃用的编辑器。
Dan Shiffman的下一个视频是关于P5.JS工作流程,这意味着如何下载项目文件,如何设置Node.js和Package Manager以及如何在计算机上运行本地服务器。我计划稍后再进行所有这些步骤,但是现在,我将使用在线编辑器。
学习图形坐标可能很困难。 0,0在左上
Processing(2001) - 由Casey Reas和Ben Fry开始 - 创建了一个工具,以帮助他们在MIT上的工作(MIT Media Lab的数字设计源自设计)
“创意编码” - 通过编码的创意应用 - 通过计算工具的创造性表达
学习编程很强大 - 不必使用其他人创建的软件被卡住 - 可以自己制作
还可以在Web Processing使用的Java上发布和分发您的创作(称为applet)将在Web浏览器中运行 - 然后是有道理的
现在没有意义 - 错误消息城市的语言是JavaScript
新项目 - 如果今天正在创建处理 - 您会选择哪种语言?
劳伦·麦卡锡(Lauren McCarthy)-JavaScript
processing.js-不要混淆-John Resig- Java翻译为JavaScript
RESIG创建了JQuery和Khan Academy编码课程SO -P5.JS是一个简单,初学者的学习JavaScript的环境,以在浏览器中进行应用程序(创意表达)
要使事情发生在浏览器中,您还需要HTML,CSS,但我们将其留下来供以后使用
处理是“建在Java之上”
P5.js是功能的“库”
如果您想学习JavaScript,则有一百万个资源 - 堆栈溢出,jQuery,文章,书籍
P5.js是一个沙盒,围墙花园
您将获得一组功能来学习编程的一些初学者步骤
这也被称为“一次一步”方法。
这也可以称为“自上而下的设计”。
不要一次尝试做太多。将较大的视力分解为较小的部分,并缓慢攻击每件零件。
太空入侵者示例:
(编者注 - 这可能是一个完全不合适的项目,取决于编码人员的技能水平。故意实践的哲学决定,最好通过具有挑战性的练习来完成学习,但并不是太具有挑战性的。我很难在学习编码的正确平衡。在编码的编码中,这两个项目都太容易了,或者他们不太难过(我都可以找到一个艰难的努力来努力地努力地找到一个综上的努力),而我可以找到一定的努力。
请参阅Shiffman编码太空入侵者的链接 - 似乎并不那么友好)
回到太空入侵者...
然后将问题分为必要的最小部分。简单简便的步骤将使编程游戏看起来更加可实现(您如何弄清楚这些步骤是另一个重要问题)。
我们将第1步分为六个程序。第一个程序将显示一个三角形。每个步骤都会增加一个小改进。下一个将移动三角形。
(当然,能够弄清楚这些步骤已经假设了大量的编码知识。如果您无法弄清楚这些步骤的顺序,甚至首先应该有哪些步骤,那么您有什么机会编写代码执行它们?)
这使得编程和“调试”更加容易 - 接下来会有更多内容。
增量开发也非常适合面向对象的编程,这使我们能够以模块化的形式开发项目,这意味着这些零件可以很容易地组织,共享和重复使用。
有关调试的更多信息,请参见P5.js和ITP的此链接的此链接。
请注意,“错误”是“代码既存在技术问题的时刻,也是您对代码中发生的事情的心理图片的问题。”
我想深入研究。
我看到的大多数调试课程和教程都集中在上述上 - 即首先了解代码在尝试修复之前所做的事情。
这似乎是合乎逻辑的,但它忘记了一个真正的新手可能会在树林中完全迷失的事实。即使新手可以理解代码中发生的事情(一个很大),该程序员也可能没有解决问题的技能。除此之外,以前“有效”的所有步骤实际上可能是当前问题的原因。新手无法知道发生了什么。
此外,除非新手在课程中,或者有另一个网络需要依靠,否则他或她一个人都可以找到“错误”。这最终可能是一项绝望的努力。
这使我的早期要回到了我的早期,这是在正确的难度级别寻找项目的重要性。此外,新手要么需要知道如何在线查找答案(例如,stackoverflow),要么需要一个人网络来寻求帮助)。否则将有一系列失败的项目。
DANS在PRANDLN上的视频。提醒我,其他处理视频可能很有用。
DevTools中的Chrome调试工具
编程都是关于编写算法。
算法是解决特定问题的指令的顺序列表。增量开发应该使编写实现您想法的算法更容易。
(我一直在想算法开发过程。人们如何善于开发基本算法,例如上面的算法,例如在编程中进行的练习?它是否是一种天生的技能?是否可以磨练他们的天生技能,也许他们可以在数学和逻辑上更加自然地学习algorith the Algorith the Algorith the Algorith the Algorithm forne forme with Algorith the Algorithm?从第一原则的角度来看,您的逻辑思维技巧是prec的,甚至是哲学上,您如何编写导致更大程序的伪码的第一行?
请参阅此链接,以了解我对牙刷算法练习的答案。
如果找到此页面,则至少必须知道如何找到GitHub。您甚至可能有一个github个人资料。这些是一个很好的第一步。
查看Dan Shiffman的此视频系列,以介绍GitHub和命令行的介绍。
我记得第一次与终端一起工作时非常恐吓。这对我来说很重要。成为“真正的”程序员的第一个真正的转折点。也许你会同样的感觉。
观看JavaScript中编程的基础-P5.js,视频1.3-2.1。这涵盖了像素,绘制基础知识(形状和颜色),上传p5.js草图以及鼠标和鼠标变量。
这是丹·希夫曼(Dan Shiffman)绘制基本形状的存储库。请注意,这些初始示例写在“设置”功能中。这是因为Dan试图遵循本书的顺序,其中首先教“静态”草图,而“流”直到第3章才引入。
这是Dan的静态外星人角色素描,称为“ Zoog”。
软件发生在一段时间内 - 我们将其称为流程。
什么是设置?
什么是抽奖?
使用设置并绘制功能,请参阅此链接以获取“ Zoog”。
请参阅此链接,以获取我在P5.js中的第一个草图。这是学习处理书中的练习3.2。我已经使用了设置并绘制功能。我使用的唯一形状函数是椭圆和矩形。我画了一条叫做“ Fido”的狗。
我们可以键入鼠标和鼠标,而不是将数字键入我们的功能(RECT,椭圆形),而是指示鼠标光标的水平和垂直位置。
Dan指出了一个有趣的例子,说明当您在设置中放置背景而不是绘制时会发生什么。他还在其中一个视频中讨论了这一点。如果您将背景放置在设置而不是绘制中,则仅绘制背景一次。根据您的程序的意图,这可能是一件好事或坏事。如果您打算设计绘画程序,这很棒,因为背景仅绘制一次,并且随后的每个绘图功能都会显示在画布上。例如,当该形状移动时,您会看到每次在画布上绘制形状的漫长的踪迹。如果您不打算每次在画布上绘制形状时显示,则需要将背景放入Draw功能中,因此每次其他形状都在绘制内部时都会重新绘制背景。与往常一样,丹在解释这一点方面做得比以往任何时候都做得更好。
下一个练习是使我们的绘画用鼠标移动。丹的素描在这里。
我的例子在这里。请注意,该书还提到根据鼠标位置改变颜色,因此我使用colormode()使最小RGB的宽度为0,而最大rgb则是帆布宽度,然后我根据鼠标更改了眼睛和鼻子的填充。
起初我有点挣扎着这个练习。特别是,我之所以挣扎,是因为我将push()和pop()用于草图的旋转“耳朵” - 见下文。
只有在观看了Dan的翻译,旋转等视频之后,我才能完成3.5练习。
请注意,即使我认为这本书中没有提到这一点,但Dan也有素描。
与“ Zoog”不同,我的图纸需要一个特殊的功能 - 与屏幕相关的矩形形状的耳朵。这可以追溯到我提出的那一点 - 在开始项目之前不知道自己会进入什么。我搜索了“用简单形状的画狗”,在网上找到了一个由圆形和矩形制成的狗的图像,并认为我可以在p5.js中绘制它。当然,这并不容易。
在编程中,没有什么简单。从来没有直线要遵循。似乎简单的一切总是变得复杂。当您是初学者并且您正在努力地知道从哪里开始故障排除过程时,更无限的是。
也许有一些关于禅宗的书,享受挫败感 /将障碍视为机遇将在编码课程中有用。我听说麻省理工学院的埃里克·格里森(Eric Grimson)教授使用“挑战的机会”一词。也许这是任何编码员需要拥抱的心态。还有其他考虑。
幸运的是,我已经在转变,轮换,推动和流行音乐方面挣扎着,所以这对我来说并不是外国领土。我能够画草图,旋转的耳朵和所有。我想知道这是否会影响以后的章节未来的项目。总是担心。
请参阅这些编码火车视频,以了解Dan关于旋转图像的课程。
这些代表“以前的”鼠标和小鼠位置,这意味着鼠标的最后一个位置是当我们循环绘制时。
使用pmousex和pmousey的示例:
鼠标点击是事件- 这意味着添加一个与设置分开的新功能并绘制
此新功能将在事件发生时告诉程序要执行什么代码。
与设置类似,它将发生一次,仅一次 - 对于事件的每个事件 - 当然可以在程序过程中多次发生。
两个新功能:
此示例演示了两个事件函数 - 每当按下Ouse并在按下键时清除背景时,添加正方形。
Framerate()需要一个整数在1到60之间,并强制P5.js通过draw()循环的速度。 Framerate(30)表示每秒30帧,是计算机动画的传统速度。如果您不包括Framerate(),则P5将尝试以每秒60帧的速度运行草图。由于计算机以不同的速度运行,因此使用Framerate()来确保您的草图在多台计算机中保持一致。
这是Dan的互动Zoog草图。 Zoog的整个身体都遵循鼠标。它的眼睛颜色取决于鼠标位置。它的腿从以前的鼠标位置到当前的鼠标位置。最后,当单击鼠标时,该消息将显示在控制台中:“带我去找您的领导者!”
本课程的最后一个项目是使用我们从第1到第3章中学到的所有内容绘制新草图。
这必须包括RGB颜色,形状,设置和绘制,以及使用Mousepressed()或KeyPress()函数的某些相互作用。
我画了一个白天原始场景的房子的草图,但是当鼠标被按下时,它会变成夜间。
我将需要一个变量才能通过另一个鼠标单击将其重新更改为白天,但这是下一个课程的主题。
我还考虑过将循环用于绘画星星和使用随机功能之类的东西,但是我决定等到这本书中的这些函数。
本节涵盖:
概述:
该视频是Dan在P5.J.中的变量介绍。
描述变量的类比的洗衣清单:
(请注意,这份90亿美元案件中的律师试图将Java的API与档案柜进行比较。解释技术很难。这就是为什么编码列车如此之大的原因。)
计算机有内存。变量是指向计算机内存中位置(一个“内存地址”)中的位置的指针。
计算机一次仅处理一项指令。因此,变量允许程序员从程序中的一个点保存信息,并在以后的时间引用。
示例:
丹说,他更喜欢纸的方法:格纹纸。
想象一下计算机的内存作为一张图形纸,而平面纸上的每个单元格都有一个地址。使用变量,我们可以命名这些单元格。
让我们命名一个“ Dan的分数”,并给它一个100的值。然后,当我们想在Progran中使用“ Dan的分数”时,它就在记忆中就在那里。我们可以以“ Dan的分数”的名字要求它。
变量的全部要点是它们有所不同。
可能的变量列表:
丹对乒乓球的编码挑战。
最好在上面链接的变量上参考Dan的视频。该书讨论了Java中具有相似性的变量,但由于需要声明变量类型,但仍然会感到困惑。
丹的第一个例子是在屏幕上移动一个圆圈,有一个宝贵的调试课程。他以略有不同的版本一遍又一遍地重复此短语。 “让我们前提是计算机。”或“成为计算机的人”。
我在这里写了示例。即使此代码相当简单,它还是让学生像计算机一样开始思考。逐步思考计算机如何执行代码。这将是至关重要的,因为代码变得更加复杂。
请注意他还如何讨论以下操作:
circleX = circleX + 1
很难将其视为一个分配操作(而不是“等于”),在该操作中,对右侧进行评估然后“分配”到左侧,但这是一个关键的概念。
示例4.3和4.4使用变量改变形状的大小,颜色和位置。
练习4.4,以获取更多变量的练习。
Dan很聪明,让学生首先先用硬编码值绘制这些草图,然后再用变量替换这些值。始终从基础知识开始 - 请确保首先获得基本图形,然后继续使用像新概念之类的更先进的东西。
就像鼠标和鼠标一样 - 这些是与所有草图相关的通常需要的数据(窗口的宽度,按键盘上按键等)
命名自己的变量时,请避免使用系统变量名称。
常用的系统变量:
这是使用系统变量的示例。
我认为这不会被任何编码火车视频所涵盖。请参阅上面的有关MouseX并制作自己的变量的视频。
练习4.5,使形状相对于窗口尺寸调整大小,在线编辑器中不起作用。我尝试了我的代码,并且在学习p5.js存储库中的代码。我认为该代码可能在不推荐使用的P5.JS编辑器中起作用(当启动单独的帆布时,可以调整大小 - 类似于处理的情况),但是在线编辑器不会发生这种情况。
这是我能提出的最好的答案。我使用了窗口宽度和窗户,而不是宽度和高度(书中建议)。
无论如何,这似乎是绕道的好时机。现在,我将通过DAN的WorkFlow视频来查看此代码在本地服务器上的浏览器中是否有效。看看我是否可以执行他的工作流视频中的步骤,这也是一个很好的测试。开始了。
第一注意 - 我也可以尝试Codepen。在此视频之后,我会这样做。丹还提到了小故障。我也会研究一下。
请注意,我使用的是崇高的文本而不是原子,因此我下载了sublimeserver的软件包将崇高变成服务器。我记得我需要先安装软件包控件才能下载诸如Sublimeserver之类的内容。如果您是编程的新手,那么您肯定会陷入此阶段,因为浏览这些设置详细信息是令人困惑的。
Sublimeserver也可以像Dan在Atom中的榜样一样进行重新加载。
这是成功的 - 我什至带有Sublime Text的故障问题软件包管理器。 :)
有几个命令要记住:
 p5 generate -b myproject

(node) http-server

python -m SimpleHTTPServer
书籍学习处理中的下一部分是关于使用Random()函数,但是编码列车在此之前有两个视频。一个关于JavaScript对象,另一个关于地图功能。在转到Random()之前,我将遵循编码列车课程并解决这些主题。
DAN设置了使用变量并在屏幕上移动椭圆的示例。
然后,他使用一个对象来组织变量。这为以后的基础设定了基础,使代码更加整洁,并跟踪您的创建内容。
 var x = 0;
var y = 100;
var diameter = 50;

//becomes...

var circle = {
	x: 0,
	y: 100;
	diameter: 50
};
这是JavaScript对象表示法。我们可以访问圆圈的数据。
我们使用点表示法访问此数据。
ellipse(circle.x, circle.y, circle.diameter, circle.diameter)
练习是使用对象重新组织我们的代码。这是使用对象的示例4.4。
Dan在此视频中还指出,在编写代码时,我们应该非常习惯于查看错误消息。这是绝对正确的。如何调试这些错误消息是另一个故事...
这个降价文件越来越长。我觉得这需要一张目录。
我可能还可以添加有关Markdown的基础知识的绕道,但我现在会跳过。
我为自己能够在Markdown中创建目录的问题而感到自豪。我可能没有找到最好的方法 - 也许某种JavaScript/node.js工具更有效 - 但是现在我找到了一种有效的方法。那就足够了。
这也是谷歌搜索答案的故障排除,并找到相关的Stackoverflow文章的良好经验。我需要阅读几篇不同的文章,最终,通过将两个文章汇总在一起,我将目录工作表明。
这是我觉得有帮助的Stackoverflow的两篇文章。
此外,这是我的目录中的示例代码:
 # Table of contents

[Introduction](#introduction)
- [What is p5.js?](#what-is-p5js)
- [Incremental Development](#incremental-development)
那么,为什么此代码可以工作?
如果您将鼠标悬停在GitHub Markdown文件中的标头上,则会看到出现一个小图标,然后如果您悬停在该图标上,则会在屏幕左下方看到链接本身。该链接的格式是<project URL#<header name> 。
您可以在目录的括号部分中使用该#<header name>链接到连接的标头。您可以将任何文本放在括号中 - 这是在页面上实际显示的文本。
请注意,这些标头名称为“ slugifiend形式”,这意味着它们都在较低的情况下,空间被' - '取代,并且所有标点符号已删除。
For instance, Incremental Development becomes "incremental-development" and What is p5.js? becomes "what-is-p5js".
Just a note to self that I'll have to return to learn more about Git and GitHub.
I foresee this being a potential problem down the road as I develop larger projects.
I just almost got into some issues with git stash . That almost led to a Git rabbit hole, with me resolving Git conflicts that may or may not have existed, with upstream changes that I dont really understand.
I'll leave this on the backburner for now, but I know that this is important, and potentially a major hurdle.
Just to do a quick recap of what I encountered so I don't forget.
I remembered that I run git stash at some point (following along with a Git error message I had received), so I decided to Google git stash to find out what git stash even means.
I then ran a series of commands, including git stash list , git stash apply and git stash show .
It turned out I had a merge conflict in my README.md file.
I tried to resolve the conflict in Sublime, but somehow whatever I was doing wasn't working.
I watched Dan's video on merge conflicts.
I copy and pasted my error message into Google and that didn't help - it just led to the Git rabbit hole (Git rebase?!).
I even ran git reset --hard at one point. I'm not sure if that did anything to help.
Ultimately, upon inspecting the merge conflict itself, it didnt really look like a conflict at all. I couldn't see any changes that I needed to make. So I ran git stash clear which got rid of the stashed away commit. It didn't look like I had stashed anything important.
This ultimately solved the issue.
I don't know if this sort of hack away and try everything approach is ok - maybe it is - but it's a little nerve-wracking.
I remember being told that when learning development, you have to be ok with "breaking things". In this case, I interpreted that to mean, you have to be ok with messing with your code, with the risk that you'll "screw things up", only to have to go back and fix it later. It's scary when you're new to coding and you feel that you don't have to the tools to fix what you've "broken", but I guess you can only develop those tools by "breaking" a lot of things and then trying to put them back together.
See the Carol Dweck TED talk on the growth mindset and this TED radiohour podcast on the Nudge technique for changing habits for more strategies on breaking out of your comfort zone and becoming comfortable with taking risks.
I'm beginning to think that my thoughts on Zen and deliberate practice might stem from being stuck in a fixed mindset. If I can continue to try to see challenges as opportunities, I will maybe be more successful on my coding journey (or maybe just be less frustrated by what I've been considering "setbacks" or "roadblocks").
Also, listen to this freakonomics radio podcast on why you always finish projects late. You may think you can learn to program in six months, or a year, but maybe it will take you thre or four years. There is something called the planning fallacy where we tend to underestimate how long projects will take. This is related to being overly optimistic about our chances of success about the projects we undertake. This is directly related to coding. We think it will take shorter than it actually will to learn to code, and we're overly optimistic about our ability to learn to code in the first place.
Here's Dan's video on the map() function.
Example - as you move the mouse across the screen, background color changes from black (RGB(0)) to white (RGB(255)).
Let's also say the canvas has dimensions of 600 width x 400 height.
So mouseX has a range of 0 to 600. And RGB has a range of 0 to 255. So we have to map the mouseX range to the RGB range. When mouseX = 0, RGB = 0, and when mouseX = 600, RGB = 255.
句法:
col = map(mouseX, 0, 600, 0, 255)
Here's Dan's code using the map function
This example is the same as my variables example, except I use the map function to make the background change from black to white as the the mouse moves from the left side of the canvas to the right.
Here is Dan's video on random().
Think back to incremental development - learn the fundamentals by looking at individual pieces - programs that do one and only one thing. Then begin to add functionality on top, step by step.
random() returns a value - abs() does the same thing - more on this in Chapter 7.
We have learned how to make one circle, at a particular location, with a particular size and fill, using variables.
If we want to make a new circle, with a random size, color, and position, every time through draw(), we can use the random() function.
The random() function in p5.js returns a floating point (or decimal) value. The book and Processing website talk about casting these returned values to integers if you want to return an integer instead of a float.
In JavaScript, I believe you would use a function such as Math.floor() to accomplish the same task.
I just discovered that there's an int() function in p5.js.
Another thing to note from the video - Dan's steps in debugging
Dan's video had a number of good exercise suggestions at the end- here's one:
Here's Dan's dots example. Note that he puts the variables into JavaScript objects.
See also this example, random painting, from the book and Dan's repo, which takes every variable associated with drawing the ellipse (fill, location, size), and assigns it to a random number each cycle through draw().
When reading a book, or watching videos, it's easy to fall into a trap of being told what code is going to do and not having to think about it for yourself.
I am trying to get into the habit of reading the code and thinking through what the code is going to do before running it. I did this with the random painting program.
In the final part of this chapter, we update our original sketches (for Dan this was "Zoog", for me this was "Fido" and the house drawing) to incorporate what we've learned - variables and the random() function. We should even try putting variables into objects, and maybe even using map() to tie everything together.
Here's Dan's "variable Zoog" in p5.js.
Here's my updated "Fido" with two new pieces of functionality:
We can complete Feature 1 for Fido by taking our previous program that used mouseX and mouseY and substituting our own variables in their place. (Dan used the word "simply" here - it may be a knee-jerk reaction but I will never use the word simply when it comes to coding). Remember the article above about the rule of simply.
We can implement Feature 2 by creating variables for the red, green, and blue values to plug into the fill() function.
Start with video 3.1 from Coding train
Taking different paths
Not on using the dist() function for rollovers (might come up in later video)
Brief note on == vs === but said that might come up in videos on strings
Boolean test - true or false (1 or 0)
Boolean expression - evaluates to true or false
Use the current value stored in a variable in boolean expressions (x > 20))
 Relational Operators
>, <, >=, <=, ==, !=
Conditionals are another word for boolean expressions
Introduces the concept of branching - depending on various conditions, the program can follow different paths
''' // If the mouse is on the left side of the screen, draw a rect // on the left side of the screen
if (mouseX < width/2) { fill(255); // white rect(0, 0, width/2, height); } '''
Example with else statement:
 // If mouse on left, draw white background, otherwise
// draw black background

if (mouseX < width/2) {
	background(255);
} 	else {
	background(0);
}
Else if - statements evaluated in order presented. As soon as one is found to be true, code is executed and remaining boolean expressions are ignored
 // If mouse on left third, background white,
// if middle, draw gray, otherwise black

if (mouseX < width/3) {
	background(255);
}	else if (mouseX < 2*width/3) {
	background(127);
}	else {
	background(0);
}
Exercise 5-1: Grading system where numbers are turned into letters (Dan doesn't have an answer - I'll code something placing text on the screen)
I ended up using the Math.floor function and also various text functions from p5.js to display grades on the screen.
I found that I needed to declare the grade variable outside of setup, without an initial value. Then give grade its initial value within setup, then use that value within draw. I think this is a pattern I might need to keep following.
Note this important example from the book about how conditional statements work. Meaning, as soon as one is found to be true, the code is executed and the remaining boolean expressions are ignored:
''' // Determine if a number is between 0 and 25, 26 and 50, or > 50
// good code
var x = 75;
if (x > 50) { print(x + " is greater than 50!"); } else if (x > 25) { print(x + " is greater than 25!") } else { print(x + " is 25 or less!") }
// Output: 75 is greater than 50!
// Bad code
var x = 75;
if (x > 25) { print(x + " is greater than 25!"); } else if (x > 50) { print(x + " is greater than 50!") } else { print(x + " is 25 or less!") }
// Output: 75 is greater than 25!
// first conditional is true, so code executes and rest of // boolean expressions are ignored
'''
Another example:
''' // If a number is 5, change it to 6. If a number is 6, change it to 5.
// good code
var x = 5; print("x is now: " + x); if (x == 5) { x = 6; } else if (x == 6) { x = 5; } print("x is now: " + x)
Output: "x is now: " + 6
// bad code
var x = 5; print("x is now: " + x); if (x == 5) { x = 6; } if (x == 6) { x = 5; } print("x is now: " + x)
Output: "x is now: " + 5
// This is buggy because both if statements are executed '''
Our program will perform different tasks based on the result of different conditions
Heres the pseudocode:
Note that functions are often included in libraries because they solve common problems. The constrain() function can be used to "constrain" the size or location of a shape, so that it does not get too big or small, or wander off of the screen.
Functions like constrain are also a great way to avoid errors and to ensure that sections of code work well together on larger projects with multiple programmers.
A more advanced example will change all three color components according to mouse location and click state (mouseIsPressed - mousePressed in processing is mouseIsPressed in p5.js). Note that the system variable mouseIsPressed() is true or false depending on wheter the user is holding down the mouse button.
These examples demonstrate using the constrain() function
Example: If the mouse is on the right side of the screen AND the mouse is on the bottom of the screen, draw a rect in the bottom right corner.
 if (mouseX > width/2 && mouseY > height/2) {
	fill(255);
	rect(width/2, height/2, width/2, height/2);
}
Logical Operators:
 &&	(logical AND)
||	(logical OR)
! 	(logical NOT)
Example using logical NOT: if (!mouseIsPressed) { ellipse(width/2, height/2, 100, 100); } else { rect (width/2, height/2, 100, 100); }
The above example could also be written without the logical NOT, saying:
Exercise demonstrating a simple rollover using dist.
伪代码:
So - how do we know if the mouse is in a given corner?
The answer uses numerical values (100 for mouseX and mouseY). I am going to use width and height.
Exercise 5.6: squares fade from black to white when the mouse leaves their area
Making a button - a rollover that responds when clicked
Practicing learning how to program these GUI elements from scratch (bottons, rollovers, sliders) is an excellent way to learn the basics of variables and conditionals. It also allows you to create customizable interfaces.
Boolean variables to program a button. Boolean variables can only be true or false.
Our button example starts with one booleann variable with a starting value of false (button starts in the off state).
var button = false
Our sketch will turn the background white when the button is pressed, and black when it is not.
 if (button) {
	background(255);
} else {
	background(0);
}
We need to combine with with checking mouse location to see if it's inside of a shape (in our example a rectangle). If it is inside the rectangle, and the mouseIsPressed, we set the button variable to true or false accordingly.
See this example.
Let's make this more like a light switch.按下按钮。 If the light is off, it turns on. If it is on, it turns off. ("toggles the switch")
We need to use the mousePressed() function here. By definition, when the user clicks the mouse, the code inside mousePressed() is executed once and only once.
mouseIsPressed is used when you check if the mouse is being held down.
Watch Dan's video for an example of creating a button. He does a very nice job of explaining all the steps of creating the button.
The example code from Coding train is better in my opinion than the p5.js ported code. Here's my version Note also that Dan mentions that we could use a function to determine if the mouse is inside of the rectangle.我们稍后再解决。
Exercise 5.8 modifies the circle move program to incorporate mousePressed(). The book only asks to make the circle move when the mouse is pressed, but I updated it so the circle stops when the mouse is pressed as well.
We can use conditionals to check if a shape (or something more complex like Zoog or Fido) has reached the edge of the screen, and if so make it turn around.
Write a program where a simple circle moves across the screen horizontally from left to right. When it reaches the right edge of the screen, it reverses direction.
We need to introduce a new variable - var speed = 1
To make the circle move, the value of the x location should change each cycle through draw() - x = x + speed .
This would make the circle run off the edge of the screen.
To make it turn around, we need a conditional statement:
 if (x > width) {
	speed = speed * -1
}
To make the circle bounce off of both sides of the screen, we can use the conditional OR:
 if ((x > width) || (x < 0)) {
	speed = speed * -1
}
See example 5.6 for the bouncing ball.
This exercise modifies the above example to have the ball bounce off all the edges.
I was inspired by this repo about brickbreaker.
The bouncing ball logic of incrementing and decrementing a variable can be aplied to also, say, make a color more red.
See this example called "bouncing color".
Now for more complex motion - a rectangle that follows the edges of the window.
We can think of a rectangle's motion as having four possible states, numbered 0 through 3:
We use a variable to keep track of the state number and adjust the x,y coordinate of the rect according to the state. For instance, if the state is 2, x = x - 1.
Once the rect reaches the endpoint for that state, we can change the state variable. If state is 2, x = x - 1. If x < 0, state = 3.
This is probably the most complicated program we've written so far.
Coding gravity with conditionals.
Gravity is a force of attraction between all masses.
Adding "acceleration" to our bouncing ball, which increases or decreases speed. Acceleration is the rate of change of speed. And speed is the rate of change of location.
speed = speed + acceleration
See this simple gravity example. I updated it adding code so the ball bounces off the edges.
We will learn:
A generative process of repeating a set of rules or steps over and over again.
It is a control structure . It is similar to conditionals (if/else), except instead of asking a yes or no to determine if a block of code should be executed one time , it asks a yes or no question to determing how many times the block of code should be repeated .
There are three types of loops:
The only loop you really ever need is a while loop, though the for loop is a convenient alternative for simple counting operations.
Do-while is rarely used so there are no examples for it.
While loops employ a boolean test condition. If the test evaluates to true, the instructions enclosed in curly brackets are executed. If false, we continue on to the next line of code.
See these two examples using while loops to draw lines and ellipses.
You don't want infinite loops - where the boolean test condition is always true.
To avoid an infinite loop, we must make sure that the exit condition for a loop will eventually be met.
If you have an infinite loop, force quit the program.
Dan has a kind of confusing example of an infinite loop and how to avoid it using constrain. Maybe his videos are clearer.
A style of while loop whereone value is incremented repeatedly (often useful with arrays).
Example code:
 // Start at 0 and count up to 9
for (var i = 0; i < 10; i++)

// Start at 0 and count up to 100
for (var i = 0; i < 101; i += 10)

// Start at 100 and count down to 0 by 5
for (var i = 100; i >= 0; i -= 5)
For loops consist of three parts:
Here's rewriting the earlier lines and ellipses exercises using for loops.
Some very cool examples of using loops to create funky drawings. I could never create these, but this is a good example of trying to read code then guess what it displays. Good to see what's possible with loops and code.
界。 Funky rects. Progressively darker squares. This darker squares one gives a cool optical illusion that the squares are different sizes but they aren't. Spaced squares.
Local vs. Global variables
Deciding what it means to declare a variable somewhere other than the top (before setup()) and how to go about choosing the right location for declaring a variable.
Scope - some variable exist (and are accessible) throughout the entire program's life (global scope) and some live temporarily, only for the brief moment when their value is required for an instruction or calculation (local variables).
Global variables are declared at the top of the program - outside of setup() and draw(). They can be used in any line of code anywhere in the program.
Local variables are variables delared within a block of code. These variables are only available for use within that specific block of code where it was declared (is this the same in JavaScript - I'll have to check in on this - it's not). Dan has a video on scope in his Processing series, but not on scope related to JavaScript.
See this video on let vs var (and even const) and this article which discuss function and block scope for variables in JavaScript and the concept of hoisting.
Display doesn't update until the end of draw() is reached. This is critical to remember when using while and for loops. These loops serve the purpose of repeating something in the context of one cycle through draw(). They are a loop inside of the sketch's main loop, draw().
To display one line at a time, we need a global variable in combination with the very looping nature of draw() itself.
See this example where lines display, one at a time, from y = 0 until y = height.
The next exercise is tricky. It implements the above example but using a for loop.
Using the loop inside draw() for interactivity. This code displays a series of rectangles, from left to right, each colored with a brightness according to its distance from the mouse.
We can use the same principles to draw multiple arms for Zoog. Or draw multiple instances of Zoog by placing the code for Zoog's body inside of a for loop.
Exercise 6.8 asks you to create a grid of squares using a for loop - actually using nested loops. Here's Dan's video on nested loops. It's a pretty big oversight that the book doesn't explain nested loops, because they can be pretty complicated to understand. A better example is actually a checkerboard. It introduces the modulo / remainder operator. My example draws a checkerboard. Mehran from Stanford also uses a checkerboard in his CS106A class.
Step 1: Rewrite lesson one design with variables instead of hard-coded values. Use a for loop for something.
Step 2: Use assignment operations that alter the values of those variables and make the design dynamic.
Step 3: Using conditional statements, alter the design behavior based on certain conditions.
I wanted to do something beyond my skill level - go from a daytime sky to a night time sky and back. I could sort of do it - I went from light blue to dark blue sky, but then it got way too complicated. I'll stick with a "simpler task" - putting lines on the house which serva as a design. And updating orion with begin and endshape.
概述:
I'm sure there are many differences between Java and JS functions - I'll need to revisit this - watch Dan's videos and probably read about it
Functions are a means of taking the parts of our program and separating them out into modular pieces, making our code easier to read and revise
Returning to Space Invaders - steps inside draw():
Previously, we would have translated the above pseudocode into actual code, and placed it inside draw().
Now, we can approach the problem as follows:
 // calling functions we made up inside of draw - also called top-down design
// Stanford 106A is really good for an overview of top-down design
function draw() {
	background(0);
	drawSpaceShip();
	drawEnemies();
	moveShip();
	moveEnemies();
}
What about function definitions? We'll get to this later
Why is it so important to write our own functions?
Local and global variables are also important, as functions are independent blocks of code that will require using local variables (I think this is true in JavaScript - function scope?)
This just means moving beyond the functions provided by p5.js (like line()) and writing our own functions.
A function definition ('declaration') had three parts:
Function example:
 function drawBlackCircle() {
	fill(0);
	ellipse(50, 50, 20, 20);
}
This code won't happen unless it's called from a part of the program that is being executed. We accomplish this by referencing the function name (calling the function).
 function draw() {
	background(255);
	drawBlackCircle();
}
The exercise is to write a function that displays Zoog, or my own design using a function.
Here's Dan's first video on functions.
His example in the video is a bouncing ball, demonstrating modularity.
Here is the bouncing ball code with functions.
Another benefit of functions is greater ease in debugging - we can turn on and off parts of the program by commenting out certain functions
Debugging tip
By adding function calls one by one and executing the sketch each time, we can more easily deduce the location of the problem code
AKA Parameters - values that are passed into a functions
Instead of just saying move - you're saying move n steps (n is the argument)
例子:
 // diameter is an argument to the function
// drawBlackCircle()
function drawBlackCircle(diameter) {
	fill(0);
	ellipse(50, 50, diameter, diameter)
}
An argument is simply a variable declaration inside the parens in the function definition
This variable is a local variable to be used in that function.
Another example:
 // The argument 'speedFactor' affects how fast
// the circle moves
function move(speedFactor) {
	x = x + (speed * speedFactor)
}
So, to move the ball twice as fast: move(2)
Or pass in a variable or the result of a mathematical expression: move(mouseX/10)
Arguments allow for more flexible, reusable functions.
Let's look at the code for drawing a collection of shapes and examine how functions allow us to draw multiple versions of the pattern without retyping the same code over and over.
The example will be drawing a car. We'll look at two examples - one using functions, one without.
The example from the book for car without functions doesnt match up perfectly because he doesn't even show if the code for the cars is in setup() or draw(). Maybe he isn't using setup() or draw() because he doesn't need to in a Processing sketch?
Here's car with functions.
The book example doesn't work because of variable scope.
I actually logged an issue about this example because I thought that the example was buggy. I asked them to include something about hoisting in JavaScript. I'll see if I get a response.
Note the use of color() in this example on parameter passing in functions.
Parameter passing is a very important idea.
The value you pass as a parameter to a function can be a literal value (20, 5, 4.3), a variable (x, y), or the result of an expression (8 + 3, 4 * x/2, random(0, 10))
Arguments act as local variables to a function and are only accessible.
Exercise 7.4: Write code that calls a function
The code is a function that adds three numbers and prints the sum of the three.
Exercise 7.5- write a function definition: You are provided with the function call multiply(5.2, 9.0) . Write the code that takes these two parameters, multiplies them and prints the result to the message window.
Exercise 7.6 is interesting because it's a bouncing car. Using functions, global, and local variables altogether.
This may or may not be the same in JavaScript. I'll need to read more.
In Java, whenever you pass a primitive value (integer, float, char) to a function, you do not actually pass the value itself, but a copy of that variable.
Here is a function called randomizer(). This function receives one argument (float) and adds a random number between -2 and 2 to it.
Pseudocode for randomizer():
Let's see if the same thing happens in JavaScript. (Yes it is because JavaScript is pass by value for primitives.)
Here's the randomizer() code.
This is commonly referred to as "pass by value".
Remember this article later because it describes how JavaScript uses pass by value for primitives but call by sharing for objects.
This definitely gets confusing.
Flow of a program when using a function. The code is executed in the order that the lines are written, but when a function is called, the code leaves its current line, executes the lines inside the function, then comes back to where it left off.
这是一个例子:
An interesting example to predict the output of the program that has various function calls. You have to understand the flow of functions and function calls.
Here's the code.
This is not really relevant to JavaScript - JavaScript is untyped - not totally clear on how and why this matters.
But return values are definitely important.
As soon as the return statement is executed, the program exits the function and sends the returned value back to the location in the code where the function was called. That value can be used in an assignment operation (to give another variable a value) or in any appropriate expression.
示例:
 function sum(a, b, c) {
	var total = a + b + c;
	return total;
}
var answer = sum(5, 10, 32);

var x = sum(5, 6, 8);
var y = sum(8, 9, 10) * 2;
var z = sum(x, y, 40);
line(100, 100, 110, sum(x, y, z));
Functions that return values are traditionally used to perform complex calculations that may need to be performed multiple times throughout the course of the program (like calculating the distance between two points (x1,y1 and x2,y2)).
The dist() function is built into p5.js to calculate the distance between pixels: var d = dist(100, 100, mouseX, mouseY)
This calculates the distance between (100, 100) and (mouseX, mouseY). Without this function, we would need the Pythagorean Theorem.
Our version of p5.js dist() function:
 function distance(x1, y1, x2, y2) {
	var dx = x1 - x2;
	var dy = y1 - y2;
	var d = sqrt(dx*dx + dy*dy);
	return d;
}
Example 7.4: Using our distance function to calculate brightness for squares in quadrants.
Exercise 7.8: write a function that takes one argument (F for Fahrenheit) and computes the temperature in Celsius.
Two new functions - drawZoog() and jiggleZoog() - move randomly in x and y directions.
Incorporate arguments so jiggliness is determined by mouseX position and Zoog's eye color is determined by Zoog's distance to the mouse.
Example 7.5 - Zoog with functions.
Exercise 7.9 - Multiple Zoogs - calls a function to draw Zoog within a for loop, so multiple Zoogs are drawn.
In this chapter:
We talked about JavaScript Objects earlier.
Dan's first video is introduction to OOP with ES6.
He then talks about ES6 Classes.
There could be significant differences between OOP in Java and JavaScript.我想我们会看到的。
We're not introducting any new programming fundamentals - objects use everything we have already learned (variables, conditionals, loops, functions).
What is new is a different way of thinking, a way of structuring and organizing everything we have already learned.
A program for your day (a list of instructions):
What is involved here? What things are involved?
The maint thing is you - a human being. You exhibit certain properties. You have certain traits (how you look). You can do things (wake up, eat, drive).
An object is like you - a thing that has properties and can do stuff.
The properties of an object are variables and the stuff an object can do are functions. OOP is the marriage of everything we have learned up to now (data and functionality) all rolled into one thing .
Data and functionality for very simple human object.
数据:
功能:
Of course, this is not a real human. This is just the idea, or concept behind a human. It describes what it is to be a human. This is a template known as a class . A class is different from an object. You then create instances of a class - which are individual human beings.
How is using objects in our main program (setup() and draw()) useful?
Car example:
Data (global variables):
设置:
画:
What did we do previously:
With OOP, we an take the variables and functions out of the main program and store them inside the car object .
A car object will know about its data - color, location, speed. That is part one.
Part two is the stuff it can do - the methods (functions inside an object). The car can move and it can be displayed .
Pseudocode for object-oriented design :
Data (Global Variables):
设置:
画:
We now have only one variabe - a car variable - instead f separate variables for car color, location, and speed.
Instead of initializing those three variables, we initialize one thing - the Car object.
Those variables (color, location, speed) still exist, but they live inside the Car object. They will be defined in the Car class.
There's now code for a Java class - I'm watching the Coding Train video to see if the code is the same.
Here's the code from the coding train video.
Note that his code uses JavaScript let, instead of var.
The examples online for 8.1 for learning p5.js put functions into the object literal. Dan seems to like constructor functions. Here's example 8.1 using a constructor function.
Use of objects in p5.js makes for clean, readable code.
The hard work goes into writing the template - writing the class itself.
It's a good exercise to take a program without objects and, not changing the functionality at all, reqrite it using objects.
All classes must include four elements:
Here's a simple non-OOP car:
 let c;
let xpos;
let ypos;
let xpseed;

function setup() {
	createCanvas(200, 200);
	c = color(255);
	xpos = width/2;
	ypos = height/2;
	xspeed = 1;
}

function draw() {
	background(0);
	display();
	drive();
}

function display() {
	rectMode(CENTER);
	fill(c);
	rect(xpos, ypos, 20, 10);
}

function drive() {
	xpos += xspeed;
	if (xpos > width) {
		xpos = 0;
	}
}
Here's the program above placed into a Car class:
''' // Declare car object as a global variable let car;
function setup() { createCanvas(200, 200); // Initialize Car object car = new Car(); }
function draw() { background(0); // Operate Car object car.display(); car.drive(); }
class Car { constructor(c, xpos, ypos, xspeed) { this.c = color(255); this.xpos = width/2; this.ypos = height/2; this.xspeed = 1; }
 // Functionality
display() {
	rectMode(CENTER);
	fill(this.c);
	rect(this.xpos, this.ypos, 20, 10);
}

drive() {
	this.xpos += this.xspeed;
	if (this.xpos > width) {
		this.xpos = 0;
	}
}
} '''
The Class Name - "class WhateverNameYouChoose".
Data - a collection of variables. Often referred to as instance variables, since instance of an object contains this set of variables.
Constructor - Special function inside of a class that creates the instance of the object itself. Where you give instructions on how to set up the object. Called by invoking the new operator - "car = new Car()".
Functionality - Add functionality by writing methods.
The three steps outlining how to use an object in a sketch: 1: Declare an object let car 2: Initialize an object (in setup()) car = new Car() 3: Call methods on the object (in draw()) car.move()
Let's look at the details behind these three steps.
Step one: Declaring an object variable
In JavaScript we don't need to specify a type. We do need to give our variable a name.
Objects are complex data types (as opposed to primitive data types like ints, floats, and chars). This is because they store multiple pieces of information: data and functionality. Primitives only store data.
Step two: Initializing an object
We initialized a variable using an assignment operation: let x = 10 .
Initializing an object is a bit more complex. Instead of simply assigning it a primitive value, like an int or a float, we have to construct the object. An object is made with the new operator. car = new Car();
"car" is the object variable name and "=" indicates that we are setting it equal to something that something being a new instance of a Car object. What we are really doing here is intializing a Car object. This line of code calls the constructor , which we create later (simply called "constructor"), that initializes all of the objects variables and makes sure the Car is ready to go.
Beware of "NullPointerException" .
It looks like in Java, the default value of a primitive int is 0, while the default value of a variable in JavaScript is undefined.
If you forget to initialize an object, you get the value null, meaning nothing.
Apparently, in JavaScript, the error will be "undefined is not a function".
Step 3: Using an object
Once we have successfully declared and initialized an object variable, we can use it.
Using an object involves coalling functions that are built into that object.
Functions that are inside of an object are called "methods" in Java - I'll call them the same for now in JavaScript.
Calling a method inside of an object is accomplished via dot syntax. variableName.objectMethod(Method Arguments)
Example: - car.draw() - car.display()
Dan actually calls this "Putthing it together with a Tab ". I'm going to assume there's some other construct in JavaScript besides a Tab because I don't know what a Tab is.
Here is Example 8.1 - a Car class and a Car object. Note that I submitted this to Dan's repo as a pull request and haven't heard anything yet.
We placed the Car class below the main body of the program (under draw()), which is identical to where we have been placing user-defined functions. But technically speaking the order does not matter as long as the blocks of code remain intact.
It's just nice to have things make the most logical sense to us humans, the bottom of the code being a good starting point.
Processing offers a useful means for separating code fro each other through the use of tabs.
We're not using Processing, however. Let's consult the videos.
It doesn't look like he talks about some analogous concept to tabs in the videos.
I think in JS you would just create new files for each class. For now I'll just assume each tab is a new .js file.
You can name each tab anything you like, but you should name it after the class you intend to put there.
You can then type the main body of code on one tab (entitled "objectExample") and type the code for your class in another (entitled "Car").
I'm assuming these will be sketch.js and car.js...
So basically, create a new file calles "objectName".js to hold the code for your class.
Let's try this with our Car example from before.
Apparently my assumptions about a new .js file were wrong. I got led down a rabbit hole about class-based vs. prototype-based languages.
This might be a bit over my head for now.
Note also that classes are "syntactical sugar" over JavaScript's prototype-based inheritance model.
I'm going to need a real textbook to better understand this concept.
Wow - it actually works...
All I needed to do was reference the car.js file in index.html....
That's a big lesson. All the reading and searching, no answers, and all I needed to do was add one line to index.html. All the other reading and researching was helpful I guess, but ultimately not getting me any closer to the answer.
Our old code would have create identical objects.
If we want to create different objects, we need constructor arguments.
For instance: var car = new Car(color(255, 0, 0), 0, 100, 2)
We need to rewrite the constructor to reflect this:
 constructor(tempC, tempXpos, tempYpos, tempXspeed) {
 // The Constructor is defined with arguments.
    this.c = tempC;
    this.xpos = tempXpos;
    this.ypos = tempYpos;
    this.xspeed = tempXspeed;
  }
Arguments are local variables used inside the body of a function that get filled with values when the function is called.
We are now creating temporary constructor artyments that exist solely to pass a value from where the object is made into the object itself.
This allows us to make a variety of objects using the same constructor .
Here's the program updated with constructor arguments, so there are now two car objects, each different.
The next exercise is to rewrite the gravity example using objects with a Ball class. Include two instances of a Ball object.
You can include as many classes as you feel like writing.
Back to Space Invaders. You could include a:
Using an object for each entity in your game
Although not primitive, classes are data types just like ints and floats. Since classes are made up of data, an object can therefore contain other objects!
This could be different in JavaScript since it's a prototype language instead of a class-based language, as described above. I won't get too into this.
Objects can be passes as arguments ito a function. Again I'm sure JS has all sorts of different issues here, left for another time.
Here, Dan discusses pass by copy for primitives vs pass by reference for objects. With pass by reference, if an object is passed to a function, those changes will affect that object used anywhere else in the sketch.
Again, this is likely different for JS.
This could start to get tricky because the book will start to use multiple objects, pass objects into functions, etc.
I might need a real JavaScript book to figure out how to use JavaScript classes and objects sadly.
我们看看。
So, when do we use object-oriented programming?
总是!
Objets allow us to organize concepts inside of a software application into modular, reusable packages.
However, it's not always convenient or necessary to start out every project using object-orientation, especially when you are learning.
We can easily "sketch" out vidual ideas with p5.js using non object-oriented code.
For any project, take a step-by-step approach. Do not start out writing classes for everything you want to do.
Sketch out your idea first by writing code in setup() and draw(). Nail down the logic of what you want to do as well as how you wnat it to look.
As your project begins to grow, take time to reorganize your code, perhaps first with functions, then with objects.
It is perfectly acceptable to dedicate a significant chunk of your time to this reorganization process (often referred to as refactoring) without making any changes to the end result, that is what your sketch looks like and does on screen.
We will now refactor Zoog by making Zoog into an object. This will give us a leg up in programming Zoog's future life in more complex sketches.
So, let's make a Zoog class.
Exercise 8-6 - rewrite Zoog class to inclood two Zoogs. Vary appearance somehow. Vary behavior somehow. Add color variable.
Take your lesson two project and reorganize your code using functions.
Reorgainze the code one step further using a class and object variable.
Add arguments to the Constructor of your class and try making two or three objects with different variables.
Here's my lesson 3 project - Sol Lewitt Squares. One version with functions, one with classes.
In this chapter:
What if we want a program with 100 car objects?
We could use clever copying and pasting, but that's not a good solution.
An array is one thing tht contains a list of variables.
Any time a program requires multiple instances of similar data, it might be time to use an array.
示例:
A variable is a named pointer to a location in memory where data is stored. In other words, variables allow programs to keep track of information over a period of time.
An array is exactly the same, only instead of pointing to one singular piece of information, an array points to multiple pieces.
We an think of an array as a list of variables.
A list is useful for two important reasons. One, it keeps track of the tlements in the list itself. Two, the list keeps track of the order of those elements. The order can be just as important as the information itself.
In an array, each element of the list has a unique indes, an integer value that designates its position in the list. In all cases, the name of the array refers to the list as a whole, while each element is accessed via its position.
We start counting arrays from index 0. This is because the first element of the array is located at the start, a distance of zero from the beginning. Numbering the elements starting at 0 also makes many array operations (the process of executing a line of code for every element of the list) a great deal more convenient.
This is different in Java and JavaScript.
We denote the use of an array by placing empty square brackets ("[]")after the name.
I don't think there's any difference between an array of ints and an array of objects in JavaScript.
Arrays in Java are also of fixed size. Arrays in JavaScript are not fixed size.
You can also use the new keyword to create arrays in JavaScript instead of creating an array literal.
One way to fill an array is to hard-code the values in each spot.
Do we need to initialize an array in JS?大概吧。
What we really want to do is iterate through the elements of the array. This requires a loop.
Consider the following problem:
(A) Create an array of 1,000 floating point numbers. (B) Initialize every element of that array with a random number between 0 and 10.
Part A we already know how to do.
float [] values = new float [ 1000 ] let values = new Array ( 1000 )We want to avoid this for B:
values[0] = random(0, 10); values[1] = random(0, 10); ETC...
Let's describe in English what we want to program (write some pseudocode):
For every number n from 0 to 999, initialize the nth element stored in the array as a random value between 0 and 10.
Translating into code, we have:
 let n = 0;
values[n] = random(0, 10);
values[n + 1] = random(0, 10);
etc...
We have not improved the situation, but we have taken a big step forward in understanding th problem. By using a variable (n) to describe an index in the array, we can now employ a while loop or a for loop to initialize every n element.
 /// while loop
let n = 0;
while (n < 1000) {
	values[n] = random(0, 10);
	n = n + 1;
}
 // for loop
for(let n = 0; n < 1000; n++) {
	values[n] = random(0, 10);
}
We don't want to use hard-coded values like 1000. What if we wanted to use 2000?
We can use array.length.
''' for (let i = 0; i < values.length; i + + ) { values[i] = 0; } '''
Exercise 9-6: Write code to perform the following array operations: 1: Square each number 2: Add a random number between zero and 10 to each number 3: Add to each number the numbe that follows in the array (skip the last value in th array) 4: Calculate the sum of all the numbers
Note this video series on ES6 Array functions like the arrow function, map, fill, reduce, filter, etc.
I'll try to do these exercises with the ES6 Array functions as well.
let nums = [5, 4, 2, 7, 6, 8, 5, 2, 8, 14]
 // Square each number
for(let i = 0; i < nums.length; i++){
	nums[i] = nums[i] * nums[i]
}
One example to use is the for...of loop.
 for (let bubble of bubbles) {
	bubble.move();
	bubble.show()
}
You need higher order functions for most of these exercises. Dan briefly discusses the difference between functional and object oriented programming (something beyond my scope right now).
Function that takes a function as input or returns a function as output - higher order function.
Can manipulate array in one fell swoop.
Map() might look nice but also might not be high performance (need to replicate entire array).
 // Using higher order function map()
function squared(x) {
	return x * x;
}

nums = nums.map(squared)
Or with an anonymous function:
 nums = nums.map(function(x) {
	return x * x;
});
Now with an arrow function:
nums = nums.map(x => x * x);
2: Add a random number
nums = nums.map(x => x + Math.floor(Math.random() * 10));
3: Add to each number the number that follows (skip last value)
 // without higher order functions
for(let i = 0; i < nums.length - 1; i++) {
	nums[i] += nums[i + 1]
}
4: Find sum
 // Without higher order functions (reduce())
let sum = 0;
for (let num of nums) {
	sum += num;
}
 function sum(acc, num) {
	console.log(acc);
	return acc + num;
}
// acc is like sum in previous example

let answer = nums.reduce(sum, 0);
// pass in initial value otherwise first value of acc is first value of array
Now with arrow syntax:
let sum = nums.reduce((acc, num) => acc + num, 0);
Finding min and max:
 function findMax(acc, val) {
	if(val > acc) {
		acc = val;
	}
	return acc;
}

let biggest = vals.reduce(findMax);
console.log(biggest);
Making it an arrow function:
 let biggest = vals.reduce((acc, val) => {
	if (val > acc) {
		add = val;
	}
	return acc;
})
Or using a ternary operator:
let biggest = vals.reduce((a, b) => b > a ? b : a);
Here's the task - programming a train following the mouse - it's not so easy.
It will require an array which will serve to store the history of mouse locations.
We will use two arrays, one to store horizontal mouse locations, and one for vertical.
Let's say, arbitrarily that we want to store the last 50 mouse locations.
First, we declare two arrays:
 let xpos = new Array(50);
let ypos = new Array(50);
In setup(), we need to initialize the arrays. At the start of the program there has not been any mouse movement, so we fill the arrays with 0's.
 for(let i = 0; i < xpos.length; i++) {
	xpos[i] = 0;
	ypos[i] = 0;
}
Another way to do this, in one line is:
 let xpos = new Array(50).fill(0);
let ypos = new Array(50).fill(0);
Each time through the draw() loop, we want to update the array with the current mouse location. Let's choose to put the current mouse location in the last spot of the array. The length of the array is 50, meaning the index values range from 0 - 49. The las tspot is 49 (length - 1).
 xpos[xpos.length-1] = mouseX;
ypos[ypos.length-1] = mouseY;
Now comes the hard part - we want to keep only the last 50 mouse locations.
By storing the current mouse location at the end, we are overwriting what was previously stored there. If the mouse is at (10,10) during one frame, and (15,15) during another, we want to put (10,10) in the second to last spot and (15,15) in the last spot.
The solution is to shift all the elements of the array down one spot before updating the current location.
The image below shows how it works.
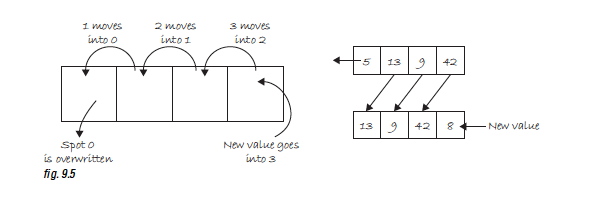
Element index 49 moves into 48, 48 to 47, etc.
We can do this by looping through the array and setting each element at i to the value of element i plus one .
We must stop at the second to last value because there is no element 50 (49 plus 1).
Instead of i < xpos.length; we must say i < xpos.length - 1 .
Here's the full code for the array shift:
 for(let i = 0; i < xpos.length - 1; i++) {
	xpos[i] = xpos[i+1];
	ypos[i] = ypos[i+1];
}
Finally, we can use the history of mouse locations to draw a series of circles. For each element of the xpos array and ypos array, draw an ellipse at the corresponding values stored in the array.
 for(let i = 0; i < xpos.length; i++) {
	noStroke();
	fill(255);
	ellipse(xpos[i], ypos[i], 32, 32);
}
We could make this fancier by linking the brightness of the circle to the location in the array, meaning the earlier (older) values will be bright and small and the later (newer) values will be darker and bigger.
This is accomplished by using the counting variable i to evaluate color and size.
 for(let i = 0; i < xpos.length; i++){
	noStroke();
	fill(255 - i*5);
	ellipse(xpos[i], ypos[i], i, 0);
}
Here's the complete code for the snake following the mouse.
The next exercise is to make the snake example object-oriented. We can try to make snakes with slightly different looks (different shapes, colors, and sizes).
I actually needed to look at the Processing example for help.
An advanced problem is to create a Point class that stores the x and y coordinate as part of the sketch. Each snake object will have an array of Point objects, instead of two separate arrays of x and y values.
The next section is about an array of objects, so maybe I'll come back to this later after learning about arrays of objects.
Note here's Dan's example using a point object literal and the splice array function to solve the snake problem.
How can we write a program with 100 car objects?
With OOP and arrays, we can simply transition a program from one object to 10 to 10,000, maybe without changing the car class at all. The class does not care how many objects are made from it.
Revisiting the code for creating one Car object:
 let myCar;

function setup() {
	myCar = new Car(color(255, 0, 0), 0, 100, 2);
}

function draw() {
	background(255);
	myCar.move();
	myCar.display();
}
Three steps in the above code needed to alter each one to account for an array.
Before we had to:
1: Declare the Car - let myCar; 2: Initialize the Car = myCar = new Car(color(255, 0, 0), 0, 100, 2); 3: Run the Car by Calling Methods:
 myCar.move();
myCar.display();
After: 1: Declare the Car Array: let cars = new Array(100); 2: Initialize each element of the Car Array:
 for(let i = 0; i < cars.length; i++) {
	cars[i] = new Car(color(i*2), 0, i*2, i)
}
3: Run each element of the Car Array:
 for(let i = 0; i < cars.length; i++) {
	cars[i].move();
	cars[i].display;
}
See this example for 100 cars. If we wand to change the number of cars present, all we have to do is change the array definition - nothing else has to change!
Back to the simple rollover effect. A rectangle appears in the window and is one color when the mouse is on top and another color when the mouse is not.
The following is an example that takes this simple idea and puts it into a "Stripe" object. Even though there 10 stripes, each one individually responds to the mouse by having its own rollover() function.
 function rollover(mx, my) {
	if (mx > this.x && mx < this.x + this.w) {
		mouse = true;
	} else {
		mouse = false;
	}
}
This function checks to see if a point (mx, my) is located within a verticle stripe. Is it greater than the left edge and less than the right edge? If so, a boolean variable "mouse" is set to true.
When designing your classes, it is often convenient to use a boolean variable to keep track of properties of an object that resemble a switch. For example, a Car object could be running or not running. Zoog could be happy or not happy.
This boolean variable is used in a conditional statement inside of the Stripe object's display() function to determine the Stripe's color.
 function display() {
	if (mouse) {
		fill(255);
	} else {
		fill(255, 100);
	}
	noStroke();
	rect(this.x, 0, this.w, height);
}
When we call the rollover() function on that object, we can then pass in mouseX and mouseY as the arguments.
stripes[i].rollover(mouseX, mouseY);
Even though we could have accessed mouseX and mouseY direcedly inside of the rollover() function, it is better to use arguments. This allows for greater flexibility. The Stripe object can check and determine if any x,y coordinate is contained within its rectangle. Perhaps later, we will want the Stripe to turn white when another object, rather than the mouse, is over it.
Here is the full "interactive stripes" example.
Here's an exercise making clickable buttons using classes. It's also good practice in using boolean variables.
p5.js ofers a set of array functions that manipulate the size of an array. I'm not sure how useful this is (unlike in Java where maybe it's more useful with Array and ArrayList), but it's still good to know I guess.
The p5.js Array functions are:
Find more details in the reference.
Here's an example using append() to expand the size of an array. Append is very similar to Array.push() - adding elements to the end of an array.
The example starts with an array of one object. Each time the mouse is pressed, a new object is created and appended to the end of the original array.
From one Zoog object to many. Similar to how we geerated the Car array or Stripe array, we can copy the exact Zoog class created in Example 8-3 and implement an array.
See this example for 200 Zoog objects in an array.
Step 1: Take the Class you made in Lesson Three and make an array of objects from that class
Step 2: Can you make the objects react to the mouse? Try using the dist() function to determine the object's proximity to the mouse. For example, could you make each object jiggle more the closer it is to the mouse?
How many objects can you make before the sketch runs too slow?
I went back to my work from lesson 2 - Fido. First I created a Fido class.
Then I made a number of Fidos using an Array, and when you click each Fido, the color of its nose changes from black to white.
Remember 'Lather.冲洗。重复。'?
What did we learn from Zoog/Fido?
We need to pause now and consider how we can apply what we have learned to what we want to do .
What is our idea and how can variables, conditionals, loops, function, objects, and arrays help us?
Our earlier examples were "one feature" - Zoog would jiggle and only jiggle. Zoog didn't suddenly start hopping. Zoog was also usually all alone. He would never start interacting with other alien creatures along the way.
In the real world, software projects usually involve many moving parts. This chapter aims to demonstrate how a larger project is created out of many smaller "one feature" programs just like the ones we are starting to feel comfortable making.
You, the programmer, will start with an overall vision, but you must learn how to break it down into invidual parts to successfully execute that vision.
We will start with an idea. Ideally, we sould pick a sample 'idea' that could set the basis for any project you want to create after reading this. Sadly there is no such thing. There are unlimited possibilities in programming, but that also means you need to find your own way to creating those possibilities.
Nevertheless, we are going to develop one example that will hopefully serve us welll for learning about the process of developing larger projects.
Our choice will be a simple game with interactivity, multipic objects, and a goal. The focus will not be on good game design, but rather on good software design . How doyou go from thought to code? How do you implement your own algorithm to realize your ideas? We will see how a larger project divides into four mini-projects and attack them one by one, ultimately bringing all parts together to execute the original idea.
We will continue to emphasize OOP, and each of these parts will be developed using a class . The payoff will be seeing how easy it then is to create the final program by bringing the self-contained, fully functional classes together.
Before we get to the idea and its parts, let's review the concept of an algorithm .
 Our process:
- 1: Idea - start with an idea
- 2: Parts - break the idea down into smaller parts
	- Algorithm pseudocode - for each part, work out the algorithm for that part in pseudocode
	- Algorithm code - Implement that algorithm with code
	- Objects - Take the data and functionality associated with that algorithm and build it into a class
- 3: Integration - Take all the classes from Step 2 and integrate them into one larger algorithm
An algorithm is a procedure or formula for solving a problem.
In computer programming, an algorithm is a sequence of steps requred to perform a task. Every single example so far in this book involved an algorithm.
An algorithm is not too far from a recipe: 1: Preheat oven fo 400F 2: Place four boneless chicken breasts in baking dish 3: Spread mustard evenly over chicken 4: Bake at 400F for 30 mins
The above is a nice algorithm for cooking mustard chicken.
This might be the pseudocode for that program:
 preheatOven(400);
placeChicken(4, "baking dish");
spreadMustard();
bake(400, 30);
An example that uses an algorith to solve a math problem is more relevant to our pursuits. Let's describe an algorithm to evaluate the sum of a sequence of numbers 1 through N.
SUM(N) = 1+2+3+...+N
Where N is any given number greater than zero.
Translating the preceding algorithm into code, we have:
 let sum = 0;
let n = 10;
let i = 0;

while(i <= n) {
	sum = sum + i;
	i++;
}
console.log(sum);
Traditionally, programming is thought of as the process of:
We have just done this in the chicken and summation examples.
Some ideas, however, are too large to be finished in one fell swoop.
So, our revised process is:
This does not mean to say you shouldnt experiment along the way, even altering the original idea completely. And certainly, once the code is finished, there will almost certainily remain work to do in terms of cleaning up the code, bug fixes, and additional features. It is this thinking process, however, that should guide you from idea to code. If you practice developing your projects with this strategy, creating code that implements your ideas will hopefully feel less daunting.
We will practice with a very simple game.
Lets describe the game in paragraph form.
 ***Rain Game***

The object of this game is to catch raindrops before they hit the ground.  Every so often (depending on the level of difficulty), a new drop falls from the top of the screen at a random horizontal location with a random vertical speed.  The player must catch the raindrops with the mouse with the goal of not letting any raindrops reach the bottom of the screen.
Exercise - Write out an idea for a project you want to create
Now this is extremely tricky. Let's try to make it similar to the game we're creating.
 My game:

The object of this game is to find the word before the first letter hits the the bottom of the screen. A series of letters will appear at the top of the screen at random horizontal location with a random vertical speed.  The player must catch the correct letters with the mouse with the goal of spelling the correct word.  If the player catches three incorrect letters, that player will lose.
Now let's see if we can take the "Rain Game" and break it down into smaller parts.我们该怎么做? For one, we can start by thinking of the elements in the game: the raindrops and the catcher. Secondly, we should think about these elements' behaviors. For example, we will need a timing mechanism so that the drops fall 'every so often'. We will also need to determine when a raindrop is 'caught'. Let's organize these parts more formally.
Part 1. Develop a program with a circle controlled by a mouse. This circle will be the user controlled 'rain catcher'.
Part 2. Write a program to test if two circles intersect. This will be used to determine if the rain catcher has caught a raindrop.
Part 3. Write a timer program that executes a function every N seconds.
Part 4. Write a program with circles falling from the top of the screen to the bottom. These will be the raindrops.
Parts 1 through 3 are simple and each can be completed in one fell swoop. However, with Part 4, even though it represents one piece of the larger project, it is complex enough that we will need to complete this exact exercise by breaking it down into smaller steps and building it back up.
Exercise - Take my idea and break it into individual parts.
Part 1. Same as Dan's - Develop a program with a circle controlled by a mouse. This circle will be the user controlled 'letter catcher'.
Part 2. Same as Dan's, since each letter will reside inside of a circle (I just thought of this). Write a program to test if two circles intersect. This will be used to determine if the letter catcher has caught a letter.
Part 3. Write a program to determine if the letter catcher has found a letter in the word. If it has, add the letter (and all circles with the same letter) to the screen. If it hasn't, add one strike.
Part 4. Same as Dan's - Write a timer program that executes a function every N seconds.
Part 5. Write a program with circles falling from the top of the screen to the bottom. Inside each circle will be a letter. These will be the letters for the words.
I actually think I'm going to program the UFO game, same as from Stanford 106A.
Step 1: Write a function that draws a rect at the top right corner. Call it 'UFO'.
Step 2: Write a function that makes the UFO move from the top to the right to the left of the screen, then from the left to the right of the screen, moving down the screen as it reaches each edge of the screen. If the UFO reaches the bottom of the screen, the game is over.
Step 3: Write a function that creates a small circle at the bottom center of the screen, called 'Bullet', when the mouse is clicked.
Step 4: Write a function that makes the bullet move from the bottom center of the screen to the top of the screen.
Step 5: Write a function that detects when the Bullet intersects with the UFO. If this happens, make the UFO disappear and display 'Game Over'.
We will now follow this process for each part:
If we do our job correctly, all of the functionality needed will be built into a class which can then be easily copied into the final project itself.
This is the simplest part to construct and requires little beyond what he learned in Chapter 3. Having pseudocode that is only two lines long is a good sign, indicating that this step is small enough to handle and does not need to be made into even smaller parts.
伪代码:
Translating it into code is easy:
 function setup() {
	createCanvas(400, 400);
}

function draw() {
	background(255);
	stroke(0);
	fill(175);
	ellipse(mouseX, mouseY, 64, 64);
}
This is a good step, but we are not done. As stated, our goal is to develop the rain catcher program in an object oriented manner. When we take this code and incorporate it into the final program, we will want to have it separated out into a class so that we can make a 'catcher' object. Our pseudocode would be revised to look like the following:
设置:
画:
Here is the Catcher class.
Part 2 requires us to determine when a catcher and raindrop intersect. Intersection functionality is what we want to focus on developing in this step. We will start with a simple bouncing ball class (which we saw in Example 5-6) and work out how to determine when two bouncing circles intersect. During the 'integration' process, this intersect() function will be incorporated into the Catcher class to catch raindrops.
Here's the algorithm for the intersection part.
设置:
画:
The hard work here is the intersection test, which we will get to in a moment. First, here is what we need for a simple bouncing "Ball" class without an intersection test.
数据:
功能:
We can now translate this into code.
From here it is pretty easy to create a sketch with two ball objects. Ultimately we'll need an array for many raindrops, but for now, two ball variables will be simpler.
Now that we've set up our system for having two circles move around the screen, we need to develop an algorithm for determining if the circles intersect.
In p5.js, we know we can calculate the distance between two points using the dist() function. We also have access to the radius of each circle (I've been calling it r but it's actually d(diameter, or width) I think. To find radius I would need to divide d by 2). See the image below - we can compare the distance between the circles and the sum of the radii to determine if the circles overlap.
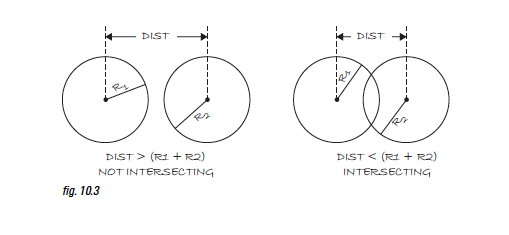
OK, so assuming the following:
We have the statement:
If the distance between (x1,y1) and (x2,y2) is less than the sum of r1 and r2, circle one intersects circle two.
Our job now is to write a function that returns true or false based on the above statement.
 // A function that returns true of false based on whether two
// circles intersect
// If the distance is less than the sum of radii the circles touch

function intersect(x1, y1, x2, y2, r1, r2) {
	let distance = dist(x1, y1, x2, y2); // calculate distance
	if(distance < r1 + r2) {		// compare distance to r1 + r2
		return true;
		} else {
			return false;
		}
	}
}
Now that the function is complete, we can test it with data from ball1 and ball2.
 let intersecting = intersect(ball1.x, ball1.y, ball2.x, ball2.y, ball1.r, ball2.r);

if (intersecting) {
	console.log("The circles are intersecting!");
}
The code above is somewhat awkward and it will be useful to take the function one step further, incorporating it into the ball class itself. Let's first look at the entire main program as it stands.
I'm pretty sure Dan has videos about this too, so I'll check that out next.
Here's Dan's first video about Object Communication.
We should, however, program this in an object oriented fashion. We should have an intersect funtion inside the Ball class that returns true or false.
Now we have learned that an object can have a function that takes another object as an argument. This is one way to have objects communicate. In this case, they are checking to see if they intersect.
Our next task is to develop a timer that executes a function every N seconds. Again, we will do this in two steps, first just using the main body of a program, and second, taking the logic and putting it into a Timer class.
p5.js has the functions hour(), second(), minute(), month(), day(), and year() to deal with time. We could conceivably use the second() function to determine how much time has passed. However, this is not terribly convenient, since second() rolls over from 60 to 0 at the end of every minute.
For creating a timer, the function millis() is best. First of all, millis(), which returns the number of milliseconds since a sketch started, allows for a great deal more precision. One millisecond is one one-thousandth of a second (1000 ms = 1s). Secondly, millis() never rolls back to zero, so asking for the milliseconds at one moment and subtracting it from the milliseconds at a later moment will always result in the amount of time passed.
Let's say we want to change the background color to red five seconds after our program started. Five seconds = 5,000 ms, so we can check:
 if (millis() > 5000) {
	background(255, 0, 0);
}
Let's try to make the background a new random color every five seconds.
Create a variable, totalTime, which is how long the timer needs to run before the background changes colors.
设置:
画:
See this example for the code.
With this logic worked out, we can now move the timer into a class. Let's think about what data is involved in the timer. A timer must know the time at which it started ( savedTime ) and how long it needs to run ( totalTime ).
数据:
A timer must also be able to start as well as check to see if it is finished .
功能:
Here is the object-oriented timer.
What have we done so far...
我们有:
The final piece of the puzzle is the raindrops themselves.
Ultimately, we want an array of Raindrop objects falling from the top of the window to the bottom. Since this step involves creating an array of objects that move, it is useful to approach this fourth part as a series of even smaller steps, subparts of Part 4, thinking again of the individual elements and behaviors we will need.
Part 4 subparts:
4.1 - creating the motion of a raindrop (a simple circle for now) is easy (we learned this in Chapter 3).
See this example for raindrop using functions.
And see this for object oriented raindrop.
Now that this is complete, the next step is to go from one drop to an array of drops - Part 4.2. We learned this in Chapter 9.
Here's a snippet:
 let drops = new Array(50);

function setup() {
	createCanvas(400, 400);
	for(let i = 0; i < drops.length; i++) {
		drops[i] = new Drop();
	}
}

function draw() {
	background(255);
	for(let i = 0; i < drops.length; i++) {
		drops[i].move();
		drops[i].display();
	}
}
The problem with this code, however, is that the raindrops appear all at once. According to our specs, we want the raindrops to appear one at a time, every N seconds.
Now we are at Part 4.3 - Flexible number of raindrops (appearing one at a time). We can skip worrying about the timer for now and just have one new raindrop appear every frame (incremental programming). We should also make our array much larger, allowing for many more raindrops.
To make this work, we need a new variable to keep track of the total number of drops - 'totalDrops'. Most array examples involve walking through the entire array in order to deal with the entire list. Now, we want to access a portion of the list, the number stored in totalDrops. Let's write some pseudocode to describe this process:
设置:
画:
This snippet translates the pseudocode into code:
 let drops = new Array(1000);
let totalDrops = 0;

function setup() {
	createCanvas(400, 400);
	for(let i = 0; i < drops.length; i++) {
		drops[i] = new Drop();
	}
}

function draw() {
	background(255);

	// Initialize one drop
	drops[totalDrops] = new Drop();

	// Increment totalDrops
	totalDrops++

	// if we hit the end of the array
	if (totalDrops > drops.length) {
		totalDrops = 0; // Start over
	}

	// We only want to display totalDrops
	for(let i = 0; i < totalDrops; i++) {
		drops[i].move();
		drops[i].display();
	}
}
See this code for the raindrop 'one at a time'.
What have we done so far:
We have, however, just been using a circle to display the drop. The advantage to this is that we were able to delay worrying about the drawing code and focus on the motion behaviors and organization of data and functions (incremental programming). Now we can focus on how the drops look - Part 4.4 - Finalize raindrop appearance.
One way to create a more 'drop-like' look is to draw a sequence of circles in the verticle direction, starting small and getting larget as they move down.
Here's a snippet of that:
 background(255);
for(let i = 2; i < 8; i++) {
	noStroke();
	fill(0);
	ellipse(width/2, height/2+i*4, i*2, i*2);
}
We can incorporate this algorithm in the raindrop class from raindrop one at a time using x and y as the start of the ellipse locations, and the raindrop radius as the maximum value for i in the loop.
See this snippet:
 function display() {
	// display the drop
	noStroke();
	fill(this.c);
	for(let i = 2; i < this.w; i++) {
		ellipse(this.x, this.y+i*4, i*2, i*2)
	}
}
What have we done:
Now we can assemble the together in one program.
The first step - create a new p5.js program - with four different javascript files. One will be our main program - sketch.js - and the other three will hold our classes - 'catcher.js', 'drop.js', and 'timer.js'. We have to make sure to add links to all of these files in our index.html.
Just as a quick note, we can create files with the command touch FILENAME . So after cd into the correct directory, touch timer.js will create a file new file called timer.js in the directory that we want.
Here is how I executed creating three JavaScript files in the directory of my choice, along with changing into the correct directory, and confirming that the files were being created with the command ls .
 // change into desired directory
[lesson-5 (master)]$ cd example-10.09-complete-raindrop-game/

// list files in that directory
[example-10.09-complete-raindrop-game (master)]$ ls
index.html	libraries	sketch.js

// create first file called 'touch.js'
[example-10.09-complete-raindrop-game (master)]$ touch timer.js

// confirm that file was created in directory
[example-10.09-complete-raindrop-game (master)]$ ls
index.html	libraries	sketch.js	timer.js
[example-10.09-complete-raindrop-game (master)]$ touch drop.js
[example-10.09-complete-raindrop-game (master)]$ touch catcher.js
[example-10.09-complete-raindrop-game (master)]$ ls
catcher.js	drop.js		index.html	libraries	sketch.js	timer.js
The first step is to copy and paste the code for each class into each of the class files we just created.
Individually, they will not need to change, so there is no need for us to revisit the code. What we need to revisit is the main program - what goes in setup() and draw().
Referring back to the original game description and knowing how the pieces were assembled, we can write the pseudocode algorithm for the entire game.
设置:
画:
Each step in the above program has already been worked out except for "Remove Drop from screen."
This is rather common. Even with breaking the idea down into parts and working them out one at a time, little bits can be missed. Fortunately, this piece of functionality is simple enough and with some ingenuity, we will see how we can slip it in during assembly.
One way to approach assembling the above algorithm is to start combining all of the above elements into one sketch and not worry about how they interact. In other words, everything but having the timer trigger the drops and testing for intersection. To get this going, all we need to do is copy/paste from each part's global variables, setup() and draw()!
Here are the global variables: a Catcher object, an array of Drop objects, a Tmer object, and an integer to store the number of drops.
 let catcher;
let timer;
let drops;

let totalDrops = 0;
In setup(), the variables are initialized. Note, however, we can skip initializing the individual drops in the array since they will be created one at a time. We will also need to call the timer's start() function.
 function setup() {
	createCanvas(400, 400);

	catcher = new Catcher(32); // create the catcher w = 32
	drops = new Array(1000); // create 1000 spots in the array
	timer = new Timer(2000); // timer goes off every two secs

	timer.start();
}
In draw(), the objects call their methods. Again, we are just taking the code from each part we did separately earlier in this chapter and pasting in sequence.
I'm interested to see how this code turns out. See this example for all the code together, but not fully integrated.
The next step is to take these concepts we have developed and have them work together. For example, we should only create one new raindrop whenever two seconds have passed (as indicated by the timer's isFinished() function).
 // Check the timer
if (timer.isFinished()) {
	// Deal with raindrops
	// Initialize one drop
	drops[totalDrops] = new Drop();
	// Increment totalDrops
	totalDrops++
	// If we hit the end of the array
	if (totalDrops >= drops.length) {
		totalDrops = 0; // Start over
	}
	timer.start();
}
We also need to find out when the Catcher object intersects a Drop. Earlier, we tested for intersection by calling the intersect() function we wrote inside the Ball class.
 let intersecting = ball1.intersect(ball2);
if (intersecting) {
	console.log('the circles are intersecting!');
}
We can do the same thing here, calling an intersect() function in the catcher class and passing through every raindrop in the system. Instead of printing out a message, we will actually want to affect the raindrop itself, telling it to disappear, perhaps. This code assumes that the caught() function will do the job. - The book is lacking here - needs more info on top down design. The Stanford course does a good job with that with introducing Karel first.
 // Move and display all drops
for (let i = 0; i < totalDrops; i++) {
	drops[i].move();
	drops[i].display();
	if (catcher.intersect(drops[i])) {
		drops[i].caught();
	}
}
Our catcher object did not originally contain the function intersect(), nor did the drop include caught(). So these are some new functions we will need to write as part of the integration process.
intersect() is easy to incorporate since we solved the problem already earlier and can literally copy it into the catcher class (changing the argument from a ball object to a drop object).
 // A function that returns true of false based if the catcher
// intersects a raindrop

intersect(d) {
	// calculate distance
	let distance = dist(this.x, this.y, d.x, d.y);
	// in addition to calling functions, we can access
	// variables inside of an object using dot syntax
	if (distance < this.w + d.w) {
		return true;
	} else {
		return false;
	}
}
When the drop is caught, we will set its location so somewhere offscreen (so that it can't be seen, the equivalent to 'disappearing') and stop it from moving by setting it's speed equal to 0. Although we did not work out this functionality in advance of the integration process, it is simple enough to throw in right now.
 // if drop is caught
caught() {
	this.speed = 0;
	this.y = -1000;
}
That's the whole program.
This exercise is interesting. We need to implement a scoring system for the game. The player starts off with 10 points. For every raindrop that reaches the bottom, we decrease the score by 1. If all 1,000 raindrops fall without the score getting to 0, a new level begins and raindrops appear faster. If 10 raindrops reach the bottom during any level, the player loses. Show an the score onscreen as a rectangle that increases and decreases with size.
Let's see if I can break this down:
1: Declare global variable score.
2: Set score = 10 pts in setup.
3: We have a reachedBottom function in drop.js - can we use this to also decrease the score? I assume so - put score-- in the reachedBottom function
OK so this was really hard. I had to look at the code. It's a good thing I did because I'm learning a lot.
I'm always reminded of this image of every coding tutorial ever written.
So to make the first part:
This is actually implemented as 'lives', not points. Lives are used on a per level basis - 10 lives per level. I was on the right track to use the reachedBottom() function, but the bug I was getting was that the score would never stop decrementing. The drop would hit the bottom then keep decreasing over and over.
Dan solved this by adding a value in the constuctor called this.isFinished which is originally set to false. There is also a function called finished() which sets this.isFinished to true.
Returning to our code, what's interesting is that we're putting all of our code inside of this drops[i].isFinished(). As long as this is true, we move the drops, and display the drops. Then, if the drops have reached the bottom, we say that drop[i] has finished() and we decrement lives by 1.
 for (let i = 0; i < totalDrops; i++) {
		if (!drops[i].isFinished) {
			drops[i].move();
			drops[i].display();
			if (drops[i].reachedBottom()){
				drops[i].finished();
				lives--;
			}
		}
	}
We're going to use the same boolean on/off switch to increase the levelCounter and score counter later.
I need more work with booleans. This is a coding pattern that I see a lot that I'm not used to yet.
OK, so now lives can decrement by 1, and I have the isFinished data attribute in the drop object along with the finished() method, I need to work on the next part - if all 1000 raindrops fall without the score getting to zero, a new level begins and the raindrops appear faster.
I'm so happy that I have Dan's code because I had no idea where to begin. I would have been so lost.
So, Dan has a variable called levelCounter that increases each time the catcher intersects a drop. Each intersection also increases the score.
If levelCounter >= the length of the drops array, we go to the next level and all game elements are reset.
I would never have thought to compare a levelCounter variable to the length of the drops array. That was not jumping out to me from the problem description.
Another doozy - the setTime function in the Timer.
 setTime(t) {
    this.totalTime = t;
  }
那我们该怎么办?
First part - when drops reach the bottom, increment the levelCounter. Then, when the catcher intersects the drops, increment the levelCounter and the score. Finally, if the levelCounter is greater than the drops array, increment the level and reset the game settings. This included resetting the time, so we needed to add a time method called setTime.见上文。
So now, the player starts off with a score of 0, has 10 lives per level, loses a life whenever a drop reaches the bottom, gets a point added when the catcher intersects a drop, and loses lives when drops reach the bottom. I added score-- if raindrop reaches bottom because that should make the score decrease by one for each drop that reaches the bottom of the screen, which is one of the specs.
The next part is a big one - if 10 raindrops reach the bottom during any level, the player loses.
So, the big part here is that the entire functionality needs to be wrapped inside of a boolean called gameOver. This is a giant if statement. gameOver begins as false, and only flips to true if lives <= 0. That other if statement is nested beneath the if statement for reachedBottom. So we have three nested if statements within a for loop.哇。 And that's all inside an if statement of its own...
What have we learned:
This process takes time and takes practice. Everyone struggles through it when first learning to program.
What we've learned and where we're headed:
Like I said, I'm going to try the UFO game. Luckily I have some code to fall back on.
I ultimately still want to code brickbreaker. Maybe I'll try that If I'm successful with the UFO game.我们看看。
So, the two main components of the UFO game are the UFO and the bullets.
Let's try the UFO first.
The UFO will be a small rectangle. Let's have it start at the upper right corner of the screen. It should move from right to left, then once it reaches the edge of the screen, down one row (down the height of the rect), before reversing direction and repeating the same action all the way down the screen.
So, whats the easiest thing I can do?
Draw the rect in the upper right hand corner.让我们这样做。 Then let's move the rect from right to left and stop it when the rect is at x=0.
I accomplished those steps and committed the code.
Now I would like to create the Bullet.
The first step is creating the Bullet, which will just be a small circle, and making the Bullet start at the bottom center of the screen and move up to the top of the screen then stop.
I added all the basic functionality. I would like to check it against the code from Stanford to see how my code compares. Good job me.
I completed the UFO game. Here's the code.
Bugs happen. It can be really frustrating.
A bug is any defect in a program. Sometimes it is obvious that you have a bug - your sketch will quit (or not run at all) and display an error in the message console. These can be caused by typos, variables that were never initialized, looking for an element in an array that doesnt exist, and so on.
Bugs can also be more sinister and mysterious, for instance if your sketch does not function the way you intended. In this case, your sketch might run without producing any errors in the console. Fiding this type of bug is more difficult since it will not necessarily be as obvious where to start looking in the code.
We will now discuss a few basic strategies for fixing bugs ("debugging").
Do anything other than working on your code. Sometimes time away from the computer is the best thing you can do.
Talk through the problem with a friend. The process of showing your code to another programmer (or nonprogrammer, even) and walking through the logic out loud will often reveal the bug. In many cases, it is somethin obvious that you did not see because you know your code so well. The process of explaining it to someone else, however, forces you to go through the code more slowly. If you do not have a friend nearby, you can also do this out loud to yourself (rubber ducky debugging). Yes, you will look silly, but it helps.
Think back to the process of incremental development. The more you develop your projects step-by-step, in small, easy to manage pieces, the fewer errors and bugs you will end up having. Of course, there is no way to avoid problems completely, so when then do occur, the philosophy of incremental development can also be applied to debugging. Instead of building the code up piece by piece, debugging involves taking the code apart piece by piece.
One way to accomplish this is to comment out large chunks of code in order to isolate a particular section. See the code below, which is sketch.js of a p5.js program. The skech has an array of Snake objects, a Button object and an Apple object. The code for the classes is not included. Let's assume that everything about the sketch is working properly, except that the Apple is invisible To debug the problem, everything is commented out except for the few lines of code displaying the Apple object . This way, we can be sure that none of the other code is the cause of the issue.
 // let snakes = new Snake(100);
// let button;
let apple;

function setup() {
	createCanvas(200, 200);
	apple = new Apple();
	/*for (let i = 0; i < snakes.length; i++) {
		snakes[i] = new Snake();
	}
	button = new Button(10, 10, 100, 50); */
}

function draw() {
	background(0);
	apple.display();
	// apple.move();

	/*for (let i = 0; i < snakes.length; i++ ) {
		snakes[i].display();
		snakes[i].slither();
		snakes[i].eat(apple);
	}

	// this is probably something different in p5.js - im just copying
	// the example from the book
	if (button.pressed()) {
		applet.restart();
	} */
}

/*function mousePressed() {
	button.click(mouseX,mouseY);
} */
Once all of the code is commented out, there are two possible outcomes. Either the apple still does not appear or it does. In the former, the issue is most definitely cause by the apple itself, and the next step would be to investigate the insides of the display() function and look for a mistake.
If the apple does appear, then the problem is caused by one of the other lines of code. Perhaps the move() function sends the apple offscreen so that we do not see it. Or maybe the Snake objects cover it up by accident.
To figure this out, I would recommend putting back lines of code, one at a time. Each time you add back in a line of code, run the sketch and see if the apple disappears. As soon as it does, you have found the culprit and can root out the cause.
Having an object oriented sketch as above (with many classes) can really help the debugging process.
Another tactic you can try is to create a new sketch and just use one of the classes, testing its basic features. In other words, do not worry about fixing your entire program just yet. First, create a new sketch that only does one thing with the relevant class (or classes) and reproduce the error. Let's say that, instead of the apple, the snakes are not behaving properly. To simplify and find the bug, we could create a sketch that just uses one snake (instead of an array) without the apple or the button. Without the bells and whistles, the code will be much easier to deal with.
Using the console to display the value of variables can be really helpful. If an object is completely missing on the screen and you want to know why, you can print out the value of its location variables.
It might look something like this: console.log("x: " + thing.x + "y: " + thing.y);
Remember - Simplify. The process of printing variable values will be much more effective if we are doing it in a sketch that only deals with the Thing object. This way, we can be sure that it is not another class, which is say, drawing over the top of the Thing by accident.
You can also use console.log() to indicate whether or not a certain part of the code has been reached. For example, what if in our bouncing ball example, the ball never bounces off the right han side of the window? The problem could be either you are not properly determining when it hits the edge or you are doing the wrong thing when it hits the edge. To know if your code correctly detects when it hits the edge, you could write:
 if (x > width) {
	console.log("x is greater than width");
	xspeed *= -1;
}
If you run the sketch and never see the message printed, then something is probably flawed with your boolean expression.
Admittedly, console.log() is not a perfect debugging tool. It can be hard to track multiple pieces of information in the console. It can slow your sketch significantly (depending on how much printing you are doing). More advanced development environments usually offer debugging tools which allow you to track specific variables, pause the program, advance line by line in the code, and so on.
Still, in terms of debugging, some sleep, a little common sense, and console.log() can get you pretty far.
We will now start using p5.js libraries. There are some differences between how to do this in Processing and p5.js, but Dan has tutorials on Coding train for the DOM and Sound libraries, which are easily searchable on Youtube.
Whenever we call a p5.js function, such as line(), background(), stroke() etc, we are calling on a function that we learned about from the p5.js reference page. That reference page is a list of all the available functions in the core p5.js library . In computer science, a library refers to a collection of "helper" code. A library might consist of functions, variables, and objects. The bulk of things we do are made possible by the core p5.js library.
In most programming languages, you are required to specify which libraries you intend to use at the top of your code. This tells the compiler where to look for things in order to translate your source code into machine code.
To use a core library (DOM or Sound, or a contributed library), link to the library in your HTML after you have linked to p5.js.
  < script src =" p5.js " >
  // sound library
  <script src="p5.sound.js">
  <script src="sketch.js">
It seems like it might be tough to work with some of these libraries in p5.js - wont be so straightforward to copy from the book.但是我们会看到的。
In this chapter:
So, we have finished the basics and we are going to start looking at some more sophisticated topics.
We will still employ the same flow structure of setup() and draw(). We will continue to use functions from the p5.js library and algorithms made of conditional statements and loops, and organize sketches with an object-oriented approach in mind. At this point, however, descriptions will assume knowledge of those essential topics.
We have already been using algebra since we started on variables - x = x + 1;
And we tested intersection using the Pythagorean Theorem:
let d = dist(x1, x2, y1, y2);
The modulo operator is written as a percent sign. It is a very simple concept that is useful for keeping a number within a certain boundary (a shape on the screen, an index value within the range of an array, etc). The modulo operator calculates the remainder when one number is divided by another. It works with both ints and floats.
20 divided by 6 = 3 remainder 2.
所以:
20 modulo 6 = 2. or 20 % 6 = 2.
3 / 5 = 0 remainder 3 so 3 % 5 = 3
9.25 % .5 = .25
You will notice that if A = B % C, A can never be larger than C. The remainder can never be larger than the divisor.
Therefore, modulo can be used whenever you need to cycle a counter variable back to zero. This example:
 x = x + 1;
if (x >= limit) {
	x = 0;
}
Can be replaced by:
x = (x + 1) % limit;
This is very useful if you want to count through the elements of an array one at a time, always returning to 0 when you get to the length of an array.
See this example, where array indices are used to determine background colors, and the modulo operator is used to loop through the array and return to the start.
We already learned about the random() function, which allowed us to randomly fill variables. p5.js random number generator produces what is known as a "uniform" distribution of numbers. For example, if we ask for a random number between 0 and 9, 0 will come up 10% of the time, 1 will come up 10% of the time, etc. We could write a simple sketch using an array to prove this fact.
See this example.
Pseudo-random numbers - the random numbers we get from random() are not truly random and are known as 'pseudo-random'. They are the result of a mathematical funciton that simulates randomness. This function would yield a pattern over time, but that time period is so long that for us, it is just as good as pure randomness.
With a few tricks we can change the way use use random() to produce a nonuniform distribution of random numbers and generate probabilities for certain events to occur. For example, what if we wanted to create a sketch where the background color had a 10% change of being green and a 90% chance or being blue?
Let's review the basic principles of probability, first looking at single event probability, that is, the likelihood of something to occur.
Given a system with a certain number of possible outcomes, the probability of any given event occurring is the number of outcomes which qualify as that event divided by the total number of possible outcomes. The simplese example is a coin toss. There are a total of two possible outcomes (heads or tails). There is only one way to flip heads, therefore the probability of heads is divided by two, that is, 1/2 or 50%.
Consider a deck of 52 cards. The probability of drawing an ace from that deck is:
number of aces/number of cards = 4/52 = 0.077 = ~8%
Probability of drawing a diamond is 25% - 13/52.
You can also calculate the probability of multiple events occurring in sequence as the product of the individual probabilities of each event.
Probability of a coin flipping heads three times in a row is:
1/2 * 1/2 * 1/2 = 1/8.
What is the probability of drawing two aces in a row?
4/52 * 3/51 = .4%
There are few different techniques for using the random() functions with probability in code. For example, if we fill an array with a selection of numbers (some repeated), we can randomly pick from that array and generate events based on what we select.
 let stuff = new Array(5);
stuff[0] = 1;
stuff[1] = 1;
stuff[2] = 2;
stuff[3] = 3;
stuff[4] = 3;
let index = int(random(stuff.length));
// picking random element from array
if(stuff[index] == 1) {
	// do something
}
If you run this code, there will be a 40% chance of selecting the value 1, a 20% chance of selecting the value 2, and a 40% chance of selecting the value 3.
Another strategy is to ask for a random number (for simplicity we consider random floating point values between 0 and 1) and only allow the event to happen if the random number we pick is within a certain range.例如:
 let prob = .1
let r = random(1);
if (r < prob) {
	// instigate the event here
}
This same technique can also be applied to multiple outcomes:
To implement this in code, we pick one random float and check where it falls:
The following example draws a circle with three different colors, each with the above probability (red: 60%, green: 10%, blue: 30%).
See this video series for more information on Perlin noise.
One of the qualitiesof a good random number generator is that numbers produced appear to have no relationship. If they exhibit no discernible pattern, they are considered random.
In programming behaviors that have an organic, almost lifelike quality, a little bit of randomness is a good thing. However, we do not want too much randomness.
Hence Perlin noise - naturally ordered (smooth) sequence of psuedo-random numbers. It was originally designed to create procedural textures.
It can be used to generate a variety of interesting effects including clouds, landscapes, marble textures, and so on.
Noise Detail:
If you visit the p5.js noise reference, you will find that noise is calculated over several "octaves". You can change the number of octaves and their relative importance by calling the noiseDetail() function. This, in turn, can change how the noise function behaves.
p5.js has a built-in implementation of the Perlin noise algorithm with the function noise(). The noise() function takes one, two, or three arguments (referring to the 'space' in which noise is computed: one, two, or three dimensions). This chapter will look at one-dimensional noise only. The p5.js and Processing websites have more information on two and three dimensional noise.
One-dimensional Perlin noise produces a liner sequences of values over time.例如:
.364, .363, .363, .364, .365
Note how the numbers move up or down randomly, but stay close to the value of their predecessor.
To get those numbers out of p5.js, we have to do 2 things:
We would typically start at t = 0 and therefore call the function like so: "noise(t);"
 let t = 0.0;
let noiseValue = noise(t);
We can also take the above code and run it looping in draw():
 let t = 0.0;
function draw() {
	let noiseValue = noise(t);
	console.log(noiseValue);
	// prints the same thing over and over
}
We can get a different result of the noise() function if we increment the time variable.
 let t = 0.0;
function draw() {
	let noiseValue = noise(t);
	console.log(noiseValue);

	t += 0.01; // time moves forward
}
How quickly we increment t also affects the smoothness of the noise.
Notice how noise() always returns a float between 0 and 1. See this example which assigns the result of the noise() function to the size of a circle.
This exercise uses Perlin noise to set the location of a circle.
Basic understanding of angles will be important for things like rotate() to rotate and spin objects.
We need to learn to learn about radians and degrees.
The book says that Processing requires angles to to be specified in radians.事实并非如此。 You can use angleMode to change the default from radians to degrees. It's still useful to learn about radians, though.
A radian is a unit of measurement for angles defined by the ratio of the length of the arc of a circle to the radius of that circle. One radian is the angle at which that ratio equals one. An angle of 180 = PI radians. An angle of 360 = 2*PI radians. 90 = PI/2.
The formula to convert from degrees to radians is:
Radians = 2 PI (degrees/360)
There is also a radians() function to automatically convert values from degres to radians. The constants PI and TWO_PI are available for convenient access.
This code will rotate shapes by 60 degrees:
 let angle = radians(60);
rotate(angle);
FYI - PI is a real number defined as the ratio of the circles circumference (the distance around the perimeter) to its diameter (a straight line that passes through the center). It is equal to approximately 3.14159.
Sohcahtoa
This is the foundation for a lot of computer graphics work.
Any time you need to determine the distance between points, deal with circles, arcs, lines, and so on, you will find that a basic understanding of trigonometry is essential.
Trigonometry is the study of the relationships between the sides and angles of triangles and socahtoa is a mnemonic device for remembering the definitions of the trigonometric functions, sine, cosine, and tangent.
Any time we display a shape in p5.js, we have to specify a pixel location, given as x and y coordinates. These are known as Cartesian coordinates.
Another useful system, known as polar coordinates, describes a point in space as an angle of rotation around the origin and a radius from the origin. We cant use polar coordinates as arguments to a function in p5.js. However, trigonometric formulas allow us to convert those coordinates to Cartesian, which can then be used to draw a shape.
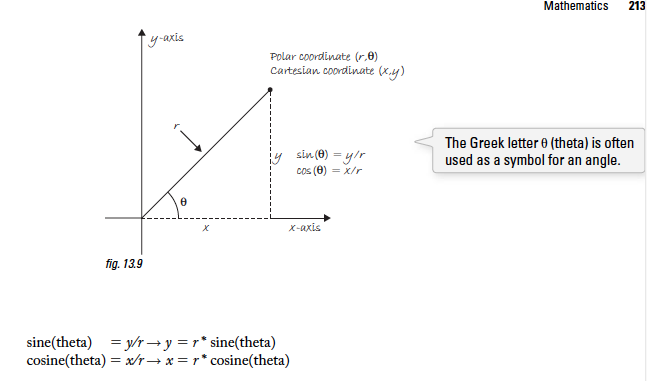
For example, if r is 75 and theta is 45, we can calculate x and y as follows. The functions for sine and cosine in p5.js are sin() and cos() respectively. They each take one argument, a floating point angle, measured in radians or degrees as determined by angleMode.
 let r = 75;
let theta = PI / 4;
let x = r * cos(theta);
let y = r * sin(theta);
This is useful in certain applications where Cartesian coordinates make things difficult, for instance moving a shape along a circular path. By using polar coordinates, we can just increment the angle.
See this example to see how it is done with the global variables r and theta.
Another exercise draws a spiral by setting r initially to 0 and incrementing r in draw.
Trig functions can be used for more than geometric calculations associated with right triangles. For instance, graphing a sine function.
The output of y = sin(x) is a smooth curve alternating between -1 and 1. This behavior is konwn as oscillation, a periodic movement between two points. A swinging pendulum, for example, oscillates.
We can simulate oscillation in a p5.js sketch by assigning the output of the sine function to an object's location. This is similar to how we used noise() to control the size of a circle, only with sin() controlling a location. Note that while noise() produces a number between 0 and 1.0, sin() outputs a range between -1 and 1.
Here is the code for an oscillating pendulum.
Here's an Oscillator object and an array of oscillators.
And here's an object that uses the sine function to oscillate in size.
We can also draw a sequence of shapes along the path of the sine function.
The following exercise rewrites the above example using the noise() function.
Mandelbrot - fractal - self-similar shapes found in nature. Much of the stuff we encounter in our physical world can be described by idealized geometrical forms (a postcard has a rectangular shape, a ping-pong ball is spherical and so on). However, many naturally occurring structures cannot be described by such simple means. Some examples are snowflakes, trees, coastlines, and mountains.
Fractals provide geometry for describing and simulating these types of self-similar shapes (by "self-similar" we mean no matter how "zoomed out" or "zoomed in" the shape ultimately appears the same).
One process for generating these shakes is known as recursion .
We know that a function can call another function. We do this whenever we call any function inside of the draw() function. But can a function call itself? Can draw() call draw()? Yes it can, but this would actually result in an infinite loop.
Functions that call themselves are recursive and are appropriate for solving different types of problems. This occurs in mathematical calculations; the most common example of this is "factorial".
The factorial of any number n, usually written as n!, is defined as:
恩! = n * n-1 * ... 3 * 2 * 1 0! = 1
We could write a function to calculate factorial using a for loop in p5.js:
 function factorial(n){
	let f = 1;
	for (let i = 0; i < n; i++) {
		f = f * (i + 1);
	}
	return f;
}
If you look closely at how factorial works, however, you will notice something interesting. Let's examine 4! and 3!
4! = 4 * 3 * 2 * 1 3! = 3 * 2 * 1 therefore... 4! = 4 * 3!
In general terms, for any positive integer n: n! = n * (n-1)! 1! = 1
Written in English:
The factorial of N is defined as N times the factorial is N - 1
So, the definition of factorial actually includes factorial.
This concept of self-reference in functions is known as recursion . We can use recursion to write a function for factorial that calls itself.
 function factorial(n) {
	if(n == 1) {
		return 1;
	} else {
		return n * factorial(n - 1);
	}
}
See the image below for the steps that happen when factorial(4) is called:
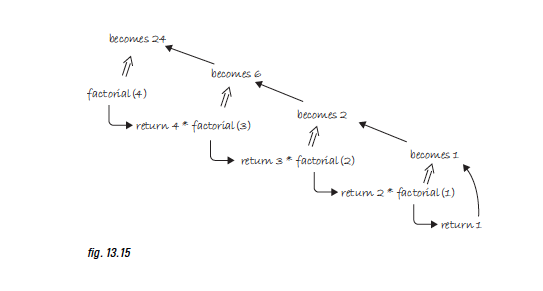
The same principle can be applied to graphics with interesting results. Look at the following recursive function.
 function drawCircle(x, y, radius) {
	ellipse(x, y, radius);
	if (radius > 2) {
		radius *= 0.75;
		drawCircle(x, y, radius);
	}
}
What does drawCircle() do? It draws an ellipse based on a set of parameters received as arguments, and then calls itself with the same parameters (adjusting them slightly). The result is a series of circles each drawn inside the previous circle.
Notice that the above function only recursively calls itself if the radius is greater than two. This is a crucial point. All recursive functions need an exit condition! This is identical to iteration, where the boolean test eventually evaluates to false thus exiting the loop. Without one, the program would crash, caught inside an infinite loop. The same can be said about recursion. If a recursive function calls itself forever and ever, you will most likely be treated to a nice frozen screen.
This example is rather trivial, since it could be achieved through iteration. But, in more complex scenarios, where a method calls itself more than once, recursion becomes wonderfully elegant.
Here is drawCircle() in a bit more complex form. For every circle displayed, draw a circle half its size to the right and left of that circle.
Here's another example of recursion with branching lines.
Arrays keep track of information in linear order, a one-dimensional list.
The data in certain systems (a digital image, a board game, etc) livs in two dimensions. To visualize this data, we need a multi-dimensional data structure, that is a multi-dimensional array.
A 2-D array is really nothing more than an array of arrays (a 3-D array is an array of arrays of arrays).
It is better to think of a 2-D array as a matrix. A matrix can be thought of as a grid of numbers, arranged in rows and columns, kind of like a bingo board.
 let myArray = [[0, 1, 2, 3],
			   [3, 1, 4, 3],
			   [3, 7, 9, 2],
			   [5, 7, 9, 2]];
We can use this type of data structure to encode information about an immage. For example, a grayscale image might represented by the array:
 let myArray = [[236, 189, 189, 0],
			   [236, 80, 189, 189],
			   [236, 0, 189, 80],
			   [236, 189, 1899, 80]];
To walk through every element of a one-dimensionla array, we use a for loop:
 let myArray = new Array(10);
for(let i = 0; i < myArray.length; i++) {
	myArray[i] = 0;
}
This part is tricky because Java is different from JS. I'll consult the example code.
For a 2-D array, in order to reference every element, we must use nested loops. This gives us a counter variable for every column and every row in the matrix.
 let cols = 10;
let rows = 10;

let myArray = new Array(cols);
for (let i = 0; i < cols; i++) {
	myArray[i] = new Array(rows);
}
I think this is actually the correct code:
 let cols = 10;
let rows = 10;

let myArray = [];

for (let i = 0; i < cols; i++) {
    myArray[i] = [];
    for (let j = 0; j < rows; j++) {
        myArray[i][j] = 0;
    }
}
Here's a program to draw a two-dimensional grayscale image.
A 2D array can also be used to store objects, which is especially convenient for programming sketches that involve some sort of 'grid' or 'board'.
The following example displays a grid of Cell objects stored in a 2D array. Each cell is a rectangle whose brightness oscillates from 0-255 with a sine function.
Here's the beginning of a tic-tac-toe game.这很困难。
We need a third axis (known as the Z-axis) for depth of any given point. The Z-axis dtermines how far in front or behind the window a pixel lives.
We can create a three-dimensional illusion with what we have learned so far. For example, if you were to draw a rectangle in the middle of the window and slowly increase its width and height, it might appear as if it were moving toward you.
See this example.
As soon as we enter the world of 3D pixel cooridinates, a certain amount of control must be relinquished to the p5.js renderer. You can no lover control exact pixel locations as you might with 2D shapes, because XY locations will be adjusted to accound for 3D perspective.
Introduction to translate:
Moves the origin point (0, 0) relative to its previous state. Always resets back to the top left corner at the beginning of draw().
See this example of multiple translations.
Let's specify 3D coordinates. Translate, unlike rect, ellipse, etc, can accept a third argument for a Z coordinate.
 // translation along the z-axis
translate(0, 0, 50)
rectMode(CENTER);
rect(100, 100, 8, 8);
It's better to specify the x,y location as part of the translation:
 translate(100, 100, 50);
rectMode(CENTER);
rect(0, 0, 8, 8);
We can use a variable for the Z location and animate the shape moving towards us. See this example.
See this tutorial on WEBGL. (0,0,0) is the middle of the canvas.
Added a new exercise using WEBGL and translate .
Translate() is particularly useful when you are drawing a collection of shapes relative to a given centerpoint. Think back to Zoog. We saw code like this:
 function display() {
	// body
	fill(150);
	rect(x, y, w/6, h*2);

	// head
	fill(255);
	ellipse(x, y-h, w, h);
}
Since we're drawing everything relative to Zoog's x and y location, translate allows us to set the oritin at x,y and then draw the shapes relatie to 0,0.
 function display() {
	// move origin 0,0 to x,y
	translate(x,y);

	// body
	fill(150);
	rect(0,0, w/6, h*2);

	// head
	fill(255);
	ellipse(0, -h/2, w, h);
}
We use vertex shapes to create custom shapes. We need the functions beginShape(), endShape(), and vertex().
The nice thing about using a custom shape over a rectangle is flexibility. For example, the sides are not required to be perpendicular.
We can also create more than one shape in a loop:
 stroke(0);
for(let i = 0; i < 10; i++) {
	beginShape();
	fill(175);
	vertex(i*20, 10-i);
	vertex(i*20 + 15, 10 + i);
	vertex(i*20 + 15, 180 + i);
	vertex(i*20, 180 - i);
	endShape(CLOSE);
}
You can also add an argument to beginShape() specifying exactly what shape you want to make. Lets say you create six vertex points. You can specify beginShape(TRIANGLES) to create two triangles instead of a hexagon. You could also create just points or lines.
Note that LINES is meant for a series of individual lines not a continuous loop.
Exercise drawing a vertex shape.


