この記事では、Angular のステートマネージャー NgRx について詳しく理解し、NgRx の使用方法を紹介します。お役に立てば幸いです。
NgRx は、Angular アプリケーションにおけるグローバル状態管理のための Redux アーキテクチャ ソリューションです。 【おすすめ関連チュートリアル:「angularチュートリアル」】
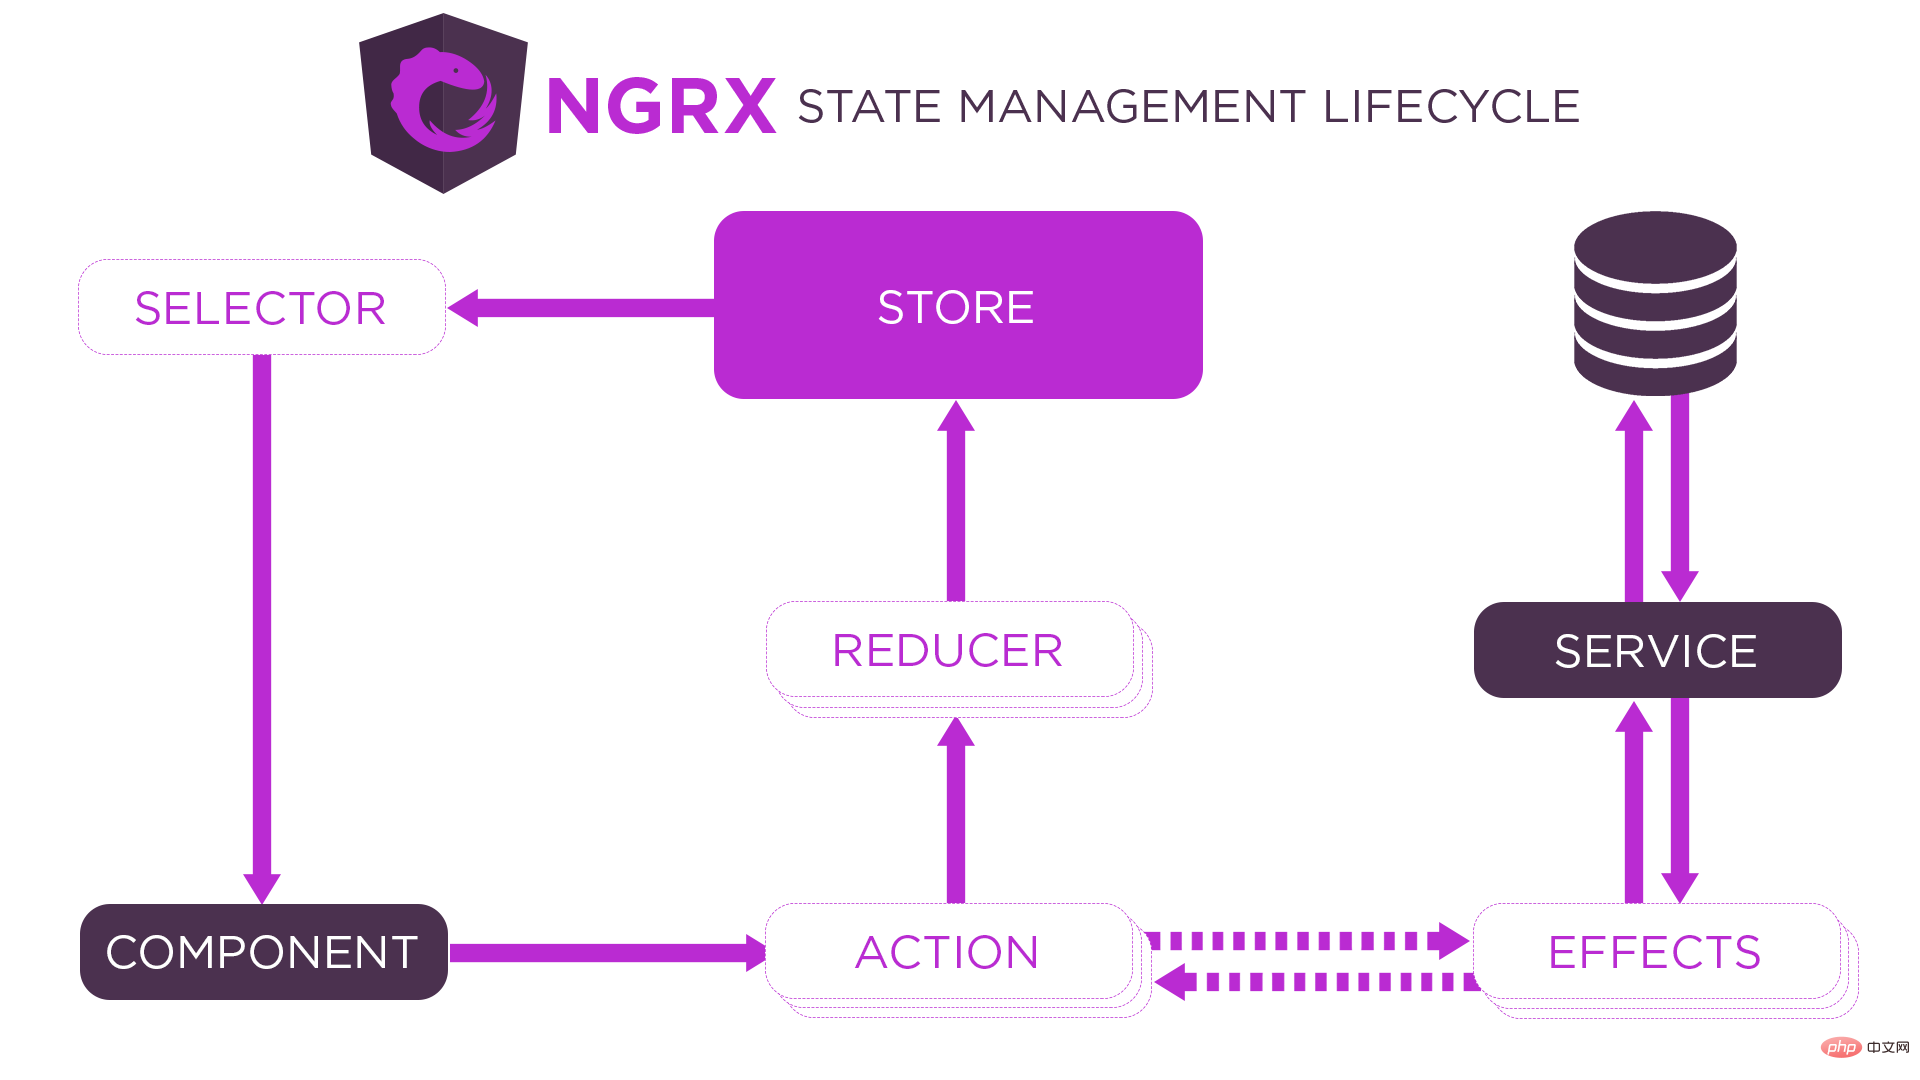
@ngrx/store: グローバル状態管理モジュール
@ngrx/Effects: 副作用の処理
@ngrx/store-devtools: ブラウザ デバッグ ツール。Redux Devtools Extension に依存する必要があります。
@ngrx/schematics: NgRx ファイルを迅速に生成するコマンド ライン ツール
@ngrx/entity: Reducer でのデータ操作における開発者の効率を向上させます
@ngrx/router-store: ルーティング ステータスをグローバル ストアに同期します
1.NgRxをダウンロードする
npm install @ngrx/store @ngrx/effects @ngrx/entity @ngrx/router-store @ngrx/store-devtools @ngrx/schematics
2. NgRx CLIの構成
ng config cli.defaultCollection @ngrx/schematics
 // 角度.json
"クリ": {
"defaultCollection": "@ngrx/schematics"
}
3. ストアの作成
ng g store State --root --module app.module.ts --statePath store --stateInterface AppState
4. アクションの作成
ng g action store/actions/counter --skipTests
 import { createAction } from "@ngrx/store"

エクスポート const インクリメント = createAction("インクリメント")
エクスポート const デクリメント = createAction("デクリメント")
5. レデューサの作成
ng g reducer store/reducers/counter --skipTests --reducers=../index.ts
 import { createReducer, on } from "@ngrx/store"
import { デクリメント, インクリメント } from "../actions/counter.actions"

import const counterFeatureKey = "カウンター"

エクスポートインターフェイスの状態 {
カウント: 数値
}

エクスポート const 初期状態: 状態 = {
カウント: 0
}

エクスポート const レデューサ = createReducer(
初期状態、
on(インクリメント, 状態 => ({ count: state.count + 1 })),
on(デクリメント, 状態 => ({ カウント: 状態.カウント - 1 }))
)
6. セレクターの作成
ng g selector store/selectors/counter --skipTests
 import { createFeatureSelector, createSelector } from "@ngrx/store"
import { counterFeatureKey, State } from "../reducers/counter.reducer"
import { AppState } from ".."

import const selectCounter = createFeatureSelector<AppState, State>(counterFeatureKey)
import const selectCount = createSelector(selectCounter, state => state.count)
7. コンポーネントクラスがアクションをトリガーし、ステータスを取得します
import { select, Store } from "@ngrx/store"
import { Observable } from "rxjs"
「./store」から { AppState } をインポートします
import { デクリメント, インクリメント } from "./store/actions/counter.actions"
import { selectCount } from "./store/selectors/counter.selector"

エクスポート クラス AppComponent {
count: Observable<number>
コンストラクター(プライベート ストア: Store<AppState>) {
this.count = this.store.pipe(select(selectCount))
}
インクリメント() {
this.store.dispatch(increment())
}
デクリメント() {
this.store.dispatch(decrement())
}
}
8. コンポーネントテンプレートの表示状態
<button (click)="increment()">+</button>
<span>{{ 非同期 }}</span>
<button (click)="decrement()">-</button>1. コンポーネントでディスパッチを使用して、Action をトリガーするときにパラメータを渡します。パラメータは最終的に Action オブジェクトに配置されます。
this.store.dispatch(increment({ count: 5 }))2. Action Creator 関数を作成するときに、パラメーターを取得し、パラメーターのタイプを指定します。
 import { createAction, props } from "@ngrx/store"
エクスポート const インクリメント = createAction("インクリメント", props<{ count:number }>())
エクスポート宣言関数 props<P extends object>(): Props<P>;
3. ReducerのActionオブジェクトを通じてパラメータを取得します。
エクスポート const レデューサ = createReducer(
初期状態、
on(インクリメント, (状態, アクション) => ({ カウント: 状態.カウント + アクション.カウント }))
)metaReducer は、Action -> Reducer 間のフックであり、開発者が Action (通常の Reducer 関数呼び出しの前に呼び出される) を前処理できるようにします。
関数デバッグ(リデューサー: ActionReducer<any>): ActionReducer<any> {
戻り関数 (状態、アクション) {
リデューサー(状態、アクション)を返す
}
}

const metaReducers をエクスポート: MetaReducer<AppState>[] = !environment.production
?[デバッグ]
: []要件: ページにボタンを追加します。ボタンをクリックした後、値が増加するまで 1 秒待ちます。
1. コンポーネントテンプレートに非同期値インクリメントのボタンを追加します。ボタンをクリックすると、 increment_asyncメソッドが実行されます。
<button (click)="increment_async()">非同期</button>
2. increment_asyncメソッドをコンポーネント クラスに追加し、メソッド内で非同期操作を実行するアクションをトリガーします。
インクリメント_async() {
this.store.dispatch(increment_async())
}
3. アクション ファイルに非同期操作を実行するアクションを追加します。
import const increment_async = createAction("increment_async")4. エフェクトを作成し、アクションを受け取り、副作用を実行し、アクションをトリガーし続けます。
ng g effect store/effects/counter --root --module app.module.ts --skipTests
Effect 関数は @ngrx/Effects モジュールによって提供されるため、関連するモジュールの依存関係をルート モジュールにインポートする必要があります。
 import { Injectable } from "@angular/core"
import { Actions, createEffect, ofType } from "@ngrx/Effects"
import {increment,increment_async} from "../actions/counter.actions"
import { mergeMap, map } from "rxjs/operators"
「rxjs」から { タイマー } をインポートします

// createEffect
// Effect の作成に使用され、Effect は副作用の実行に使用されます。
// メソッド呼び出し時にコールバック関数を渡し、コールバック関数内で副作用の実行後にトリガーされる Action オブジェクトを返します。 // コールバック関数の戻り値は createEffect 内で返され続けます。 // Effect クラスをインスタンス化した後、NgRx は Effect クラスのプロパティをサブスクライブし、副作用が完了すると、トリガーされる Action オブジェクトを取得します。そしてアクションをトリガーします。

//アクション
// コンポーネントがアクションをトリガーするとき、エフェクトはアクション サービスを通じてアクションを受け取る必要があるため、エフェクト クラスでは、コンストラクター パラメーターを通じてアクション サービス クラスのインスタンス オブジェクトが // インスタンスに挿入されます。 Actions サービス クラスのオブジェクトが Observable である場合、Action がトリガーされると、Action オブジェクト自体がデータ ストリーム // ofType として出力されます。
// 対象の Action オブジェクトをフィルタリングします。
// パラメータは、ターゲット アクションの Action Creator 関数です。 // ターゲット アクション オブジェクトがフィルタリングされない場合、データ ストリームは今回は送信されません。 // ターゲット アクション オブジェクトがフィルタリングされている場合、Action オブジェクトはデータストリーム @Injectable() として送信され続けます。
エクスポートクラス CounterEffects {
コンストラクター(プライベートアクション:アクション) {
// this.loadCount.subscribe(console.log)
}
loadCount = createEffect(() => {
return this.actions.pipe(
ofType(increment_async)、
mergeMap(() => timer(1000).pipe(map(() => インクリメント({ count: 10 }))))
)
})
}1. 概要
Entity はエンティティと訳され、エンティティはコレクション内のデータの一部です。
NgRx は、エンティティ アダプタ オブジェクトを提供します。エンティティ アダプタ オブジェクトの下には、開発者のエンティティ操作の効率を向上させるために、コレクション内のエンティティを操作するためのさまざまなメソッドが提供されます。
2.コア
1. EntityState: エンティティ タイプ インターフェイス
/*
	{
		ID: [1, 2],
		エンティティ: {
			1: { id: 1, title: "Hello Angular" },
			2: { id: 2、タイトル: "Hello NgRx" }
		}
	}
*/
エクスポート インターフェイス State extends EntityState<Todo> {}
2. createEntityAdapter: エンティティアダプターオブジェクトの作成
3. EntityAdapter: エンティティ アダプタ オブジェクト タイプ インターフェイス
エクスポート const アダプター: EntityAdapter<Todo> = createEntityAdapter<Todo>()
// 初期状態を取得します。 // {ids: []、entities: {}} を渡すこともできません。
エクスポート const 初期状態: 状態 = アダプター.getInitialState()
3. インスタンスメソッド
https://ngrx.io/guide/entity/adapter#adapter-collection-methods
4. セレクター
// selectTotal はデータ項目の数を取得します // selectAll はすべてのデータを取得し、配列の形式で表示します // selectEntities はエンティティ コレクションを取得し、辞書の形式で表示します // selectIds は ID コレクションを取得して表示します配列の形式で const { selectIds, selectEntities, selectAll, selectTotal } =adapter .getSelectors();export const selectTodo = createFeatureSelector<AppState, State>(todoFeatureKey) import const selectTodos = createSelector(selectTodo, selectAll)
1. ルーティングステータスを同期する
1)モジュールの導入
import { StoreRouterConnectingModule } から "@ngrx/router-store"

@NgModule({
輸入品: [
StoreRouterConnectingModule.forRoot()
】
})
エクスポート クラス AppModule {}
2) ルーティングステータスをストアに統合する
import * as fromRouter from "@ngrx/router-store"

インターフェイス AppState をエクスポート {
ルーター: fromRouter.RouterReducerState
}
const リデューサーのエクスポート: ActionReducerMap<AppState> = {
ルーター: fromRouter.routerReducer
}
2. ルーティングステータスを取得するセレクターを作成する
// router.selector.ts
import { createFeatureSelector } から "@ngrx/store"
import { AppState } from ".."
import { RouterReducerState, getSelectors } from "@ngrx/router-store"

const selectRouter = createFeatureSelector<AppState, RouterReducerState>(
「ルーター」
)

エクスポート定数 {
// 現在のルートに関連する情報 (ルーティング パラメータ、ルーティング設定など) を取得します。
現在のルートを選択、
// アドレスバーの # 番号以降のコンテンツを取得します selectFragment,
// ルーティング クエリ パラメータを取得します。 selectQueryParams,
// 特定のクエリパラメータを取得します selectQueryParam('name')
selectQueryParam、
// 動的ルーティングパラメータを取得します。 selectRouteParams,
// 特定の動的ルーティング パラメータを取得します。 selectRouteParam('name')
selectRouteParam、
// ルートカスタムデータを取得 selectRouteData,
  // 获取路由的实际访问地址  selectUrl
= getSelectors(selectRouter)
// ホーム.コンポーネント.ts
import { select, Store } from "@ngrx/store"
「src/app/store」から {AppState} をインポートします
import { selectQueryParams } from "src/app/store/selectors/router.selector"
エクスポートクラス AboutComponent {
コンストラクター(プライベート ストア: Store<AppState>) {
this.store.pipe(select(selectQueryParams)).subscribe(console.log)
}
}