fluid behavior tree
v2.3.0

Unity3Dプロジェクトの動作ツリー。ビルダーパターンを使用して、大規模なプロジェクトで保守性を最大化するためのコード駆動型アプローチで書かれています。流fluentな行動の木に触発されました。
特徴
サポート
質問がある場合や助けが必要な場合は、Discordコミュニティに参加してください。
Trello Boardの今後の機能と開発の進捗状況を参照してください。
すべての必要なデータを適切にキャッシュするには、ツリーを作成するときは変数に保存する必要があります。
 using UnityEngine ;
using CleverCrow . Fluid . BTs . Tasks ;
using CleverCrow . Fluid . BTs . Trees ;

public class MyCustomAi : MonoBehaviour {
    [ SerializeField ]
    private BehaviorTree _tree ;

    private void Awake ( ) {
        _tree = new BehaviorTreeBuilder ( gameObject )
            . Sequence ( )
                . Condition ( " Custom Condition " , ( ) => {
                    return true ;
                } )
                . Do ( " Custom Action " , ( ) => {
                    return TaskStatus . Success ;
                } )
            . End ( )
            . Build ( ) ;
    }

    private void Update ( ) {
        // Update our tree every frame
        _tree . Tick ( ) ;
    }
}タスクステータスのために返すものに応じて、異なることが起こります。
tree.Tick()他のノードが実行されない場合にツリーを再起動しますtree.Tick()が呼び出されます。ポインターリファレンスはツリーによって追跡され、 tree.Reset()が呼び出された場合にのみクリアできます。ツリーストレージ変数がpublicに設定されているか、 SerializeField属性がある限り。ゲームがエディターで実行されている間に、ツリーの視覚化を印刷することができます。ゲームが実行されていない間に木を表示できないことに注意してください。視覚化するためにツリーを構築する必要があるため。
いくつかの行で動作ツリーに新しいコードを安全に追加できます。将来のバージョンのアップグレードをサポートしながらBTSをカスタマイズできるようにします。
 using UnityEngine ;
using CleverCrow . Fluid . BTs . Tasks ;
using CleverCrow . Fluid . BTs . Tasks . Actions ;
using CleverCrow . Fluid . BTs . Trees ;

public class CustomAction : ActionBase {
    protected override TaskStatus OnUpdate ( ) {
        Debug . Log ( Owner . name ) ;
        return TaskStatus . Success ;
    }
}

public static class BehaviorTreeBuilderExtensions {
    public static BehaviorTreeBuilder CustomAction ( this BehaviorTreeBuilder builder , string name = " My Action " ) {
        return builder . AddNode ( new CustomAction { Name = name } ) ;
    }
}

public class ExampleUsage : MonoBehaviour {
    public void Awake ( ) {
        var bt = new BehaviorTreeBuilder ( gameObject )
            . Sequence ( )
                . CustomAction ( )
            . End ( ) ;
    }
}流体の動作ツリーは、Unityのパッケージマネージャーを介して使用されます。使用するには、次の行をPackages/manifest.jsonファイルに追加する必要があります。その後、Unityのパッケージマネージャーウィンドウから使用しているFluid Behaviorツリーの特定のバージョンを視覚的に制御できます。 UnityエディターがNPMのパッケージレジストリに接続できるように、これを行う必要があります。
{
  "scopedRegistries" : [
    {
      "name" : " NPM " ,
      "url" : " https://registry.npmjs.org " ,
      "scopes" : [
        " com.fluid "
      ]
    }
  ],
  "dependencies" : {
    "com.fluid.behavior-tree" : " 2.2.0 "
  }
}
特定のバージョンとリリースノートのアーカイブは、リリースページで入手できます。
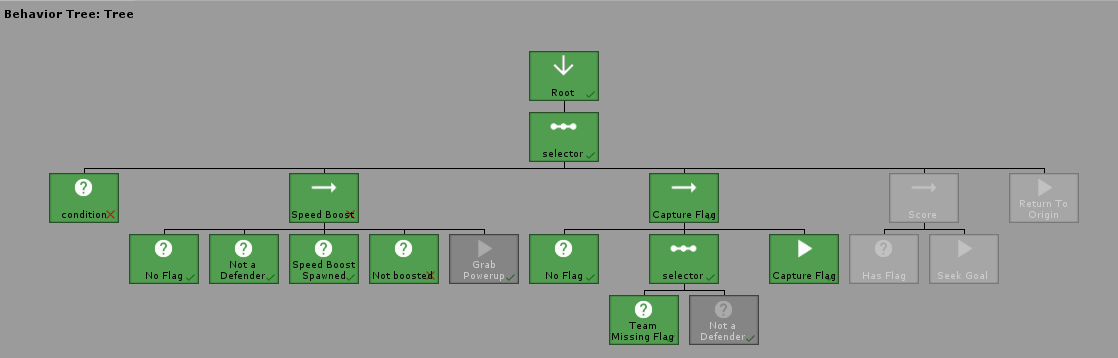
プロジェクトで流動的な動作ツリーをどのように使用できるかの実用的な例については、Capture the Flagの例プロジェクトを見てみたいと思うかもしれません。これは、優位を獲得しようとするためにパワーアップをつかみながら旗をキャプチャしようとするユニットでのリアルタイムの使用を示しています。
プロジェクトで流動的な動作ツリーをどのように使用できるかの実用的な例については、Capture the Flagの例プロジェクトを見てみたいと思うかもしれません。これは、優位を獲得しようとするためにパワーアップをつかみながら旗をキャプチャしようとするユニットでのリアルタイムの使用を示しています。
流体の動作ツリーには、開発プロセスを高速化するために、事前に作られたアクション、条件、複合材、およびその他のノードの堅牢なライブラリが付属しています。
その場で一般的なアクションを作成できます。同じアクションを再利用している場合は、独自のカスタムアクションを作成する際のセクションを調べたい場合があります。
 . Sequence ( )
    . Do ( " Custom Action " , ( ) => {
        return TaskStatus . Success ;
    } )
. End ( ) 動作ツリーに多くのティックをスキップします。
 . Sequence ( )
    // Wait for 1 tick on the tree before continuing
    . Wait ( 1 )
    . Do ( MyAction )
. End ( ) deltaTimeで合格した秒数が失効するまで待ちます。
 . Sequence ( )
    . WaitTime ( 2.5f )
    . Do ( MyAction )
. End ( )その場で一般的な状態を作成できます。同じアクションを再利用している場合は、独自のカスタム条件を作成するセクションを調べたい場合があります。
 . Sequence ( )
    . Condition ( " Custom Condtion " , ( ) => {
        return true ;
    } )
    . Do ( MyAction )
. End ( ) パスされたチャンスに基づいて、ノードを真またはfalseとしてランダムに評価します。
 . Sequence ( )
    // 50% chance this will return success
    . RandomChance ( 1 , 2 )
    . Do ( MyAction )
. End ( )各チャイルドノードを順番に実行すると、次のノードをチェックする成功ステータスが期待されます。障害が返された場合、シーケンスは子ノードの実行を停止し、親に障害を返します。
すべて、すべての複合材の後に.End()ステートメントが続くことが重要です。これにより、ツリーが構築されたときにノードが適切にネストされることを確認します。
 . Sequence ( )
    . Do ( ( ) => { return TaskStatus . Success ; } )
    . Do ( ( ) => { return TaskStatus . Success ; } )

    // All tasks after this will not run and the sequence will exit
    . Do ( ( ) => { return TaskStatus . Failure ; } )

    . Do ( ( ) => { return TaskStatus . Success ; } )
. End ( ) 成功が返されるまで、各子供ノードを実行します。
 . Selector ( )
    // Runs but fails
    . Do ( ( ) => { return TaskStatus . Failure ; } )

    // Will stop here since the node returns success
    . Do ( ( ) => { return TaskStatus . Success ; } )

    // Does not run
    . Do ( ( ) => { return TaskStatus . Success ; } )
. End ( ) シャッフルアルゴリズムで子ノードをランダムに選択します。 Successが返されるか、すべてのノードが失敗するまで見えます。ツリーが最初に実行を開始するたびにシャッフルします。
 . SelectorRandom ( )
    . Do ( ( ) => { return TaskStatus . Failure ; } )
    . Do ( ( ) => { return TaskStatus . Success ; } )
    . Do ( ( ) => { return TaskStatus . Failure ; } )
. End ( ) すべての子ノードを同時に実行します。それらのいずれかが障害を返した場合、すべてのノードを停止します。
 . Parallel ( )
    // Both of these tasks will run every frame
    . Do ( ( ) => { return TaskStatus . Continue ; } )
    . Do ( ( ) => { return TaskStatus . Continue ; } )
. End ( )デコレーターは、任意のノードをラップして戻り値を変更する(または特別なロジックを実行する)親要素です。それらは非常に強力であり、行動、条件、複合材料を大いにcompめています。
任意のノードを独自のカスタムデコレータコードでラップできます。これにより、再利用可能な機能をカスタマイズできます。
注:子ノードでUpdate()手動で呼び出す必要があります。そうしないと、発射されません。また、すべてのデコレーターの後に.End()ステートメントが続く必要があります。それ以外の場合、ツリーは正しく構築されません。
 . Sequence ( )
    . Decorator ( " Return Success " , child => {
        child . Update ( ) ;
        return TaskStatus . Success ;
    } )
        . Do ( ( ) => { return TaskStatus . Failure ; } )
    . End ( )
    . Do ( ( ) => { return TaskStatus . Success ; } )
. End ( ) TaskStatus.SuccessまたはTaskStatus.Failureの場合、子ノードの返されたステータスを逆にします。 TaskStatus.Continueを変更しません。
 . Sequence ( )
    . Inverter ( )
        . Do ( ( ) => { return TaskStatus . Success ; } )
    . End ( )
. End ( ) 子どもがTaskStatus.Failureを返す場合、 TaskStatus.Successを返します。 TaskStatus.Continueを変更しません。
 . Sequence ( )
    . ReturnSuccess ( )
        . Do ( ( ) => { return TaskStatus . Failure ; } )
    . End ( )
. End ( ) 子供がTaskStatus.Successを返す場合、 TaskStatus.Failureを返します。 TaskStatus.Continueを変更しません。
 . Sequence ( )
    . ReturnFailure ( )
        . Do ( ( ) => { return TaskStatus . Success ; } )
    . End ( )
. End ( ) TaskStatus.Continueを返します。子供がどのステータスを返すかに関係なく。このデコレーター(およびすべての子孫タスク)はBehaviorTree.Reset()を呼び出すことで中断することができます。
 . Sequence ( )
    . RepeatForever ( )
        . Do ( ( ) => { return TaskStatus . Success ; } )
    . End ( )
. End ( ) TaskStatus.Failureを返す子供がTaskStatus.Failureを返した場合、それ以外の場合はTaskStatus.Continueを返します。
 . Sequence ( )
    . RepeatUntilFailure ( )
        . Do ( ( ) => { return TaskStatus . Success ; } )
    . End ( )
. End ( ) TaskStatus.Successを返す子供がTaskStatus.Successを返した場合、それ以外の場合はTaskStatus.Continueを返します。
 . Sequence ( )
    . RepeatUntilSuccess ( )
        . Do ( ( ) => { return TaskStatus . Success ; } )
    . End ( )
. End ( ) ツリーは、ほんの数行のコードと組み合わせることができます。これにより、検索や攻撃などの複雑な機能のために異なるノードをバンドルする注射可能な動作ツリーを作成できます。
ノードは.Build()にのみ深いコピーされているため、スプライスされた木には新しく構築された木が必要であることに注意してください。
 using CleverCrow . Fluid . BTs . Trees ;
using CleverCrow . Fluid . BTs . Tasks ;
using UnityEngine ;

public class MyCustomAi : MonoBehaviour {
    private BehaviorTree _tree ;

    private void Awake ( ) {
        var injectTree = new BehaviorTreeBuilder ( gameObject )
            . Sequence ( )
                . Do ( " Custom Action " , ( ) => {
                    return TaskStatus . Success ;
                } )
            . End ( ) ;

        _tree = new BehaviorTreeBuilder ( gameObject )
            . Sequence ( )
                . Splice ( injectTree . Build ( ) )
                . Do ( " Custom Action " , ( ) => {
                    return TaskStatus . Success ;
                } )
            . End ( )
            . Build ( ) ;
    }

    private void Update ( ) {
        // Update our tree every frame
        _tree . Tick ( ) ;
    }
} 流体の動作を非常に強力にしているのは、ソースを編集せずに独自のノードを書き、ビルダーに追加できることです。新しいビルダー機能を追加するUnityパッケージを作成することもできます。たとえば、このような新しいツリービルダーメソッドを書くことができます。これにより、AIシステムのターゲットを数行のコードで設定できます。
 var tree = new BehaviorTreeBuilder ( gameObject )
    . Sequence ( )
        . AgentDestination ( " Find Enemy " , target )
        . Do ( ( ) => {
            // Activate chase enemy code
            return TaskStatus . Success ;
        } )
    . End ( )
. Build ( ) ;最初のカスタムアクションを作成して実装するには、約3分かかります。最初に新しいアクションを作成します。
 using CleverCrow . Fluid . BTs . Tasks ;
using CleverCrow . Fluid . BTs . Tasks . Actions ;
using UnityEngine ;
using UnityEngine . AI ;

public class AgentDestination : ActionBase {
    private NavMeshAgent _agent ;
    public Transform target ;

    protected override void OnInit ( ) {
        _agent = Owner . GetComponent < NavMeshAgent > ( ) ;
    }

    protected override TaskStatus OnUpdate ( ) {
        _agent . SetDestination ( target . position ) ;
        return TaskStatus . Success ;
    }
}
次に、新しいエージェントデステーションアクションを使用して、 BehaviorTreeBuilderスクリプトを拡張する必要があります。 C#クラス拡張機能の詳細については、公式ドキュメントを参照してください。
 using CleverCrow . Fluid . BTs . Trees ;

public static class BehaviorTreeBuilderExtensions {
    public static BehaviorTreeBuilder AgentDestination ( this BehaviorTreeBuilder builder , string name , Transform target ) {
        return builder . AddNode ( new AgentDestination {
            Name = name ,
            target = target ,
        } ) ;
    }
}
そして、あなたは終わった!これで、新しいバージョンで将来的に証明されたカスタムアクションと拡張可能な動作ツリービルダーを作成しました。次の例は同じです。ただし、それぞれが異なるノードタイプをカバーします。
次のテンプレートで独自のカスタムアクションを作成できます。これは、常に使用しているコードをまとめるのに役立ちます。
 using UnityEngine ;
using CleverCrow . Fluid . BTs . Tasks ;
using CleverCrow . Fluid . BTs . Tasks . Actions ;

public class CustomAction : ActionBase {
    // Triggers only the first time this node is run (great for caching data)
    protected override void OnInit ( ) {
    }

    // Triggers every time this node starts running. Does not trigger if TaskStatus.Continue was last returned by this node
    protected override void OnStart ( ) {
    }

    // Triggers every time `Tick()` is called on the tree and this node is run
    protected override TaskStatus OnUpdate ( ) {
        // Points to the GameObject of whoever owns the behavior tree
        Debug . Log ( Owner . name ) ;
        return TaskStatus . Success ;
    }

    // Triggers whenever this node exits after running
    protected override void OnExit ( ) {
    }
}
新しいノードを拡張機能に追加します。
 using CleverCrow . Fluid . BTs . Trees ;

public static class BehaviorTreeBuilderExtensions {
    public static BehaviorTreeBuilder CustomAction ( this BehaviorTreeBuilder builder , string name = " My Action " ) {
        return builder . AddNode ( new CustomAction {
            Name = name ,
        } ) ;
    }
}次の例テンプレートでカスタム条件を追加できます。これらは、AIが場所に移動できる場合、および複雑なチェックを必要とする他のタスクなどのチェックにこれらを使用することをお勧めします。
 using UnityEngine ;
using CleverCrow . Fluid . BTs . Tasks ;

public class CustomCondition : ConditionBase {
    // Triggers only the first time this node is run (great for caching data)
    protected override void OnInit ( ) {
    }

    // Triggers every time this node starts running. Does not trigger if TaskStatus.Continue was last returned by this node
    protected override void OnStart ( ) {
    }

    // Triggers every time `Tick()` is called on the tree and this node is run
    protected override bool OnUpdate ( ) {
        // Points to the GameObject of whoever owns the behavior tree
        Debug . Log ( Owner . name ) ;
        return true ;
    }

    // Triggers whenever this node exits after running
    protected override void OnExit ( ) {
    }
}
次のスニペットを使用して、動作ツリービルダーに新しい状態を追加します。
 using CleverCrow . Fluid . BTs . Trees ;

public static class BehaviorTreeBuilderExtensions {
    public static BehaviorTreeBuilder CustomCondition ( this BehaviorTreeBuilder builder , string name = " My Condition " ) {
        return builder . AddNode ( new CustomCondition {
            Name = name ,
        } ) ;
    }
}流体の動作ツリーは、カスタムアクションと条件だけに限定されません。かなりシンプルなAPIを使用して、新しいコンポジットタイプを作成できます。基本的なシーケンスの例を次に示します。
 using CleverCrow . Fluid . BTs . TaskParents . Composites ;
using CleverCrow . Fluid . BTs . Tasks ;

public class CustomSequence : CompositeBase {
    protected override TaskStatus OnUpdate ( ) {
        for ( var i = ChildIndex ; i < Children . Count ; i ++ ) {
            var child = Children [ ChildIndex ] ;

            var status = child . Update ( ) ;
            if ( status != TaskStatus . Success ) {
                return status ;
            }

            ChildIndex ++ ;
        }

        return TaskStatus . Success ;
    }
}
動作ツリーにカスタムコンポジットを追加することは、アクションを追加するのと同じくらい簡単です。コードの1行を取得するだけです。
 using CleverCrow . Fluid . BTs . Trees ;

public static class BehaviorTreeBuilderExtensions {
    public static BehaviorTreeBuilder CustomSequence ( this BehaviorTreeBuilder builder , string name = " My Sequence " ) {
        return builder . ParentTask < CustomSequence > ( name ) ;
    }
}デコレーターは、繰り返しコードを削減するためにカスタム作成することもできます。
 using CleverCrow . Fluid . BTs . Decorators ;
using CleverCrow . Fluid . BTs . Tasks ;

public class CustomInverter : DecoratorBase {
    protected override TaskStatus OnUpdate ( ) {
        if ( Child == null ) {
            return TaskStatus . Success ;
        }

        var childStatus = Child . Update ( ) ;
        var status = childStatus ;

        switch ( childStatus ) {
            case TaskStatus . Success :
                status = TaskStatus . Failure ;
                break ;
            case TaskStatus . Failure :
                status = TaskStatus . Success ;
                break ;
        }

        return status ;
    }
}
デコレータの実装は、複合材料に似ています。複合材料で引数を設定する必要がある場合は、method BehaviorTreeBuilder.AddNodeWithPointer()で戦利品を取得することをお勧めします。
 using CleverCrow . Fluid . BTs . Trees ;

public static class BehaviorTreeBuilderExtensions {
    public static BehaviorTreeBuilder CustomInverter ( this BehaviorTreeBuilder builder , string name = " My Inverter " ) {
        // See BehaviorTreeBuilder.AddNodeWithPointer() if you need to set custom composite data from arguments
        return builder . ParentTask < CustomInverter > ( name ) ;
    }
} オートフォーマッタを使用している場合、おそらくビルダーの構文でコードフォーマットをマングルするでしょう。これを避けるために、Jetbrains Riderのようにフォーマットをオフにすることができます。特定のIDEが必要な場合は、必要な特定のフォーマットを無効にするコメントをグーグルで検索するのがそれほど難しくないはずです。
 // @formatter:off
_tree = new BehaviorTreeBuilder ( gameObject )
    . Sequence ( )
        . Condition ( " Custom Condition " , ( ) => {
            return true ;
        } )
        . Do ( " Custom Action " , ( ) => {
            return TaskStatus . Success ;
        } )
    . End ( )
    . Build ( ) ;
// @formatter:on パッケージマネージャーフレンドリーであるdevelopの毎晩のビルドにアクセスするには、 Packages/manifest.json手動で編集する必要があります。
{
    "dependencies" : {
      "com.fluid.behavior-tree" : " https://github.com/ashblue/fluid-behavior-tree.git#nightly "
    }
}
新しい夜間のビルドを取得するには、この行と関連するロックデータをマニフェストで削除する必要があることに注意してください。Unityの再構築を行い、追加します。 Unityがロックされると、git URLのコミットハッシュはパッケージとして。
開発環境を実行するために実行したい場合は、node.jsをインストールする必要があります。次に、ルートから次のことを一度実行します。
npm install
ルートからビルドランnpm run buildを作成する場合、 distフォルダーに登場します。
すべてのコミットは、コミットメントを使用して行う必要があります( npm install実行するときに自動的にインストールされます)。コミットはリリース時にバージョン番号に自動的にコンパイルされるため、これは非常に重要です。コミットメントベースのコミットを持たないPRは拒否されます。
commitタイプをルートから端末にターミナルにするには
npm run commit詳細については、貢献ガイドラインドキュメントをご覧ください。
これらの素晴らしい人々に感謝します(絵文字キー):
アッシュブルー | Jesse Talavera-Greenberg | Puresaltproductions ? | マーティンデュベージ ? | コールスタック ? | Piotr Jastrebski | sounghoo |
Tnthomas ? | 所有者 | Angstr0m ? | イジー ? | Jeremyvansnick |
このプロジェクトは、全委員会の仕様に従います。あらゆる種類の貢献を歓迎します!
これらの素晴らしい人々に感謝します(絵文字キー):
このプロジェクトは、全委員会の仕様に従います。あらゆる種類の貢献を歓迎します!


