Getting_Started_With_LoRa
1.0.0
This project seeks to carry out a small test of the LORA Transmission Technology to collect information that can be used by the CTIC Foundation. Information will be sent from a final device (node or customer), this information will be collected by a Gateway device and this, in turn, will forward it to a server to store it.
Lora is an wireless technology (such as Wifi, Bluetooth, LTE, Sigfox or Zigbee) that uses a type of radio frequency modulation patented by Semtech.
Currently the technology is administered by the Alliance Lora that certifies all Hardware Manufacture that seeks to work with this technology.
Lora has a high tolerance to interference , a high sensitivity to receive data (-168DB), a very low consumption (the device can last a decade with a single battery) and a range of 10 to 20km (depending on whether direct vision or the topology of the land is available). On the other hand, we find a very low data transfer (up to 255 bytes).
All this makes this transfer technology useful for large distances or IoT networks that do not need or do not have access to electric current.
Lora works at free frequencies (these are 868MHz in Europe, 916MHz in America or 433MHz in Asia, for example) which, gathering the non -need to have an electric network supplier and a telecommunications provider (we use radiofrequency), makes it possible to emit and send information without risk.
We can communicate to the devices through Loremac (also known through LORA) or by Lorawan.
Loramac : used to communicate two devices with each other with a point to point to point, one sends information and another collects it (or vice versa).
Lorawan : used to communicate a network of devices. In this approach the figure of the Gateway appears (device that collects the information of one or more devices and forwards it to the server). In Lorawan the information must be filtered to know what devices you should listen to the gateway and which to ignore, but this will be seen later. This approach uses a star topology.
On the other hand, in Lorawan , there are also three types of final devices or nodes :
*In the examples only support for class A and B nodes (supported by the library used), but only the type A. is implemented only
If the free frequency band in Europe (868MHZ) is used, some limitations must be taken into account:
In each frequency band there are several channels or sub-bands, in the case of the European (868MHz) we find 10 channels numbered from 0 to 9. But, for example in the American (915MHz) we can find up to 64.
The sending of information through one channel or another is a task that libraries usually facilitate to use.
In some end-evices it is possible to modify the datarrate or the device spreader .
The Datarrate and the Spreadingfactor are related: a datarrate of 0 indicates a SF12 and a Datarrate of 5 indicates a SF7. All at a frequency of 125khz having the following exception: a Dataterate of 6 indicates a SF7 with 250khz.
Two devices (one for the node and one for the gateway, which must also have WiFi connectivity) and an associated account in TTS ( The Things Network ) or Chirpstack (being able to use its own server at home). In this example, both Loremac and Lorawan examples that make use of an Arduino node and a Pycom Gateway.
To start, it is enough to clone the repository:
git clone https://github.com/Javieral95/Getting_Started_With_LoRa.git
And then upload the relevant projects to the devices
Why two ides? Simple, Pymakr extension barely works in Visual Studio Code. Feel free to use the work space that is most comfortable.
Both devices have an antera lora connected to them.
Note : The code for an Arduinomkr1300 (more prepared for use such as Lora End-Device) and codes to use a pysense or pytrack as an end-evex is also included in the repos.

The Loramac example (are found in the homonym folder) are functional making use of an Arduino final device and a pycom gateway.
The node only sends hardcode information and the gateway only connects to Lora and WiFi, receives the Pycom information and prints the data read (although it has implemented the function of sending the data to the network).
The use of a network server is dispensed with.
To know more you can access the folder /loramac .
For the use of these examples (which are functional making use of an Arduino final device and a pycom gateway) a server is required to visualize the data. In this example, the use of The Things Network and Chirpstack (previously known as Loraserver) has been addressed.
To know more you can access the folder /lorawan and then continue consulting this documentation.
There are two types of authentication in Lorawan:
*In the examples at the moment only OTAA is made.
As previously mentioned, we will need a server. For this example, a free version of The Things Network, a Chirpstack server owned by Pycom and another deployed at home has been used.
It is the most reliable, safe and better documented alternative. However, everything indicates that it will cease to be open (there is a limit of 50 nodes per application).
Creating an application is simple, access the menu and click on the +button. Once we indicate the name of the application, a unique ID and a description.
When the application is created, we can add final devices (nodes) clicking on the +button.
Gateways are devices that are responsible for sending traffic that comes from several final devices (belonging to several applications) and forwards to the server. Creating a gateway is also simple, click on the + button and fill in the form paying attention to the following concepts:
To be able to read the data that the node has sent to the server, it is necessary to decode the payload, in the case of TTN we will do it for each device, in the Payload Formatters tab. We choose how Formatter Type the JavaScript option and:
 function Decoder(bytes, port) {
  // Decode plain text; for testing only
  return {
      myTestValue: String.fromCharCode.apply(null, bytes)
  };
}
arduino_ttn_decoder.js It is established that all the hexadecimal addresses of The Things Network are in mayor, it is not important when programming the devices but errors have been suffered in past versions.
This is the Open Source alternative, it is still in development and its documentation is not so good. However, it works and allows the server to be launched.
Pycom offers a Chirpstack server to connect your gateway device.
The application is similar to the detailed in the section of The Things Network.
You must go to the Device-Profiles of the server section, once in it access to the profile that interests (OTAA in this case) and modify the versions:
To create a gateway, access the same name and click the +button. Fill in the form paying special attention to the Gateway ID field (64 bits in hexadecimal that identifies Gateway), you can make Chirpstack generate them for you but the MAC of the device is usually used (if you do not know it in the section that explains the Gateway Pycom it will be detailed as obtaining it).
You can leave the rest of the default values.
In order to read the data that the node has sent to the server, it is necessary to decodify the payload, in the case of Chirpstack we will do it for each device profile, in the device propiles_ we access the profile that interests us (in this case OTAA) and we access the CODEC tab:
We choose in the Custom Decipt Codec Functions and:
 function Decode(fPort, bytes) {
    var tempObj = new Object();
  	tempObj.data=bytes;
    tempObj.decodedData = String.fromCharCode.apply(null, bytes);
    tempObj.message = "Informacion recibida del nodo";
    return tempObj;
}
arduino_chirpstark_decoder.js It is established that all Hexadecimal addresses of Chirpstack are in minuscules, it is not important when programming the devices but errors have been suffered in past versions.
Chirpstack provides an Opensource alternative to launch our own private server in Lorawan, and allows us to do it in a simple way and through containers.
That is why another repository owned by the founder of Chirpstack (Brocar) that allows this operation: Chirpstack-Docker has been cloned in the present repository. We find it in the chirpstack-docker folder.
Chirpstack has various components in its architecture to make the service capable of operating, they are the following:
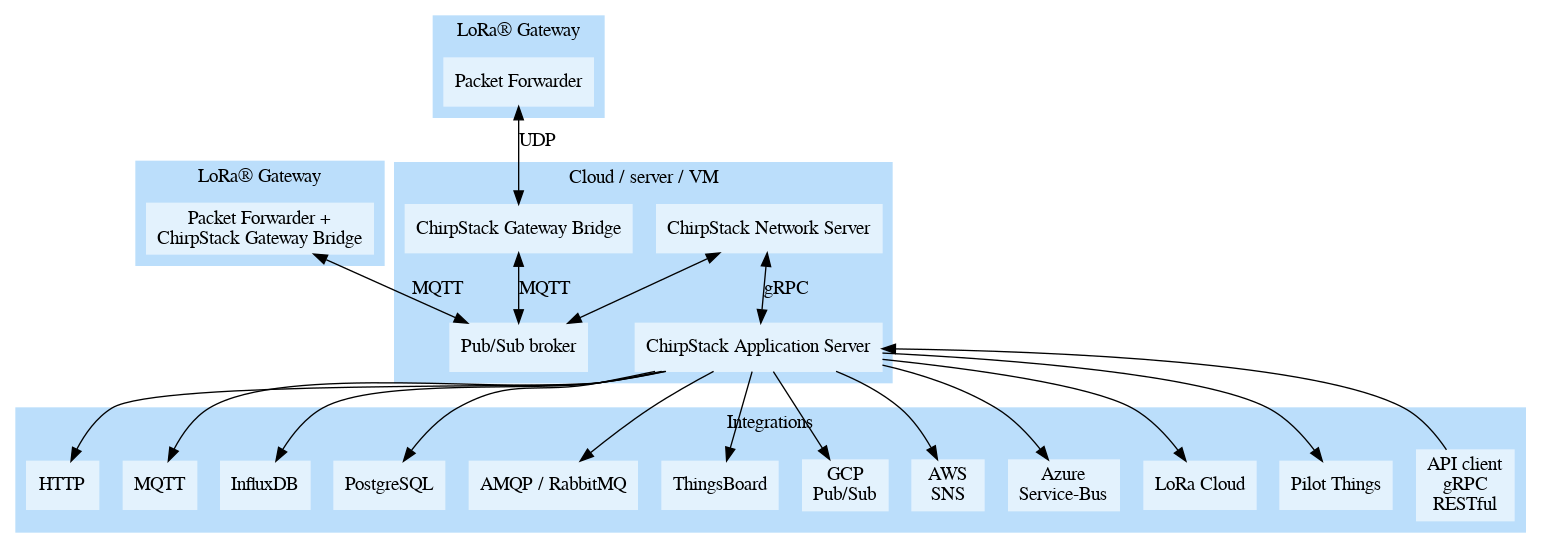
The way to display the server in the form of containers allows us to abstract much of the architecture components, however they are detailed below:
Before deploying, all the necessary parameters must be configured in the configuration files stored in the Configuration Board.
You can consult the following official documentation:
Note: The configuration files are sensitive to blank spaces or empty lines (they have been found in the mosquito net), check the files and eliminates to avoid errors.
As already mentioned before, the deployment in containers is simple and is located in the chirpstack-docker directory.
Once the necessary is already configured, it is enough to be placed in the Chirpstack-Docker directory and launch:
docker-compose up
With the default configuration you can access the server in the local direction: 8080 . The user will be admin and the admin password.
Let's start adding the basic configuration:
Once the server has been configured we will have to register our gateways and create applications to record our final devices. This process is carried out analogously to the one explained in the previous section of this documentation: Chirpstack (Lora Server).
Additionally, the function that decodes and encodes the information received must be indicated, it is also explained in the previous section.
The code used to launch the gateway is detailed below in an Pycom (FIPY with Pytrack). This code is located in Lorawan/Lorapycomgateway .
Nanogateway Py library has been used that allows gateway to be launched in minutes.
Nano-Gateway converts a Pycom device into a simple gateway that listens only to a frequency band (monochanal) channel , to listen to more bands in Pycom, it is possible to be required of a commercial gateway.
In the config file everything necessary to customize the gateway:
 WIFI_MAC = ubinascii.hexlify(machine.unique_id()) #.toUpper() para TTS
SERVER = 'loraserver.pycom.io' #(or url of your server)
GATEWAY_ID = WIFI_MAC[:6] + "ffff" + WIFI_MAC[6:12] #Minusculas: Chirpstack
 NTP = "es.pool.ntp.org"
NTP_PERIOD_S = 3600

#WiFi settings (change it)
WLAN_SSID = "MyAwesomeWiFi" #"pycom-wifi"
WLAN_PASS = "CheckOutThisGoodPassword" #"securepassword"
WLAN_TIMEOUT_MS = 180000

### LoRaWAN for EU868 ###
LORA_FREQUENCY = 868500000
#Spreading Factor: (Higher value in SF=More distance but less speed transmision)
LORA_GW_DR = "SF7BW125" # DR_5,Can change in range: SF7 to SF15 (SF7B250 also exists)
LORA_NODE_DR = 5 #5 (6 uses 250Khz) for SF7, 4 for SF6.. all using 125Khz
###
 def get_gateway_id():
    print("Your gateway_id is: {}".format(GATEWAY_ID)) #The gateway is b'THIS_STRING'
    return GATEWAY_ID
Note: If you connect your gateway to a local network without internet connection, it will return an error when synchronizing the watches. You can get out of the step commenting on the following lines of code in the Start (Self) function of the nanogateway.py file as the following example shows:
 # get a time sync
self._log('Syncing time with {} ...', self.ntp_server)
#self.rtc.ntp_sync(self.ntp_server, update_period=self.ntp_period)
#while not self.rtc.synced():
#    utime.sleep_ms(50)
self._log("RTC NTP sync complete")
Several Main file functions are not used, it is only necessary to launch the gateway as follows and will already be working.
 def init_loraWAN_gateway():
    print("Initializing LoRaWAN nano Gateway")
    nanogw = NanoGateway(
        id=config.GATEWAY_ID,
        frequency=config.LORA_FREQUENCY,
        datarate=config.LORA_GW_DR,
        ssid=config.WLAN_SSID,
        password=config.WLAN_PASS,
        server=config.SERVER,
        port=config.PORT,
        ntp_server=config.NTP,
        ntp_period=config.NTP_PERIOD_S
        )
    print("Ok! Now you have a LoRaWAN Gateway! Lets start it, wait . . .")
    pycom.rgbled(0xAA0000)
    nanogw.start()
    nanogw._log('. . . Yeah! Nano gateway is connected and running, enjoy the log:')
    pycom.rgbled(0x000000)
The Pycom will keep the red light until it manages to connect, once listens to devices of devices will flash its green LED.
The following is detailed to operate the class node A Using Arduino.
Theory uses all the channels available in the frequency band, later a way of force will be seen only one (not recommended).
McCi Arduino Lorawan library has been used that allows you to abstract many aspects of LORA communication. It has been installed by the Platformio Library Manager.
Basically the code used for the Arduino client is the one found in the ttn-otaa.ino example of the library, except for some modification.
The configuration is made in two different files:
All configuration related to Lorawan, as indicated above is indicated in the Lorawan.cpp file. At the beginning of the document it is detailed that data should be indicated: app_eui , dev_eui and app_key (eye to the format indicated below).
Then the example in Chirpstack:
 static const u1_t PROGMEM APPEUI[8] = {0x00, 0x00, 0x00, 0x00, 0x00, 0x00, 0x00, 0x00};
static const u1_t PROGMEM DEVEUI[8] = {0x7b, 0x6b, 0xff, 0x2c, 0x7b, 0x2c, 0x19, 0x5a};
static const u1_t PROGMEM APPKEY[16] = {0xbd, 0x21, 0x5a, 0x82, 0xb2, 0xf7, 0x92, 0xf3, 0xc7, 0xcb, 0xb2, 0x88, 0xc7, 0x55, 0x33, 0xe7};
Under the entire key configuration, in the loraWan.cpp file, we can choose whether to send flat text or data from the temperature and humidity sensor. Decomes the desired option:
 /******* Send data config *******/

// Use this to send a Hello world in plain text
// static uint8_t mydata[] = "Hello World!";

// Use this to send sensor data
const int neededBytes = 4; // 4 bytes: 2 for temperature and 2 for humidity, can change this value
static byte mydata[neededBytes];
static LoraEncoder encoder(mydata);
Depending on the information sent, a decoding or other function must be used, as indicated in the sections of The Things Network and Chirpstack.
As previously seen, the Nano-Gateway Pycom plate is only able to read on a channel while the Arduino final device is able to broadcast on all the band channels (for example, in the European band there are 10 channels). Although it is not recommended (the 1%rule may be breached) can be forced to use only a channel and a frequency only due to development and testing issues.
For this, it is necessary to modify the library code, more specifically the lorabase_eu868.h (in the case of using the European frequency) and forcing the desired frequency to issue as follows (observe how all the values have been hardcoded to indicate the frequency 868.mhz):
 enum {
        EU868_F1 = 868500000,      // g1   SF7-12
        EU868_F2 = 868500000,      // g1   SF7-12 FSK SF7/250
        EU868_F3 = 868500000,      // g1   SF7-12
        EU868_F4 = 868500000,      // g2   SF7-12
        EU868_F5 = 868500000,      // g2   SF7-12
        EU868_F6 = 868500000,      // g3   SF7-12
        EU868_J4 = 868500000,      // g2   SF7-12  used during join
        EU868_J5 = 868500000,      // g2   SF7-12   ditto
        EU868_J6 = 868500000,      // g2   SF7-12   ditto
};
enum {
        EU868_FREQ_MIN = 868500000,
        EU868_FREQ_MAX = 868500000
};
The following function should also be called at the beginning of Lora ( Lorawan_startjob () function:
 // Define the single channel and data rate (SF) to use
void disableChannels(int selectedChannel, int dr)
{
    // Disable all channels, except for the one defined above.
    // ONLY FOR TESTING AND DEVELOPING!
    for (int i = 0; i < 9; i++)
    { // For EU; for US use i<71
        if (i != selectedChannel)
        {
            LMIC_disableChannel(i);
        }
    }

    // Set data rate (SF) and transmit power for uplink
    LMIC_setDrTxpow(dr, 14);
}
The channel and the daterate to be configured are at the beginning of the file, in the lines (by default: channel 0 and the desired datate of the Spreading Factor 7 whose value is 5):
 /******* Channel config (only change if you want to uses a single channel) *******/
const int channel = 0; // Use if you want to use only one Band's Channel.
const int dr = DR_SF7; // Use if you want to use a specific datarate (The spreading factor mark the dr's value).
This would make the loss of packages be reduced considerably, although there are still some that the Gateway does not receive.
Just copy the project to your Arduino plate.
The bookstore works by events, in this case the most important will be the authentication (when you complete you will see the keys in console) and the data shipping.
The event in which data is sent will be EV_Txcomplete in the Void Onevent function (EV_T EV) of the Lorawan.cpp file, observe that the event includes the "RX window", at which time the device listens.
    case EV_TXCOMPLETE:
        Serial.println(F("EV_TXCOMPLETE (includes waiting for RX windows)"));
        if (LMIC.txrxFlags & TXRX_ACK)
            Serial.println(F("Received ack"));
        if (LMIC.dataLen)
        {
            Serial.print(F("Received "));
            Serial.print(LMIC.dataLen);
            Serial.println(F(" bytes of payload"));
        }
        // Schedule next transmission
        os_setTimedCallback(&sendjob, os_getTime() + sec2osticks(TX_INTERVAL), do_send);
        break;
The function, in the same file, where it will be detailed what data are sent is DO_SEND (comment or decoment the lines that encode the information if you want to send flat text):
 void do_send(osjob_t *j)
{
    // Check if there is not a current TX/RX job running
    if (LMIC.opmode & OP_TXRXPEND)
    {
        Serial.println(F("OP_TXRXPEND, not sending"));
    }
    else
    {
        // Leer datos de sensor y codificar (Libreria LoRa_Serialization).
        am2315_readedData data = readAM2315Data();
        encoder.writeTemperature(data.temp);
        encoder.writeHumidity(data.hum);
        // Comentar las dos lineas "encoder" para enviar texto plano

        // Send packet
        LMIC_setTxData2(1, mydata, sizeof(mydata), 0);

        if (isLoopRunning)
        {
            freq = String(LMIC.freq);
            Serial.println("-->Packet queued using freq = " + freq);
            // Prepare upstream data transmission at the next possible time.
            printSensorInfoInDisplay(data.temp, data.hum);
            printLoraSentInDisplay(freq);
        }
    }

    // Next TX is scheduled after TX_COMPLETE event.
}
Note : an error was suffered that prevented the node from receiving back packages, so it was impossible to authenticate the device in front of the server. It has been added in the customer setup () (more specifically in the Lorawan_startjob () function of the Lorawan.CPP file) the following code line that increases the maximum clock error by 10%:
LMIC_setClockError(MAX_CLOCK_ERROR * 10 / 100);
Both Chirpstack and The Things Network offer a series of integrations to send the data that our server receives to other services. For example: we can send the data to an influence database, make use of MQTT, connect to AWS Services or Azure ...
In this section a practical case will be seen in which we can use the integration of HTTP (Webhooks in The Things Network) and MQTT to send the data that our devices send and that our server receives to an application of its own.
To access integrations:
In case of using Chirpstack we are interested
In both servers this integration works in a similar way: launches an event every time an application device sends information (in the case of TTN we must mark the Uplink Message box) and, with this information, a postp of post -type HTTP request is launched to the URL that we indicate.
Note: A good practice, either to verify that the event is launched correctly or to visualize the data format is to access the postbin service, where we can create a BIN (temporary URL to receive requests).
Note2: If the application to which you will launch the petition is housed in localhost and the Chirpstack server also (in a dokerized way as shown in this documentation) you will have to indicate the URL as follows:
http://host.docker.internal:PUERTO/uri
This documentation only covers the use of Chirpstack and TTN is not documented to send data (it has a different format in the petition).
If the data has been decoded with the examples of this repository (folder Decoders-Integrations ), we will obtain a body in the request similar to the following:
 {
    "applicationID": 0,
    "applicationName": "Name",
    "deviceName": "DeviceName",
    "devEUI": "BYTES_EUI",
    "txInfo": [Object object],
    "adr": true,
    "dr": 5,
    "fCnt": 24,
    "fPort": 1,
    "data": "DATA_WITHOUT_DECODE",
    "objectJSON": {
      "data":"DATA_WITHOUT_DECODE==",
      "decodedData":{
        "humidity":37,"temperature":23
      },
      "message":"Informacion recibida del nodo"
    },
    "tags": [Object object],
    "confirmedUplink": false,
    "devAddr": "BYTES_DEV_ADDR"
}
Objectjson is the object returned by our decoder function.
Para leerlo, por ejemplo en una aplicación JavaScript bastaría con hacer algo parecido a lo siguiente (más en el archivo /Decoders-Integrations/arduino_Chirpstack_Http_Integration.js )
 const { deviceName, objectJSON, devAddr} = req.body;
var sensorData = JSON.parse(objectJSON);
//devAddr esta codificado!
var temperature = sensorData.decodedData.temperature;
var humidity = sensorData.decodedData.humidity;
Realmente, a no ser que usemos MQTTS (Mqtt con TLS) no será necesario acceder a ninguna integración desde la aplicación web del servidor.
En este ejemplo suscribiremos nuestra aplicación al topico al que nuestro dispositivo final enviará los datos.
Si nuestra aplicación esta lanzada en local y el servidor Chirpstack también (dockerizado como hemos mostrado en esta documentación), el host del broker será la IP de la máquina WSL. Para conocer este dato lanzaremos:
wsl hostname -I
También habrá que realizar algunas configuraciones lanzando los siguientes comandos (1883 es el puerto de Mosquitto, si se usa otro modificarlo):
netsh interface portproxy add v4tov4 listenport=1883 listenaddress=0.0.0.0 connectport=1883 connectaddress=127.0.0.1
Podemos usar MQTT tal y como viene en el ejemplo de docker, con el parametro anonymous con valor true (sin usar ningún tipo de contraseña o lista de usuarios) o podemos configurar un listado de usuarios (cada uno con los topicos que pueden leer o escribir) con sus respectivas contraseñas (como indica la siguiente documentación).
Para ello, lanzaremos los siguientes comandos (podemos lanzarlos desde WSL ), cada uno de ellos nos pedirá que introduzcamos una contraseña para cada usuario (en este ejemplo se ha usado pass para todos):
 # Create a password file, with users chirpstack_gw, chirpstack_ns, chirpstack_as, bob and nodeApp
sudo mosquitto_passwd -c /etc/mosquitto/passwd chirpstack_gw
sudo mosquitto_passwd /etc/mosquitto/passwd chirpstack_ns
sudo mosquitto_passwd /etc/mosquitto/passwd chirpstack_as
sudo mosquitto_passwd /etc/mosquitto/passwd bob
sudo mosquitto_passwd /etc/mosquitto/passwd nodeApp

# Optional, Secure the password file
sudo chmod 600 /etc/mosquitto/passwd
Esto nos creará el fichero passwd que contendrá todos los usuarios y contraseñas, ahora podremos configurar un listado de acls en un fichero homónimo como el siguiente:
 user chirpstack_gw
topic write gateway/+/event/+
topic read gateway/+/command/+

user chirpstackns
topic read gateway/+/event/+
topic write gateway/+/command/+

user chirpstack_as
topic write application/+/device/+/event/+
topic read application/+/device/+/command/+

user bob
topic read application/123/device/+/event/+
topic write application/123/device/+/command/+

user nodeApp
topic read application/+/device/#
topic write application/+/device/#
Ahora, deberemos modificar la configuración del servidor para utilizar estas credenciales modificando los ficheros albergados en /chirpstack-docker/configuration :
 [application_server.integration.mqtt]
server="tcp://mosquitto:1883"
username="chirpstack_as"
password="pass"
 [integration.mqtt.auth.generic]
servers=["tcp://mosquitto:1883"]
username="chirpstack_gw"
password="pass"
 [network_server.gateway.backend.mqtt]
server="tcp://mosquitto:1883"
username="chirpstack_ns"
password="pass"
 listener 1883
password_file /mosquitto/config/passwd
acl_file /mosquitto/config/acls
allow_anonymous false
 mosquitto:
  image: eclipse-mosquitto:2
  ports:
    - 1883:1883
  volumes:
    - ./configuration/eclipse-mosquitto/mosquitto.conf:/mosquitto/config/mosquitto.conf
    - ./configuration/eclipse-mosquitto/passwd:/mosquitto/config/passwd
    - ./configuration/eclipse-mosquitto/acls:/mosquitto/config/acls
En este ejemplo usaremos una aplicación NodeJS para conectarnos a nuestro servidor local Chirpstack dockerizado. Todo el código podemos encontrarlo en el archivo /Decoders-Integrations/arduino_Chirpstack_mqtt_Integration.js .
Lo primero, tendremos que instalar el paquete mqtt
npm install mqtt --save
Con él, ya podremos conectarnos al broker:
 var mqtt = require('mqtt')
const host = 'WSL_IP'
const port = '1883' //or your port
const clientId = 'mqtt_NodeApp_' + Math.random().toString(16).slice(3)

const connectUrl = 'mqtt://' + host + ':' + port;

const client = mqtt.connect(connectUrl, {
    clientId,
    clean: true,
    //username: "nodeApp", //Descomentar si usamos contraseñas y acls
    //password: "pass", //Colocar el usuario y contraseña correspondiente
    connectTimeout: 4000,
    reconnectPeriod: 1000,
    debug: true
  })
Y suscribirnos al topico deseado (el caracter # es un wildcard multinivel, significa que leemos cualquier subtopico, mientras que el caracter + es un wildcard de un solo nivel).
 const chirpstackApplicationID = 1; //Check url, for example: http://localhost:8080/#/organizations/1/applications. /1/ is the ID
const chirpstackDeviceID = "DEV_EUI";
const chirpstackReadAppTopic = "application/" + chirpstackApplicationID + "/device/#";
const chirpstackWriteAppTopic = "application/" + chirpstackApplicationID + "/device/"+chirpstackDeviceID+"/EXAMPLE";
Usaremos los siguientes eventos para ello:
 //Evento al conectarse
client.on('connect', function () {
    console.log("Connected")
    client.subscribe(chirpstackReadAppTopic, function (err) {
      if (!err) {
        console.log("Subscribed to topic: "+chirpstackReadAppTopic)
        //client.publish(chirpstackWriteAppTopic, 'Hello mqtt') //Podemso enviar un mensaje para debugear
      }
      else {
        console.log("Error in connection:")
        console.log(err)
      }
    })
  })

  //Evento al recibir un mensaje
  client.on('message', function (topic, message) {
    // El mensaje es un buffer, convertimos a String.
    var stringMsg = message.toString();
    console.log(topic + " - " + stringMsg)
    insertSensorEntry_Mqtt(topic, stringMsg); //Funcion que lee el mensaje e inserta en base de datos
  })
En ambos servidores (Chirpstack y The Things Network) la integración tiene por nombre MQTT , eso sí, antes de realizar ninguna integración debemos configurar los certificados.
A continuación se documentará como realizar la integración con MQTT en un servidor local de Chirpstack (para más info revisar el apartado ChirpStack privado en local de esta documentación).
Antes de generar los certificados, debemos tener instalado CFSSL & CFSSLJSON. Tras ello, clonaremos el siguiente repositorio propiedad del creador de Chirpstack y seguiremos los pasos de su documentación: Chirpstack-Certificates.
NOTA: Si se usa Windows, instalar los pre-requisitos en la máquina WSL pues se necesitará hacer uso del comando make .
Colocamos la carpeta certs generada con el proyecto Chirpstack-Certificates en nuestro proyecto Chirpstack-Docker . Después modificados el archivo docker-compose.yml para añadir a cada contenedor el volumen que contendrá los certificados correspondientes.
Seguimos siguiendo la documentación del proyecto Chirpstack-Certificates para realizar todas las modificaciones pertinentes en la configuración del servidor:
Como hemos visto anteriormente, el evento que se lanza al recibir un mensaje llama a una función que lee el mensaje recibido y lo descodifica.
El formato del mensaje recibido (si hemos usado los descodificadores del ejemplo) es una cadena de texto con el siguiente contenido:
{"applicationID":"1","applicationName":"APP_NAME","deviceName":"DEV_NAME","devEUI":"DEV_ADDRESS", "txInfo":{"frequency":868500000,"dr":5},"adr":true,"fCnt":2, "fPort":1,"data":"DATA","object":{"data":"DATA","decodedData":{"humidity":0,"temperature":-327},"message":"Informacion recibida del nodo"}}
Y es lo que buscamos leer en la siguiente función:
  function insertSensorEntry_Mqtt(topic, msg){
    console.log("INSERTAMOS DATO DE SENSOR RECIBIDO POR MQTT EN TOPICO: "+topic);
    const parseMsg = JSON.parse(msg); //Recordar haber hecho un ToString al buffer antes!

    var deviceName = parseMsg.deviceName;
    var devAddr = parseMsg.devEUI; //No codificado
    var temperature = parseMsg.object.decodedData.temperature;
    var humidity = parseMsg.object.decodedData.humidity;
    var success = true;
  }
object es el objeto retornado por nuestra función Decoder .
Como bien se sabe, la tasa de transferencia de LoRA es muy baja, lo que provoca una gran perdida de paquetes y una enorme latencia cuando se envía información:
Algunos expertos indican que es necesario cierta distancia entre los dispositivos (30m y preferiblemente algún obstaculo entre ellos) para que la comunicación sea más fluida. No ha sido probado y solo se ha lanzado con las dos tarjetas en un extremo cada una de un piso.
Por otro lado se hace uso de versiones antiguas de LoRaWAN (1.0.2 y 1.0.3) que tienen problemas de seguridad que se solventan en parte en las siguientes versiones (1.0.4 y 1.1.0, esta última también implementa re-conectividad en caso de desconectarse de la red LoRaWAN), pero no se dispone de librerias para trabajar con ellas.
Esto no quita que esta técnología pueda ser muy interesante y útil en el futuro debido a no depender de proveedores externos (de comunicaciones y electricidad), siendo una opción ecónomica y muy llamativa para utilizar en proyectos IoT de grandes ciudades o entornos rurales.
Este proyecto ha sido realizado para la Fundación CTIC, su uso es libre y no es necesarío ningún crédito en su uso (Revisar las licencia de las librerias utilizadas).


