AivisSpeech
1.0.0
? AivisSpeech: AI V oice I mitation S ystem - Text to Speech Software
AivisSpeech is Japanese speech synthesis software based on VOICEVOX's editor UI.
It incorporates the Japanese speech synthesis engine AivisSpeech Engine, which allows you to easily generate emotional voices.
If you are looking to use AivisSpeech, please visit the AivisSpeech official website.
This page contains information mainly for developers.
Below is a document for users:
Compatible with PCs with Windows and macOS.
To start AivisSpeech, your PC needs at least 3GB of free memory (RAM).
Note
We have not actively verified the operation on Macs with Intel CPUs.
Macs with Intel CPUs are already out of production, and it is becoming more difficult to prepare a verification and build environment. We recommend using this product on a Mac with Apple Silicon as much as possible.
Warning
On Windows 10, we only check the operation of version 22H2.
There have been reports of cases where AivisSpeech Engine crashes and fails to start on older versions of Windows 10 that have no support.
From a security perspective, we strongly recommend that you use Windows 10 environments only update to the minimum version 22H2 before using the service.
The AivisSpeech Engine, built into AivisSpeech, supports speech synthesis model files in the AIVMX ( Ai vis V oice M odel for ONN X ) ( .aivmx ) format.
AIVM ( Ai vis V oice M odel) / AIVMX ( Ai vis V oice M odel for ONN X ) is an open file format for AI speech synthesis models that combines pre-trained models, hyperparameters, style vectors, speaker metadata (names, overviews, licenses, icons, voice samples, etc.) into one file .
For more information about the AIVM specifications and AIVM/AIVMX files, please refer to the AIVM specifications developed in the Aivis Project.
Note
"AIVM" is also a general term for both AIVM/AIVMX format specifications and metadata specifications.
Specifically, the AIVM file is a model file in "Safetensors format with AIVM metadata added", and the AIVMX file is a model file in "ONNX format with AIVM metadata added".
"AIVM Metadata" refers to various metadata that is linked to a trained model as defined in the AIVM specification.
Important
The AivisSpeech Engine is also a reference implementation of the AIVM specification, but it is deliberately designed to support only AIVMX files.
This eliminates dependency on PyTorch, reduces installation size and provides fast CPU inference with ONNX Runtime.
Tip
AIVM Generator allows you to generate AIVM/AIVMX files from existing speech synthesis models and edit the metadata of existing AIVM/AIVMX files!
The AIVMX files for the following model architectures are available:
Style-Bert-VITS2Style-Bert-VITS2 (JP-Extra) Note
The AIVM metadata specification allows you to define multilingual speakers, but AivisSpeech Engine, like VOICEVOX ENGINE, only supports Japanese speech synthesis.
Therefore, even if you use a speech synthesis model that supports English or Chinese, speech synthesis other than Japanese cannot be performed.
Place the AIVMX files in the following folders for each OS:
C:Users(ユーザー名)AppDataRoamingAivisSpeech-EngineModels~/Library/Application Support/AivisSpeech-Engine/Models~/.local/share/AivisSpeech-Engine/Models The actual folder path will be displayed as Models directory: in the logs immediately after starting AivisSpeech Engine.
Tip
When using AivisSpeech, you can easily add speech synthesis models from the AivisSpeech UI screen!
For end users, we recommend that you add a speech synthesis model using this method.
Important
The deployment folder for the development version (if you are running AivisSpeech Engine while not built with PyInstaller) is not AivisSpeech-Engine or below AivisSpeech-Engine-Dev .
VOICEVOX is a huge software that is still actively developed today.
Therefore, AivisSpeech is developing the latest version of VOICEVOX under the following policy:
The steps differ from the original VOICEVOX.
Node.js 20.12.2 must be installed beforehand.
 # 依存関係をすべてインストール
npm ci

# .env.development を .env にコピー
# # コピーした .env を編集する必要はない
cp .env.development .env

# macOS のみ、.env.production を編集
nano .env.production
--------------------
# executionFilePath を "AivisSpeech-Engine/run.exe" から "../Resources/AivisSpeech-Engine/run" に書き換える
# # executionFilePath は、npm run electron:build でビルドした製品ビルドの AivisSpeech の起動時に使用される
...
VITE_DEFAULT_ENGINE_INFOS= ` [
    {
        " uuid " : " 1b4a5014-d9fd-11ee-b97d-83c170a68ed3 " ,
        " name " : " AivisSpeech Engine " ,
        " executionEnabled " : true,
        " executionFilePath " : " ../Resources/AivisSpeech-Engine/run " ,
        " executionArgs " : [],
        " host " : " http://127.0.0.1:10101 "
    }
] `
...
--------------------

# 事前に別のターミナルで AivisSpeech Engine を起動しておく
# # AivisSpeech Engine の開発環境は別途構築する必要がある
cd ../AivisSpeech-Engine
poetry run task serveThe steps differ from the original VOICEVOX.
 # 開発環境で Electron 版 AivisSpeech を起動
npm run electron:serve

# 開発環境でブラウザ版 AivisSpeech を起動
npm run browser:serve

# Electron 版 AivisSpeech をビルド
npm run electron:build

# ブラウザ版 AivisSpeech (WIP) をビルド
npm run browser:build

# コードフォーマットを自動修正
npm run format

# コードフォーマットをチェック
npm run lint

# OpenAPI Generator による自動生成コードを更新
npm run openapi:generate

# 依存ライブラリのライセンス情報を生成
# # VOICEVOX と異なり、音声合成エンジンとのライセンス情報との統合は行わない
# # エディタ側で別途エンジンマニフェストから取得したライセンス情報を表示できるようにしているため不要
npm run license:generateOf the dual licenses of the base VOICEVOX/VOICEVOX ENGINE, only LGPL-3.0 will be inherited independently.
The following and docs/ The following documents carry on the original VOICEVOX document without modification. It is not guaranteed that the contents of these documents will also apply to AivisSpeech.
This is the editor for VOICEVOX.
(The engine is VOICEVOX ENGINE, the core is VOICEVOX CORE, and the overall structure can be found here.)
This is a development page. For information on how to use it, please visit the VOICEVOX official website.
The VOICEVOX project welcomes interested participants. We have a guide explaining the contribution procedure.
When you think of contributions, you might think of creating a program, but there are various ways to participate, such as writing a document, generating tests, and participating in discussions in proposals for improvements. We also offer tasks that welcome beginners, so we look forward to your participation.
VOICEVOX's editors use Electron, TypeScript, Vue, Vuex, and more, making the overall structure difficult to understand.
We will introduce the structure in how to walk the code, so we hope it will help you develop it.
When creating a pull request to resolve an issue, please either tell the Issue that you have begun working on it or create a Draft pull request first to avoid working on the same issue as someone else.
Development discussions and chats are held on the VOICEVOX unofficial Discord server. Please feel free to join us.
Please refer to UX/UI Design Policy.
Please install the version of Node.js listed in .node-version.
Node.js management tools (such as nvs and Volta) make it easy to install and automatically switch Node.js.
After installing Node.js, fork this repository and git clone it.
Run the following command to install and update the dependent libraries:
npm ci Copy .env.production to create .env , and specify vv-engine/run.exe in the product version of VOICEVOX in executionFilePath in VITE_DEFAULT_ENGINE_INFOS to vv-engine/run.exe in the product version of VOICEVOX to run.
If you have not changed the installation location on Windows, specify C:/Users/(ユーザー名)/AppData/Local/Programs/VOICEVOX/vv-engine/run.exe .
Please note that the path delimiter is not /
If you are using VOICEVOX.app for macOS, please specify /path/to/VOICEVOX.app/Resources/MacOS/vv-engine/run .
For Linux, specify vv-engine/run command included in the tar.gz version available from Releases. For the AppImage version, you can mount the file system using $ /path/to/VOICEVOX.AppImage --appimage-mount .
If you are running an engine API server separately from running the VOICEVOX editor, you do not need to specify executionFilePath , but instead, set executionEnabled to false . This applies even if you are running the product version of VOICEVOX.
If you want to change the destination endpoint of the engine API, change host in VITE_DEFAULT_ENGINE_INFOS .
 # 開発しやすい環境で実行
npm run electron:serve

# ビルド時に近い環境で実行
npm run electron:serve -- --mode production
The voice synthesis engine repository is here: https://github.com/VOICEVOX/voicevox_engine
You can develop components using Storybooks.
npm run storybook You can view the Storybook for the main branch from VOICEVOX/preview-pages.
https://voicevox.github.io/preview-pages/preview/branch-main/storybook/index.html
Start the separate speech synthesis engine and run the following to access the displayed localhost:
npm run browser:serve Additionally, the build results for the main branch have been deployed in VOICEVOX/preview-pages.
https://voicevox.github.io/preview-pages/preview/branch-main/editor/index.html
Now you need to start the speech synthesis engine on your local PC.
npm run electron:build You can build by turning on Actions in the repository that you forked and launching build.yml with workflow_dispatch. The deliverables will be uploaded to Release.
Run the tests under ./tests/unit/ and the Storybook tests.
npm run test:unit
npm run test-watch:unit # 監視モード
npm run test-ui:unit # VitestのUIを表示
npm run test:unit -- --update # スナップショットの更新
Note
The tests under ./tests/unit change the environment in which the test is run depending on the file name.
.node.spec.ts : Node.js environment.browser.spec.ts : Browser environment (Chromium).spec.ts : Browser environment (emulatory using happy-dom)Run End to End tests such as UI and speech synthesis that do not require Electron functionality.
Note
Tests that rewrite settings for some engines are now only performed on CI (Github Actions).
npm run test:browser-e2e
npm run test-watch:browser-e2e # 監視モード
npm run test-watch:browser-e2e -- --headed # テスト中の UI を表示
npm run test-ui:browser-e2e # Playwright の UI を表示
You can also generate test patterns because you use Playwright. Run the following command while the browser version is running :
npx playwright codegen http://localhost:5173/ --viewport-size=1024,630For more information, see Test generator in the Playwright documentation.
Compare screenshots of Storybook components and show differences if any changes are made.
Note
This test can only be run on Windows.
npm run test:storybook-vrt
npm run test-watch:storybook-vrt # 監視モード
npm run test-ui:storybook-vrt # Playwright の UI を表示Browser End to End tests and Storybooks provide Visual Regression Testing. Currently, VRT testing is performed only on Windows. You can update your screenshot by following the steps below:
Enable GitHub Actions in the forked repository settings.
Under Actions > General > Workflow permissions in the repository settings, select Read and write permissions.
Commit the string [update snapshots] in the commit message.
git commit -m " UIを変更 [update snapshots] "Once Github Workflow is complete, the updated screenshot will be committed.
After pulling, push an empty commit and run the test again.
git commit --allow-empty -m " (テストを再実行) "
git push
Note
You can automatically rerun the test by creating a token and adding it to Secrets.
ユーザー名/voicevox , and under Repository permissions, select Read and write under Contents.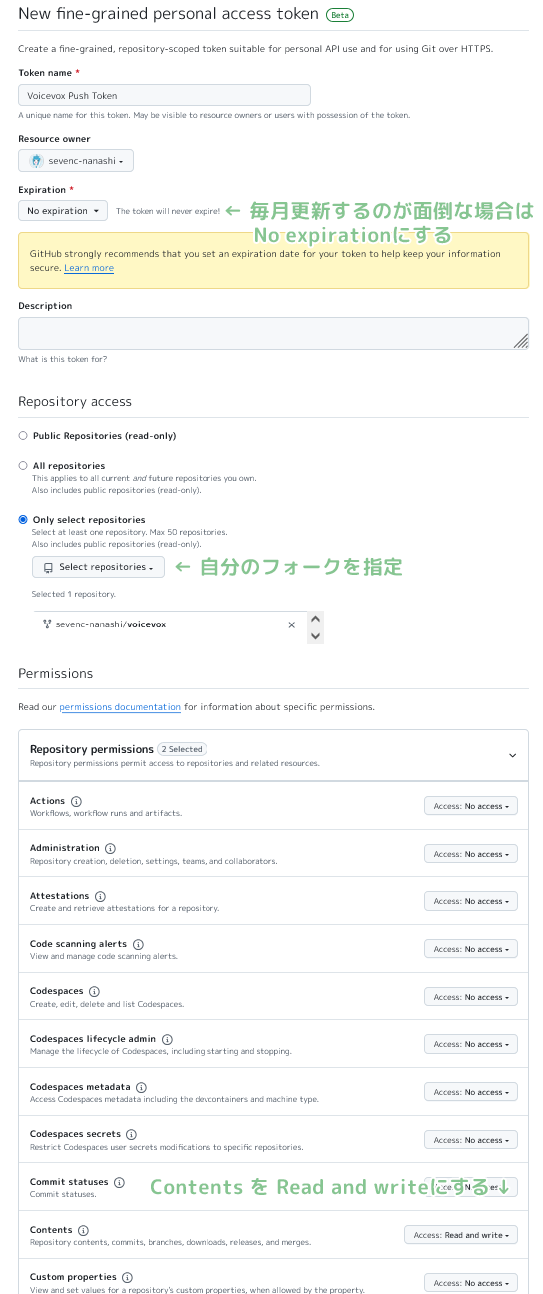
ユーザー名/voicevox repository.PUSH_TOKEN in the name, paste the string above and add Secrets. Only those that support the local PC's OS will be updated.
npm run test:browser-e2e -- --update-snapshotsRun End to End tests that require Electron functionality, including engine startup and termination.
npm run test:electron-e2e
npm run test-watch:electron-e2e # 監視モードLicensing information for dependent libraries is automatically generated when building with Github Workflow. You can generate it with the following command:
 # get licenses.json from voicevox_engine as engine_licenses.json

npm run license:generate -- -o voicevox_licenses.json
npm run license:merge -- -o public/licenses.json -i engine_licenses.json -i voicevox_licenses.jsonFormat the code. Please execute it before sending a pull request.
npm run fmtStatic analysis of your code to prevent bugs. Please execute it before sending a pull request.
npm run lintI use typos to check my typos.
npm run typos You can check the type. If there are any files that should be excluded from false judgments or checks, please follow the instructions in the configuration file to edit _typos.toml .
TypeScript type checking.
npm run typecheckPerforms a Markdown grammar check.
npm run markdownlintDo a ShellScript grammar check. For installation instructions, please see here.
shellcheck ./build/ * .shRun the following command while the speech synthesis engine is running.
curl http://127.0.0.1:50021/openapi.json > openapi.json

npx openapi-generator-cli generate
    -i openapi.json
    -g typescript-fetch
    -o src/openapi/
    --additional-properties " modelPropertyNaming=camelCase,supportsES6=true,withInterfaces=true,typescriptThreePlus=true "

npm run fmtYou can check and install a new version using the following command:
npx openapi-generator-cli version-manager list Under development builds such as npm scripts serve and electron:serve , sourcemap is output in the vite used for the build, so the source code and the output code are mapped.
Copying .vscode/launch.template.json to create .vscode/launch.json and .vscode/tasks.template.json .vscode/tasks.json enable tasks that allow for debugging by running development builds from VS Code.
It is a dual license with LGPL v3 and separate licenses that do not require the publication of the source code. If you would like to obtain a separate license, please ask Heho.
X Account: @hiho_karuta


