wiz editor
1.0.0
Wiz-editor is a web page rich text editing that supports multi-person real-time collaborative editing.
Note: The contents of online demonstrations will be automatically emptied regularly due to regulatory issues, so please do not use them for content release.
Video Demo
wiz-editor upgrade log
Weizhi Notes Refactored Edition, Weizhi Notes Lite has fully used the editor.
Wiz-editor is specially developed for online documents and has provided integrated services to many companies. Wiz-editor provides powerful expansion capabilities and can integrate enterprise business into documents. For example, the integration of conventional reminders, tasks, calendars, etc. can be integrated with the IM and task systems within the enterprise. At the same time, using the template capabilities, various documents can be quickly generated, such as contracts, weekly reports, etc.
At the same time, wiz-editor can seamlessly integrate users and permissions within the enterprise, without requiring multiple users to log in.
Taking advantage of the wiz-editor feature of multi-person real-time collaborative editing, documents shared within the enterprise do not need to worry about version conflicts, so that documents will always remain the latest version.
Wiz-editor can replace traditional web editors, such as editors for various blogs, etc. Even if multiple people do not need to collaborate in real time, you can use the wiz-editor client alone (no need to rely on the server). This allows you to make full use of the powerful editing features of wiz-editor.
Wiz-editor provides complete markdown function, and can directly write documents using markdown syntax. It also supports markdown import/export function.

It contains the editor server, which can be run directly on the local machine.
Directly download the code from git clone or download it and unzip it to disk.
Note: Nodejs 13 or higher is required
 cd h5
npm install
npm start localhost:9000
 cd h5
# 完整的自定义扩展例子,包含外部工具栏,各种自定义组件等
npm run custom
# 极简编辑器,无外部UI
npm run simple
# 各种自定义box
npm run calendar
npm run date
npm run mention
npm run labelnpm i wiz-editor import {
createEditor ,
Editor ,
} from 'wiz-editor/client' ;
// 定义AppID,AppSecret, AppDomain。在自带的测试服务器中,下面三个key不要更改
const AppId = '_LC1xOdRp' ;
const AppSecret = '714351167e39568ba734339cc6b997b960ed537153b68c1f7d52b1e87c3be24a' ;
const AppDomain = 'wiz.cn' ;
// 初始化服务器地址
const WsServerUrl = window . location . protocol !== 'https:'
? `ws:// ${ window . location . host } `
: `wss:// ${ window . location . host } ` ;
// 定义一个用户。该用户应该是由应用服务器自动获取当前用户身份
// 编辑服务需要提供用户id以及用户的显示名。
const user = {
userId : ` ${ new Date ( ) . valueOf ( ) } ` ,
displayName : 'test user' ,
avatarUrl : 'xxx' ,
} ;
// 设置编辑器选项
const options = {
serverUrl : WsServerUrl ,
} ;
// 从应用服务器获取一个AccessToken。应用服务器需要负责验证用户对文档的访问权限。
// accessToken采用jwt规范,里面应该包含用户的userId,文档的docId,以及编辑应用的AppId。
// 下面是一个演示例子。在正常情况下,AccessToken应该通过用户自己的应用服务器生成。
// 因为在前端使用JWT加密规范的时候,必须在https协议下面的网页才可以使用。为了演示,
// 我们自带的测试服务器会提供一个虚拟的token生成功能。(启动服务的时候,需要指定--enable-fake-token-api 参数)
// 请勿在正式服务器上面,启用这个参数。
async function fakeGetAccessTokenFromServer ( userId : string , docId : string ) : Promise < string > {
//
const data = {
userId ,
docId ,
appId : AppId ,
} ;
const fromHexString = ( hexString : string ) => {
const parts = hexString . match ( / .{1,2} / g ) ;
assert ( parts ) ;
const arr = parts . map ( ( byte ) => parseInt ( byte , 16 ) ) ;
return new Uint8Array ( arr ) ;
} ;
//
const key = fromHexString ( AppSecret ) ;
try {
const accessToken = await new EncryptJWT ( data )
. setProtectedHeader ( { alg : 'dir' , enc : 'A256GCM' } )
. setIssuedAt ( )
. setIssuer ( AppDomain )
. setExpirationTime ( '120s' )
. encrypt ( key ) ;
return accessToken ;
} catch ( err ) {
const res = await fetch ( `http:// ${ window . location . host } /token/ ${ AppId } / ${ docId } / ${ userId } ` ) ;
const ret = await res . json ( ) ;
return ret . token ;
}
}
// 文档id
const docId = 'my-test-doc-id' ;
( async function loadDocument ( ) {
// 验证身份,获取accessToken
const token = await fakeGetAccessTokenFromServer ( user . userId , docId ) ;
// 生成编辑服务需要的认证信息
const auth = {
appId : AppId ,
userId : user . userId ,
displayName : 'name' ,
avatarUrl : 'xxx' ,
docId ,
token ,
permission : 'w' ,
} ;
// 创建编辑器并加载文档
const editor = createEditor ( document . getElementById ( 'editor' ) as HTMLElement , options , auth ) ;
} ) ( ) ;Through the above code, you can create a multi-player real-time collaborative editor in your own application. In the above code, you can view the effect by running npm run simple under the h5 example.
View source code
wiz-editor-react
 < script src =' https://cdn.jsdelivr.net/npm/[email protected]/client/src/index.js ' charset =" utf-8 " > </ script >

< script >
const {
  Editor ,
  createEditorPromise ,
  assert ,
  BlockElement ,
  blockUtils ,
  containerUtils ,
  CommandItemData ,
  MenuItem ,
  domUtils ,
  getEditor ,
  AuthMessage ,
  OnProgress ,
  EditorOptions ,
  SelectionDetail ,
  EditorDoc ,
} = window . WizEditor ;
</ script > Editor structure
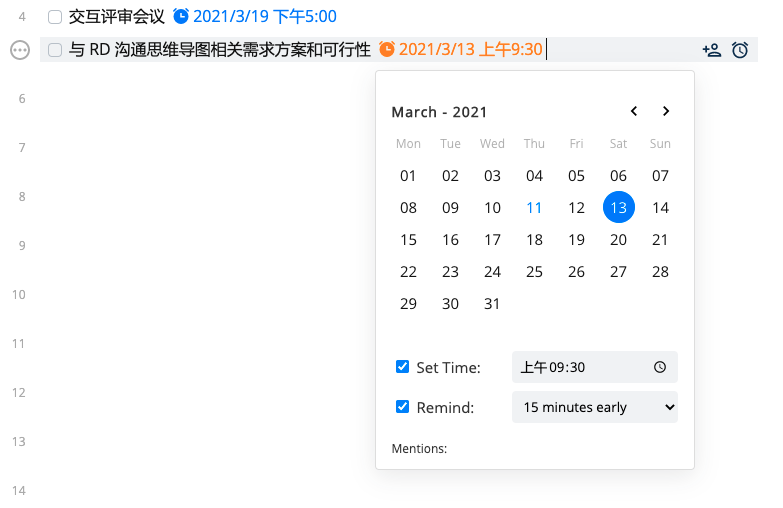
Added insertion reminder function
Respond to comment messages
Custom box instructions
Custom block buttons/menu
Custom text styles
Custom document templates
Editor structure
Custom Embed type block
Custom Complex type block
wiz-editor server adaptation
Introduction to wiz-editor server architecture
local demo
CDN demo
Custom floating toolbar
Respond to editor events
Send custom messages


