goit js hw 09
1.0.0
Read in Other Languages: Ukrainian, English.
goit-js-hw-09 repository was created.GitHub Pages .Prettier . In the SRC folder you will find starting files with ready -made markings, styles and connected scripts for each task. Copy them into the project by completely replacing the src folder in Parcel-Project-TEMPlate. To do this, download all this repository as an archive or use the Downgit service to download a separate folder from the repository.
Complete this task in 01-color-switcher.html and 01-color-switcher.js . See the demo-video of the switch.
HTML contains "Start" and "Stop" buttons.
 < button type =" button " data-start > Start </ button >
< button type =" button " data-stop > Stop </ button >
Write a script that changes the color of the background <body> to a random value using the inline style after clicking the Start button. Clicking on the "STOP" button change the color of the background should stop.
️ Keep in mind that you can click an endless number of times on the Start button. Make sure the change is started, the Start button was inactive.
Use getRandomHexColor to generate random color.
 function getRandomHexColor ( ) {
  return `# ${ Math . floor ( Math . random ( ) * 16777215 ) . toString ( 16 ) } ` ;
} Complete this task in files 02-timer.html and 02-timer.js . Write a timer script that checks the count down to a certain date. Such a timer can be used in blogs and online stores, event registration pages, maintenance and more. See the demo-video of the timer.
HTML contains a ready -made timer, the field selection fields and a button on the click on which the timer should start. Add the minimum interface.
 < input type =" text " id =" datetime-picker " />
< button type =" button " data-start > Start </ button >

< div class =" timer " >
  < div class =" field " >
    < span class =" value " data-days > 00 </ span >
    < span class =" label " > Days </ span >
  </ div >
  < div class =" field " >
    < span class =" value " data-hours > 00 </ span >
    < span class =" label " > Hours </ span >
  </ div >
  < div class =" field " >
    < span class =" value " data-minutes > 00 </ span >
    < span class =" label " > Minutes </ span >
  </ div >
  < div class =" field " >
    < span class =" value " data-seconds > 00 </ span >
    < span class =" label " > Seconds </ span >
  </ div >
</ div >
flatpickr LibraryUse the Flatpickr library to allow the user to choose the end date and time in one interface element. In order to connect the CSS library code to the project, you need to add another import, except as described in the documentation.
 // Описаний в документації
import flatpickr from 'flatpickr' ;
// Додатковий імпорт стилів
import 'flatpickr/dist/flatpickr.min.css' ;
The library expects it to be initialized on the input[type="text"] , so we added input#datetime-picker field to the HTML document.
< input type =" text " id =" datetime-picker " /> The second argument of flatpickr(selector, options) can transmit an optional parameter object. We have prepared for you an object that is needed to complete the task. Understand what every property in the Options documentation is responsible, and use it in your code.
 const options = {
  enableTime : true ,
  time_24hr : true ,
  defaultDate : new Date ( ) ,
  minuteIncrement : 1 ,
  onClose ( selectedDates ) {
    console . log ( selectedDates [ 0 ] ) ;
  } ,
} ; onClose() method of parameter object is called every time the interface that creates flatpickr is closed. It is necessary to process the date chosen by the user. The selectedDates parameter is an array of selected dates, so we take the first element.
window.alert() with the text "Please choose a date in the future" . Clicking on the "Start" script should be calculated once a second, how much time is left to the specified date, and update the timer interface, showing four digits: days, hours, minutes and second in xx:xx:xx:xx .
00:00:00:00 .We will not complicate. If the timer is running to select a new date and restart it, you need to restart the page.
To calculate the values, use the finished function convertMs , where ms is the difference between the final and current date in milliseconds.
 function convertMs ( ms ) {
  // Number of milliseconds per unit of time
  const second = 1000 ;
  const minute = second * 60 ;
  const hour = minute * 60 ;
  const day = hour * 24 ;

  // Remaining days
  const days = Math . floor ( ms / day ) ;
  // Remaining hours
  const hours = Math . floor ( ( ms % day ) / hour ) ;
  // Remaining minutes
  const minutes = Math . floor ( ( ( ms % day ) % hour ) / minute ) ;
  // Remaining seconds
  const seconds = Math . floor ( ( ( ( ms % day ) % hour ) % minute ) / second ) ;

  return { days , hours , minutes , seconds } ;
}

console . log ( convertMs ( 2000 ) ) ; // {days: 0, hours: 0, minutes: 0, seconds: 2}
console . log ( convertMs ( 140000 ) ) ; // {days: 0, hours: 0, minutes: 2, seconds: 20}
console . log ( convertMs ( 24140000 ) ) ; // {days: 0, hours: 6 minutes: 42, seconds: 20} convertMs() feature returns an object with a calculated time remaining to the final date. Please note that it does not format the result. That is, if there are 4 minutes or any other component of time, then the function will return 4 , not 04 . In the timer interface, you must add 0 if there are less than two characters. Write the addLeadingZero(value) feature that uses padStart() method and format the value before rendering.
️ The following functionality is not required for the task, but will be a good extra practice.
DD display messages to the user instead of window.alert() , use the Notiflix library.
Complete this task in 03-promises.html and 03-promises.js . See the demo-video of the work generator.
HTML contains a marking of the form in which the user will enter the first delay in milliseconds, a step in increasing the delay for each cutter after the first and the number of measures to be created.
 < form class =" form " >
  < label >
    First delay (ms)
    < input type =" number " name =" delay " required />
  </ label >
  < label >
    Delay step (ms)
    < input type =" number " name =" step " required />
  </ label >
  < label >
    Amount
    < input type =" number " name =" amount " required />
  </ label >
  < button type =" submit " > Create promises </ button >
</ form >
Write a script that at the time of the form of the form causes the function createPromise(position, delay) as many times as entered in the amount field. During each call, pass position number that is created and the delay, given the first delay ( delay ) entered by the user and step ( step ).
 function createPromise ( position , delay ) {
  const shouldResolve = Math . random ( ) > 0.3 ;
  if ( shouldResolve ) {
    // Fulfill
  } else {
    // Reject
  }
}
Complement the createPromise function code so that it returns one cut or rejecting after delay . The value of the side must be an object in which position and delay properties with values of the same parameters. Use the original function code to choose what you need to do with the punishment - perform or reject.
 createPromise ( 2 , 1500 )
  . then ( ( { position , delay } ) => {
    console . log ( `✅ Fulfilled promise ${ position } in ${ delay } ms` ) ;
  } )
  . catch ( ( { position , delay } ) => {
    console . log ( ` Rejected promise ${ position } in ${ delay } ms` ) ;
  } ) ;
️ The following functionality is not required for the task, but will be a good extra practice.
To display messages to the user, instead of console.log() , use the Notiflix library.
This project was a Sozdan at Parcel. For the marking and adjustment of the anchorage of exposure to be selected for documentation.
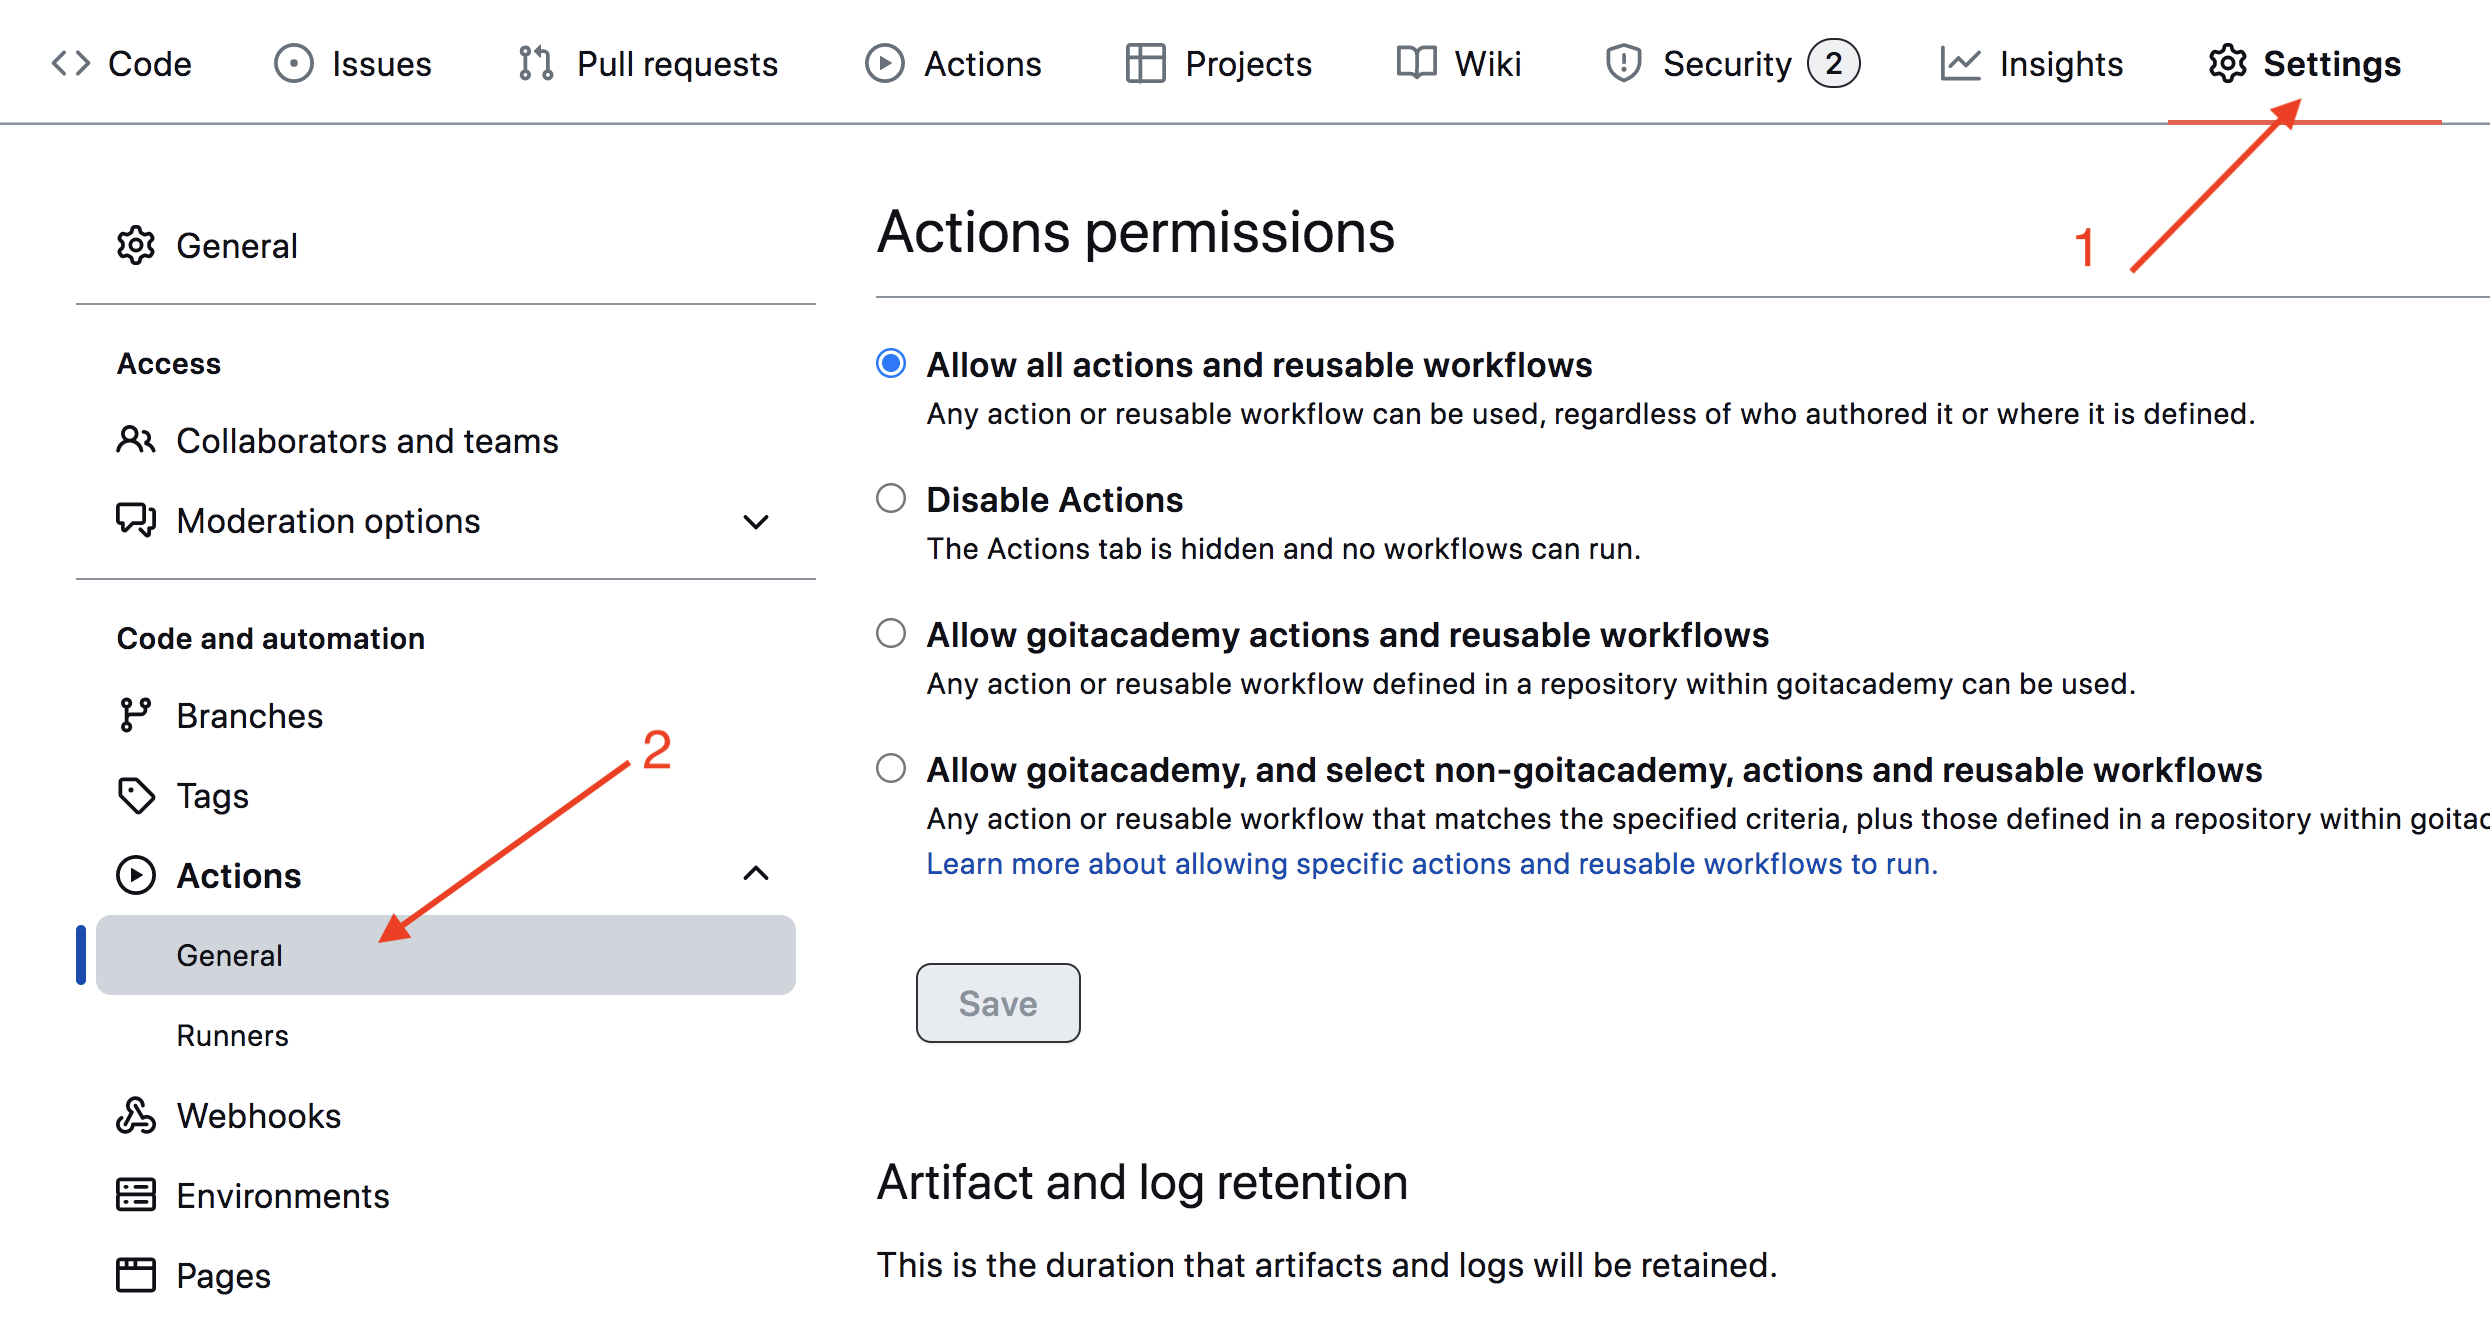
parcel-project-template NASH NASHMI.npm install team.npm start command.src/sass Papquet and are imported in the File files of pages. For example, for index.html the style file is called index.scss .src/images folder. The chorusian optimizes them, but only with the deploration of the project version of the project. Everything goes into the sight of your computer, so as it can be a lot of time on the weak cars. To adjust the project depaza, it is necessary to draw a lot of additional shags on the setting of your repository. Come on Settings tab and in the Actions Subsecations Select the General item.
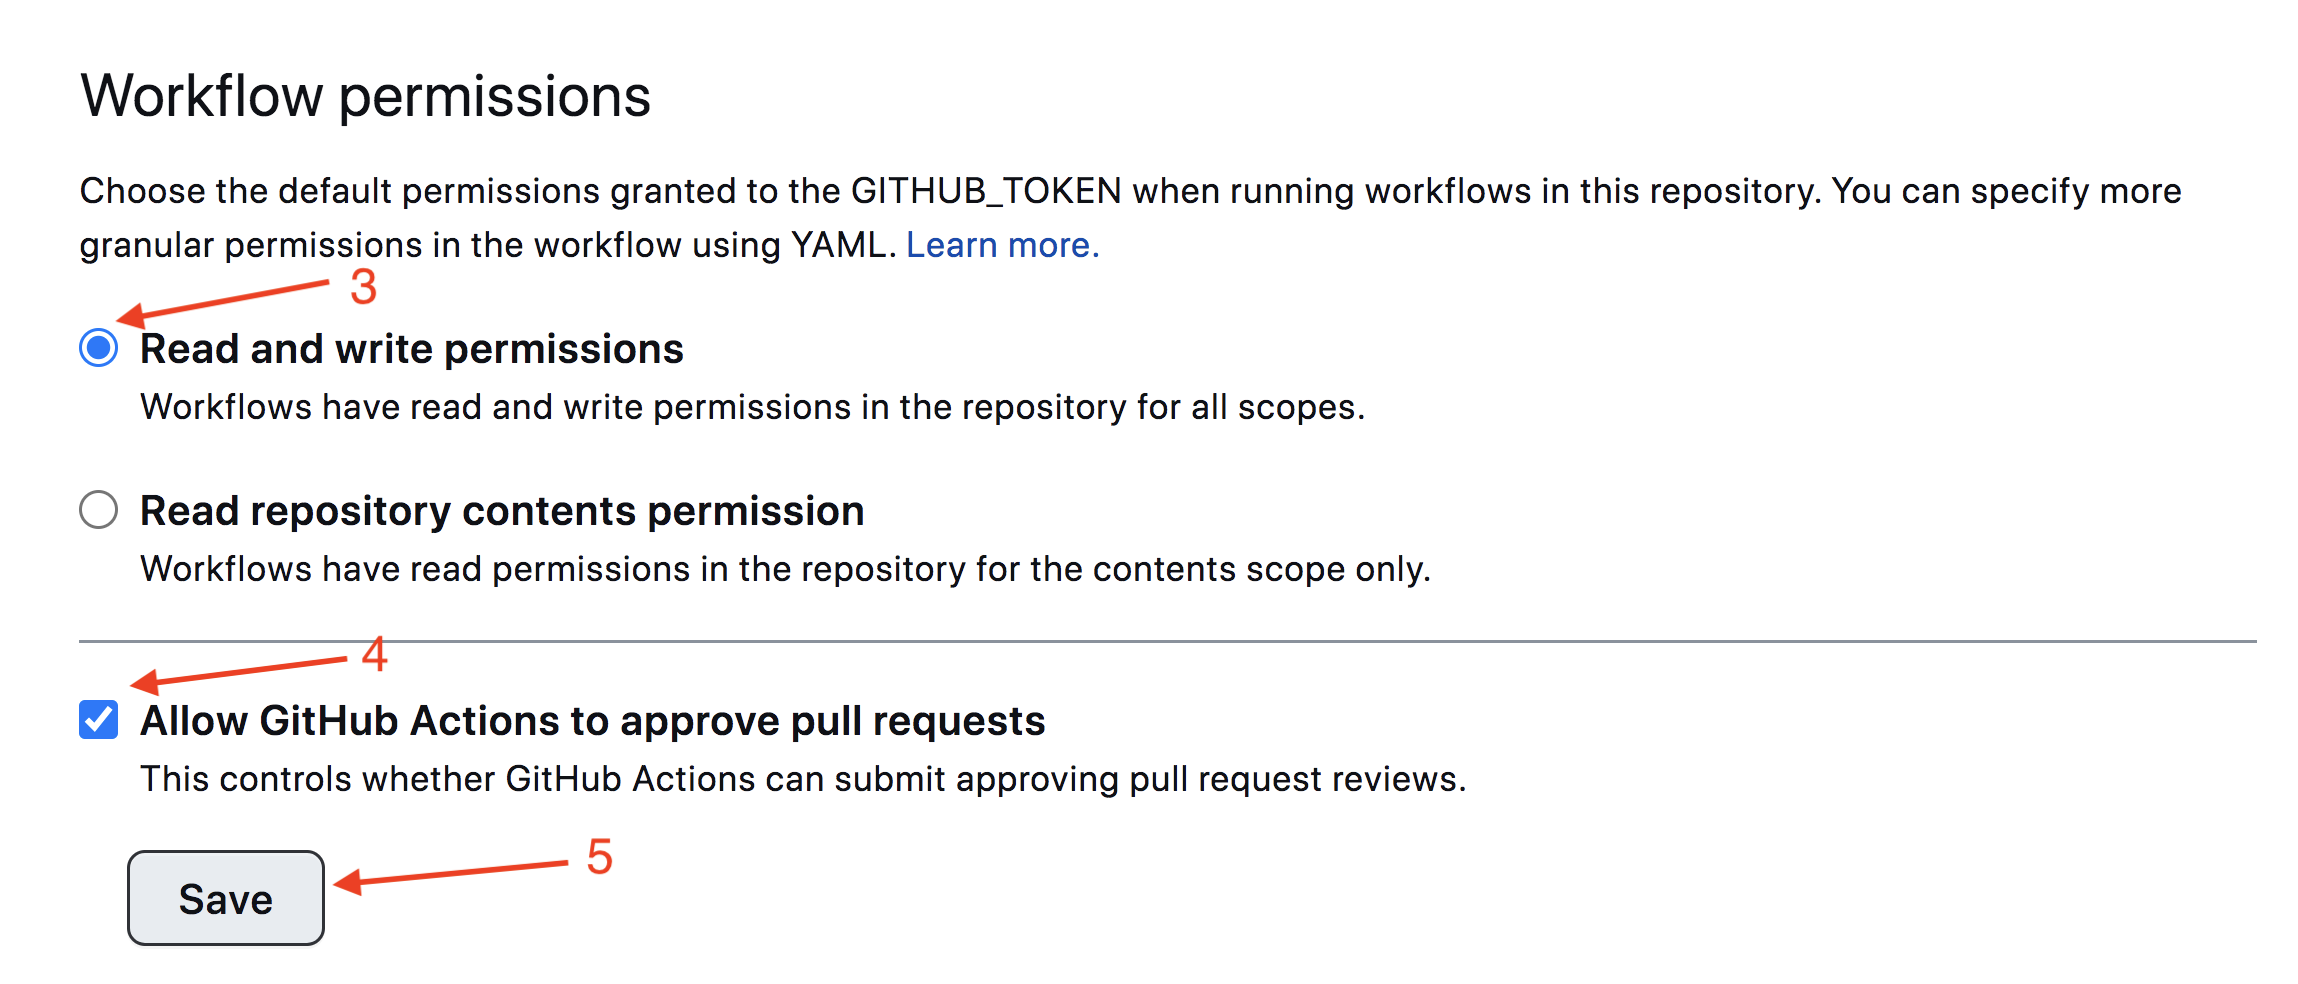
Slide the plot to the post -Secia, in which the opacia is taken in the track on the trace of the image and the sake of Save . Without these tunks in the scoops, there will be unburrency for automating the process of deployed.
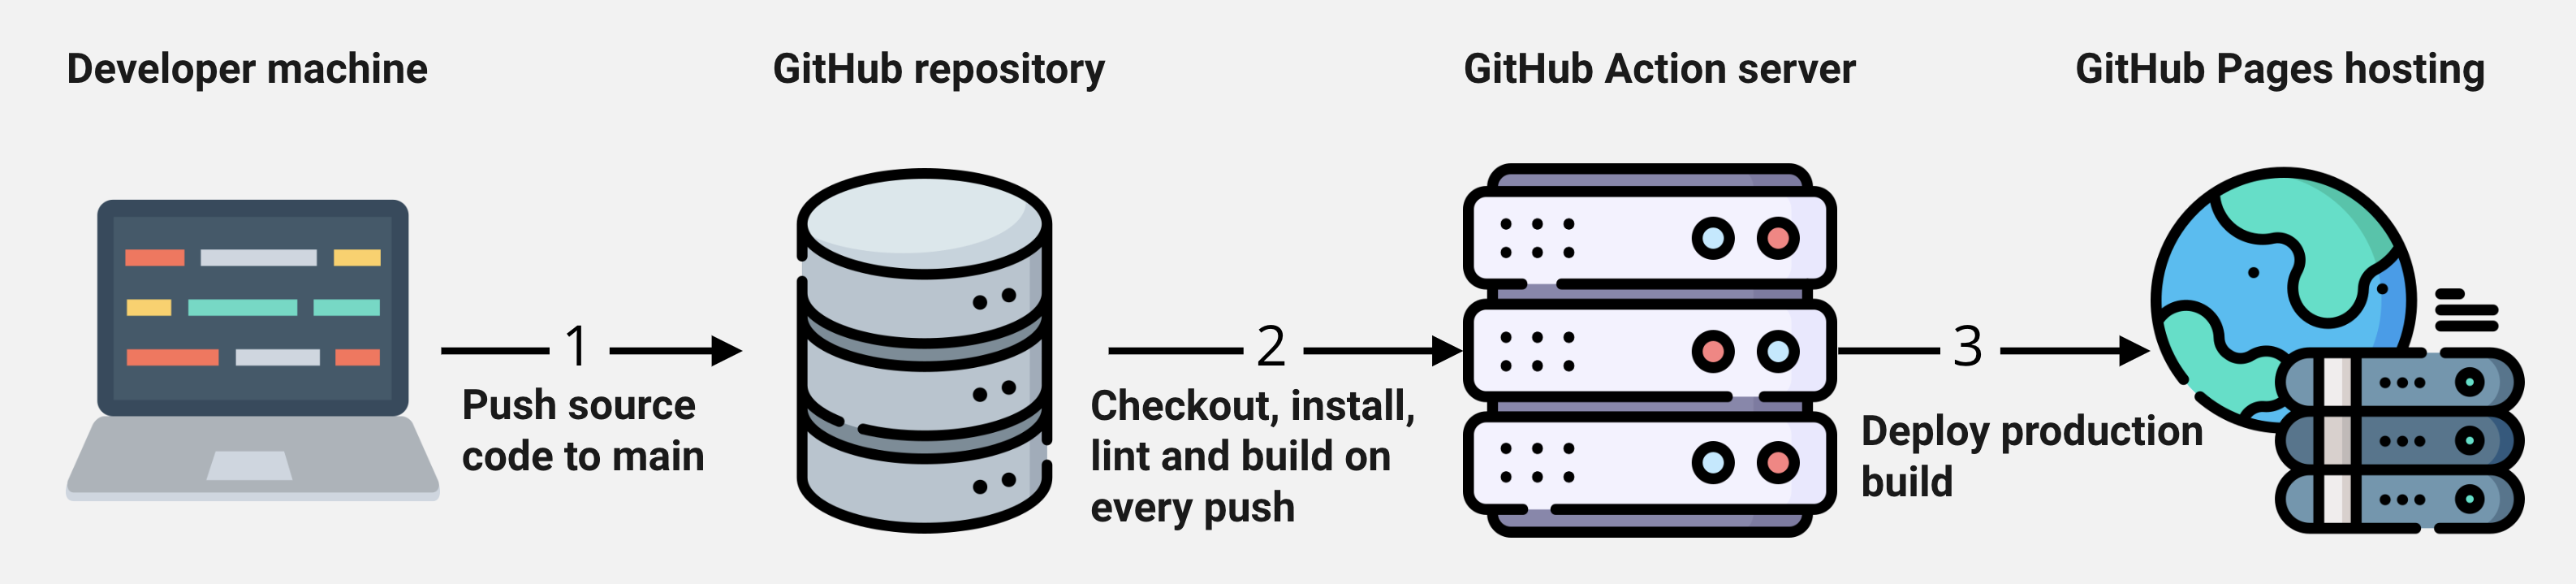
The project version of the project will be automatic and stopped on the Github pages, in the gh-pages Wet, the time of the cogd is updated main Wet. For example, a straight pusha or a pool-retested pusha or a straight pusha. For this, you need to file a package.json file homepage and script build , muffled your_username and your_repo_name for your own, and send the name on Github.
"homepage" : " https://your_username.github.io/your_repo_name/ " ,
"scripts" : {
"build" : " parcel build src/*.html --public-url /your_repo_name/ "
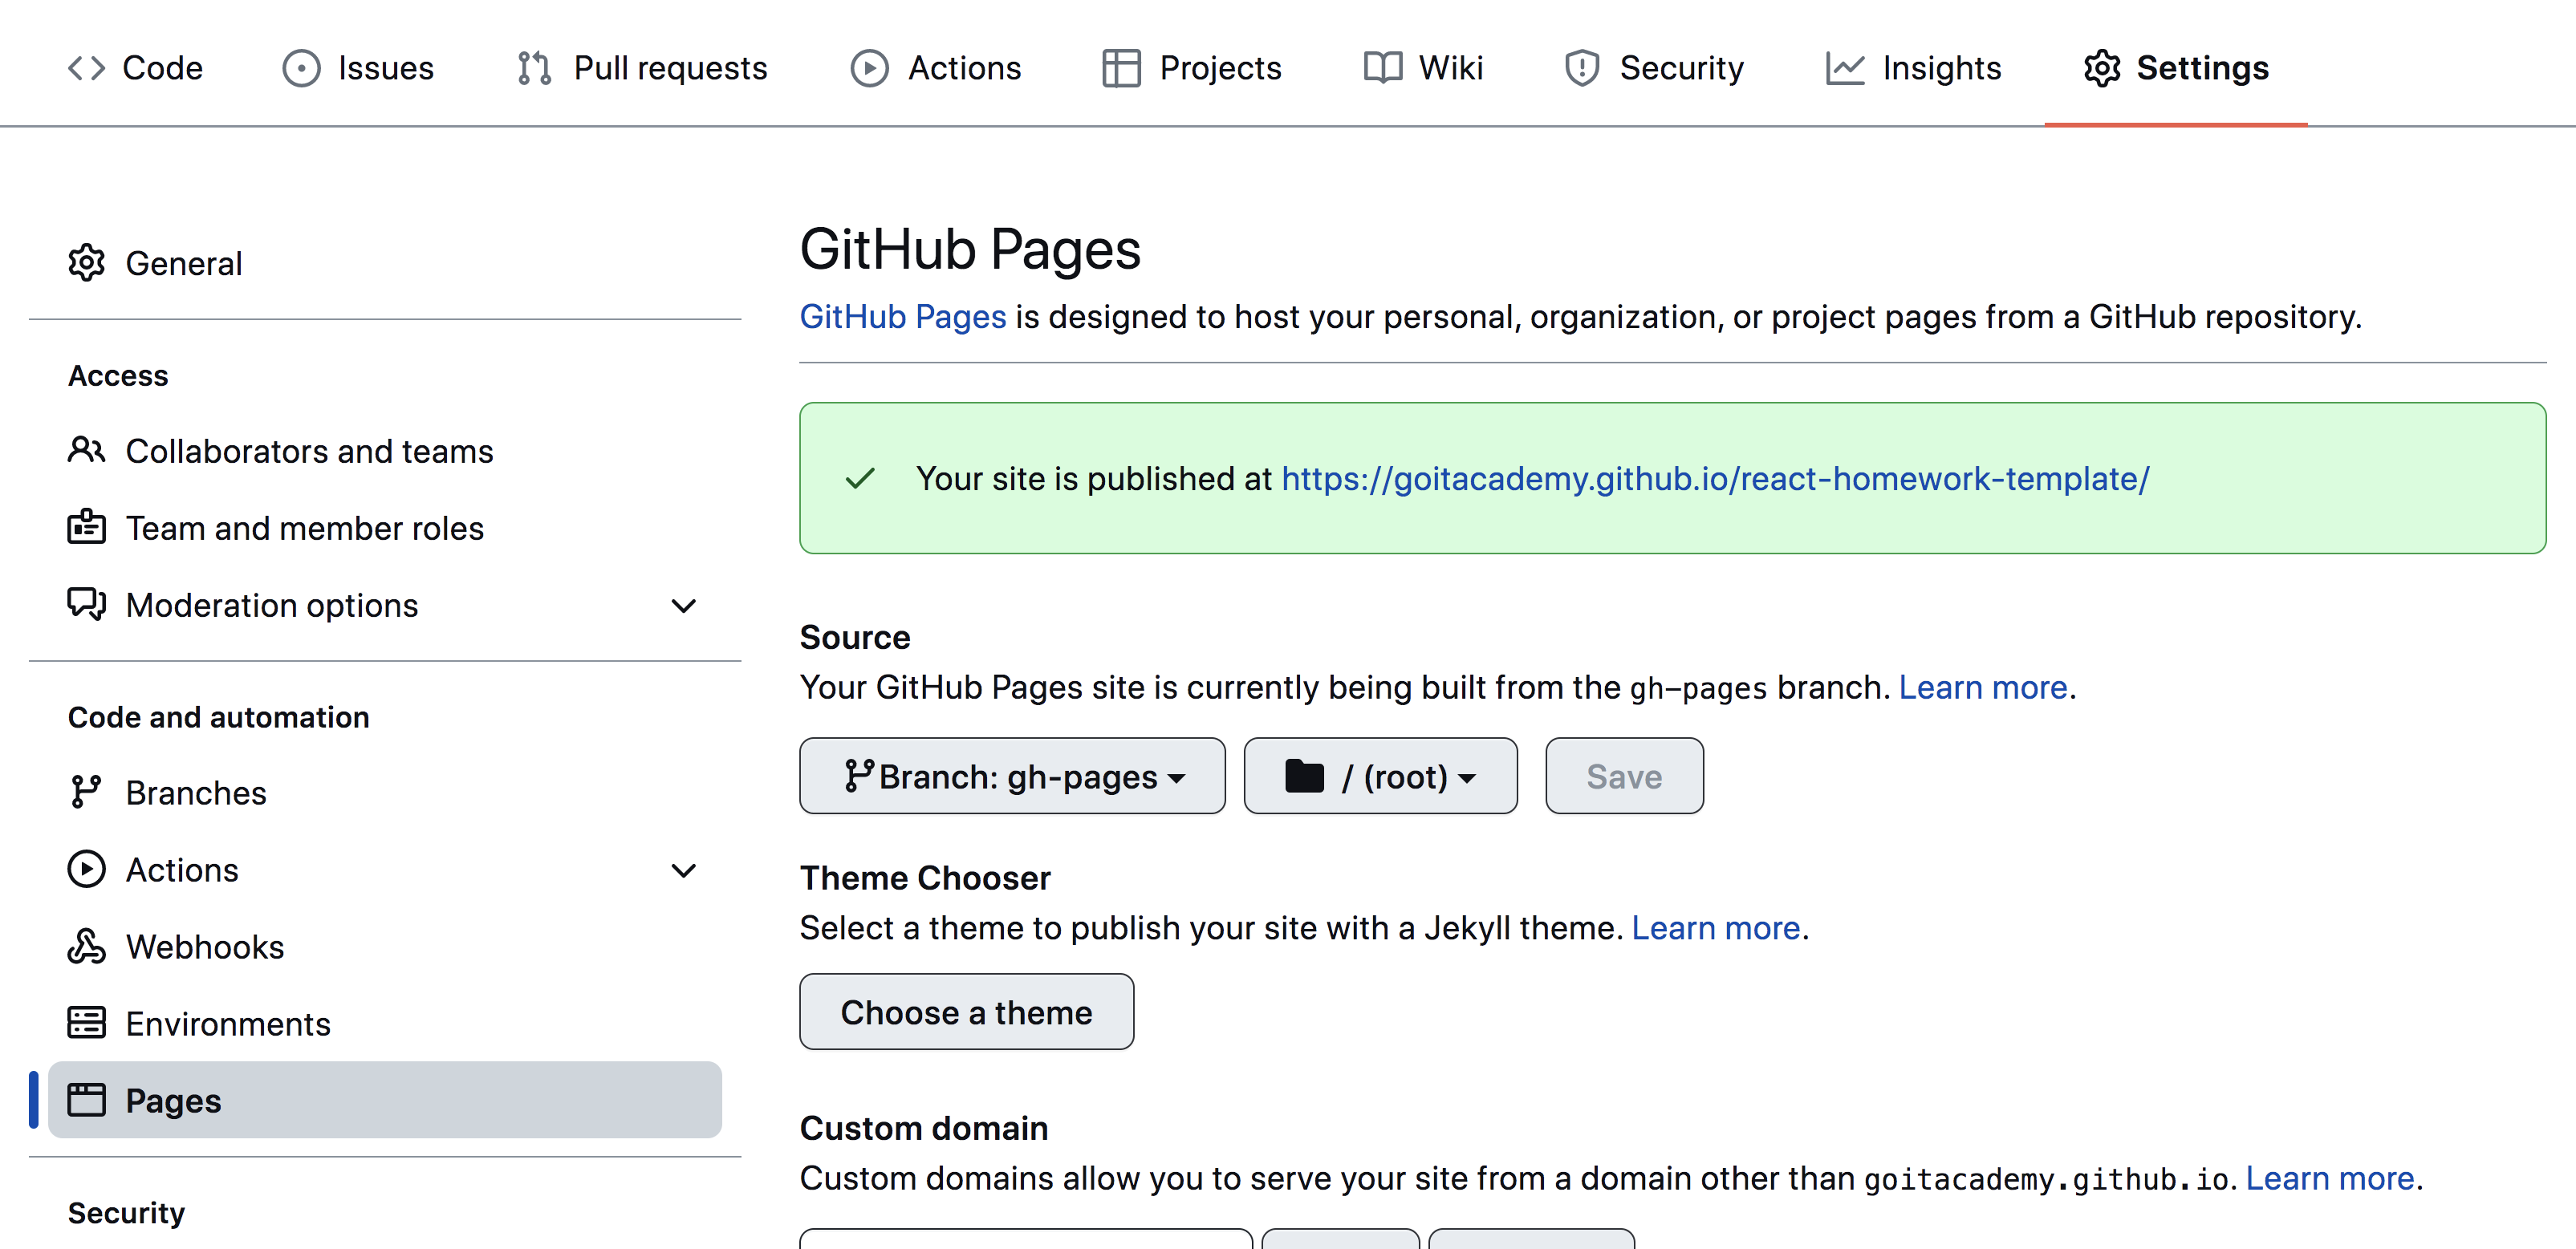
}, Nearly go into the github-repository tuning ( Settings > Pages ) and will draw out the production of File File from the folder /root of gh-pages , if this is not a lot of automatic.
The status of a deploy of an extreme commuty is conquered by the icon of ego of the yoditicator.
The painful detailed information about the status can be soaked in the icon, and in the exceeding the windows switch on Details .

Because of the time, a couple of fleets, I live the plot, you can simmer at the address indicated in homepage . For example, I live a mand for this repository https://goitacademy.github.io/parcel-project-template.
If a desert plot is opened, to kill Console tab of the nor to the sight of the incorporated packs of CSS and JS project files ( 404 ). Stork all in Taby Irregular Meaning of homepage or build script in file package.json .
main special script (Github Action) from the .github/workflows/deploy.yml file is launched.gh-pages vet. In the opposite case, in the logic script will be given in the problem.

