MFP Auth LDAP
1.0.0
User authentication is a fundamental requirement in almost all enterprise mobile apps. For internal mobile apps such as those related to payroll, leave and business travel booking, organizations want to leverage single-sign-on by authenticating users against its on-premise LDAP server. And for apps targeted to end users where enterprise data is not exposed such as, an app for product users that allows them to raise service requests, allowing users to authenticate using their social login such as Facebook login/Google login would be much easier. This code pattern shows how developers can leverage IBM Mobile Foundation service to implement following user authentication mechanisms:
When you have completed this code pattern, you will understand:
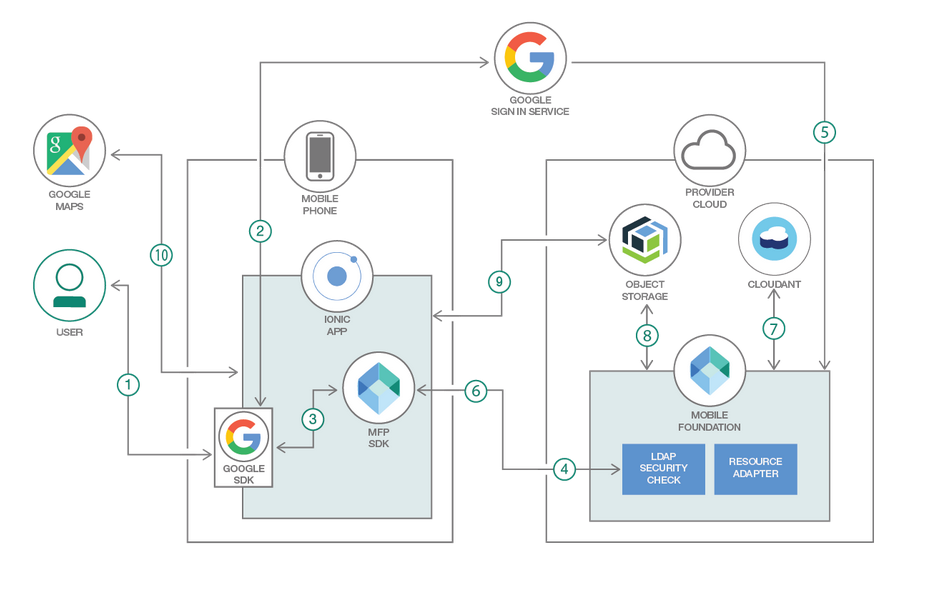
The diagram above illustrates the login flow (here described with Google but also relevant to Facebook or other social providers). The diagram shows that the trigger to call social providers is initiated by the client.
1. Setup Ionic and MobileFoundation CLI
2. Create Cloudant database and populate it with sample data
3. Create IBM Cloud Object Storage service and populate it with sample data
4. Create Mobile Foundation service and configure MFP CLI
5. Setup LDAP server and Secure Gateway Client
6. Register Android App with Google and Facebook for Social Login
7. Download source repo and customize
7.1 Clone repo
7.2 Update App ID, Name and Description
7.3 Specify Cloudant credentials in MobileFoundation adapter
7.4 Specify Cloud Object Storage credentials in MobileFoundation Adapter
7.5 Specify LDAP Credentials in MobileFoundation Adapter
7.6 Specify Google Sign-in credentials in MoileFoundation Adapter
7.7 Specify the Facebook AppID and Google clientID in the Ionic App
8. Deploy the MobileFoundation Adapters and Test
8.1 Build and Deploy the MobileFoundation adapters
8.2 Launch MobileFoundation dashboard and verify adapter configurations
9. Run application on Android phone
This project builds on top of https://github.com/IBM/Ionic-MFP-App. Run following steps from that base project to provision the needed mobile backend services from IBM Cloud and populate them with sample data, as well as to setup Ionic and MobileFoundation CLI on your development machine.
Step 1. Setup Ionic and MobileFoundation CLI
Step 2. Create Cloudant database and populate it with sample data
Step 3. Create IBM Cloud Object Storage service and populate it with sample data
Step 4. Create Mobile Foundation service and configure MobileFoundation CLI
If you have your enterprise LDAP server setup and running, you can skip the rest of this section and move to 'Setup Secure Gateway Client' section. If you do not have any LDAP server setup, you could try installing apacheDS - https://directory.apache.org/apacheds. The basic install and setup guide for apacheDS is available at - https://directory.apache.org/apacheds/basic-user-guide.html (please refer section 1). Import the sample data available here by following steps here. Add a new entry with your details, for example,
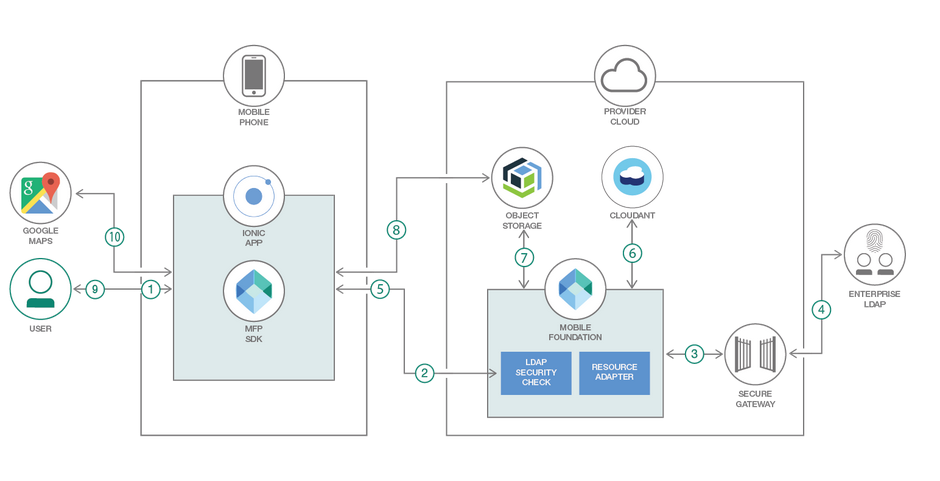
To be able to access your on-premise LDAP server from within the Mobile Foundation server running on IBM Cloud, we must first create a secure gateway connection between the on-premise LDAP server and IBM Cloud as per following steps:
Log on to IBM Cloud. Click on
Catalog > All Categories > Integration > Secure Gateway > Create
Inside the Secure Gateway service dashboard, click Add Gateway. Specify a name and click Add Gateway. Click the icon for the gateway that you just added.
Click Add Clients. Leave the default selection of IBM Installer as-is. Note down the Gateway ID and Security Token.
Copy the Download URL for the Secure Gateway Client installer for the OS where LDAP server is running.
Log on to the on-premise machine where LDAP server is running. Download the Secure Gateway Client installer using the download URL obtained from Secure Gateway dashboard. Install and start the Secure Gateway Client by using instructions available here.
Add the LDAP server as a destination in the secure gateway client using instructions available here.
If the newly added destination shows a raised hand in red colour with info Access blocked by ACL, then make sure you have run acl allow < host >:< port > in Secure Gateway Client command-line.
hostname:port of LDAP server.
$ git clone https://github.com/IBM/MFP-Auth-LDAP
$ cd MFP-Auth-LDAP
Update IonicMobileApp/config.xml as below. Change id, name, description and author details appropriately.
<?xml version='1.0' encoding='utf-8'?>
<widget id="org.mycity.myward" version="2.0.0" xmlns="https://www.w3.org/ns/widgets" xmlns:cdv="http://cordova.apache.org/ns/1.0" xmlns:mfp="http://www.ibm.com/mobilefirst/cordova-plugin-mfp">
    <name>MyWard</name>
    <description>Get your civic issues resolved by posting through this app.</description>
    <author email="[email protected]" href="https://developer.ibm.com/code/author/shivahr/">Shiva Kumar H R</author>
...
Open MobileFoundationAdapters/MyWardData/src/main/adapter-resources/adapter.xml and update the following properties to point to the Cloudant database created in Step 2.
key and password with the Cloudant API key as generated in Step 2.2.account, specify the Cloudant Dashboard URL portion upto (and including) -bluemix.cloudant.com as shown in the snapshot of Step 2.2.DBName, leave the default value of myward as-is.
<mfp:adapter name="MyWardData" ...>
  <property name="account" displayName="Cloudant account" defaultValue=""/>
  <property name="key" displayName="Cloudant key" defaultValue=""/>
  <property name="password" displayName="Cloudant password" defaultValue=""/>
  <property name="DBName" displayName="Cloudant DB name" defaultValue="myward"/>
  ...
</mfp:adapter>
Open MobileFoundationAdapters/MyWardData/src/main/adapter-resources/adapter.xml and update the following properties to point to the Cloud Object Storage created in Step 3.
bucketName as created in Step 3.1.serviceId and apiKey created in Step 3.2.endpointURL as per the specification in https://cloud.ibm.com/docs/services/cloud-object-storage/basics/endpoints.html#select-regions-and-endpoints.
<mfp:adapter name="MyWardData" ...>
  ...
  <property name="endpointURL" displayName="Cloud Object Storage Endpoint Public URL" defaultValue="https://s3-api.us-geo.objectstorage.softlayer.net"/>
  <property name="bucketName" displayName="Cloud Object Storage Bucket Name" defaultValue=""/>
  <property name="serviceId" displayName="Cloud Object Storage Service ID" defaultValue=""  />
  <property name="apiKey" displayName="Cloud Object Storage API Key" defaultValue=""/>
</mfp:adapter>
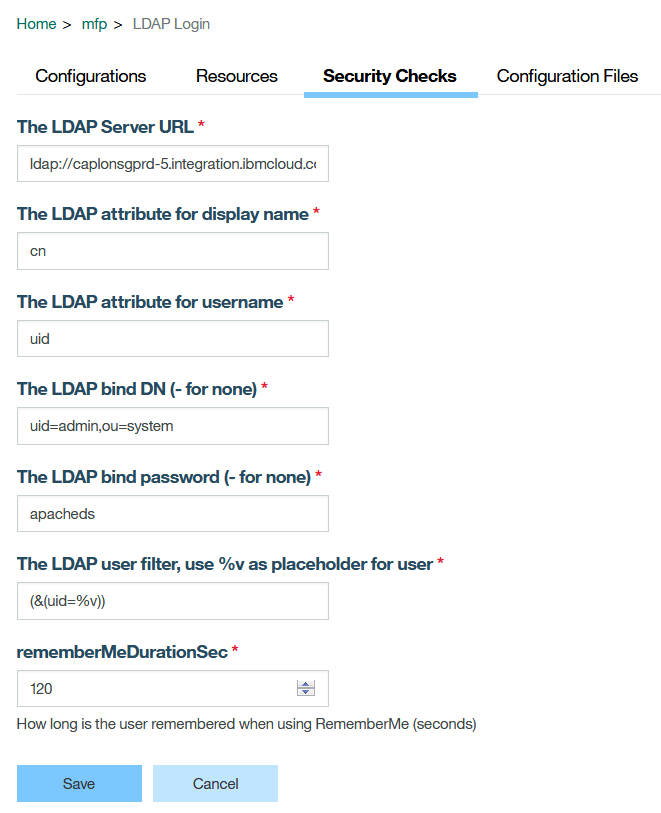
Open MobileFoundationAdapters/LDAPLoginAdapter/src/main/adapter-resources/adapter.xml and update the following properties to point to the Secure Gateway client created in step 5.2
<property name="ldapUserAttribute" defaultValue="uid" displayName="The LDAP attribute for username"/>
		<property name="ldapNameAttribute" defaultValue="cn" displayName="The LDAP attribute for display name"/>
		<property name="ldapURL" defaultValue="ldap://caplonsgprd-5.integration.ibmcloud.com:15315" displayName="The LDAP Server URL"/>
		<property name="userFilter" defaultValue="(&(uid=%v))" displayName="The LDAP user filter, use %v as placeholder for user"/>
		<property name="bindDN" defaultValue="uid=admin,ou=system" displayName="The LDAP bind DN (- for none)"/>
<property name="bindPassword" defaultValue="apacheds" displayName="The LDAP bind password (- for none)" type="string"/>
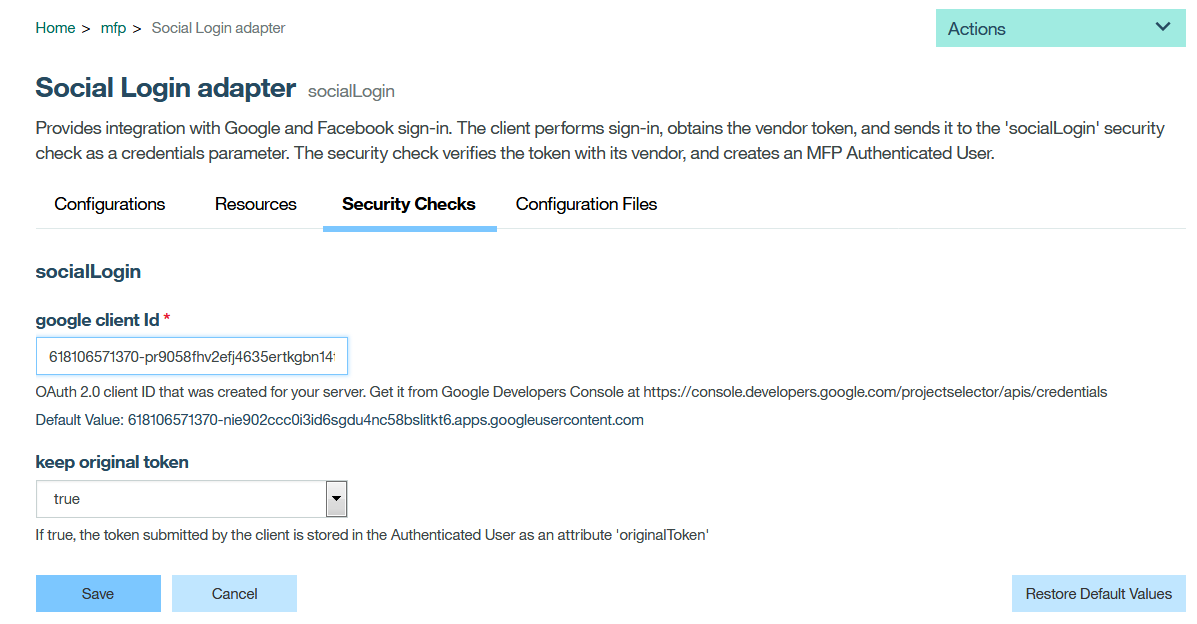
Open MobileFoundationAdapters/SocialLoginAdapter/src/main/adapter-resources/adapter.xml and update the google client-id created in step 6 as shown below
<property name="google.clientId"
                  defaultValue="618106571370-nie902ccc0i3id6sgdu4nc58bslabcde.apps.googleusercontent.com"
				  displayName="google client Id"
                  description="OAuth 2.0 client ID that was created for your server. Get it from Google Developers Console
                  at https://console.developers.google.com/projectselector/apis/credentials"/>
Install the Cordova and Ionic Facebook plugin and GooglePlus plugin using following commands (python2 is a pre-requisite)
$ ionic cordova plugin add cordova-plugin-facebook4 --variable APP_ID="your_appid_from_step6" --variable APP_NAME="your application name"

$ npm install --save @ionic-native/facebook
$ ionic cordova plugin add cordova-plugin-googleplus --variable REVERSED_CLIENT_ID="reverseclientid_from_step6"

$ npm install --save @ionic-native/google-plus
After the facebook and googleplus plugins are installed, check if the Facebook App ID and Google webclientID obtained in step 6 are present in the config.xml file as shown below
<plugin name="cordova-plugin-facebook4" spec="^1.9.1">
        <variable name="APP_ID" value="your_appid" />
        <variable name="APP_NAME" value="MyWard" />
    </plugin>
<plugin name="cordova-plugin-googleplus" spec="^5.3.0">
        <variable name="REVERSED_CLIENT_ID" value="your_reverse_clientid" />
    </plugin>
The REVERSED_CLIENT_ID is the reverse form of the google webclientID obtained in step6.
Also add the webclientID in the auth_handler.ts file in the googlePlusLogin() method.
Build and deploy MyWardData Adapter as below.
$ cd MobileFoundationAdapters/
$ cd MyWardData
$ mfpdev adapter build
$ mfpdev adapter deploy
Note- If the server is not a default one, please mention the server name 'mfpdev adapter deploy command' in the command.
Build and deploy LDAPLoginAdapter adapter as below.
$ cd ../LDAPLoginAdapter/
$ mfpdev adapter build
$ mfpdev adapter deploy
Build and deploy SocialLoginAdapter adapter as below.
$ cd ../SocialLoginAdapter/
$ mfpdev adapter build
$ mfpdev adapter deploy
Launch MobileFoundation Dashboard as below:
Cloud Foundry Services, click on the Mobile Foundation service you created in Step 4. The service overview page that gets shown, will have the MobileFoundation dashboard embedded within it. You can also open the MobileFoundation dashboard in a separate browser tab by appending /mfpconsole to the url mentioned in Step 4.LDAPLoginAdapter, SocialLoginAdapter and MyWardData adapters listed.Verify MobileFoundation Adapter configuration as below:
MyWardData adapter. Under Configurations tab, you should see the various properties we specified in Step 7.3 and Step 7.4 for accessing Cloudant database and Cloud Object Storage as shown below. As an alternative to specifying those property values in MobileFoundationAdapters/MyWardData/src/main/adapter-resources/adapter.xml as previously shown in Step 7.3 and Step 7.4, you can deploy the adapters with empty defaultValue, and once the adapter is deployed, change the values on this page.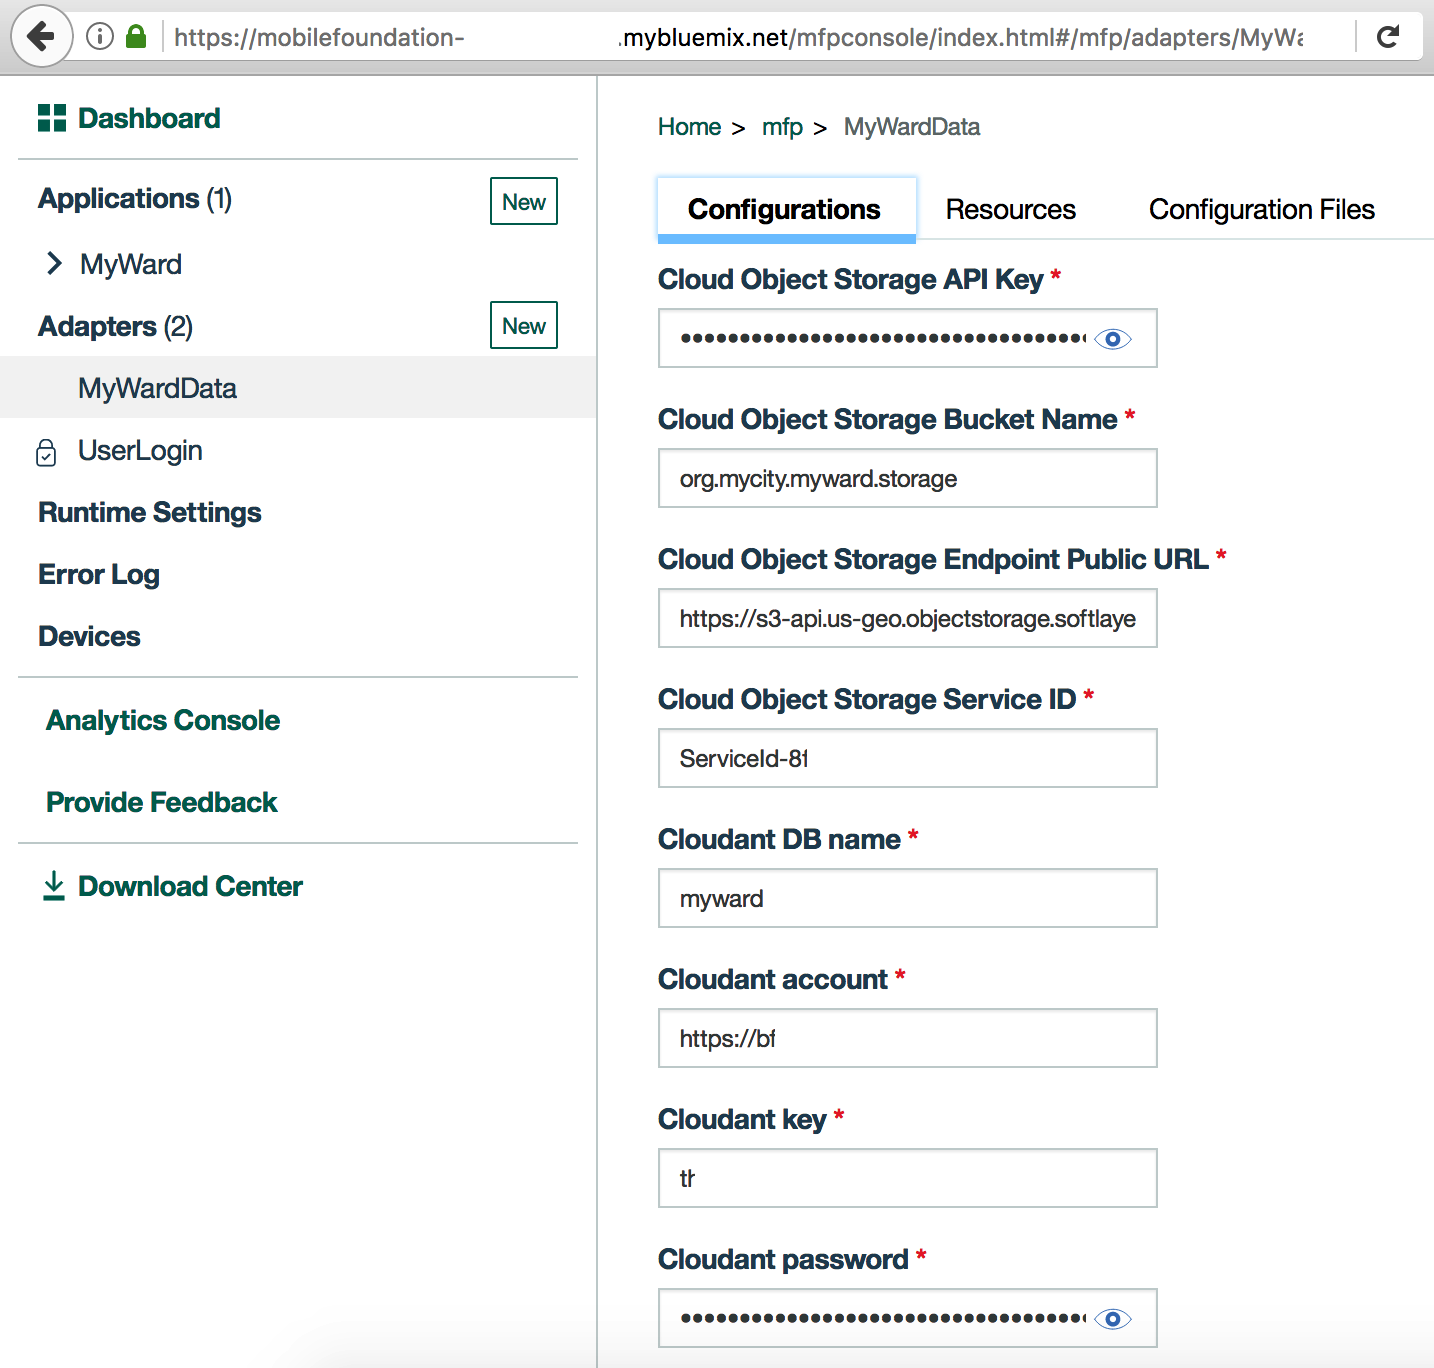
Resources tab. You should see the various REST APIs exposed by MyWardData adapter as shown below. The Security column should show the protecting scope UserLogin against each REST method.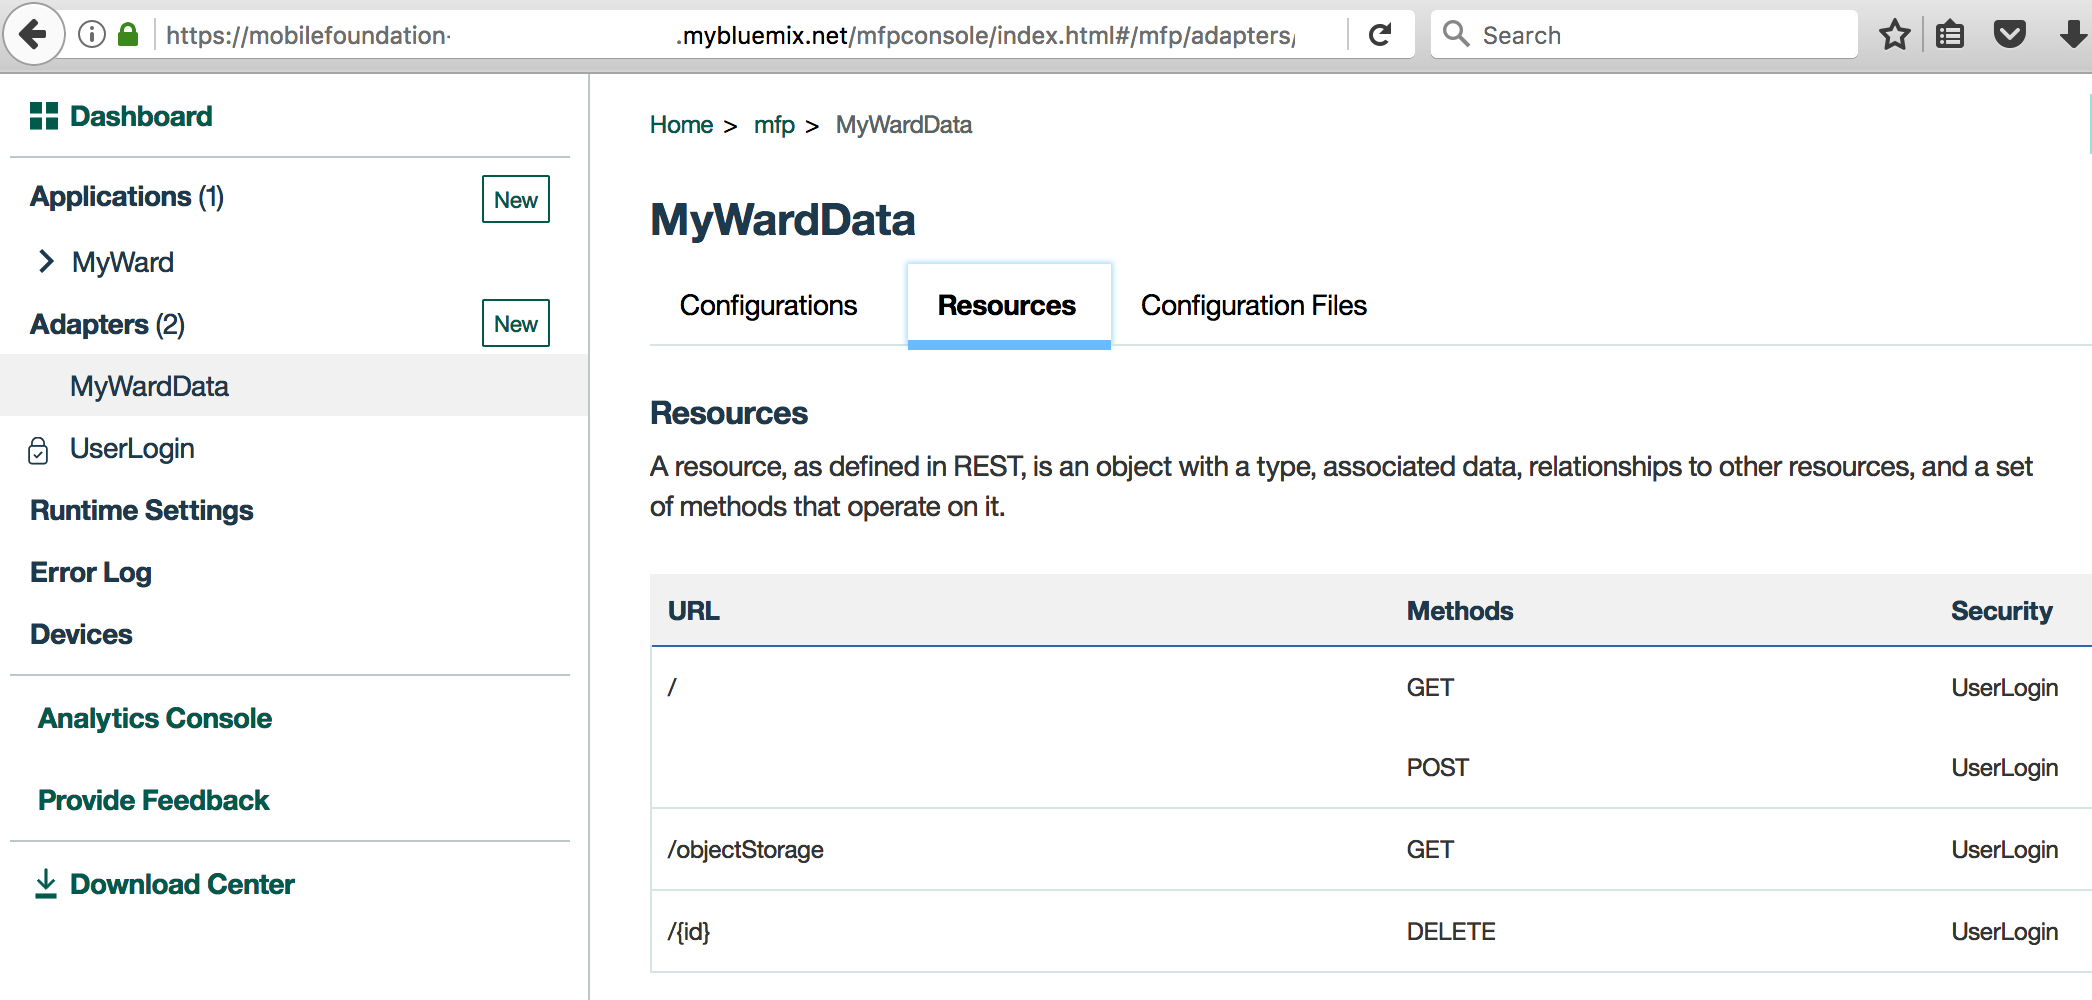
Follow the instructions in Step 7 of base project to run the application on Android phone. Instead of a plain UserLogin, test the Google Sign-in button or FB sign-in button or the LDAPlogin button.Based on the button chosen, the user authentication validation mechanism will vary.
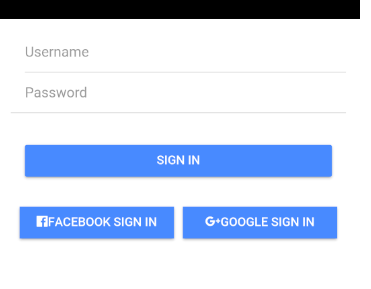
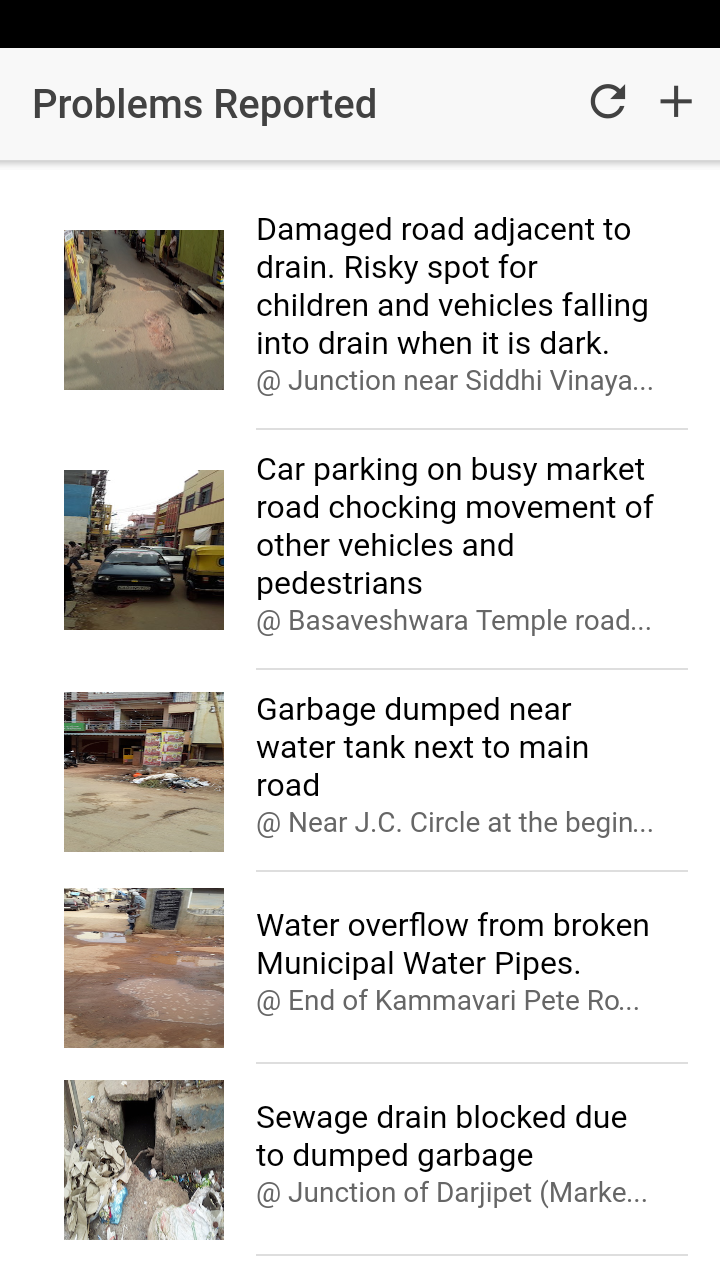
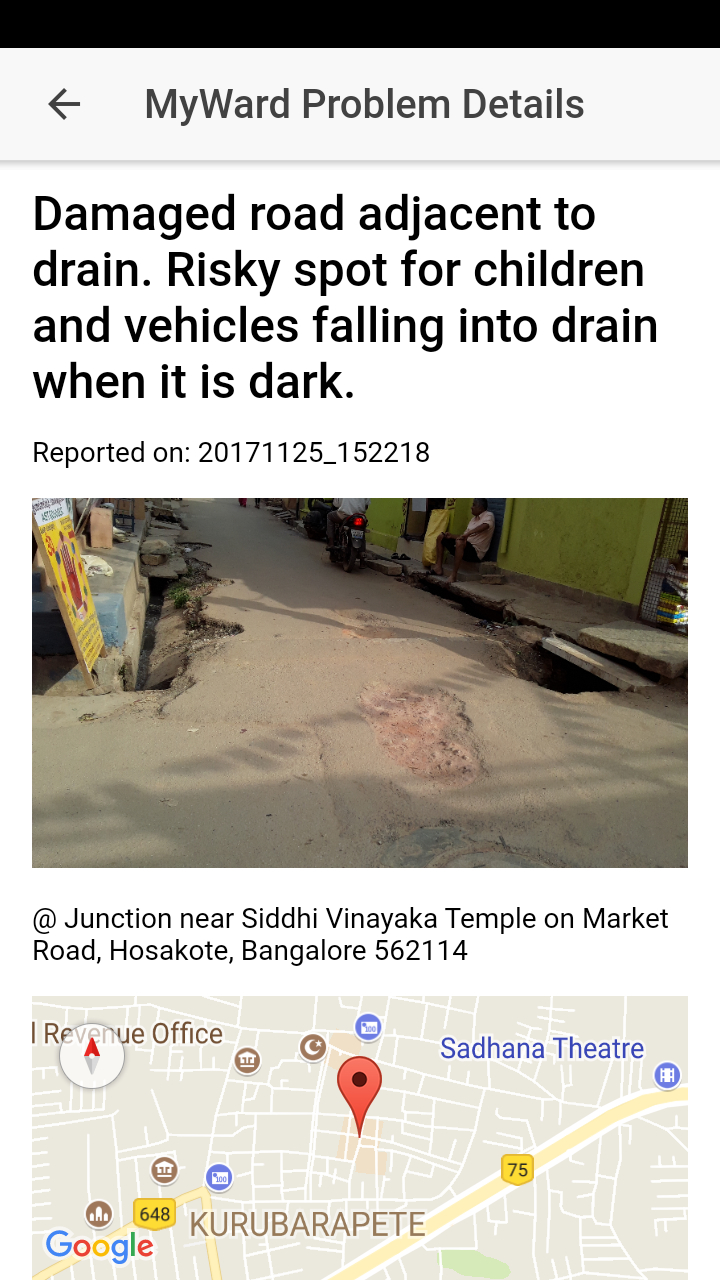
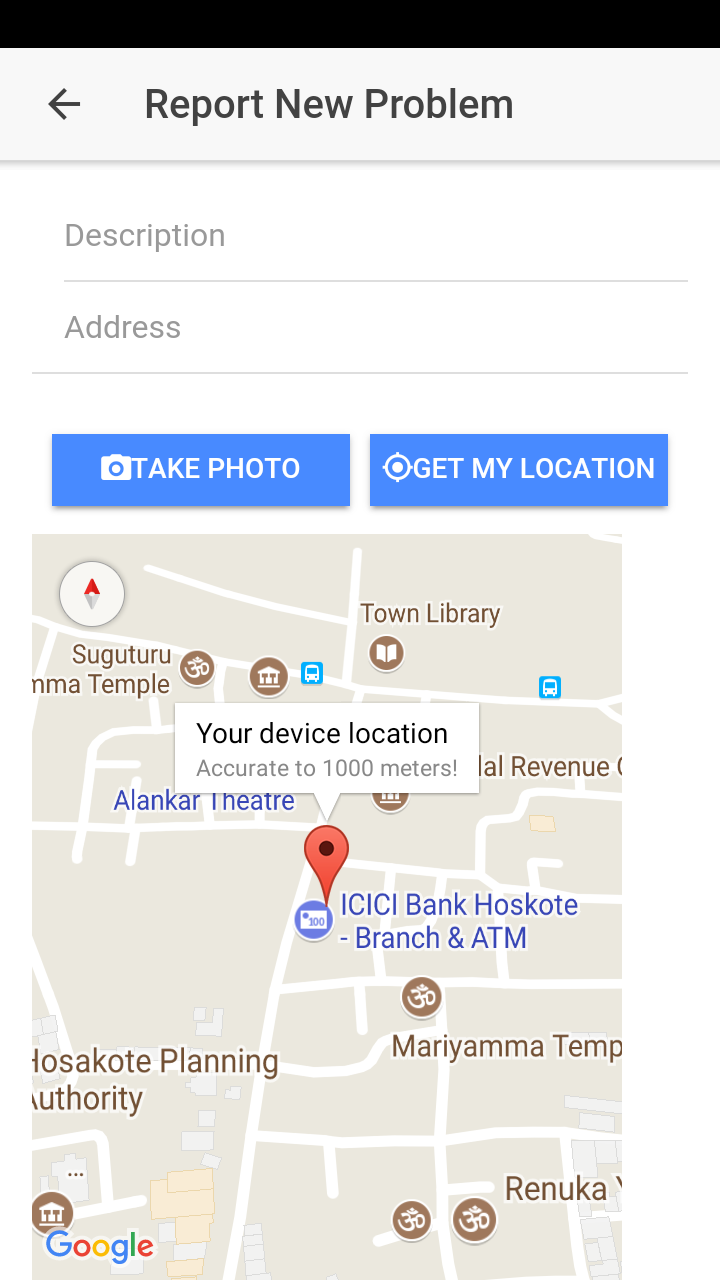
Below screenshot shows the different pages of the application.
Please see instructions for debugging Android hybrid app using Chrome Developer Tools or troubleshooting guide for solutions to some commonly occuring problems.
Apache 2.0


