triumphmayflowerclub.com
ved Mark Smith's email address
 TriumphMayflowerClub.com
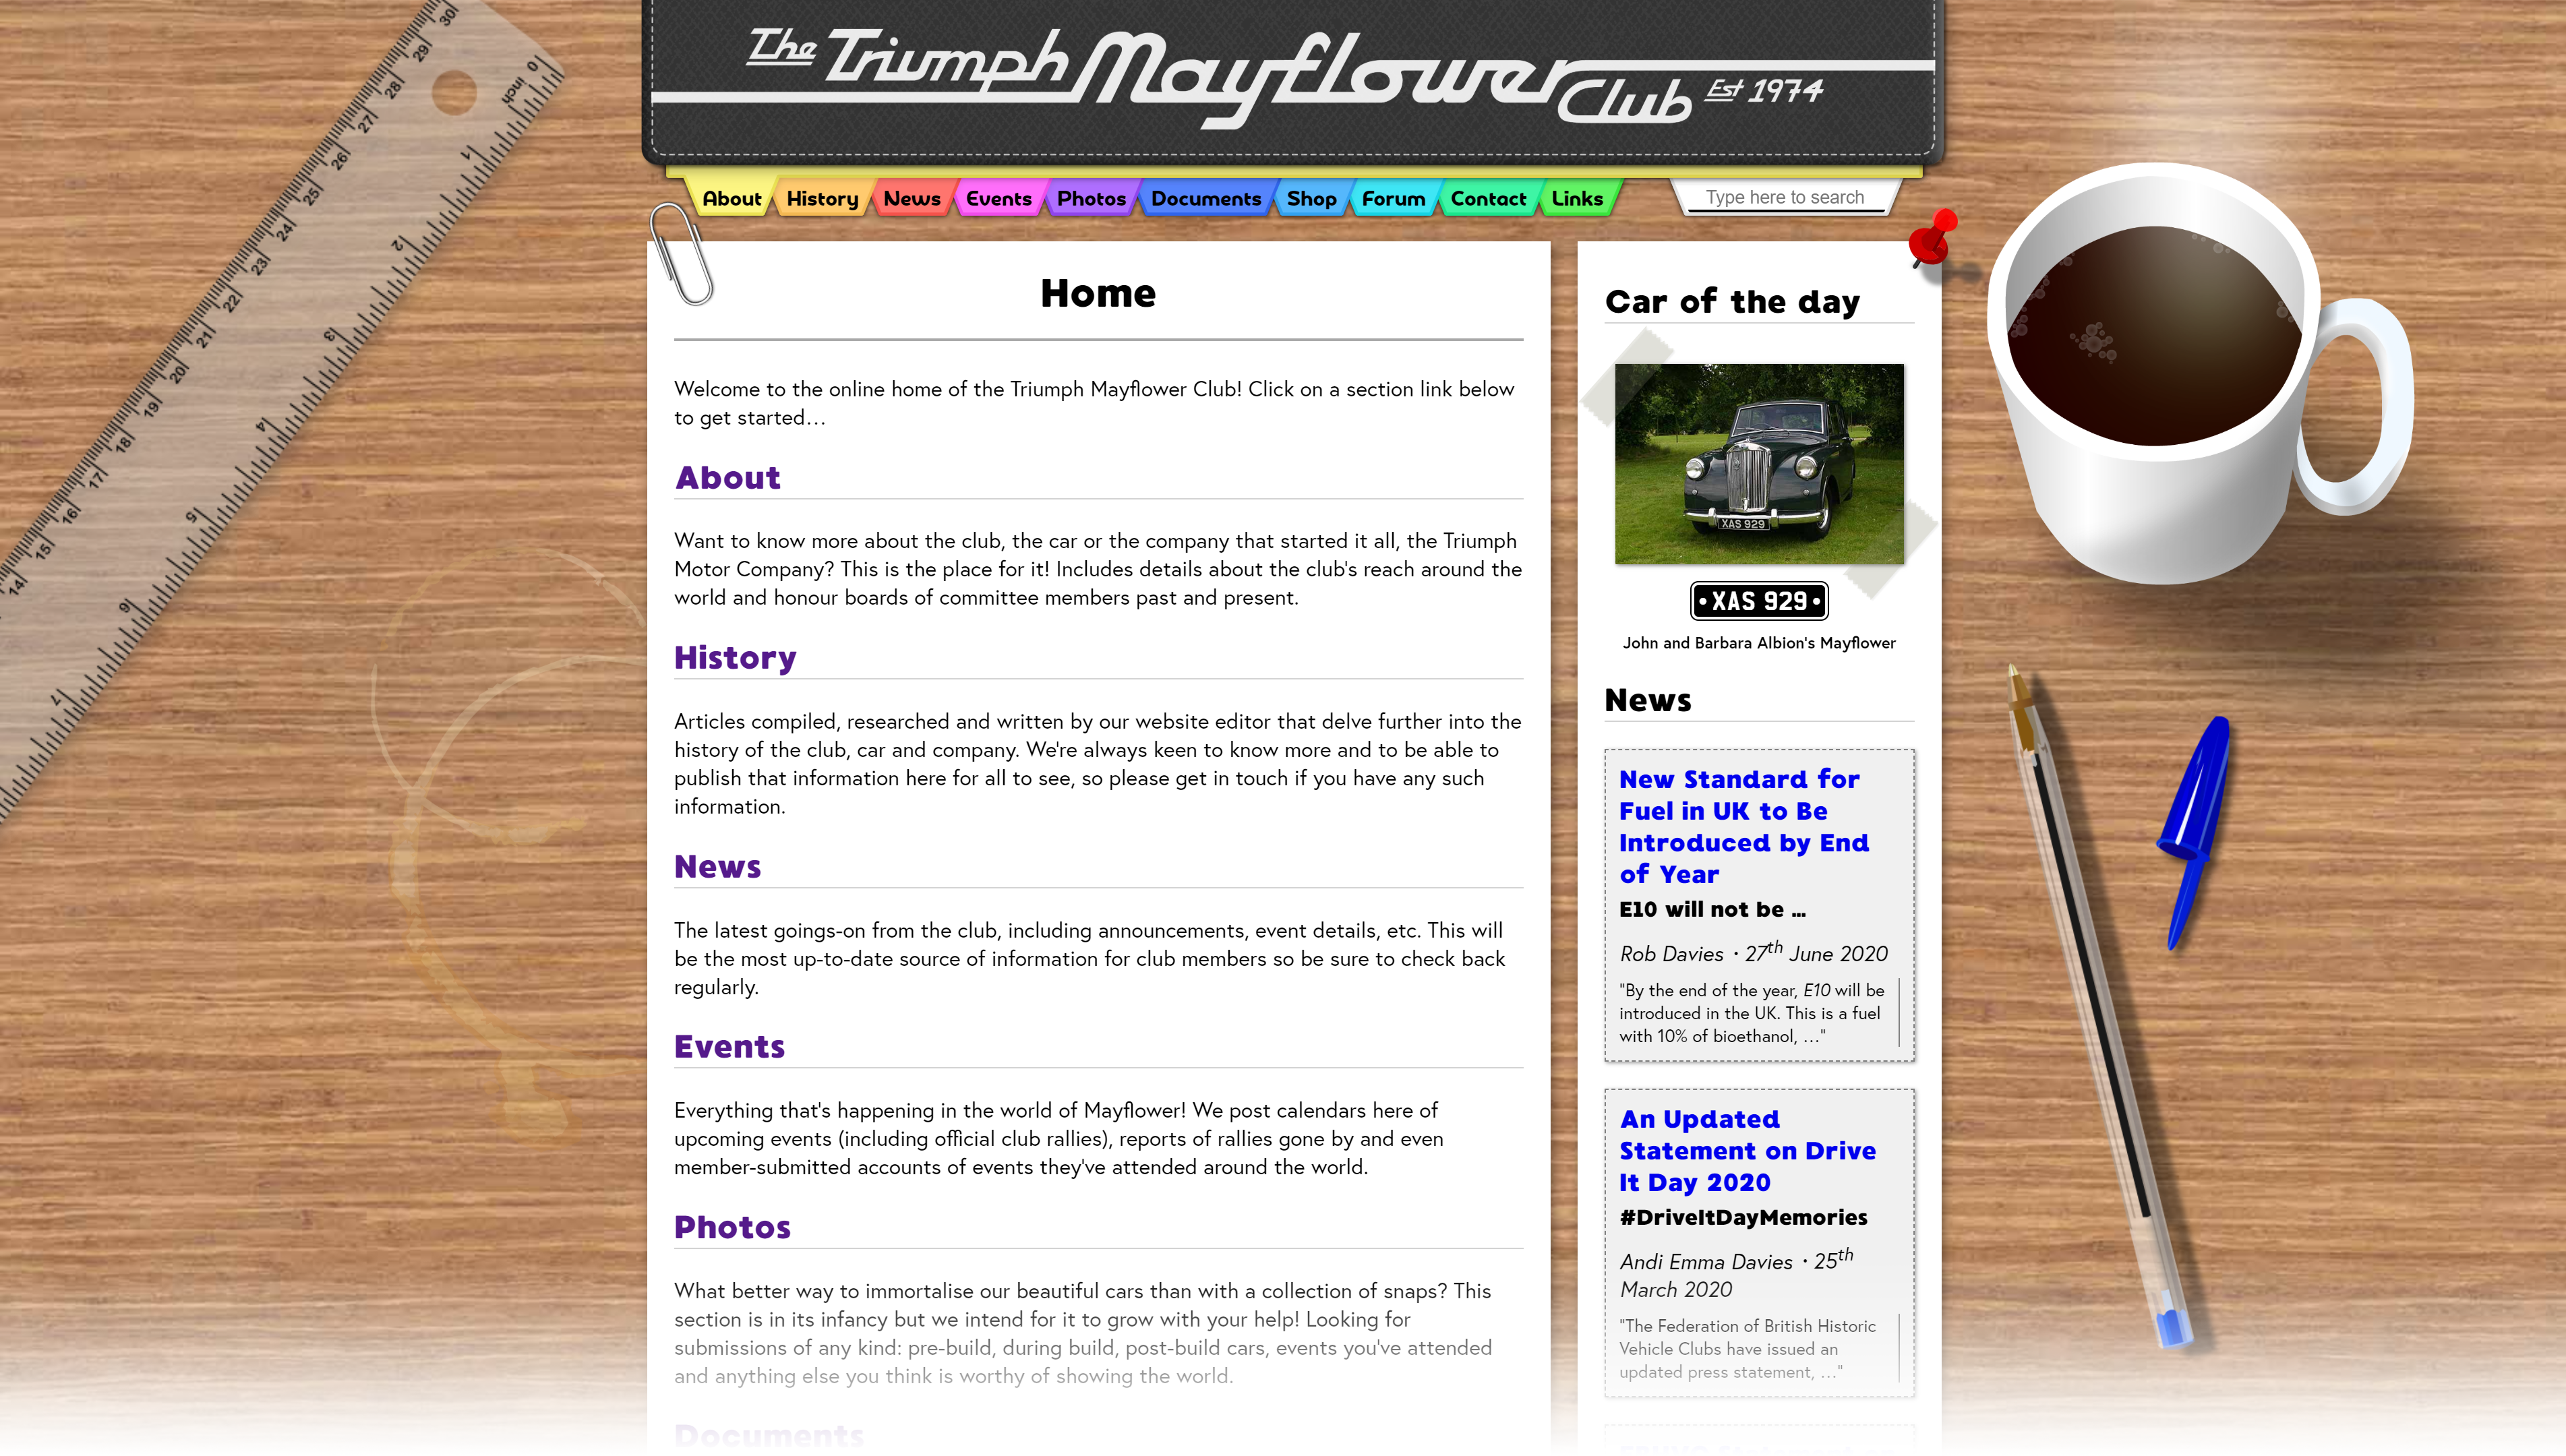
The Triumph Mayflower Club is an organisation dedicated to the preservation of classic 1950s car, the Mayflower, by British car manufacturer Triumph. The club itself formed in 1974 and made its initial, limited foray into the World Wide Web back in 2005, and then I (Andi, project maintainer) was commissioned in 2017 to create them a new website from scratch when my parents became members. Click here if you’re interested in reading more about the car and the club.
This new website is written in vanilla HTML5 for the documents’ markup, CSS3 for styling, a small amount of JavaScript (ES6) and is built using Jekyll as a static site generator to minimise code duplication. It is designed to run in any major “evergreen” browser (i.e. Chromium-based Microsoft Edge, Google Chrome, Mozilla Firefox, Apple Safari or Opera), desktop or mobile, without issue.
The current hosting situation for the production site is only really suitable for hosting a static HTML site (yay, budget constraints of a niche club), so it’s not really practical to host anything other than that, for instance an ASP.NET Core server application for more advanced functionality, so I consider it somewhat of a personal engineering challenge to see how far I can push the limits of what can be done, feature-wise, with a static website, before having to upgrade the hosting to allow for a more complex client-server solution.
The different hosted versions of the website can be found at the following locations, where the canary server is the automatically-generated GitHub Pages site based-on the latest master, the staging area is a subdomain of the live website that we deploy to manually when we want to test-out new features and the production site is the current publicly-available website (also deployed to manually):
Oh, and just for the fun of it, here’s what the old website looked like for comparison!
The GitHub Releases system is used to increment the version of, tag and publish releases, and is the single source of truth for what the current version of the website is. No version numbers are explicitly held in the repo’s files.
Since this codebase is a website, there’s obviously no need to maintain any release branches to backport fixes to, as there’ll only ever be one live site which will always have the latest changes on it.
When a new version of the site is released via GitHub, the website will query a specific GitHub API endpoint at runtime to get both the latest release’s version number and publish date, which is then displayed to the end user in the footer of each page.
SemVer is used, albeit loosely, as a version numbering scheme for the website. The major, minor and patch parts are bumped for a release in accordance with the following types of change to the codebase:
There have been two major releases published so far, which are listed below with their key changes, as well as which features are currently in progress for the next major update – every historical release ever published since going-live with this new site can be found on the Releases page:
This is a non-exhaustive list of the things I’d like to add in future development, in no particular order. This is obviously subject to change, but it should be a good indication of what’s to come. I’ll tick things off as and when they get done. I want to eventually get to a stage where I’ve provided enough tooling so that most of the content can be published by other people, so that I’m freed-up to work primarily on adding new features.
I’ve tried to write this readme in such a way that those who aren’t necessarily familiar with coding have a fighting chance of contributing to the website’s development if they’re so inclined; such as club members. As such, if you’re already a developer, some of these instructions may seem a little overly-verbose, so you can probably skip some elements. Conversely, if you’re not too tech-savvy, I recommend reading everything if you want to be able to help us out with the site – incidentally, you’re absolutely welcome here whatever level of experience (if any), hence why I’ve tried to be as explicit as possible with instructions, so please don’t feel put-off if it looks overwhelming! Send me an email if you’d like to get involved but could do with a hand getting started, and I’d be happy to get you going.
For the most part, these are the bare-minimum requirements for getting up-and-running.
While not strictly a requirement, I personally develop on Windows myself so, naturally, this guide is tailored to getting a development environment established on a Windows PC. If you are on Windows then I highly recommend upgrading to Windows 10 if you haven’t already done so:
I have no problem with contributors developing using macOS or Linux assuming you know what you’re doing and stick to Windows-style line endings (CR+LF). I may expand these instructions in future if there’s enough demand for people wanting to develop on other platforms – feel free to submit a pull request yourself to update the readme with said instructions if you’re one such developer!
Git is what’s known as a version control system (VCS) and it’s what millions of developers the world over use every day to manage their codebases. It provides a comprehensive history of changes made to the source code repository as well as tools to help multiple developers work together on the same codebase remotely from potentially anywhere on the planet. The new Triumph Mayflower Website is currently being developed using Git as its VCS to provide a solid backbone for our development process. Follow these steps to install Git for Windows:
The website’s source code is hosted on GitHub (the website you’re currently reading this on). In order to download and alter the source code, you’ll need to sign-up for a GitHub account:
ssh-keygencat ~/.ssh/id_rsa.pub > /dev/clipboardFor those unfamiliar, a Git “repository”, or “repo” for short, is a set of source code files (usually stored on a centralised “remote” server somewhere) alongside specific Git-managed metadata files which contain information about where the remote server can be found on the internet (or local network), various pieces of configuration information and, most importantly, a complete history tree of all changes made to the codebase – what specific changes were made at each stage, when they were made, who made them and how they were integrated back into the primary flow of code from temporary “branches” where developers can work on isolated copies of the code without interfering with other devs working on the same codebase.
In order to make changes to the website and see the effect those changes have, you’ll need to download the source code to your local machine in what’s called a “clone” operation. This will download a copy of the source code repository to your file system and allow it to be managed by Git:
C:dev; I personally keep my repos in C:DevelopmentRepositories).C:dev):
cd /c/devgit clone [email protected]:Stack-in-a-box/triumphmayflowerclub.com.gityes and hit [Enter].cd triumphmayflowerclub.comWhen you’ve downloaded a local copy of the repository, you need to configure Git such that it automatically credits you as the author of any code changes you make:
<name> with your first and last name:
git config --local user.name "<name>"<email> with the email address you used to register your GitHub account with (you don’t need the quotes either side of the email address like with setting your name in the previous step, as it won’t contain any spaces):
git config --local user.email <email>Jekyll is what’s known as a “static site builder”. It allows us to reduce the amount of repeated code throughout the codebase, by “factoring” the commonly used parts of a page (such as the title image, navigation bar, page footer, primary styles, etc.) into single files which are simply referenced in specific pages; then, when Jekyll is run to “build” the site, it will re-insert the factored-out code into each of the source files that reference it, creating a reconstructed set of files which can then be deployed to the live server and opened in a web browser.
(Note: At the time of writing, which is July 2020, Jekyll doesn’t fully support WSL 2, as it doesn’t receive all file-system update events which are required for the jekyll serve feature that allows for automatically-triggered rebuilding whenever source files change, so stick to WSL 1 for the time being.)
Enable-WindowsOptionalFeature -Online -FeatureName Microsoft-Windows-Subsystem-Linuxbash prompt, which should look something like <username>@<machine>:~$, run the following command to update the list of packages that can be installed and repositories to install them from (enter your UNIX password when prompted). This will take a while to complete:
sudo apt-get update -y && sudo apt-get upgrade -ysudo apt-add-repository ppa:brightbox/ruby-ng (press [Enter] to confirm)sudo apt-get updatesudo apt-get install ruby2.7 ruby2.7-dev build-essential (enter “Y” when asked)sudo gem updatesudo gem install jekyllOnce Jekyll has finished installing, in an Ubuntu terminal session, and assuming you chose C:dev as your location for storing your repositories, perform the following steps to spin-up a local development server instance:
cd /mnt/c/dev/triumphmayflowerclub.comjekyll serveServer running... press ctrl-c to stop. will be displayed. At this point, open a web browser and navigate to http://localhost:4000/ to view the website running locally from your local copy of the source code....done in x seconds. will be shown, where x is the number of seconds it took to generate the new changes). At this point, you can refresh the page loaded in your browser and the changes will appear on the site.(Note: Jekyll doesn’t always notice when brand new files are created, so if you refresh your browser and the page isn’t accessible, try closing Jekyll and running it again, and the new page should then be included in the build.)
I’ve recommended some tools you may want to use for development. None of these are required, they just might make working on the site easier.
You’ll need a web browser, preferably a Chromium-based one, such as Microsoft Edge (included with Windows 10) or Google Chrome, in order to test any changes you make to the website before committing them to the codebase.
If you’re going to be modifying the website’s source code, you’ll need a good text editor. I recommend using Visual Studio Code as it’s modern, lightweight, cross-platform and has many features that you’d usually find in a fully-fledged IDE such as syntax highlighting, code completion, IntelliSense and a large ecosystem of plugins. For simple website development using vanilla HTML, CSS and very occasional JavaScript, it should work extremely well out of the box without any configuration changes or additional plugins:
Not a necessity but it can be useful when authoring news articles or content for inclusion on the site, as it automatically adds typographical Unicode characters that are required by our code standards (to be documented at some point in the future), such as “smart quotes”, en dashes, etc. The full version of Word is obviously paid software as part of the Office suite of applications, but there are plenty of decent, free, open-source alternatives that offer similar functionality.
Photoshop is what I use for photo editing, but most editors should do a good job of simple editing tasks.
My vision for this project, as it evolves, is that it will start to attract a small core team of developers and non-technical contributors, such that it becomes a great place where those wanting to get their hands dirty with some open-source website development can do so. Having more team members will also free me up to work on feature additions, major refactors and integrating new technologies.
Eventually, it would be great if I had time to develop a simple, bespoke set of CMS-style authoring tools that would let non-technical club members author and submit news articles and other content for inclusion on the site with minimal or even zero technical intervention. As it stands, the site will need manually updating by technically-minded folk for the foreseeable future, but hopefully we’ll get to this stage someday.
To deploy either the staging or live site, perform the following:
jekyll build_site directory in the root of your repo, as this is where Jekyll places the output from the site generation process.beta.triumphmayflowerclub.com or public_html subdirectory, depending on whether you’re deploying to the staging or live site respectively.index.html and rename updating.html to index.html. Ideally, this would be an atomic operation to minimise the risk of someone being unable to load the homepage, but the timeframe in which this happens and the relatively few people accessing our website mean that this isn’t really an issue in practice. This will be addressed properly once we start using GitHub Actions for continuous deployment.index.html, and drag them across to the right-hand destination panel.index.html from the source panel to the destination one to overwrite it. The deployment is now complete.If you need to get in-touch with me (Andi Emma Davies-Wilcox – lead developer), please do so at the following email address: [email protected]
Copyright © Stack-in-a-box Software 2017–2021
Copyright © Triumph Mayflower Club 2005-2021


