secure_esp
1.0.0
Secure designed ESP32 Framework with Update Over the Air (OTA), flash encryption, signed firmeware verification, MQTT and non-volatile storage. It can be used for all kinds of IoT development projects, which consider a secure base. For this project an ESP-WROOM-32 is used.
A full explanation of the installation of the ESP-IDF for Windows Linux and Mac is available on the Espressif Installation Step by Step guide. In this project the Linux path with Ubuntu and Debian was followed:
Prerequisites:
sudo apt-get install git wget flex bison gperf python3 python3-pip python3-setuptools cmake ninja-build ccache libffi-dev libssl-dev dfu-util libusb-1.0-0
Download & Install:
mkdir -p ~/esp
cd ~/esp
git clone --recursive https://github.com/espressif/esp-idf.git
cd ~/esp/esp-idf
./install.sh
Use ESP-IDF (needs to be executed every time a new shell is launched):
. ~/esp/esp-idf/export.sh
Create a folder for the project and download the ESP32 Framework from git:
cd ~/esp
git clone https://github.com/flouflouit/secure_esp
A short list of the commands which are necessary for this project. All of them have to be executed in the root project folder secure_esp.
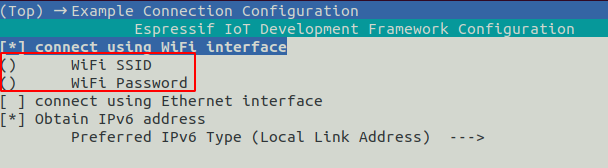
The SSID and the password for the WIFI is configured in the idf.py menuconfig under Example Connection Configuration or directly in the sdkconfig:
CONFIG_EXAMPLE_WIFI_SSID=""
CONFIG_EXAMPLE_WIFI_PASSWORD=""
For the update server and MQTT Broker certificates need to be created. Therefore, a certificate_creation.sh bash script was implemented. If this script is executed on the MQTT Broker the MQTT Certificates can be directly copied to the mosquitto folder. The IP variable must contain the IP Adress of the Update Server and the MQTT Broker, which needs to be edited in the script.
. ~/esp/secure_esp/certificate_creation.sh
This script generates the following tree structure:
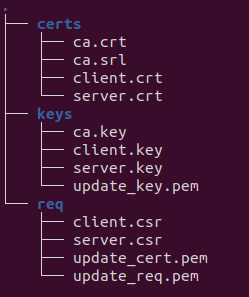
Moreover, the script also copies the keys and certificates to the ota_certs and mqtt_certs project folder.
The signing process of the firmware needs a signing key. This sigining key is created with openssl which needs to be executed in the root project folder secure_esp:
openssl ecparam -name prime256v1 -genkey -noout -out ~/esp/secure_esp/secure_boot_signing_key.pem
Installation of the Mosquitto Broker, which is done on Ubuntu Server 20.04 LTS:
sudo apt-get install mosquitto
Installation of the Mosquitto Client:
sudo apt-get install mosquitto-clients
After the Mosquitto Broker is installed a new file named secure.conf has to be created in the folder: /etc/mosquitto/conf.d
This file must contain the following information:
  listener 8883
  cafile /etc/mosquitto/certs/ca.crt
  certfile /etc/mosquitto/certs/server.crt
  keyfile /etc/mosquitto/certs/server.key
  require_certificate true
  use_identity_as_username true
Copy the certificates ca.crt, server.crt and server.key, created with certificate_creation.sh, to the /etc/mosquitto/certs/ folder.
After that, the Broker needs to be restarted:
sudo systemctl restart mosquitto.service
The Broker can be tested with subscribing a topic and publishing a message to this topic. The IP must be changed to the IP Adress of the Broker.
mosquitto_sub -h $IP -t "/test" -p 8883 -d --cert client.crt --key client.key --cafile ca.crt
mosquitto_pub -h $IP -t "/test" -m "test-message" -p 8883 -d --cert client.crt --key client.key --cafile ca.crt
The certificate_creation.sh creates the folders mqtt_certs and ota_certs. In these folders the certificates and keys for the Update and MQTT Server are automatically copied from the created ca directory. After that, the IP adress of the MQTT Broker must be configured in the source code of the file mqtt.c:
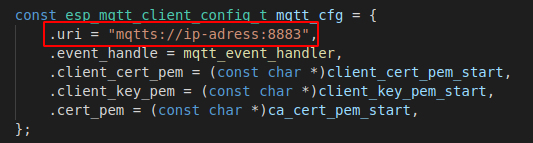
We use mqtts and port 8883 for a secure connection over TLS.
/esp/update/url - Publish Topic
mosquitto_pub -h $IP -t "/esp/update/url" -m "https://domain.de:8070/secure_esp.bin" -p 8883 -d --cert client.crt --key client.key --cafile ca.crt
/esp/update/use_url - Publish Topic
mosquitto_pub -h $IP -t "/esp/update/use_url" -m "1" -p 8883 -d --cert client.crt --key client.key --cafile ca.crt
/esp/update/interval - Publish Topic
mosquitto_pub -h $IP -t "/esp/update/interval" -m "10000" -p 8883 -d --cert client.crt --key client.key --cafile ca.crt
/esp/update/run - Publish Topic
mosquitto_pub -h $IP -t "/esp/update/run" -m "" -p 8883 -d --cert client.crt --key client.key --cafile ca.crt
/esp/restart - Publish Topic
mosquitto_pub -h $IP -t "/esp/restart" -m "" -p 8883 -d --cert client.crt --key client.key --cafile ca.crt
/esp/log - Subscribe Topic
mosquitto_sub -h $IP -t "/esp/log" -p 8883 -d --cert client.crt --key client.key --cafile ca.crt
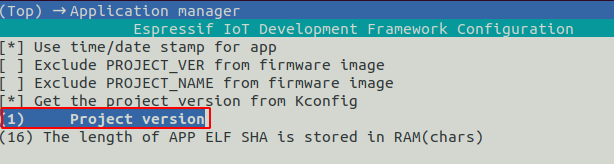
The Update Firmware Version must be higher than the Running Firmware Version. That is why the version number needs to be increased in the file sdkconfig under CONFIG_APP_PROJECT_VER before building the project for the OTA Update. Alternatively it can be done by the idf.py menuconfig under Application manager:
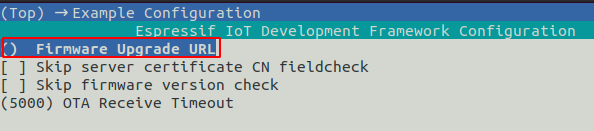
The Firmware Upgrade URL can be changed in the idf.py menuconfig under Example configuration or dircetly in the sdkconfig file: CONFIG_EXAMPLE_FIRMWARE_UPGRADE_URL
During the build process the Firmware is signed digitally with the secure_boot_signing_key.pem:
idf.py build
After executing this command the firmware binary can be found under: ~/esp/secure_esp/build/secure_esp.bin
If not already done, generate the files update_cert.pem and update_cert.pem with the certificate_creation.sh script.
After that, these files have to be copied in one folder with the binary of the firmware. To start the update server the following command is used:
openssl s_server -WWW -key update_key.pem -cert update_cert.pem -port 8070
For coding an application for this project a example blink application is included in the code. This example application can be found the file secure_esp.c. It will be executed by the main process and runs in an endless loop. For the blink example a LED is defined on GPIO pin 9. It turns off and on again after one second. This example shows how to include a basic app to secure_esp:

In this project flash-encryption is enabled. The initial flash must be done with the normal flash command:
idf.py -p [port] flash monitor
Afterwards the ESP32 can only be flashed with the encrypted-flash command:
idf.py -p [port] encrypted-flash monitor
If following error message occurs it is helpfull to press the Boot button on the ESP32 while flashing:


