interactive chat using Lex and ChatGPT
1.0.0
Amazon Lex is a complete management AI service that uses natural language models to design, build, test, and distribute interactive interface for applications. Thus, the Chatbot made of Amazon Lex can identify intentions so that you can send and receive a continuous conversation, so you can display the information you need to fulfill your intentions. In addition, Amazon Kendra can be used to answer the intentions that are not identified in Amazon Lex. Similarly, using the 3rd Party Open API, you can get similar effects. In November 2022, Chatgpt was released, showing excellent conversation ability, making it possible to use Chatgpt as Open API as well as Kendra. In this post, I would like to explain how to implement an interactive CHATBOT that uses CHATGPT as an Open API to answer intentions that are not defined in advance.
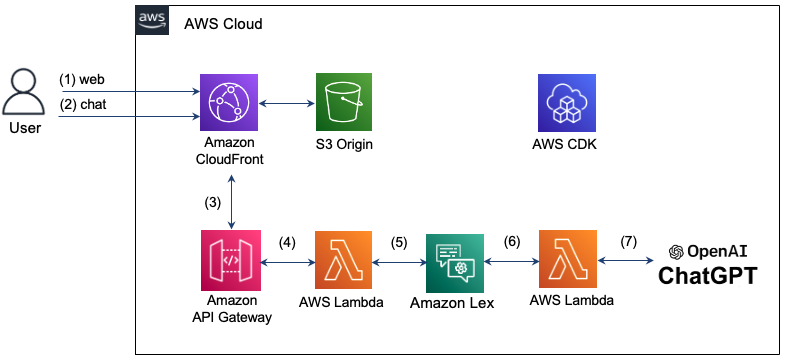
The architecture you implement here is as follows. Using Amazon CloudFront, we provide a web page for chat. The chat message you entered by the user uses Amazon API Gateway and AWS Lambda to answer the intent in LEX. However, if there is an intention that is not recognized in LEX, the Lambda function will be used to query in the CHATGPT, and the result is displayed in the chat window. Infrastructure for configuring such interactive CHATBOT is created and managed using AWS CDK. Since all infrastructure is composed of serverless (serverless), it is possible to stably operate the system through auto scaling even in efficient and fluctuating traffic in the maintenance surface.
See below for detailed operation.
Step 1: The user attempts to connect to the Chatbot web page with a domain of CloudFront and loads HTML, CSS, and JavaScript stored in S3.
Step 2: Enter a chat message on the web page. At this time, the "/CHAT" resource will request a text message in the JSON format in the "/Chat" resource.
Step 3: CloudFront sends a request to API Gateway.
Step 4: API Gateway calls the Lambda function connected to the /Chat resource.
Step 5: Lambda functions pass the chat message to LEX using the LEX V2 API.
Step 6: LEX performs the corresponding behavior if there is an intent defined intention. If you can't recognize your intentions, send a request to contact CHATGPT.
Step 7: If you answer in CHATGPT, the response is delivered to the reverse order of the previous stage and is delivered to the user.
The Seoul Region does not support LEX V1, but only LEX V2 supports. Therefore, the recognizEtext of the LEX V2 is used to send the user's input to the message to the message. LEX RUNTIME V2 Client defines as follows.
import { LexRuntimeV2Client , RecognizeTextCommand } from "@aws-sdk/client-lex-runtime-v2" ; The lambda function is separated from the event and delivers the message using the BotaliasId or Botid as shown below, and extracts and passes the message from the response delivered from LEX.
 const text = event . text ;

let lexParams = {
  botAliasId : process . env . botAliasId ,
  botId : process . env . botId ,
  localeId : process . env . localeId ,
  text : text ,
  sessionId : process . env . sessionId ,
};
const lexClient = new LexRuntimeV2Client ();
const command = new RecognizeTextCommand ( lexParams );

const data = await lexClient . send ( command );

return {
  statusCode : 200 ,
  msg : data [ 'messages' ][ 0 ]. content ,
};In March 2023, CHATGPT's official open API was released. The path of the new API is "/V1/Chat/Completions" and uses the "GPT-3.5-TURBO" model. This model can be used at a 90% lower cost compared to the existing model "Text-Davinci-003", but it cannot be done to search the weather in CHATGPT. Here, we will describe how to use the "Text-Davinci-003" model that supports search during chat with the CHATGPT official API.
The request is made by the Chatgpt API provided by Openai, "V1/Chat/Completions" to HTTPS POST. To do this, we use fetch here. At this time, the header of the request to be delivered to the CHATGPT must include authorization and content-type as shown below. The API Key required for authorization is issued by Openai: API Key and stored as an environment variable. When requesting a message, Role can be specified as "User", "System", or "Assistant" according to the Chatgpt API Transition Guide. Detailed code can be found here (index.mjs).
 import fetch from 'node-fetch' ;

const apiKey = process . env . OPENAI_API_KEY

let msg = "" ;
const res = await fetch ( 'https://api.openai.com/v1/chat/completions' ,{
  method : "POST" ,
  headers : {
    "Authorization" : "Bearer " + apiKey ,
    "Content-Type" : "application/json" ,
  },
  body : JSON . stringify ({
    "model" : "gpt-3.5-turbo" ,
    "messages" : [
      { "role" : "user" , "content" : prompt },
    ],
  }),
});
When you send the response message sent by CHATGPT, you must send it to the format below when sending it to LEX. In this case, the sessionState should include dialogaction and intent, and the intent name must be extracted from the input. In addition, the response message of CHATGPT is put in "Content" of "Messages" and delivered as follows.
 if ( res . ok ) {
  const data = await res . json ();
  console . log ( "output: " , data . choices [ 0 ]);

  msg = `[ ChatGPT ] $ { data . choices [ 0 ]. message . content }`;
  console . log ( "msg: " + msg );

  const intentName = event . interpretations [ 0 ]. intent . name ; // intent name
  response = {
    "sessionState" : {
      "dialogAction" : {
        "type" : "Close"
      },
      "intent" : {
        "confirmationState" : "Confirmed" ,
        "name" : intentName ,
        "state" : "Fulfilled" ,
      },
    },
    "messages" : [
      {
        "contentType" : "PlainText" ,
        "content" : msg ,
      }
    ]
  }
} The "Text-Davinci-003" model uses "V1/Completions" according to Completion API. Here you are implemented using Openai Node.js Library. Detailed code can be found here (index-davinch.mjs).
 import { Configuration , OpenAIApi } from " openai ";

const configuration = new Configuration({
  apiKey: process.env.OPENAI_API_KEY,
});

const openai = new OpenAIApi(configuration);

const models = ['text-davinci-003','code-davinci-002'];
const frequency_penalty = 0.5;
const max_tokens = 2000;
const presence_penalty = 0.1;
const temperature = 0;
const top_p = 1;
const model_name = models[0];
const prompt = event.text;

const params = {
  model: model_name,
  prompt: prompt,
  temperature: temperature,
  max_tokens: max_tokens,
  top_p: top_p,
  frequency_penalty: frequency_penalty,
  presence_penalty: presence_penalty,
};

const result = await openai.createCompletion(params);
const choices = result.data.choices;
return {
  statusCode: 200,
  id: result.data.id,
  msg: choices[0].text,
}; The client transmits the chat message as shown below in the Chat server and displays it in the receiving chat bubble when the response comes. The address of the chat server here is the domain of CloudFront. The detailed code is confirmed here (Chat.js).
 function sendRequest ( text ) {
    const uri = "/chat" ;
    const xhr = new XMLHttpRequest ();

    xhr . open ( "POST" , uri , true );
    xhr . onreadystatechange = () => {
        if ( xhr . readyState === 4 && xhr . status === 200 ) {
            response = JSON . parse ( xhr . responseText );
            console . log ( "response: " + JSON . stringify ( response ));

            addReceivedMessage ( response . msg )
        }
    };

    var requestObj = { "text" : text }
    console . log ( "request: " + JSON . stringify ( requestObj ));

    var blob = new Blob ([ JSON . stringify ( requestObj )], { type : 'application/json' });

    xhr . send ( blob );
}Here you can configure AWS CDK using TypeScript. Detailed code can be found here (CDK-CHATBOT-SACK.TS).
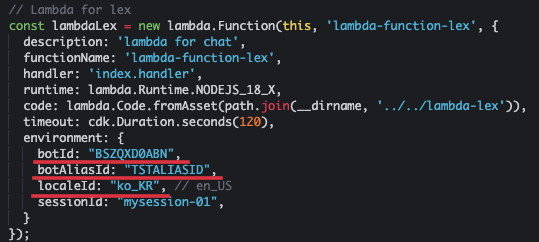
The Lambda function for LEX is defined as below. It should include Botid and Botaliasid in Environment. Here, we use CHATBOT in Korean, so we specify "KO_KR" as LocalID as shown below. This Lambda function must have permissions for LEX and API Gateway.
 // Lambda for lex
const lambdaLex = new lambda . Function ( this , 'lambda-function-lex' , {
  description : 'lambda for chat' ,
  functionName : 'lambda-function-lex' ,
  handler : 'index.handler' ,
  runtime : lambda . Runtime . NODEJS_18_X ,
  code : lambda . Code . fromAsset ( path . join ( __dirname , '../../lambda-lex' )),
  timeout : cdk . Duration . seconds ( 120 ),
  environment : {
    botId : "BSZQXD0ABN" ,
    botAliasId : "TSTALIASID" ,
    localeId : "ko_KR" , // en_US
    sessionId : "mysession-01" ,
  }
});
const lexPolicy = new iam . PolicyStatement ({
  actions : [ 'lex:*' ],
  resources : [ '*' ],
});
lambdaLex . role ?. attachInlinePolicy (
  new iam . Policy ( this , 'rekognition-policy' , {
    statements : [ lexPolicy ],
  }),
);
// permission for api Gateway
lambdaLex . grantInvoke ( new iam . ServicePrincipal ( 'apigateway.amazonaws.com' ));
The input of LEX is set to receive through the Post method with the "/Chat" resource as shown below using the API Gateway.
 const api = new apiGateway . RestApi ( this , 'api-chatbot' , {
  description : 'API Gateway for chatbot' ,
  endpointTypes : [ apiGateway . EndpointType . REGIONAL ],
  deployOptions : {
    stageName : stage ,
  },
});

const chat = api . root . addResource ( 'chat' );
chat . addMethod ( 'POST' , new apiGateway . LambdaIntegration ( lambdaLex , {
  passthroughBehavior : apiGateway . PassthroughBehavior . WHEN_NO_TEMPLATES ,
  credentialsRole : role ,
  integrationResponses : [{
    statusCode : '200' ,
  }],
  proxy : false ,
}), {
  methodResponses : [
    {
      statusCode : '200' ,
      responseModels : {
        'application/json' : apiGateway . Model . EMPTY_MODEL ,
      },
    }
  ]
});
To bypass the CORS, register the behavior for the "/Chat" resource as shown below.
 distribution . addBehavior ( "/chat" , new origins . RestApiOrigin ( api ), {
  cachePolicy : cloudFront . CachePolicy . CACHING_DISABLED ,
  allowedMethods : cloudFront . AllowedMethods . ALLOW_ALL ,
  viewerProtocolPolicy : cloudFront . ViewerProtocolPolicy . REDIRECT_TO_HTTPS ,
});
Send the text to the CHATGPT and prepare the lambda function that receives the response. Where Openai_API_KEY is an API key issued by Openai.
 const lambdachat = new lambda . Function ( this , 'lambda-chatgpt' , {
  description : 'lambda for chatgpt' ,
  functionName : 'lambda-chatgpt' ,
  handler : 'index.handler' ,
  runtime : lambda . Runtime . NODEJS_18_X ,
  code : lambda . Code . fromAsset ( path . join ( __dirname , '../../lambda-chatgpt' )),
  timeout : cdk . Duration . seconds ( 120 ),
  environment : {
    OPENAI_API_KEY : "123456" ,
  }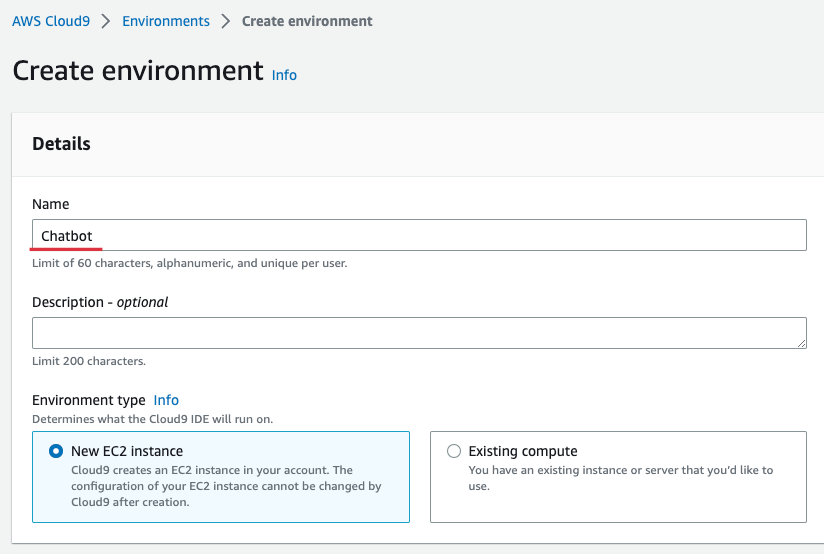
}); For convenience, we prepare distribution using Cloud9 in Seoul Region. Cloud9 provides a convenient environment for creating, running, and debugging code in the browser. Enter Cloud9 Console, select [Create Environment] and enter the name as shown below. Here, I entered "CHATBOT". Afterwards, the rest is maintained and select [Create].
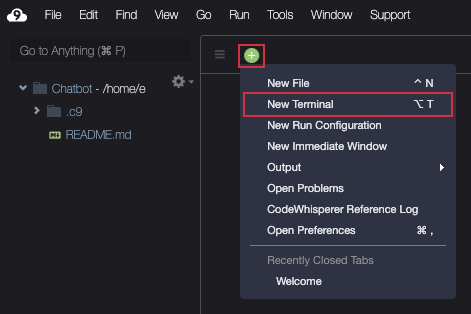
When Cloud9 is created, [Open] and then prepare the terminal as shown below.
Download the source as shown below.
git clone https : //github.com/kyopark2014/interactive-chat-using-Lex-and-ChatGPTGo to the CDK folder and install the necessary libraries. The AWS-CDK-LIB is a CDK 2.0 library.
cd interactive - chat - using - Lex - and - ChatGPT / cdk - chatbot && npm installIf you are using CDK for the first time, you must run the bootstrap as shown below. Where the Account-ID here means 12-digit Account Number. You can check on the AWS console screen or by checking the "AWS STS Get-Caller-IDentity-Query Account-ID-Output Text" command.
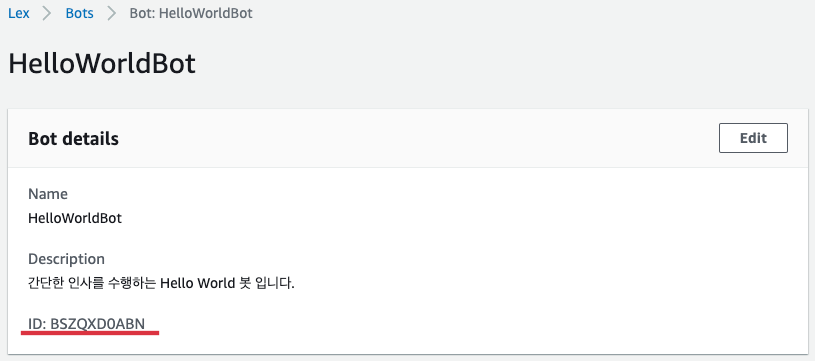
cdk bootstrap aws : //account-id/ap-northeast-2Create HelloWorld Bot according to the Hello World Bot in Amazon Lex Korean Chatbot Build Workshop. "Hello World BOT" is a simple greeting bot that asks and checks the name.
After completing the creation of "Hello World BOT", access the BOT Console and select "HelloWorldbot". You can see that the botid is "bszqxd0abn" as shown below.
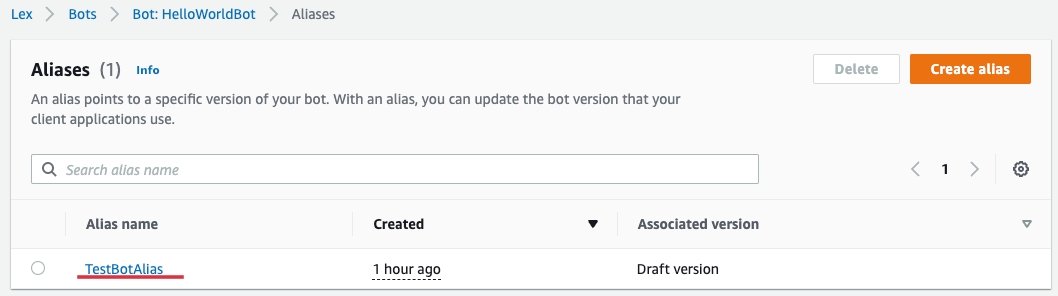
If you select [Aliases] of "HelloWorldbot", you can know Aliases as shown below. Select "Testbotoalias" here.
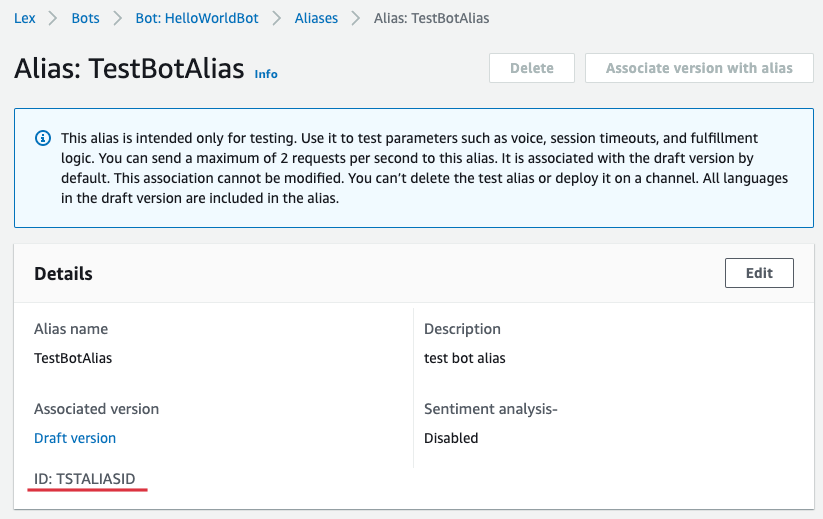
You can see that Botaliasid is "TSTALIASID" as shown below.
Return to Cloud9 and open "Interactive-Chat-Use-Lex-to-Chtgpt/CDK-LEX/LIB/LIX-LEX-SACK.TS" in the left file explorer and open "lambda for lex" Update Botaliasid. Where the sessionID maintains the current value or entered any value.
In addition, enter "Openai_API_KEY" in Environment of "Lambda for Chatgpt". If you don't have a pre -received key, you will be issued from Openai: API Key.

Now create a full infrastructure with CDK.
cdk deployWhen it is installed normally, the following "OUTPUT" is shown. Here, DistributionDomainName is "d3ndv6lhze8yc5.cloudFront.net" and Weburl is "https://d3ndv6lhze8yc5.cloudfront.net/Chat.html".

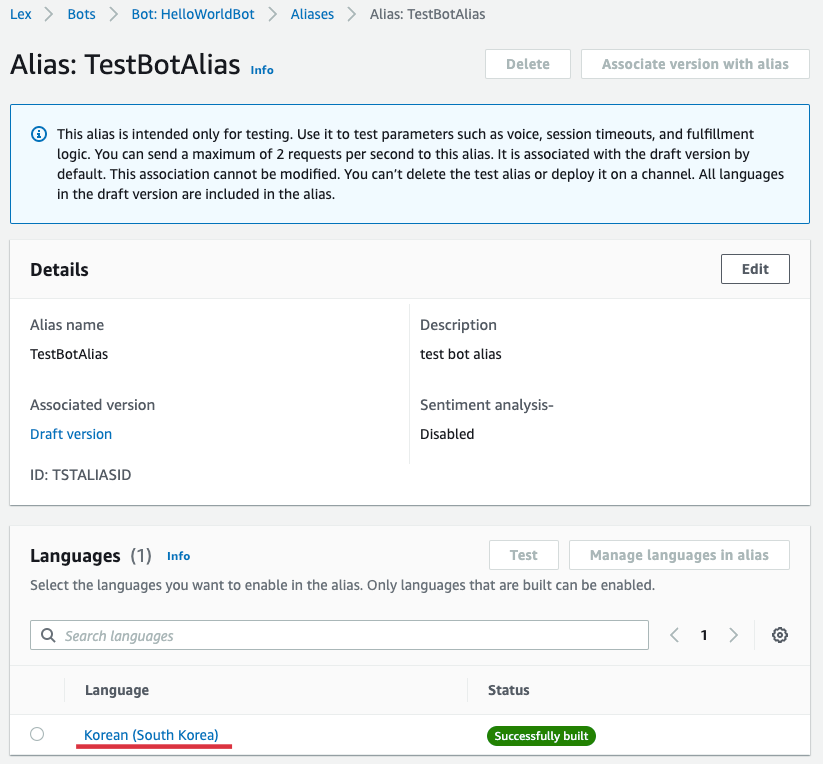
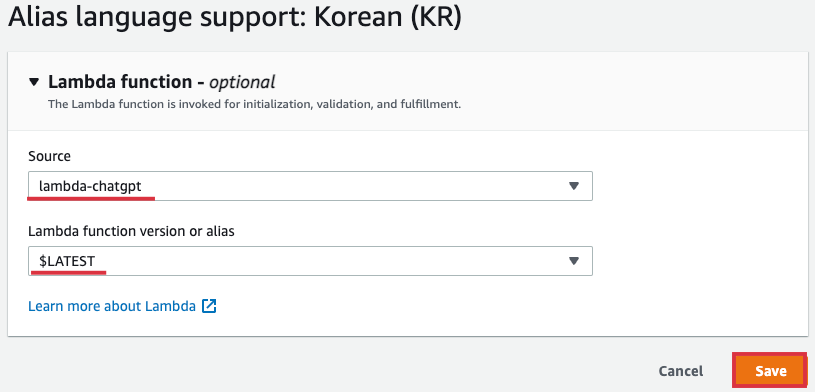
Select "Hellowworldbot" from AWS LEX Console and select [Languages] in "Aliases" and select [Korean (SOUTH KOREA)] as shown below.
Select "Lambda-Chatgpt" as [soucet], and [Lambda Function Version or Alias] select "$ Latest" and select [Save].
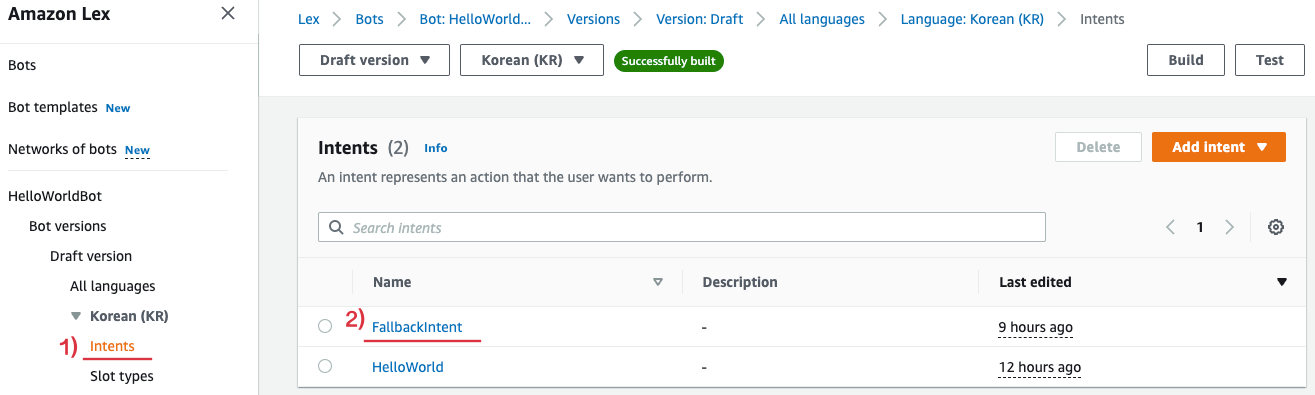
Then select [Fallbackintent] as shown below in [Intents] of "Hellowworldbot".
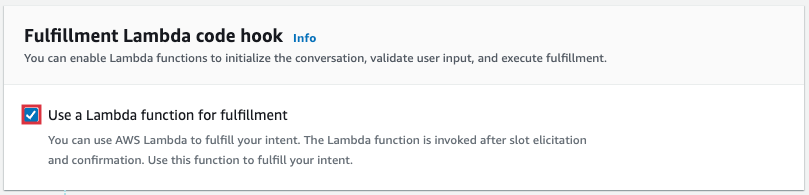
Scroll down and select [Advanced Options] from Fullfillment and Enables [Use a Lambda Function for FULFILLMENT] of the pop -up below.
Select [Build] at the top of the screen to apply the changed contents.

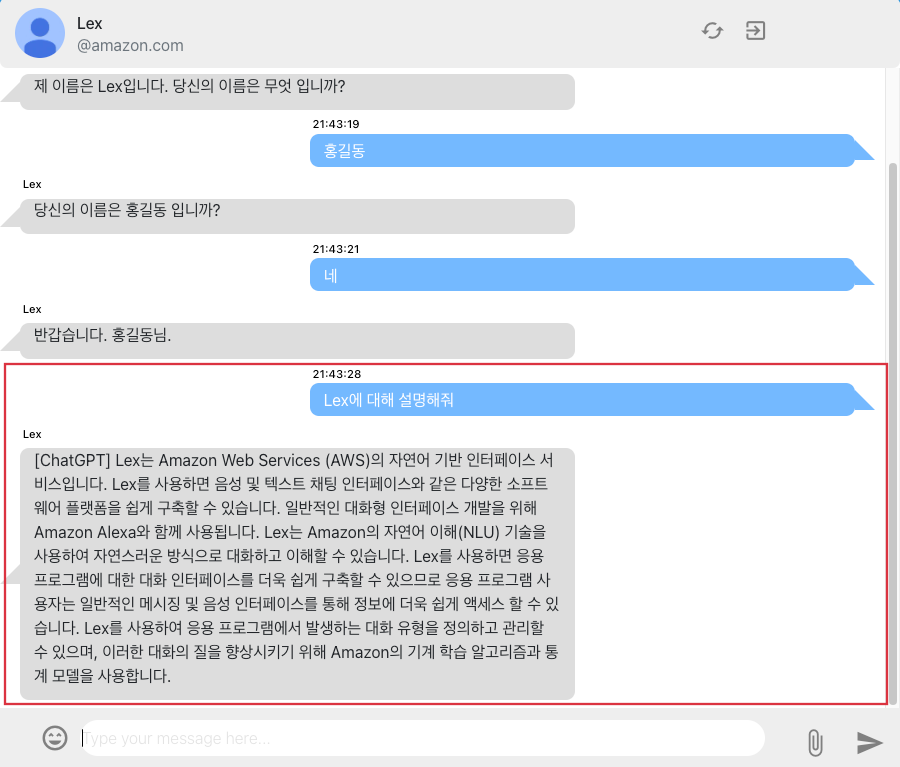
Weburl's "" https://d3ndv6lhze8yc5.cloudFront.net/Chat.html "is connected to the chat screen in the browser. You can chat with LEX in the web browser as shown below. The question of "LEX", which is the question after the Intent operation, was not registered as an intent. Depending on the browser's settings, you may not be able to receive some of the response to Chatgpt.
If you don't use the infrastructure anymore, you can delete all resources as shown below.
cdk destroy I implemented interactive CHATBOT using Amazon Lex and Chatgpt, and explained how to use AWS CDK to effectively develop and operate the infrastructure. By using CHATGPT, you can also improve your usability by giving users with the appropriate response to the intentions that are not recognized in LEX. CHATGPT has already proved its excellent conversation ability, and various GPT models are currently being announced. Therefore, by introducing these artificial intelligence models into CHATBOT services such as LEX, it is expected to improve user usability and provide better service.


