gpt home
v1.6.0 ? ?
ChatGPT at home! Basically a better Google Nest Hub or Amazon Alexa home assistant. Built on the Raspberry Pi using the OpenAI API.

This guide will explain how to build your own. It's pretty straight forward. You can also use this as a reference for building other projects on the Raspberry Pi.
|
|
||||||||
echo "export OPENAI_API_KEY='your_api_key_here'" >> ~/.bashrc && source ~/.bashrcLITELLM_API_KEY. See the LiteLLM docs for a list of all supported providers.echo "export LITELLM_API_KEY='your_api_key_here'" >> ~/.bashrc && source ~/.bashrc--no-build flag to pull the latest image from DockerHub:curl -s https://raw.githubusercontent.com/judahpaul16/gpt-home/main/contrib/setup.sh |
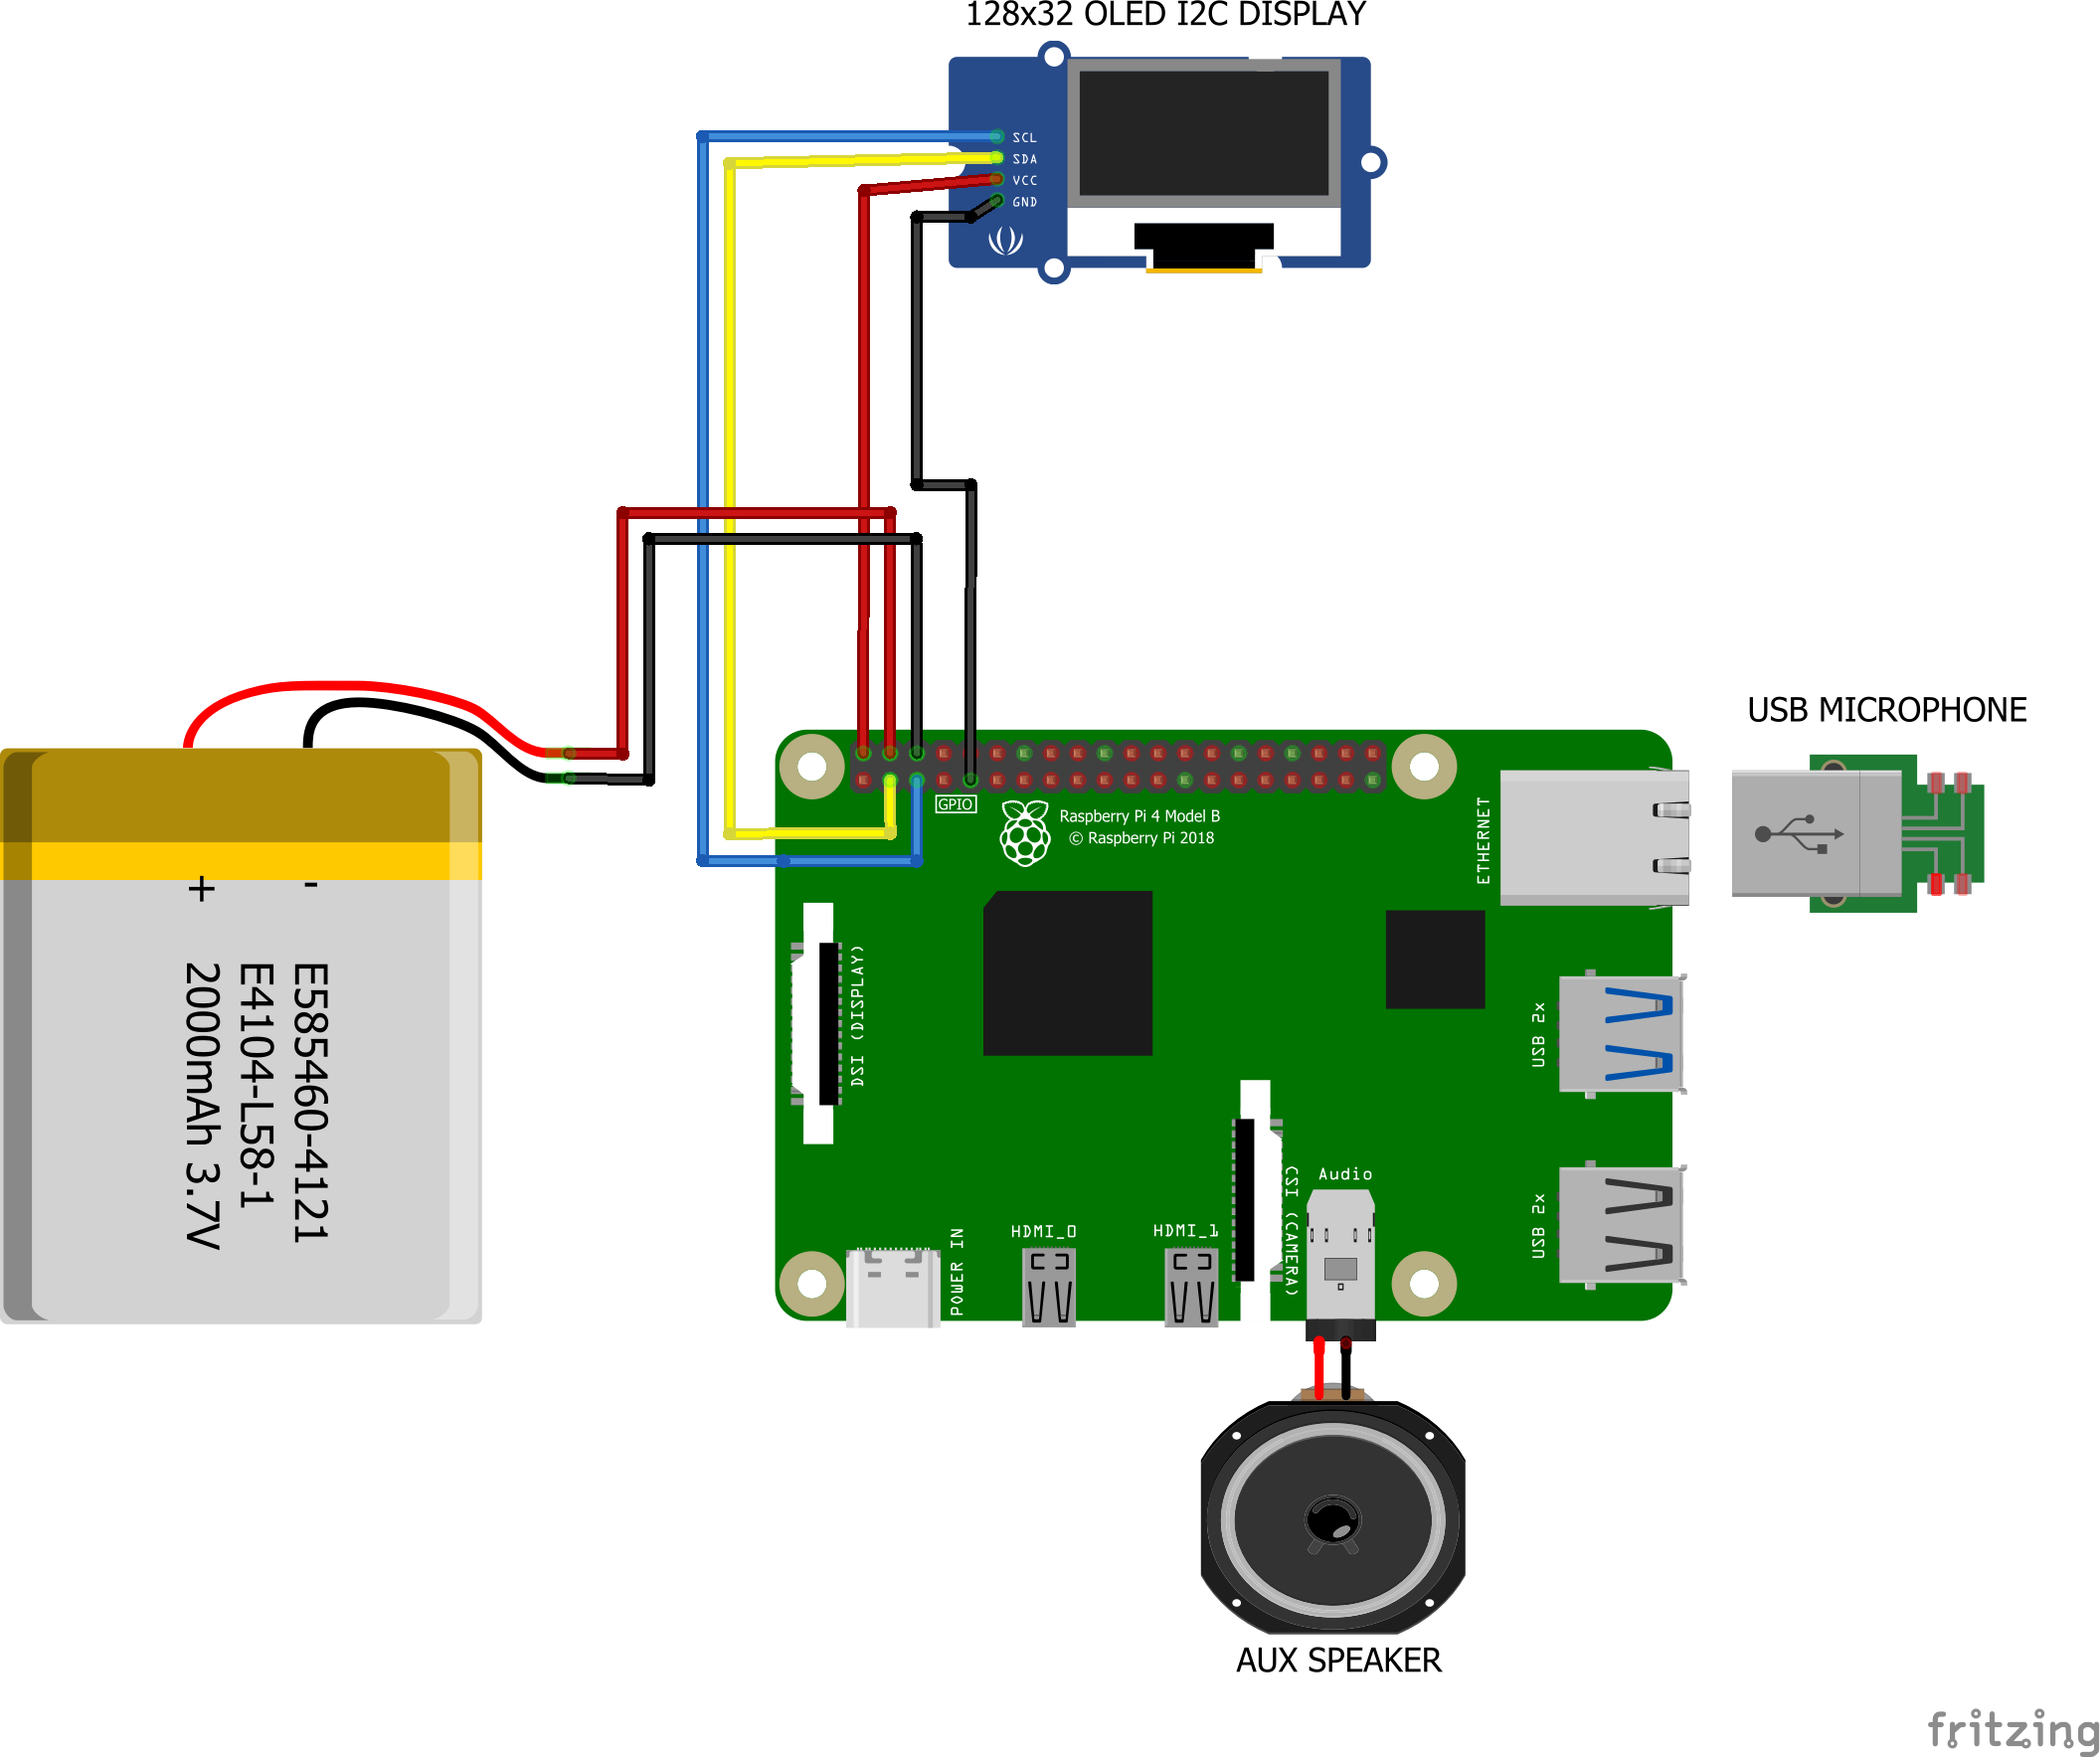
bash -s -- --no-buildIMPORTANT: The image on the left is for illustration purposes. Do not connect the battery directly to the Raspberry Pi. Use a UPS or power supply with a battery like this one. Connecting the battery directly to the Raspberry Pi can cause damage to the board from voltage fluctuations.
Before connecting the battery, ensure that the polarity is correct to avoid damage to your Raspberry Pi or other components. Disconnect power sources before making changes.
 |
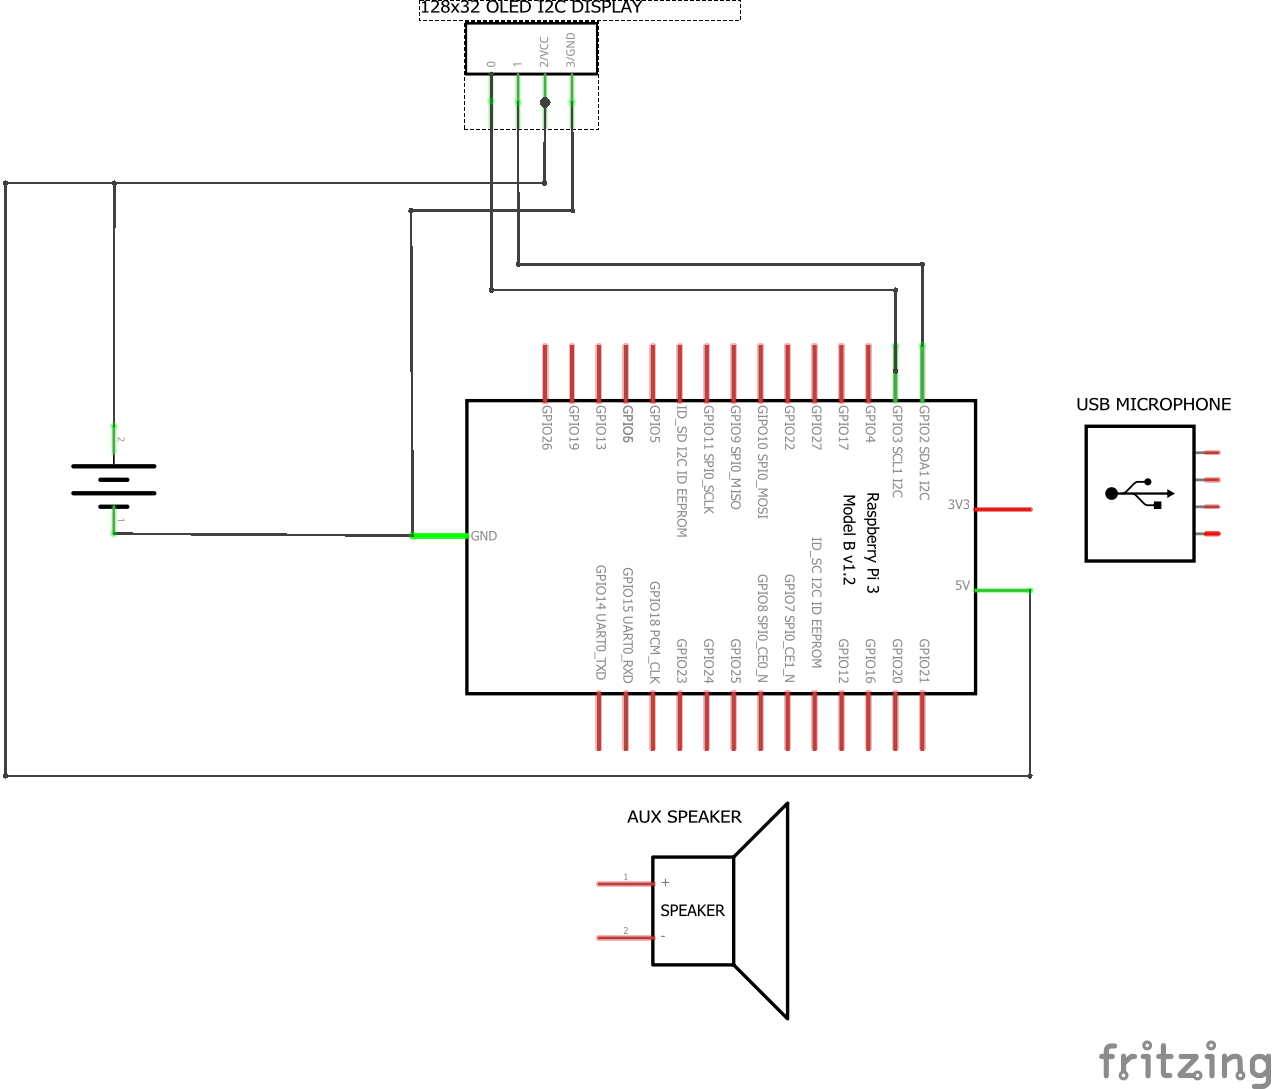 |
This is the list of parts I used to build my first GPT Home. You can use this as a reference for building your own. I've also included optional parts that you can add to enhance your setup. To be clear you can use any system that runs Linux.
Core Components
Optional Components
To configure Wi-Fi on your Raspberry Pi, you'll need to edit the wpa_supplicant.conf file and ensure the wireless interface is enabled at boot. This method supports configuring multiple Wi-Fi networks and is suitable for headless setups.
You could also use the raspi-config or the nmcli utility to configure Wi-Fi; or simply use an Ethernet connection if you prefer.
Step 1: Create the Bash Script
sudo nano /usr/local/bin/start_wifi.shAdd the following content to the script:
#!/bin/bash
# Set the interface and SSID details
INTERFACE="wlan0"
SSID="your_wifi_ssid"
PASSWORD="your_wifi_password"
# Make sure no previous configuration interferes
sudo killall wpa_supplicant
sudo dhcpcd -x $INTERFACE
# Ensure the wireless interface is up
sudo ip link set $INTERFACE up
# Create a wpa_supplicant configuration file
WPA_CONF="/etc/wpa_supplicant/wpa_supplicant.conf"
wpa_passphrase "$SSID" "$PASSWORD" | sudo tee $WPA_CONF > /dev/null
# Start wpa_supplicant
sudo wpa_supplicant -B -i $INTERFACE -c $WPA_CONF
# Obtain an IP address
sudo dhcpcd $INTERFACEMake sure to replace your_wifi_ssid and your_wifi_password with your actual WiFi network's SSID and password.
Step 2: Make the Script Executable
sudo chmod +x /usr/local/bin/start_wifi.shStep 3: Create a Systemd Service File
sudo nano /etc/systemd/system/start_wifi.serviceAdd the following content to the service file:
[Unit]
Description=Start WiFi at boot
After=network.target
[Service]
ExecStart=/usr/local/bin/start_wifi.sh
RemainAfterExit=true
[Install]
WantedBy=multi-user.targetStep 4: Reload Systemd and Enable the Service
sudo systemctl daemon-reload
sudo systemctl enable start_wifi.service
sudo systemctl start start_wifi.serviceYour Raspberry Pi should now connect to the Wi-Fi network automatically on boot.
If you want to connect to hidden networks or multiple networks, edit the wpa_supplicant.conf file located at /etc/wpa_supplicant/wpa_supplicant.conf and add the following configuration:
network={
priority=1 # Higher priority networks are attempted first
ssid="Your_Wi-Fi_Name"
psk="Your_Wi-Fi_Password"
key_mgmt=WPA-PSK
scan_ssid=1 # Hidden network
priority=2
ssid="Enterprise_Wi-Fi_Name"
key_mgmt=WPA-EAP
eap=PEAP # or TTLS, TLS, FAST, LEAP
identity="Your_Username"
password="Your_Password"
phase1="peaplabel=0" # or "peapver=0" for PEAPv0
phase2="auth=MSCHAPV2" # or "auth=MSCHAP" for MSCHAPv1
}Restart the wpa_supplicant service to apply the changes:
sudo systemctl restart wpa_supplicantSee the wpa_supplicant example file for more information on the configuration options.
Before running this project on your system, ensure your system clock is synchronized, your package lists are updated, and NGINX and Docker are installed. The setup script will take care of this for you but you can also do this manually.
Synchronize your system clock:
Install chrony for time synchronization:
sudo apt install -y chrony # For Debian/Ubuntu
sudo yum install -y chrony # For RHEL/CentOS/Alma
sudo dnf install -y chrony # # For RHEL/CentOS/Alma 9^
sudo zypper install -y chrony # For openSUSE
sudo pacman -S chrony # For Arch LinuxActivate and synchronize time immediately with chrony:
sudo chronyc makestepUpdate your package list:
Regular updates to your package list ensure access to the latest software and security patches.
sudo apt update # For Debian/Ubuntu
sudo yum makecache # For RHEL/CentOS/Alma
sudo dnf makecache # For RHEL/CentOS/Alma 9^
sudo zypper refresh # For openSUSE
sudo pacman -Sy # For Arch LinuxEnable additional repositories:
For systems that utilize EPEL and other special repositories, you may need to enable them to access a wider range of available packages.
For Debian/Ubuntu:
sudo add-apt-repository universe
sudo apt updateFor RHEL/CentOS/Alma and Fedora:
sudo yum install -y epel-release # For RHEL/CentOS/Alma
sudo dnf install -y epel-release # For RHEL/CentOS/Alma 9^
sudo yum makecache --timer # For RHEL/CentOS/Alma
sudo dnf makecache --timer # For RHEL/CentOS/Alma 9^Install Development Tools:
Development tools are essential for building packages and compiling software. Ensure you have the necessary tools installed.
For Debian/Ubuntu:
sudo apt install -y build-essentialFor RHEL/CentOS/Alma and Fedora:
sudo yum groupinstall -y "Development Tools" # For RHEL/CentOS/Alma
sudo dnf groupinstall -y "Development Tools" # For RHEL/CentOS/Alma 9^Install System Dependencies
Docker: Required for containerization.
sudo apt-get install -y docker.io # For Debian/Ubuntu
sudo yum install -y docker # For RHEL/CentOS/Alma
sudo dnf install -y docker # For RHEL/CentOS/Alma 9^
sudo zypper install -y docker # For openSUSE
sudo pacman -S docker # For Arch Linuxthen sudo systemctl enable --now docker
NGINX: Required for reverse proxy for the web interface.
sudo apt-get install -y nginx # For Debian/Ubuntu
sudo yum install -y nginx # For RHEL/CentOS/Alma
sudo dnf install -y nginx # For RHEL/CentOS/Alma 9^
sudo zypper install -y nginx # For openSUSE
sudo pacman -S nginx # For Arch LinuxBefore you run the setup script to build the container you should first make sure to export your OpenAI API Key to an environment variable.
LITELLM_API_KEY. See the LiteLLM docs for a list of all supported providers. The setup script will use this variable to initialize the container.Note: Executing export directly in the terminal does not persist after reboot.
export OPENAI_API_KEY="your_api_key_here"Alternatively, you can put this at the end of your ~/.bashrc file. (recommended)
# export your API Key in here to initialize it at boot
export OPENAI_API_KEY="your_api_key_here"
# Optional: Anthropic, Mistral, Cohere, HuggingFace, etc.
export LITELLM_API_KEY="your_api_key_here"
# Optional: Add these aliases to your .bashrc file for easier management
alias gpt-start="docker exec -it gpt-home supervisorctl start app"
alias gpt-restart="docker exec -it gpt-home supervisorctl restart app"
alias gpt-stop="docker exec -it gpt-home supervisorctl stop app"
alias gpt-status="docker exec -it gpt-home supervisorctl status app"
alias gpt-log="docker exec -it gpt-home tail -n 100 -f /app/src/events.log"
alias wi-start="docker exec -it gpt-home supervisorctl start web-interface"
alias wi-restart="docker exec -it gpt-home supervisorctl restart web-interface && sudo systemctl restart nginx"
alias wi-stop="docker exec -it gpt-home supervisorctl stop web-interface"
alias wi-status="docker exec -it gpt-home supervisorctl status web-interface"
alias wi-build="docker exec -it gpt-home bash -c 'cd /app/src/frontend && npm run build'"
alias wi-log="tail -n 100 -f /var/log/nginx/access.log"
alias wi-error="tail -n 100 -f /var/log/nginx/error.log"
alias spotifyd-start="docker exec -it gpt-home supervisorctl start spotifyd"
alias spotifyd-restart="docker exec -it gpt-home supervisorctl restart spotifyd"
alias spotifyd-stop="docker exec -it gpt-home supervisorctl stop spotifyd"
alias spotifyd-status="docker exec -it gpt-home supervisorctl status spotifyd"
alias spotifyd-log="docker exec -it gpt-home tail -n 100 -f /var/log/spotifyd.log"Run source ~/.bashrc to apply the changes to your current terminal session.
The setup script will take quite a while to run (900.0s+ to build and setup dependencies on my quad-core Raspberry Pi 4B w/ 1G RAM). It will install all the dependencies and build the Docker container. However, you can skip the build process by passing the --no-build flag to the script; it will install the dependencies, set up the firewall and NGINX, and pull the container from Docker Hub and run it.
curl -s https://raw.githubusercontent.com/judahpaul16/gpt-home/main/contrib/setup.sh |
bash -s -- --no-buildAlternatively, for development purposes, running setup.sh without the --no-build flag mounts the project directory to the container by adding -v ~/gpt-home:/app to the docker run command. This allows you to make changes to the project files on your Raspberry Pi and see the changes reflected in the container without rebuilding the image. This is useful for testing changes to the codebase. Run directly with:
curl -s https://raw.githubusercontent.com/judahpaul16/gpt-home/main/contrib/setup.sh |
    bash -s
You can also run the container interactively if you need to debug or test changes to the codebase with the -it (interactive terminal), --entrypoint /bin/bash, and --rm (remove on process exit) flags. This will drop you into a shell session inside the container. Alternatively, if the conatiner is already running:
docker exec -it gpt-home bashThis will start the container and drop you into a shell session inside the container.
Explanation of Docker Run Flags
--tmpfs /run:
    Mounts a tmpfs at /run for transient runtime data.
--tmpfs /run/lock:
    Mounts a tmpfs at /run/lock for lock files.
--privileged:
    Grants extended privileges to the container
    Necessary for accessing host audio devices.
--net=host:
    Uses the host network stack directly.
    May be necessary for avahi-daemon services.
-v /dev/snd:/dev/snd:
    Provides access to the host's sound devices.
-v /dev/shm:/dev/shm:
    Provides access to shared memory.
-v /usr/share/alsa:/usr/share/alsa:ro:
    Maps the ALSA shared data as read-only.
-v /var/run/dbus:/var/run/dbus:
    Provides access to the D-Bus system for inter-process communication.
--mount type=bind,source=/etc/asound.conf,target=/etc/asound.conf:
Binds the host's ALSA configuration to the container.If you prefer to run the setup script manually, you can do so. Create a script in your home folder with vim ~/setup.sh or nano ~/setup.sh and paste in the following:
#!/bin/bash
latest_release=$(curl -s https://api.github.com/repos/judahpaul16/gpt-home/releases/latest | grep 'tag_name' | cut -d" -f4)
# Colors
RED='�33[0;31m'
GREEN='�33[0;32m'
YELLOW='�33[0;33m'
BLUE='�33[0;34m'
MAGENTA='�33[0;35m'
CYAN='�33[0;36m'
WHITE='�33[0;37m'
NC='�33[0m' # No Color
echo ""
echo -e "${MAGENTA}"
echo "GPT Home $latest_release"
echo "Created by Judah Paul"
echo "More info @ https://github.com/judahpaul16/gpt-home/"
echo -e "${NC}"
echo -e "${GREEN}"
echo " ____ ____ _____ _ _ "
echo " / ___| _ \_ _| | | | | ___ _ __ ___ ___ "
echo "| | _| |_) || | | |_| |/ _ \| '_ ` _ \ / _ \"
echo "| |_| | __/ | | | _ | (_) | | | | | | __/"
echo " \____|_| |_| |_| |_|\___/|_| |_| |_|\___|"
echo -e "${NC}"
echo -e "${CYAN}"
echo " ______________"
echo " | how may I |"
echo " | assist you |"
echo " | today? |"
echo " |______________|"
echo " \ |"
echo " \ |"
echo " \ |"
echo " _______ ________ |"
echo " |ooooooo| ____ | __ __ | |"
echo " |[]+++[]| [____] |/ \/ \| |"
echo " |+ ___ +| ]()()[ |\__/\__/| |"
echo " |:| |:| ___\__/___ |[][][][]| |"
echo " |:|___|:| |__| |__| |++++++++| |"
echo " |[]===[]| |_|/ \|_| | ______ | |"
echo "_ ||||||||| _ | | __ | | __ ||______|| __|"
echo " |_______| |_|[::]|_| |________| \"
echo " \_|_||_|_/ \"
echo " |_||_| \"
echo " _|_||_|_ \"
echo " ____ |___||___| \"
echo -e "${NC}"
# Mask systemd-networkd-wait-online.service to prevent boot delays
sudo systemctl mask systemd-networkd-wait-online.service
# Set Permissions
sudo chown -R $(whoami):$(whoami) .
sudo chmod -R 755 .
# Function to install system dependencies
function install() {
local package=$1
echo "Ensuring package '$package' is installed..."
# Detect the package management system
if command -v apt-get >/dev/null; then
if ! dpkg -s "$package" >/dev/null 2>&1; then
sudo yes | add-apt-repository universe >/dev/null 2>&1 || true
sudo apt update || true
if [ "$package" == "docker" ]; then
sudo apt-get install -y docker.io
else
sudo apt-get install -y "$package"
fi
fi
elif command -v yum >/dev/null; then
if ! rpm -q "$package" >/dev/null 2>&1; then
sudo yum install -y epel-release >/dev/null 2>&1 || true
sudo yum makecache --timer || true
sudo yum install -y "$package"
fi
elif command -v dnf >/dev/null; then
if ! dnf list installed "$package" >/dev/null 2>&1; then
sudo dnf install -y epel-release >/dev/null 2>&1 || true
sudo dnf makecache --timer || true
sudo dnf install -y "$package"
fi
elif command -v zypper >/dev/null; then
if ! zypper se -i "$package" >/dev/null 2>&1; then
sudo zypper refresh || true
sudo zypper install -y "$package"
fi
elif command -v pacman >/dev/null; then
if ! pacman -Q "$package" >/dev/null 2>&1; then
sudo pacman -Sy
sudo pacman -S --noconfirm "$package"
fi
else
echo "Package manager not supported."
return 1
fi
if [ "$package" == "docker" ]; then
if ! docker ps >/dev/null 2>&1; then
echo "Docker installed. Adding $(whoami) to the 'docker' group..."
sudo usermod -aG docker $(whoami)
echo -e "${RED}User added to `docker` group but the session must be reloaded to access the Docker daemon. Please log out, log back in, and rerun the script. Exiting...${NC}"
exit 0
fi
fi
}
install chrony
install nginx
install containerd
install docker
install docker-buildx-plugin
install alsa-utils
sudo systemctl enable docker
sudo systemctl start docker
# Create ALSA config (asound.conf, adjust as needed)
sudo tee /etc/asound.conf > /dev/null <<EOF
pcm.!default { type hw card Headphones device 0 }
ctl.!default { type hw card Headphones }
EOF
# Install Docker Buildx plugin
mkdir -p $HOME/.docker/cli-plugins
curl -Lo $HOME/.docker/cli-plugins/docker-buildx https://github.com/docker/buildx/releases/download/v0.14.0/buildx-v0.14.0.linux-arm64
sudo chmod +x $HOME/.docker/cli-plugins/docker-buildx
docker buildx version
# Setup UFW Firewall
echo "Setting up UFW Firewall..."
if which firewalld >/dev/null; then
sudo systemctl stop firewalld
sudo systemctl disable firewalld
sudo yum remove firewalld -y 2>/dev/null || sudo apt-get remove firewalld -y 2>/dev/null || sudo zypper remove firewalld -y 2>/dev/null
fi
if ! which ufw >/dev/null; then
sudo yum install ufw -y 2>/dev/null || sudo apt-get install ufw -y 2>/dev/null || sudo zypper install ufw -y 2>/dev/null
fi
sudo ufw allow ssh
sudo ufw allow 80,443/tcp
sudo ufw allow 5353/udp
echo "y" | sudo ufw enable
# Setup NGINX for reverse proxy
echo "Setting up NGINX..."
sudo mkdir -p /etc/nginx/sites-available /etc/nginx/sites-enabled
sudo tee /etc/nginx/sites-available/gpt-home <<EOF
server {
listen 80;
location / {
proxy_pass http://127.0.0.1:8000/;
proxy_set_header Host $host;
proxy_set_header X-Real-IP $remote_addr;
proxy_set_header X-Forwarded-For $proxy_add_x_forwarded_for;
}
}
EOF
# Remove gpt-home site symlink if it exists
[ -L "/etc/nginx/sites-enabled/gpt-home" ] && sudo unlink /etc/nginx/sites-enabled/gpt-home
# Remove the default site if it exists
[ -L "/etc/nginx/sites-enabled/default" ] && sudo unlink /etc/nginx/sites-enabled/default
# Create a symlink to the gpt-home site and reload NGINX
sudo ln -s /etc/nginx/sites-available/gpt-home /etc/nginx/sites-enabled
sudo systemctl enable nginx
sudo nginx -t && sudo systemctl restart nginx
sudo systemctl status --no-pager nginx
if [[ "$1" != "--no-build" ]]; then
[ -d ~/gpt-home ] && rm -rf ~/gpt-home
git clone https://github.com/judahpaul16/gpt-home ~/gpt-home
cd ~/gpt-home
echo "Checking if the container 'gpt-home' is already running..."
if [ $(docker ps -q -f name=gpt-home) ]; then
echo "Stopping running container 'gpt-home'..."
docker stop gpt-home
fi
echo "Checking for existing container 'gpt-home'..."
if [ $(docker ps -aq -f status=exited -f name=gpt-home) ]; then
echo "Removing existing container 'gpt-home'..."
docker rm -f gpt-home
fi
echo "Pruning Docker system..."
docker system prune -f
# Check if the buildx builder exists, if not create and use it
if ! docker buildx ls | grep -q mybuilder; then
docker buildx create --name mybuilder --use
docker buildx inspect --bootstrap
fi
# Building Docker image 'gpt-home' for ARMhf architecture
echo "Building Docker image 'gpt-home' for ARMhf..."
timeout 3600 docker buildx build --platform linux/arm64 -t gpt-home --load .
if [ $? -ne 0 ]; then
echo "Docker build failed. Exiting..."
exit 1
fi
echo "Container 'gpt-home' is now ready to run."
echo "Running container 'gpt-home' from image 'gpt-home'..."
docker run --restart unless-stopped -d --name gpt-home
--mount type=bind,source=/etc/asound.conf,target=/etc/asound.conf
--privileged
--net=host
--tmpfs /run
--tmpfs /run/lock
-v ~/gpt-home:/app
-v /dev/snd:/dev/snd
-v /dev/shm:/dev/shm
-v /usr/share/alsa:/usr/share/alsa
-v /var/run/dbus:/var/run/dbus
-e OPENAI_API_KEY=$OPENAI_API_KEY
-e LITELLM_API_KEY=$LITELLM_API_KEY
gpt-home
echo "Container 'gpt-home' is now running."
# Show status of the container
docker ps -a | grep gpt-home
sleep 10
# Show status of all programs managed by Supervisor
docker exec -i gpt-home supervisorctl status
fi
if [[ "$1" == "--no-build" ]]; then
docker ps -aq -f name=gpt-home | xargs -r docker rm -f
docker pull judahpaul/gpt-home
docker run --restart unless-stopped -d --name gpt-home
--mount type=bind,source=/etc/asound.conf,target=/etc/asound.conf
--privileged
--net=host
--tmpfs /run
--tmpfs /run/lock
-v /dev/snd:/dev/snd
-v /dev/shm:/dev/shm
-v /usr/share/alsa:/usr/share/alsa
-v /var/run/dbus:/var/run/dbus
-e OPENAI_API_KEY=$OPENAI_API_KEY
-e LITELLM_API_KEY=$LITELLM_API_KEY
judahpaul/gpt-home
docker ps -a | grep gpt-home
sleep 10
docker exec -i gpt-home supervisorctl status
fiBe sure to make the script executable to run it
chmod +x setup.sh
./setup.sh
|
|
|
|
||||||||||||||||||||||||||||||||||||||||||||||||||||||||||||||
|
|
|
Contributions are certainly welcome! Please read the contributing guidelines for more information on how to contribute.
This project is licensed under the GNU GPL v3.0 License - see the LICENSE file for details.


